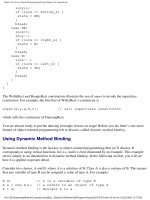
head first java programming phần 9 pdf
Bạn đang xem bản rút gọn của tài liệu. Xem và tải ngay bản đầy đủ của tài liệu tại đây (1.32 MB, 44 trang )
you are here 4 319
graphical interface elements
Not all events are generated by button clicks
Your GUI program processes lots of events, not just the events generated by your
user when, for instance, buttons are clicked.
Your operating system can send events to your GUI program, too. Some of these
events are commonly handled by the graphical programming technology you
are working with. For most of the operating system’s events, tkinter very kindly
handles them for you. When you click the close box on your GUI, this generates a
Window Manager event for your code to handle. If your code doesn’t handle a
Window Manager event, tkinter handles it for you in a default way, too.
If the default event handling isn’t what you want, you have to capture the event
before it gets to tkinter and is handled in the default way. At the moment, the click
on the close box is being handled for you by tkinter and the default behavior is to
close the window.
Let's take control of this default behavior.
Click!
Wait for another event.
Your user
generates a
button-click
event in the
GUI.
The Window Manager
generates an event
when the user clicks
on the close box.
Run the event-handling code
associated with whatever
event occurred or perform
some default action.
Click!
320 Chapter 9
the cost of interactive loveliness
Frank: What’s up now?
Joe: Well, it looks like I have to worry about lots of other GUI
events, not just my own.
Jim: Yeah. It appears the operating system and this Window
Manager thing can give the GUI application work to do.
Frank: Yes, that’s right. All that interactive loveliness comes at a
cost.
Joe: Cost?!? You mean we have to pay?
Frank: No, not that sort of cost. You sometimes need to write a little
extra code to interact with the Window Manager when and where
necessary that’s what I mean by “cost.”
Joe: Phew! So what’s a Window Manager, anyway?
Frank: It’s something built into every GUI application that handles
the management of your application’s windows. Python’s GUI,
tkinter, has a Window Manager, as do all the other GUI toolkits.
Joe: So, how do I work with the events generated by the Window
Manager?
Frank: You create a function with the code you want to run and
then connect the function to the event.
Joe: OK, I get that. But which event do I connect up to? It’s not like
the Window Manager has a button to click on, is it?
Jim: That’s a good question Frank?
Frank: Well spotted. What happens with the Window Manager is
that there’s a set of protocol properties that you can interact with as
and when required.
Joe: Protocol what? Properties?
Jim: Yeah, you’ve lost me there, Frank.
Frank: Yes, protocol properties they really are not as scary as they
sound. Remember: with GUIs, it’s all just code.
Jim & Joe: Where have we heard that before ?
Frank: Here, let me show you what I mean
You see, GUIs might look
nice and easy, but they are
actually a pretty complicated
beast under the hood. There‛s
lots of different events to
worry about.
Joe
Frank
Jim
you are here 4 321
graphical interface elements
A message sent to your main window
when the operating system is shutting
down
WM_TAKE_FOCUS
Study the three tkinter properties presented below and see if you can
match up the properties to the correct description:
A message sent to your main window
when the close box has been clicked
WM_SAVE_YOURSELF
A message sent to your main window
when the window has been selected
after a mouse click
WM_DELETE_WINDOW
Which of these protocol messages do you think you need to capture?
Geek Bits
The tkinter library provides a mechanism to
react to an event that is associated with the GUI
window. These are known as Window Manager
protocol properties. Think of the event as a
protocol event.
322 Chapter 9
capture the event
app.protocol("WM_DELETE_WINDOW", shutdown)
A message sent to your main window
when the operating system is shutting
down
WM_TAKE_FOCUS
You were to study the three tkinter properties presented below and see
if you could match up the properties to the correct description:
SOlUTion
A message sent to your main window
when the close-box has been clicked
WM_SAVE_YOURSELF
A message sent to your main window
when the window has been selected
after a mouse click
WM_DELETE_WINDOW
You were to identify which of these protocol messages you think you
need to capture:
WM_DELETE_WINDOW
You'll have to create the
“shutdown” function.
Associate the event-
handling function
with the property.
Be sure to call
“protocol()" BEFORE
“mainloop()".
OK here comes a click
on the close box. What‛s my
protocol? Ah, yes it hasn‛t
been captured, so I‛ll just
execute the default behavior
and close that sucker!
?
Controlling the Window Manager
To capture the event before it gets to tkinter, call your app’s
protocol() method and identify the function that should be
called instead of executing the default behavior:
Click!
you are here 4 323
graphical interface elements
Now that you know about window manager properties and how
to capture them, write the code for the
shutdown() function:
from tkinter import *
import pygame.mixer
app = Tk()
app.title("Head First Mix")
app.geometry('250x100+200+100')
sound_file = "50459_M_RED_Nephlimizer.wav"
mixer = pygame.mixer
mixer.init()
def track_start():
track.play(loops = -1)
def track_stop():
track.stop()
track = mixer.Sound(sound_file)
start_button = Button(app, command = track_start, text = "Start")
start_button.pack(side = LEFT)
stop_button = Button(app, command = track_stop, text = "Stop")
stop_button.pack(side = RIGHT)
app.mainloop()
Here's the code so far.
Put the
“shutdown”
function here.
What needs
to go here?
324 Chapter 9
shutdown function
Now that you know about window manager properties and
how to capture them, you were asked to write the code for the
shutdown() function:
from tkinter import *
import pygame.mixer
app = Tk()
app.title("Head First Mix")
app.geometry('250x100+200+100')
sound_file = "50459_M_RED_Nephlimizer.wav"
mixer = pygame.mixer
mixer.init()
def track_start():
track.play(loops = -1)
def track_stop():
track.stop()
track = mixer.Sound(sound_file)
start_button = Button(app, command = track_start, text = "Start")
start_button.pack(side = LEFT)
stop_button = Button(app, command = track_stop, text = "Stop")
stop_button.pack(side = RIGHT)
app.mainloop()
def shutdown():
track.stop()
Simply arrange for the
track to stop playing
when the window closes.
app.protocol(“WM_DELETE_WINDOW", shutdown)
Call “app.protocol()”
before the call to
“app.mainloop()”.
graphical interface elements
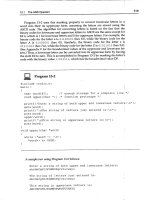
Test Drive
With the changes made to your program in IDLE, press F5 to see how things
perform now.
The sound stops when I
click to close the window,
but now the GUI doesn‛t
disappear!
What gives? You’ve solved one problem, but created another.
When the DJ clicks on the close box, the track stops playing,
which is what you wanted. But now, the window won’t close.
This can’t be good, can it?
Click!
Click!
Click!
Click!
You'll need to quit IDLE and
the Python Shell to force the
window to close.
No matter how often you click
the close box, the window won't
go away
you are here 4 325
Click!
326 Chapter 9
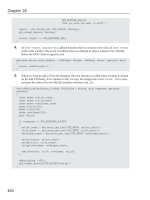
terminate with extreme prejudice
from tkinter import *
from tkinter.messagebox import askokcancel
app = Tk()
app.title("Capturing Events")
app.geometry('250x100+200+200')
def shutdown():
if askokcancel(title = 'Are you sure?', message = 'Do you really want to quit?'):
app.destroy()
app.protocol("WM_DELETE_WINDOW", shutdown)
app.mainloop()
Capturing the protocol event isn’t enough
Your code captures the protocol event and redefines its behavior. But, what
about the behavior that used to execute by default?
Take a look at this small example program, which redefines the close-box
protocol to check with the user before actually destroying the window:
Do this!
Add the app.destroy() line of code to the end of your
shutdown() function and see if it makes any difference.
Clicking on the close box runs the
“shutdown()” function, which then
displays an AskOkCancel dialog.
If you click OK, the GUI is
destroyed (which has the effect of
closing the window).
you are here 4 327
graphical interface elements
Test Drive
You’ve added in the line of code that terminates (destroys) your GUI
application. Now, press F5 to see what happens.
That‛s great!
Let‛s see my
rivals scoff now
Poof!
When you click on the
close box now, the GUI
application disappears.
Which helps explain why you
can't see it on this page
anymore!
Your GUI is not only doing what the DJ wants; it’s behaving itself, too. By
redefining the protocol event associated with the click on the close box, you
are able to stop the track eh in its tracks. You also ensure that the default
behavior associated with the click is performed by arranging to destroy the
GUI application.
That’s great!
This extra line of
code makes all the
difference.
328 Chapter 9
toggle time
Two buttons, or not two buttons?
That is the question
The DJ is happy with the program so far. However, he thinks it would work
better if he had just one button instead of two. He’s convinced this would be
easier to use, because he wouldn’t have to move his mouse around the screen
quite so much.
Speed‛s important, dude.
Can‛t I just press the
button to start the track,
then press it again to stop
it?
It is possible to use a single button here but, without changing the physical
appearance of the button each time it’s clicked, a user can’t possibly know
what state the button is currently in, even though the DJ does have ears in
this instance. But, in general, using a button to switch between two states is not
regarded as best practice in GUI design.
What your DJ friend actually wants is some sort of visual toggle
something that can be flipped between one of two states: on/off, open/close,
flip/flop, and so on. You need to use a different graphical interface element.
Is there a GUI visual toggle you can use here?
Will the next click
start or stop whatever
this button does?
you are here 4 329
graphical interface elements
Take a look at the following window that appears when you ask a full-featured web browser to
display its preferences. Grab a pencil and draw a circle around any graphical interface elements
you haven’t worked with yet.
From the elements that you have circled, identify one that might be of use to you in your program. Which
would work best as an on/off toggle?
Write your answer here.
330 Chapter 9
check on the checkbox
Take a look at the following window that appears when you ask a full-featured web browser
to display its preferences. You were to grab a pencil and draw a circle around any graphical
interface element you haven’t worked with yet.
From the elements that you have circled, identify one that might be of use to you in your program. You
were asked to identify an element that would work best as an on/off toggle:
The checkbox is
either on or off.
The checkbox
Here's an
element we
haven't used
yet.
you are here 4 331
graphical interface elements
The checkbox is an on/off, flip/flop toggle
The great thing about the checkbox graphical interface element is that it can
be in only one of two states, either on or off. Depending on the current state
of the checkbox, an object can be set to either 1 for “on” or 0 for “off.”
In tkinter, checkboxes are created using Checkbutton(), and they can be
associated with a tkinter IntVar, first introduced in Chapter 7. The tkinter
Checkbutton() is either on or off and sets the associated IntVar to
either 1 or 0, which is perfect for what you need.
Let’s look at using a checkbox in tkinter.
Set me, checkbox,
set me I can be
either 1 or 0.
Whoo hoo! Set
that object to
1, baby!
Click the checkbox
to “tick” it and set
the object to “on”.
Click the checkbox to
“untick” it and set the
object to “off”.
Ah, phooey! Set
that object to 0,
which is, like, oooh.
332 Chapter 9
flip it off
flipper = IntVar()
def flip_it():
if flipper.get() == 1:
print("Cool. I'm all ON, man!")
else:
print("Phooey. I'm OFF.")
Checkbutton(app, variable = flipper,
command = flip_it,
text = "Flip it?").pack()
Working with checkboxes in tkinter
The tkinter Checkbutton needs three things: an IntVar to hold its
current value, an event-handler function to run when it’s ticked, and a
descriptive label to say what it does. Take a look at this example code:
The “flip_it()"
function is the
Checkbutton's
event handler.
The Checkbutton is
associated with the
“IntVar”, links to the
event handler, and has
a descriptive label, too.
Create an “IntVar” to hold a value that
is either 1 or 0, depending on whether
the checkbox is ticked.
Using the get() method
If you look closely at the code for the flip_it()
event handler, you’ll notice that the message displayed
on screen is controlled by whatever value is returned
from the call to flipper.get(). The get()
method is part of every IntVar object, and it lets
you easily determine, in this case, the current value
associated with the flipper variable.
But, what sets the value?
The Checkbutton automatically sets the value of
flipper as a result of the click on the checkbox.
Tick the box and the value is set to 1. Untick the box
and the value is set to 0.
Cool. I‛m all
ON, man!
Phooey.
I‛m OFF.
you are here 4 333
graphical interface elements
Here’s your code from earlier. Use your pencil to put a line
through the code you don’t need anymore:
from tkinter import *
import pygame.mixer
app = Tk()
app.title("Head First Mix")
app.geometry('250x100+200+100')
sound_file = "50459_M_RED_Nephlimizer.wav"
mixer = pygame.mixer
mixer.init()
def track_start():
track.play(loops = -1)
def track_stop():
track.stop()
def shutdown():
track.stop()
app.destroy()
track = mixer.Sound(sound_file)
start_button = Button(app, command = track_start, text = "Start")
start_button.pack(side = LEFT)
stop_button = Button(app, command = track_stop, text = "Stop")
stop_button.pack(side = RIGHT)
app.protocol("WM_DELETE_WINDOW", shutdown)
app.mainloop()
Write the code you need to implement the checkbox here, based on the sample code from the previous
page. Give your
IntVar the name track_playing. Use track_toggle as your function name,
and call the checkbox
track_button:
1
2
334 Chapter 9
checkbox added
def track_toggle():
if track_playing.get() == 1:
track.play(loops = -1)
else:
track.stop()
track_playing = IntVar()
track_button = Checkbutton(app, variable = track_playing,
command = track_toggle,
text = sound_file)
track_button.pack()
Here’s your code from earlier. You were to use your pencil to put a
line through the code you don’t need anymore:
from tkinter import *
import pygame.mixer
app = Tk()
app.title("Head First Mix")
app.geometry('250x100+200+100')
sound_file = "50459_M_RED_Nephlimizer.wav"
mixer = pygame.mixer
mixer.init()
def track_start():
track.play(loops = -1)
def track_stop():
track.stop()
def shutdown():
track.stop()
app.destroy()
track = mixer.Sound(sound_file)
start_button = Button(app, command = track_start, text = "Start")
start_button.pack(side = LEFT)
stop_button = Button(app, command = track_stop, text = "Stop")
stop_button.pack(side = RIGHT)
app.protocol("WM_DELETE_WINDOW", shutdown)
app.mainloop()
Write the code you need to implement the checkbox here. You were asked to give your
IntVar the name
track_playing, use track_toggle as your function name, and call the checkbox track_button:
The functions that start and stop
the track are no longer needed.
You can also get rid of the two buttons,
since they aren't needed either.
The “track_toggle" function
either plays or stops the
track, based on the state of
the checkbox.
Use the name of the sound
file as the text associated
with the checkbox.
1
2
All of this code needs to
be added to your program
BEFORE the call to “app.
mainloop()".
you are here 4 335
graphical interface elements
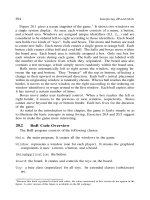
Test Drive
With your program amended to include the checkbox code, let’s
run the latest version of the DJ’s program in IDLE and see if the
checkbox works as advertised.
Sweet! Toggle the sound
on and off by simply
clicking on the checkbox.
Man, that‛s so easy
to use! Let‛s adjust
the volume, too, while
the sound is playing
Creating the program bit by bit is working out. Each time
your DJ friend needs something new, you incrementally
improve the program in order to provide the functionalilty
he needs. Of course, there’s always something new.
Will this guy ever be satisfied?!?
336 Chapter 9
add a slider
Pump up the volume!
To make the program more useful, the DJ wants to be able to dynamically
and interactively control the volume of the track as it plays. Basically, as the
track plays, the DJ wants to fiddle with the volume.
The control might look like this,
a slider that can be moved from
left (down) to right (up)
or the control
might look like this.
Turn it up to the
right, down to the
left
Because a slider is much easier to manipulate with a click and drag of a
mouse than a knob, the slider on a scale is used in lots of modern GUIs. It’s the
classic choice for showing a volume control.
Look closely at the slider. What do you need to model?
In the physical world, most devices
that have a volume control provide
either a large, circular knob or
a slider on a scale:
Louder!
Softer, softer,
softer
you are here 4 337
graphical interface elements
Look at the volume control shown above and identify four key
characteristics of the volume control.
1.
2.
3.
4.
Write your four answers here.
Model a slider on a scale
There’s quite a bit going on with a slider on a scale. It’s a simple control that
everyone’s familiar with, but the simplicity masks quite a bit of complexity.
The devil is most definitely in the details:
Here's the standard
representation of a
slider on a scale that we
all know and love.
This end of the scale
marks a LOW value.
This end of the scale
marks a HIGH value.
There's a bunch of markings on the
device that indicate where on the
scale you currently are.
There is always something
that you can grab onto
and slide from left to
right.
338 Chapter 9
sound before beauty
You were to look at the volume control on the previous page and
identify four key characteristics of the volume control.
1.
2.
3.
4.
There's a scale that goes from a low value to a high value.
The scale has a fixed set of intervals.
The volume control “slider" moves from left to right.
Moving the “slider" dynamically adjusts the volume based on its current
position on the scale.
Start with the volume
Before you start worrying about creating the appropriate GUI interface
element to actually model the slider, you first need to know how to adjust the
volume of a track.
Once you know how to adjust the volume, you can then start to worry
about linking the volume to the slider, with the current position of the slider
dictating the current volume setting.
Then you can allow your user to move the slider which has the effect of
dynamically and interactively adjusting the volume.
Sounds easy, eh?
you are here 4 339
graphical interface elements
Use pygame to set the volume
Turns out pygame has this functionality built right into its library code via the
set_volume() method.
Take a look at this small example program:
Set the volume to a LOUD
setting.
Set the volume to
a very low setting.
Louder, dude, louder!
Turn that racket down!
import pygame.mixer
from time import sleep
mixer = pygame.mixer
mixer.init()
track = mixer.Sound("50459_M_RED_Nephlimizer.wav")
print("Play it LOUD, man!")
track.play(loops = -1)
track.set_volume(0.9)
sleep(2)
print("Softly does it ")
track.set_volume(0.1)
sleep(2)
track.stop()
When you set the track’s volume to a high value using set_volume(), it’s
the equivalent of cranking up the volume by moving the slider to the right. When
you set it to a low value, that’s like moving the slider to the left.
340 Chapter 9
create the slider
Use tkinter for everything else
The tkinter library has a graphical interface element called Scale that lives
to help you create a slider. Take a look at this example code and let’s see how
it works:
volume = DoubleVar()
volume_scale = Scale(app,
variable = volume,
from_ = 0.0,
to = 1.0,
resolution = 0.1,
command = change_volume,
label = "Volume",
orient = HORIZONTAL)
volume_scale.pack(side = RIGHT)
Create a tkinter DoubleVar variable. Like
IntVar and StringVar, the DoubleVar variable
stores a “magic" value, this time a float.
The tkinter Scale
widget creates a
slider.
The slider can be linked
to a “magic" variable.
Specify the
resolution value,
which indicates the
interval.
Connect the
widget to an
event handler.
Provide a nice, human-
friendly label for the
slider.
Indicate whether the slider
runs across the screen
(HORIZONTAL) or up the
screen (VERTICAL).
Specify the lowest and
the HIGHEST values on
the scale.
Click and drag
the slider to
adjust the volume.
The Scale() element is your most complex tkinter widget yet. But, despite
this, it is not hard to work out what’s going on here. The graphical interface
element is linked to a tkinter DoubleVar (called variable), the lowest/
highest slider values are provided (to and from_), and an interval between
them (resolution) is specified. The event handler is assocated with an
event handler (command), a descriptive label is supplied (label), and, finally,
the orientiation of the slider is specified (orient). There’s a lot going on
here, but none of it is that hard to understand.
you are here 4 341
graphical interface elements
Q:
The Scale() code on the previous
page has a variable called from_, that is,
the word “from” together with a trailing
underscore. Was that a typo?
A: No, it wasn’t a tyop, eh, typo. The
reason for the underscore has to do
with the fact that Python uses “from” as
a reserved word. These are words that
Python uses for its own special purposes,
which means you cannot name one of your
variables after a reserved word. As using
the word “from” makes a lot of sense when
taking about a scale, the authors of tkinter
decided to tack on the underscore so that
the meaning of the variable would be clear,
while allowing for the variable name not to
clash with a reserved word.
Q:
Are there other reserved words?
A: Yes, a few. And every programming
language has its own list. In Python, words
like “while”, “for”, “if”, “def”, “class”, and
“pass” are all reserved words.
Q:
What happens if I use one
anyway?
A: Python will most likely complain with
a syntax error.
Q:
Where can I find a list?
A: Any good Python reference book
will contain a list, and it’s also included as
part of the Python documentation that’s
installed with Python on your computer and
available on the web at the main Python
website.
Q:
How do I know which graphical
interface element to use and when?
A: This is really a matter of experience.
However, a lot of platforms go to great
lengths to specify exactly when each of
the elements should be used and for what
purpose. Of them all, the Macintosh is the
leader of the pack. Apple’s engineers have
worked hard to strictly enforce consistent
usage of the Mac GUI among programmers.
Q:
So, it’s a case of anything goes
with the other operating systems?
A: No. That’s not what we are saying.
The Apple folks are very strict with their
rules and regulations, and the others are
less so. But there are still standards that
you should try as much as possible to
adhere to. One of the reasons for using
a GUI is that your users will expect your
program to work in a standard way. This
makes your program immediately familiar
to new users and lets them become
productive with your program more quickly.
Q:
So there are no badly designed
GUI apps?
A: No. There are plenty of howlers out
there and they tend to be harder to use
than necessary, due to the fact that the
programmers responsible for creating them
did not conform to established interface
standards and practices. When it comes
to GUI programs, conformance is a good
thing.
Q:
So does tkinter work well on all
platforms?
A: The latest version of tkinter (which
comes with Python 3) is pretty good. If
you run your tkinter program on a Mac, it
looks like a Mac OS X program, whereas
on Windows it looks like a Windows
application, and on Linux it takes on the
look and feel of the graphical environment
you happen to be using (there are a few
choices on Linux).
Q:
Other than tkinter, what other
graphical toolkits does Python support,
and should I learn any of them?
A: Python supports lots of other toolkits
on lots of operating systems. For now,
tkinter is all you really need, and you
shouldn’t worry about the other choices
until you are in a situation where learning
how to use them becomes a necessity.
342 Chapter 9
control the volume
Take the pygame and tkinter code and combine it to support a volume control. Then, complete
the next version of your program.
from tkinter import *
import pygame.mixer
app = Tk()
app.title("Head First Mix")
app.geometry('250x100+200+100')
sound_file = "50459_M_RED_Nephlimizer.wav"
mixer = pygame.mixer
mixer.init()
def track_toggle():
if track_playing.get() == 1:
track.play(loops = -1)
else:
track.stop()
Add a function here
to adjust the volume
that the track
currently plays at.
you are here 4 343
graphical interface elements
track = mixer.Sound(sound_file)
track_playing = IntVar()
track_button = Checkbutton(app, variable = track_playing,
command = track_toggle,
text = sound_file)
track_button.pack(side = LEFT)
def shutdown():
track.stop()
app.destroy()
app.protocol("WM_DELETE_WINDOW", shutdown)
app.mainloop()
Add the code
that implements
the volume
control here.