Java 2 Bible Enterprise Edition phần 7 pot
Bạn đang xem bản rút gọn của tài liệu. Xem và tải ngay bản đầy đủ của tài liệu tại đây (222.82 KB, 71 trang )
Tip You can't control bean−security issues through the policy files used by J2SE. These policy files only
control functions of a particular API, such as file I/O or threading, and they won't work because they must
be available across all clients and servers. In addition, the environment (for example Java code embedded
in an Oracle database as a trigger) may not support them.
The assignment of a set of access restrictions is known as a role in EJB terminology. A role acts as a grouping
mechanism. You don't use it to predefine access capabilities or users who wish to attempt certain tasks; rather
it acts as a means of collecting like−minded methods together after you have written them.
A particular user of the system is known as a security principal. When your servlet code needs to access an
EJB, it has an identity, which is the principal's name. The name represents the user attempting to perform the
task. The role information forms the other half of the request. At some point during the deployment, the
person responsible for deploying beans will pull up the administration tool and provide a mapping of principal
names to roles. Consider it a many−to−many mapping where a single principal may be allocated a number of
roles, but a role may be assigned to many principal names. How the roles and principles are arranged depends
on your application requirements.
Determining who is calling
As we alluded to earlier, some programmatic ways of accessing security information exist. The two methods
provided enable you to determine the identity of the principal calling you and to check the role of the caller.
Caution The J2EE specification explicitly warns against using these methods as means of
controlling secure access to your code. They should be treated as purely informational,
because if your method has been called, the assumption is that the EJB container has
already performed all the necessary checks.
Finding out the identity of the principal calling your code is the job of the getSecurityPrincipal() method of
the EJBContext. The return value of the method is java.security.Principal, which represents the underlying
authorization mechanism (for example, Keberos or NIS). You can then obtain the name of the user as a String
with the getName() method.
So why would you want to know the name of the user calling you? Let's say you are running an application
that is a data−entry terminal, such as a terminal in the dispatch warehouse. The user logs on and then starts
processing orders. The terminal brings up the next order pending. Off goes the storeman to acquire the items,
parcel them up, and call the courier. Before the storeman can move on to the next item, the order is marked as
being processed, and the next order comes up. As far as he or she is concerned, "Order completed" is the only
button on the screen. Down the back, on the EJB server, the database requires a record of who actually
processed the order. Instead of having to ask the storeman to enter his or her name each time, you can use the
getSecurityPrincipal() method to access the login name and assign it to your database record. For example,
you might find the following business method in the Order bean (ignoring exception handling):
public void orderCompleted() {
Principal operator = ejbContext.getSecurityPrincipal();
String op_name = operator.getName();
InitialContext ctx = new InitialContext();
Object home_ref = ctx.lookup("ejb/EmployeeLocalHome");
EmployeeLocalHome home = (EmployeeLocalHome)home_ref;
Employee emp = home.findByPrimaryKey(op_name);
Chapter 17: Using Advanced EJB Techniques
418
// now assign the reference to the employee bean here as we
// are assuming a CMR field
setEmployee(emp);
}
Notice that the code uses the operator's login name as the primary key for the employee bean. The assumption
here is that the login name is always unique and therefore valid for a unique identifier for a bean. To access
the real details of the employee, you can then look up the bean or one of the other server−administration tools.
Using the operator details, the code then looks up the representative bean and assigns it to this order−bean
instance so that the relationship is established and then maintained by the EJB container using
container−managed relationship capabilities.
On the odd occasion when the deployment−descriptor handling of role−based information is not sufficient,
you can enforce tighter rules using the isCallerInRole() method from EJBContext. For example, the bean
might impose a maximum number of simultaneous requests for a particular role, backed by information in a
database.
The isCallerInRole() method takes a single argument of a String, representing the name of the desired role to
check against. In return you are given a Boolean value indicating whether the caller is using the nominated
role. For example, if you want to check that the user about to process an order as complete is actually the
storeman, then the following code becomes useful:
public void orderCompleted() {
if(!ejbContext.isCallerInRole("stores"))
throw new SecurityException("The caller is not " +
"authorized to complete an order");
}
It is important to understand that the role information that is checked is what the caller is acting as, not what
your bean code is currently acting as. These may well be two separate things — you could allow four roles to
access your code, but be described by a completely different role.
Profiling the user for access capabilities
Now we get into the specifics of applying role and security information to individual bean instances. All the
information in this section is described in the deployment descriptor. As you will see, it is quite verbose as a
process and will usually be easier to set up in the tool provided by your EJB server vendor. However, read on,
as you will need to understand the terminology used in all those wizard dialog boxes.
Security information is defined in so many places in a deployment descriptor that deciding where to start can
be a daunting exercise. In order to make the following sections more understandable, we're going to introduce
the ideas in the order in which you might consider security issues from the deployment perspective.
Unfortunately, that means that we'll be jumping all over the deployment descriptor to insert the new
information provided in each step. We hope not to confuse you too much!
The Role Chain of Execution
In all but the simplest systems, your particular bean may be at the end of a long series of method calls. In
order to reach your code, a request may have passed through a servlet or two, a JMS message queue, and then
a few layers of beans. By the time you receive a request, how do you know whether the original caller was
Chapter 17: Using Advanced EJB Techniques
419
actually allowed to access the information?
Roles have the interesting ability to form a chain. The original caller sets the role, and then all subsequent
method calls maintain that role. So even if you are buried under 10 levels of method calls and beans, you will
still maintain the original caller's role. In this way, you can determine whether the original caller was a servlet,
message queue, or any other type of bean.
For example, if you have a servlet and you set its role to be customer_servlet, then your order bean's
ejbCreate() method will return isCallerInRole("customer_servlet") as true. However, if the order was placed
as a telephone operator using a kiosk application, the method will return false. Even if you are called by other
beans between the servlet and your code, the role is not changed by any of the intermediaries.
The only time you have a chance of influencing the role used is when your bean is directly accessed by
application code. For example, a kiosk application accesses your bean directly. The application does not have
a role associated with it, so the EJB container will take the role assigned to your bean as the originating role.
Declaring role information
The first task in building security information is deciding on the various roles that will be assumed by the
beans and the bean clients. Ideally you will decide in a very early stage of the project's analysis and design,
not right at the end when you have finished testing.
You start the process by declaring all the roles to be used by the beans. Role declarations take place in the
security−role element, which is in turn held in the hitherto−unseen assembly−descriptor element.
You declare assembly−descriptor as the last child of the ejb−jar element — after the enterprise−beans element
in which you have so far been placing all your information:
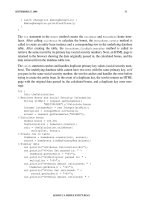
<ejb−jar>
<enterprise−beans>
</enterprise−beans>
<assembly−descriptor>
</assembly−descriptor>
</ejb−jar>
The assembly−descriptor element starts by listing all the security−role elements. Each declaration of the
security−role covers exactly one role in the bean. So, if you need 20 roles, 20 declarations of security−role
will exist.
Tip The security roles defined by the security−role elements are scoped to the ejb−jar file level, and apply to
all the enterprise beans in the ejb−jar file. If you have two JAR files that nominate the same roles, they are
treated as independent entities as far as the container is concerned.
Inside the security−role element is only one required tag — the name of the role being declared:
<assembly−descriptor>
<security−role>
<role−name>customer_servlet</role−name>
</security−role>
Chapter 17: Using Advanced EJB Techniques
420
</assembly−descriptor>
Tip You can add a description string with each role's name, just as you can with most other items in
the deployment descriptor.
Declaring role names is just the first step. It is a declaration of who might want to use the system for the
deployment tool to look at in order to start putting things in order. The next step is to assign a role to an
individual bean to be used when no other information is known about the caller (that is, when no role
information is present yet).
Forcing a bean to run as a particular user
To define information about the default security information for a bean, we now jump back to the
deployment−descriptor declarations dealing with a specific bean instance (such as entity or session elements).
When declaring user information for a bean, you have two options: provide a specific role name to run under
every time, or always use whatever the caller provides. The choice here is binary — you can't provide both
paths. In either case, you start by specifying the security−identity element. The new element is placed between
the primkey−field and query elements if you are using an entity bean, and after the transaction−type element
if you are using a session bean, as shown in the following example:
<enterprise−beans>
<entity>
<primkey−field>OrderID</primkey−field>
<security−identity>
???
</security−identity>
<query>
</query>
</entity>
<session>
<transaction−type>Container</transaction−type>
<security−identity>
???
</security−identity>
</session>
</enterprise−beans>
security−identity has one of two children elements: run−as or use−caller−identity. As the names suggest, these
control either a role name to be used by the bean, or a direction in which to use the caller's identity
information.
For the former case, you provide a role−name element as the child that declares the role that should be used.
The name here must be one of the names that you have just declared in the security−role section:
<security−identity>
<run−as>
<role−name>servlet_customer</role−name>
</run−as>
</security−identity>
In order to use caller identity, you need only the empty element declaration. The rest is assumed from the
runtime context.
Chapter 17: Using Advanced EJB Techniques
421
<security−identity>
<use−caller−identity/>
</security−identity>
Note Message−driven beans do not permit the use of use−caller−identity semantics. The deployment tool
should flag an error if you declare them.
Nominating security information
Earlier you saw the use of the programmatic methods for checking the caller−role information. When you do
this, you need to let the container know that you are going to be performing these checks, and exactly what
you will be checking for. The effect of these checks is to imply the roles the bean code wants to check for as
part of the deployment process.
References to roles declared in code are contained in the security−role−ref element. This element is placed
just before the security−identity element if you declared it earlier. In the role declaration, you place the name
of one role that you have declared in code and an optional element that provides a link between the code
declaration and one of your defined declarations in the security−role section. If more than one role is being
checked in the bean's code, you just declare more security−role−ref elements.
<entity>
<primkey−field>OrderID</primkey−field>
<security−role−ref>
<role−name>stores</rolename>
</security−role−ref>
<security−identity>
</security−identity>
</entity>
Tip Security−role nomination is not available to message−driven beans.
You use link information when you wish to map the code's role declarations to your own preferred
declarations. For example, a third−party bean declares a name that conflicts with one of your names, so you
want to map it to something else or to a broader category:
<security−role−ref>
<role−name>stores</role−name>
<role−link>warehouse_staff</role−link>
</security−role−ref>
Whatever you declare in the role−link element must have been previously declared in the security−role
section.
Getting picky with per−method security
Once you have defined the larger perspective of security, you can become much more detailed in your
requirements. Should you require it, you can become as detailed as individual method calls when singling out
who can access what functionality.
In each of the following pieces of functionality, the method is always described by a single structure: the
method element. Different behaviors are then wrapped around this structure. The purpose of the method
Chapter 17: Using Advanced EJB Techniques
422
element is to describe, in as much detail as necessary, the method signature. So you start with the bean
affected:
<method>
<ejb−name>Product</ejb−name>
</method>
Next you need to declare which methods in the bean are affected. If you want to use all methods (the most
typical case), you can use the special wildcard character, the asterisk (*), in the method−name element, as
follows:
<method>
<ejb−name>Product</ejb−name>
<method−name>*</method−name>
</method>
If you wish to have different permissions on each method, then you provide the name of the method in the
method−name element. Because we are dealing with security information, this method name is always the
name used in the home or remote/local interface, not the bean implementation: That is you should never see a
method starting with ejb. For example, here we declare a finder method:
<method>
<ejb−name>Product</ejb−name>
<method−name>findByCategory</method−name>
</method>
Mapping the Bean's View to the Real World
From your perspective, the security net starts with the deployment descriptor. In the deployment descriptor,
you describe the access requirements of the various pieces of code in terms of roles. In order for these
definitions to take effect, they must mean something in the greater scope of the entire system.
Roles don't have any meaning in the real world of the server's operating system. They are not required to,
either. Roles are only a construct of the EJB server software. If the roles do have any relationship to user
details on the underlying system, it is purely due to the server administrator's creating matching information.
However, roles are much smaller in scope than a standard user login, so it would be unusual to see a direct
mapping of EJB roles to system users. A role may only encompass a single method call out of thousands of
beans. If your system consisted of hundreds or thousands of beans, the management issues would become a
nightmare as you tried to keep the EJB parts synchronized with the servers.
When you have only one of this method in the class, you can stop here. However, when you have overloaded
methods, such as create(), you might want to single a specific method out for separate treatment by providing
the method arguments. To specify a particular method based on the argument list, use the method−params
element, which looks and works identically to the examples you saw earlier with EJB QL:
<method>
<ejb−name>Product</ejb−name>
<method−name>findByCategory</method−name>
<method−params>
Chapter 17: Using Advanced EJB Techniques
423
<method−param>java.lang.String</method−param>
<method−param>java.lang.String</method−param>
</method−params>
</method>
Finally, you have one more way to provide restrictions — some classes have both remote and local interfaces
declared for accessing a particular bean. The most common restriction here is to prevent the caller from
accessing some methods that are available in both the remote and local interfaces. For example, a setter
method may be available to all local users, but only to remote users of a specific role. Declaring whether a
method belongs to a remote or local interface declaration is the job of the method−intf element. This element
is inserted between the ejb−name and method−name elements. There are four valid values: Local, Remote,
Home, and LocalHome.
<method>
<ejb−name>Product</ejb−name>
<method−intf>Remote</method−intf>
<method−name>findByCategory</method−name>
Now that you know how to declare methods, it's time to use them in something. You can declare methods to
be completely off−limits, or you can create a free−for−all.
At the tightest end of the spectrum is the list of methods that cannot be called at all. These methods are listed
in the exclude−list element. exclude−list is placed as the last element of the assembly−descriptor (before the
exclude−list are a couple of elements that we'll be covering shortly). Inside exclude−list you list all the
methods that should not be accessed:
<assembly−descriptor>
<exclude−list>
<method>
<ejb−name>Product</ejb−name>
<method−name>setProductID</method−name>
</method>
<method>
<ejb−name>UnusedBean</ejb−name>
<method−name>*</method−name>
</method>
</exclude−list>
</assembly−descriptor>
Lightening up the heavy−handed restrictions is the job of the method−permission element, which can be
found just ahead of the exclude−list. In this element, you place the list of methods and the roles that are
allowed access.
Inside the method−permission element, you find a collection of individual methods and the role(s) that are
allowed to access them. Each permission declaration starts with the list of acceptable role names, followed by
the method declarations of all the methods affected by these permissions:
<assembly−descriptor>
<method−permission>
<role−name>stores</role−name>
<role−name>call−center</role−name>
<method>
<ejb−name>Product</ejb−name>
<method−name>getProductID</method−name>
</method>
Chapter 17: Using Advanced EJB Techniques
424
<method>
<ejb−name>Order</ejb−name>
<method−name>*</method−name>
</method>
</method−permission>
<method−permission>
<role−name>customer−servlet</role−name>
<method>
<ejb−name>Customer</ejb−name>
<method−name>*</method−name>
</method>
</method−permission>
<exclude−list>
</exclude−list>
</assembly−descriptor>
Caution The EJB 2.0 specification does not mention the order of priorities when declarations conflict with
each other. It is best to double−check everything you provide to make sure no conflicts exist.
If you would like to go all the way and let any user call a method, you can substitute the empty element
unchecked for the list of role−name in the method−permission. The result is that the server always lets
requests to these methods go through:
<method−permission>
<unchecked/>
<method>
<ejb−name>Customer</ejb−name>
<method−name>*</method−name>
</method>
</method−permission>
Note If you don't declare a method in any of the permissions, then the bean container must assume that you
want unchecked semantics.
This completes the introduction to setting up security for EJB systems. As we mentioned before, security is
more than just a few lines in a configuration file. In order for it to be effective, you need to involve everyone
in the requirements and implementation.
Dealing with Bean−Configuration Issues
The last topic that we wish to cover with regard to beans is dealing with configuration issues. You've been
inundated with one aspect of configuration already: specifying deployment information with the deployment
descriptor. What we have not covered so far are all the small details, like environmental properties — items
that you have traditionally used Java properties files and the java.util.Properties class to deal with.
New Feature The J2SE 1.4 API introduces a standardized preferences API for the first time in the
java.util.prefs package. J2EE 1.3 requires only J2SE 1.3, and so you may or may not have
access to these capabilities.
Under the EJB specification, providing property information to configure your beans is just as important as
before. Although beans like stateless session beans are not supposed to be individually configured, plenty of
areas still exist in which you can provide configuration information for business logic. These include areas in
which you might need a constant defined, such as maximum and minimum values of a range check.
Chapter 17: Using Advanced EJB Techniques
425
Summary of existing configuration techniques
Before venturing into the approved method of providing configuration information to beans, let's quickly go
back over the previously existing options and where they fail in the EJB worldview.
Properties files
Until the release of J2SE 1.4, no standard system for storing and loading user preferences existed. If a
programmer wanted to create a portable application that was configurable, the only option, apart from creating
a custom system, was to use text−properties files and use the Properties class to load and save the information.
J2EE requires a heavy restriction on the use of file I/O. The use of the java.io.File class is not permitted within
a bean implementation. This leaves you rather handicapped because you have no real way of reading, and
more importantly no way of saving again, a properties file. There is a potential alternative method to locate
and open the file using ClassLoader's getSystemResourceAsStream() method and storing the property file in
the EJB−JAR file. This tactic is thwarted by the rule that bean implementations are not permitted to access the
current class loader that the method call relies on.
JNDI driver registration
Throughout this book you have been seeing examples of how configuration and storage information is
maintained. For example, JDBC drivers are registered by the system, and you access the current driver
through JNDI. Each of these drivers is externally configured as part of the J2EE middleware−vendor's
software.
Because no standard configuration mechanism exists for low−level drivers, this lack of a standard system
does not make the idea of portable environment variables particularly appealing. Each time you move to a
new system, you need to build a new set of configuration files. If you are providing a bean library for others to
use, the requirement that each customer build his or her own set of configuration files can be a major
headache.
Providing system−agnostic configuration properties
Providing property information falls to the pairing of JNDI and the deployment descriptor. Once again, the
deployment descriptor holds the values to be used during runtime, while your bean−implementation code
accesses values through JNDI.
Accessing properties in code
In your bean−implementation code, accessing environment properties starts with creating a JNDI
InitialContext instance. Accessing property values starts with you performing a lookup() operation on the
name of the variable (just like you've done before with JDBC data sources and bean home interfaces). This
obviously requires you to know what those property names are beforehand. The root name to use in the JNDI
context is the same as that of all other J2EE items: java:comp/env. Below this, you provide the name of the
property that you are after. For example:
InitialContext i_ctx = new InitialContext();
Context env = i_ctx.createSubcontext("java:comp/env");
Object prop = env.lookup("MyProperty");
Chapter 17: Using Advanced EJB Techniques
426
Tip The J2EE specification makes no recommendations for naming conventions for properties, unlike for
JDBC drivers or EJBs. Properties are only visible to their particular beans, so there is no need to come up
with really long, convoluted names.
Property values are restricted to using only the primitive types available in Java. Effectively, that means
strings, integers, and floating−point values. When you access a value through the lookup() method you will
then need to cast the return value to the appropriate class type, as follows:
Integer max_int = (Integer)env.lookup("MaxRange");
Integer min_int = (Integer)env.lookup("MinRange");
int max_value = max_int.intValue();
int min_value = min_int.intValue();
That's all there is to using properties in your bean code. The next step is to declare the property values.
Declaring property values
Completing the task of using property values requires us to wander back to our old friend, the deployment
descriptor. Properties are defined with the bean in which they are used, rather than as a global setting.
Therefore you can have properties with the same name in different beans that use different datatypes and
values! We really don't recommend it, though, and always suggest using clear, meaningful names for each
property.
Property values are contained in the env−entry element, which you can find just after the primkey−field of
entity beans, and in the transaction−type element of session and message−driven beans. You must declare one
env−entry per property. Within env−entry, you then provide a name, the Java class type that it must use, and
the value, in that order. For example, to declare the MaxRange value we used in the preceding code snippet,
you need to declare the following in the deployment descriptor:
<env−entry>
<env−entry−name>MaxRange</env−entry−name>
<env−entry−type>java.lang.Integer</env−entry−type>
<env−entry−value>20</env−entry−value>
</env−entry>
Tip The name declaration will have the java:comp/env prefix added to it by the container at deployment time.
This is fairly straightforward as far as the deployment descriptor is concerned. The only mildly interesting part
is that the entry type must be the fully qualified Java class type rather than just the class name.
If you need more than one property defined, then just use more env−entry elements. For example:
<entity>
<ejb−name>MyBean</ejb−name>
<env−entry>
<env−entry−name>MaxRange</env−entry−name>
<env−entry−type>java.lang.Integer</env−entry−type>
<env−entry−value>20</env−entry−value>
</env−entry>
<env−entry>
<env−entry−name>MinRange</env−entry−name>
<env−entry−type>java.lang.Integer</env−entry−type>
<env−entry−value>−5</env−entry−value>
</env−entry>
Chapter 17: Using Advanced EJB Techniques
427
<entity>
Who Is Looking After the Code?
Code, code, code. When you look back over the past two chapters, all we ever talk about is how you can write
this bit of wonderful code that does all these terrific things. Barely do we stop to consider that there are people
also involved in the system. If you read between the lines, you will have noticed passing references to other
people – system administrators, architects, users and more. EJBs fulfill one very small part of a very big
system – it is a little, tiny, bit of code in amongst a billion dollar company that employs thousands of people.
Surely at least one or two of these might be a bit interested in what you are doing with the company's money
and very expensive hardware.
Before you even start looking at code, and well after you have finished, there are many other people involved
in the process of giving your fellow workers a useful piece of software. The EJB specification defines a
number of roles that make up the process of getting the code from the drawing board to the user. As you could
imagine, not all these roles involve code cutting.
Note The roles outlined in this section only consider the EJB worldview. Where you have middleware, you
will need a client application, and a datastore. The roles described here do not consider these other roles
of the full application development.
EJB development roles
The EJB specification defines six roles involved in the development of an EJB. All of these roles have some
relationship to the process of developing code. Depending on the size of your organization and the project, a
person may fulfill more than one of these roles. However, as you can see, these roles are distinct phases in the
development process.
The bean provider
That's you — the code cutter. You are required to code the complete bean: home and remote interfaces, local
interfaces if needed, and the implementation class. If you must use other code libraries inside your
implementation, then you may need to code those as well. After coding, and testing, your bean you are also
responsible for creating the EJB−JAR file. That is, you must put together the deployment descriptor and
create the JAR file.
At this stage, the assumption is that you are coding one bean at a time. That bean represents a specific piece of
information, and you are the expert in that area. Your role does not need to consider higher−level issues such
as transaction management or how the beans may be deployed on the server. If you have container−managed
beans, then you must also provide the EJB QL statements.
The application assembler
After a collection of beans have been written, they need to be assembled into the EAR file so that it may be
deployed to the server. This function is performed by the application assembler. They take your collection of
EJB−JAR files and add more information to the deployment descriptor. The main function of this role is to
consider architectural issues such as how transactions are to be managed.
Chapter 17: Using Advanced EJB Techniques
428
An application will consist of more than just the beans. A further task for this role is to collect the work of the
client−side developers, such as servlets, JSPs and any standalone applications, and include those in the EAR
files.
The deployer
With all the code packaged, ready to go, the next role is to deploy that EAR file onto the middleware server.
The deployer role must resolve any external dependencies during this process. That means if your bean
requires JDBC data sources or environment entries to be set, the deployer must provide all of that information.
Put simply, this person customizes the beans to the particular environment that they will exist in.
The person fulfilling the role of the deployer is not likely to be a code−cutter. Typically he or she is an expert
in that particular environment — for example he or she will have an Oracle or Websphere certification.
The server provider
Unless you are working on an Open Source project like JBoss, you are unlikely to be fulfilling this role within
your company. The role of the server provider is taken by the various product vendors, such as Oracle, IBM or
BEA. They are required to provide you with server software, which may involve many different products. For
example, you might have DB2 database from IBM, BEA's Weblogic for the middleware and Apache/Tomcat
for the web tier. Each of these is a server provider role.
The container provider
In most cases, the container provider role is the same thing as the server provider role. While the server
provider role can be quite general, this role focuses purely on the job of taking bean code and providing tools
to make those beans available to all takers.
The container provider is required to provide deployment tools as well as the software that manages the
runtime instances of the beans. If there are clusters of servers, then the container provider must also provide
the management facilities for the cluster.
The system administrator
Finally the management of the whole system — servers, networking, communications and software falls to
the system administrator role. This role is just your standard sysadmin that has to deal with installing
software, fixing broken printers and keeping the users happy.
Non−development roles
In addition to the development roles, there are also roles that do not involve the development. These roles are
not defined in the EJB specification, but you are going to come across these people once you start developing
real−world code.
The Business Analyst
Before you even start coding, someone has to decide what needs to be coded. Deciding what needs to be
coded must start with a person talking to other people, such as the users. In this role, the business analyst is
responsible for doing that thing that all techies detest — talking to the end user. Believe it or not, that's a
really useful thing to do, because with happy users, you have happy managers. With happy managers, you
have a much better life. The key to happy users is to provide them with software that they want, not what you
Chapter 17: Using Advanced EJB Techniques
429
feel like hacking up in your spare time between games of Q3 or Everquest.
Business analysts are the people that do a lot of the basic footwork of getting around to all of the people that
have a vested interest in the project and trying to make sense out of all their wishes. They filter the various
wishes and build a list of requirements and the tasks the users will be performing. Sometimes they may get
involved in specifying the user interface layout. It will be your job to take the information they present and
turn it into a usable application.
The end−user
The most important role of all. Without the end user, you would not have an application. Your job is to make
them happy (well, most of the time anyway).
In terms of your application development process, the end user should be involved all along. Obviously, they
are involved right at the start and finish of the project. In between, you should also be seeking to bring them
into the process. Sometimes you will find that a particular process cannot be implemented, so you'll have to
work out an alternate approach. Even if things are going well, the user should be seeing your progress and
helping you to do some of the testing. For example, they might (will!) decide that a particular process might
be better done in a different manner. Better to do that change early in the development rather than right at the
end or even end up with unhappy users after you have finished.
The management
Everybody loves to hate them. Of course, the management role is just as important as any other in the
software development. Not only do they make sure you get paid, but they are the ones that have to sponsor
your project work. Management roles extend all the way from your team leader up to the CEO. At each stage,
there are a different set of responsibilities, but each makes sure that development proceeds, or stops. They will
also feed requirements into your development — deadlines, testing requirements, hardware and more.
Summary
Writing and deploying Enterprise JavaBeans is a huge part of any enterprise−level application. As they have
gained more acceptance, the specification has grown to include new uses for them. This chapter has covered
most of the new functionality included in the EJB 2.0 specification. As you can see, it is a big chapter already,
without covering the now−obsolete EJB 1.1 spec!
We covered many detailed topics in this chapter. The most important of these were:
Advanced EJB topics such as method granularity•
The new EJB local interfaces•
Writing the new message−driven beans•
Container−managed persistence of entity beans, as well as the new EJB QL•
Providing a secure EJB environment•
Providing configurable properties to all bean types•
Chapter 17: Using Advanced EJB Techniques
430
Chapter 18: Introducing CORBA
The success of a software product depends on the following factors: code reusability, code efficiency, and
code maintainability. Of these criteria, reusability is probably the most important, as it drives the other two —
that is, code that is written with reusability in mind tends to be both efficient and easily maintainable. So, the
object−oriented techniques plays an important role in mainstream software design.
The Need for CORBA
The need for design of "objects" that could be used across networks by multiple users resulted in the
development of CORBA specifications. These specifications, developed by the Object Management Group
(OMG), were designed exclusively for a distributed−applications framework. Developers using these
specifications can create applications that can be used across multiple configurations and that are both
fault−tolerant and sophisticated in their core functionality.
Business units today, even within the same organization, have the flexibility to use diverse IT software,
hardware, and networking systems. Business units therefore look for applications that are supported by these
diverse systems. CORBA enables developers to develop applications that work seamlessly across these
systems.
Consider the following example: A needs to send a package to B. A and B are in different locations. Assume
that A sends his package through the postal service to B. Earlier, the only information A could receive about
the status of the package was an acknowledgement of receipt at the other end by B. Now, however, thanks to
the improvements brought about by the Internet, A can not only know whether the package has reached its
destination, but can also track it throughout its transit, enabling A (the sender), B (the recipient), and the
postal service to know exactly where the package is at any given time. The postal service enables this by
providing access to a tracking application that both sender and receiver can use to get the status of the
package.
This is a simple example that illustrates how diverse systems across multiple organizations are required to
execute the same code object. CORBA is a set of tools that can be used to develop objects whose central
feature is global usability.
What Is CORBA?
CORBA is the acronym for Common Object Request Broker Architecture. It is an open, vendor−independent
specification developed by the Object Management Group (OMG) to support applications designed to work
across networks (both within the same organization and across multiple organizations). This model, because it
enables the interoperability of distributed objects across diverse architectures and platforms, allows clients to
access and execute various objects across networks with ease. Basic architectural features provided by the
CORBA architecture are as follows:
Location transparency — This allows client applications to access objects across the network without
knowing where they reside. As far as the client is concerned (at least in theory), the object being
called could be in the same server as the client, in another server on the same LAN, or ten thousand
miles away, accessed through a WAN.
•
431
Support for distributed networks — CORBA−compliant products are all platform−independent,
which allows applications to work on a wide range of systems. A CORBA object can be invoked, by
any client that uses the proper interface definition, regardless of the hardware and software platforms
running on the client system.
•
Seclusion of interface and implementation — Because clients "talk to" (that is, invoke) objects only
through appropriately defined interfaces, implementation changes in the server do not directly affect
the client. In fact, clients are unaware of implementation changes in the object, as they interact only
through interface definitions, which are constant for an object invoked from a client. This feature of
CORBA enables you to modify and upgrade objects without having to also change how clients invoke
the object — or, indeed, anything else about the clients.
•
The Object Management Architecture
Understanding the Object Management Architecture (OMA) is critical to developing a proper understanding
of how CORBA works. The OMA acts as the base for the CORBA architecture. It is a mature model, enabling
location−transparency of objects across heterogeneous networks. The OMG originally designed the OMA
specifications, like CORBA, in order to standardize applications developed for CORBA.
Figure 18−1 illustrates the structure of the OMA. Its relevance to CORBA is that it uses an ORB to mediate
communication between services provided through objects and the client applications that invoke them.
Figure 18−1: Object Management Architecture (OMA)
Object services
Several object services are made available to applications that invoke them, and are standardized under the
Common Object Service Specification (COSS). Utilities that provide functionality for managing and
maintaining objects is one example of the types of services in this category. This service is an object service
that performs lifecycle management of objects — one that starts from the creation of the object and tracks it
throughout its lifecycle, tracking changes made to it and to referring applications as well. You can find a list
of CORBA services in the later sections (CORBA Services).
Common facilities
These are generic application interfaces that assist user applications. This category includes function such as
standardization of time functions. As they are generic, these interfaces are typically applicable to and usable
by most application domains.
Chapter 18: Introducing CORBA
432
Domain interfaces
These are also generic application interfaces; they differ in their functionalities, which tend to be specific to a
particular function or industry, such as accounting, payroll, finance, telecommunications, transportation, and
so on.
Application interfaces
These are interfaces to non−standardized (or custom) applications, created to solve a specific problem. These
interfaces are used by clients to access applications.
Object Request Broker
The Object Request Broker (ORB) is the heart of the OMA and of CORBA. It allows objects to interact with
each other regardless of the platforms they reside and execute on. The ORB is the coordinating core for all
objects in the system, receiving and processing requests and responses from objects and from requesting
clients across the network. A client requesting an object gains access to it through the ORB. The ORB
provides a layer of abstraction between the client and the application.
CORBA objects are prohibited from interacting directly with each other. When two objects do have to
communicate, they do so through an interface. These interfaces are in turn based on a set of OMG−defined
specifications known as the Interface Definition Language (IDL). Applications use IDL to create common
interfaces with which clients and objects can interact with other objects independent of the underlying
programming languages and platforms they have been designed to run on. IDLs in turn are mapped to any
programming language using an appropriate IDL compiler. As interfaces are designed to be
language−independent, accessing the CORBA object is relatively simple. Multiple ORBs communicate by
means of a messaging protocol known as Internet InterOperable Protocol (IIOP).
Structure and Action of ORB
Figure 18−2 shows the structure of the ORB. The various elements are as follows:
Figure 18−2: Structure of the Object Request Broker (ORB)
Client — The application that requests the remote object.•
IDL compiler — The IDL compiler creates the language maps of IDL code, based on the
programming language(s) used.
•
IDL stub — The IDL interface created on the client by the IDL compiler. It ensures the marshalling
of the appropriate parameters involved in the invocation of the remote object. Marshalling is the
process by which the necessary parameters for calling the remote object's method are inserted into the
remote object and sent to the server for processing.
•
Chapter 18: Introducing CORBA
433
IDL skeleton — The IDL interface created on the server by the IDL compiler. It ensures the
unmarshalling of parameters involved in the invocation of the remote object. Unmarshalling is the
process by which the skeleton extracts the parameters from the remote object for processing. It has the
same functionality as the IDL stub, except that it resides on the server instead of the client.
•
Dynamic Invocation Interface (DII) — The DII allows applications to call remote objects without the
help of the client stub. In effect, this allows clients to call remote object methods whose types are
unknown. DII also improves performance, as it allows client applications to execute other tasks until
the request is served.
•
ORB interface — The ORB interface has some local functions that object implementations and clients
can use to talk to other CORBA services, such as the naming service and the lifecycle service.
•
Dynamic Skeleton Interface (DSI) — The same as the DII, with the difference that it resides on the
server.
•
ORB — The architecture of the ORB is discussed in detail later on in this section.•
Object implementation — The layer in which the remote objects are implemented. Typically, the IDL
skeleton or DSI layer communicates with this object implementation to access the real remote object.
•
Object adapter — The object adapter helps the ORB locate the target object implementation in the
server.
•
Interface repository — This repository stores all the interface definitions defined by the IDL. The
ORB uses it as a lookup directory for all interface definitions when the DII is used. It acts as a
substitute for the client stub when there is a need to type−check objects.
•
Implementation repository — This repository stores information about object implementations.•
Every client that can invoke an object, and every server on which an object resides, has at least one ORB
component. The chief purpose of ORB is to facilitate and manage requests between clients and the (remote)
objects they invoke. Actual communication between clients and objects takes place through the IDL stub and
the IDL skeleton; the ORB monitors and manages the process. These communications (mainly requests and
responses) between clients and objects, and between objects that the ORB mediates, typically take the form of
IIOP messages.
Upon initialization, the ORB performs the following series of steps for each object:
Initialize the ORB component.1.
Get the initial object reference for the Naming Services.2.
Convert the object reference to a string.3.
Connect the object reference to the server object and then disconnect.4.
Figure 18−3 illustrates how ORB achieves its purpose.
Figure 18−3: Interaction between server and client
The following are the steps a client typically goes through when it calls a (remote) CORBA object through
ORB:
To call the remote object, the client first needs an object reference. Because the remote object can be
accessed from within any ORB framework, it is also referred to as an Interoperable Object Reference.
Once the client obtains the Object Reference, the IDL stub containing the necessary interface
definitions creates and sends a CORBA defined request object containing the necessary parameters to
the ORB. The process of inserting the parameters into the request object is called marshalling. As
1.
Chapter 18: Introducing CORBA
434
explained in the bulleted list at the beginning of this section, this process can also be done through the
DII.
The ORB then sends an IIOP message through the network to locate the remote object needed.2.
The server application, upon "seeing" the request, creates an instance of the actual object and informs
the ORB that it exists. It then waits for the request from the clients.
3.
After getting the request from the client, the ORB finds the target object from the request object and
passes control to the generated IDL skeleton or the Dynamic Skeleton Interface (DSI) of the CORBA
object.
4.
This IDL skeleton/DSI layer extracts the appropriate input, as well as the processing and output
parameters, and then invokes the methods that pass the parameters. This process is known as
unmarshalling. The object implementation does not need to know whether the object was called by
the IDL skeleton layer or the DSI layer.
5.
The skeleton receives the return values and any exceptions, creates the response message and sends it
to the ORB.
6.
The ORB sends this response back to the client by way of an IIOP message.7.
The ORB on the client side extracts the data from the response message and sends it to the stub.8.
The stub extracts the returned data and returns it to the client application.9.
Dynamic Invocation Interface (DII)
Remote calls to CORBA objects are made when the client calls a method that is resident in the remote object.
The client calls the method by means of the client stub created by the IDL compiler, which "knows" the
method — that is, the number and type of the parameters, the exceptions that will occur, and the return type.
This is how objects are invoked through static invocation, in which the client has all the details about the
object at compile time.
The Dynamic Invocation Interface (DII), as the name suggests, allows client applications to dynamically call
remote objects. This process does not require a client stub; instead, the ORB uses the Interface Repository to
check and resolve calls to the remote objects. This in effect enables client applications to invoke and use
objects that were not available at compile time. In addition, it allows client applications to use newly created
objects that are available at runtime. Dynamic invocation is also useful in synchronous applications. Usually,
the client makes a request for the object and waits until the server sends the response back to it. With the help
of dynamic invocation, the client can send the request to the server and monitor the response, simultaneously
executing other tasks until it receives the response. This improves the performance and efficiency of the
application. Additionally, client applications are not restricted to use any particular remote objects and need
not be recompiled when they use new objects. The only drawback is the programming effort required to
replace the stub in the client application.
The following are the steps involved in making calls using the DII:
The remote object's reference must be obtained.1.
The request object is composed with details such as parameters, return type, and exceptions it might
cause.
2.
Finally, the requested object is invoked and the results awaited.3.
This process is similar to the one used for static invocation, in which the client stub performs the entire
process. In case of DII, the operations performed by the client stub are handled by the application itself.
Chapter 18: Introducing CORBA
435
Dynamic Skeleton Interface (DSI)
The Dynamic Skeleton Interface (DSI) resolves client requests dynamically to transfer control to the target
CORBA object. The DSI helps clients locate target CORBA objects that the clients do not have compile−time
knowledge of. When a client submits a request, the ORB interface attempts to locate the target object with the
help of this interface, thus performing the role of the static skeleton. The DSI makes use of the Interface
Repository to resolve object calls.
Interface Repository
The Interface Repository acts as a dictionary, containing definitions of the remote objects. It plays an
important role in the dynamic invocation of remote objects, and does some of the work of the client stub in
dynamic invocations. Because the Interface Repository holds the definitions of all object interfaces, client
applications that use it do not need to restrict themselves to the use of objects that were available when their
applications were compiled. Client applications can use it to invoke objects created after application compile
time through dynamic invocation. The Interface Repository is also used to check the accuracy of the
inheritance graphs.
Implementation Repository
The Implementation Repository contains all the relevant information about object implementations. The ORB
uses it as a dictionary to monitor the process of locating and activating remote objects. It also stores additional
information associated with the object implementation that could potentially be useful to the ORB.
Object adapters
Adapters are units in the ORB that serve as intermediaries between the ORB and the object implementation.
The ORB uses the object adapter to obtain information about CORBA objects. In order to execute the
operations on the CORBA object as requested by the client, the ORB in the server must determine the details
of the implementation of that particular object. The function of the object adapter is to find the correct object
implementation. The object that implements the CORBA interface is called the servant object; it may also be
called the object implementation.
When a client invokes a method on the CORBA object, the client ORB bundles the request and sends it to the
server ORB. The server ORB then passes the client request to the object adapter. The object adapter, which
maintains details about all the servant objects (object implementations) that implement the CORBA object,
locates the appropriate servant object and passes control to the static skeleton layer or the DSI. The skeleton
layer extracts the input parameters and passes them to the servant object (object implementation) to perform
the necessary operations, as illustrated in Figure 18−4.
Figure 18−4: Structure of the object adapter
Chapter 18: Introducing CORBA
436
Before you can understand object adapters, you must understand the servant object. The term "servant object"
indicates that this is the object that is created in and residing in the server, and that it actually implements the
CORBA interface. Since servant objects implement the CORBA interface, the object adapter must have
access to the relevant information about CORBA entities and their associated servant objects. Object adapters
perform the following functions:
Registering servant objects — Servant objects, once created, must be registered with the object
adapter so that the adapter is aware that that particular servant exists in the server. The object adapter
identifies the servant objects with the help of an object ID (defined later in this section) that acts as a
unique (within the adapter only) key for identification.
•
Activating and deactivating CORBA objects — Activation is the process by which the CORBA object
is made eligible to service client requests. It typically involves creating and associating a servant
object with a CORBA entity. Deactivation is the process by which the association between the
CORBA entity and the servant object is removed, during which the servant object may be destroyed.
•
Maintaining the object map — It is the responsibility of the object adapter to maintain an associative
map of the CORBA object and its servant so that the servant can be located when a client makes a
request.
•
Two types of object adapters are in use, Basic Object Adapters (BOAs) and Portable Object Adapters (POAs).
Basic Object Adapters
Basic Object Adapters are the simplest type of object adapter in use. These are the adapter whose interfaces
were initially introduced by the OMG. The object adapter's function is to help the ORB in the server locate the
right target object when the ORB receives the client request. The BOA provides interfaces for creating,
activating, deactivating, and destroying objects, and also monitors them in the server. The BOA uses certain
activation models to maintain server processes. These are as follows:
Shared server model — As the name indicates, this model allows the server to share the existence of
the various CORBA objects, thus enabling support of CORBA objects of different types.
•
Unshared server model — This model allows only one CORBA object of a particular type to reside in
the server.
•
Persistent object model — This model allows the server to be launched by the user code, a shared
server that supports CORBA objects of different types.
•
Server−per−operation model — This model creates a separate server process for all incoming
requests.
•
The BOA was the first adapter type introduced by the OMG, and largely because of the lack of
standardization associated with several of its key features, it has some deficiencies that reduce its portability.
For example:
No standard interface defines the association between the object adapter and the skeleton layer.•
No common specification is available for registering servant objects.•
No standard interface exists for the multi−threading environment.•
Portable Object Adapter
Portable Object Adapter (POA) is the recent, flexible object adapter in use. It maintains the objects by
assigning them a unique ID called the object ID. This adapter maintains an active object map that is used to
map the CORBA servant objects with the object IDs. This object ID will be unique well within the POA.
When the client passes an object reference, the client ORB sends an object key that is used to locate the target
Chapter 18: Introducing CORBA
437
object. The object ID is a part of that object key. The object key may also contain information about the POA.
Unlike BOA, the Portable Object Adapter uses the concept of nesting, starting with a root POA. This allows
the server to have multiple POAs that can cover different CORBA objects, and it also provides functions to
establish the association between the object adapter and the skeleton layer. The Portable Object Adapter
supports multi−threading, which does not exist in the Basic Object Adapter. Portable Object Adapters are the
most common adapters in use now.
The Portable Object Adapter incorporates policies to maintain and organize the objects in use. Some of the
important policies are:
Object ID assignment policy•
ObjectID uniqueness policy•
Lifespan policy•
Request processing policy•
Implicit activation policy•
Servant retention policy•
Object references
Client applications can get references to a CORBA object in many different ways. The two important means
of obtaining object references are Naming Services and stringified object references.
Naming Services
As the name suggests, Naming Services refer to the locators of object references. Naming Services provided
by CORBA enable storage of object references in the depository by assigning unique names to them. This
name−reference binding helps the service locate object references at client requests. Naming contexts store
this name−reference binding, known as the name component, in the naming service. The naming context can
be a single object−reference binding, or a group of object−reference bindings stored hierarchically. Since the
naming context acts as a lookup directory that clients can use to obtain object references, it is the server's
responsibility to insert the object reference with a name — that is, to create the naming context in the Naming
Services.
Following are the details of how Naming Services work to connect servers and clients to objects, when
Naming Services are first invoked:
The resolve_initial_references function of the ORB is called as the first step to obtain the CORBA
object reference from the root (the initial object reference).
1.
The initial object reference thus obtained from the ORB is a generic CORBA object reference. The
client and server need to handle it as a NamingContext object; so, the generic CORBA object
reference is converted into a Naming Context object.
2.
The Helper class of the NamingContext interface then converts this generic CORBA object reference
to a NamingContext objects.
3.
On the server side, now that the server has access to the naming context, it has to create a component
to be stored in the naming context.
4.
The server then creates a NameComponent with a unique identifier to identify that particular object
reference.
5.
The NameComponent and the object reference are then bound in the naming context.6.
On the client side, the client gets a NamingContext reference from the ORB, which is then converted
into a naming−context object.
7.
Chapter 18: Introducing CORBA
438
The client also creates a name component to query the naming context about that particular object
reference.
8.
The naming context then resolves the name component and returns the object. As the type of the
returned object is generic, the object is converted to a specific object reference with the help of its
Helper class.
9.
Now the client can invoke the methods on that particular object and perform all the operations.10.
Note that in Java, the naming service used is known as the COS Naming Service. All necessary interfaces
required to be able to use this naming service are available in a package called org.omg.CosNaming. CORBA
applications in Java need to import this package in order to use the naming service.
The following example, which creates an object reference−name binding using Naming Services, may help
you understand Naming Services better. First, assume the existence of a CORBA application called Welcome,
which welcomes a new user with the message "Welcome to CORBA." Consider the steps the server performs
to add the object−reference binding in the naming service:
Implement the interface. Assume that the implementation already exists:
class WelcomeServant extends _WelcomeImplBase {
// Implementation code goes here
}
1.
Create an instance of the object in the main server application. Also create the ORB object. Then, add
the object to the ORB with the help of connect( ) method of the ORB:
public class WelcomeServer {
public static void main(String args[])
{
ORB orb = ORB.init(args,null);
WelcomeServant wsRef = WelcomeServant();
orb.connect(wsRef);
}
}
2.
Get the initial object reference from the ORB by calling the resolve_initial_ references method in the
ORB interface, as follows (Where "NameService" is the initial name of the service):
org.omg.CORBA.Object objtRef =
ORB.resolve_initial_references("NameService");
3.
This method returns a CORBA object. In order to use it as a naming context object, you must narrow
it down to a naming−context object by invoking the narrow() method present in the NamingContext
Helper class:
NamingContext nmctRef = NamingContextHelper.narrow(objtRef);
4.
Subsequently, a name component is created, and is used to uniquely identify the CORBA object
("Welcome"). The first parameter is the ID, and the second parameter is its kind (which, in principle,
can be null):
NameComponent nct = new NameComponent("Welcome","");
5.
Since only object−reference binding exists, and no hierarchical structure is involved, a
single−dimensioned array of NameComponents is created to store the object−name binding:
NameComponent nctStore [] = {nct};
6.
This name is then bound to the object by the following method:
nmctRef.rebind(wsRef,nctStore);
7.
Chapter 18: Introducing CORBA
439
You can perform the name−object binding by calling either the bind() or the rebind() methods of the
NamingContext interface.
On the client side, steps 2–6 are repeated to create the NamingContext object. As the client has to query on the
NamingContext object, it invokes the resolve method of the NamingContext interface to return the object.
This object must be narrowed down to the specific object the client requested.
Stringified object references
As the name suggests, the object reference is stored as a string so that the client can make use of it. As you
saw with the Naming Services, you obtain the initial object reference by calling the
resolve_initial_references() method of the ORB. This generic object reference is narrowed down to the
naming context object type by calling the narrow() method of the naming−context object's Helper class. The
name component is created for the CORBA object and is bound with a unique name. The ORB interface has a
function called object_to_string() that converts this object reference to a string, which can be stored in a Java
file. When a request comes in for an object reference from the client, the client can access the file containing
the object reference and use it. This is useful in an environment where no Naming Services are available.
Internet Inter−ORB Protocol
The Internet Inter−ORB Protocol (IIOP) is the protocol with which the ORB achieves its objectives. When a
client requests a CORBA object, it uses an inter−operable reference to identify the CORBA object in the
server. The ORB on the client side then passes this reference to the ORB in the server, which identifies the
CORBA object and processes the request. The client ORB and the server ORB communicate through the
Internet Inter−ORB Protocol. As the name indicates, this protocol carries inter−operable references across
wide−area networks (such as the Internet) to facilitate communication between CORBA objects, as shown in
Figure 18−5.
Figure 18−5: IIOP protocol
The IIOP specification uses a data format called Common Data Representation (CDR), which supports several
of the datatypes in the OMG IDL. The IIOP protocol uses this format along with some specific message
formats to send messages across the ORBs. The message format supported by IIOP can be transmitted across
a variety of protocols that are currently in vogue, including TCP/IP and SNA, and this helps CORBA achieve
location transparency. The main advantage of using the IIOP protocol is platform independence, which helps
CORBA objects interact with each other even when they are not physically located on the same server.
Interface Definition Language
Remote objects can be accessed from client applications only when the client invokes a method on that
particular object. Clients, to be able to identify these objects, must have the definition of the remote object's
interface at compile time. This interface definition is provided by the Interface Definition Language (IDL).
The IDL file stores the interface definitions of the remote objects needed by client applications. IDL files are
typically not written in any programming language, but instead can be mapped to any programming language
with the appropriate IDL−Language compilers. For IDL−to−Java mapping, for example, you would use the
idltojava compiler (in version 1.2) or the idlj compiler (version 1.3 and above) to create the equivalent
interface definitions.
The following is a simple IDL file with an interface called Sample.idl:
Chapter 18: Introducing CORBA
440
module SampleApp {
interface Sample {
string sayName();
};
};
This is only a simple definition of an IDL file. The following is a list of some of the features of the syntax that
IDL file definitions use:
The first module statement in the IDL file corresponds to the package statement in Java. If this IDL
file is actually compiled for Java mapping, it would have generated a package with the name
SampleApp.
•
The second statement, namely the interface statement, is similar to the interface definition in Java.•
The third statement specifies an operation in IDL. This is an operation that must be performed by the
interface. In Java, this operation would correspond to object's methods.
•
The equivalent Java mapping for the file Sample.idl is as follows:
package SampleApp;
public interface Sample
extends org.omg.CORBA.Object, org.omg.CORBA.portable.IDLEntity
{
String sayName();
}
In addition to the equivalent Java file for the interface, the IDL compiler also creates other files. For this
particular example, if you look in the folder SampleApp, you will see that the compiler creates a total of five
files for this particular IDL file:
Sample.java•
SampleHelper.java•
SampleHolder.java•
_SampleImplBase.java•
_SampleStub.java•
Sample.java is the file that contains the mapping of the IDL interface in Java. As the name indicates,
SampleStub.java is the client stub, and SampleImplBase.java the IDL skeleton created by the IDL compiler.
This leaves SampleHelper.java and SampleHolder.java.
The Helper classes allow the applications to write objects to and read them from the stream. They also help to
convert generic object references to specific objects in use with the help of the narrow() method defined in the
Helper class, and list the repository ID of the object. The Helper classes also allow the applications to extract
data from or add them to a special datatype (called Any) that the IDL uses.
The Holder classes provide functionality for manipulating the in/out parameters used in the interfaces. Since
Java does not provide any mechanism for resolving the in/out parameters, Holder classes help pass the
parameters properly to achieve the correct results. For example, the omg.org.CORBA package offers Holder
classes for all the basic datatypes, while user−defined datatypes have their Holder classes defined as <user
type>Holder.java, and Holder classes for basic datatypes in turn are defined as <datatype>Holder. Holder
classes for basic datatypes are typically initialized with default values.
Note The following general rules apply to the IDL definitions: Identifiers are usually case−sensitive,
comments can be written as C++ or Java comments, and all statements end in a semicolon.
Chapter 18: Introducing CORBA
441
An IDL file supports the use of basic datatypes, complex datatypes (such as structures, unions, enums, arrays,
and so forth), and user−defined exceptions. Much like Java interfaces, it also supports the inheritance of
interfaces.
Constants
Constants can be defined in IDL just as in any other programming language. Constants play an important role
in many applications. For example, if a generic application calculates the area of all available geometric
shapes, it becomes necessary to define pi as a constant in the IDL file. Pi will in turn be mapped as a Java
constant, as in the following example.
IDL Definition
module SampleApp {
interface Sample {
const float PI = 3.14;
};
};
Java Definition
package SampleApp;
public interface Sample extends org.omg.CORBA.Object,
org.omg.CORBA.portable.IDLEntity {
final float PI = (float) (3.14D);
}
Basic Datatypes
Basic datatypes are mapped in the same way as constant datatypes. Table 18−1 indicates how basic datatypes
are mapped. All datatypes in IDL are shown with their equivalents in Java. Note that the int and Long
datatypes are not interchangeable; take care when defining datatypes as one or the other.
Table 18−1: IDL Datatypes
IDL Datatype Java Datatype
Boolean boolean
Char char
string java.lang.String
short short
Long int
long long long
Float float
double double
The following is the code for the basic datatypes as an IDL definition.
IDL Definition
module SampleApp {
interface Sample {
Chapter 18: Introducing CORBA
442