Java Extreme Programming Cookbook phần 6 ppt
Bạn đang xem bản rút gọn của tài liệu. Xem và tải ngay bản đầy đủ của tài liệu tại đây (371.2 KB, 28 trang )
return true;
}
public int getRow( ) throws SQLException {
return 1;
}
}
MockResultSet mockRs = new MyMockResultSet( );
mockRs.setExpectedCloseCalls(1);
mockRs.setExpectedNextCalls(1);
MockPreparedStatement mockPs = new MockPreparedStatement(
);
mockPs.addExpectedSetParameter(1, "0001");
mockPs.setExpectedCloseCalls(1);
mockPs.addResultSet(mockRs);
MockConnection mockConnection = new MockConnection( );
mockConnection.setupAddPreparedStatement(mockPs);
mockConnection.setExpectedCloseCalls(0);
AccountFactory acctFact = new AccountFactory( );
// call the method that we are actually testing
Account acct = acctFact.getAccount("0001",
mockConnection);
mockRs.verify( );
mockPs.verify( );
mockConnection.verify( );
}
MyMockResultSet
is the key to this test. It extends MockResultSetJdk14 (described
shortly).
MyMockResultSet overrides a handful of abstract methods in order to simulate data
that would normally be returned from a true database call. Our goal is to support our unit tests without
relying on a real database, and we only need to stub out the actual methods that our test calls.
The remainder of the unit test should look familiar if you read through the recipes presented earlier in
this chapter. Specifically, we tell the mock result set how many calls to expect. We then create and set
up the mock prepared statement and connection, using them to exercise the code in
AccountFactory. When finished, we ask each of the mock objects to verify themselves.
It turns out that the version of Mock Objects used in this chapter does not fully support J2SE 1.4.
Specifically, many new JDBC methods are not defined in the
MockResultSet class. For this
reason, we created
MockResultSetJdk14, as shown in Example 6-10. This class merely
provides dummy implementations of the new JDBC methods so our examples compile under J2SE
1.4.
Example 6-10. Making MockResultSet work with J2SE 1.4
package com.oreilly.mock;
import com.mockobjects.sql.MockResultSet;
import java.net.URL;
import java.sql.*;
public abstract class MockResultSetJdk14 extends MockResultSet
{
public URL getURL(int columnIndex) throws SQLException {
notImplemented( );
return null;
}
public URL getURL(String columnName) throws SQLException {
notImplemented( );
return null;
}
public void updateRef(int columnIndex, Ref x) throws
SQLException {
notImplemented( );
}
public void updateRef(String columnName, Ref x) throws
SQLException {
notImplemented( );
}
// etc
public void updateBlob(int columnIndex, Blob x) throws
SQLException
public void updateBlob(String columnName, Blob x) throws
SQLException
public void updateClob(int columnIndex, Clob x) throws
SQLException
public void updateClob(String columnName, Clob x) throws
SQLException
public void updateArray(int columnIndex, Array x) throws
SQLException
public void updateArray(String columnName, Array x) throws
SQLException
}
The fact that we had to write our own class to support J2SE 1.4 illustrates a pitfall of the mock object
approach to testing. The mock objects must be kept up-to-date whenever new methods are added to
the interfaces you are testing.
It is important to remember that these tests are not actually testing SQL or the database. Instead, they
are testing code at the database access layer of an application by "faking out" the database.
6.5.4 See Also
The previous recipe shows how to modularize JDBC code so it is testable. The Mock Objects
framework is available at
.
6.6 Generating Mock Objects with MockMaker
6.6.1 Problem
You want to automatically generate a mock object from any Java interface.
6.6.2 Solution
Use MockMaker, available from .
6.6.3 Discussion
Writing mock objects by hand is tedious, and relying on a framework like Mock Objects is
troublesome because it might not provide mock implementations for all of the interfaces you need to
test against. The MockMaker project allows you to automatically generate new mock objects from any
existing Java interface.
Using MockMaker is simple. Just include the MockMaker JAR files in your CLASSPATH and invoke
the tool as follows:
java mockmaker.MockMaker <interfaceName>
The generated source code is then echoed to the console. Example 6-11 shows the output from typing
the following command:
java mockmaker.MockMaker javax.swing.event.TableModelListener
Example 6-11. Generated mock object
import mockmaker.ReturnValues;
import com.mockobjects.*;
import javax.swing.event.TableModelListener;
import javax.swing.event.TableModelEvent;
public class MockTableModelListener implements
TableModelListener{
private ExpectationCounter myTableChangedCalls = new
ExpectationCounter("javax.swing.
event.TableModelListener TableChangedCalls");
private ExpectationList myTableChangedParameter0Values =
new ExpectationList("javax.
swing.event.TableModelListener TableChangedParameter0Values");
public void setExpectedTableChangedCalls(int calls){
myTableChangedCalls.setExpected(calls);
}
public void addExpectedTableChangedValues(TableModelEvent
arg0){
myTableChangedParameter0Values.addExpected(arg0);
}
public void tableChanged(TableModelEvent arg0){
myTableChangedCalls.inc( );
myTableChangedParameter0Values.addActual(arg0);
}
public void verify( ){
myTableChangedCalls.verify( );
myTableChangedParameter0Values.verify( );
}
}
The generated code relies on code found in the Mock Objects framework for keeping track of
expectations, such as the expected events or number of times a method was called. You use this class
almost exactly like you would use the hand-coded mock object, as shown in Example 6-5
(although
the method names are slightly different).
Here is how you can run MockMaker from an Ant buildfile:
<path id="classpath.mockmaker">
<pathelement path="${dir.build}"/>
<pathelement
location="${env.MOCKMAKER_HOME}/mockmaker.jar"/>
<pathelement
location="${env.MOCKMAKER_HOME}/mmmockobjects.jar"/>
<pathelement location="${env.MOCKMAKER_HOME}"/>
</path>
<target name="generateMockObjects" depends="prepare">
<java fork="true" classname="mockmaker.MockMaker"
output="${dir.generatedSrc}/MockTableModelListener.java">
<classpath refid="classpath.mockmaker"/>
<arg line="javax.swing.event.TableModelListener"/>
</java>
</target>
6.6.4 See Also
Recipe 6.2 and Recipe 6.3 show how to hand-code mock objects that look similar to the code
generated by MockMaker. The Mock Objects web site,
, lists URLs for
several other mock object generation tools, including Easy Mock, Mock Creator, and Mock Doclet.
6.7 Breaking Up Methods to Avoid Mock Objects
6.7.1 Problem
You want to test a method without resorting to the complexity of mock objects.
6.7.2 Solution
Split the method into smaller pieces, ensuring that each piece performs one task. Small, single-purpose
methods improve code quality in addition to making them testable.
6.7.3 Discussion
Example 6-12 shows a method that is hard to test. It is hard because you must create a mock
ResultSet implementation in order to write your tests.
Example 6-12. Hard to test
// fetch an account type code from the database and convert it
// into one of the Account constants
int getAccountType(ResultSet rs, String acctTypeColName)
throws SQLException, DataSourceException {
String acctStr = rs.getString(acctTypeColName);
if ("SA".equals(acctStr)) {
return Account.SAVINGS;
}
if ("CH".equals(acctStr)) {
return Account.CHECKING;
}
throw new DataSourceException("Unknown account type: " +
acctStr);
}
The fundamental problem is that this method performs two tasks, rather than one. It is also a little
messy because it throws two types of exceptions. The first task is to retrieve data from the
ResultSet. The second task is to convert that data into some other form.
When confronted with a method like this, do not try to write a sophisticated unit test. Instead, first try
to simplify the method. Example 6-13
shows a simplified version of this method. It is now assumed
that the caller obtains the account code from the database before calling this method, whose sole
purpose is converting that string into a Java constant.
Example 6-13. The same logic, now testable
// convert a database account code, such as "CH", into a Java
constant
int getAccountType(String acctTypeStr)
throws DataSourceException {
if ("SA".equals(acctTypeStr)) {
return Account.SAVINGS;
}
if ("CH".equals(acctTypeStr)) {
return Account.CHECKING;
}
throw new DataSourceException("Unknown account type: " +
acctTypeStr);
}
You can now test this method without resorting to mock objects. We also eliminated the extra
SQLException because we no longer use JDBC in this method. Example 6-14 shows the test.
Example 6-14. Test for the getAccountType( ) method
public void testGetAccountType( ) throws Exception {
AccountFactory acctFact = new AccountFactory( );
assertEquals("account type", Account.CHECKING,
acctFact.getAccountType("CH"));
assertEquals("account type", Account.SAVINGS,
acctFact.getAccountType("SA"));
try {
acctFact.getAccountType("bogus");
fail("Expected DataSourceException");
} catch (DataSourceException expected) {
}
}
6.7.4 See Also
This method was taken from Example 6-8 earlier in this chapter.
6.8 Testing Server-Side Business Logic
6.8.1 Problem
You want to test business logic that normally depends on a database, but mocking out the low-level
SQL is far too complex.
6.8.2 Solution
Organize your server-side code using business objects and database access objects (DAOs). Place all
business logic in your business objects, and all database access in your DAOs. Use a factory to create
mock implementations of your DAOs when testing your business objects.
6.8.3 Discussion
We showed how to write mock objects to simulate low-level SQL code earlier in this chapter. It is a
useful technique for testing the data access tier of your application, but tends to be far too complex for
business logic tests. For business objects, you should strive to create mock implementations of the
entire data access tier, rather than mock implementations of the JDBC interfaces.
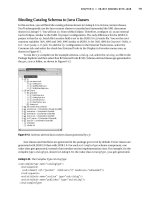
Figure 6-1
illustrates a common design pattern for server-side Java code. In this diagram, either an
EJB or a servlet dispatches method calls to
CustomerBO, a business object that contains server-
side business logic. The business object is what we would like to test.
Figure 6-1. Business object and DAO pattern
The first box in Figure 6-1 shows either an EJB or a servlet. This pattern works well with either
approach, although the EJB approach allows you to easily invoke many different business objects
under the umbrella of a single transaction. Regarding testing, the business object pattern is fantastic
because you can test CustomerBO as you would test any other standalone Java class. That is, you
don't need to run your tests inside of the application server.
The second key to making business objects testable is keeping data access code separate. The
CustomerDAO interface defines an API to a data source, and the OracleCustomerDAO is an
Oracle-specific implementation. When using this approach, your business objects generally locate the
correct DAO implementations using some sort of factory object. Example 6-15
shows what some of
the methods in
CustomerDAO might look like.
Example 6-15. CustomerDAO methods
public interface CustomerDAO {
Customer getCustomer(long customerId) throws
DataSourceException;
void deleteCustomer(long customerId) throws
DataSourceException;
CustomerSummaryInfo[] searchByFirstName(String firstName)
throws DataSourceException;
}
There are no specific requirements for the DAO, other than that it should not expose JDBC
implementation details to the caller. Notice that our methods all throw
DataSourceException,
which is an exception we made up for this example. If our methods throw
SQLException, it
would make them harder to implement for non-relational data sources.
Rather than creating a mock DAO implementation, you might want to create a
DAO implementation that hits a small, local database rather than the official
database. This allows you to run tests against small, easily configured data
without the political battles often required to make changes to the main project
database.
Example 6-16 shows an imaginary test case for the business object.
Example 6-16. Imaginary test case for CustomerBO
public class TestCustomerBO extends TestCase {
public void testSomething( ) throws DataSourceException {
// instantiate and test the business object
CustomerBO custBo = new CustomerBO( );
assertEquals(" ", custBo.doSomething( ));
}
}
The test constructs a CustomerBO and calls methods on it. It is within these methods that the
CustomerBO presumably performs the business logic that we are testing. Example 6-17 shows
what a method in
CustomerBO might look like.
Example 6-17. CustomerBO method
public class CustomerBO {
public void deleteCustomer(long customerId)
throws DataSourceException {
CustomerDAO dao = MyDAOFactory.getCustomerDAO( );
dao.deleteCustomer(customerId);
perhaps some business logic here
}
}
From the perspective of CustomerBO, the actual DAO implementation is completely unknown.
The
MyDAOFactory class takes care of instantiating the correct DAO, whether it is a mock
implementation or the real Oracle implementation. You will have to come up with a mechanism to
inform the factory which DAO implementation to create. An easy approach is to set a system property
in your Ant buildfile. The system property allows you to avoid hardcoding in your application, making
it possible to plug in different DAO implementations in the future.
The details of the mock DAO implementations are not important. The general rule is that they should
do as little as possible. Their sole purpose is to support the unit tests, so they should be implemented
on an as-needed basis to support different tests. They are nothing more than hardcoded dummy
classes.
6.8.4 See Also
Search for "J2EE Patterns Catalog" on Google. It should bring up links to Sun's Java Blueprints
documentation, which explains the DAO pattern in detail. Our implementation assumes that the
business object is a standalone Java class, while Sun's examples usually implement the business object
as an EJB. This topic is also discussed in Chapter 11
.
Chapter 7. Cactus
Section 7.1. Introduction
Section 7.2. Configuring Cactus
Section 7.3. Setting Up a Stable Build Environment
Section 7.4. Creating the cactus.properties File
Section 7.5. Generating the cactus.properties File Automatically
Section 7.6. Writing a Cactus Test
Section 7.7. Submitting Form Data
Section 7.8. Testing Cookies
Section 7.9. Testing Session Tracking Using HttpSession
Section 7.10. Testing Servlet Initialization Parameters
Section 7.11. Testing Servlet Filters
Section 7.12. Securing Cactus Tests
Section 7.13. Using HttpUnit to Perform Complex Assertions
Section 7.14. Testing the Output of a JSP
Section 7.15. When Not to Use Cactus
Section 7.16. Designing Testable JSPs
7.1 Introduction
Cactus, available from is an open source unit-testing framework for
server side Java code. Specifically, Cactus allows you to test servlets, JSPs, and servlet filters.
[1]
[1]
Cactus may also be used to test Enterprise JavaBean code. This chapter does not discuss this technique.
For more information please consult the Cactus documentation.
Cactus extends JUnit to provide three specific junit.framework.TestCase subclasses:
org.apache.cactus.ServletTestCase
org.apache.cactus.JspTestCase
org.apache.cactus.FilterTestCase
Each Cactus test case provides a specific function and is discussed in more detail in the following
recipes. Cactus tests execute on both client and server. This is a significant departure from other
testing frameworks and deserves some explanation. When using Cactus, you create a single subclass
of one of the previously mentioned classes. Cactus then creates and runs two instances of your test
case. One instance runs on the client JVM and the other runs inside of the servlet container's JVM.
The client side allows HTTP headers and HTTP parameters to be added to the outgoing request. The
server side invokes your servlet's methods, performs any necessary assertions, and sends back a
response to the client. The client may then assert that the response contained the expected information.
It is important to know that you have to deploy your Cactus tests to the server.
Specifically, you must create a web-application WAR file containing a valid
web.xml file, all Cactus tests, and all support classes needed for your tests to
execute. This is necessary because Cactus tests are executed on both the client
and server. The recipes in this chapter delve into how this is done.
7.1.1 Implicit Objects
Each Cactus test case has a set of implicit objects. Implicit objects are only valid on the test case
instance running in the server. These objects are used to set up information that a servlet expects to
exist before invoking any methods to test. For example, you can use the
config implicit object to
set up initialization parameters. Here are the implicit objects defined by each test case:
org.apache.cactus.ServletTestCase
HttpServletRequestWrapper request
HttpServletResponse response
HttpSession session
ServletConfigWrapper config
org.apache.cactus.JspTestCase
PageContextWrapper pageContext
JspWriter out
org.apache.cactus.FilterTestCase
HttpServletRequestWrapper request
HttpServletResponse response
FilterConfigWrapper config
FilterChain filterChain
7.1.2 How Does It Work?
Cactus executes your tests on the client and server. This means two instances of your test case are
created to run the tests. Figure 7-1
shows the execution of a Cactus test.
Figure 7-1. Execution of a Cactus test
First, the JUnit test runner, executing in the client JVM, creates one instance of your test case. A
redirector proxy executing in the server JVM creates the second instance. A redirector proxy is
responsible for managing the server-side execution of a test. Let's walk through an example:
1. The JUnit test runner instantiates your test case on the client and executes the
runTest(
)
method. For each testXXX( ) method, Cactus looks for an optional
beginXXX(WebRequest) method. For example, if the test method is called
testGetCustomerInformation( ), then Cactus looks for a method called
beginGetCustomerInformation(WebRequest) to execute on the client.
The
beginXXX(WebRequest) allows for HTTP Parameters, HTTP Headers, Cookies,
etc. to be added to the
WebRequest object. This capability provides your test a chance to
set up valid or invalid information for your servlet to handle.
2. An HTTP connection is made with the server and a redirector is invoked. Cactus sends the
WebRequest through the open connection to the server, too. This allows for the client to
pass information to the servlet just like a typical HTTP request.
3. The redirector proxy, executing on the server, takes control, instantiates a new instance of
your test case, and sets up the appropriate implicit (depending on the Cactus test case). Only
after the new instance is successfully constructed are the implicit objects valid.
The implicit objects are only available on the server side instance of your test
case. Accessing these objects in the client side test case causes a
NullPointerException.
4. The redirector invokes the setUp( ) method, followed by the testXXX( ) method.
5. The
testXXX( ) method must instantiate a new instance of your servlet and the call
methods needed to execute your test.
[2]
JUnit assertion methods are used to test if the servlet's
logic passed or failed. After the
testXXX( ) method completes, the redirector calls the
tearDown( ) method.
[2]
You, the unit test writer, must instantiate the servlet yourself. Cactus does not take on the role of
a servlet container and therefore does not instantiate the servlet for you.
6. The redirector proxy collects all test results and exceptions.
7. Once all tests are complete, the information collected by the redirector proxy is sent back to
the client.
8. If a test did not fail, the optional
endXXX(WebResponse) method is invoked (the one
that matches the
testXXX( ) method). For example, if you have a method called
testGetCustomerInformation( ), then Cactus looks for a method called
endGetCustomerInformation(WebResponse).
The
endXXX(WebResponse) method allows for the client to perform assertions on the
information sent back by a servlet or JSP.
7.2 Configuring Cactus
7.2.1 Problem
You want to set up Cactus to test Servlets, JSPs, and Filters.
7.2.2 Solution
Add junit.jar, cactus.jar, httpclient.jar, commons-logging.jar, log4j.jar, and aspectjrt.jar to the client
classpath. Add junit.jar, cactus.jar, commons-logging.jar, and log4j.jar to your web application's
WEB-INF/lib directory.
7.2.3 Discussion
A Cactus test suite executes on both client and server, requiring both client and server classpaths to be
set properly. Cactus configuration is tricky and almost all Cactus problems are related to classpath
issues. This chapter assumes Cactus 1.4.1, which bundles the JAR files listed below.
The JAR files that come bundled with Cactus 1.4 and higher include the
version of the tool in the filename. For example, the JUnit JAR file used in
Cactus 1.4.1 is junit-3.7.jar, specifying JUnit 3.7 is being used. This chapter
does not assume any specific version for JAR files because you are free to use
any compatible version of a third party tool.
7.2.3.1 Client-side classpath
junit.jar contains the JUnit framework that Cactus extends from, and is needed to compile and run the
Cactus test suite. All Cactus framework test cases, as mentioned in the introduction, extend the
org.junit.framework.TestCase class.
cactus.jar contains the Cactus framework, which includes three Cactus test cases
(
ServletTestCase, JspTestCase, FilterTestCase) that your test classes may
extend.
httpclient.jar contains a framework supporting HTTP-based methods such as GET and POST,
provides the ability to set cookies, and uses BASIC authentication.
aspectjrt.jar is used by Cactus to perform tasks such as configuration checking and logging when
methods begin and end.
commons-logging.jar is the Jakarta Commons Logging facade framework. Cactus uses this framework
to allow for different logging frameworks to be plugged in. For example, you may seamlessly use
log4j or JDK 1.4 logging. Even if you do not want to use logging, HttpClient needs this JAR file in the
classpath.
log4j.jar is an optional JAR file needed if you plan on using log4J to log client-side information
during your tests.
httpunit.jar, tidy.jar and xerces.jar are optional JAR files needed if you plan to use HttpUnit in your
endXXX( ) methods. HttpUnit provides these three JAR files in its distribution.
cactus.properties is a Java properties file that configures the Cactus testing environment.
7.2.3.2 Server-side classpath
The server-side test is deployed as a web application to your servlet container. This means that your
web applications, including cactus tests, are deployed as self-contained WAR files. Cactus executes
the
testXXX( ) methods inside the servlet container's JVM and requires, at minimum, the JAR
files described below, which ultimately go in your web application's WEB-INF/lib directory.
cactus.jar contains the core Cactus framework needed by the server to locate Cactus classes used by
your Cactus test.
junit.jar contains the core JUnit framework that Cactus extends from.
aspectjrt.jar is used by Cactus to perform tasks such as configuration checking and logging when
methods begin and end.
log4j.jar is an optional JAR file needed if you plan on using log4J to log server side information
during your tests.
commons-logging.jar is the Jakarta Commons Logging facade framework.
You may be tempted to put these JAR files in your servlet container's shared
library path. We recommend that you include all third party JAR files in your
web application's WEB-INF/lib directory. This guarantees that the servlet
container will find and load the correct classes. Your servlet container
probably has different classloaders for your web applications, and different
classloaders for running the core libraries needed by your container. See your
servlet container's documentation for more information.
7.2.4 See Also
Recipe 7.3 shows how to create an Ant buildfile to support server-side testing. Recipe 7.4 describes
the cactus.properties file. Recipe 7.5
shows how to use Ant to automatically generate the
cactus.properties file.
7.3 Setting Up a Stable Build Environment
7.3.1 Problem
You want to configure your environment to support test-first development with Cactus, Tomcat, and
Ant.
7.3.2 Solution
Create an Ant buildfile to automatically build, start Tomcat, deploy to the server, execute your web
application's test suite, and stop Tomcat.
7.3.3 Discussion
Setting up an Ant buildfile to properly handle Cactus tests is nontrivial and deserves some explanation
A successful environment allows developers to make and test small code changes quickly, and
requires a server that supports hot deploying. The ability to hot deploy a modified web application is
critical for test-first development because it takes too long to restart most servers. Tomcat provides a
built-in web application called manager that supports hot deploying. For more information on Tomcat
see Chapter 10
.
Figure 7-2
shows a graphical view of the Ant buildfile we are creating. Setting up a stable and easy-to-
use environment is imperative for server-side testing. For example, typing
ant cactus prepares
the development environment, compiles all out-of-date files, creates a new WAR file, starts Tomcat (if
it isn't already started), removes the old web application (if it exists), deploys the updated web
application, and invokes the Cactus test suite. The developer does not have to worry about whether the
server is started. Ant takes care of the details, allowing developers to concentrate on writing testable
code. If the tests are too hard to execute, then developers will not write them.
Figure 7-2. Graphical view of the Ant buildfile
The properties defined below set up information used throughout the buildfile. For example, the
properties
username.manager and username.password are needed to login to Tomcat's
manager application for deploying and removing web applications while Tomcat is running, a concept
known as hot deploying. If the username or password changes, we only have to change it here.
<property environment="env"/>
<property name="dir.build" value="build"/>
<property name="dir.src" value="src"/>
<property name="dir.resources" value="resources"/>
<property name="dir.lib" value="lib"/>
<property name="url.manager"
value="http://localhost:8080/manager"/>
<property name="username.manager" value="javaxp"/>
<property name="password.manager" value="secret"/>
<property name="host" value="http://localhost"/>
<property name="port" value="8080"/>
<property name="webapp.context.name" value="xptest"/>
<property name="servlet.redirector"
value="ServletRedirector"/>
<property name="cactus.service" value="RUN_TEST"/>
<property name="jsp.redirector" value="JspRedirector"/>
<property name="filter.redirector" value="FilterRedirector"/>
The classpath shown below is used to compile the web application, and is used as the client-side
classpath when executing Cactus.
<path id="classpath.project">
<pathelement location="${dir.build}"/>
<pathelement location="${env.CACTUS_HOME}/lib/aspectjrt-
1.0.5.jar"/>
<pathelement location="${env.CACTUS_HOME}/lib/cactus-
1.4.1.jar"/>
<pathelement location="${env.CACTUS_HOME}/lib/commons-
logging-1.0.jar"/>
<pathelement location="${env.CACTUS_HOME}/lib/httpclient-
2.0.jar"/>
<pathelement location="${env.CACTUS_HOME}/lib/httpunit-
1.4.1.jar"/>
<pathelement location="${env.CACTUS_HOME}/lib/junit-
3.7.jar"/>
<pathelement location="${env.CACTUS_HOME}/lib/log4j-
1.2.5.jar"/>
<pathelement location="${env.CACTUS_HOME}/lib/servletapi-
2.3.jar"/>
[3]
</path>
[3]
Cactus 1.4 and higher now ships with the Servlet 2.3 API.
The next target sets the property is.tomcat.started if Tomcat is running. The property
is.webapp.deployed is set if Tomcat is started and there is an instance of our web application
currently installed. The Ant
http conditional subtask returns a response code, and if that response
code indicates some sort of success, we can assume the application is deployed. The
undeploy
target uses the
is.webapp.deployed property to determine if an old copy of the web
application should be removed:
<target name="init">
<condition property="is.tomcat.started">
<http url="${host}:${port}"/>
</condition>
<condition property="is.webapp.deployed">
<and>
<isset property="is.tomcat.started"/>
<http url="${host}:${port}/${webapp.context.name}"/>
</and>
</condition>
</target>
The code is compiled with this target:
<target name="compile" depends="prepare"
description="Compile all source code.">
<javac srcdir="${dir.src}" destdir="${dir.build}">
<classpath refid="classpath.project"/>
</javac>
</target>
Next, your buildfile should have a target to generate the WAR file:
<target name="war" depends="compile">
<war warfile="${dir.build}/${webapp.context.name}.war"
webxml="${dir.resources}/web.xml">
<classes dir="${dir.build}">
<include name="com/oreilly/javaxp/cactus/**/*.class"/>
</classes>
<lib dir="${env.CACTUS_HOME}/lib">
<include name="aspectjrt-1.0.5.jar"/>
<include name="cactus-1.4.1.jar"/>
<include name="commons-logging-1.0.jar"/>
<include name="httpunit-1.4.1.jar"/>
<include name="junit-3.7.jar"/>
</lib>
<fileset dir="${dir.resources}">
<include name="*.jsp"/>
<include name="*.html"/>
</fileset>
</war>
</target>
Cactus tests need a few support classes on the web application's classpath. The simplest way to ensure
that these files are on the web application's classpath is to include them in the WEB-INF/lib directory.
Using the
lib subtask accomplishes this goal. Finally, if you are testing JSPs, then you need to copy
the jspRedirector.jsp
[4]
file to the root of your web application—otherwise, do not worry about it.
[4]
This file is located under the CACTUS_HOME/sample-servlet/web. For convenience, this file has been
copied to our project's resources directory.
Since we are using Tomcat's manager web application to deploy, Tomcat must be started. In order to
achieve test-first development, we created a new Ant task to start Tomcat. We need our build process
to patiently wait until the server is started before trying to deploy.
<target name="start.tomcat">
<taskdef name="starttomcat"
classname="com.oreilly.javaxp.tomcat.tasks.StartTomcatTask">
<classpath>
<path location="${dir.lib}/tomcat-tasks.jar"/>
</classpath>
</taskdef>
<starttomcat
testURL="${host}:${port}"
catalinaHome="${env.CATALINA_HOME}"/>
</target>
Before deploying, the old instance of the web application must be removed, if it exists. First, the
init target is called to see if the web application has been deployed. If so, then Tomcat's
RemoveTask is used to remove the old instance.
The RemoveTask fails if the web application is not installed (previously
deployed), causing the build to stop. Depending on your needs, this may or
may not be what you expect. In our case, it's not what we expect, and is why
we verify that the web application is deployed before trying to remove it.
<target name="undeploy" depends="init"
if="is.webapp.deployed">
<taskdef name="remove"
classname="org.apache.catalina.ant.RemoveTask">
<classpath>
<path
location="${env.CATALINA_HOME}/server/lib/catalina-ant.jar"/>
</classpath>
</taskdef>
<remove
url="${url.manager}"
username="${username.manager}"
password="${password.manager}"
path="/${webapp.context.name}"/>
</target>
The deploy target depends on generating a new WAR file, starting Tomcat, and removing a
previously-deployed instance of the web application. Tomcat's
InstallTask is used to install the
WAR file.
<target name="deploy" depends="war,start.tomcat,undeploy">
<taskdef name="install"
classname="org.apache.catalina.ant.InstallTask">
<classpath>
<path
location="${env.CATALINA_HOME}/server/lib/catalina-ant.jar"/>
</classpath>
</taskdef>
<pathconvert dirsep="/" property="fullWarDir">
<path>
<pathelement
location="${dir.build}/${webapp.context.name}.war"/>
</path>
</pathconvert>
<install
url="${url.manager}"
username="${username.manager}"
password="${password.manager}"
path="/${webapp.context.name}"
war="jar:file:/${fullWarDir}!/"/>
</target>
After the web application is successfully deployed, the Cactus test suite is executed. Cactus provides
an Ant task called
RunServerTestsTask to execute the tests. This task is located in the cactus-
ant-1.4.1.jar file. Here is how to setup a target to execute Cactus tests:
[5]
[5]
The testURL attribute value has a line break so that the URL fits nicely on the page.
<target name="cactus " depends="deploy"
description="Deploys and runs the Cactus Test suite on
Tomcat 4.1.x">
<taskdef name="runservertests"
classname="org.apache.cactus.ant.RunServerTestsTask">
<classpath>
<path location="${env.CACTUS_HOME}/lib/cactus-ant-
1.4.1.jar"/>
</classpath>
</taskdef>
<runservertests
testURL="${host}:${port}/${webapp.context.name}/${servlet.redi
rector}?
Cactus_Service=${cactus.service}"
startTarget="start.tomcat"
testTarget="junit.cactus"
stopTarget="stop.tomcat"/>
</target>
The runservertests task defines four attributes:
• The testURL attribute checks if the specified URL is available by constantly polling the
server. Cactus recommends using a specific URL to the server is ready to execute Cactus
tests. This URL invokes the
ServletTestRedirector servlet and passes a parameter
to it, telling the servlet to check if all is well to execute tests. If the URL fails, then the server
has not been started, or the web application is not properly deployed (probably classpath
issues).
If the server hangs when executing this task, you need to check the Tomcat
logfiles. Typically, the web application did not start properly due to classpath
issues. Almost all Cactus problems are classpath-related.
• The startTarget attribute specifies a target within the buildfile that starts the server, if
the server is not already started.
• The testTarget attribute specifies a target within your buildfile that executes the Cactus
tests.
• The stopTarget attribute specifies a target within your buildfile that stops the server.
The server is only stopped if the
startTarget started the server.
First, the startTarget starts the server, if the server is not already started. Once the server is
running, the
testTarget is responsible for starting the tests. A Cactus test suite is started the same
way as a JUnit test suite. The next target uses the
junit task to start the Cactus tests on the client.
It's important to know that Cactus retains control during test execution, ensuring that the client and
server tests are kept in sync.
<target name="junit.cactus">
<junit printsummary="yes" haltonfailure="yes"
haltonerror="yes" fork="yes">
<classpath refid="classpath.project"/>
<formatter type="plain" usefile="false"/>
<batchtest fork="yes" todir="build">
<fileset dir="src">
<include name="**/Test*.java"/>
</fileset>
</batchtest>
</junit>
</target>
After the tests are complete, the stopTarget is executed to stop the server (if the server was
started by startTarget). Otherwise, the server is left running. In order to facilitate test-first
development, we created a custom Ant task specifically to stop Tomcat. Here is the target to stop
Tomcat:
<target name="stop.tomcat">
<taskdef name="stoptomcat"
classname="com.oreilly.javaxp.tomcat.tasks.StopTomcatTask">
<classpath>
<path location="${dir.lib}/tomcat-tasks.jar"/>
</classpath>
</taskdef>
<stoptomcat
testURL="${host}:${port}"
catalinaHome="${env.CATALINA_HOME}"/>
</target>
7.3.4 See Also
Chapter 10 describes the custom Ant tasks to start and stop Tomcat.
7.4 Creating the cactus.properties File
7.4.1 Problem
You are setting up your Cactus environment and need to create the cactus.properties file.
7.4.2 Solution
Create a file called cactus.properties and place it on the client classpath.
7.4.3 Discussion
Cactus uses a Java properties file called cactus.properties to specify client-side attributes needed to
successfully execute your tests. This file must be located on the client classpath, and simply tells
Cactus the web context of your test application and the redirector values. The redirector values are
URL patterns used in the deployment descriptor that point to a particular Cactus redirector proxy.
Here's an example of the cactus.properties file:
cactus.contextURL=http://localhost:8080/xptest
cactus.servletRedirectorName=ServletRedirector
cactus.jspRedirectorName=JspRedirector
cactus.filterRedirectorName=FilterRedirector
Here's the corresponding deployment descriptor web.xml file:
[6]
[6]
If you are using the JSP Redirector, you must add the jspRedirector.jsp file to your web application. This
file is located under the CACTUS_HOME/sample-servlet/web directory.
<?xml version="1.0" encoding="ISO-8859-1"?>
<!DOCTYPE web-app
PUBLIC "-//Sun Microsystems, Inc.//DTD Web Application
2.3//EN"
"
<web-app>
<filter>
<filter-name>FilterRedirector</filter-name>
<filter-class>
org.apache.cactus.server.FilterTestRedirector
</filter-class>
</filter>
<filter-mapping>
<filter-name>FilterRedirector</filter-name>
<url-pattern>/FilterRedirector</url-pattern>
</filter-mapping>
<servlet>
<servlet-name>ServletRedirector</servlet-name>
<servlet-class>
org.apache.cactus.server.ServletTestRedirector
</servlet-class>
</servlet>
<servlet>
<servlet-name>JspRedirector</servlet-name>
<jsp-file>/jspRedirector.jsp</jsp-file>
</servlet>
<servlet>
<servlet-name>CustomerServlet</servlet-name>
<servlet-class>
com.oreilly.javaxp.cactus.servlet.CustomerServlet
</servlet-class>
</servlet>
<servlet-mapping>
<servlet-name>JspRedirector</servlet-name>
<url-pattern>/JspRedirector</url-pattern>
</servlet-mapping>
<servlet-mapping>
<servlet-name>ServletRedirector</servlet-name>
<url-pattern>/ServletRedirector</url-pattern>
</servlet-mapping>
</web-app>
Table 7-1 describes each property in detail.
Table 7-1. Cactus properties
Property Description
cactus.contextURL
A URL specifying the host, port, and web context
name of the Cactus test web application.
cactus.servletRedirectorName
The name of the Cactus Servlet redirector specified by
the
url-pattern element in the web.xml file. This
property is needed only if your tests extend
org.apache.cactus.ServletTestCase.
cactus.jspRedirectorName
The name of the Cactus JSP redirector specified by the
url-pattern element in the web.xml file. This
property is needed only if your tests extend
org.apache.cactus.JspTestCase.
cactus.filterRedirectorName
The name of the Cactus Filter redirector specified by
the
url-pattern element in the web.xml file. This
property is needed only if your tests extend
org.apache.cactus.FilterTestCase.
7.4.4 See Also
Recipe 7.5 shows how to use Ant to automatically generate the cactus.properties file.
7.5 Generating the cactus.properties File Automatically
7.5.1 Problem
You want to automatically generate the cactus.properties file to match the current environment.
7.5.2 Solution
Create a target within your Ant buildfile to generate the cactus.properties file each time Cactus tests
are run.
7.5.3 Discussion
Writing Cactus tests is pretty straightforward, but configuring your environment can be cumbersome,
especially if your environment changes over time. Automatically generating configuration files eases
the burden of keeping your testing environment in sync with your development environment.
Ant is the obvious choice for generating the cactus.properties file. The first step is to ensure that the
following Ant properties are defined in your buildfile:
[7]
[7]
Your test environment may require different property values for the host, port, web application context
name, etc. than shown here.
<property name="dir.build" value="build"/>
<property name="host" value="http://localhost"/>
<property name="port" value="8080"/>
<property name="webapp.context.name" value="xptest"/>
<property name="servlet.redirector"
value="ServletRedirector"/>
<property name="jsp.redirector" value="JspRedirector"/>
<property name="filter.redirector" value="FilterRedirector"/>
By setting up global properties, you ensure that a single change ripples through the rest of the
buildfile. Next, your buildfile should execute the
propertyfile task:
<target name="prepare">
<mkdir dir="${dir.build}"/>
<propertyfile file="${dir.build}/cactus.properties">
<entry key="cactus.contextURL"
value="${host}:${port}/${webapp.context.name}"/>
<entry key="cactus.servletRedirectorName"
value="${servlet.redirector}"/>
<entry key="cactus.jspRedirectorName"
value="${jsp.redirector}"/>
<entry key="cactus.filterRedirectorName"
value="${filter.redirector}"/>
</propertyfile>
</target>
The propertyfile task is an optional Ant task. If you are using Ant 1.4
then you must include the optional Ant JAR file in Ant's classpath. The
simplest way to do this is to copy the optional Ant JAR file to Ant's lib
directory. If you are using Ant 1.5 or greater you do not have to do anything.
The best place to generate the cactus.properties file is within a target that executes each time the
Cactus test suite runs. In this recipe, the property file is generated within the
prepare target, which
is the first target executed when running the test suite. Each time you run the Cactus test suite the
cactus.properties file is generated by Ant to reflect any changes to the host, port, web context name,
or redirector values.
7.5.4 See Also
Recipe 7.4 describes the details of the cactus.properties file. Recipe 7.3 describes how to setup a
stable build environment for server-side testing.
7.6 Writing a Cactus Test
7.6.1 Problem
You want to use Cactus to test server-side code.
7.6.2 Solution
Extend the appropriate Cactus test-case class and implement one or more testXXX( ),
beginXXX( ), and endXXX( ) methods.
7.6.3 Discussion
Cactus is a testing framework that extends JUnit to provide a way to execute tests against code
running in a server. Specifically, Cactus allows for testing servlets, JSPs, and filters while running
within a servlet container.
There are seven main steps to writing a Cactus test.
1. Import the JUnit and Cactus classes:
2. import org.apache.cactus.*;
import junit.framework.*;
3. Extend one of three Cactus test case classes:
org.apache.cactus.ServletTestCase
Extend this class when you want to write unit tests for your servlets. For example, if you need
to test how a servlet handles
HttpServletRequest, HttpServletResponse,
HttpSession, ServletContext, or ServletConfig objects, write a
ServletTestCase:
public class TestMyServlet extends ServletTestCase {
}
org.apache.cactus.JspTestCase
Extend this class when you want to write unit tests for your JSPs. For example, if you need to
test a custom tag library or
JspWriter, write a JspTestCase:
public class TestMyJsp extends JspTestCase {
}
org.apache.cactus.FilterTestCase
Extend this class when you want to write unit tests for your filters. For example, if you need
to test that a
FilterChain or FilterConfig object executes correctly, write a
FilterTestCase:
public class TestMyFilter extends FilterTestCase {
}
4. Implement the JUnit setUp( ) and tearDown( ) methods. The setUp( ) and
tearDown( ) methods are optional methods that can be overridden by your test. Unlike a
normal JUnit test that executes these methods on the client, Cactus executes these methods on
the server. This allows you access to the implicit objects defined by Cactus. Here is an
example of setting an attribute on the HttpSession implicit object:
5. public void setUp( ) throws Exception {
6. this.session.setAttribute("BookQuantity", new
Integer(45));
7. }
8.
9. public void tearDown( ) throws Exception {
10. this.session.removeAttribute("BookQuantity");
}
As in JUnit, the setUp( ) and tearDown( ) methods are executed for each
testXXX( ) method. The only twist is that Cactus executes these methods on the server.
Using the Constructor in Place of setUp( ) May
Cause Problems
An idiom for writing JUnit tests is to use the constructor instead of overriding the setUp(
)
method. This works because each testXXX( ) method creates a new instantiation of
the test class, so instance variables are allocated for each test. Here's an example of using
the
setUp( ) method:
public void setUp( ) {
this.myobject = new MyObject( );
}
Here's how the same thing can be accomplished using the constructor:
public MyJUnitTest(String name) {
super(name);
this.myobject = new MyObject( );
}
This technique may cause problems with Cactus if you try to set up information on any of
the implicit objects. The implicit objects are only valid on the server and are not initialized