Java software solutions foundations of program design 4th edition phần 7 docx
Bạn đang xem bản rút gọn của tài liệu. Xem và tải ngay bản đầy đủ của tài liệu tại đây (949 KB, 91 trang )
548 CHAPTER 9 graphical user interfaces
In the PickImage program, we set the list selection mode to single selection
because only one image can be displayed at a time. However, even if multiple
selections were allowed in this program, the getSelectedValue method returns
the first item selected, so that would be the image displayed. A similar method
called getSelectedValues returns an array of objects representing the items
selected when multiple selections are permitted.
Instead of an array of String objects, the JList constructor could be passed
an array of ImageIcon objects instead. In that case, the images would be dis-
played in the list.
combo boxes
A combo box allows the user to select one of several options. When the
user presses a combo box using the mouse, a list of options is displayed
from which the user can choose. The current choice is displayed in the
combo box. A combo box is defined by the JComboBox class.
Note the similarities and differences between a combo box and a
JList object (described in the previous section). Both allow the user to select an
item from a set of choices. However, the choices on a list are always displayed,
with the current choice highlighted, whereas a combo box presents its options
only when the user presses it with the mouse. The only item displayed all the time
in a combo box is the current selection.
A combo box can be either editable or uneditable. By default, a combo box is
uneditable. Changing the value of an uneditable combo box can be accomplished
only by selecting an item from the list. If the combo box is editable, however, the
user can change the value by either selecting an item from the list or by typing a
particular value into the combo box area.
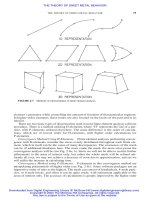
figure 9.11 List selection modes
Single Selection Only one item can be selected at a time.
Any combination of items can be selected.
Multiple, contiguous items can be selected at a time. Single Interval Selection
Multiple Interval Selection
List Selection Mode Description
A combo box provides a list of
options from which to choose
and displays the current
selection.
key
concept
9.4 additional components 549
The options in a combo box list can be established in one of two ways. We can
create an array of strings and pass it into the constructor of the JComboBox class.
Alternatively, we can use the addItem method to add an item to the combo box
after it has been created. Like a JList, a JComboBox can also display ImageIcon
objects as options as well.
The JukeBox program shown in Listing 9.14 demonstrates the use of a combo
box. The user chooses a song to play using the combo box, and then presses the
Play button to begin playing the song. The Stop button can be pressed at any
time to stop the song. Selecting a new song while one is playing also stops the cur-
rent song.
The JukeBoxControls class shown in Listing 9.15 is a panel that contains the
components that make up the jukebox GUI. The constructor of the class also
loads the audio clips that will be played. An audio clip is obtained first by creat-
ing a URL object that corresponds to the wav or au file that defines the clip. The
first two parameters to the URL constructor should be “file” and “localhost”
respectively, if the audio clip is stored on the same machine on which the program
is executing. Creating URL objects can potentially throw an exception; therefore
they are created in a try block. However, this program assumes the audio clips
will be loaded successfully and therefore does nothing if an exception is thrown.
Once created, the URL objects are used to create AudioClip objects using the
static newAudioClip method of the JApplet class. The audio clips are stored in
an array. The first entry in the array, at index 0, is set to null. This entry corre-
sponds to the initial combo box option, which simply encourages the user to
make a selection.
The list of songs that are displayed in the combo box is defined in an array of
strings. The first entry of the array will appear in the combo box by default and
is often used to direct the user. We must take care that the rest of the program
does not try to use that option as a valid song.
The play and stop buttons are displayed with both a text label and an image
icon. They are also given mnemonics so that the jukebox can be controlled par-
tially from the keyboard.
A combo box generates an action event whenever the user makes a selection
from it. The JukeBox program uses one action listener class for the combo box
and another for both of the push buttons. They could be combined if desired.
The actionPerformed method of the ComboListener class is executed when
a selection is made from the combo box. The current audio selection that is play-
ing, if any, is stopped. The current clip is then updated to reflect the new selec-
tion. Note that the audio clip is not immediately played at that point. The user
must press the play button to hear the new selection.
550 CHAPTER 9 graphical user interfaces
listing
9.14
//********************************************************************
// JukeBox.java Author: Lewis/Loftus
//
// Demonstrates the use of a combo box.
//********************************************************************
import javax.swing.*;
public class JukeBox
{
//
// Creates and displays the controls for the juke box.
//
public static void main (String[] args)
{
JFrame frame = new JFrame ("Java Juke Box");
frame.setDefaultCloseOperation (JFrame.EXIT_ON_CLOSE);
JukeBoxControls controlPanel = new JukeBoxControls();
frame.getContentPane().add(controlPanel);
frame.pack();
frame.show();
}
}
display
9.4 additional components 551
listing
9.15
//********************************************************************
// JukeBoxControls.java Author: Lewis/Loftus
//
// Represents the control panel for the juke box.
//********************************************************************
import java.awt.*;
import java.awt.event.*;
import javax.swing.*;
import java.applet.AudioClip;
import java.net.URL;
public class JukeBoxControls extends JPanel
{
private JComboBox musicCombo;
private JButton stopButton, playButton;
private AudioClip[] music;
private AudioClip current;
//
// Sets up the GUI for the juke box.
//
public JukeBoxControls()
{
URL url1, url2, url3, url4, url5, url6;
url1 = url2 = url3 = url4 = url5 = url6 = null;
// Obtain and store the audio clips to play
try
{
url1 = new URL ("file", "localhost", "westernBeat.wav");
url2 = new URL ("file", "localhost", "classical.wav");
url3 = new URL ("file", "localhost", "jeopardy.au");
url4 = new URL ("file", "localhost", "newAgeRythm.wav");
url5 = new URL ("file", "localhost", "eightiesJam.wav");
url6 = new URL ("file", "localhost", "hitchcock.wav");
}
catch (Exception exception) {}
music = new AudioClip[7];
music[0] = null; // Corresponds to "Make a Selection "
music[1] = JApplet.newAudioClip (url1);
music[2] = JApplet.newAudioClip (url2);
music[3] = JApplet.newAudioClip (url3);
552 CHAPTER 9 graphical user interfaces
listing
9.15
continued
music[4] = JApplet.newAudioClip (url4);
music[5] = JApplet.newAudioClip (url5);
music[6] = JApplet.newAudioClip (url6);
JLabel titleLabel = new JLabel ("Java Juke Box");
titleLabel.setAlignmentX (Component.CENTER_ALIGNMENT);
// Create the list of strings for the combo box options
String[] musicNames = {"Make A Selection ", "Western Beat",
"Classical Melody", "Jeopardy Theme", "New Age Rythm",
"Eighties Jam", "Alfred Hitchcock's Theme"};
musicCombo = new JComboBox (musicNames);
musicCombo.setAlignmentX (Component.CENTER_ALIGNMENT);
// Set up the buttons
playButton = new JButton ("Play", new ImageIcon ("play.gif"));
playButton.setBackground (Color.white);
playButton.setMnemonic ('p');
stopButton = new JButton ("Stop", new ImageIcon ("stop.gif"));
stopButton.setBackground (Color.white);
stopButton.setMnemonic ('s');
JPanel buttons = new JPanel();
buttons.setLayout (new BoxLayout (buttons, BoxLayout.X_AXIS));
buttons.add (playButton);
buttons.add (Box.createRigidArea (new Dimension(5,0)));
buttons.add (stopButton);
buttons.setBackground (Color.cyan);
// Set up this panel
setPreferredSize (new Dimension (300, 100));
setBackground (Color.cyan);
setLayout (new BoxLayout (this, BoxLayout.Y_AXIS));
add (Box.createRigidArea (new Dimension(0,5)));
add (titleLabel);
add (Box.createRigidArea (new Dimension(0,5)));
add (musicCombo);
add (Box.createRigidArea (new Dimension(0,5)));
add (buttons);
add (Box.createRigidArea (new Dimension(0,5)));
musicCombo.addActionListener (new ComboListener());
stopButton.addActionListener (new ButtonListener());
9.4 additional components 553
listing
9.15
continued
playButton.addActionListener (new ButtonListener());
current = null;
}
//*****************************************************************
// Represents the action listener for the combo box.
//*****************************************************************
private class ComboListener implements ActionListener
{
//
// Stops playing the current selection (if any) and resets
// the current selection to the one chosen.
//
public void actionPerformed (ActionEvent event)
{
if (current != null)
current.stop();
current = music[musicCombo.getSelectedIndex()];
}
}
//*****************************************************************
// Represents the action listener for both control buttons.
//*****************************************************************
private class ButtonListener implements ActionListener
{
//
// Stops the current selection (if any) in either case. If
// the play button was pressed, start playing it again.
//
public void actionPerformed (ActionEvent event)
{
if (current != null)
current.stop();
if (event.getSource() == playButton)
if (current != null)
current.play();
}
}
}
554 CHAPTER 9 graphical user interfaces
The actionPerformed method of the ButtonListener class is executed
when either of the buttons is pushed. The current audio selection that is playing,
if any, is stopped. If it was the stop button that was pressed, the task is complete.
If the play button was pressed, the current audio selection is played again from
the beginning.
sliders
A slider is a component that allows the user to specify a numeric value
within a bounded range. A slider can be presented either vertically or
horizontally and can have optional tick marks and labels indicating the
range of values.
A program called ViewColors is shown in Listing 9.16. It presents three slid-
ers that control the RGB components of a color. The color specified by the val-
ues of the sliders is shown in a square that is displayed to the right of the sliders.
A slider lets the user specify a
numeric value within a
bounded range.
key
concept
listing
9.16
//********************************************************************
// ViewColors.java Authors: Lewis/Loftus
//
// Demonstrates the use slider components.
//********************************************************************
import java.awt.*;
import javax.swing.*;
public class ViewColors
{
//
// Presents up a frame with a control panel and a panel that
// changes color as the sliders are adjusted.
//
public static void main (String[] args)
{
JFrame frame = new JFrame ("View Colors");
frame.setDefaultCloseOperation (JFrame.EXIT_ON_CLOSE);
9.4 additional components 555
The panel called colorPanel defined in the main method is used to display
(by setting its background color) the color specified by the sliders. Initially, the
settings of the sliders are all zero, which correspond to the initial color displayed
(black).
listing
9.16
continued
JPanel colorPanel = new JPanel();
colorPanel.setPreferredSize (new Dimension (100, 100));
colorPanel.setBackground (new Color (0, 0, 0));
Container cp = frame.getContentPane();
cp.setLayout (new FlowLayout());
cp.add (new ViewSliderPanel(colorPanel));
cp.add (colorPanel);
frame.pack();
frame.show();
}
}
display
556 CHAPTER 9 graphical user interfaces
The ViewSliderPanel class shown in Listing 9.17 is a panel used to display
the three sliders. Each is created from the JSlider class, which accepts four
parameters. The first determines the orientation of the slider using one of two
JSlider constants (HORIZONTAL or VERTICAL). The second and third parameters
specify the maximum and minimum values of the slider, which are set to 0 and
255 for each of the sliders in the example. The last parameter of the JSlider
constructor specifies the slider’s initial value. In our example, the initial value of
each slider is zero, which puts the slider knob to the far left when the program
initially executes.
listing
9.17
//********************************************************************
// ViewSliderPanel.java Authors: Lewis/Loftus
//
// Represents the slider control panel for the ViewColors program.
//********************************************************************
import java.awt.*;
import javax.swing.*;
import javax.swing.event.*;
public class ViewSliderPanel extends JPanel
{
private JPanel colorPanel;
private JSlider rSlider, gSlider, bSlider;
private JLabel rLabel, gLabel, bLabel;
//
// Sets up the sliders and their labels, aligning them along
// their left edge using a box layout.
//
public ViewSliderPanel (JPanel panel)
{
colorPanel = panel;
9.4 additional components 557
listing
9.17
continued
rSlider = new JSlider (JSlider.HORIZONTAL, 0, 255, 0);
rSlider.setMajorTickSpacing (50);
rSlider.setMinorTickSpacing (10);
rSlider.setPaintTicks (true);
rSlider.setPaintLabels (true);
rSlider.setAlignmentX (Component.LEFT_ALIGNMENT);
gSlider = new JSlider (JSlider.HORIZONTAL, 0, 255, 0);
gSlider.setMajorTickSpacing (50);
gSlider.setMinorTickSpacing (10);
gSlider.setPaintTicks (true);
gSlider.setPaintLabels (true);
gSlider.setAlignmentX (Component.LEFT_ALIGNMENT);
bSlider = new JSlider (JSlider.HORIZONTAL, 0, 255, 0);
bSlider.setMajorTickSpacing (50);
bSlider.setMinorTickSpacing (10);
bSlider.setPaintTicks (true);
bSlider.setPaintLabels (true);
bSlider.setAlignmentX (Component.LEFT_ALIGNMENT);
SliderListener listener = new SliderListener();
rSlider.addChangeListener (listener);
gSlider.addChangeListener (listener);
bSlider.addChangeListener (listener);
rLabel = new JLabel ("Red: 0");
rLabel.setAlignmentX (Component.LEFT_ALIGNMENT);
gLabel = new JLabel ("Green: 0");
gLabel.setAlignmentX (Component.LEFT_ALIGNMENT);
bLabel = new JLabel ("Blue: 0");
bLabel.setAlignmentX (Component.LEFT_ALIGNMENT);
setLayout (new BoxLayout (this, BoxLayout.Y_AXIS));
add (rLabel);
add (rSlider);
add (Box.createRigidArea (new Dimension (0, 20)));
add (gLabel);
add (gSlider);
add (Box.createRigidArea (new Dimension (0, 20)));
add (bLabel);
add (bSlider);
}
558 CHAPTER 9 graphical user interfaces
The JSlider class has several methods that allow the programmer to tailor
the look of a slider. Major tick marks can be set at specific intervals using the
setMajorTickSpacing method. Intermediate minor tick marks can be set using
the setMinorTickSpacing method. Neither is displayed, however, unless the
setPaintTicks method, with a parameter of true, is invoked as well. Labels
indicating the value of the major tick marks are displayed if indicated by a call to
the setPaintLabels method.
Note that in this example, the major tick spacing is set to 50. Starting at zero,
each increment of 50 is labeled. The last label is therefore 250, even though the
slider value can reach 255.
listing
9.17
continued
//*****************************************************************
// Represents the listener for all three sliders.
//*****************************************************************
private class SliderListener implements ChangeListener
{
//
// Gets the value of each slider, then updates the labels and
// the color panel.
//
public void stateChanged (ChangeEvent event)
{
int red, green, blue;
red = rSlider.getValue();
green = gSlider.getValue();
blue = bSlider.getValue();
rLabel.setText ("Red: " + red);
gLabel.setText ("Green: " + green);
bLabel.setText ("Blue: " + blue);
colorPanel.setBackground (new Color (red, green, blue));
}
}
}
9.5 events revisited 559
A slider produces a change event, indicating that the position of the slider and
the value it represents has changed. The ChangeListener interface contains a
single method called stateChanged. In the ViewColors program, the same lis-
tener object is used for all three sliders. In the stateChanged method, which is
called whenever any of the sliders is adjusted, the value of each slider is obtained,
the labels of all three are updated, and the background color of the display panel
is revised. It is actually necessary to update only one of the labels (the one whose
corresponding slider changed). However, the effort to determine which slider was
adjusted is not warranted. It’s easier—and probably more efficient—to update all
three labels each time. Another alternative is to have a unique listener for each
slider, though that extra coding effort is not needed either.
A slider is often a good choice when a large range of values is possible but
strictly bounded on both ends. Compared to alternatives such as a text field, slid-
ers convey more information to the user and eliminate input errors.
9.5 events revisited
Throughout the graphics track sections of previous chapters, and continuing into
this chapter, we’ve discussed various events that components might generate. At
this point it is worth taking a moment to put the event/component relationship
into context.
The events listed in Fig. 9.12 are generated by every Swing compo-
nent. That is, we can set up a listener for any of these events on any
component.
Some events are generated only by certain components. The table in
Fig. 9.13 maps the components to the events that they can generate. Keep in mind
figure 9.12 Events that are generated by every Swing component
Component Event Changing a component's size, position, or visibility.
Pressing, releasing, and clicking keyboard keys.
Moving or dragging a mouse over a component.
Clicking the mouse button and moving the mouse into and out of
a component's drawing area.
Gaining or losing the keyboard focus. Focus Event
Key Event
Mouse Event
Mouse Motion Event
Event Represents
Some events are generated by
every Swing component; others
are generated only by a few.
key
concept
560 CHAPTER 9 graphical user interfaces
that these events are in addition to the ones that all components generate. If a
component does not generate a particular kind of event, a listener for that event
cannot be added to that component.
We have discussed some of the events in Figs. 9.10 and 9.11 at appropriate
points in this text; we have left others for your independent exploration. Applying
the basic concept of component/event/listener interaction is often just a matter of
knowing which components generate which events under which circumstances.
figure 9.13 Specific events generated by specific components
JButton
JCheckBox
JColorChooser
JComboBox
JDialog
JEditorPane
JFileChooser
JFrame
JInternalFrame
JList
JMenu
JMenuItem
JOptionPane
JPasswordField
JPopupMenu
JProgessBar
JRadioButton
JSlider
JTabbedPane
JTable
JTextArea
JTextField
JTextPane
JToggleButton
JTree
Action
Component
Caret Item Window
Other
List
Selection
Change Document
Event
9.6 more about GUIs 561
Of course, many events occur in a GUI that have no bearing on the current
program. For example, every time a mouse is moved across a component, many
mouse motion events are generated. However, this doesn’t mean we must listen
for them. A GUI is defined in part by the events to which we choose to respond.
9.6 more about GUIs
Even though we’ve used several graphics track sections from earlier chapters to
discuss GUIs, and have devoted this entire chapter to GUIs as well, we’ve still
only scratched the surface of Java GUI possibilities. The constraints of space limit
us, though additional GUI topics and examples can be found on the text’s Web
site.
Let’s briefly describe, but not explore, a few other Java GUI containers that are
not covered in depth in this text:
◗ A tool bar is a container that groups several components into a row or col-
umn. A tool bar usually contains buttons that correspond to tasks that can
also be accomplished in other ways. Tool bars can be dragged away from
the container in which they initially exist into their own window.
◗ An internal frame is a container that operates like a regular frame but only
within another window. An internal frame can be moved around within the
window and overlapped with other internal frames. Internal frames can be
used to create the feel of a GUI desktop in which components can be
arranged as the user chooses.
◗ A layered pane is a container that takes into account a third dimension,
depth, for organizing the components it contains. When a component is
added to a layered pane, its depth is specified. If components overlap, the
depth value of each component determines which is on top.
The text’s Web site contains additional examples and explanations of Java GUI
topics.
562 CHAPTER 9 graphical user interfaces
You may also be interested in a few other regular GUI components provided
by the Swing API:
◗ A progress bar can be used to indicate the progress of a particular activity.
The user does not generally interact with a progress bar other than to view
it to determine how far along a task, such as the loading of images, has
progressed.
◗ A table is a Java GUI component that displays data in a table format. A
Java table can be completely tailored to provide a precise organization and
presentation. It can allow the user to edit the data as well. A Java table
does not actually contain or store the data; it simply presents it to the user
in an organized manner.
◗ A tree is a component that presents a hierarchical view of data. Like a
table, it doesn’t actually store the data; it provides an organized view that
allows the user to traverse the data from a high-level root node down
through the various branches.
◗ Another area for which Java provides rich support is text processing. We’ve
made use of basic text components such as text fields and text areas, but
that’s only the beginning. The Java standard class library, and particularly
the Swing API, has a huge number of classes that support the display, edit-
ing, and manipulation of text.
As with all topics introduced in this book, we encourage you to explore these
issues in more detail. The world of Java GUIs, in particular, has many opportu-
nities still to discover.
summary of key concepts 563
◗ The design of any GUI should adhere to basic guidelines regarding consis-
tency and usability.
◗ The layout manager of a container determines how components are visu-
ally presented.
◗ When changes occur, the components in a container reorganize themselves
according to the layout manager’s policy.
◗ The layout manager for each container can be explicitly set.
◗ A tabbed pane presents a set of cards from which the user can choose.
◗ In a flow layout, the width of the container determines how many compo-
nents fit on a row.
◗ Not all areas of a border layout must be used; the areas that contain com-
ponents fill in the unused space.
◗ The cells of a grid layout are filled in order as components are added to
the container.
◗ A box layout can use invisible components to provide space between com-
ponents.
◗ A GUI’s appearance is a function of the containment hierarchy and the
layout managers of each of the containers.
◗ Using the special features of various components often improves a GUI’s
functionality.
◗ Various borders can be applied to Swing components to group objects and
to enhance the visual effect.
◗ A scroll pane is useful if you want to view large objects or large amounts
of data.
◗ A split pane displays two components separated by a movable divider bar.
The components can be displayed either horizontally or vertically.
◗ A list can be set up to allow multiple selections.
◗ A combo box provides a list of options from which to choose and displays
the current selection.
◗ A slider lets the user specify a numeric value within a bounded range.
◗ Some events are generated by every Swing component; others are gener-
ated only by a few.
summary of
key concepts
564 CHAPTER 9 graphical user interfaces
self-review questions
9.1 What general guidelines for GUI design are presented in this
chapter?
9.2 When is a layout manager consulted?
9.3 How does the flow layout manager behave?
9.4 Describe the areas of a border layout.
9.5 What effect does a glue component in a box layout have?
9.6 What is the containment hierarchy for a GUI?
9.7 What is a tool tip?
9.8 What is a mnemonic and how is it used?
9.9 Why might you want to disable a component?
9.10 What is the role of the
BorderFactory class?
9.11 Describe the use of scrollbars on a scroll pane.
9.12 What is a combo box?
9.13 Why is a slider a better choice than a text field in some cases?
9.14 Can we add any kind of listener to any component? Explain.
exercises
9.1 Draw the containment hierarchy tree for the LayoutDemo program.
9.2 Draw the containment hierarchy tree for the
LightBulb program.
9.3 Draw the containment hierarchy tree for the
PickImage program.
9.4 Draw the containment hierarchy tree for the JukeBox program.
9.5 Draw the containment hierarchy tree for the
ViewColors program.
9.6 What visual effect would result by changing the horizontal and verti-
cal gaps on the border layout used in the
LayoutDemo program?
Make the change to test your answer.
9.7 Write the lines of code that will define a compound border using
three borders. Use a line border on the inner edge, an etched border
on the outer edge, and a raised bevel border in between.
9.8 What effect would removing the call to
setSelectionMode in the
ListPanel class have? Make the change to test your answer.
programming projects 565
programming projects
9.1 Modify the IntroPanel class of the LayoutDemo program so that it
uses a box layout manager. Use invisible components to put space
before and between the two labels on the panel.
9.2 Modify the
QuoteOptions program from Chapter 6 to change its
visual appearance. Present the radio buttons in a vertical column
with a surrounding border to the left of the quote label.
9.3 Modify the JukeBox program such that it plays a song immediately
after it has been selected using the combo box.
9.4 Modify the StyleOptions program from Chapter 6 so that it uses a
split pane. Orient the split pane such that the label is on the top and
the style check boxes are in the bottom. Add tool tips to the check
boxes to explain their purpose.
9.5 Modify the PickImage program so that it presents several additional
image options. Display the list within a scroll pane with a vertical
scroll bar that is always displayed. Display the image in a scroll pane
that uses both horizontal and vertical scroll bars, but only when
necessary.
9.6 Design and implement a program that displays a numeric keypad
that might appear on a phone. Above the keypad buttons, show a
label that displays the numbers as they are picked. To the right of
the keypad buttons, include another button to clear the display. Use
a border layout to manage the overall presentation, and a grid lay-
out to manage the keypad buttons. Put a border around the keypad
buttons to group them visually, and a border around the display.
Include a tool tip for the clear button, and mnemonics for all but-
tons in the program.
9.7 Design and implement a program that combines the functionality of
the
StyleOptions and QuoteOptions programs from Chapter 6.
That is, the new program should present the appropriate quote
(using radio buttons) whose style can be changed (using check-
boxes). Also include a slider that regulates the size of the quotation
font. Design the containment hierarchy carefully and use layout
managers as appropriate to create a nice interface.
9.8 Design and implement an application that works as a stopwatch.
Include a display that shows the time (in seconds) as it increments.
Include buttons that allow the user to start and stop the time, and
566 CHAPTER 9 graphical user interfaces
reset the display to zero. Arrange the components to present a nice
interface. Include mnemonics for the buttons. Hint: use the Timer
class (described in Chapter 8) to control the timing of the stopwatch.
9.9 Design and implement an application that draws the graph of the
equation ax
2
+ bx + c, where the values of a, b, and c are set using
three sliders.
9.10 Design and implement an application that performs flashcard testing
of simple mathematical problems. Allow the user to pick the cate-
gory. Repetitively display a problem and get the user’s answer.
Indicate whether the user’s answer is right or wrong for each prob-
lem, and display an ongoing score.
9.11 Design and implement an application that helps a pizza restaurant
take orders. Use a tabbed pane for different categories of food
(pizza, beverages, special items). Collect information about quantity
and size. Display the cost of the order as information is gathered.
Use appropriate components for collecting the various kinds of
information. Structure the interface carefully using the containment
hierarchy and layout managers.
answers to self-review questions
9.1 The general guidelines for GUI design include: know the needs and
characteristics of the user, prevent user errors when possible, opti-
mize user abilities by providing shortcuts and other redundant means
to accomplish a task, and be consistent in GUI layout and coloring
schemes.
9.2 A layout manager is consulted whenever the visual appearance of its
components might be affected, such as when the container is resized
or when a new component is added to the container.
9.3 Flow layout attempts to put as many components on a row as possi-
ble. Multiple rows are created as needed.
9.4 Border layout is divided into five areas: North, South, East, West,
and Center. The North and South areas are at the top and bottom of
the container, respectively, and span the entire width of the con-
tainer. Sandwiched between them, from left to right, are the West,
Center, and East areas. Any unused area takes up no space, and the
others fill in as needed.
answers to self-review questions 567
9.5 A glue component in a box layout dictates where any extra space in
the layout should go. It expands as necessary, but takes up no space
if there is no extra space to distribute.
9.6 The containment hierarchy for a GUI is the set of nested containers
and the other components they contain. The containment hierarchy
can be described as a tree.
9.7 A tool tip is a small amount of text that can be set up to appear
when the cursor comes to rest on a component. It usually gives
information about that component.
9.8 A mnemonic is a character that can be used to activate a control
such as a button as if the user had used to mouse to do so. The user
activates a mnemonic by holding down the ALT key and pressing the
appropriate character.
9.9 A component should be disabled if it is not a viable option for the
user at a given time. Not only does this prevent user error, it helps
clarify what the current valid actions are.
9.10 The BorderFactory class contains several methods used to create
borders that can be applied to components.
9.11 A scroll pane can have a vertical scrollbar on the right side and/or a
horizontal scrollbar along the bottom. The programmer can deter-
mine, in either case, whether the scrollbar should always appear,
never appear, or appear as needed to be able to view the underlying
component.
9.12 A combo box is a component that allows the user to choose from a
set of options in a pull-down list. An editable combo box also allows
the user to enter a specific value.
9.13 If in a specific situation user input should be a numeric value from a
bounded range, a slider is probably a better choice than a text field.
A slider prevents an improper value from being entered and conveys
the valid range to the user.
9.14 No, we cannot add any listener to any component. Each component
generates a certain set of events, and only listeners of those types can
be added to the component.
characterize any software devel-
opment effort: requirements,
design, implementation, and
testing. In subsequent chapters,
we’ve learned to design and
implement classes and objects
with various characteristics,
including those that support sys-
tems with graphical user inter-
faces (GUIs). To successfully
develop large systems, however,
we must refine these develop-
ment activities into a well-
defined process that can be
applied repeatedly and consis-
tently. This chapter explores
models for developing software
and defines an evolutionary
approach that specifically takes
object-oriented issues into
account. This approach is illus-
trated using an extended exam-
ple that synthesizes many of the
programming concepts explored
thus far in the text.
◗ Explore several different software
development models.
◗ Explain the life cycle of a software
system and its implications for
software development.
◗ Contrast linear and iterative devel-
opment approaches.
◗ Discuss prototypes and their vari-
ous uses.
◗ Consider the goals and techniques
of testing.
◗ Define an evolutionary approach
to object-oriented design and
implementation.
◗ Demonstrate evolutionary develop-
ment using a nontrivial example.
chapter
objectives
The quality of software is only as good as the
process used to create it. In Chapter 3, we
introduced four basic phases that should
10
software engineering
570 CHAPTER 10 software engineering
10.0 software development models
A program goes through many phases from its initial conception to its ultimate
demise. This sequence is often called the life cycle of a program. Too often pro-
grammers focus so much on the particular issues involved in getting a program to
run that they ignore other important characteristics. Developing high-quality soft-
ware requires an appreciation for many issues, and those issues must be consid-
ered in the day-to-day activities of a programmer. We explore these issues as we
discuss the software life cycle and software development models in this chapter.
software life cycle
All programs go through three fundamental stages: development (with its four
basic phases), followed by use, and maintenance. Figure 10.1 shows the life cycle
of a program. Initially, the idea for a program is conceived by a software devel-
oper or by a user who has a particular need. The new program is created in the
development stage. At some point the new program is considered to be complete
and is turned over to users. The version of the program that is made available to
users is often called an initial release of the program.
Almost certainly, users discover problems with the program. Often they also
have suggestions for new features that they would like to see added to the pro-
gram in order to make it more useful. These defects and ideas for new features
are conveyed back to the developer, and the program undergoes maintenance.
Software maintenance is the process of modifying a program in order to
enhance it or eliminate deficiencies. Unlike hardware, software does not degrade
over time. Thus, the goal of software maintenance is to produce an improved
program rather than a program that is “almost like new.” The changes are made
to a copy of the program, so that the user can still use the current release while
figure 10.1 The life cycle of a program
Conception
Development
Release
Use
Maintenance
Defect reports and
feature requests
Release
Retirement
10.0 software development models 571
the program is being maintained. When the changes are serious or
numerous enough, a new version of the program is released for use. A
program might be maintained many times over, resulting in several
releases.
For a variety of reasons, a developer may decide that it is no longer
worth the effort to maintain an existing program and therefore releases no fur-
ther versions of it. A program eventually reaches the end of its useful life. Users
abandon it or seek another solution. This eventual demise is sometimes referred
to as the program’s retirement from active use.
The duration of a program’s life cycle varies greatly depending on the purpose
of the program, how useful the program is, and how well it is constructed. The
time taken for the development portion of a program can vary from a few weeks
to several years. Likewise, a program may be used and maintained for many
years.
One important aspect of software development is the relationship between
development effort and maintenance effort. Figure 10.2 shows a typical ratio of
development effort to maintenance effort. This may seem contrary to intuition
because it seems that the initial development of a program is where the real work
is done, but this isn’t actually the case. Much more effort is expended overall to
enhance and fix an existing system than to develop it.
For various reasons, maintenance is often more difficult than the
original development effort. For instance, the original developers are
rarely the same people as the ones who maintain it. A significant
amount of time often elapses between the initial development and the
maintenance tasks, and often the responsibilities of personnel change.
Therefore, maintainers often do not understand the software as well as
Maintaining software is the
process of modifying a pro-
gram in order to enhance it or
to eliminate deficiencies.
key
concept
Often the maintainers of a pro-
gram are not the program’s
original developers; thus main-
tainers must be able to under-
stand a program that they
didn’t design.
key
concept
figure 10.2 A typical ratio of development effort to maintenance effort
Use and
maintenance
Development
572 CHAPTER 10 software engineering
the original developers did. The effort involved in a maintenance task, such as fix-
ing a defect, depends on the maintainer’s ability to understand the program,
determine the cause of the problem, and correct it.
The ability to read and understand a program depends on how clearly the
requirements are established, and how well it is designed, implemented, and doc-
umented. It depends on how classes are organized and how objects are used. It
depends on how elegantly methods accomplish their goals and how closely cod-
ing guidelines are followed. In short, the ability to read and understand a pro-
gram depends on the effort put into the initial development process.
When requirements are not clearly established and when designs are
not carefully thought out, software can be unnecessarily complex and
difficult to understand. The more complex a program is, the easier it is
to introduce errors during development, and the more difficult it is to
remove these errors when they are found. The earlier the problems are
discovered, the easier and less costly they are to correct.
Designing a solution without establishing clear requirements is as unreason-
able as creating a blueprint for a house without first determining what purposes
the house must serve. While the blueprint may qualify as a design for a house, the
design may be entirely unsuitable for a particular family. Writing a program with-
out establishing a careful design first is as absurd as building the house without
creating a blueprint. The builder may actually create some kind of structure, even
one that looks good on a superficial examination. However, it is possible that the
structure will fail to meet the safety requirements of the local building code, or it
will not stand up to the local weather nearly as well as a house that has been care-
fully designed. It is almost certain that the resulting structure will not satisfy a
particular family’s requirements. Likewise, a program that is created in an ad hoc
fashion, with little or no attention to requirements or design, is likely to contain
many defects and will not perform well when used.
The relationship between development effort and maintenance effort is not lin-
ear. Small changes in the development effort can greatly reduce the effort neces-
sary during maintenance. The bars in Fig. 10.3 show the relationship between the
development effort and the maintenance effort. The bottom bar shows that if a
small increase in effort is expended during development, significantly higher sav-
ings in maintenance effort can be realized. The effort put into the development
stage is an investment that will reduce the overall effort required throughout the
life cycle of the program. Thus, a good programmer keeps long-term effects in
mind while performing near-term activities.
In some ways, this issue centers on maturity. An experienced software devel-
oper realizes the long-term advantages of certain development activities. This sit-
The earlier a problem is discov-
ered during the software devel-
opment process, the easier and
less costly it is to correct.
key
concept