microsoft visual c 2008 step by step phần 3 pdf
Bạn đang xem bản rút gọn của tài liệu. Xem và tải ngay bản đầy đủ của tài liệu tại đây (731.2 KB, 67 trang )
108 Part I Introducing Microsoft Visual C# and Microsoft Visual Studio 2008
FormatException and Exception in two different handlers, which one will run (or will
both execute)?
When an exception occurs, the fi rst handler found by the runtime that matches the excep-
tion is used, and the others are ignored. What this means is that if you place a handler for
Exception before a handler for FormatException, the FormatException handler will never run.
Therefore, you should place more-specifi c catch handlers above a general catch handler after
a try block. If none of the specifi c catch handlers matches the exception, the general catch
handler will.
In the following exercise, you will write a try block and catch an exception.
Write a statement
1. Start Visual Studio 2008 if it is not already running.
2. Open the MathsOperators solution located in the \Microsoft Press\Visual CSharp Step
By Step\Chapter 6\MathsOperators folder in your Documents folder.
This is a variation on the program that you fi rst saw in Chapter 2, “Working with
Variables, Operators, and Expressions.” It was used to demonstrate the different
arithmetic operators.
3. On the Debug menu, click Start Without Debugging.
The form appears. You are now going to enter some text that is deliberately not valid in
the left operand text box. This operation will demonstrate the lack of robustness in the
current version of the program.
4. Type John in the left operand text box, and then click Calculate.
A dialog box reports an unhandled exception; the text you entered in the left operand
text box caused the application to fail.
Note The Debug button does not appear if you are using Microsoft Visual C# 2008
Express Edition.
You might see a different version of this dialog box (shown later) depending on how
you have confi gured problem reporting in Control Panel. If you see this dialog box,
simply click the Close the program link whenever the instructions in the following steps
refer to the Close Program button, and click the Debug the program link whenever
W
r
ite
a
state
m
e
n
t
Chapter 6 Managing Errors and Exceptions 109
the instructions refer to the Debug button. (If you are using Windows XP rather than
Windows Vista, you will see a different dialog box with Debug, Send Error Report, and
Don’t Send buttons. Click the Don’t Send button to close the program.)
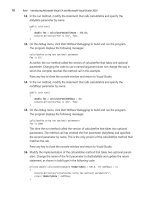
5. If you are using Visual Studio 2008, click Debug. In the Visual Studio Just-In-Time
Debugger dialog box, in the Possible Debuggers list box, select MathsOperators –
Microsoft Visual Studio: Visual Studio 2008, and then click Yes:
6. If you are using Visual C# 2008 Express Edition, click Close Program. On the
Debug menu, click Start Debugging. Type John in the left operand text box, and
then click Calculate.
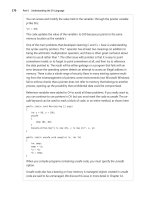
7. Whether you are using Visual Studio 2008 or Visual C# 2008 Express Edition, the Visual
Studio 2008 debugger starts and highlights the line of code that caused the exception
and displays some additional information about the exception:
110 Part I Introducing Microsoft Visual C# and Microsoft Visual Studio 2008
You can see that the exception was thrown by the call to int.Parse inside the
calculateClick method. The problem is that this method is unable to parse the text
“John” into a valid number.
Note
You can view the code that caused an exception only if you actually have the source
code available on your computer.
8. On the Debug menu, click Stop Debugging.
9. Display the code for the fi le Window1.xaml.cs in the Code and Text Editor window, and
locate the calculateClick method.
10. Add a try block (including braces) around the four statements inside this method, as
shown in bold type here:
try
{
int leftHandSide = int.Parse(lhsOperand.Text);
int rightHandSide = int.Parse(rhsOperand.Text);
int answer = doCalculation(leftHandSide, rightHandSide);
result.Text = answer.ToString();
}
11. Add a catch block immediately after the closing brace for this new try block, as follows:
catch (FormatException fEx)
{
Chapter 6 Managing Errors and Exceptions 111
result.Text = fEx.Message;
}
This catch handler catches the FormatException thrown by int.Parse and then displays
in the result text box at the bottom of the form the text in the exception’s Message
property.
12. On the Debug menu, click Start Without Debugging.
13. Type John in the left operand text box, and then click Calculate.
The catch handler successfully catches the FormatException, and the message “Input
string was not in a correct format” is written to the Result text box. The application is
now a bit more robust.
14. Replace John with the number 10, type Sharp in the right operand text box, and then
click Calculate.
Notice that because the try block surrounds the statements that parse both text boxes,
the same exception handler handles user input errors in both text boxes.
15. Click Quit to return to the Visual Studio 2008 programming environment.
Using Checked and Unchecked Integer Arithmetic
In Chapter 2, you learned how to use binary arithmetic operators such as + and * on primi-
tive data types such as int and double. You also saw that the primitive data types have a fi xed
size. For example, a C# int is 32 bits. Because int has a fi xed size, you know exactly the range
of value that it can hold: it is –2147483648 to 2147483647.
Tip
If you want to refer to the minimum or maximum value of int in code, you can use the int.
MinValue or int.MaxValue property.
112 Part I Introducing Microsoft Visual C# and Microsoft Visual Studio 2008
The fi xed size of the int type creates a problem. For example, what happens if you add 1 to
an int whose value is currently 2147483647? The answer is that it depends on how the ap-
plication is compiled. By default, the C# compiler generates code that allows the calculation
to overfl ow silently. In other words, you get the wrong answer. (In fact, the calculation wraps
around to the largest negative integer value, and the result generated is –2147483648.) The
reason for this behavior is performance: integer arithmetic is a common operation in almost
every program, and adding the overhead of overfl ow checking to each integer expression
could lead to very poor performance. In many cases, the risk is acceptable because you know
(or hope!) that your int values won’t reach their limits. If you don’t like this approach, you can
turn on overfl ow checking.
Tip
You can activate and disable overfl ow checking in Visual Studio 2008 by setting the project
properties. On the Project menu, click YourProject Properties (where YourProject is the name of
your project). In the project properties dialog box, click the Build tab. Click the Advanced button
in the lower-right corner of the page. In the Advanced Build Settings dialog box, select or clear
the Check for arithmetic overfl ow/underfl ow check box.
Regardless of how you compile an application, you can use the checked and unchecked
keywords to turn on and off integer arithmetic overfl ow checking selectively in parts of an
application that you think need it. These keywords override the compiler option specifi ed for
the project.
Writing Checked Statements
A checked statement is a block preceded by the checked keyword. All integer arithmetic in a
checked statement always throws an Overfl owException if an integer calculation in the block
overfl ows, as shown in this example:
int number = int.MaxValue;
checked
{
int willThrow = number++;
Console.WriteLine(“this won’t be reached”);
}
Important Only integer arithmetic directly inside the checked block is subject to overfl ow
checking. For example, if one of the checked statements is a method call, checking does not
apply to code that runs in the method that is called.
Chapter 6 Managing Errors and Exceptions 113
You can also use the unchecked keyword to create an unchecked block statement. All integer
arithmetic in an unchecked block is not checked and never throws an Overfl owException. For
example:
int number = int.MaxValue;
unchecked
{
int wontThrow = number++;
Console.WriteLine(“this will be reached”);
}
Writing Checked Expressions
You can also use the checked and unchecked keywords to control overfl ow checking on inte-
ger expressions by preceding just the individual parenthesized expression with the checked or
unchecked keyword, as shown in this example:
int wontThrow = unchecked(int.MaxValue + 1);
int willThrow = checked(int.MaxValue + 1);
The compound operators (such as += and -=) and the increment (++) and decrement ( )
operators are arithmetic operators and can be controlled by using the checked and un-
checked keywords. Remember,
x += y; is the same as x = x + y;.
Important
You cannot use the checked and unchecked keywords to control fl oating-point (non-
integer) arithmetic. The checked and unchecked keywords apply only to integer arithmetic using
data types such as int and long. Floating-point arithmetic never throws Overfl owException—not
even when you divide by 0.0. (The .NET Framework has a representation for infi nity.)
In the following exercise, you will see how to perform checked arithmetic when using Visual
Studio 2008.
Use checked expressions
1. Return to Visual Studio 2008.
2. On the Debug menu, click Start Without Debugging.
You will now attempt to multiply two large values.
3. Type 9876543 in the left operand text box, type 9876543 in the right operand text
box, select the Multiplication option, and then click Calculate.
The value –1195595903 appears in the Result text box on the form. This is a negative
value, which cannot possibly be correct. This value is the result of a multiplication
operation that silently overfl owed the 32-bit limit of the int type.
U
se checked ex
p
ress
i
ons
114 Part I Introducing Microsoft Visual C# and Microsoft Visual Studio 2008
4. Click Quit, and return to the Visual Studio 2008 programming environment.
5. In the Code and Text Editor window displaying Window1.xaml.cs, locate the
multiplyValues method. It looks like this:
private int multiplyValues(int leftHandSide, int rightHandSide)
{
expression.Text = leftHandSide.ToString() + “ * “ + rightHandSide.ToString();
return leftHandSide * rightHandSide;
}
The return statement contains the multiplication operation that is silently overfl owing.
6. Edit the return statement so that the return value is checked, like this:
return checked(leftHandSide * rightHandSide);
The multiplication is now checked and will throw an Overfl owException rather than
silently returning the wrong answer.
7. Locate the calculateClick method.
8. Add the following catch handler immediately after the existing FormatException catch
handler in the calculateClick method:
catch (OverflowException oEx)
{
result.Text = oEx.Message;
}
Tip The logic of this catch handler is the same as that for the FormatException catch
handler. However, it is still worth keeping these handlers separate rather than simply
writing a generic Exception catch handler because you might decide to handle these
exceptions differently in the future.
9. On the Debug menu, click Start Without Debugging to build and run the application.
10. Type 9876543 in the left operand text box, type 9876543 in the right operand text
box, select the Multiplication option, and then click Calculate.
The second catch handler successfully catches the Overfl owException and displays the
message “Arithmetic operation resulted in an overfl ow” in the Result text box.
11. Click Quit to return to the Visual Studio 2008 programming environment.
Throwing Exceptions
Suppose you are implementing a method called monthName that accepts a single int
argument and returns the name of the corresponding month. For example, monthName(1)
returns “January”, monthName(2) returns “February”, and so on. The question is: What should
Chapter 6 Managing Errors and Exceptions 115
the method return when the integer argument is less than 1 or greater than 12? The best
answer is that the method shouldn’t return anything at all; it should throw an exception.
The .NET Framework class libraries contain lots of exception classes specifi cally designed
for situations such as this. Most of the time, you will fi nd that one of these classes describes
your exceptional condition. (If not, you can easily create your own exception class, but you
need to know a bit more about the C# language before you can do that.) In this case, the
existing .NET Framework ArgumentOutOfRangeException class is just right. You can throw an
exception by using the throw statement, as shown in the following example:
public static string monthName(int month)
{
switch (month)
{
case 1 :
return “January”;
case 2 :
return “February”;
case 12 :
return “December”;
default :
throw new ArgumentOutOfRangeException(“Bad month”);
}
}
The throw statement needs an exception object to throw. This object contains the details of
the exception, including any error messages. This example uses an expression that creates
a new ArgumentOutOfRangeException object. The object is initialized with a string that will
populate its Message property by using a constructor. Constructors are covered in detail in
Chapter 7, “Creating and Managing Classes and Objects.”
In the following exercises, you will add to the MathsOperators project code for throwing an
exception.
Throw your own exception
1. Return to Visual Studio 2008.
2. On the Debug menu, click Start Without Debugging.
3. Type 24 in the left operand text box, type 36 in the right operand text box, and then
click Calculate.
The value 0 appears in the Result text box. The fact that you have not selected an
operator option is not immediately obvious. It would be useful to write a diagnostic
message in the Result text box.
4. Click Quit to return to the Visual Studio 2008 programming environment.
T
hrow your own exceptio
n
116 Part I Introducing Microsoft Visual C# and Microsoft Visual Studio 2008
5. In the Code and Text Editor window displaying Window1.xaml.cs, locate and examine
the doCalculation method. It looks like this:
private int doCalculation(int leftHandSide, int rightHandSide) {
int result = 0;
if (addition.IsChecked.HasValue && addition.IsChecked.Value)
result = addValues(leftHandSide, rightHandSide);
else if (subtraction.IsChecked.HasValue && subtraction.IsChecked.Value)
result = subtractValues(leftHandSide, rightHandSide);
else if (multiplication.IsChecked.HasValue && multiplication.IsChecked.Value)
result = multiplyValues(leftHandSide, rightHandSide);
else if (division.IsChecked.HasValue && division.IsChecked.Value)
result = divideValues(leftHandSide, rightHandSide);
else if (remainder.IsChecked.HasValue && remainder.IsChecked.Value)
result = remainderValues(leftHandSide, rightHandSide);
return result;
}
The addition, subtraction, multiplication, division, and remainder fi elds are the radio
buttons that appear on the form. Each radio button has a property called IsChecked
that indicates whether the user has selected it. The IsChecked property is an example
of a nullable value, which means it can either contain a specifi c value or be in an unde-
fi ned state. (You learn more about nullable values in Chapter 8, “Understanding Values
and References.”) The IsChecked.HasValue property indicates whether the radio button
is in a defi ned state, and if it is, the IsChecked.Value property indicates what this state
is. The IsChecked.Value property is a Boolean that has the value true if the radio button
is selected or false otherwise. The cascading if statement examines each radio button
in turn to fi nd which one is selected. (The radio buttons are mutually exclusive, so the
user can select only one radio button at most.) If none of the buttons is selected, none
of the if statements will be true and the result variable will remain at its initial value (0).
This variable holds the value that is returned by the method.
You could try to solve the problem by adding one more else statement to the if-else
cascade to write a message to the result text box on the form. However, this solution is
not a good idea because it is not really the purpose of this method to output messages.
It is better to separate the detection and signaling of an error from the catching and
handling of that error.
6. Add another else statement to the list of if-else statements (immediately before the
return statement), and throw an InvalidOperationException exactly as follows:
else
throw new InvalidOperationException(“no operator selected”);
7. On the Debug menu, click Start Without Debugging to build and run the application.
8. Type 24 in the left operand text box, type 36 in the right operand text box, and then
click Calculate.
Chapter 6 Managing Errors and Exceptions 117
An exception dialog box appears. The application has thrown an exception, but your
code does not catch it yet.
9. Click Close program.
The application terminates, and you return to Visual Studio 2008.
Now that you have written a throw statement and verifi ed that it throws an exception, you
will write a catch handler to handle this exception.
Catch your own exception
1. In the Code and Text Editor window displaying Window1.xaml.cs, locate the
calculateClick method.
2. Add the following catch handler immediately below the existing two catch handlers in
the calculateClick method:
catch (InvalidOperationException ioEx)
{
result.Text = ioEx.Message;
}
This code catches the InvalidOperationException that is thrown when no operator radio
button is selected.
3. On the Debug menu, click Start Without Debugging.
4. Type 24 in the left operand text box, type 36 in the right operand text box, and then
click Calculate.
The message “no operator selected” appears in the Result text box.
5. Click Quit.
The application is now a lot more robust than it was. However, several exceptions could still
arise that would not be caught and that might cause the application to fail. For example, if
you attempt to divide by 0, an unhandled DivideByZeroException will be thrown. (Integer divi-
sion by 0 does throw an exception, unlike fl oating-point division by 0.) One way to solve this
is to write an ever larger number of catch handlers inside the calculateClick method. However,
a better solution is to add a general catch handler that catches Exception at the end of the list
of catch handlers. This will trap all unhandled exceptions.
Tip
The decision of whether to catch all unhandled exceptions explicitly in a method depends
on the nature of the application you are building. In some cases, it makes sense to catch
exceptions as close as possible to the point at which they occur. In other situations, it is more
useful to let an exception propagate back to the method that invoked the routine that threw the
exception.
C
atch your own exceptio
n
118 Part I Introducing Microsoft Visual C# and Microsoft Visual Studio 2008
Catch unhandled exceptions
1. In the Code and Text Editor window displaying Window1.xaml.cs, locate the
calculateClick method.
2. Add the following catch handler to the end of the list of existing catch handlers:
catch (Exception ex)
{
result.Text = ex.Message;
}
This catch handler will catch all hitherto unhandled exceptions, whatever their specifi c
type.
3. On the Debug menu, click Start Without Debugging.
You will now attempt to perform some calculations known to cause exceptions and
confi rm that they are all handled correctly.
4. Type 24 in the left operand text box, type 36 in the right operand text box, and then
click Calculate.
Confi rm that the diagnostic message “no operator selected” still appears in the Result
text box. This message was generated by the InvalidOperationException handler.
5. Type John in the left operand text box, and then click Calculate.
Confi rm that the diagnostic message “Input string was not in a correct format” appears
in the Result text box. This message was generated by the FormatException handler.
6. Type 24 in the left operand text box, type 0 in the right operand text box, select the
Divide radio button, and then click Calculate.
Confi rm that the diagnostic message “Attempted to divide by zero” appears in the
Result text box. This message was generated by the general Exception handler.
7. Click Quit.
Using a fi nally Block
It is important to remember that when an exception is thrown, it changes the fl ow of
execution through the program. This means you can’t guarantee that a statement will always
run when the previous statement fi nishes because the previous statement might throw an
exception. Look at the following example. It’s very easy to assume that the call to reader.Close
will always occur. After all, it’s right there in the code:
TextReader reader = src.OpenText();
string line;
while ((line = reader.ReadLine()) != null)
{
C
atch unhandled except
i
on
s
Chapter 6 Managing Errors and Exceptions 119
source.Text += line + “\n”;
}
reader.Close();
Sometimes it’s not an issue if one particular statement does not run, but on many occasions
it can be a big problem. If the statement releases a resource that was acquired in a previous
statement, failing to execute this statement results in the resource being retained. This exam-
ple is just such a case: If the call to src.OpenText succeeds, it acquires a resource (a fi le handle)
and you must ensure that you call reader.Close to release the resource. If you don’t, sooner or
later you’ll run out of fi le handles and be unable to open more fi les. (If you fi nd fi le handles
too trivial, think of database connections instead.)
The way to ensure that a statement is always run, whether or not an exception has been
thrown, is to write that statement inside a fi nally block. A fi nally block occurs immediately
after a try block or immediately after the last catch handler after a try block. As long as the
program enters the try block associated with a fi nally block, the fi nally block will always be
run, even if an exception occurs. If an exception is thrown and caught locally, the exception
handler executes fi rst, followed by the fi nally block. If the exception is not caught locally (the
runtime has to search through the list of calling methods to fi nd a handler), the fi nally block
runs fi rst. In any case, the fi nally block always executes.
The solution to the reader.Close problem is as follows:
TextReader reader = null;
try
{
reader = src.OpenText();
string line;
while ((line = reader.ReadLine()) != null)
{
source.Text += line + “\n”;
}
}
finally
{
if (reader != null)
{
reader.Close();
}
}
Even if an exception is thrown, the fi nally block ensures that the reader.Close statement
always executes. You’ll see another way to solve this problem in Chapter 14, “Using Garbage
Collection and Resource Management.”
If you want to continue to the next chapter
Keep Visual Studio 2008 running, and turn to Chapter 7.
120 Part I Introducing Microsoft Visual C# and Microsoft Visual Studio 2008
If you want to exit Visual Studio 2008 now
On the File menu, click Exit. If you see a Save dialog box, click Yes (if you are using
Visual Studio 2008) or Save (if you are using Visual C# 2008 Express Edition) and save
the project.
Chapter 6 Quick Reference
To Do this
Throw an exception
Use a throw statement. For example:
throw new FormatException(source);
Ensure that integer arithmetic
is always checked for overfl ow
Use the checked keyword. For example:
int number = Int32.MaxValue;
checked
{
number++;
}
Catch a specifi c exception
Write a catch handler that catches the specifi c exception class. For
example:
try
{
}
catch (FormatException fEx)
{
}
Catch all exceptions in a
single catch handler
Write a catch handler that catches Exception. For example:
try
{
}
catch (Exception ex)
{
}
Ensure that some code will
always be run, even if an
exception is thrown
Write the code inside a fi nally block. For example:
try
{
}
finally
{
// always run
}
Microsoft Visual C# 2008 Step by Step
121
Part II
Understanding the C# Language
In this part:
Chapter 7. Creating and Managing Classes and Objects . . . . . . . . . . . . . . . . . . . 123
Chapter 8. Understanding Values and References . . . . . . . . . . . . . . . . . . . . . . . . 145
Chapter 9. Creating Value Types with Enumerations and Structures . . . . . . . . . 167
Chapter 10. Using Arrays and Collections . . . . . . . . . . . . . . . . . . . . . . . . . . . . . . . . 185
Chapter 11. Understanding Parameter Arrays . . . . . . . . . . . . . . . . . . . . . . . . . . . . 207
Chapter 12. Working with Inheritance . . . . . . . . . . . . . . . . . . . . . . . . . . . . . . . . . . 217
Chapter 13. Creating Interfaces and Defi ning Abstract Classes . . . . . . . . . . . . . 239
Chapter 14. Using Garbage Collection and Resource Management . . . . . . . . . 257
Chapter 7
Creating and Managing Classes
and Objects
After completing this chapter, you will be able to:
Defi ne a class containing a related set of methods and data items.
Control the accessibility of members by using the public and private
keywords.
Create objects by using the new keyword to invoke a constructor.
Write and call your own constructors.
Create methods and data that can be shared by all instances of the same class by
using the static keyword.
In Part I, “Introducing Microsoft Visual C# and Microsoft Visual Studio 2008,” you learned
how to declare variables, use operators to create values, call methods, and write many of the
statements you need when implementing a method. You now know enough to progress to
the next stage—combining methods and data into your own classes.
The Microsoft .NET Framework contains thousands of classes, and you have used a number
of them already, including Console and Exception. Classes provide a convenient mechanism
for modeling the entities manipulated by applications. An entity can represent a specifi c item,
such as a customer, or something more abstract, such as a transaction. Part of the design
process of any system is concerned with determining the entities that are important and then
performing an analysis to see what information they need to hold and what functions they
should perform. You store the information that a class holds as fi elds and use methods to
implement the operations that a class can perform.
The chapters in Part II, “Understanding the C# Language,” provide you with all you need to
know to create your own classes.
Understanding Classifi cation
Class is the root word of the term classifi cation. When you design a class, you systemati-
cally arrange information into a meaningful entity. This arranging is an act of classifi cation
and is something that everyone does—not just programmers. For example, all cars share
common behaviors (they can be steered, stopped, accelerated, and so on) and common at-
tributes (they have a steering wheel, an engine, and so on). People use the word car to mean
124 Part II Understanding the C# Language
objects that share these common behaviors and attributes. As long as everyone agrees
on what a word means, this system works well; you can express complex but precise ideas
in a concise form. Without classifi cation, it’s hard to imagine how people could think or
communicate at all.
Given that classifi cation is so deeply ingrained in the way we think and communicate, it
makes sense to try to write programs by classifying the different concepts inherent in a
problem and its solution and then modeling these classes in a programming language. This
is exactly what you can do with modern object-oriented programming languages, such as
Microsoft Visual C#.
The Purpose of Encapsulation
Encapsulation is an important principle when defi ning classes. The idea is that a program that
uses a class should not have to worry how that class actually works internally; the program
simply creates an instance of a class and calls the methods of that class. As long as those
methods do what they say they will do, the program does not care how they are implement-
ed. For example, when you call the Console.WriteLine method, you don’t want to be bothered
with all the intricate details of how the Console class physically arranges for data to be writ-
ten to the screen. A class might need to maintain all sorts of internal state information to
perform its various methods. This additional state information and activity is hidden from the
program that is using the class. Therefore, encapsulation is sometimes referred to as informa-
tion hiding. Encapsulation actually has two purposes:
To combine methods and data inside a class; in other words, to support classifi cation
To control the accessibility of the methods and data; in other words, to control the use
of the class
Defi ning and Using a Class
In C#, you use the class keyword to defi ne a new class. The data and methods of the class oc-
cur in the body of the class between a pair of braces. Here is a C# class called Circle that con-
tains one method (to calculate the circle’s area) and one piece of data (the circle’s radius):
class Circle
{
double Area()
{
return Math.PI * radius * radius;
}
int radius;
}
Chapter 7 Creating and Managing Classes and Objects 125
Note The Math class contains methods for performing mathematical calculations and fi elds
containing mathematical constants. The Math.PI fi eld contains the value
3.14159265358979323846, which is an approximation of the value of pi.
The body of a class contains ordinary methods (such as Area) and fi elds (such as radius)—
remember that variables in a class are called fi elds. You’ve already seen how to declare vari-
ables in Chapter 2, “Working with Variables, Operators, and Expressions,” and how to write
methods in Chapter 3, “Writing Methods and Applying Scope”; in fact, there’s almost no new
syntax here.
Using the Circle class is similar to using other types that you have already met; you create a
variable specifying Circle as its type, and then you initialize the variable with some valid data.
Here is an example:
Circle c; // Create a Circle variable
c = new Circle(); // Initialize it
Note the use of the new keyword. Previously, when you initialized a variable such as an int or
a fl oat, you simply assigned it a value:
int i;
i = 42;
You cannot do the same with variables of class types. One reason is that C# just doesn’t pro-
vide the syntax for assigning literal class values to variables. (What is the Circle equivalent
of 42?) Another reason concerns the way in which memory for variables of class types is al-
located and managed by the runtime—this is discussed further in Chapter 8, “Understanding
Values and References.” For now, just accept that the new keyword creates a new instance of
a class (more commonly called an object).
You can, however, directly assign an instance of a class to another variable of the same type,
like this:
Circle c;
c = new Circle();
Circle d;
d = c;
However, this is not as straightforward as it fi rst appears, for reasons that I cover in Chapter 8.
Important
Don’t get confused between the terms class and object. A class is the defi nition of a
type. An object is an instance of that type, created when the program runs.
126 Part II Understanding the C# Language
Controlling Accessibility
Surprisingly, the Circle class is currently of no practical use. When you encapsulate your meth-
ods and data inside a class, the class forms a boundary to the outside world. Fields (such as
radius) and methods (such as Area) defi ned in the class can be seen by other methods inside
the class but not by the outside world—they are private to the class. So, although you can
create a Circle object in a program, you cannot access its radius fi eld or call its Area method,
which is why the class is not of much use—yet! However, you can modify the defi nition of a
fi eld or method with the public and private keywords to control whether it is accessible from
the outside:
A method or fi eld is said to be private if it is accessible only from the inside of the class.
To declare that a method or fi eld is private, you write the keyword private before its
declaration. This is actually the default, but it is good practice to state explicitly that
fi elds and methods are private to avoid any confusion.
A method or fi eld is said to be public if it is accessible from both the inside and the
outside of the class. To declare that a method or fi eld is public, you write the keyword
public before its declaration.
Here is the Circle class again. This time Area is declared as a public method and radius is
declared as a private fi eld:
class Circle
{
public double Area()
{
return Math.PI * radius * radius;
}
private int radius;
}
Note C++ programmers should note that there is no colon after the public and private
keywords. You must repeat the keyword for every fi eld and method declaration.
Note that radius is declared as a private fi eld; it is not accessible from outside the class.
However, radius is accessible from inside the Circle class. This is why the Area method can
access the radius fi eld; Area is inside the Circle class, so the body of Area has access to radius.
This means that the class is still of limited value because there is no way of initializing the
radius fi eld. To fi x this, you can use a constructor.
Tip
The fi elds in a class are automatically initialized to 0, false, or null depending on their type.
However, it is still good practice to provide an explicit means of initializing fi elds.
Chapter 7 Creating and Managing Classes and Objects 127
Naming and Accessibility
The following recommendations relate to the naming conventions for fi elds and
methods based on the accessibility of class members:
Identifi ers that are public should start with a capital letter. For example,
Area starts with “A” (not “a”) because it’s public. This system is known as the
PascalCase naming scheme (it was fi rst used in the Pascal language).
Identifi ers that are not public (which include local variables) should start with
a lowercase letter. For example, radius starts with “r” (not “R”) because it’s
private. This system is known as the camelCase naming scheme.
There’s only one exception to this rule: class names should start with a capital let-
ter, and constructors must match the name of their class exactly; therefore, a private
constructor must start with a capital letter.
Important
Don’t declare two public class members whose names differ only in case. If you do,
your class will not be usable from other languages that are not case sensitive, such as Microsoft
Visual Basic.
Working with Constructors
When you use the new keyword to create an object, the runtime has to construct that object
by using the defi nition of the class. The runtime has to grab a piece of memory from the
operating system, fi ll it with the fi elds defi ned by the class, and then invoke a constructor to
perform any initialization required.
A constructor is a special method that runs automatically when you create an instance of a
class. It has the same name as the class, and it can take parameters, but it cannot return a
value (not even void). Every class must have a constructor. If you don’t write one, the compiler
automatically generates a default constructor for you. (However, the compiler-generated
default constructor doesn’t actually do anything.) You can write your own default constructor
quite easily—just add a public method with the same name as the class that does not return
a value. The following example shows the Circle class with a default constructor that initializes
the radius fi eld to 0:
class Circle
{
public Circle() // default constructor
{
radius = 0;
}
128 Part II Understanding the C# Language
public double Area()
{
return Math.PI * radius * radius;
}
private int radius;
}
Note In C# parlance, the default constructor is a constructor that does not take any parameters.
It does not matter whether the compiler generates it or you write it; it is still the default con-
structor. You can also write nondefault constructors (constructors that do take parameters), as
you will see in the upcoming section titled “Overloading Constructors.”.
Note that the constructor is marked as public. If this keyword is omitted, the constructor
will be private (just like any other methods and fi elds). If the constructor is private, it cannot
be used outside the class, which prevents you from being able to create Circle objects from
methods that are not part of the Circle class. You might therefore think that private construc-
tors are not that valuable. However, they do have their uses, but they are beyond the scope
of the current discussion.
You can now use the Circle class and exercise its Area method. Notice how you use dot
notation to invoke the Area method on a Circle object:
Circle c;
c = new Circle();
double areaOfCircle = c.Area();
Overloading Constructors
You’re almost fi nished, but not quite. You can now declare a Circle variable, point it to a
newly created Circle object, and then call its Area method. However, there is still one last
problem. The area of all Circle objects will always be 0 because the default constructor sets
the radius to 0 and it stays at 0; the radius fi eld is private, and there is no way of changing its
value after it has been initialized. One way to solve this problem is to realize that a construc-
tor is just a special kind of method and that it—like all methods—can be overloaded. Just as
there are several versions of the Console.WriteLine method, each of which takes different pa-
rameters, so too you can write different versions of a constructor. You can add a constructor
to the Circle class, with the radius as its parameter, like this:
class Circle
{
public Circle() // default constructor
{
radius = 0;
}
Chapter 7 Creating and Managing Classes and Objects 129
public Circle(int initialRadius) // overloaded constructor
{
radius = initialRadius;
}
public double Area()
{
return Math.PI * radius * radius;
}
private int radius;
}
Note The order of the constructors in a class is immaterial; you can defi ne constructors in
whatever order you feel most comfortable with.
You can then use this constructor when creating a new Circle object, like this:
Circle c;
c = new Circle(45);
When you build the application, the compiler works out which constructor it should call
based on the parameters that you specify to the new operator. In this example, you passed an
int, so the compiler generates code that invokes the constructor that takes an int parameter.
You should be aware of a quirk of the C# language: if you write your own constructor for a
class, the compiler does not generate a default constructor. Therefore, if you’ve written your
own constructor that accepts one or more parameters and you also want a default construc-
tor, you’ll have to write the default constructor yourself.
Partial Classes
A class can contain a number of methods, fi elds, and constructors, as well as other
items discussed in later chapters. A highly functional class can become quite large. With
C#, you can split the source code for a class into separate fi les so that you can organize
the defi nition of a large class into smaller, easier to manage pieces. This feature is used
by Microsoft Visual Studio 2008 for Windows Presentation Foundation (WPF) applica-
tions, where the source code that the developer can edit is maintained in a separate
fi le from the code that is generated by Visual Studio whenever the layout of a form
changes.
130 Part II Understanding the C# Language
When you split a class across multiple fi les, you defi ne the parts of the class by using
the partial keyword in each fi le. For example, if the Circle class is split between two fi les
called circ1.cs (containing the constructors) and circ2.cs (containing the methods and
fi elds), the contents of circ1.cs look like this:
partial class Circle
{
public Circle() // default constructor
{
radius = 0;
}
public Circle(int initialRadius) // overloaded constructor
{
radius = initialRadius;
}
}
The contents of circ2.cs look like this:
partial class Circle
{
public double Area()
{
return Math.PI * radius * radius;
}
private int radius;
}
When you compile a class that has been split into separate fi les, you must provide all
the fi les to the compiler.
In the following exercise, you will declare a class that models a point in two-dimensional
space. The class will contain two private fi elds for holding the x- and y-coordinates of a point
and will provide constructors for initializing these fi elds. You will create instances of the class
by using the new keyword and calling the constructors.
Write constructors and create objects
1. Start Visual Studio 2008 if it is not already running.
2. Open the Classes project located in the \Microsoft Press\Visual CSharp Step by Step\
Chapter 7\Classes folder in your Documents folder.
3. In Solution Explorer, double-click the fi le Program.cs to display it in the Code and Text
Editor window.
W
rite constructors and create objects
Chapter 7 Creating and Managing Classes and Objects 131
4. Locate the Main method in the Program class.
The Main method calls the Entrance method, wrapped in a try block and followed by a
catch handler. With this try/catch block, you can write the code that would typically go
inside Main in the Entrance method instead, safe in the knowledge that it will catch and
handle any exceptions.
5. Display the fi le Point.cs in the Code and Text Editor window.
This fi le defi nes a class called Point, which you will use to represent the location of a
point defi ned by a pair of x- and y-coordinates. The Point class is currently empty.
6. Return to the Program.cs fi le, and locate the Entrance method of the Program class. Edit
the body of the Entrance method, replacing the
// to do comment with the following
statement:
Point origin = new Point();
7. On the Build menu, click Build Solution.
The code builds without error because the compiler automatically generates the code
for a default constructor for the Point class. However, you cannot see the C# code
for this constructor because the compiler does not generate any source language
statements.
8. Return to the Point class in the fi le Point.cs. Replace the
// to do comment with a pub-
lic constructor that accepts two int arguments called x and y and that calls the Console.
WriteLine method to display the values of these arguments to the console, as shown in
bold type in the following code example. The Point class should look like this:
class Point
{
public Point(int x, int y)
{
Console.WriteLine(“x:{0}, y:{1}”, x, y);
}
}
Note Remember that the Console.WriteLine method uses {0} and {1} as placeholders. In
the statement shown, {0} will be replaced with the value of x, and {1} will be replaced with
the value of y when the program runs.
9. On the Build menu, click Build Solution.
The compiler now reports an error:
‘Classes.Point’ does not contain a constructor that takes ‘0 ‘ arguments
132 Part II Understanding the C# Language
The call to the default constructor in Entrance no longer works because there is no
longer a default constructor. You have written your own constructor for the Point class,
so the compiler no longer generates the default constructor. You will now fi x this by
writing your own default constructor.
10. Edit the Point class, and add a public default constructor that calls Console.WriteLine to
write the string “default constructor called” to the console, as shown in bold type in the
following code example. The Point class should now look like this:
class Point
{
public Point()
{
Console.WriteLine(“default constructor called”);
}
public Point(int x, int y)
{
Console.WriteLine(“x:{0}, y:{1}”, x, y);
}
}
11. On the Build menu, click Build Solution.
The program should now build successfully.
12. In the Program.cs fi le, edit the body of the Entrance method. Declare a variable called
bottomRight of type Point, and initialize it to a new Point object by using the construc-
tor with two arguments, as shown in bold type in the following code. Supply the values
1024 and 1280, representing the coordinates at the lower-right corner of the screen
based on the resolution 1024 × 1280. The Entrance method should now look like this:
static void Entrance()
{
Point origin = new Point();
Point bottomRight = new Point(1024, 1280);
}
13. On the Debug menu, click Start Without Debugging.
The program builds and runs, displaying the following messages to the console:
default constructor called
x:1024, y:1280
14. Press the Enter key to end the program and return to Visual Studio 2008.
You will now add two int fi elds to the Point class to represent the x- and y-coordinates
of a point, and you will modify the constructors to initialize these fi elds.