microsoft visual c 2008 step by step phần 10 pptx
Bạn đang xem bản rút gọn của tài liệu. Xem và tải ngay bản đầy đủ của tài liệu tại đây (758.46 KB, 69 trang )
Chapter 27 Introducing ASP.NET 577
4. Add a method called initPositionRole to the _Default class after the Page_Load method:
private void initPositionRole()
{
}
You will invoke this method to initialize the positionRole drop-down list to its default set
of values.
5. Add the following statements shown in bold type to the initPositionRole method:
private void initPositionRole()
{
positionRole.Items.Clear();
positionRole.Enabled = true;
positionRole.Items.Add(“Analyst”);
positionRole.Items.Add(“Designer”);
positionRole.Items.Add(“Developer”);
}
The fi rst statement clears the items from the drop-down list box. The second statement
activates the list box. (You will write some code shortly that disables it under certain
circumstances.) The remaining statements add the three roles that are applicable to
workers.
6. Add the statements shown here in bold type to the Page_Load method:
protected void Page_Load(object sender, EventArgs e)
{
if (!IsPostBack)
{
initPositionRole();
}
}
This block of code causes the positionRole drop-down list to be populated when the
form appears in the user’s browser. However, it is important to understand that the
Page_Load method runs every time the Web server sends the form to the user’s brows-
er. For example, when the user clicks a button the form can be sent back to the Web
server for processing; the Web server then responds by sending the form back to the
browser for displaying when the processing has completed. You don’t want the initial-
ization to be performed every time the page appears because it is a waste of process-
ing and can lead to performance problems if you are building a commercial Web site.
You can determine whether the Page_Load method is running because this is the fi rst
time the page is being displayed by querying the IsPostBack property of the Web page.
This property returns false the fi rst time the page is displayed and true if the page is
being redisplayed because the user has clicked a control. In the code you added, you
call the initPositionRole method only when the form is fi rst displayed.
578 Part VI Building Web Applications
7. Switch to the EmployeeForm.aspx fi le, and click the Design button. Select the Worker
radio button. In the Properties window toolbar, click the Events toolbar button. (This
button has a little lightning icon.) Double-click the CheckedChanged event. This event
occurs when the user clicks the radio button and its value changes. Visual Studio 2008
generates the method workerButton_CheckedChanged to handle this event.
Note
The Properties window of an ASP.NET Web application provides additional features
not currently available when you build a WPF application. These features include being
able to list the events available for a control and specify an event handler. When you create
a WPF application, this functionality is available only when you edit the Extensible
Application Markup Language (XAML) code for a control.
8. In the Code and Text Editor window, add the statement shown here in bold type to the
workerButton_CheckedChanged event method:
protected void workerButton_CheckedChanged(object sender, EventArgs e)
{
initPositionRole();
}
Remember that the default values for the positionRole drop-down list are those for a
worker, so the same method can be reused to initialize the list.
9. Switch to the Design View window displaying the EmployeeForm.aspx form. Select
the Boss radio button, and use the Properties window to create an event method
called bossButton_CheckedChanged for the CheckedChanged event. When the form
is displayed in the Code and Text Editor window, type the following statements in the
BossCheckedChanged method:
protected void bossButton_CheckedChanged(object sender, EventArgs e)
{
positionRole.Items.Clear();
positionRole.Enabled = true;
positionRole.Items.Add(“General Manager”);
positionRole.Items.Add(“Project Manager”);
}
These are the roles that a manager can fulfi ll.
10. Return to the Design View window displaying the EmployeeForm.aspx form, and create
an event handler for the CheckedChanged event for the Vice President radio button. In
the Code and Text Editor window, add the following statements shown in bold type to
the vpButton_CheckedChanged event method:
protected void vpButton_CheckedChanged(object sender, EventArgs e)
{
positionRole.Items.Clear();
positionRole.Enabled = true;
Chapter 27 Introducing ASP.NET 579
positionRole.Items.Add(“VP Sales”);
positionRole.Items.Add(“VP Marketing”);
positionRole.Items.Add(“VP Production”);
positionRole.Items.Add(“VP Human Resources”);
}
11. Switch to the Design View window displaying the EmployeeForm.aspx form, and create
an event handler for the CheckedChanged event for the President radio button. Add the
code shown here in bold type to the presidentButton_CheckedChanged event method:
protected void presidentButton_CheckedChanged(object sender, EventArgs e)
{
positionRole.Items.Clear();
positionRole.Enabled = false;
}
Roles do not apply to the president of the company, so the drop-down list is cleared
and disabled.
12. Return to the Design View window displaying the EmployeeForm.aspx form, and create
an event handler for the Click event of the Save button. The method would usually save
the information to a database, but to keep this application simple, the method will just
echo some of the data in the InfoLabel control instead. Add the following statements
shown in bold type to the saveButton_Click method:
protected void saveButton_Click(object sender, EventArgs e)
{
String position = “”;
if (workerButton.Checked)
position = “Worker”;
if (bossButton.Checked)
position = “Manager”;
if (vpButton.Checked)
position = “Vice President”;
if (presidentButton.Checked)
position = “President”;
infoLabel.Text = “Employee: ” + firstName.Text + “ ” +
lastName.Text + “    Id: ” +
employeeID.Text + “    Position: ” +
position;
}
The   character is a nonbreaking space in HTML; ordinary white-space characters
after the fi rst white-space character will usually be ignored by the browser.
13. Using the same technique, create an event method for the Click event of the Clear
button. Add the following block of code shown in bold type to this method:
protected void clearButton_Click(object sender, EventArgs e)
{
firstName.Text = “”;
lastName.Text = “”;
580 Part VI Building Web Applications
employeeID.Text = “”;
workerButton.Checked = true;
bossButton.Checked = false;
vpButton.Checked = false;
presidentButton.Checked = false;
initPositionRole();
infoLabel.Text = “”;
}
This code clears the information entered by the user and then resets the role to Worker
(the default value).
Note
Although only one radio button in a group can have its Checked property set to
true, it is necessary to set the Checked property of the remaining radio buttons to false to
ensure that the correct button is displayed as being selected when ASP.NET refreshes the
form in the user’s Web browser.
Test the Web form again
1. On the Debug menu, click Start Debugging to run the Web form again.
2. When the Web form appears in Internet Explorer, type an employee’s name, enter an
ID number (make them up), and then click the Role drop-down list.
The list of roles for a worker is displayed.
3. Change the position of your fi ctitious employee to Vice President, and then click the
Role drop-down list box.
Notice that the list has not changed and still displays the roles for a worker. The list
hasn’t changed because the CheckedChanged event for the Vice President radio button
has not been raised.
4. Close Internet Explorer, and return to Visual Studio 2008.
5. Display the EmployeeForm.aspx Web form in the Design View window, and then select
the worker-Button radio button. In the Properties window, set the AutoPostBack prop-
erty to True.
Tip
If the Properties window is still displaying the list of events for the radio button, click
the Properties button next to the Events button on the Properties window toolbar.
T
est the Web form a
g
ai
n
Chapter 27 Introducing ASP.NET 581
When the user clicks this radio button, the form will be sent back to the server for
processing, the CheckedChanged event will fi re, and the form can be updated to display
the roles for this radio button. By default, the AutoPostBack property is set to False to
avoid unnecessary network traffi c.
6. Set the AutoPostBack property to True for the other radio buttons: bossButton,
vpButton, and presidentButton.
7. Run the Web form again.
This time you will fi nd that when you click the radio buttons, there is a slight fl icker
while the form is submitted to the server, the event handler runs, the drop-down list is
populated, and the form is displayed again.
8. On the Internet Explorer toolbar, click the Page drop-down list, and then click View
Source to display the source of the HTML page being displayed in the browser.
Note
If the Internet Explorer Security message box appears, click Allow so that you can
view the source fi le for the page.
Notepad starts and displays the HTML source for the page. Notice that there is no
mention of any “asp:” Server controls in this fi le and no C# code. Instead, the Server
controls and their contents have been converted to the equivalent HTML controls (and
some JavaScript). This is one of the basic features of the Server controls—you access
them programmatically like ordinary .NET Framework objects, with methods, proper-
ties, and events. When they are rendered by the Web server, they are converted to
HTML so that you can display the form in any HTML-compliant browser.
9. When you have fi nished examining the fi le, close Notepad.
10. On the Web form, click Save.
The InfoLabel control displays the details of the new employee. If you examine the
source, you will see that the HTML for the InfoLabel control (rendered as an HTML span
with an ID of “InfoLabel”) contains this text.
11. Click Clear.
The form resets to its default values.
12. Close Internet Explorer, and return to Visual Studio 2008.
582 Part VI Building Web Applications
Event Processing and Roundtrips
Server controls are undoubtedly a powerful feature of ASP.NET, but they come with
a price. You should remember that although events are raised by the Web client, the
event code is executed on the Web server, and that each time an event is raised, an
HTTP request (or postback) is sent over the network to the Web server. The task of the
Web server is to process this request and send a reply containing an HTML page to be
displayed. In the case of many events, this page is the same as the one that issued the
original request. However, the Web server also needs to know what other data the user
has entered on the page so that when the server generates the HTML response, it can
preserve these values in the display. (If the Web server sent back only the HTML that
composed the original page, any data entered by the user would disappear.) If you look
at the HTML source of a page generated by a Web form, you will notice a hidden input
fi eld in the form. The example shown previously had this hidden fi eld:
<input type=”hidden” name=”__VIEWSTATE”
value=”/WEPdDwxNDk0MzA1NzE0O3Q8O2w8aTwxPjs+O2w8bDxpPDE3PjtpPDE5
PjtpP DIxPjtpPDI3PjtpPDMzPjs+O2w8dDxwPHA8bDxDaGVja2VkOz47bDxvPH
Q+Oz4+Oz 47Oz47dDxwPHA8bDxDaGVja2VkOz47bDxvPGY+Oz4+Oz47Oz47dDxw
PHA8bDxDaGVja2 VkOz47bDxvPGY+Oz4+Oz47Oz47dDx0PDt0PGk8Mz47QDxBbm
FseXN0O0Rlc2lnbmVyO0 RldmVsb3Blcjs+O0A8QW5hbHlzdDtEZXNpZ25lcjtE
ZXZlbG9wZXI7Pj47Pjs7Pj t0PHA8cDxsPFRleHQ7PjtsPFxlOz4+Oz47Oz47Pj
47Pj47bDxQZW9uQnV0dG9uO1BIQ kJ1dHRvbjtQSEJCdXR0b247VlBCdXR0b247
VlBCdXR0b247UHJlc2lkZW50QnV0dG9uO 1ByZXNpZGVudEJ1dHRvbjs+Pg==” />
This information is the content of the controls, or view state, in an encoded form. It is
sent to the Web server whenever any event causes a postback. The Web server uses
this information to repopulate the fi elds on the page when the HTML response is
generated.
All of this data has an impact on scalability. The more controls you have on a form, the
more state information has to be passed between the browser and Web server dur-
ing the postback processing, and the more events you use, the more frequently this
will happen. In general, to reduce network overhead, you should keep your Web forms
relatively simple, avoid excessive use of server events, and be selective with view state
to avoid sending unnecessary information across the network. You can disable the view
state for a control by setting the EnableViewState property of the control to False (the
default setting is True).
Creating and Using a Theme
When you fi rst created the Web site, you defi ned a style for the form. This style determined
the default font and color for controls on the form and could also be used to specify default
Chapter 27 Introducing ASP.NET 583
values for other attributes, such as the way in which lists are formatted and numbered. (You
can edit a style by right-clicking the style in the Manage Styles window and then by clicking
Modify Style.) However, a style defi ned in this way applies only to a single form. Commercial
Web sites typically contains tens, or maybe hundreds, of forms. Keeping all of these forms
consistently formatted can be a time-consuming task; if the company you work for decided
to change the font on all of its Web pages, imagine how many forms you would need to
update and rebuild! This is where themes can be very useful. A theme is a set of properties,
styles, and images that you can apply to the controls on a page or globally across all pages in
a Web site.
Note
If you are familiar with cascading style sheets (.css fi les), the concept of themes might be
familiar to you. However, there are some differences between cascading style sheets and themes.
In particular, themes do not cascade in the same way as cascading style sheets, and properties
defi ned in a theme applied to a control always override any local property values defi ned for the
control.
Defi ning a Theme
A theme is made up of a set of skin fi les located in a named subfolder in the App_Themes
folder for a Web site. A skin fi le is a text fi le that has the fi le name extension .skin. Each skin
fi le specifi es the default properties for a particular type of control using syntax very similar to
that which is displayed when you view a Web form in the Source View window. For example,
the following skin fi le specifi es the default properties for TextBox and Label controls:
<asp:TextBox BackColor=”Blue” ForeColor=”White” Runat=”Server” />
<asp:Label BackColor=”White” ForeColor=”Blue” Runat=”Server” Font-Bold=”True” />
You can specify many properties of a control in a skin fi le, but not all of them. For example,
you cannot specify a value for the AutoPostBack property. Additionally, you cannot create
skin fi les for every type of control, but most commonly used controls can be confi gured in
this way.
Applying a Theme
After you have created a set of skin fi les for a theme, you can apply the theme to a page
by modifying the @Page attribute that occurs at the start of the page in the Source View
window. For example, if the skin fi les for a theme are located in the App_Themes\BlueTheme
folder under the Web site, you can apply the theme to a page like this:
<%@Page Theme=”BlueTheme” %>
584 Part VI Building Web Applications
If you want to apply the theme to all pages in the Web site, you can modify the web.confi g
fi le and specify the theme in the pages element, like this:
<configuration>
<system.web>
<pages theme=”BlueTheme” />
</system.web>
</configuration>
If you modify the defi nition of a theme, all controls and pages that use the theme will pick up
the changes automatically when they are next displayed.
In the fi nal set of exercises in this chapter, you will create a theme for the Litware Web site
and then apply this theme to all pages in the Web site.
Create a new theme
1. In Solution Explorer, right-click the C:\ \Litware project folder. Point to Add ASP.NET
Folder, and then click Theme.
A new folder called App_Themes is added to the project, and a subfolder is created
called Theme1.
2. Change the name of the Theme1 folder to LitTheme.
3. In Solution Explorer, right-click the LitTheme folder, and then click Add New Item.
The Add New Item dialog box appears, displaying the types of fi le that can be stored in
a themes folder.
4. Click the Skin File template, type Lit.skin in the Name text box, and then click Add.
The skin fi le Lit.skin is added to the LitTheme folder, and the fi le is displayed in the
Code and Text Editor window.
5. Append the following lines to the end of the Lit.skin fi le in the Code and Text Editor
window (this fi le contains a comment with some very brief instructions):
<asp:TextBox BackColor=”Red” ForeColor=”White” Runat=”Server” />
<asp:Label BackColor=”White” ForeColor=”Red” Runat=”Server” Font-Bold=”True” />
<asp:RadioButton BackColor=”White” ForeColor=”Red” Runat=”Server”/>
<asp:Button BackColor=”Red” ForeColor=”White” Runat=”Server” Font-Bold=”True”/>
<asp:DropDownList BackColor=”Red” ForeColor=”White” Runat=”Server”/>
This simple set of properties displays TextBox, Button, and DropDownListBox controls
as white text on a red background, and Label and RadioButton controls as red text on
a white background. The text on Label and Button controls is displayed using the bold
font version of the current font.
C
r
eate
a
n
e
w
t
h
e
m
e
Chapter 27 Introducing ASP.NET 585
Important The skin fi le editor is very basic and does not provide any IntelliSense to help
you. If you make a mistake in this fi le, the application will run, but entries in this fi le might
be ignored. When you run the application later, if any of the controls do not appear as
expected, ensure that you have not mistyped anything in this fi le.
As mentioned previously, there are at least two ways you can apply a theme to a Web form:
you can set the @Page attribute for each page, or you can specify the theme globally across
all pages by using a Web confi guration fi le. You are going to use the latter approach in the
next exercise. This mechanism causes all pages for the Web site to apply the same theme
automatically.
Create a Web confi guration fi le, and apply the theme
1. In Solution Explorer, double-click the web.confi g fi le to display it in the Code and Text
Editor window.
2. Locate the <pages> line, and modify it as shown here in bold type:
<pages theme=”LitTheme”>
3. On the Debug menu, click Start Without Debugging.
Internet Explorer appears and displays the Web form. Verify that the style of the con-
trols on the form have changed as expected, although any text in the text boxes might
be a little hard to read (you will fi x this shortly). Close Internet Explorer when you have
fi nished.
4. In Solution Explorer, double-click the Lit.skin fi le to display it in the Code and Text Editor
window. Modify the element defi ning the appearance of TextBox and DropDownList
controls, as shown here in bold type:
<asp:TextBox BackColor=”White” ForeColor=”Red” Font-Bold=”True” Runat=”Server” />
<asp:DropDownList BackColor=”White” ForeColor=”Red” Runat=”Server” />
5. Run the form again. Notice how the style of the First Name, Last Name, and Employee
Id TextBox controls, and the Role drop-down list have changed; hopefully, they are
easier to read.
6. Close Internet Explorer when you have fi nished.
C
reate a Web confi guration fi le, and apply the theme
586 Part VI Building Web Applications
If you want to continue to the next chapter
Keep Visual Studio 2008 running, and turn to Chapter 28.
If you want to exit Visual Studio 2008 now
On the File menu, click Exit. If you see a Save dialog box, click Yes and save the project.
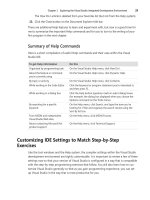
Chapter 27 Quick Reference
To Do this
Create a Web application Create a new Web site using the ASP.NET Web Site template. Specify
whether you want to use the Development Server (specify a fi le system
location and fi le name) or IIS (specify an HTTP location and URL).
View and edit the HTML defi nition
of a Web form
Click the Source button in the Design View window.
Create a style for a Web form
In the Manage Styles window, click New Style. Use the New Style dialog
box to defi ne the style for the form.
Add ASP.NET Server controls to a
Web form
Click the Design button in the Design View window. In the Toolbox,
expand the Standard category. Drag controls onto the Web form.
Add HTML controls to a Web form
(with HTML controls, you can more
easily port existing ASP pages into
ASP.NET)
In the Toolbox, click the HTML category. Drag controls onto the Web
form.
Create an event handler for an ASP.
NET Server control
In the Design View window, select the control on the Web form. In the
Properties window, click the Events button. Choose the event you want
to handle and type the name of an event handler method or double-
click the event name to select the default name. In the Code and Text
Editor window, write the code to handle the event.
Create a theme Add an App_Themes folder to the Web site. Create a subfolder for
the theme. Create a skin fi le defi ning the properties of controls in this
folder.
Apply a theme to a Web site
Either specify the theme using the @Page attribute of each page, like
this:
<%@Page Theme=”BlueTheme” %>
or modify the web.confi g fi le and specify the theme in the pages
element, like this:
<pages theme=”BlueTheme”>
587
Chapter 28
Understanding Web Forms
Validation Controls
After completing this chapter, you will be able to:
Validate user input in a Microsoft ASP.NET Web form by using the ASP.NET validation
controls.
Determine whether to perform user input validation in the user's Web browser or at the
Web server.
As with a Microsoft Windows Presentation Foundation (WPF) application, validating user
input is an important part of any Web application. With WPF, you can check that the us-
er’s input makes sense by binding controls to properties of business objects and letting the
code in these business objects validate the data, or by writing code to validate the contents
of these fi elds in response to events that occur when the user moves from fi eld to fi eld on a
form. ASP.NET Web forms do not support binding to business objects for validation purpos-
es, so at fi rst glance it appears that your only option might be to use events. However, there
is one fundamental consideration that you should think about. Web applications are distrib-
uted in their nature: the presentation logic runs in the Web browser on the user's computer,
while the code for the application runs on the Web server. With this in mind, should you
perform user input validation at the client (the Web browser) or at the Web server? In this
chapter, you will examine this question and discover the options that are available to you.
Note
As you read this chapter, you might be surprised to discover that it contains no C# code.
This is intentional. You could validate data by using C# methods, but sometimes it is equally
instructive to see situations where you do not actually need to write C# code to perform
potentially complex tasks.
Comparing Server and Client Validations
Consider the EmployeeForm.aspx page of the Litware Web site again. The user is expected
to enter the details of an employee: name, employee ID, position, and role. All the text boxes
should be mandatory. Additionally, the employee ID should be a positive integer.
588 Part VI Building Web Applications
Validating Data at the Web Server
If you examine the TextBox class, you will notice that it provides the TextChanged event. After
the user changes the text in the text box, this event runs the next time the form is posted
back to the server. As with all Web Server control events, the TextChanged event handler
runs at the Web server. Validating data at the server involves transmitting data from the Web
browser to the server, processing the event at the server to validate the data, and then pack-
aging up any validation errors as part of the HTML response sent back to the client so that
the browser can display these errors. If the validation being performed is complex or requires
processing that can be performed only at the Web server (such as ensuring that an employee
ID the user enters exists in a database), this is an acceptable technique. But if you are simply
inspecting the data in a single text box in isolation (such as making sure that the user types a
positive integer into an Employee ID text box), performing this type of validation on the Web
server could impose unacceptable overhead; why not perform this check in the browser on
the client computer and save a network round-trip?
Validating Data in the Web Browser
The ASP.NET Web Forms model facilitates performing client-side validation in a Web browser
through the use of validation controls. If the user is running a browser (such as Microsoft
Internet Explorer 4 or later) that supports dynamic HTML, the validation controls generate
JavaScript code that runs in the browser and avoids the need to perform a network round-
trip to the server. If the user is running an older browser, the validation controls generate
server-side code instead. The key point is that the developer creating the Web form does
not have to worry about checking for browser capabilities; all the browser detection and
code generation features are built into the ASP.NET validation controls. The developer simply
drops an ASP.NET validation control onto the Web form, sets its properties (either by using
the Properties window or by writing code), and specifi es the validation rules to be performed
and any error messages to be displayed.
ASP.NET provides the following validation controls:
RequiredFieldValidator
Use this control to ensure that the user has entered data into
a control.
CompareValidator
Use this control to compare the data entered with a constant
value, the value of a property of another control, or a value retrieved from a database.
RangeValidator
Use this control to check the data entered by a user against a range
of values, checking that the data falls either inside or outside a given range.
RegularExpressionValidator
Use this control to check that the data input by the user
matches a specifi ed regular expression, pattern, or format (such as a telephone number,
for example).
Chapter 28 Understanding Web Forms Validation Controls 589
CustomValidator
Use this control to defi ne your own custom validation logic and at-
tach it to a control to be validated.
Note
You should be aware that if a user can type unrestricted text into a text box and send it to
the Web server, the user could type text that looks like HTML tags (<b> for example). Hackers
sometimes use this technique to inject HTML into a client request in an attempt to cause damage
to the Web server or to try to break in. (I am not going to go into the details here!) By default, if
you try this trick with an ASP.NET Web page, the request will be aborted and the user is shown
the message “A potentially dangerous Request.Form value was detected from the client.” You can
disable this check, although that is not recommended. A better approach is to use a
RegularExpressionValidator control to verify that the user input in a text box does not constitute
an HTML tag (or anything that looks like it). For more information about regular expressions and
how to use them, see the topic “.NET Framework Regular Expressions” in the Microsoft Visual
Studio 2008 documentation.
Although each control performs a single well-defi ned type of validation, you can use several
of them in combination. For example, if you want to ensure that the user enters a value in a
text box and that this value falls in a particular range, you can attach a RequiredFieldValidator
control and a RangeValidator control to the text box.
These controls can work in conjunction with a ValidationSummary control to display error
messages. You will use some of these controls in the following exercises.
Implementing Client Validation
Returning to the EmployeeForm.aspx Web form, you can probably see that
RequiredFieldValidator controls will be required for the First Name, Last Name, and Employee
Id text boxes. The employee ID must also be numeric and should be a positive integer. In this
application, you will specify that the employee ID must be between 1 and 5000. This is where
a RangeValidator control is useful.
Add RequiredFieldValidator controls
1. Start Microsoft Visual Studio 2008 if it is not already running.
2. If you are using Visual Studio 2008 Professional Edition or Enterprise Edition, on the File
menu, point to Open, and then click Web Site.
3. If you are using Microsoft Visual Web Developer 2008 Express Edition, on the File
menu, click Open Web Site.
4. In the Open Web Site dialog box, ensure that the File System option is selected,
browse to Microsoft Press\Visual CSharp Step by Step\Chapter 28\Litware under your
Documents folder, and then click Open.
A
dd
RequiredFieldValidator
contro
ls
r
590 Part VI Building Web Applications
Note When you create a new Web site, Visual Studio 2008 creates a solution fi le in a
solution folder in the Visual Studio 2008 folder under your Documents folder. However,
you do not need to select a Microsoft Visual C# solution or project fi le to open a Web site
for editing; just move to the folder containing the Web site fi les and subfolders. If you do
want to open a Web site by using the solution fi le, on the File menu, point to Open, and
click Project/Solution (instead of Web Site), move to the solution folder, and then click the
solution fi le.
5. In Solution Explorer, right-click EmployeeForm.aspx, and then click Set As Start Page.
6. Right-click EmployeeForm.aspx again, and then click View Designer to display the Web
form in the Design View window.
7. In the Toolbox, expand the Validation category.
8. Add a RequiredFieldValidator control to the form.
The control appears in the upper-left part of the form, displaying the text
“RequiredFieldValidator”.
9. Click the Source button to display the HTML source code for the form. Locate the code
for the RequiredFieldValidator control toward the bottom of the fi le, and set the Style
property to position it underneath the fi rstName text box, as shown here in bold type.
(The position of a validation control determines where the error message is displayed.)
<asp:RequiredFieldValidator ID=”RequiredFieldValidator1”
Style=”position: absolute; left: 166px; top: 128px”></asp:RequiredFieldValidator>
10. Click the Design button, and then select the RequiredFieldValidator control. In the
Properties window, use the drop-down list to set the ControlToValidate property to
fi rstName. Setting the ControlToValidate property links the validation control to the
item it will validate. Enter You must specify a fi rst name for the employee in the
ErrorMessage property. This is the message that will be displayed if the control to be
validated (the First Name text box) is left blank. Notice that this message replaces the
default red text error message (“RequiredFieldValidator”) on the form.
11. Add two more RequiredFieldValidator controls to the form.
12. Click the Source button, and add the Style properties shown here in bold type to
position these controls under the lastName and employeeID text boxes.
<asp:RequiredFieldValidator ID=”RequiredFieldValidator2”
Style=”position: absolute; left: 508px; top: 128px”></asp:RequiredFieldValidator>
<asp:RequiredFieldValidator ID=”RequiredFieldValidator3”
Style=”position: absolute; left: 166px; top: 194px”></asp:RequiredFieldValidator>
13. Click the Design button, and then select the RequiredFieldValidator control under
the Last Name text box. Using the Properties window, set its ControlToValidate prop-
erty to lastName, and enter You must specify a last name for the employee in its
ErrorMessage property. Notice that the RequiredFieldValidator control automatically
resizes itself to display the complete error message.
Chapter 28 Understanding Web Forms Validation Controls 591
14. Select the RequiredFieldValidator control under the Employee Id text box; set its
ControlToValidate property to employeeID, and enter You must specify an employee
ID in its ErrorMessage property.
15. On the Debug menu, click Start Without Debugging to run the form in Windows
Internet Explorer.
16. When the form fi rst appears, all the required text boxes will be empty. Click Save. The
error messages belonging to all three RequiredFieldValidator controls are displayed.
Notice that the Click event for the Save button did not run, and the label at the bottom
of the form did not display the data summary (and the screen did not even fl icker). This
behavior is because the validation controls prevented the postback to the server; they
generate code that can be executed by the browser, and they will continue to block
posts back to the server until all the errors have been corrected.
Note
If you click the Clear button while an error message is displayed, it will not clear
the form because the error blocks the postback to the Web server. ASP.NET provides sup-
port for client-side scripting so that you can add JavaScript code to clear the Web form.
This code is not blocked by postbacks because it runs in the user’s Web browser (assuming
the browser supports JavaScript). The validation controls actually generate JavaScript code
that runs in the user’s browser rather than being posted back to the Web server. The de-
tails of writing your own client-side JavaScript code in an ASP.NET Web form are outside
the scope of this book, but for more information, search for the article “How to Add Client
Script Events to ASP.NET Web Server Controls” in the documentation provided with Visual
Studio 2008.
17. Type a name in the First Name text box.
592 Part VI Building Web Applications
As soon as you move away from the text box, the corresponding error message
disappears. If you return to the First Name text box, erase the contents, and then move
to the next text box, the error message is displayed again. All this functionality is being
performed in the browser with no data being sent to the server over the network.
18. Enter values in the First Name, Last Name, and Employee Id text boxes, and then click
Save.
This time the Click event runs and the summary is displayed in the InfoLabel control at
the bottom of the form.
19. Close the form, and return to Visual Studio 2008.
Currently, you can type anything into the Employee Id text box. In the following exercise, you
will use a RangeValidator control to restrict the acceptable values to integers in the range of 1
through 5000.
Add a RangeValidator control
1. In the Design View window, from the Toolbox, add a RangeValidator control to the form.
2. Click the Source button, and add the Style properties shown here in bold type to
position the RangeValidator control under the employeeID text box.
<asp:RangeValidator ID=”RangeValidator1”
Style=”position: absolute; left: 166px; top: 194px”></asp:RangeValidator>
This is exactly the same position as the RequiredFieldValidator control for the
employeeID text box. Specifying the same location for these two error messages is not
a problem because the validations performed by these controls are mutually exclusive
(if the employee ID is blank, the RangeValidator control cannot test the value entered
by the user), so only one of the error messages can be displayed.
3. Click anywhere in the HTML code for the RangeValidator1 control. In the Properties
window, set the ControlToValidate property to employeeID. Enter The employee ID
must be between 1 and 5000 in the ErrorMessage property. Set the MaximumValue
property to 5000, the MinimumValue property to 1, and the Type property to Integer.
Note
You can use the RangeValidator control to restrict the range of non-numeric data
by setting the Type property. The types you can specify are String, Integer, Double, Date,
and Currency. You should specify values of the appropriate type for the MaximumValue
and MinimumValue properties. The RangeValidator control uses the collation sequence of
the character set used by the current locale when performing range checking for strings,
and when checking Date ranges, an earlier date is considered to be lower than a later date.
4. Run the form again. Enter a fi rst name and a last name, but leave the employee ID
blank. Click Save.
An error message telling you that you must supply an employee ID appears.
A
dd
a
RangeValidator
co
n
t
r
ol
r
Chapter 28 Understanding Web Forms Validation Controls 593
5. Type –1 in the Employee Id text box, and then click Save.
An error message telling you that the employee ID must be between 1 and 5000
appears.
6. Type 101 in the Employee Id text box, and then click Save.
This time the data is valid. The form is posted back to the server, the Click event of the
Save button runs, and a summary of the information entered in the InfoLabel label
appears at the bottom of the form.
7. Experiment with other values that are out of range or of the wrong type. Try 5001 and
the text “AAA” to check that the RangeValidator control works as expected.
8. On the Internet Explorer toolbar, click the Page drop-down list, and then click View
Source to display the source of the HTML page being displayed in the browser.
Note
If the Internet Explorer Security message box appears, click Allow so that you can
view the source fi le for the page.
Notepad starts and displays the HTML source for the page. Scroll through the fi le and
examine its contents. Near the end, you will fi nd some JavaScript code that performs
the validations. This code was generated by using the properties of the validation con-
trols. Close Notepad when you have fi nished browsing the HTML source code.
9. Close Internet Explorer, and return to Visual Studio 2008.
Disabling Client-Side Validation
In the preceding exercise, you saw that the validations were performed by using
JavaScript code running in the browser. The ASP.NET runtime generates this code
automatically, depending on the capabilities of the Web browser being used to view
the page. If the browser does not support JavaScript, all validation checks will be per-
formed by using code running on the Web server instead. The validation will
be performed only when the form is posted back to the server.
If you want, you can suppress client-side validation and force all checks to be per-
formed at the server. To do this, set the EnableClientScript property of the validation
control to False. You might fi nd it useful to do this under certain circumstances, such as
those involving custom validations (by using the CustomValidator control) that are com-
plex or require access to data that is available only on the server. The CustomValidator
control also has a ServerValidate event that can be used to perform additional valida-
tion explicitly on the server, even if EnableClientScript is set to True.
594 Part VI Building Web Applications
You have seen how validation controls can validate the data that the user enters, but
the error message display is not very pretty. In the following exercise, you will use a
ValidationSummary control to change the way that the error information is presented to
the user.
Add a ValidationSummary control
1. In the Code and Text Editor window, click anywhere in the HTML code for the
RequiredFieldValidator1 control. In the Properties window, set the Text property to *.
If you set the Text property of a validation control, the corresponding text value is
displayed on the form rather than the error message. (If no value is specifi ed for the
Text property, the value of the ErrorMessage property is displayed.)
2. Modify the Style property of the RequiredFieldValidator1 control to position it to the
right of the First Name text box, as shown in bold type here:
<asp:RequiredFieldValidator ID=”RequiredFieldValidator1”
Style=”position: absolute; left: 400px; top: 106px”></asp:RequiredFieldValidator>
Now, if a validation error occurs, the user will see a red asterisk appear next to the text
box with the error.
3. Click anywhere in the HTML code for the RequiredFieldValidator2 control, set its Text
property to *, and then change the Style to move it to the right of the Last Name text
box.
<asp:RequiredFieldValidator ID=”RequiredFieldValidator2”
Style=”position: absolute; left: 744px; top: 106px”></asp:RequiredFieldValidator>
4. Click anywhere in the HTML code for the RequiredFieldValidator3 control, set its
Text property to *, and then change the Style property to move it to the right of the
Employee Id text box.
<asp:RequiredFieldValidator ID=”RequiredFieldValidator3”
Style=”position: absolute; left: 400px; top: 172px”></asp:RequiredFieldValidator>
5. Click anywhere in the HTML code for the RangeValidator1 control, set its Text property
to *, and then change the Style property to move it to the right of the Employee Id text
box.
<asp:RangeValidator ID=”RangeValidator1”
Style=”position: absolute; left: 400px; top: 172px”></asp:RangeValidator>
6. Click the Design button. From the Toolbox, add a ValidationSummary control to the
form.
7. Click the Source button, locate the ValidationSummary control toward the end of the
fi le, and add the following Style property to place it in the space above the button
controls and to the right of the radio buttons.
A
dd
a
ValidationSummary
co
n
t
r
ol
y
Chapter 28 Understanding Web Forms Validation Controls 595
<asp:ValidationSummary ID=”ValidationSummary1”
Style=”position: absolute; left: 300px; top: 260px” />
A ValidationSummary control displays the ErrorMessage values for all of the validation
controls on the Web form.
8. In the Properties window, verify that the ShowSummary property for the
ValidationSummary1 control is set to True.
9. Run the Web form. When the form appears in Internet Explorer, leave the First Name,
Last Name, and Employee Id text boxes blank, and then click Save.
Red asterisks appear next to each of the text boxes, and the corresponding error
messages are displayed in the ValidationSummary control at the bottom of the form.
10. Enter a fi rst name and a last name, and then type AAA in the Employee Id text box.
As you move from text box to text box, the asterisks disappear from the First Name and
Last Name text boxes, but an asterisk remains next to the Employee Id text box.
11. Click Save.
The error message displayed by the ValidationSummary control changes.
12. Type 101 in the Employee Id text box, and then click Save.
All error messages and asterisks disappear, and a summary of the data you entered
appears in the InfoLabel control as before.
13. Close the form, and return to Visual Studio 2008.
596 Part VI Building Web Applications
Dynamic HTML and Error Messages
If you are viewing the page with a browser that supports dynamic HTML, you can dis-
play the validation summary data in a message box in addition to or rather than on the
Web form. To do this, set the ShowMessageBox property of the ValidationSummary
control to True. At run time, if any validation errors occur, the error messages will be
displayed in a message box. If the Web browser does not support dynamic HTML, the
value of the ShowMessageBox property is ignored (it defaults to False).
If you want to continue to the next chapter
Keep Visual Studio 2008 running, and turn to Chapter 29.
If you want to exit Visual Studio 2008 now
On the File menu, click Exit. If you see a Save dialog box, click Yes and save the project.
Chapter 28 Quick Reference
To Do this
Perform server-side validation of
user input
Use events belonging to server controls, for example, the
TextChanged event of the TextBox control.
Perform client-side validation of
user input
Use a validation control. Set the ControlToValidate property to the
control to be validated, and set the ErrorMessage property to an
error message to be displayed. Verify that the EnableClientScript
property is set to True.
Force the user to enter a value in a
text box
Use a RequiredFieldValidator control.
Check the type and range of data
values entered into a text box
Use a RangeValidator control. Set the Type, MaximumValue, and
MinimumValue properties as required.
Display a summary of validation error
messages
Use a ValidationSummary control. Verify that the ShowSummary
property is set to True. Set the ShowMessageBox property to True
if you want browsers that support dynamic HTML to display the
error messages in a message box.
597
Chapter 29
Protecting a Web Site and Accessing
Data with Web Forms
After completing this chapter, you will be able to:
Restrict access to a Web site by using Microsoft ASP.NET Login controls and
Forms-based authentication.
Create Web forms that present data from a database using a GridView control.
Build Web applications that need to display potentially large volumes of data while
minimizing resource use.
Update a database from a Web form.
Build applications that can pass data between Web forms.
In the previous two chapters, you have seen how to build a Web site that enables the user to
enter information and validate the data that was entered. You’ve also seen in earlier chapters
how to build a non-Web-based application that displays and updates data from a database.
In this chapter, you’ll learn about creating Web applications that display data from a database
and that can update the database with any changes made by the user. You will see how to do
this in an effi cient manner that minimizes use of shared resources, such as the network and
the database.
Security is always an important issue, especially when building applications that can be
accessed over the Internet, when a Web application accesses sensitive resources such as
your company’s databases. Therefore, you will start by learning how to confi gure a Web
forms application to use Forms-based security to verify the identity of the user.
Managing Security
Applications built by using the Microsoft .NET Framework have a range of mechanisms
available for ensuring that the users who run those applications have the appropriate user
rights. Some of the techniques rely on authenticating users based on some form of identifi er
and password, whereas others are based on the integrated security features of the Microsoft
Windows operating system. If you are creating a Web application that will be accessed over
the Internet, using Windows security is probably not an option—users are unlikely to be
members of any Windows domain recognized by the Web application and might be running
598 Part VI Building Web Applications
an operating system other than Windows, such as UNIX. Therefore, the best option to use in
this environment is Forms-based security.
Understanding Forms-Based Security
With Forms-based security, you can verify the identity of a user by displaying a login form
that prompts the user for an ID and a password. After the user has been authenticated, the
various Web forms that make up the application can be accessed, and the user’s security
credentials can be examined by the code running in any page if additional authorization is
needed. (A user might be able to log in to the system but might not have access to every
part of the application.)
To use ASP.NET Forms-based security, you must confi gure the Web application by making
some changes to the web.confi g fi le, and you must also supply a login form to validate the
user. This login form will be displayed whenever the user tries to gain access to any page in
the application if the user has not already been validated. The user will be able to proceed to
the requested page only if the logic in the login form successfully verifi es the user’s identity.
Important
To the uninitiated, it might seem that ASP.NET Forms-based security is excessive. It’s
not. Don’t be tempted to simply create a login form that acts as an entry point to your
application and assume that users will always access your application through it. Browsers can
cache forms and URLs locally on users’ computers. Another user might be able to gain access to
the browser cache depending on how the computer itself is confi gured, fi nd the URLs of the
sensitive parts of your application, and navigate directly to them, bypassing your login form. You
have control over your Web server (hopefully), but you have almost no control over the user’s
computer. The ASP.NET Forms-based mechanism is robust, and assuming that your Web server is
well protected, it should be adequate for most of your applications.
Implementing Forms-Based Security
In the fi rst set of exercises in this chapter, you will create and confi gure a Web application
that implements Forms-based security. The application will ultimately enable a user to view
and modify customer information in the Northwind database.
Create the Northwind Web site
1. Start Microsoft Visual Studio 2008 if it is not already running.
2. If you are using Visual Studio 2008 Professional Edition or Enterprise Edition, on the File
menu, point to New, and then click Web Site.
3. If you are using Microsoft Visual Web Developer 2008 Express Edition, on the File
menu, click New Web Site.
C
reate the Northw
i
nd Web s
i
t
e
Chapter 29 Protecting a Web Site and Accessing Data with Web Forms 599
4. In the New Web Site dialog box, click the ASP.NET Web Site template. Select File System
in the Location drop-down list box, and specify the \Microsoft Press\Visual CSharp Step
By Step\Chapter 29\Northwind folder under your Documents folder. Set the Language
to Visual C#, and then click OK.
5. In Solution Explorer, right-click Default.aspx, click Rename, and rename the form to
CustomerData.aspx.
6. Right-click CustomerData.aspx, and click Set As Start Page.
7. In the Code and Text Editor window displaying the HTML source code for the Web form,
click the Design button.
8. Using the Toolbox, add a Label control from the Standard category to the Web form.
Set the Text property of the label to This form will be implemented later.
In the next exercises, you will build a login form to authenticate the user and confi gure
Forms-based security for the Web application. When confi gured to use Forms-based security,
the ASP.NET runtime will redirect to the login form attempts made by an unauthenticated
user to access the application.
Implementing a login form for Forms-based security is such a common task that Microsoft
has implemented a set of Login controls to simplify matters. You will use one of these
controls now.
Build the login form
1. On the Website menu, click Add New Item.
2. In the Add New Item dialog box, ensure that the Web Form template is selected, and
type LoginForm.aspx for the name. Verify that the Language drop-down list box is set
to Visual C#, the Place code in separate fi le check box is selected, and the Select master
page check box is cleared, and then click Add to create the form.
The new Web form is created, and the HTML code for the form is displayed in the Code
and Text Editor window.
3. Click the Design button to display LoginForm.aspx in the Design View window.
4. In the Properties window, set the Title property of the DOCUMENT object to Northwind
Traders – Log In.
5. In the Toolbox, expand the Login category. Add a Login control to the Web form.
The Login control is a composite control that is composed of several labels, two text
boxes for the user to type a name and a password, the Remember me next time check
box, and a button to click to log in. You can confi gure most of these items by using the
Properties window for this control, and you can also modify the style of the control.
B
uild the login form
600 Part VI Building Web Applications
6. In the Common Login Tasks menu displayed by the Login control, click Auto Format on
the Login Tasks menu that appears.
Tip
If the Common Login Tasks menu is not displayed, click the Login control, and then
click the smart tag icon on the top edge of the control, near the right-hand corner.
The Auto Format dialog box appears. You can use this dialog box to change the look
and feel of the Login control by selecting a predefi ned scheme. You can also defi ne
your own layout by creating a template using the Convert to Template command on the
Common Login Tasks menu for the Login control.
7. In the Auto Format dialog box, click the Classic scheme, and then click OK. Click the
smart tag icon on the Login control to hide the Login Tasks menu.
8. In the Properties window, change the properties of the Login control by using the
values in the following table.
Property Value
DisplayRememberMe
False
FailureText
Invalid User Name or Password. Please enter a valid User
Name and Password.
TitleText
Northwind Traders – Log In
DestinationPageUrl
~/CustomerData.aspx
The Login control should look like this:
When the user clicks the Log In button, the user must be authenticated. If the user name
and password are valid, the user should be allowed to proceed to the form specifi ed by the
DestinationPageUrl property; otherwise, the error message stored in the FailureText property
of the Login control should be displayed and the user prompted to log in again. How do you
perform these tasks? You have at least two options:
Write code that handles the Authenticate event for the Login control. This event is
raised whenever the user clicks the Log In button. You can examine the values in the
UserName and Password properties, and if they are valid, allow the user to proceed to
the page identifi ed by the DestinationPageUrl property. This strategy is highly customi-
zable but requires that you maintain your own secure list of user names and passwords
to authenticate against.
Chapter 29 Protecting a Web Site and Accessing Data with Web Forms 601
Use the built-in features of Visual Studio 2008 with the ASP.NET Web Site
Administration Tool to manage user names and passwords, and let the Login control
perform its default processing to validate users when the user clicks the Log In button.
The ASP.NET Web Site Administration Tool maintains its own database of user names
and passwords, and it provides a wizard to help you add users to your Web site.
You will use the second option in the following exercise. (You can investigate the fi rst option
on your own time.)
Confi gure Web site security, and activate Forms-based security
1. On the Website menu, click ASP.NET Confi guration.
The ASP.NET Confi guration command opens Windows Internet Explorer and starts a
Web application called the ASP.NET Web Site Administration Tool, which uses its own
instance of the ASP.NET Development Server, independent from your Web application.
By using this tool, you can add and manage users for your Web site, specify application
settings that you want to be stored in the application confi guration fi le, and specify
how security information such as user names and passwords are stored. By default, the
ASP.NET Web Site Administration Tool stores security information in a local Microsoft
SQL Server database called ASPNETDB.MDF that it creates in the App_Data folder of
your Web site. You can confi gure the ASP.NET Web Site Administration Tool to store
security information elsewhere, but that is beyond the scope of this book.
2. In the ASP.NET Web Site Administration Tool, click the Security tab.
C
on
fi
g
ure Web site securit
y
, and activate Forms-based securit
y