Mobile Web Development phần 9 potx
Bạn đang xem bản rút gọn của tài liệu. Xem và tải ngay bản đầy đủ của tài liệu tại đây (832.37 KB, 23 trang )
Chapter 9
[ 173 ]
Comments in VXML are within <! and >, just as in any other XML document.
Our list of application variables is dened before our main form.
We want to customize the message given on different forms, so we have kept the
nomatch and noinput tags within the form.
The <filled> tag has two new attributes. The namelist attribute species elds
that should be populated to execute this <filled> code segment, the mode denes
whether all of those elds should be lled or any before the block gets executed.
When we talked about the $ shadow variable earlier, we did not mention that
it's possible to populate multiple elds from the grammar le. Here's that trick.
Something like this in our grammar le:
<item> something <tag><![CDATA[ <pizza "Best Pizza"> <size "Best
Size">]]></tag></item>
And this in our VXML:
<assign name="application.pizza" expr="pizza$.interpretation.
pizza"/>
<assign name="application.size" expr="pizza$.interpretation.
size"/>
The pizza and interpretation variables act much like an object.
pizza and size selection become properties of that object.
One more trick is to evaluate expressions as needed to get their value. In our case, we
are evaluating the value of the pizza the user said and informing them in a <prompt>.
We have stored the caller ID in an application variable customer. This is not really
required because we can access it from the session scope later. But we are doing this
to keep things consistent, and also to allow us to extend the way we determine the
customer later.
Understanding Prophecy Error Messages
If you get an MRCP error when you run your application, your grammar
le has a problem. Double-check and correct it. If you get an error
message that says could not connect to dialog, there is a problem in your
VXML code—including linked les.
Looking Under the Hood: Which Words are Being Recognized?
In the Log Viewer, create a new lter. For the lter condition select
Message, contains and put Partial result as value. When you apply this
lter, you will see the results of the speech recognition engine as it does
its work.
Interactive Voice
[ 174 ]
We have traveled a good distance. Congratulations!
Now, let's see how we can handle some complex grammar rules. Let's have the user
say both the size and crust in the same prompt and detect what she said!
Writing Complex Grammar Rules
We want to ask the customer to speak the size of pizza and the crust she or he
wants in a single input. She or he could say "twelve inch deep" or "twelve inch deep
crust" or "medium and deep crust", or any other combination. We will dene some
intelligent rules to handle all these conditions and return the crust and the size.
Time for Action: Writing Complex Grammars
1. Create a new grammar le called size_grammar.xml.
2. Let's start with pieces. Let's rst write the grammar rule for size. The
following code shows this grammar.
<rule id="SIZE">
<one-of>
<item>twelve<tag>return ("Medium")</tag></item>
<item>medium<tag>return ("Medium")</tag></item>
<item>fourteen<tag>return ("Large")</tag></item>
<item>large<tag>return ("Large")</tag></item>
</one-of>
</rule>
3. Let us add another rule for the crusts now.
<rule id="CRUST">
<one-of>
<item>deep<tag>return ("Deep")</tag></item>
<item>thin<tag>return ("Thin")</tag></item>
</one-of>
</rule>
4. It's now time to write our main rule, which will call these two rules. Make
sure to make it the root rule in the <grammar> tag.
<rule id="SIZECRUST">
<item>
<item>
<ruleref uri="#SIZE"/>
<tag>assign(size $return)</tag>
</item>
<item repeat="0-1">inch</item>
Chapter 9
[ 175 ]
<item repeat="0-1">and</item>
<item>
<ruleref uri="#CRUST"/>
<tag>assign(crust $return)</tag>
</item>
<item repeat="0-1">crust</item>
</item>
<tag><![CDATA[ <crust (strcat(strcat($size '|') $crust))>
]]></tag>
</rule>
5. If you noticed, we have concatenated the size and crust with a pipe. That's
the value our VXML crust eld will receive. How do we break that apart?
Here's a little secret! VXML supports JavaScript! We can write a JavaScript
function to split the string at the pipe character and return the rst or second
part as required. Let's write up this small function in our order.xml , right
after the application variable declarations:
<script>
<![CDATA[
function getValueFromPhrase(phrase, pos)
{
phrase = phrase.toString();
if (phrase.indexOf("|") > 0)
{
var valArr = phrase.split("|");
if (valArr.length-1 > pos)
{
return valArr[pos];
}
else
{
return valArr[valArr.length-1];
}
}
return phrase;
}
]]>
</script>
6. Now let's add the crustSelection form to our order.xml le. Add the
following code after the pizzaSelection form.
<form id="crustSelection">
<field name="crust">
<grammar src="size_grammar.xml" type="application/grammar-xml"/>
Interactive Voice
[ 176 ]
<prompt>We make medium and large pizzas with thin crust or
deep crust.
What size and crust do you want?
</prompt>
<noinput>
<prompt>Sorry, I could not hear you. Please say again.</prompt>
<reprompt/>
</noinput>
<nomatch>
<prompt>Sorry, I did not understand. Please say size followed
by crust choice.</prompt>
<reprompt/>
</nomatch>
</field>
<filled namelist="crust" mode="all">
<assign name="application.size" expr="getValueFromPhrase(
crust$.interpretation.crust, 0)"/>
<assign name="application.crust" expr="getValueFromPhrase
(crust$.interpretation.crust, 1)"/>
<prompt>Ok. <value expr="application.crust" />
<value expr="application.size" />.</prompt>
<goto next="#toppingSelection" />
</filled>
</form>
7. That completes it. Give the app a shot and see how you get the crust and
size selections.
What Just Happened? How Did it Work?
Here's some insight on what's happening!
The main grammar rule—SIZECRUST—calls in the size and crust rules. In between,
it puts in items that may or may not occur in the input, like inch, and/or crust.
strcat is a function available in grammar XML that allows you to join two strings.
Note that there is no comma between the two arguments, and the order of execution
is from the innermost to the outermost.
Our JavaScript function takes a string and an index position. It converts the input
parameter to a string if it is an object. Then it checks if there is a pipe character in
the string. If there is, it will split the string at the pipe. It validates the pos argument
next, returning the item at that position if valid, and the last element if invalid. If no
conditions are matched, it returns the string version of the input phrase.
Chapter 9
[ 177 ]
The VXML code is quite similar to what we have seen so far, except the assignment
of value to the application variable. We call the JavaScript function with the
interpretation of the crust eld, and pass 0 or 1, telling the function to return the
rst or second value. The prompt after that conrms the values set in the
application variables.
Selecting the Topping and Quantity
Selecting the topping and quantity can be done just like selecting pizzas. For
toppings, we have mushroom and olive available. A simple <one-of> rule will
sufce here. For quantities, the value can range from 1 to 9. We can recognize and
handle them like this: <item>one<tag><![CDATA[ <qty "1"> ]]></tag></item>.
We are not going to cover toppings and quantity here to save space. But once you
have added the forms and grammar for them, we can go ahead and conrm the
order details with the customer, and submit the order to the server for further
processing. Shall we jump on to that now?
Confirming and Submitting an Order
Once we have got all the order details, we would like to conrm them with the
customer before we place the order. This is important because we want to eliminate
problems of bad speech recognition. After conrmation, we would send it to our web
server. The order should be saved and added to our normal order queue.
Time for Action: Confirming and Submitting
an Order
1. The rst thing we want to do is to repeat what options the customer has
chosen, and ask her or him to conrm them. The following code shows the
confirmOrder form that we need to add right after the quantity selection
form is complete.
<form id="confirmOrder">
<field name="confirm" slot="confirm">
<grammar src="confirm_grammar.xml" type="
application/grammar-xml"/>
<prompt bargein="false">
You ordered <value expr="application.quantity" /> <value
expr="application.size" /> <value expr="application.pizza" />
with <value expr="application.crust" /> crust and <value
expr="application.topping" /> topping.
Should I take the order?
Interactive Voice
[ 178 ]
</prompt>
</field>
<filled namelist="confirm" mode="all">
<if cond="confirm == 'Yes'">
<goto next="#placeOrder" />
<elseif cond="confirm == 'No'" />
<prompt>Ok. Let us do it again.</prompt>
<goto next="#pizzaSelection" />
</if>
</filled>
</form>
2. Our conrmation grammar is simple. We check for different words the
customer can say to conrm the order and return a Yes or a No. Here's how it
will look:
<?xml version="1.0" encoding="UTF-8"?>
<grammar root="CONFIRM" xmlns="
/grammar" xml:lang="en-US">
<rule id="CONFIRM">
<one-of>
<item>yes<tag><![CDATA[ <confirm "Yes"> ]]></tag></item>
<item>yep<tag><![CDATA[ <confirm "Yes"> ]]></tag></item>
<item>yeah<tag><![CDATA[ <confirm "Yes"> ]]></tag></item>
<item>no<tag><![CDATA[ <confirm "No"> ]]></tag></item>
<item>nope<tag><![CDATA[ <confirm "No"> ]]></tag></item>
<item>nah<tag><![CDATA[ <confirm "No"> ]]></tag></item>
</one-of>
</rule>
</grammar>
3. Once the order is conrmed, we need to place it on the server. For this we
need to send all application-level variables that we collected to our web
server. As you may have guessed, this can be achieved with one tag. The
<submit> tag. We specify the server URL in the next attribute, and the
variables to pass in namelist. When control comes to this place, Prophecy
will make a request to the URL, passing these variables, and play back the
response to the caller online. The following code shows the VXML code for
the placeOrder form.
<form id="placeOrder">
<block>
<submit next="http://localhost/potr/takeIVROrder.php"
namelist="application.pizza application.size
application.crust application.topping application.
quantity application.customer" method="post"/>
</block>
</form>
Chapter 9
[ 179 ]
4. On the server side, we need to create a new page called takeIVROrder.php.
We can do all the business logic for handling IVR orders there. We can nd
a customer record from our database based on the caller ID of the person
ordering, or insert a new record for that customer. If we have record for the
customer in our database, we don't need to get their address; else, we need to
call her or him back and take the address. The following code is a sample that
simply writes out all the incoming variables to a text le. We have omitted
the implementation for this example.
<?php
header("Content-Type: text/xml");
echo "<?xml version=\"1.0\" encoding=\"UTF-8\"?>";
?>
<vxml version = "2.1">
<meta name="maintainer" content=""/>
<?php
file_put_contents("vars.txt", print_r($_POST, true));
?>
<form id="orderPlaced">
<block>
<prompt>Order confirmed. We will call you back soon to
take your address. Thank you.
</prompt>
</block>
</form>
</vxml>
5. Now that we have done everything, it's time to give our application a shot.
Come back to the SIP phone, and dial into the application. Select your pizza,
size, and crust, the topping you want, and the quantity you want to order.
Listen to the conrmation; say yes, and bingo, the order is in!
How Did It Turn It All Around?
We used all the application variables we gathered in the prompt to conrm the
order. If you noticed we stuck a bargein="false" attribute on our <prompt> to
make sure nothing can disturb the process. Once we got the conrmation of the
order, we passed a list of variables to our PHP script.
The variables will come in PHP a little differently from what we mentioned. They
will become application_pizza, application_size, and so on. For now, we
simply write them out to a text le to conrm the order goes through.
Interactive Voice
[ 180 ]
It's critical that our PHP outputs valid VXML code. Prophecy will not be able to play
it back to the caller otherwise. Worse yet, it will play an error message to the user.
To ensure success here, we put the proper XML header and prolog at the start of the
PHP le. The rest of the code in PHP is standard VXML code.
You can generate your full voice XML application using PHP. PHP can
pull up information from the database, based on the user's inputs, and
generate VXML or grXML content. All we need to ensure is valid VXML
and grXML code so that the server can play it back as audio.
If you are waiting for more, there is none! We have achieved the titanic feat of taking
a complete pizza order on the phone. Here are some online resources that will help
you in developing voice applications:
Voxeo's VXML Developers Guide: />Ken Rehor's World of Voice XML: />Reviews, Events and more: />What's next in VXML? Now, let's see what we did in
this chapter!
Summary
In this chapter, we learned to develop voice-enabled dynamic applications.
Specically:
Understanding the basics of IVR and telephony
Setting up a Voxeo Prophecy server for development
Creating voice applications using VXML and grXML grammar
Playing pre-recorded audio and automatic text to speech
Accepting keypad inputs
Recognizing different spoken words via simple to complex grammars
Processing data in VXML with JavaScript
Integrating with server-side scripting and generating dynamic VXML pages
Luigi is extremely pleased now! He's got everything he wanted, but then he wants
some more! Luigi's heard enough of AJAX for the web, and he is wondering if we
can do AJAX on the mobile web! AJAX on the mobile web? Here comes the
next chapter!
•
•
•
•
•
•
•
•
•
•
•
Mobile AJAX
AJAX and Web 2.0 are two expressions that web developers have uttered a million
times in the last two years. Apart from being hot buzzwords, they actually represent
advances in technology that facilitate building better web applications. AJAX is now
possible even on mobile devices, and Luigi is interested in exploring what can be
done for Pizza On The Run.
In this chapter, we will learn how to use AJAX on mobile devices. We will
specically look at:
Getting pizza recipes via AJAX
Enabling AJAX in forms
Understanding iPhone application development
More of building rich mobile apps
Mobile devices have limited CPU power, memory, and network speed. These restrict
the usage of scripting in the browser. Most of the time, it's not feasible to allow
scripting. Loops in JavaScript and XML DOM (Document Object Model) processing
can also drain the batteries as they involve a lot of CPU cycles. A mobile device can
be on the move, so the network connection may drop and reconnect and is not
very reliable.
But with better phones, it is now possible to run JavaScript-based AJAX applications
on mobile devices. On the extreme side, AJAX applications are the only way to build
and run custom applications on a device like the iPhone.
Let's now see how we can use these technologies!
•
•
•
•
Mobile AJAX
[ 182 ]
Getting Pizza Recipes via AJAX
Luigi wants to build a social tool where visitors can participate. He wants to share
pizza recipes, and even allow visitors to contribute their own recipes. But more
importantly, he wants to allow them to comment on a recipe, share their experiences
cooking that recipe, and get connected with other pizza lovers!
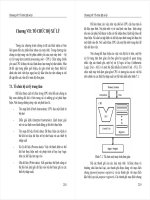
The following gure shows how the page will be laid out for the new Recipes section
on Pizza On The Run. The recipe and comments are the main sections of the page.
Navigation at the top will allow visitors to traverse between recipes.
Navigation
Add Comment
Form
Title
Photo
Pizza Recipe
Meta Info
Comments
Devising our AJAX Strategy
We are assuming that you have a fair understanding of the basic AJAX concepts.
If you are new to AJAX, it's a good time to read Jesse James Garrett's article at
that started the whole AJAX revolution. Googling for AJAX too will give you
a wealth of information on the topic.
If you think about it, the main advantage of AJAX is reduced page reloads. We can
retrieve only the data that we want from the server, and change only the part of the
page that we want to change. This makes the interface more interactive and uid. For
our recipes page, we want to bring the recipe and comments via AJAX. The comment
submission too will happen over AJAX.
Chapter 10
[ 183 ]
But hey, AJAX has XML in it! Are we really going to use XML? If we use XML,
the mobile browser has to process the XML, format it, and then display it. This
could take up a lot of CPU power. So what can we do? Simple; don't use XML! Use
XHTML! We will format the output on the server, and the client will only have to
display that at an appropriate place in the page. This will make our job easier. So as
such, we will be using AJAH (Asynchronous JavaScript and HTML) and not AJAX!
Another caveat is the use of JavaScript! The purpose of mobile AJAX is to make
things faster. So, we need to ensure that our JavaScript neither takes too long to
download, nor takes the CPU for a spin!
If you have worked with AJAX on the Web, you will be aware of many libraries and
tools available to build AJAX applications. Dojo, Prototype, YUI, and Script.actulo.
us are some of the most popular toolkits. Unfortunately, there are no such libraries
available for mobile AJAX as of this writing. There are a few projects under way, but
none released to the public. A mobile AJAX library must be lightweight and ideally,
be adapted as per the device—exposing features supported only by that device. If we
don't want to get into a lot of complexity, implementing basic AJAX is very simple.
We can use the XMLHttpRequest object to build our AJAX application.
What we will do is extend the Frost AJAX library. Frost is the rst mobile
AJAX library, and is still under development. Available from Paving Ways
(www.pavingways.com), Frost provides the basic AJAX functions. We will write
additional JavaScript code to serve our needs and glue things together.
On the back end, we will write code that will retrieve the recipe and comment
information. One important thing we need to keep in mind here is that only the
recipe and comments HTML code should be outputted. No <body> or other XHTML
tags are necessary. This is because whatever our back end will output will come to
the AJAX call. And that is what will be inserted into the <div> that shows recipes
and comments. If we have extra HTML code, that too will be inserted in the <div>,
making our document syntactically incorrect. It may also affect the way the page
is displayed.
We have a problem to solve here. All our back end gets routed through index.php,
hence the header and other les get included automatically on all calls. We do not
need them on our AJAX calls. To avoid this, we will use PHP's output buffering
system. In index.php, we will start buffering the output via ob_start(). At the end
of index.php—once all operations are done—we will ush the output buffer with
ob_end_flush(). This will ensure other pages work well. Now at the beginning of
our AJAX handler, we will simply do an ob_end_clean() to discard current output
buffers and stop further buffering. We can then output whatever we want. At the
end of our handler, we will exit(), so that no footer code will be shown as well.
Mobile AJAX
[ 184 ]
In terms of page structure, we will have a few <div> tags. The main div will be the
one that will hold the recipe and comments. We will have a div for the comment form
also—but it will be hidden at the start. We will have a <script> area where we will
keep all our functions that use the Frost library and perform operations that we want.
We now have the fundamentals in place. Let's go ahead and implement the
recipes page!
Time for Action: Showing Recipes
1. We need to rst create two tables—one for recipes and the other for
comments. The following code shows the SQL to create these tables.
CREATE TABLE `recipes` (
`id` int(10) unsigned NOT NULL auto_increment,
`submitter` varchar(75) NOT NULL,
`submitterPhone` varchar(20) NOT NULL,
`photo` varchar(30) NOT NULL,
`dateUpdated` timestamp NOT NULL,
`title` varchar(30) NOT NULL,
`basicInfo` mediumtext NOT NULL,
`ingredients` mediumtext NOT NULL,
`directions` mediumtext NOT NULL,
PRIMARY KEY (`id`)
) COMMENT='Hot recipes';
CREATE TABLE `recipeComments` (
`id` int(10) unsigned NOT NULL auto_increment,
`recipeId` int(11) unsigned NOT NULL,
`submitter` varchar(75) NOT NULL,
`submitterPhone` varchar(20) NOT NULL,
`dateUpdated` timestamp NOT NULL,
`comment` mediumtext NOT NULL,
PRIMARY KEY (`id`)
) COMMENT='Comments on recipes';
2. We can now add a few recipes and comments via phpMyAdmin, so that
when we do the rest of the code, we have some data to display. While
adding data, please ensure that you use proper recipeId values in the
recipeComments table.
3. Let us create the Recipe class now. It will extend the BaseModel class we have
been using in the rest of the POTR code, and will make it easy to retrieve or
save data from the recipe table. The following code shows this class.
<?php
class Recipe extends BaseModel
{
public $_submitter;
public $_submitterPhone;
Chapter 10
[ 185 ]
public $_photo;
public $_dateUpdated;
public $_basicInfo;
public $_ingredients;
public $_directions;
public function __construct($tableName = "recipes",
$data = null)
{
parent::__construct($tableName, $data);
}
}
?>
4. Similarly, we can create the RecipeComment class. Let's add a function to get
all comments for a particular recipe too.
<?php
class RecipeComment extends BaseModel
{
public $_recipeId;
public $_dateUpdated;
public $_submitter;
public $_submitterPhone;
public $_comment;
public function __construct($tableName = "recipeComments",
$data = null)
{
parent::__construct($tableName, $data);
}
public function GetCommentsForRecipe($recipeId)
{
return $this->GetAll("recipeId = '$recipeId'",
"dateUpdated desc");
}
}
?>
5. It's time to create a PHP le that will show the recipes to the visitor. This
le will also make the AJAX calls and provide a form to comment on a
recipe. First, let's get the structure ready. Refer to the following code for
recipes.inc.php's rst cut!
<div id="jsarea">
<script type="text/javascript" src="assets/frost.js"></script>
<script type="text/javascript">
<![CDATA[
// Check for AJAX support. If not supported, show a warning
if (!TestXHR())
Mobile AJAX
[ 186 ]
{
document.write("Your browser has JavaScript support, but no
AJAX support.");
}
else
{
// Get a recipe via AJAX
}
]]>
</script>
<noscript>Sorry your browser does not support
JavaScript!</noscript>
</div>
<div id="main">
<h2>Hot Recipes</h2>
<p>Latest recipes from POTR and our visitors!</p>
</div>
<div id="commentForm"></div>
6. You may have noticed the frost.js there and the call to the TestXHR()
function. This is the Frost mobile AJAX library we talked about. The
TestXHR() function checks if the browser has AJAX support. If the browser
does not have AJAX or JavaScript support, we show an appropriate message.
Ideally, we should provide such browsers with another page from which
they can see recipes in a non-AJAX way. A nice article on dev.mobi explains
how to do this (i/node/557). We will just focus on the
AJAX way in our examples. So let's see what's in the frost.js le.
var xhr = false;
var dgbcnt = 0;
// preload loading image
loading = new Image();
loading.src = "assets/loading.gif";
function dbg(message){
dgbcnt ++;
var messobj = document.getElementById('debug');
if(messobj) messobj.innerHTML += dgbcnt+': '+message+'<br />';
}
function TestXHR(){
// check for XHR support
var xhrsupport = XHRInit();
if(xhrsupport){
return true;
}
return false;
Chapter 10
[ 187 ]
}
function XHRInit() {
if(xhr){ return "true 1"; }
else {
req = false;
if(window.XMLHttpRequest) {
try { xhr = new XMLHttpRequest(); return
"XMLHttpRequest Object"; }
catch(e) { xhr = false; return false; }
return false;
} else if(window.ActiveXObject) {
try { xhr = new ActiveXObject('Msxml2.XMLHTTP');
return "ActiveX"; }
catch(e) {
try {xhr = new ActiveXObject('Microsoft.XMLHTTP');
return "ActiveX";} catch(e) { xhr = false;
return false; }
}
return false;
} else { xhr = false; return false; }
}
}
function XHReq(url, responsediv, addcontent, returnvalue){
if(XHRInit()){
xhr.open('POST', url, true);
xhr.setRequestHeader('Content-Type', 'text/html;
charset=utf-8');
xhr.onreadystatechange = function(){ if(xhr.readyState
== 4){ ProcessXHR(xhr, responsediv, addcontent); } }
xhr.send('');
}
return returnvalue;
}
function ProcessXHR(xmlHttpReq, responsediv, addcontent){
var responseText = xmlHttpReq.responseText ? xmlHttpReq.
responseText : '';
if(addcontent){document.getElementById(responsediv).innerHTML
+= responseText;}
else {document.getElementById(responsediv).innerHTML =
responseText;}
}
function ShowDetails(url, responsearea, addcontent, returnvalue){
document.getElementById(responsearea).innerHTML = '<img
class="loadimg" src="'+loading.src+'" alt="loading "
width="16" height="16" />';
return XHReq(url, responsearea, addcontent, returnvalue);
}
Mobile AJAX
[ 188 ]
7. The library now gives us functions that we can use to implement AJAX.
XMLHttpRequest and response handling are essential parts of AJAX. But we
still have to write our back end and extra JavaScript functions that will glue
things together. Let us rst build a PHP back end that will give us recipe
details and comments on them. Below is the code in recipeHandler.inc.
php—the le that will be invoked via index.php through AJAX.
<?php
ob_end_clean();
if (!$_REQUEST['what'] || $_REQUEST['what'] == 'show')
{
// Replace new lines with list item tags so that we can show
// a nice display
function splitToList($string)
{
return '<li>'.str_replace("\n", "</li><li>",
trim($string)).'</li>';
}
if(!isset($_REQUEST['num']))
{
$_REQUEST['num'] = 0;
}
$recipe = new Recipe();
// Get recipe details - limit at num - this will
// fetch only one recipe
$result = $recipe->GetAll("", "id desc", "1",
$_REQUEST['num']);
if (count($result) == 1)
{
foreach($result as $item)
{
echo '<h2>'.$item['title'].'</h2>
<img src="assets/recipes/'.$item['photo'].'" alt="'
.$item['title'].'" /><br />
<h3>Basic Information</h3><ul>'.splitToList(
$item['basicInfo']).'</ul>
<h3>Ingredients</h3><ul>'.splitToList($item['ingredients']).'</ul>
<h3>Directions</h3><ol>'.splitToList($item['directions']).'</ol>
<p>Submitted by '.$item['submitter'].' on '.$item[
'dateUpdated'].'</p>';
// Pass a hidden field. This will be required while adding
// comments later on
echo '<form name="recipeHiddenInfo"><input type="hidden"
name="recipeId" value="'.$item['id'].'" /></form>';
Chapter 10
[ 189 ]
// Get the comments for this item
$rc = new RecipeComment();
$comments = $rc->GetCommentsForRecipe($item['id']);
if (count($comments) > 0)
{
echo '<h3>Comments:</h3>';
foreach($comments as $comment)
{
echo '<p>'.$comment['comment'].'<br />
By: '.$comment['submitter'].' On: '.$comment[
'dateUpdated'].'</p>';
}
}
}
}
else
{
echo '<p>Sorry, no more recipes found.</p>';
}
}
else if ($_REQUEST['what'] == 'comment')
{
// Comment saving code here
}
exit;
?>
8. That was a lot of PHP code! We are now ready to add JavaScript functions
and get recipes! Let's give it a shot. Let's add some code to our recipe.inc.
php in the JavaScript section. We will get a recipe if our AJAX test succeeds.
Below is this code. The code to make the AJAX call is highlighted.
<div id="jsarea">
<script type="text/javascript" src="assets/frost.js"></script>
<script type="text/javascript">
<![CDATA[
var num = 0;
var reqNum = 0;
function GetRecipe(index)
{
reqNum = index;
if (reqNum >= 0)
{
Mobile AJAX
[ 190 ]
ShowDetails('?action=recipeHandler&what=show&num='+
(reqNum), 'main', false, false);
}
}
if (!TestXHR())
{
document.write("Your browser has JavaScript support, but no
AJAX support.");
}
else
{
GetRecipe(0);
}
]]>
</script>
<noscript>Sorry your browser does not support
JavaScript!</noscript>
</div>
9. If all went well, you should see something like the following gure in your
mobile browser!
Chapter 10
[ 191 ]
10. If you face any problem, add an alert(responseText); after the rst line in
the ProcessXHR function in frost.js. That will show you the HTML code
coming from the server. You may also use the dbg()function for any other
debugging needs. If your mobile device does not support JavaScript, the
following gure is what you may see.
What's Going on in the Background?
We created a platform for building AJAX-enabled applications. The way it works
is that when the page gets loaded in the browser, the JavaScript will execute and
check if the browser has XMLHttpRequest (XHR) object support. If it does, we call
the GetRecipes function with 0 as argument. That in turn calls the ShowDetails
function of Frost library. This put up a loading image in the main div and makes
an XHR request through the XHReq function. This is an asynchronous call, and the
ProcessXHR function will be called once the server's response is received.
On the server, the PHP code makes a query, and limits it for one record starting from
0. Once we get the recipe data, we format it using some nice HTML. We also use a
custom function to split the data at new line characters and show it in a list format.
We are using a form and a hidden variable that stores the recipeId in the output.
This will be used later in the JavaScript function that submits a comment on a recipe.
Once this is done, we check the recipeComments table for comments made on this
recipeId. If we nd any, we include them also in the output.
All this output from PHP comes in ProcessXHR as responseText. And we put that
in the main div. As we do this, the page content changes and shows us our recipe!
And all this happened without reloading the page!
Mobile AJAX
[ 192 ]
What if Your Device Does Not Support AJAX?
If the devices you are testing on do not support AJAX, it would be difcult to test.
One option is to use a service like DeviceAnywhere (www.deviceanywhere.com)
that allows you to remotely test on a variety of mobile devices and carriers. You get
to test on the actual devices remotely, and it's very convenient to test multiple real
devices from a single place. The following screenshot shows our POTR application
running in an iPhone over DeviceAnywhere.
If you do not want to use DeviceAnywhere, you can test with desktop versions
of Opera and Safari browsers. Many mobile browsers these days are based on
the WebKit engine ( and you can test on that too. But do
remember that testing on real devices may have varying results.
Chapter 10
[ 193 ]
On the other side, what if your target users don't have AJAX support? It's always a
good practice to have a backup! Though AJAX support is increasing, do take some
time to build a fallback for your production applications. The dev.mobi article
mentioned earlier shows a good example of how you can do this.
While doing AJAX, don't go overboard. Animated "loading" images,
animations, and other eye candy may actually hinder the usability of your
application because of the download size and CPU needs. Stay focused on
the user!
Adding Navigation
We got one recipe on the page. But we need a simple way to navigate within the
recipes. This is very easy now with our GetRecipe function. What we need to keep
track of is the current index of the recipe. And we can add one or subtract one from it
to get the next or previous recipe. Let's code it up!
Time for Action: Adding Navigation for Recipes
1. If you noticed, in the previous code, we have checked if the requested index
is greater than zero. If it is, only then we make the request to get the recipe.
At the start of our JavaScript, we have initialized two variables—num and
reqNum. Variable num will store the index of the current recipe and reqNum is
the index of the requested recipe.
2. What remains is to set the num to reqNum once the requested recipe is
received! Let us write a function that does this in recipe.inc.php. We will
then call this function once we get the XHR response. Below is the code.
function ResultProcessed()
{
num = reqNum;
}
3. Next, let us modify frost.js ProcessXHR() to call our function once
the response is processed. This means once the recipe is displayed,
ResultProcessed() will be called. If you are going to use frost.js
in other pages, you should make sure that you have a function named
ResultProcessed() on the page, otherwise it will throw up a JavaScript error.
function ProcessXHR(xmlHttpReq, responsediv, addcontent){
var responseText = xmlHttpReq.responseText ?
xmlHttpReq.responseText : '';
if(addcontent){document.getElementById(responsediv)
.innerHTML += responseText;}
Mobile AJAX
[ 194 ]
else {document.getElementById(responsediv).innerHTML
= responseText;}
ResultProcessed();
}
4. What remains now is to link up the next and previous recipes via JavaScript.
Let's add this at the top of our recipes.inc.php. Below is the code.
<p><a href="#" onclick="JavaScript:GetRecipe(num-1);">Prev recipe</a>
- <a href="#" onclick="JavaScript:GetRecipe(num+1);">Next recipe</a>
- <a href="#commentForm" onclick="JavaScript:ShowCommentForm();
">Add a Comment</a></p>
5. That's all! Clicking on Next or Prev on our recipes page will load up the
appropriate recipe. When all recipes are nished, we will get an apology
message saying there are no more recipes! The following screenshot shows
what the navigation looks like, on the iPhone.
Yes! Simply setting a variable to hold the current index and adjusting it on fetching
the next or previous recipe does the trick for us. The PHP back end expects just the
index, and it fetches one recipe from there. When the code is done, it feels so uid
navigating among recipes! That's the power of AJAX!
Adding Comments
We want to allow users to submit comments on the recipes displayed. This will
build a community around our recipes service. We have already added a link for
submitting comments. Let's see how we can develop the code for it.
Chapter 10
[ 195 ]
Time for Action: Submitting Comments
1. Let us add the comment form to recipe.inc.php rst. We will keep it in a
<div> and hide it by default. This will save some screen space. Below is the
form code.
<div id="commentForm" style="display:none">
<a id="commentForm"></a>
<h2>Add a Comment</h2>
<form name="formComment">
<fieldset>
<input type="hidden" name="recipeId" value="0" />
Your Name: <input type="text" name="submitter" value=""
size="20" maxlength="35" /><br/>
Your Phone: <input type="text" name="submitterPhone" value=""
size="20" maxlength="35" /><br/>
Comment: <textarea name="comment" value="" cols="35"
rows="10" ></textarea><br/>
<input type="button" value="Contribute" onClick="
SubmitComment()"/>
</fieldset>
</form>
</div>
2. In the link we added, we have set the href to #commentForm, which is the
anchor ID. The page will scroll to the form when the link is clicked. Let us
write a function that will show the form if it's hidden, and hide it if
it's visible.
function ShowCommentForm()
{
var elm = document.getElementById("commentForm").style;
if (elm.display == "none")
{
elm.display = "block";
}
else
{
elm.display = "none";
}
}