Manning Windows Forms Programming (phần 9) potx
Bạn đang xem bản rút gọn của tài liệu. Xem và tải ngay bản đầy đủ của tài liệu tại đây (640.45 KB, 50 trang )
366 CHAPTER 11 MORE CONTROLS
The Photographs group box is now replaced with a Photos tab page. This tab is
aligned on the left side of the tab control. The
Alignment property uses the Tab-
Alignment
enumeration, with possible values Top, Bottom, Left, and Right.
As you may have noticed, when the
Alignment property for a tab control is
Left or Right, the Multiline property is automatically set to true. Compile and
run the application to make sure the controls still behave as expected, including mul-
tiple selection and the owner-drawn list feature via the Thumbnails menu.
We will add a second
TabPage later in the chapter to display the set of dates asso-
ciated with the album in a calendar format. This will enable a discussion of the
MonthCalendar class. Before we can do this, we will first provide the appropriate
support for the
DateTaken property of the Photograph class.
11.3 DATES AND TIMES
We will return to tab pages and our MyAlbumEditor application in a moment. In
this section we finally preserve the Date Taken value entered by the user in our
Pho-
toEditDlg
form. As you may recall, in chapter 9 we intentionally ignored this value
to avoid converting the user-entered string value into a date. At the time we said there
was a better way to deal with date constructs. In this section we finally see exactly
what this looks like.
Dealing with dates and times is one of those issues that prevent some program-
mers from getting a good night’s sleep. With 3600 seconds in an hour, and 24 hours
in a day, and different days per month, and leap years almost but not quite every four
years, it’s no wonder. Fortunately, most languages and environments these days pro-
vide direct support for date-time values to simplify handling of these constructs. In the
.NET Framework, this support extends to Windows Forms controls as well.
In chapter 5 we saw how the
DateTime structure is used to represent a date-time
value within a program. In this section we will look at representing a date-time value
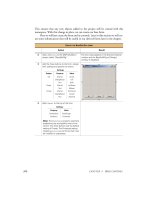
8 Manually reestablish the event
handlers for the controls. This
includes the
DoubleClick,
DrawItem, MeasureItem, and
SelectedIndexChanged event
handlers for the list box, and the
Click handlers for each of the
four button controls.
How-to
Use the Events listing in the
Properties window, and select
the existing methods from the
appropriate dropdown lists.
The event handlers for the controls are assigned to the
appropriate events.
Note: This step is required whenever a control is
cut from one location and pasted into another. The
event handlers are not preserved, although the
properties of the controls are.
REPLACE THE GROUPBOX WITH A TABPAGE (continued)
Action Result
DATES AND TIMES 367
on a form using the
DateTimePicker class, as summarized in .NET Table 11.3. This
class displays a date and/or time to the user, and allows the user to change the values
from the keyboard or from a dropdown calendar control. The dropdown calendar is
based on the
MonthCalendar class, which we will examine in the next section.
11.3.1 D
ATES AND TIMES
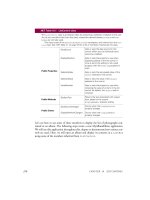
Our Photo Properties dialog with a DateTimePicker control in place is shown in
figure 11.5. As you can see, the dropdown calendar control is displayed for the object.
.NET Table 11.3 DateTimePicker class
The DateTimePicker class represents a date and/or time value on a form. It allows the user
to select a specific date and/or time, and presents this selection in a specified format. The
DateTime value is presented in a text box control, with a down arrow providing access to a
calendar from which an alternate date can be selected. The various parts of the
DateTime
value can alternately be modified using an up-down button or the arrow keys on the keyboard.
This class is part of the
System.Windows.Forms namespace, and inherits from the Con-
trol class. See .NET Table 4.1 on page 104 for a list of members inherited from this class.
Public Properties
CalendarFont Gets or sets the Font to apply to the calendar
portion of the control.
CalendarForeColor Gets or sets the foreground color for the
calendar.
Checked When the
ShowCheckBox property is true, gets
or sets whether the check box is checked.
CustomFormat Gets or sets the custom date-time format.
Format Gets or sets how the date-time value is
formatted in the control.
MaxDate Gets or sets the maximum date-time value for
the control.
MinDate Gets or sets the minimum date-time value for
the control.
ShowCheckBox Gets or sets whether a check box displays to the
left of the selected date.
ShowUpDown Gets or sets whether an up-down control is used
to adjust the date-time value.
Value Gets or sets the
DateTime value assigned to the
control. Default is the current date and time.
Public Events
CloseUp Occurs when the dropdown calendar is
dismissed and disappears.
DropDown Occurs when the dropdown calendar is shown.
FormatChanged Occurs when the
Format property changes.
ValueChanged Occurs when the
Value property changes.
368 CHAPTER 11 MORE CONTROLS
We can add this control to our dialog using the following steps. We will begin with
the default display settings for this control, and look at how to modify these settings
later in the section.
Set the version number of the MyPhotoAlbum application to 11.3.
Figure 11.5
The DateTimePicker shown
here displays the Long date for-
mat, which is the default.
REPLACE THE DATE TEXT BOX WITH A DATETIMEPICKER CONTROL
Action Result
1 In the PhotoEditDlg.cs [Design]
window, delete the
TextBox control
next to the Date Taken label.
2 Place a DateTimePicker control
where the text box used to be.
Note: The location of this control is shown in
figure 11.5.
3 Locate the
ResetSettings method
in the MainForm.cs source file.
protected override void ResetSettings()
{
// Initialize the ComboBox settings
. . .
4 Set the Value property for the date
and time control.
How-to
Use the DateTaken property.
Photograph photo = _album.CurrentPhoto;
if (photo != null)
{
txtPhotoFile.Text = photo.FileName;
txtCaption.Text = photo.Caption;
dtpDateTaken.Value = photo.DateTaken;
cmbxPhotographer.SelectedItem
= photo.Photographer;
txtNotes.Text = photo.Notes;
}
}
Settings
Property Value
(Name) dtpDateTaken
TabIndex 5
DATES AND TIMES 369
And there you have it. One
DateTimePicker control ready to work. Compile and
run the application, and set the dates for your photographs as appropriate. Make sure
your albums preserve the selected date after exiting and restarting the program.
You may have noticed that our control does not display the time. By default, the date
and time control displays what .NET calls the long date. This includes the day of the
week and month written out in the local language as well as the two-digit day and
four-digit year. The format used by the control is specified by the
Format property,
using the
DateTimePickerFormat enumeration described in .NET Table 11.4. As
you can see from the table, various values allow either the date or time to be displayed
in a format specified by the operating system.
11.3.2 C
USTOMIZING A DATETIMEPICKER CONTROL
As can be seen in .NET Table 11.4, a custom display setting for the DateTime-
Picker
control is used when the Format property is set to DateTimePicker-
5 Locate the SaveSettings method.
protected override void SaveSettings()
{
6 Set the DateTaken property to the
date-time value specified by the user.
Photograph photo = _album.CurrentPhoto;
if (photo != null)
{
photo.Caption = txtCaption.Text;
photo.DateTaken = dtpDateTaken.Value;
photo.Photographer
= cmbxPhotographer.Text;
photo.Notes = txtNotes.Text;
}
}
REPLACE THE DATE TEXT BOX WITH A DATETIMEPICKER CONTROL (continued)
Action Result
.NET Table 11.4 DateTimePickerFormat enumeration
The DateTimePickerFormat enumeration specifies how to display a date-time value in a
DateTimePicker control. This enumeration is part of the System.Windows.Forms
namespace. For each value, the default setting for the U.S. English culture is provided. The for-
mat codes used here correspond to the codes supported by the
DateTimeFormatInfo class.
Enumeration
Values
Custom A custom format is used, as specified by the
CustomFormat property.
Long The long date format is used. In Windows, this is typically
“dddd, MMMM dd, yyyy” for U.S. English environments.
This is the default value.
Short The short date format is used. In Windows, this is
typically “MM/dd/yyyy” for U.S. English environments.
Time The time format is used. In Windows, this is typically
“HH:mm:ss tt” for U.S. English environments.
370 CHAPTER 11 MORE CONTROLS
Format.Custom. The CustomFormat property contains the string value to use
in this case. A number of format codes are available within this string. These codes
are managed by the sealed
DateTimeFormatInfo class. The following table shows
a number of these codes, along with some corresponding properties in the
DateTimeFormatInfo class, which can be especially useful when operating in a
multi-language environment. Consult the .NET documentation for the complete
list of codes and additional information on the specified properties.
Let’s modify our date and time control to display a customized value. We will include
both the date and time in the display.
Date-time codes for the DateTimeFormatInfo class
Pattern Description
Default U.S. English
Value s
DateTimeFormatInfo
Property
d Day of the month. 1 to 31
dd Two-digit day of the month. 01 to 31
ddd Abbreviated day of the week. Sun to Sat AbbreviatedDayNames
dddd Full day of the week. Sunday to Saturday DayNames
M Numeric month. 1 to 12
MM Two-digit numeric month. 01 to 12
MMM Abbreviated month name. Jan to Dec AbbreviatedMonthNames
MMMM Full month name. January to December MonthNames
y Year without century. 1 to 99
yy Two-digit year without century. 01 to 99
yyyy Four-digit century. 0001 to 9999
gg Period or era, if any. B.C. or A.D.
h Hour on a 12-hour clock. 1 to 12
hh Two-digit hour on a 12-hour clock. 01 to 12
H Hour on a 24-hour clock. 1 to 24
HH Two-digit hour on a 24-hour clock. 01 to 24
m Minute. 0 to 59
mm Two-digit minute. 00 to 59
s Second. 0 to 59
ss Two-digit second. 00 to 59
tt AM/PM designator. AM or PM AMDesignator and
PMDesignator
: Default time separator. : ( a colon) TimeSeparator
/ Default date separator. / (a slash) DateSeparator
‘c’ Displays the specified character. For
example, ‘s’ will display the
character s rather than the number
of seconds.
DATES AND TIMES 371
If you compile and run these changes, you will find that the dropdown calendar still
appears. The time values can be modified by hand or with the arrow keys. You might
try using some alternate format strings, or setting the
ShowUpDown property to true
as a way to experiment with these customized settings.
The
DateTimePicker class is great for displaying a single date-time value.
When multiple dates or a range of dates are required, the
MonthCalendar class can
be used. We will discuss this control next.
More .NET
As an alternative to a DateTimePicker control, another option here is to
create separate controls for the month, day, and year, and if necessary the
time of day. While the
TextBox or ComboBox controls could be used for
this purpose, you could also use the
DomainUpDown and NumericUpDown
controls. These controls are derived from the UpDownBase control, which
in turn is based on the
ContainerControl class presented in chapter 7.
The up-down controls present a text-box-like window that displays a
range of values. The
DomainUpDown control presents a string value tak-
en from a collection of objects, while the
NumericUpDown control pre-
sents a numeric value, optionally over a defined range.
For separate month, day, and year controls, the properties for the
DateTime-
FormatInfo
class shown earlier in this section may be used to obtain the default
set of month strings for display within a
DomainUpDown control. The day
and year values can be displayed in a
NumericUpDown control, with the
range set based on the current month and the requirements of the application.
DISPLAY A CUSTOM DATE-TIME VALUE IN THE DATETIMEPICKER CONTROL
Action Result
1 Display the properties for the
DateTimePicker control in the
PhotoEditDlg.cs [Design] window.
2 Modify this control to display a custom
format string.
The control displays the new format within Visual
Studio.
Settings
Property Value
CustomFormat MM/dd/yy 'at' hh:mm tt
Format Custom
372 CHAPTER 11 MORE CONTROLS
11.4 CALENDARS
Sometimes a single date will not do. A scheduling program, for example, might need
to show a calendar with meeting days highlighted, or display a meeting that covers a
range of dates. The
MonthCalendar class allows one or more months to be dis-
played on a
Form, with individual days highlighted or a range of days selected.
Since our
PhotoAlbum class permits each photograph to specify its own date, it
seems appropriate to demonstrate the calendar control by highlighting the days in a
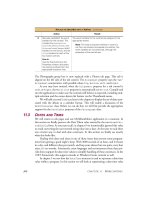
calendar on which a photograph was taken. We will do this by adding a second
TabPage object to our MyAlbumEditor main window. The result of our changes is
shown in figure 11.6. Note how some dates are in bold to indicate one or more pho-
tographs were taken that day. If the user clicks on a date, a context menu pops up con-
taining the corresponding photographs. When a photograph is selected from this
context menu, the properties for that photograph are displayed.
The interface in figure 11.6 provides a very different view of our album. While
the order of photographs in the album is not apparent, the specific days that a collec-
tion of pictures was taken is immediately available.
This section will discuss the month calendar control in general and add the con-
trol to a new tab page in our application. We will discuss how to bold the dates when
photographs were taken, and how to process and respond to mouse clicks made within
the control.
11.4.1 A
DDING A MONTHCALENDAR CONTROL
An overview of the MonthCalendar class is provided in .NET Table 11.5. This class
handles the entire range of dates possible in
DateTime objects, which is basically any
date with a four-digit century. This class is a good way to display a series of dates
related to an object or collection of objects.
Figure 11.6
The MonthCalendar control will
automatically display multiple
months as it is resized.
CALENDARS 373
In our case, we will display the dates associated with a collection of photographs. Let’s
begin by adding a new
TabPage containing a MonthCalendar control to our form.
.NET Table 11.5 MonthCalendar class
The MonthCalendar class represents a control that displays one or more months to the user.
Days in each month can be displayed in bold, and the user can select single or multiple dates.
This class is part of the
System.Windows.Forms namespace, and inherits from the Control
class. See .NET Table 4.1 on page 104 for a list of members inherited from this class.
Public
Properties
AnnuallyBoldedDates Gets or sets an array of
DateTime objects that
indicate which days to show in bold on an annual
basis.
BoldedDates Gets or sets an array of
DateTime objects of specific
dates to show in bold.
MaxDate Gets or sets the maximum date. The user will not be
able to display months occurring after this date.
MaxSelectionCount Gets or sets the maximum number of dates that can
be selected in the control. Defaults to seven (7).
ScrollChange Gets or sets the number of months to scroll per click
of a scroll button. Defaults to one (1).
SelectionRange Gets or sets the range of dates selected in the
control.
SelectionStart Gets or sets the initial date of the range selected in
the control.
ShowToday Gets or sets whether to display the
TodayDate
value at the bottom of the control.
ShowTodayCircle Gets or sets whether the
TodayDate value is circled.
TodayDate Gets or sets the DateTime value used as today’s
date.
Public
Methods
AddAnnuallyBoldedDate Adds a day to display in bold on an annual basis.
GetDisplayRange Retrieves the range of dates displayed by the
control.
HitTest Determines which aspect of the month calendar
control is located at a specific point.
RemoveBoldedDate Removes a specific date from the list of nonrecurring
bolded dates.
SetDate Selects the given date in the control.
Public
Events
DateChanged Occurs when the current date in the control is
modified, such as when a new month is displayed.
DateSelected Occurs when the dates selected in the control are
modified.
374 CHAPTER 11 MORE CONTROLS
Set the version number of the MyAlbumEditor application to 11.4.
You will note that the Dock property for our month calendar object is set to Fill.
This ensures that the number of months displayed will expand to fill the entire tab page
as the form is enlarged. As we will see in the next section, months before the
MinDate
property value and after the MaxDate value will not be accessible from this control.
11.4.2 I
NITIALIZING A CALENDAR
Now that our MonthCalendar control is on the form, we can hook it up to our
PhotoAlbum class. We do not want to initialize the calendar needlessly, so we will
only do so when the Dates tab is displayed. By the same token, we do not want to ini-
tialize the
lstPhotos list box needlessly, so we need to ensure that this only occurs
when the Photos tab is displayed. Since we used the method
UpdateList for our list
box, we will create an
UpdateCalendar method to initialize and update our
MonthCalendar control.
The following steps are required for this change:
CREATE THE DATES TAB PAGE
Action Result
1 In the MainForm.cs [Design]
window, add a second tab page
to the
TabControl object.
2 Add a
MonthCalendar control
to this page.
Note: Your
MonthCalendar control will circle the
current date, which is likely not the date shown in
the graphic.
Settings
Property Value
(Name) tabDates
Text Da tes
Settings
Property Value
(Name) monthCalDates
Dock Fill
MaxSelection-
Count
1
ShowToday False
CALENDARS 375
INITIALIZE THE MONTH CALENDAR CONTROL
Action Result
1 In the MainForm.cs source file,
add an
UpdateCalendar method
to update the
MonthCalendar
control in the Dates tab.
private void UpdateCalendar()
{
// Initialize MonthCalendar control
2 In this method, calculate the range
of dates used by photographs in
this album.
DateTime minDate = DateTime.MaxValue;
DateTime maxDate = DateTime.MinValue;
DateTime[] dates
= new DateTime[_album.Count];
3 For each Photograph in the
album, record its date and adjust
the minimum and maximum date
as required.
Note: We could use a
foreach
loop here, of course. A
for loop
works a little better since an index
for the
dates array is required.
for (int i = 0; i < _album.Count; i++)
{
DateTime newDate
= _album[i].DateTaken;
dates[i] = newDate;
if (newDate < minDate)
minDate = newDate;
if (newDate > maxDate)
maxDate = newDate;
}
4 Assign the MonthCalendar
properties based on the calculated
date values.
Note: The
SelectionStart prop-
erty ensures that the initial date
for the album is displayed by the
calendar.
if (_album.Count > 0)
{
monthCalDates.BoldedDates = dates;
monthCalDates.MinDate = minDate;
monthCalDates.MaxDate = maxDate;
monthCalDates.SelectionStart = minDate;
}
}
5 Add a new UpdatePhotographs
method to update the appropriate
tab page.
How-to
Use the SelectedTab property of
the
tcPhotos control.
private void UpdatePhotographs()
{
if (tcPhotos.SelectedTab == tabPhotos)
UpdateList();
else if (tcPhotos.SelectedTab == tabDates)
UpdateCalendar();
}
6 Modify the OpenAlbum method to
update the appropriate tab page.
private void OpenAlbum(string fileName)
{
CloseAlbum();
_album.Open(fileName);
this.Text = _album.FileName;
UpdatePhotographs();
}
7 In the MainForm.cs [Design]
window, handle the
SelectedIndexChanged event for
our tab control.
Note: This is the default event for
tab controls, and occurs when-
ever a new tab is selected by the
user.
private void tcPhotos_SelectedIndexChanged
(object sender, System.EventArgs e)
{
UpdatePhotographs();
}
376 CHAPTER 11 MORE CONTROLS
Our calendar, as well as our list box, is updated whenever an album is opened and
whenever the user displays an alternate tab page. Compile and run the application if
you would like to see this in action. The next section processes the user’s mouse clicks
in the control to provide access to the
PhotoEditDlg form associated with a
selected date.
11.4.3 H
ANDLING MOUSE CLICKS IN A CALENDAR CONTROL
Our MonthCalendar control is on the form and displays the dates assigned to an
album’s photographs in bold. The next step is to handle clicks by the user and link
them up with associated photographs.
We will handle the
MouseDown event for this purpose, and create a Context-
Menu
object on the fly to display any photos associated with the selection point. The
MonthCalendar class also provides the DateChanged event that occurs whenever
a valid date is clicked. We could use this event instead, although the current mouse
position would still be required to display the context menu. Since the
MouseDown
event provides the mouse location directly, this event seems a more logical choice.
We will discuss mouse events in more detail in the next chapter. Like the
Mouse-
Move
event used in chapter 8, a MouseDown event handler receives a MouseEvent-
Args
that includes the current position of the mouse. We will use this position both
to determine which aspect of the calendar the user clicked on and to display the con-
text menu at the appropriate location.
Before we see how to add this handler, one other item is needed. When we create
MenuItem objects for the context menu, we will need a way to retrieve the associated
Photograph object if the user later selects the menu. While the Control class pro-
vides a
Tag property that associates an object instance with a control, the MenuItem
8 Update the
SelectedIndexChanged event
handler for our combo box control
to enable or disable the controls as
required.
Note: We take a slightly different
approach here than we used ear-
lier in the chapter. The final effect
is the same.
private void cmbxAlbums_SelectedIndexChanged
(object sender, System.EventArgs e)
{
. . .
try
{
CloseAlbum();
OpenAlbum(albumPath);
tcPhotos.Enabled = true;
btnAlbumProp.Enabled = true;
}
catch (Exception)
{
// Unable to open album
this.Text = "Unable to . . . album";
tcPhotos.Enabled = false;
lstPhotos.Items.Clear();
monthCalDates.RemoveAllBoldedDates();
btnAlbumProp.Enabled = false;
}
}
INITIALIZE THE MONTH CALENDAR CONTROL (continued)
Action Result
CALENDARS 377
class has no such property. As a result, we have to deal with this unfortunate omission
ourselves. In chapter 3, we created an array indexed by the menu location that linked
a display mode to the menu. Now that we are more experienced, we will simply create
a new class derived from
MenuItem for a similar purpose.
As you will see, this very simple class will make our click handling much more effi-
cient. Let’s take a look at this code.
CREATE A CUSTOM MENUITEM CLASS TO HOLD THE ALBUM INDEX
Action Result
1 Within the
MainForm class definition,
define a new
PhotoMenuItem class
based on the
MenuItem class within
the
MainForm class.
private class PhotoMenuItem : MenuItem
{
2 Add a public field in this class to hold
the integer album index associated
with the menu.
public int tag;
}
HANDLE A MOUSE CLICK IN THE CALENDAR CONTROL
Action Result
3 Add an event handler for the
MouseDown event in the
MonthCalendar control.
private void monthCalDates_MouseDown
(object sender,
System.Windows.Forms.MouseEventArgs e)
{
4 Determine if the user clicked on a
date.
How-to
Use the HitTest method.
MonthCalendar.HitTestInfo info
= monthCalDates.HitTest(e.X, e.Y);
if (info.HitArea
== MonthCalendar.HitArea.Date)
{
5 If so, create a new context menu
to hold any photographs
associated with this date.
ContextMenu ctxtPhotoCal
= new ContextMenu();
6 Iterate through the photos in the
album.
for (int i = 0; i < _album.Count; i++)
{
7 Look for any photographs taken
on the same date as the date
clicked by the user.
How to
Use the Date property to obtain
only the date portion of the
DateTime objects.
if (_album[i].DateTaken.Date
== info.Time.Date)
{
378 CHAPTER 11 MORE CONTROLS
8 If a matching photo is found,
create a new
PhotoMenuItem
object for this photo.
PhotoMenuItem newItem
= new PhotoMenuItem();
newItem.tag = i;
newItem.Text = _album[i].FileName;
newItem.Click += new
EventHandler(
ctxtPhotoCal_MenuClick);
9 Add this new item to the context
menu.
ctxtPhotoCal.MenuItems.Add(newItem);
}
}
10 If one or more matching
photographs were found, display
the context menu.
How-to
Use the Show method at the
current mouse location.
if (ctxtPhotoCal.MenuItems.Count >= 1)
{
ctxtPhotoCal.Show(monthCalDates,
new Point(e.X, e.Y));
}
}
}
11 Create a private DisplayPhoto-
EditDlg method to accept an
album index and display the
associated dialog.
Note: This method returns a
boolean value indicating whether
the user modified any settings.
private bool DisplayPhotoEditDlg(int index)
{
_album.CurrentPosition = index;
using (PhotoEditDlg dlg
= new PhotoEditDlg(_album))
{
if (dlg.ShowDialog() == DialogResult.OK)
{
_bAlbumChanged = true;
return true;
}
}
return false;
}
12 Implement a ctxtPhoto-
Cal_MenuClick
method to
handle any context menu
selection and display the
associated Photo Properties
dialog.
private void ctxtPhotoCal_MenuClick
(object sender, System.EventArgs e)
{
PhotoMenuItem mi = sender as PhotoMenuItem;
if ((mi != null)
&& (DisplayPhotoEditDlg(mi.tag)))
{
UpdateCalendar();
}
}
HANDLE A MOUSE CLICK IN THE CALENDAR CONTROL (continued)
Action Result
How-to
a. Initialize the tag field to the
photograph’s index.
b. Initialize the
MenuItem.Text
property to the image file
name.
c. Set a
Click handler for this
menu item.
CALENDARS 379
When the user clicks on the
MonthCalendar control, this code will find and display
any photographs associated with a selected date. Note how the
HitTest method is
used to retrieve information about the selected point. This method returns a
Hit-
TestInfo
object. The HitTestInfo class is defined within the MonthCalendar
class, and provides a HitArea property containing the type of area clicked by the
user, and a
Time property containing the DateTime value corresponding to the
selected item. The possible values for the
HitArea property are defined by the
MonthCalendar.HitArea enumeration, as described in .NET Table 11.6.
private void monthCalDates_MouseDown
(object sender, System.Windows.Forms.MouseEventArgs e)
{
MonthCalendar.HitTestInfo info = monthCalDates.HitTest(e.X, e.Y);
if (info.HitArea == MonthCalendar.HitArea.Date)
{
Another important part of this code is the definition and use of the PhotoMenuItem
class. Without this class, we would be forced to search for a selected photograph
based on the file name stored in the
Text property of the menu. This rather simple
extension to
MenuItem provides an efficient method of communicating a photo-
graph’s index from the context menu to a menu item’s
Click handler.
private class PhotoMenuItem : MenuItem
{
// An integer field to store a photograph’s index
public int tag;
}
Because this class is still a MenuItem instance, we can use it just like any other menu
item object. We can set the
Text property, establish a Click event handler, and add
the menu to our context menu.
PhotoMenuItem newItem = new PhotoMenuItem();
newItem.tag = i;
13 Update the
Click handler for the
photo’s Properties button on the
Photos tab page to use the new
DisplayPhotoEditDlg method.
private void btnPhotoProp_Click
(object sender, System.EventArgs e)
{
if (_album.Count == 0)
return;
if (lstPhotos.SelectedIndex >= 0)
{
if (DisplayPhotoEditDlg(
lstPhotos.SelectedIndex))
{
UpdateList();
}
}
}
HANDLE A MOUSE CLICK IN THE CALENDAR CONTROL (continued)
Action Result
380 CHAPTER 11 MORE CONTROLS
newItem.Text = _album[i].FileName;
newItem.Click += new EventHandler(ctxtPhotoCal_MenuClick);
// Add this item to the context menu
ctxtPhotoCal.MenuItems.Add(newItem);
After the context menu has been displayed, the Click handler receives the menu
item object selected by the user. We downcast the given
object into a PhotoMenu-
Item
instance in order to retrieve the index in the photo album and display the
appropriate Photo Properties dialog.
private void ctxtPhotoCal_MenuClick(object sender, System.EventArgs e)
{
PhotoMenuItem mi = sender as PhotoMenuItem;
if ((mi != null) && (DisplayPhotoEditDlg(mi.tag)))
{
UpdateCalendar();
}
}
Compile and run the application to see how all this code works. Click on a date
where one or more photographs were taken and be amazed as a context menu pops
up with the corresponding photos. Also try clicking on other aspects of the control to
see what happens. In particular, see what happens when you click on the month and
year in the title of the control. Note that your ability to alter the month and year dis-
played is restricted by the range of dates represented in the photo album.
More .NET
The PhotoMenuItem class developed in this section extends the Menu-
Item
object provided by the Windows Forms namespace. This technique
is useful when you need a class that is similar to an existing control, and the
ability to downcast objects in C# ensures that you can access the additional
members of your derived class in a type-safe manner.
You can also build custom controls by extending the
Control class
directly. Windows Forms also provides a
UserControl class that is spe-
cifically intended for building customized container controls. The
Project menu in Visual Studio .NET includes an Add User Control item
for creating such a control. There is a walkthrough in the .NET docu-
mentation entitled “Authoring a User Control with Visual C#” that in-
troduces this concept.
Custom controls can also be tightly integrated into the Toolbox and
other parts of Visual Studio .NET. The
System.Windows.Forms.De-
sign
namespace contains the classes and other types to support such inte-
gration. If you are interested in this topic, search for more information at
any of the .NET web sites listed in appendix D. In particular, as of this
writing there is an article by Shawn Burke entitled “Writing Custom De-
signers for .NET Components” at the Microsoft Developer Network at
msdn.microsoft.com.
RECAP 381
11.5 RECAP
In this chapter we created tab controls and tab pages dynamically and using Visual
Studio .NET. We modified our MyAlbumEditor application to use a tab control in
place of the Photographs group box used in chapter 10. We then added a second tab
to contain a calendar control displaying the dates when photographs in the album
.NET Table 11.6 HitArea enumeration
The HitArea enumeration specifies the possible display areas in a MonthCalendar control.
Typically, this is used when analyzing a specific point in a calendar control using the
HitTest
method. This enumeration is defined within the
MonthCalendar class, and is part of the
System.Windows.Forms namespace.
Enumeration
Values
CalendarBackground The specified point is part of the calendar’s
background.
Date The specified point is part of a specific date of
the current month in the calendar. The
Time
property of the
MonthCalendarInfo.HitTestInfo class is set
to the corresponding
DateTime value.
DayOfWeek The point is part of a day abbreviation, such as
“Mon.” The
Time property should contain the
date on the top row of the calendar.
NextMonthButton The point is part of the next month button at the
top right of the control.
NextMonthDate The point is part of a date from the next month in
the control.
Nowhere The point is not in the
MonthCalendar control,
nor is it in an active portion of the control. This is
the default.
PrevMonthButton The point is part of the previous month button at
the top left of the control.
PrevMonthDate The point is part of a date from the previous
month in the control.
TitleBackground The point is over the background of a month’s
title.
TitleMonth The point is over a month name in the title of the
control.
TitleYear The point is over a year value in the title of the
control.
TodayLink The point is over the “today” link at the bottom
of the control.
WeekNumbers The point is over a week number when these
values are displayed. The
Time property should
contain the first date of that week.
382 CHAPTER 11 MORE CONTROLS
were taken, and permitted the user to click on a date to view the properties associated
with the corresponding photographs.
We also examined the
DateTimePicker class, and used this control in our
PhotoEditDlg form to present the DateTaken property of a Photograph object.
This led to a discussion of the formats used to display custom date-time strings.
In chapter 12 we will take up an assortment of different topics related to Win-
dows Forms application development.
383
CHAPTER 12
A .NET assortment
12.1 Keyboard events 384
12.2 Mouse events 387
12.3 Image buttons 393
12.4 Icons 405
12.5 Recap 409
In the last three chapters we looked at various controls available in the Windows
Forms namespace, and demonstrated the use of these controls in applications. In this
chapter we take a break from this aspect of Windows Forms development, and turn
our attention to interacting with the keyboard and mouse, and the placement of
images within certain controls.
For this discussion we return to the MyPhotos application we left in chapter 9.
As usual, the Visual Studio.NET solution is available on the book’s web site in case
you have misplaced your copy. We will examine the following topics:
• Keyboard events
• Mouse events
• Placing images on button controls
• Icons in a form and an application
Our discussion will present each concept in a separate section, beginning with the
keyboard events.
384 CHAPTER 12 A .NET ASSORTMENT
12.1 KEYBOARD EVENTS
We looked briefly at keyboard events in chapter 9 while discussing the TextBox
class. There we used the KeyPress event to limit what characters could appear in a
text box control. In this section we look more generically at keyboard events, and use
them in our application to provide some quick shortcuts for the user.
There are three distinct events that occur whenever a key is pressed and released.
Note that we did not say whenever a character is pressed and released. A character may
involve multiple key presses. For example, the letter ‘A’ requires the use of the Shift
key and the A key, typically abbreviated as Shift+A (of course, this is not true if the
Caps Lock key is pressed, but you understand).
The three keyboard events are summarized in the following table. These events
occur for a control in the order shown in the table whenever the control has the focus.
12.1.1 H
ANDLING THE KEYPRESS EVENT
The KeyPress event is used for generic handling of keyboard characters. Event han-
dlers of this type receive an instance of the
KeyPressEventArgs class as its event
parameter. See .NET Table 12.1 for an overview of this class.
It is important to realize that this event, as well as the
KeyDown and KeyUp events, is
received by the control that currently has the focus. In particular, they are not nor-
mally received by parent controls such as
Panel and Form objects that contain the
control. Normally this is a good thing. The per-character behavior is defined by each
control, with no need for parental involvement. For example, if you are handling the
Keyboard events
Event Description Event Argument
KeyDown Occurs when a key on the keyboard is pressed
down.
KeyEventArgs class
KeyPress Occurs when a character is pressed on the
keyboard, and again each time the character is
repeated while it continues to be pressed.
KeyPressEventArgs class
KeyUp Occurs when a key on the keyboard is released.
KeyEventArgs class
.NET Table 12.1 KeyPressEventArgs class
The KeyPressEventArgs class is the event argument class associated with the KeyPress
event. This class represents the keyboard character pressed by the user. It is part of the
Sys-
tem.Windows.Forms namespace, and inherits from the System.EventArgs class.
Public Properties
Handled Gets or sets whether the keyboard character
was handled. If
true, then the control will not
receive the character.
KeyChar Gets the
char value corresponding to the
keyboard character pressed.
KEYBOARD EVENTS 385
KeyPress event to force a text box to contain only integer values, you do not want
to spend precious operating system cycles percolating this event up through the set of
containing objects for the text box. A parent control such as a
Panel or GroupBox
will only receive a keyboard event if it specifically has the focus.
This presents a slight problem for subclasses of the
ContainerControl object,
and in particular the
Form object. As you may recall, a ContainerControl object
manages the focus for the contained controls, and does not receive the focus directly.
There are plenty of situations where you would like to initiate an action from the key-
board regardless of the current control.
The good folks at Microsoft created the
KeyPreview property in the Form class
for just this purpose. When this property is set to
true, the Form object will receive
all keyboard events before they are passed to the current control. If the event handler
sets the
Handled property to true, then the current control will not receive the key-
board key or corresponding character.
Let’s create an example of this in our MyPhotos program by handling the plus
‘+’ and minus ‘–’ characters. The plus character will display the next photograph in
the album, while the minus will display the previous photograph. We would like these
to occur at the
Form level, and not just in our Panel object where the image is dis-
played. The following table presents the steps required for this change.
Set the version number of the MyPhotos application to 12.1.
MAP THE PLUS AND MINUS KEYS TO THE NEXT AND PREVIOUS MENUS
Action Result
1 In the MainForm.cs [Design] window,
modify the
KeyPreview property for the
MainForm object to be true.
2 Override the protected
OnKeyPress
method in the MainForm.cs source file.
protected override void OnKeyPress
(KeyPressEventArgs e)
{
3 When a plus sign ‘+’ is pressed, invoke
the Next menu handler.
switch (e.KeyChar)
{
case '+':
e.Handled = true;
menuNext.PerformClick();
break;
4 When a minus sign ‘-’ is pressed, invoke
the Previous menu handler.
case '-':
e.Handled = true;
menuPrevious.PerformClick();
break;
5 For all other characters, do nothing. This
permits the character to be sent to child
controls.
default: // do nothing
break;
}
6 Don’t forget to call the base class at the
end of the method.
base.OnKeyPress(e);
}
386 CHAPTER 12 A .NET ASSORTMENT
We could have used an if statement in this code, especially with only two items to
check. Since we may add behavior for additional characters in the future, a
switch
statement seems like a good idea. Note how we used the MenuItem.PerformClick
method to simulate a user click of the appropriate menu. We could have called the
Click event handler directly, of course, but this solution is a bit more elegant.
It should be noted here that not all characters are received by the
KeyPress and
other keyboard events. Depending on the control, some characters may be prepro-
cessed and unavailable by default in this event. The protected
IsInputKey and
IsInputChar methods can be used to determine whether a specific character is pre-
processed in a derived control.
Let’s move on to the
KeyDown and KeyUp events.
12.1.2 H
ANDLING OTHER KEYBOARD EVENTS
The KeyDown and KeyUp events are useful to fine-tune an application’s behavior as
keyboard keys are pressed and released, and for handling noncharacter keys such as
the function or arrow keys. Handlers for these events receive an instance of the
KeyEventArgs class as their event parameter. This class is summarized in .NET
Table 12.2.
We will demonstrate the use of the KeyEventArgs class by setting the Page Up and
Page Down keys to invoke the Previous and Next menus, respectively. We will use the
KeyDown event for this purpose. We have already set the KeyPreview property to
receive keyboard events in our
Form, so all we have to do is override the OnKeyDown
method here.
.NET Table 12.2 KeyEventArgs class
The KeyEventArgs class is the event argument class associated with the KeyDown and KeyUp
events. This class represents the keyboard key pressed down or released by the user. It is part
of the
System.Windows.Forms namespace, and inherits from the System.EventArgs class.
Public
Properties
Alt Gets whether the Alt key was pressed.
Control Gets whether the Ctrl key was pressed.
Handled Gets or sets whether the event was handled.
KeyCode Gets the specific keyboard key pressed as a value in the
Keys
enumeration.
KeyData Gets the combination of keyboard keys pressed at the same
time using the
Keys enumeration values.
KeyValue Gets the
int character value corresponding to the keyboard
combination.
Modifiers Gets the combination of modifier keys pressed or released
using the
Keys enumeration values. This is a combination of the
Ctrl, Shift, and Alt values, or None if no keys were pressed.
Shift Gets whether the Shift key was pressed.
MOUSE EVENTS 387
Run the program to see how this code works. Open an album and make sure all four
keys we handled work as expected.
TRY IT!
Modify the OnKeyDown method to recognize the Home and End keys as
well. Have the Home key display the first photograph in the album, and
the End key display the last.
As an alternate approach, modify this method so that Shift+PageDown
will display the last photograph, and Shift+PageUp the first photograph in
the album. To implement this change, you will need to modify the method
to check the
Shift property within the PageUp and PageDown case
blocks.
That’s probably enough for our quick look at keyboard events. Let’s also take a look at
mouse events.
12.2 MOUSE EVENTS
The mouse device has gone through its own little evolution since it was invented by
Xerox Corporation almost 30 years ago. The number of buttons have varied from one
to three, and the shape has evolved from a rather uncomfortable rectangle to the
hand-fitting contours found in most modern versions. The mouse wheel is a rather
recent addition, permitting automated scrolling from the comfort of your mouse. An
even newer addition is a five-button mouse, with the extra buttons intended for back-
ward/forward navigation in applications such as web browsers.
Regardless of the type mouse you own, the possible events in .NET are the same.
In chapter 8 we used the
MouseMove event to update the PixelDlg form as the
MAP THE PAGE DOWN AND PAGE UP KEYS TO THE NEXT AND PREVIOUS MENUS
Action Result
1 In the MainForm.cs source
window, override the
OnKeyDown method.
protected override void OnKeyDown
(KeyEventArgs e)
{
2 Invoke the Previous menu
when the Page Up key is
pressed down.
switch (e.KeyCode)
{
case Keys.PageUp:
e.Handled = true;
menuPrevious.PerformClick();
break;
3 Invoke the Next menu
when the Page Down key
is pressed down.
case Keys.PageDown:
e.Handled = true;
menuNext.PerformClick ();
break;
4 Do nothing by default.
default: // do nothing
break;
}
base.OnKeyDown(e);
}
388 CHAPTER 12 A .NET ASSORTMENT
mouse pointer changed position. In the previous chapter we used the MouseDown
event in our MonthCalendar control to pop up a context menu when the user
clicked on a date. Here, we look at mouse events in general.
Mouse events are somewhat similar to keyboard events. Mouse buttons go down
and up just like keyboard keys, and the events
MouseDown and MouseUp occur
accordingly. Since the mouse also controls the mouse pointer, there are events related
to pointer movement as well. The complete list of mouse events is shown in the fol-
lowing table. These events occur with respect to a specific control.
12.2.1 T
HE MOUSEEVENTARGS CLASS
As you can see from the table, all mouse event handlers received an instance of the
MouseEventArgs class as their event parameters. A summary of this class appears in
.NET Table 12.3. We will illustrate mouse events a few different ways in this chapter.
Our first example will combine the keyboard support we examined in the previous
chapter with mouse events.
12.2.2 H
ANDLING MOUSE EVENTS
Since we have seen a couple of mouse events before, let’s make a change that involves
both keyboard and mouse events. Keeping with our theme of the Previous and Next
menus, let’s modify the mouse button behavior in our
Panel control so that the left
and right buttons invoke the Previous and Next menus, respectively, when the Ctrl
key is pressed.
Mouse events
Event Description Event Argument
MouseDown Occurs when a mouse button is pressed down while
the pointer is over the control.
MouseEventArgs class
MouseEnter Occurs when the mouse pointer enters the control.
MouseEventArgs class
MouseHover Occurs when the mouse pointer remains, or hovers,
over a control for a configurable amount of time.
MouseEventArgs class
MouseLeave Occurs when the mouse pointer leaves the control.
MouseEventArgs class
MouseMove Occurs when the mouse pointer moves over the
control.
MouseEventArgs class
MouseUp Occurs when a mouse button is released while the
pointer is over the control.
MouseEventArgs class
MouseWheel Occurs when the mouse wheel moves while the
control has focus. The read-only
MouseWheelPresent property in the
SystemInformation class indicates whether the
operating system believes a mouse wheel is
present.
MouseEventArgs class
MOUSE EVENTS 389
This requires handling both the
KeyDown and KeyUp events to track when the Ctrl
key is held down, and the
MouseDown event to map a mouse click to the appropriate
menu. Once we have done this, we will discover some additional changes that will
improve our interface. First, let’s take a look at how to track the Ctrl key.
Set the version number of the MyPhotos application to 12.2.
.NET Table 12.3 MouseEventArgs class
The MouseEventArgs class is the event argument class associated with the mouse events.
This class represents information about the mouse device and the mouse pointer position
when the event occurs. It is part of the
System.Windows.Forms namespace, and inherits
from the
System.EventArgs class.
Properties
Button Gets the
MouseButtons enumeration value corresponding to
the mouse button pressed by the user.
Clicks Gets the number of times the mouse button was pressed and
released. Note that the
DoubleClick event should normally be
used to process double-clicks of the mouse.
Delta Gets a signed integer representing the number of detents the
mouse wheel has rotated. A detent is a rotation of the mouse
wheel by one notch.
X Gets the x-coordinate of the current mouse pointer position.
Y Gets the y-coordinate of the current mouse pointer position.
TRACK WHEN THE CTRL KEY IS HELD DOWN
Action Result
1 In the MainForm.cs window, create a
boolean field to identify when the Ctrl
key is held down.
private bool ctrlKeyHeld = false;
2 Modify the OnKeyDown method to set
this field to
true.
protected override void OnKeyDown
(KeyEventArgs e)
{
switch (e.KeyCode)
{
. . .
case Keys.ControlKey:
ctrlKeyHeld = true;
break;
. . .
}
. . .
}
390 CHAPTER 12 A .NET ASSORTMENT
Note that we use the ControlKey value from the Keys enumeration in our switch
statement. There is also a Control value for the Keys enumeration that is used for
the
Modifiers property of the KeyEventArgs class which will not work here.
With this in place, we can now use the
MouseDown event to invoke the Next and
Previous menus when the Ctrl key is held. Continuing the previous steps:
This looks good, right? Well, not exactly. If you run the program, you’ll find that this
code mostly works as long as you do nothing else while the Ctrl key is pressed. When
you press the right mouse button, the next photo is displayed but the context menu
also pops up. In addition, if you use a keyboard accelerator such as Ctrl+O, or you
3 Override the OnKeyUp method to set
this field to
false.
protected override void OnKeyUp
(KeyEventArgs e)
{
switch (e.KeyCode)
{
case Keys.ControlKey:
ctrlKeyHeld = false;
break;
default: // do nothing
break;
}
base.OnKeyUp(e);
}
TRACK WHEN THE CTRL KEY IS HELD DOWN (continued)
Action Result
MODIFY THE MOUSE BEHAVIOR WHEN THE CTRL KEY IS HELD
Action Result
4 In the MainForm.cs
[Design] window, add a
MouseDown event handler
for the
Panel control.
private void pnlPhoto_MouseDown
(object sender, System.Windows.
Forms.MouseEventArgs e)
{
5 If the Ctrl key is currently
held down, see which
button was pressed.
if (ctrlKeyHeld)
{
switch (e.Button)
{
6 For the left mouse button,
invoke the Previous menu.
case MouseButtons.Left:
menuPrevious.PerformClick();
break;
7 For the right mouse button,
invoke the Next menu.
case MouseButtons.Right:
menuNext.PerformClick();
break;
8 Do nothing if any other
button is pressed.
default: // do nothing
break;
}
}
}