NetBeans the Definitive User Guide phần 4 pot
Bạn đang xem bản rút gọn của tài liệu. Xem và tải ngay bản đầy đủ của tài liệu tại đây (8.73 MB, 64 trang )
2. Create the source to use for your template—Start with one of the NetBeans templates, then modify it to meet your
needs, or create completely new source code.
3. Save the source as a template—Start in the Explorer window, right click the source, select Save as Template from
the context menu, and select the template category from the Save As Template dialog.
Chapter 9. GUI Building
170
And here are the steps for making a custom GUI component:
1. Optionally, create your own Component Palette tab—From the main window select Tools->Options. Open nodes
IDE Configuration node, then Look and Feel. Right click the Component Palette node, then select Add Palette
Category from context menu. Name the new category, and click OK.
2. Create or locate the new component—It's just a Java Bean. Use an existing bean, or write your own. See the next
chapter for more on beans.
3. Add the new component to the Component Palette, then customize it.
We will take a closer look at adding components to the Component Palette in the next chapter, after creating our own
Java Bean component.
Containers within Containers
A JPanel can contain any number of components. Since a JPanel is itself a component, it can be contained within a
another JPanel, a JFrame, or any other GUI container. As we will see in the next section, this can be a powerful
technique for building complex GUIs. But there's a potential editing problem with components in containers within
containers. If all the components in all the containers were visible at the same time, it could become visually confusing
and unmanageable. The Form Editor prevents such confusion by showing only one container with its components at a
time, and by enabling the developer to choose which container to show. Let's walk through a short demonstration to see
how it works.
Notice the empty space in the upper right corner of our AddStrings example. Let's fill the space with a JPanel,
then put a couple of GUI components into the JPanel, just to demonstrate what's possible. Select the JPanel icon in
the Component Pallet, then drop it into the empty corner of AddStrings in the Form Editor. It shows up as a small
blue square, much too small to be useful. We'll fix that by using the GridBag Customizer to adjust the space it occu-
pies. Right click GridBagLayout in the Component Inspector, then select Customize from the context menu. Select the
JPanel in the Customizer Dialog window, then adjust GridWidth to 3 and GridHeight to 2. Close the Customizer and
turn your attention back to the Form Editor.
Where's our JPanel? The little blue square has vanished, and the space just looks blank in the Form Editor. No prob-
lem, the JPanel still there in the Component Inspector. Select it in the Component Inspector, and the blue square
reappears. The JPanel was just hidden, and selecting it in the Component Inspector brought it to the fore in the Form
Editor. Right click the JPanel in the Component Inspector, then select Design This Container from the context menu.
Now the JPanel takes over all the space, and the JFrame disappears!
Drop in a few components from the Component Palette—A JButton or two, maybe a JLabel—whatever you like
just to get something visible in the JPanel. Then compile and execute to see what you've done. Not fancy, but it
opens up a world of possibilities. By allowing the developer to put containers within containers, and by focusing the
Form Editor on one container and its components at a time, NetBeans allows unlimited complexity in GUI design, and
keeps the complexity manageable.
Go back to the Form Editor, which has the JPanel visible. Right click, and examine the context menu. Now the
choices include Design This Container and Design Top Container. This gives you an easy way to switch back and forth
with either the JFrame or JPanel in the foreground.
Building Complex GUIs
Chapter 9. GUI Building
171
When you create a complex GUI with many components, it can be difficult to make them behave properly. Trying to
control the size and placement of even a few components can be like herding cats; focus your attention on one, and the
others run amok. As we have seen, GridBagLayout is often your best hope for managing multiple components in a sin-
gle container. But there's another way. Instead of struggling with too many components in one container, use the con-
tainers within containers technique to build a GUI that's many layers deep with just a few components in each layer.
Create a container, say a JPanel, then add just a few components to the container, few enough that you can easily
control their size and placement. Use the container in constructing the next layer of your complex GUI. For greater
flexibility in testing and reuse, and for a cleaner design, you may choose to turn the container with its components into
a Java Bean. This is exactly where we're headed with the AddStrings example. We will place a manageable number
of components into a JPanel container, then turn the JPanel into a Bean. We will add our new Bean to a JFrame
container and use the Bean properties to configure it. Of course, if you're only creating a Bean as an intermediate com-
ponent for one project, then you won't need to do everything that will be done in the Java Beans chapter—create a
BeanInfo class, link it to an icon, and add it to your Component Palette. Giving your intermediate containers a few
basic Bean features will be enough to greatly simplify your GUI building task.
By now our AddStrings example is looking good and running smoothly. But it's a standalone application. The only
way other users could benefit from using the application would be to install it, launch it every time they wanted to use
it, and then explicitly exit when they're done. If we convert the application into a component that other developers can
include in larger applications, then it can be used much more widely and easily. So, in the next chapter, we will build a
Java Bean around the essential feature of AddStrings. Then anyone using Java to build a complex GUI can drop
AddStrings into their form with just a few mouse clicks.
Chapter 9. GUI Building
172
Chapter 10. Java Beans
Table of Contents
Why Should I Make Beans? 173
CreatingJavaBeans 173
CreatingaGUIComponent 174
Converting a GUI Component into a Bean 176
Adding an Event Set to a Bean 179
GeneratingaBeanInfo Class 181
AddingaDesign-Time Icon 183
ComponentPalette 183
Adding a Category to the Component Palette 183
Adding a Bean to the Component Palette 184
ComponentPaletteProblems 185
Why Should I Make Beans?
You should make Java Beans to encourage reuse of your Java code. JavaBeans is the standard architecture for building
reusable components in Java. Originally intended as visual components for building GUIs, now the Java Beans are
widely used in all Java environments, including JSP and EJB development. Like components in other object oriented
programming languages, Java Beans have properties that can be set at design time by visual design tools, or at run time
by the containing program.
If you want other developers to use your code, if you want your components to snap together with ease, if you want to
spend your time developing application logic instead of debugging interfaces, then make Java Beans. For a deeper un-
derstanding of the JavaBeans architecture, see Sun's JavaBeans[TM] Technology [ page, or
read Developing Java Beans (O'Reilly).
Creating Java Beans
We will continue with the AddStrings example from the GUI Building chapter to demonstrate NetBeans features
for developing Java Beans. It is not necessary to go through all this to create a Bean from scratch. Simply follow the
procedure for creating a New Java object, and use the Bean template. We're taking the long route to show more ways
that NetBeans can help. Here's the plan:
1. Create a GUI component from the AddStrings JFrame.
2. Convert the component into a proper Bean.
3. Add an event set to inform the container about changes to Bean properties.
4. Generate a BeanInfo class to support using the Bean in a visual design tool, such as NetBeans.
• Generate the BeanInfo class.
Chapter 10. Java Beans
173
• Launch and use the BeanInfo Editor.
• Add a design time Icon.
5. Add your own category to the NetBeans Component Palette.
6. Add the Bean to your Component Palette category.
7. Use the Bean in GUI construction.
Next, we will go through the steps for this plan in detail. With any application, the functional decomposition necessary
to create usable components from the application's logic requires analytical skill and care. But once you've decided
what to include in each component, the process of creating Java Beans from application code is straightforward. We
will go through the process more thoroughly than you may choose to do in actual practice, just to give a complete pic-
ture of what's possible.
Creating a GUI Component
A GUI component is an object that can be placed in a GUI container. A JFrame is a container, but is not a component
and cannot be placed in a container. A JPanel is both a container and a component, so it can contain other compo-
nents, and it can be placed in a container. We based our original AddStrings example on a JFrame to make testing
easy, because a JFrame is a top level window that can be executed alone. But the JFrame version of AddStrings
cannot be used as a component. Therefore, the first step in creating an AddStrings Java Bean is to create an
AddStrings JPanel with the same components and logic as the original JFrame example from the previous chap-
ter.
1. Let's keep the name AddStrings for the component we are creating. We need to avoid a name conflict between
the new AddStrings JPanel and the old AddStrings JFrame. So our example uses a new package named
Beans. You could also rename or move the old JFrame.
2. Create a JPanel named AddStrings in the new Beans package. Change the layout manager to GridBagLay-
out.
3. Open both the old and new AddStrings objects by double clicking their nodes in the Explorer. Open the Form
AddStrings node for both objects, then the JPanel and JFrame nodes to expose their components.
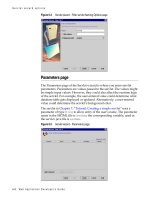
4. Select and copy the JLabel and JTextField components from the JFrame (see Figure 10.1). Don't bother
with the JMenu components, because they aren't needed for the Bean that we're creating.
Figure 10.1. Copying AddStrings components
Chapter 10. Java Beans
174
5. Paste the components copied from the JFrame in the GuiDemoAdvanced package into the JPanel in the
Beans package. You may close the old AddStrings JFrame.
6. In the new JPanel create ActionPerformed events for JTextFields tbA and tbB. Fill in the handling
code for each event. While we're at it, let's extract the common code into a convenience method named up-
dateTfSum, creating the code shown in Example 10.1. The new AddStrings JPanel isn't a Bean yet, but it
is a component that we can use in GUI building.
Example 10.1. Code in AddStrings JFrame needed for the new Bean
Chapter 10. Java Beans
175
private void tfAActionPerformed(java.awt.event.ActionEvent evt) {
// Add your handling code here:
updateTfSum();
}
private void tfBActionPerformed(java.awt.event.ActionEvent evt) {
// Add your handling code here:
updateTfSum();
}
private void updateTfSum(){
tfSum.setText(tfA.getText() + tfB.getText());
}
Compile and continue to the next step. Don't try to execute the compiled class, because the JPanel doesn't have
a main.
7. Let's test it! We will add the JPanel component to a JFrame, then execute the JFrame.
a. Create a new JFrame named ASTest1.
b. In the Explorer (not the Component Inspector) open the nodes of the JFrame to expose its components.
c. Copy the JPanel to the system clipboard—right click the highest level node of the new AddStrings
JPanel, then select Copy from the context menu.
d. Paste the JPanel into the JFrame—right click the JFrame level of ASTest1, then select Paste from the
context menu. This adds AddStrings as a component in ASTest1.
8. Compile and Execute ASTest1. You will see the AddStrings GUI, familiar from the previous chapter.
We will continue working with the same AddStrings source as we develop our example. For reference, the author
has saved a copy at this stage named AddStrings_1. To make it easy to follow the process of creating an
AddStrings Bean, intermediate source has been saved at several stages and is available for download from the
O'Reilly website [ />Converting a GUI Component into a Bean
A bare bones Bean doesn't need much. It needs to be serializable, to have a no-argument constructor, and at least one
property with public getter and setter methods. Our Bean will be a bit more interesting, but we'll start by giving it the
bare essentials.
1. A Bean must be serializable, so modify the AddStrings class declaration to the following.
public class AddStrings extends javax.swing.JPanel
implements java.io.Serializable {
2. AddStrings already has a no-argument constructor, so we don't need to do anything to meet that requirement.
3. Let's add some Bean properties. Open nodes in the Explorer from the top level AddStrings object down through
the class AddStrings node to Bean Patterns. We will add Bean properties that correspond to the text fields in
Chapter 10. Java Beans
176
AddStrings. Right click Bean Patterns, select Add, then select Property to launch the Bean Property wizard.
Fill in the wizard properties as shown in Table 10.1. This requires using the wizard three times for the three text
fields in AddStrings.
4. Now we have a valid Bean, but the properties aren't worth much because they aren't connected to anything. Mod-
ify the getter and setter methods as shown in Example 10.2. Just add the lines from the following code sample that
have the comment /*connect property to field*/. Notice that the read only property textSum does not store its
value in a separate field. Its getter method just calculates the value when it's needed:
Example 10.2. Code Needed in Getter and Setter methods for AddStrings Bean
/** Getter for property textA.
* @return Value of property textA.
*/
public String getTextA() {
return this.textA;
}
/** Setter for property textA.
* @param textA New value of property textA.
*/
public void setTextA(String textA) {
this.textA = textA;
tfA.setText(this.textA);/*connect property to field*/
updateTfSum();/*connect property to field*/
}
/** Getter for property textB.
* @return Value of property textB.
*/
public String getTextB() {
return this.textB;
}
/** Setter for property textB.
* @param textB New value of property textB.
*/
public void setTextB(String textB) {
this.textB = textB;
tfB.setText(this.textB);/*connect property to field*/
updateTfSum();/*connect property to field*/
}
/** Getter for property textSum.
* @return Value of property textSum.
*/
public String getTextSum() {
return tfSum.getText();/*connect property to field*/
}
Compile and continue to the next step.
5. Now that our component is a Bean, it's time to test it again. One quick way to test it is similar to the BeanBox that
comes with the JavaBeansTM Development Kit (BDK) from Sun Microsystems. Right click AddStrings in the Ex-
plorer, then select Customize Bean from the context menu. Two windows will open—a Bean properties editor,
and a Bean test window. This should be sufficient for testing during normal development. The Customize Bean
tool also provides a way to set property values and save the results as a serialized object.
Chapter 10. Java Beans
177
But we will continue building test drivers to demonstrate the Bean in a more realistic context. Create a new
JFrame named ASTest2. Open its nodes in the Explorer to expose the components in the JFrame. Right click
the highest level AddStrings node in the Explorer, then select Copy from the context menu. Right click the
JFrame level of ASTest2, then select Paste from the context menu.
So far it's like the previous test driver, ASTest1. Next, add two JTextField components and one JLabel.
Be sure to add them to the JFrame and not to addStrings1. Keep the default names for the components, then
use the Layout tab in the Component Inspector to set their Direction property in the default BorderLayout as
shown in Table 10.2.
Use the Events tab in the Component Inspector to add ActionPerformed event handler methods for the two
JTextFields. Add method body code as shown in Example 10.3. The added lines use the Bean's setter methods
to modify its TextA and TextB properties.
Example 10.3. Event Handler Methods in AddStrings Bean
private void jTextField1ActionPerformed(java.awt.event.ActionEvent evt) {
// Add your handling code here:
addStrings1.setTextA(jTextField1.getText());
jLabel1.setText(jTextField1.getText() + jTextField2.getText());
}
private void jTextField2ActionPerformed(java.awt.event.ActionEvent evt) {
// Add your handling code here:
addStrings1.setTextB(jTextField2.getText());
jLabel1.setText(jTextField1.getText() + jTextField2.getText());
}
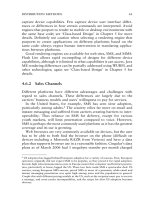
6. We aren't finished with AddStrings yet, but we've done enough to test it as a Bean. Compile and execute
ASTest2. It should look like Figure 10.2.
Figure 10.2. Testing the AddStrings Bean
The lower part of the window shows the familiar AddStrings GUI. The text fields in the upper part allow us to
test AddStrings as a Bean. When you change information in the upper text fields, the corresponding Bean
properties and the associated AddStrings fields are also changed. But we're only half done, because changing
Chapter 10. Java Beans
178
AddStrings fields should also change the upper ASTest2 fields. As before, the author has saved a reference
copy at this stage named AddStrings_2 that is available for download from the O'Reilly website
[ />Adding an Event Set to a Bean
Next, we'll turn the Read/Write properties of AddStrings into bound properties. That means any change to a prop-
erty will fire an event to inform listening objects about the change. We will use this to update the upper text fields in
our test driver when the AddStrings fields are changed. This is only one way for our Bean to inform listeners about
property changes. As you step through the process, you'll glimpse other options and get a sense of what's possible with
NetBeans.
1. Again, open nodes in the Explorer from the top level AddStrings object down through the class AddStrings node
to Bean Patterns. Right click Bean Patterns, select Add, then select Multicast Event Source to launch the Event Set
wizard. Fill in the wizard properties as shown in Table 10.3.
2. The event processing code that was added needs customization before it will do the job.
a. Remove the following line from the tfAActionPerformed and tfBActionPerformed methods.
updateTfSum();
b. Add the lines from Example 10.4 that have the comment /*needed for event*/.
Example 10.4. Code Needed for Events in AddStrings Bean
private void tfAActionPerformed(java.awt.event.ActionEvent evt) {
// Add your handling code here:
setTextA(tfA.getText());/*needed for event*/
}
private void tfBActionPerformed(java.awt.event.ActionEvent evt) {
// Add your handling code here:
setTextB(tfB.getText());/*needed for event*/
}
private void updateTfSum(){
tfSum.setText(tfA.getText() + tfB.getText());
}
/** Getter for property textA.
* @return Value of property textA.
*/
public String getTextA() {
return this.textA;
}
/** Setter for property textA.
* @param textA New value of property textA.
*/
public void setTextA(String textA) {
String oldTextA = this.textA;/*needed for event*/
Chapter 10. Java Beans
179
this.textA = textA;
tfA.setText(this.textA);/*connect property to field*/
updateTfSum();/*connect property to field*/
java.beans.PropertyChangeEvent event = /*needed for event*/
new java.beans.PropertyChangeEvent(this, "textA", oldTextA, this.textA);
firePropertyChangeListenerPropertyChange(event);/*needed for event*/
}
/** Getter for property textB.
* @return Value of property textB.
*/
public String getTextB() {
return this.textB;
}
/** Setter for property textB.
* @param textB New value of property textB.
*/
public void setTextB(String textB) {
String oldtextB = this.textB;/*needed for event*/
this.textB = textB;
tfB.setText(this.textB);/*connect property to field*/
updateTfSum();/*connect property to field*/
java.beans.PropertyChangeEvent event = /*needed for event*/
new java.beans.PropertyChangeEvent(this, "textB", oldtextB, this.textB);
firePropertyChangeListenerPropertyChange(event);/*needed for event*/
}
Compile and continue to the next step.
3. We're ready for the next test driver. Copy ASTest2, paste the copy into your working directory, and rename the
copy ASTest3. Open it for editing, and change ASTest2 to ASTest3 globally.
4. AddStrings will fire PropertyChangeEvent, so ASTest3 must implement PropertyChangeLis-
tener and must be registered as a listener with AddStrings. Modify the ASTest3 class declaration and con-
structor as shown in Example 10.5. When you modify the class declaration, NetBeans launches a wizard that rec-
ommends adding a propertyChange method. Click Process All to accept the recommendation.
Example 10.5. Beginning of ASTest3
public class ASTest3 extends javax.swing.JFrame
implements java.beans.PropertyChangeListener {
/** Creates new form ASTest3 */
public ASTest3() {
initComponents();
addStrings1.addPropertyChangeListener(this);
}
5. Implement the propertyChange method as shown in Example 10.6. This will update the editable text fields in
ASTest3 with any changes to the corresponding text fields in the AddStrings Bean.
Example 10.6. propertyChange Method in ASTest3
Chapter 10. Java Beans
180
public void propertyChange
(java.beans.PropertyChangeEvent propertyChangeEvent) {
if (propertyChangeEvent.getSource() == addStrings1) {
String propertyName = propertyChangeEvent.getPropertyName();
String propertyNewValue = (String)propertyChangeEvent.getNewValue();
if (propertyName == "textA") {
if (!(jTextField1.getText()).equals(propertyNewValue)) {
jTextField1.setText(propertyNewValue);
}
}
else if (propertyName == "textB") {
if (!(jTextField2.getText()).equals(propertyNewValue)) {
jTextField2.setText(propertyNewValue);
}
}
jLabel1.setText(addStrings1.getTextSum());
}
}
6. Now that ASTest3 is listening for propertyChangeEvent, the propertyChange method will be called
each time addStrings1.setTextA or addStrings1.setTextB is called. Since the propertyChange
method updates jLabel1, we can optionally remove the commented lines in Example 10.7.
Example 10.7. ActionPerformed Event Handlers in ASTest3
private void jTextField1ActionPerformed(java.awt.event.ActionEvent evt) {
// Add your handling code here:
addStrings1.setTextA(jTextField1.getText());
// jLabel1.setText(addStrings1.getTextSum());
}
private void jTextField2ActionPerformed(java.awt.event.ActionEvent evt) {
// Add your handling code here:
addStrings1.setTextB(jTextField2.getText());
// jLabel1.setText(addStrings1.getTextSum());
}
7. Compile and execute ASTest3. Notice that the test driver fields and the Bean fields stay in sync with changes to
either. Again, the author has saved a reference copy of the Bean at this stage named AddStrings_3 that is
available for download from the O'Reilly website [ />Generating a BeanInfo Class
A BeanInfo class is optional, and provides additional information about its Bean. To be efficient, a Bean should only
include features and information that are needed at runtime. A BeanInfo class provides features and information that
support design time activities. A visual design tool, like NetBeans, can use a BeanInfo class to configure a Bean
property's default values.
NetBeans provides a powerful BeanInfo Editor for creating and modifying BeanInfo classes. The Editor uses intro-
spection to determine the Bean's public run time properties, methods, and event sources, whether inherited or declared.
It displays all this information, plus some design time properties that apply to the Bean and the BeanInfo classes.
You, the developer, decide what to include in the BeanInfo class. The IDE generates BeanInfo source for the
Chapter 10. Java Beans
181
properties you chose. Much of the generated source is guarded code, which follows the same rules as guarded code for
GUI forms. You must use the BeanInfo Editor to modify it. Let's create a BeanInfo class for the AddStrings Bean to
see what's possible.
1. Launch the BeanInfo Editor— Open nodes in the Explorer from the top level AddStrings object down through the
class AddStrings node to Bean Patterns. Right click Bean Patterns, select BeanInfo Editor. The dialog box (seen in
Figure 10.3) displays nodes for the BeanInfo and the Bean, followed by a very long list of run time properties,
methods, and event sources (mostly inherited from super-classes) that could be included in the BeanInfo class.
Figure 10.3. The BeanInfo Editor dialog box
2. Select Event Sources and Methods to include in the BeanInfo class— The Bean, Properties, Event Sources, and
Methods nodes have a property named Get From Introspection. The default value is False, meaning the Bean-
Info class will provide values for the design time properties for the subordinate nodes. Source code will be gen-
erated in the BeanInfo class to provide the information. We don't want this much code to be generated for our
AddStrings example, so change the value of Get From Introspection to True for the Event Sources and Methods
nodes. Notice the lower nodes are greyed out when Get From Introspection is True.
3. Select Properties to include in the BeanInfo class—The lower nodes have a property named Include in Bean-
Info. For example, under the Properties node click the background node. Set Include in BeanInfo to False for all
the nodes under Properties, except for textA, textB, and textSum. You can multiselect the unwanted nodes to
change them all at once. Notice the red "X" icon next to the nodes that have Include in BeanInfo set to False.
4. Generate the BeanInfo class— Click the OK button in the BeanInfo Editor. A BeanInfo class named
AddStringsBeanInfo will be created and opened in the Source Editor. Compile it.
Chapter 10. Java Beans
182
When you install a Bean for use as a component in a GUI building tool, such as NetBeans or any other full featured
IDE for Java development, the tool automatically uses the corresponding BeanInfo class if it exists. The BeanInfo
class enables the GUI building tool to present Bean users with the view that the Bean developer intended. For example,
only the properties that are appropriate for adjustment by a Bean user will be exposed, instead of all the properties in-
herited from the Bean's superclasses. We will see this in action in the next section, when we add our AddStrings
Bean to the Component Palette.
Adding a Design-Time Icon
Let's give our AddStrings an icon to identify it in the Component Palette. It's optional, but it will give our compo-
nent a nice finished look in the IDE. A 16x16 icon, AddStrings.gif, has been included with the source examples
for this book. Figure 10.4 is an enlarged view.
Figure 10.4. The AddStrings Bean icon
In the BeanInfo Editor select the topmost node, named simply BeanInfo. Fill in the Icon 16x16 Color property with the
classpath to the icon. If you want help getting the classpath right, then click the ellipsis button ( ) to open the Icon
Property Editor, select its Classpath radiobutton, click the ellipsis button in its Name field, and browse through the
Filesystems nodes to the AddStrings.gif file. When the classpath is right, the icon appears in the space below the
Name field. When you click OK to close the BeanInfo Editor, guarded code in AddStringsBeanInfo is modified,
so be sure to recompile.
Component Palette
We need to make our Bean available within the IDE to fully appreciate its value as a component for GUI building. Let's
add it to the Component Palette, but let's create our own Category to place the Bean within. We could easily add the
Bean to an existing category, but let's keep it separate from the NetBeans components.
Adding a Category to the Component Palette
Chapter 10. Java Beans
183
It's surprisingly easy to create a new Component Palette Category. Just right click the right spot in the Component
Palette, then select Create New Category from the context menu. What exactly is the right spot? Try the empty space to
the right of the last tab for the existing categories. Or try a hairsbreadth above any existing tab, as seen in Figure 10.5.
Figure 10.5. Creating a new component palette category
Create a new category now, and name it whatever you like. In the example it's named testPalette.
Adding a Bean to the Component Palette
You can add a Bean from the Explorer or from a JAR file, but the procedures are different. We will use the Explorer
procedure, since we haven't put our Bean into a JAR file.
Adding a Bean from the Explorer takes only a few seconds. Right click the AddStrings class to pop up the context
menu, then select Tools->Add to Component Palette to open the Palette Category dialog, and select the new category
created above. There's our AddStrings Bean in the Component Palette with its icon, as Figure 10.6 illustrates.
Figure 10.6. The AddStrings Bean in the component palette
Now let's create one more test driver just to prove that AddStrings works in the Component Palette. Start by creat-
ing a new JFrame named ASTest4 in your working directory. Then click AddStrings in the Component Palette, drop
it into ASTest4, compile, and test. Works perfectly, doesn't it?
Chapter 10. Java Beans
184
For the final test, let's set the Bean's properties. Double click ASTest4 in the Explorer to open it in the Component In-
spector. Open the JFrame node in the Component Inspector to expose its components. Select AddStrings to expose its
properties. Only textA and textB are available. They are the writeable properties that were selected to include in the
BeanInfo class. Give them initial values, for example "AAA" and "BBB", and initialization code is inserted into the
initComponents method as shown in Example 10.8.
Example 10.8. initComponents method for ASTest4
private void initComponents() {
addStrings1 = new Beans.AddStrings();
addWindowListener(new java.awt.event.WindowAdapter() {
public void windowClosing(java.awt.event.WindowEvent evt) {
exitForm(evt);
}
});
addStrings1.setTextB("BBB");
addStrings1.setTextA("AAA");
getContentPane().add(addStrings1, java.awt.BorderLayout.CENTER);
pack();
}
Component Palette Problems
Of course, things can always go wrong. Perhaps your Bean disappeared from the Component Palette. Did you wipe out
the compiled class file and reopen NetBeans? The component palette can't show a Bean that has no class file.
Does your Bean no longer have the icon you assigned it? Perhaps you generated a BeanInfo class for your Bean, but
didn't compile it. The BeanInfo class is the link from the icon to the IDE. The source examples with this book must
be compiled before the BeanInfo class can do its job. When you configured the BeanInfo class with the icon's
classpath, was the icon's image correct in the Icon Property Editor? The icon file must be a valid graphic type, and the
classpath must be right. GIF, JPG, and PNG types should work, but don't count on ICO, BMP, or others.
This chapter demonstrated the features NetBeans provides for creating and managing Java Beans, building a visual
component as an example. Beans are perhaps the most commonly used design pattern in Java, used for far more than
visual components. If it makes sense for a class to use properties for communicating with the outside world, then it
makes sense for the class to be a Java Bean or at least to have some Bean patterns, and it makes sense to use the Bean
building features of NetBeans.
Chapter 10. Java Beans
185
Chapter 11. Using Javadoc
Table of Contents
JavadocSupportin NetBeans 186
Mounting Javadocs in theJavadoc Repository 186
TheJavadocSearch Tool 187
Creatingyourown Javadoc 190
TheAutoComment Tool 190
JavadocGeneration 193
Javadoc Support in NetBeans
All programmers are familliar with code commenting. The Java language supports C style code commenting (/* and */
for multiline comments and // for single line comments) plus an additional commenting style called "doc comments". A
doc comment in a Java source file begins with /** (note the double asteriks) and ends with */. These comments are
viewed as regular comments by the compiler, but the javadoc tool can be used to parse them and produce an HTML
document known as a Javadoc.
Since doc comments are used to produce HTML they can contain HTML markup tags. Typically these are HTML for-
matting tags such as <B> and <I>. There are also several special non-html tags that can be used. For more information
on the javadoc tool and the Javadoc tags see The Javadoc Tools Homepage [ />The javadoc tool has been fully integrated into the NetBeans IDE. Developers can search and browse Javadoc libraries
(JAR files or folders containing Javadoc HTML files); get context-sensitive Javadocs; add and verify Javadoc tags to
their code; and create Javadocs from their source code using the IDE's Javadoc features.
Mounting Javadocs in the Javadoc Repository
Note
The Javadoc Repository will be removed in NetBeans 3.4.
Before you can search and browse Javadocs they must be mounted in the Javadoc repository. NetBeans maintains a
separate repository for each project you create. The repository contains folders and JAR files that contain Javadocs in
HTML format. To see a list of folders and JARs currently loaded in the repository, click on the Javadoc tab in the ex-
plorer. Figure 11.1 shows the Javadoc repository.
Figure 11.1. The Javadoc Repository
Chapter 11. Using Javadoc
186
You can add Javadocs to the repository by mounting the root folder or JAR file. Only folders and JAR files that contain
a valid Javadoc file structure are allowed to be mounted in the repository. A valid Javadoc file structure is one that con-
tains one of the following files in its root directory:
• index-files
• api/index-files
• index-all.html
• api/index-all.html
Once you have mounted a valid Javadoc folder or archive, its contents become immediately available for searching and
browsing. Typically, there will be an index.html file in the root of each mounted Javadoc in the repository. Double
clicking on this file allows you to browse the Javadocs just as you would with a web browser.
The Javadoc Search Tool
The Javadoc Search Tool allows users to search and view Javadocs in HTML format. Figure 11.2 shows the Javadoc
Search Tool in the IDE. To launch the tool from the IDE select Javadoc Index Search from the View menu, or hit the
Alt-F1. The buttons seen in the tool are shown and described in Table 11.1.
Figure 11.2. The Javadoc Search Tool
Chapter 11. Using Javadoc
187
The search tool is divided into three panes (these panes may be arranged differently in your distribution). The top sec-
tion is used to enter a Javadoc query string. The query string need not be complete, but must at least match the begining
of a class, interface, exception, method, or field in the Javadoc repository. After entering the string and clicking on the
Find button, the left pane of the tool is populated with a list of results matching the query. If no entry is found for the
query the message "No Documentation Found" is shown. If this occurs you should check your spelling and make sure
that you have all the necessary Javadoc archives mounted in the Javadoc repository (covered in the next section). Each
entry in the list is associated with Javadoc comments that can be viewed in HTML format. The list can be sorted alpha-
betically or by type, and can also be grouped by package names using the buttons found in the top section of the tool.
Clicking on an entry in the list causes the right section of the tool to be populated with its Javadocs in HTML format.
This pane acts as an HTML browser and so hyperlinks in the Javadocs can be further explored in this view. Double
clicking on an item in the left section launches a Web Browser to show the Javadocs for that item.
The search tool can also be launched from the editor to perform a context-sensitive search. The context of the search
will be the currently selected text, or the current word on which the cursor is positioned. For example, to perform a con-
text sensitive Javadoc search for a method named getString you would select the word "getString" in the text editor
then hit Alt-F1. The search tool will be launched with "getString" as the query string and the results of the query show-
ing in the list in the left section of the tool's window. This process is illustrated in Figure 11.3 and Figure 11.4. The
same effect is achieved by right clicking on a word in the Source Editor and selecting Tools->Show Javadoc from the
Chapter 11. Using Javadoc
188
context menu.
Figure 11.3. Select the text to search for in Javadocs and hit Ctrl+F1
Figure 11.4. The search tool starts with your text and matching results.
Chapter 11. Using Javadoc
189
Creating your own Javadoc
After using the Javadoc search tool and seeing how simple it is to add archives to the IDE's repository, you'll probably
realize how convenient it would be to generate Javadocs for your own source code and distribute it for your cohorts to
mount, query and browse in their NetBeans environment. Before you go on to document generation heaven however,
you should make sure that your comments, specifically your Javadoc tags, are correct and according to standards. This
can be a tedious task and is probably why many a developer is not enthusiastic about producing Javadocs for their code.
The NetBeans IDE comes to the rescue here with a saavy tool - the Javadoc Auto Commenting Tool - that allows you
to easily create, edit, and manage Javadocs by focusing explicitly on the related comments.
The Auto Comment Tool
Chapter 11. Using Javadoc
190
You may use the Auto Comment Tool at any point during development. It is also useful for non-developers; for exam-
ple, an editor may use the tool to correct spelling and add formatting without the fear that he may contaminate the
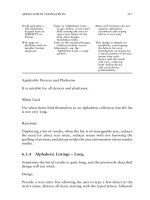
source code. The Auto Commenting Tool is shown in Figure 11.5.
Figure 11.5. The Javadoc Auto-Commenting Tool
To launch the Auto Commenting Tool, open the Java source file in the editor, right click on the opened file and select
Tools->Auto Comment. You should now see a dialog box similar to the one shown in Figure 11.5. The tool lists all the
classes, methods and fields in the the Java file and allows you to view and correct the Javadoc comments. The tool also
points out which of these elements have well-formed Java doc comments and which do not. A class, method or field el-
ement has a well-formed Javadoc comment if there are Javadoc tags for each part of the element as is necessary. For
example, examine the following method:
Chapter 11. Using Javadoc
191
/**
*
* This method prints a hello message
*/
public void sayHello(String sayHelloTo)
{
}
Although the fragment contains an informative comment, it does not have a well-formed Javadoc comment because the
tag for documenting the sayHelloTo parameter is missing. The well-formed version of this method is:
/**
*
* This method prints a hello message
*
*@param sayHelloTo The method will print a hello message using this
parameter as the name. Ex. "Hello Bob" if set to Bob.
*/
public void sayHello(String sayHelloTo)
{
}
Javadoc Filtering
The Auto Comment Tool shows you which classes, methods and fields are not well- formed and can even auto correct
the problem for you. You can control which of these elements needs correcting or viewing by using one of the seven
filtering buttons provided by the tool. Each button is represented by an icon that indicates whether the Javadoc com-
ments are correct or erroneous, or the element visibility (public, private, protected). Table 11.2 shows the filtering but-
tons.
Viewing, Editing and Correcting Javadoc Comments
Now that you've filtered the classes, methods and fields that you would like to have Javadocs generated for, you'll want
to make corrections as suggested by the Auto Commnent Tool. Correcting Javadocs typically involves adding comment
text and Javadoc tags. As you press the filtering buttons a list of filtered items gets displayed. Selecting any of the fil-
tered items, displays the related comment text and tags. The Details section of the tool's dialog box informs you of any
Javadoc errors associated with the selected item. Based on the errors reported here, you can make the corrections by
modifying text in the "Javadoc Comment Text" section, and the "Tags" Section.
Typing text in the "Javadoc Comment Text" section will update an element's Javadoc comments. You will typically
write any informative blurb here that describes the class, method, or field to a perusing developer. This is also a good
place for an editor to make grammatical and typographical corrections. You can add HTML tags to your text for for-
matting purposes. The tool includes 6 HTML formatting buttons that add tags to your text. These buttons are located
just beneath the "Tags" section. Any formatting that is applied to your text will be seen in the HTML after it is gener-
ated by a Javadoc generation tool.
The "Details" section will inform you of any tags that may be missing from the currently selected item. You can mod-
ify an item's tags by using the buttons provided in the "Tags" section. For example, examine the following method sig-
nature:
Chapter 11. Using Javadoc
192
public float getCurrentTemperature(boolean celcius) throws ThermometerException
After adding some documentation in the "Javadoc Comment Text" section, you would click the New button in the
"Tags" section, select the radio box named "@param" and click the "ok" button. You should see a combo box and a
text box appear. Select the "celcius" parameter from the drop down box, and type in a description of the parameter in
the text box. You also have to add tags for the return value and the Exception. The steps for adding these are quite simi-
lar. For the return value you need to select the "@return" radio box, and for the exception you will need to select
"@throws". Once you've completed all editing, you can click the Refresh button to commit the changes and update the
filtered item list.
After making corrections in the Auto Comment Tool you will still need to save the Java source file in order for your
changes to be permanently committed.
Javadoc Generation
You are now ready to generate your own Javadocs based on source files in your project. The IDE has an embedded,
customizeable Documentation Engine that is used for this task. The documentation engine consists of the following
customizeable options:
• Javadoc Search Types
• Javadoc Executors
• Doclets
These options are described in the following sections. To select the customized properties, you can set them as the de-
fault values for the Documentation Engine by selecting Code Documentation->Documentation from the Options dialog
and selecting your Default Search Engine and Executor from the drop down lists provided (Doclets are selected in the
property sheets for Javadoc Executors).
You may chose to generate Javadocs for a single class, or for an entire package. If you choose to perform generation on
a package and would like the process to be recursive, you must be sure to have the recursive property set to true on the
Javadoc Executor option that the Documentation Engine is using (see Table 11.3). To begin generation, right click on
the folder (package) or file (in explorer, or in an opened editor) and select Tools->Generate Javadoc from the context
menu. If generation is successful you will be prompted to view the docs in an HTML browser. Click the "Yes" button
to review your Javadocs.
Javadoc Search Types
NetBeans provides a mechanism for you to search internationalized Javadocs using Javadoc Search Types. Currently
the IDE ships with a Javadoc search type for the Japanese locale in addition to the default english. By selecting this
search type you can browse Javadoc HTML documents generated for the Japanese locale. In the near future other lo-
cales may become available and can be added to your installation via the NetBeans Update Center.
Javadoc Executors
A Javadoc Executor is an Execution Service that processes source files in the IDE to produce Javadoc files. Like Java
source file Execution Services there is an external and internal Execution service for Javadocs. The External Service
can be used to call a javadoc tool other than the one in the JVM used by the IDE (this is used by the Internal Service).
Both executors are configurable in the Options dialog (Tools->Options->Code Documentation). Table 11.3 explains the
Chapter 11. Using Javadoc
193
properties for the External Javadoc Executor.
When you choose to generate Javadocs for a given source file or package a Javadoc executor is invoked that generates
Javadoc HTML files in the specified directory. The executor will format the HTML files based on the preconfigured
doclet that is specified in the Doclets property. Additional source files can be added to your generated Javadocs if you
specify them in the Extdirs property. Any Java files found in these directories will be processed by the executor and the
resulting html files copied to the specified output directory.
Doclets
Doclets are Java programs used to format and add content to the output of the javadoc tool. Java has a doclet API that
all doclets must be written against. A doclet basically operates on the javadoc tags. It can perform specific operations
based on a given tag. For example, create a hyperlink in the HTML when it encounters the @link tag. By default, the
javadoc tool uses a standard doclet. This doclet generates API documentation in HTML format. The doclet API allows
you to extend the standard API or write your own doclets for maximum flexibility. Using your own doclet or an exten-
sion of the standard one is extremely useful when you want to introduce custom Javadoc tags. When using custom do-
clets with the javadoc tool you must specify the classname of the doclet you are using, ex:
javadoc -doclet ora.com.MyDoclet MyClass.java
For more on doclets and the doclet API go to />The IDE comes with a standard doclet that has customizeable properties. This doclet is the default for the Internal and
External Javadoc Executors. You can create many versions of this Doclet, each with its own customized properties.
However you cannot create your own custom doclet. You can create a new Doclet (based on the Standard Doclet) by
selecting Code Documentation->Doclets, right-clicking and selecting New->Standard Doclet from the context menu.
The newly created Doclet can be configured via its property sheets. These properties are explained in the sections to
follow.
Adding Content
Doclet properties can be used to add additional content to each Java page produced in the generation process. Table
11.4 shows Doclet properties that can be used to add content to generated Javadocs.
Adding Links
At times you may need to provide a link in the Javadocs of one class to the Javadoc of another using the @link tag. The
IDE allows you to specify links to other generated Javadocs by using the Doclet's Link and Link Offline properties.
The difference between these properties is that the former requires a path to a directory where a package-list file can be
found while the latter does not require the package-list files to be existent at the time of generation.
To add links to your generation, click on the ellipsis button that appears when editing the Link or Link Offline property
in the Doclet property sheet. You should see a dialog box similar to the one shown in Figure 11.6. Type in the path to
the directory containing the package-list file and use the Add button to add it to the list of links. The Up and Down but-
tons can be used to move links higher or lower in the search path.
Figure 11.6. Adding Javadoc Links
Chapter 11. Using Javadoc
194