PHP Game Programming 2004 phần 4 pdf
Bạn đang xem bản rút gọn của tài liệu. Xem và tải ngay bản đầy đủ của tài liệu tại đây (545.16 KB, 38 trang )
98 Chapter 5
■
Operators, Statements, and Functions
See how the value of
$someNum
changed? Its value is the result from the operations inside
the function. Passing variables by reference is a very handy way to return results for mul
-
tiple variables because a function can return only one value if you are using the return
keyword.
Recursion
PHP functions also support recursion. Recursion is simply when a function calls itself.
One of the easiest ways to explain recursion is just to show you; take this, for example:
function power($base, $exponent)
{
if($exponent)
{
return $base * power($base, $exponent - 1);
}
return 1;
}
Notice how the return statement is calling the
power
function, but it is subtracting one
from the variable
$exponent
every time it is called. Eventually
$exponent
will hit zero and the
if statement will not execute. At this point is when the recursion ends. Take an in-depth
look at how this works.
echo(power(2,3));
1. The function
power
is called with the base set to 2 and the exponent set to 3.
2. Next, the
$exponent
is tested; since it is non-zero it succeeds and proceeds to the
next line.
3. The return statement calls the
power
function again, except this time the base is 2
and the exponent is also 2.
4. The
$exponent
variable is tested again. It is still a non-zero value.
5.
Power
is called again with the value 2 as the base and 1 as the exponent.
6. The exponent variable is tested again; it is still a non-zero value.
7.
Power
is called a final time with the value 2 as the base and 0 as the exponent.
8. This time the test fails and the function returns 1 to the third invocation of the
function.
9. 1 is now multiplied by the base and the third invocation of the function returns 2
to the second invocation of the function.
99 The Magic of Including Files
10. 2 is now multiplied by the base value, giving us 4, and 4 is returned to the first
invocation of the
power
function.
11. 4 is now multiplied by the base, giving us the final value of 8, and 8 is returned
from the
power
function back to your program.
Pretty confusing, huh? Recursion can be a nasty beast but you can do some pretty cool
things with it.
The Magic of Including Files
Now that you have all this cool knowledge about how to make functions, you need a way
to include libraries (so to speak) in your PHP pages. Basically what you can do is make a
file full of common functions that you use all the time and put them in all of your games.
For instance, if you take a look at the CD, I have included a PHP file (common.php) that
has some base functions that will be used in all of the games in this book.
PHP gives you two ways to include files in your application. You can use the require state-
ment or the include statement. When the PHP interpreter encounters the require state-
ment it puts the file in the code and it is now generally available to your page. The include
statement evaluates and executes the code each time the include statement is encountered.
This allows you to have dynamic includes in your files. For example:
for($loopCounter = 0; $loopCounter < 5; $loopCounter++)
{
include(“file” . $loopCounter . “.php”);
}
If you did the above example with the require statement, then the only file that would be
included would be file4.php. Instead of worrying about which one is better I would just
always use the include statement. There is no performance hit and you can be a lot more
flexible in your coding.
Note
PHP assumes the include files are in the directory specified by the include_path directive in the
php.ini file. If your include files are not in this directory you need to specify the full path along with
the filename to include it.
100 Chapter 5
■
Operators, Statements, and Functions
Conclusion
You have covered a ton of information in this chapter. You now know all about operators
and how to control the flow of your code with sound logic. You also know how to create
blocks of reusable code using functions. You even know how to make a mini-library and
include it in all of your PHP pages.
Next up: arrays, and then your first PHP game!
Arrays, Games,
and Graphics
Chapter 6
Arrays! . . . . . . . . . . . . . . . . . . . . . . . . . . . . . . . . . . . . . . . . . . . . . . . . .103
Chapter 7
Playing with Chess and Databases . . . . . . . . . . . . . . . . . . . . . . . . . . . .133
Chapter 8
GD Graphics Overview . . . . . . . . . . . . . . . . . . . . . . . . . . . . . . . . . . . . .157
Chapter 9
Creating Battle Tank and Using Dynamic Terrain . . . . . . . . . . . . . . . .193
PART III
This page intentionally left blank
chapter 6
Arrays!
■
Initializing Arrays
■
Using Strings for Indexes
■
Looping through Sequential Arrays
■
Looping through Non-Sequential Arrays
■
Multi-Dimensional Arrays
■
Sorting Arrays
■
Your First PHP Game
I
n Chapter 4, when you were making the form processing example, the check boxes
were named
nEquipmentID[]
. Those two brackets mean that it is an array. An array
consists of several elements, each of which has a value. You can access each element
in the array by using an index. In PHP your index can be either an integer or a string,
which allows a lot of flexibility in your code.
Note
As in C/C++, arrays in PHP are zero based, meaning that the first index in the array starts at 0.
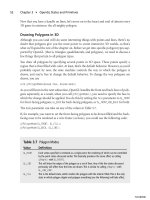
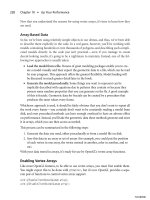
Take a look at Figure 6.1. This representation should make it clear how an array stores its
data.
103
104 Chapter 6
■
Arrays!
$board[0] $board[1] $board[2] $board[3]
"A" "B" "C" "D"
Figure 6.1 How an array stores data.
In this case the array is named
$board
, and it has four elements. The first element of the
array,
$board[0]
, is equal to “A”. The second element of the array,
$board[1]
, is equal to “B,”
and so on. So how do you create arrays?
Initializing Arrays
There are several ways that you can initialize arrays. You could simply list the variable with
the value you would like to add to the array, like this:
$board[] = “A”:
$board[] = “B”:
$board[] = “C”:
$board[] = “D”:
Because you did not specify an index, the elements are automatically added in sequential
order. You could have also specified what index you would like the element to appear in,
like this:
$board[0] = “A”:
$board[1] = “B”:
$board[5] = “C”:
$board[7] = “D”:
This is more impractical, but valid all the same. Usually when assigning elements to an
array you should do it in a sequential order. This way there is no confusion about where
the element is. However, there are times when you will want to create a hash key and use
that for your index.
If you ever assign items in a non-sequential order and then later add an element to the
array without specifying the index it should appear in, then the element will be automat
-
ically added to the next highest index. For example:
$board[0] = “A”:
$board[1] = “B”:
Using Strings for Indexes 105
$board[60] = “C”:
$board[] = “D”: // “D” would be added to index 61, not 2.
The final way to declare an array is to use the
array()
function. You simply pass the values
you want in the array as parameters to the function.
$board = array(“A”, “B”, “C”, “D”);
This will create an array exactly like the first example did. “A” is the first element in the
array with an index of 0. “B” is the second element in the array with an index of 1, and so
on. If you wish to change the index of an element using the
array()
function, you can do
so like this:
$board = array(1 => “a”, “b”, 7 => “c”, “d”);
In the example above, “a” will be at index 1, “b” will be located at index 2, “c” will be
located at index 7, and “d” will be located at index 8. You can put the
=>
operator before
any element of the array to change its index.
Using Strings for Indexes
As mentioned earlier in this chapter, you can use strings as indexes into your arrays. The
global variable
_SESSION
in PHP uses strings as its indexes. The syntax for accessing an
array that uses strings as an index looks like this:
_SESSION[“gTurn”];
Creating an array that uses strings for an index is very simple. Recall the first example I
used to initialize an array with elements in a specific index.
$board[0] = “A”:
$board[1] = “B”:
$board[5] = “C”:
$board[7] = “D”:
Instead of using an integer as an index you would simply replace it with a string, as the
following example demonstrates:
$board[“element1”] = “A”:
$board[“element2”] = “B”:
$board[“element3”] = “C”:
$board[“element4”] = “D”:
106 Chapter 6
■
Arrays!
You can also use the
=>
operator along with the
array()
function to create an array with
strings as indexes.
$board = array(“element1” => “A”, “element2” => “B”,
“element3” => “C”, “element4” => “D”);
If you use strings as indexes into your array, you have to access the array with the speci-
fied string indexes. In other words, if you typed in the following code:
<?php
$board = array(“element1” => “A”, “element2” => “B”,
“element3” => “C”, “element4” => “D”);
echo($board[“element1”]);
echo($board[0]);
?>
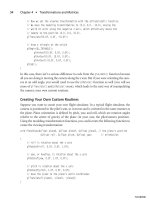
You would get an error when the PHP interpreter tried to print the last line,
echo($board[0]”)
, that looks like Figure 6.2.
Looping through Sequential Arrays
The easiest way to loop through sequential arrays is to use the for loop. I know you are
probably thinking, “How do I know how many elements are in the array?” You can access
Figure 6.2 Trying to access a string-indexed array with an integer.
Looping through Sequential Arrays 107
the number of elements in the array by using the
count()
function. Your for loop should
look like the following:
<?php
$board = array(“a”, “b”, “c”, “d”);
for($index = 0; $index < count($board); $index++)
{
// Print each element on its own line
echo(“Index = “ . $index . “, Element = “ . $board[$index] . “<BR>”);
}
?>
First you initialize your array with all the elements you need. Then, in the first statement
of the for loop, you initialize your indexing variable (
$index
). The second statement of the
for loop is your Boolean expression. This tells the loop when to stop; in this case the for
loop will stop when it reaches one less than the total number of elements in the array
$board
. Why don’t you specify to stop when the loop reaches the total count of the ele-
ments? Because you have to remember that PHP uses a starting index of zero for arrays.
If you went to the total count of the elements you would get an error when you tried to
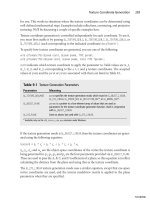
print the value because that index does not exist in the array. The third and final statement
of the for loop simply increments the indexing variable every time the loop restarts. The
results should look like Figure 6.3.
Figure 6.3 Results of looping through a sequential array.
108 Chapter 6
■
Arrays!
Looping through the array with a for loop is perfect, as long as you know that the array is
zero-based and ordered sequentially. So how do you loop through an array that is not
ordered sequentially?
Looping through Non-Sequential Arrays
This is a perfect time to use a while loop. Of course, you will be using the while loop in
conjunction with three other functions:
reset()
,
list()
, and
each()
.The
reset
function sets
the current index of the array back to the first element available. It takes one argument,
and that is the array that you would like to reset.
reset($someArray);
The
list
function takes two parameters: a variable to store the index of the element and a
variable to store the value of the element.
list($index, $value);
The function
each()
takes one argument, and that is the array you wish to iterate on.
each($someArray);
Take a look at the following example of how to use these three functions together in a
while loop to iterate through a non-sequential array.
<?php
$board = array(“a”, 7 => “b”, 25 => “c”, 50 => “d”);
reset($board);
while(list($index, $value) = each($board))
{
echo(“Index = “ . $index . “, Element = “ . $value . “<BR>”);
}
?>
The results of the example above appear exactly like Figure 6.3, even though the indexes
in this particular array are not in a sequential order. Calling the
reset()
function in this
example is quite unnecessary because, since the array has just been created, the current
index is obviously the first available element. But it is good practice to get into, because
you might end up trying to loop through an array and it could be starting in the middle
of it, and that would be no good.
Looping through Non-Sequential Arrays 109
PHP also offers several other functions to operate on arrays, such as
current()
,
key()
,
next()
, and
prev()
to name just a few. For a complete list of functions that PHP supports,
please refer to Appendix B. Take a look at the following example and Figure 6.4 to see what
the
key()
and
current()
functions do:
<?php
$board = array(“a”, “b”, “c”, “d”);
$index = key($board);
$value = current($board);
echo(“Index = “ . $index . “, Element = “ . $value . “<BR>”);
?>
Note
Key and index mean exactly the same thing; the function in PHP is called
key()
instead of
index()
.
Figure 6.4 An example of the
key()
and
current()
functions.
110 Chapter 6
■
Arrays!
Earlier I mentioned
next()
and
prev()
. These two functions are another way to navigate
through an array. As you might imagine,
next()
goes to the next available index in the
array, and returns the element.
prev()
does the same thing but instead of going to the next
available index, it goes to the previous index. Take a look at the following loop:
<?php
$board = array(“a”, “b”, “c”, “d”);
reset($board);
for($i = 0; $i < 4; $i++)
{
$index = key($board);
$value = current($board);
next($board);
echo(“Index = “ . $index . “, Element = “ . $value . “<BR>”);
}
This will print the same results to the browser as Figure 6.3 did, but it does so in a differ-
ent way. But be careful if you use the
next()
and
prev()
functions. Remember I said it
returns the value of the element of the next index in the array? Well, what if the value is
0? Take a look at this example:
<?php
$board = array(3, 0, 2, 4);
do
{
$index = key($board);
$value = current($board);
echo(“Index = “ . $index . “, Element = “ . $value . “<BR>”);
} while(next($board));
?>
This loop will stop when it gets to the second element of the array because the while state-
ment will evaluate to false. So be very careful if you use the
next()
and
prev()
functions. If
you ever run into a loop that is stopping abruptly, take a look to make sure that your
Boolean expression isn’t being evaluated to false.
Multi-Dimensional Arrays
Creating multi-dimensional arrays in PHP is very similar to creating multi-dimensional
arrays in C/C++. In C/C++ you have support for single-dimension arrays, but you create
a multi-dimensional array by nesting an array as an element in a parent array. This is
Multi-Dimensional Arrays 111
exactly how you create multi-dimensional arrays in PHP. You make an array that holds an
array.
<?php
$board = array(“Row1” => array(“a”, “b”), “Row2” => array(“c”, “d”, “e”));
echo($board[“Row1”][0]); // Prints “a”
echo($board[“Row2”][2]); // Prints “e”
?>
One great use for multi-dimensional arrays is that you can represent a game board using
a two-dimensional array. Then each position in the game board, at say location e1, would
hold a value that would tell you if there is a piece at that square or not. Or you could use
a loop, like in the following example, to print the game board:
<?php
$board = array(array(“r”, “k”, “b”, “q”, “k”, “b”, “k”, “r”),
array(“p”, “p”, “p”, “p”, “p”, “p”, “p”, “p”),
array(“ ”, “ ”, “ ”, “ ”, “ ”,
“ ”, “ ”, “ ”),
array(“ ”, “ ”, “ ”, “ ”, “ ”,
“ ”, “ ”, “ ”),
array(“ ”, “ ”, “ ”, “ ”, “ ”,
“ ”, “ ”, “ ”),
array(“ ”, “ ”, “ ”, “ ”, “ ”,
“ ”, “ ”, “ ”),
array(“p”, “p”, “p”, “p”, “p”, “p”, “p”, “p”),
array(“r”, “k”, “b”, “q”, “k”, “b”, “k”, “r”));
echo(“<table border=1 cellpadding=2 cellspacing=0 width=250>”);
for($yIndex = 0; $yIndex < count($board); $yIndex++)
{
echo(“<tr>”);
for($xIndex = 0; $xIndex < count($board[$yIndex]); $xIndex++)
{
echo(“<td align=center valign=middle>” .
$board[$yIndex][$xIndex] . “</td>”);
}
echo(“</tr>”);
}
echo(“</table>”);
?>
The results of this loop look like Figure 6.5.
112 Chapter 6
■
Arrays!
Figure 6.5 Results of looping through a multi-dimensional array.
Sorting Arrays
PHP provides tons of functions with which you can manipulate the arrays. Some of the
handiest are the sorting functions. Take a look at Table 6.1 to see the list of sorting functions.
Sorting Functions
Function Name Description
sort()
asort()
rsort()
arsort()
ksort()
krsort()
usort()
A customizable sort function.
uasort()
uksort()
Table 6.1
Sorts arrays in alphabetical order.
Sorts arrays in alphabetical order without changing indexes.
Sorts arrays in reverse order.
Sorts arrays in reverse order without changing indexes.
Sorts arrays by key values.
Sorts arrays by key values in reverse order.
A customizable sort function that keeps string indices.
A customizable sort function that sorts by key.
*A complete list of PHP functions is available in Appendix B.
Sorting Arrays 113
Now take a closer look at each of these sorting functions. The
sort()
function sorts the ele-
ments in the array by numeric and then alphabetical order. Numbers come first, then
punctuation marks, and finally letters. While the function is sorting, it reassigns the
indexes to reflect the new order.
<?php
$items = array(“Sword”, “Medpac”, “Advanced Medpac”,
“Armor”, “Blaster”, “Shotgun”);
// Print the unsorted items
for($index = 0; $index < count($items); $index++)
{
echo(“Index = “ . $index . “, “ . $items[$index] . “<BR>”);
}
// Print the sorted items
sort($items);
for($index = 0; $index < count($items); $index++)
{
echo(“Index = “ . $index . “, “ . $items[$index] . “<BR>”);
}
?>
The results of this example should look like Figure 6.6.
Figure 6.6 The
sort()
function in action.
114 Chapter 6
■
Arrays!
Take a look at what happens when you have an array with specified indexes when you use
the
sort
function.
<?php
$items = array(“Item1” => “Sword”, “Item2” => “Medpac”, “Item3” => “Advanced Medpac”,
“Item4” => “Armor”, “Item5” => “Blaster”, “Item6” => “Shotgun”);
// Print the unsorted items
while(list($index, $value) = each($items))
{
echo(“Index = “ . $index . “, “ . $value . “<BR>”);
}
echo(“<br>”);
// Print the sorted items
sort($items);
while(list($index, $value) = each($items))
{
echo(“Index = “ . $index . “, “ . $value . “<BR>”);
}
?>
If you use the
sort
function with specified indexes, like in the example above, it will lose
its indexes. Take a look at Figure 6.7 to see the results.
Figure 6.7 The
sort()
function with specified indexes.
Sorting Arrays 115
To avoid losing your specified string indices you need to use the
asort()
function. This will
sort the array and its elements without taking away your string indices. If you wanted to sort
this array in reverse you would use the
rsort()
function. However, the
rsort()
function will
also lose specified string indices, so to sort an array in reverse with string indices you need
to use the
arsort()
function. You can also sort by your string indices by using
ksort()
.
<?php
$items = array(“Item6” => “Sword”, “Item5” => “Medpac”, “Item3” => “Advanced Medpac”,
“Item4” => “Armor”, “Item2” => “Blaster”, “Item1” => “Shotgun”);
// Print the unsorted items
while(list($index, $value) = each($items))
{
echo(“Index = “ . $index . “, “ . $value . “<BR>”);
}
echo(“<br>”);
// Print the sorted items
ksort($items);
while(list($index, $value) = each($items))
{
echo(“Index = “ . $index . “, “ . $value . “<BR>”);
}
?>
The results of this example look like Figure 6.8.
Figure 6.8 The
ksort()
function in action.
116 Chapter 6
■
Arrays!
Note
You can sort in reverse order by key by using the
krsort()
function.
The last of the sorting functions for arrays has to be the coolest. With
usort()
you can
organize your arrays however you want. The
usort()
function takes two arguments: the
first is the array you would like to sort, and the second is a name of a function that con
-
tains your own sorting logic.
usort(someArray, someFunction);
The following example will sort the array
$items
by the length of each string:
<?php
function SortByLength($element1, $element2)
{
$lengthOfElement1 = strlen($element1);
$lengthOfElement2 = strlen($element2);
if($lengthOfElement1 == $lengthOfElement2)
return 0;
return ($lengthOfElement1 < $lengthOfElement2) ? -1 : 1;
}
$items = array(“Item6” => “Sword”, “Item5” => “Medpac”, “Item3” => “Advanced Medpac”,
“Item4” => “Armor”, “Item2” => “Blaster”, “Item1” => “Shotgun”);
// Print the unsorted items
while(list($index, $value) = each($items))
{
echo(“Index = “ . $index . “, “ . $value . “<BR>”);
}
echo(“<br>”);
// Print the sorted items
usort($items, ‘SortByLength’);
while(list($index, $value) = each($items))
{
echo(“Index = “ . $index . “, “ . $value . “<BR>”);
}
?>
The results of the above example are displayed in Figure 6.9.
Your First PHP Game 117
Figure 6.9 The
usort()
function in action.
Caution
Make sure you pass the function name to
usort()
as a string; otherwise you will get a warning dis-
play in the middle of your page.
Your First PHP Game
Now it’s time to program your first game in PHP! You will start off with a simple game of
tic-tac-toe. This game will use all the aspects that you have learned in all the previous
chapters. It contains session variables, arrays, functions, and PHP working together with
HTML.
The first step you need to take to set up a new game is to create a directory for it inside
your Web server. For IIS the directory would be C:\Inetpub\wwwroot, and if you are using
an Apache Web server the directory would be /usr/web. If you are on Windows the Apache
directory would look something like C:\Apache depending on where you installed
Apache. You can name the directory whatever you like. I am going to name it tictactoe.
118 Chapter 6
■
Arrays!
Now that you have a directory set up you can create a new PHP file. I recommend fol-
lowing a regular naming scheme. The default page in a directory should be named
index.php or default.php. You can use whichever you like. Since the game will only be in
one file I will just name it index.php.
The next step you need to take is to define all of your constants and globals, and include
the common functions file that you use in all of your games. The first set of constants that
you need is four game states. The first of the four states is to tell you when the game is
starting, the second lets you know when the game is in play, the third tells you if someone
has won the game, and the fourth and final state tells you if someone has lost the game.
// Includes
include(“common.php”);
// Game States
define(“GAME_START”, 0);
define(“GAME_PLAY”, 1);
define(“GAME_WIN”, 2);
define(“GAME_OVER”, 3);
For tic-tac-toe, the only other two defines needed are one for the “X” image and one for
the “O” image.
// Images
define(“X_IMAGE”, “images/X.gif”);
define(“O_IMAGE”, “images/O.gif”);
The only reason you define these is because it makes it easy if you want to change the
images later, plus it saves you some typing when you create the render function to display
your board to the browser. You will also need three global variables for all of your func
-
tions to use. The first stores what state the game is in, the second stores the state of the
board, and the third stores the difficulty level of the computer A.I.
// Globals
global $gGameState;
global $gBoard;
global $gDifficulty;
Now that the global information for the game is defined, you will set up the HTML frame-
work for the game. The HTML framework is the form you will use to get user input for
your game. The following is all the HTML you will need for the game:
<!doctype html public “-//W3C//DTD HTML 4.0 //EN”>
<html>
Your First PHP Game 119
<head>
<title>Tic-Tac-Toe</title>
<link rel=”stylesheet” href=”style.css” type=”text/css”>
</head>
<body>
<form action=”index.php” method=”post”>
<input type=”hidden” name=”turn” value=”<? printf($turn) ?>”>
<?php WriteTableHeader(); ?>
<div align=”center”>
<input type=”submit” name=”btnNewGame” value=”New Game”>
<b>Difficulty Level</b>
<select name=”dlDifficulty”>
<option value=”1”>Easy</option>
<option value=”2” SELECTED>Normal</option>
<option value=”3”>Not-Likely</option>
</select><br><br>
<?php
// Render the game
Render();
?>
</div>
<?php WriteTableFooter(); ?>
</form>
</body>
</html>
Note
Remember that all of this code is provided for you on the CD.
The framework for the game is very simple; the form is redirecting back to itself. Then the
header for the cool table layout is written. After that, some form elements are created. One
allows the user to start a new game, and the drop-down box is used to choose the diffi
-
culty level of the computer A.I. After all that, the render function is called. Because you
don’t yet have a render function, you’ll need to create one now.
The render function needs to determine what state the game is in by using the global game
state variable that was declared earlier. If the state of the game is starting, then the render
function needs to start a new game and change the state to playing. If the state of the game
120 Chapter 6
■
Arrays!
is playing then the render function needs to take the user input, process it, calculate the
move for the computer, and update the board. If one of the players has won the game, the
render function needs to tell the user that he either has won or lost the game.
As you can see, the render function needs to do a ton of work. To accomplish all these
tasks the render function will need some helper functions. You will need a function to
start a new game, a function to draw the board, a function to check for a win, a function
to check to see if the board is full, and, finally, a function to end the game and free your
session. Let’s start off with the render function itself and then continue on to the child
functions that
render()
will call.
function Render()
{
global $gGameState;
global $gBoard;
global $gDifficulty;
switch($gGameState)
{
case GAME_PLAY:
{
// Get the move if the user made one
if($_POST[‘btnMove’] != “”)
{
$gBoard[$_POST[‘btnMove’]] = “x”;
$_SESSION[‘gBoard’] = $gBoard;
}
// Check for a win
if(CheckWin() == “X”)
{
$gGameState = GAME_WIN;
Render();
return;
}
// Check to see if the board is full
if(CheckFull() == 1)
{
$gGameState = GAME_OVER;
Render();
return;
Your First PHP Game 121
}
// Compute the computer’s move if we can still move
if($gGameState == GAME_PLAY && $_POST[‘btnMove’] != “”)
{
if($gDifficulty == 1)
{
ComputerRandomMove();
}
elseif($gDifficulty == 2)
{
$computerMove = ComputerMove();
if($computerMove == “”)
{
ComputerRandomMove();
}
else
{
$gBoard[$computerMove] = “o”;
$_SESSION[‘gBoard’] = $gBoard;
}
}
elseif($gDifficulty == 3)
{
$computerMove = ComputerMove();
if ($computerMove == ‘’)
{
if($gBoard[4] == ‘’)
$computerMove = 4;
elseif($gBoard[0] == ‘’)
$computerMove = 0;
elseif($gBoard[2] == ‘’)
$computerMove = 2;
elseif($gBoard[6] == ‘’)
$computerMove = 6;
elseif($gBoard[8] == ‘’)
$computerMove = 8;
if($computerMove == ‘’)
ComputerRandomMove();
}
}
122 Chapter 6
■
Arrays!
}
// Check for a win
if(CheckWin() == “O”)
{
$gGameState = GAME_OVER;
Render();
return;
}
// Check to see if the board is full
if(CheckFull() == 1)
{
$gGameState = GAME_OVER;
Render();
return;
}
// Draw the board
DrawBoard();
break;
}
case GAME_WIN:
{
EndGame();
printf(“<br><br><br><img border=\”0\”>”);
break;
}
case GAME_OVER:
{
EndGame();
printf(“<br><br><br><img src=\”images/gameOver.jpg\”
border=\”0\”>”);
break;
}
}
// Update our game state
$_SESSION[‘gGameState’] = $gGameState;
}