PHP in Action phần 9 potx
Bạn đang xem bản rút gọn của tài liệu. Xem và tải ngay bản đầy đủ của tài liệu tại đây (837.72 KB, 55 trang )
DESIGNING A SOLUTION USING HTML_QUICKFORM 415
• Feature-revealing code. To make the code as readable as possible, let’s try to avoid
making it too convenient. Hiding as much of the mechanics of the process as
possible is tempting, but the code will be more self-documenting if important
steps in the process are explicit—validating the form, populating it, and passing
values into the template.
• Te s t a b l e . A by-product of making the code more explicit is making it testable.
We want to be able to replace important objects with mock objects. Typically,
this involves passing them into a constructor or other method.
18.1.2 Putting generated elements into the HTML form
Perhaps the greatest challenge of all in form handling is getting the form contents and
the
HTML markup to work together as a team. This is, of course, the same challenge
as in other dynamic web pages, but a typical form has a particularly high density of
individual values to be inserted, especially if there is client-side validation. Also, the
form speaks to a mixed audience, since some of it is intended for the human user and
some is not. We’ll see what we can do using the simplest possible strategy, and con-
sider whether we need the
HTML_QuickForm Renderer class.
Manual template building
The simplest way to insert elements of the form object into the template is the direct
route. That means something like this, using
PHPTAL syntax:
<span tal:content="form/elements/headline/getLabel">
Headline (this is sample text that PHPTAL removes)
</span>
<input type="text"
name="${form/elements/headline/getName}"
value="${form/elements/headline/getValue}" />
We can avoid making the paths this long if we want; the example is just intended to
illustrate the principle.
Having a template, getting the values from the form object, and inserting them
into the template is the basic way to do it. The alternative is passing the form object
to the template.
Do we need the renderer?
Given the popularity of
HTML_QuickForm, it’s not surprising that we’re not the
only ones who have wanted to use it with a template engine. The developers of
HTML_QuickForm have responded rather appropriately by letting a separate Ren-
derer object do the job of generating the
HTML for the form. That means we can
produce something else by using a different Renderer. There are already other Ren-
derers, including one that is specialized for Smarty.
So if we want some other template engine, one thing we could do is to make our own
Renderer. But is it necessary? The Renderer is an abstraction that comes out of a more
416 CHAPTER 18 FORM HANDLING
complex and ambitious design than we’re after right now—one that’s capable of gener-
ating the full
HTML code for a form. We can achieve the same thing more simply by
calling the components of the form object directly in the template, as shown earlier.
We may or may not want to include the label in the form object. When the
approach is this simple, it’s easy to make the label a fixed string in the template if we
want the template designer to be able to change it.
18.1.3 Finding abstractions
As mentioned earlier, we can get more mileage out of
our code by identifying some appropriate abstractions.
When dealing with forms, it’s easy to make the
abstractions too dependent on the technical imple-
mentation in
HTML. A better way to define the
abstractions is by starting out with how different input
controls work. That will help decide what we need to
do with them in code. And since these are user inter-
face elements, “how they work” is mostly synonymous
with what the user is able to do with them. This does
not map exactly to the
HTML implementation. A
plain
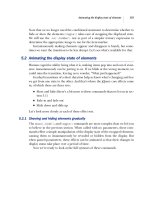
<select> drop-down menu does the same
thing for the user as a set of radio buttons: it allows him or her to select one out of a
fixed set of alternatives, as shown in figure 18.1.
1
A
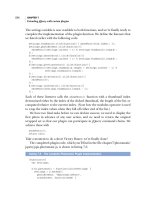
<select multiple> box does the same thing as a set of check boxes, allow-
ing the user to choose more than one item (see figure 18.2).
Table 18.1 summarizes these two abstractions and text input as well.
Now that we have the abstractions and the basic guidelines, we’re ready to get more
specific about what we need and don’t.
1
The W3C XForms recommendation recognizes this similarity.
Figure 18.1 A plain drop-
down menu is functionally
equivalent to a set of radio
buttons
Figure 18.2
A multi-select box is functionally
equivalent to a set of checkboxes
DESIGNING A SOLUTION USING HTML_QUICKFORM 417
18.1.4 More specific requirements
Since we’re using an existing package, we want to use the parts of it that we need, and
only those. There are some features we don’t need and some we do need.
We don’t need this
If we use
HTML_QuickForm in the default way—generating all the HTML piece by
piece from the form element objects—we have to add all form controls to the form.
With a template approach, this is not necessary. Even though generating everything
may seem convenient, there are some things that become easier and more straightfor-
ward when we use templates. All the elements that are not actually used to input val-
ues can just be written as
HTML in the template. This includes buttons, images,
“hidden inputs,”
2
and anything else we need except text and selection input controls.
In fact, if we were to decide to populate the form manually with values from the
HTTP request, we would only need to represent the ones that have to be validated.
We will have support for text inputs, select menus, and radio buttons. We won’t
deal with multi-select controls. This leaves our form handling incomplete, but even
moderately complex web applications sometimes don’t have multi-select controls, and
our simple approach doesn’t burn any bridges or close any doors. We can always do
it the old-fashioned way if we need to.
We do need this
If we want to support only the most basic elements of a form, the element objects we
will need are the following:
• A text input object. We don’t need to distinguish between single-line text input
controls and text areas at all in our
PHP code, although we will, of course, do so
in the
HTML markup. Both can be validated in the same way and have their
values set in the same way.
• A select menu object.
Table 18.1 An abstract, user-oriented way of looking at form input controls
User task Examples HTML implementation
Text input Single-line text input field
Multi-line text area
<input type="text" >
<textarea>
Select one option from a
fixed list of alternatives
Drop-down menu
Set of radio buttons
<select>
repeated <input type="radio" >
Select one or more
options from a fixed list
of alternatives
Multi-select box
Set of check boxes
<select multiple="multiple">
repeated <input type="checkbox" >
2
Again, thinking abstractly, it’s not really an input control even though it’s represented as one (<input
type="hidden" >
) in HTML.
418 CHAPTER 18 FORM HANDLING
• A radio button group object. This should work as similarly to the select menu
object as possible. Usability considerations should dictate the choice between
radio buttons and a menu. To the
PHP application, they will look the same.
Although we don’t want to generate all
HTML code piecemeal, there is something to
be said for generating some elements. For example, a
<select> element with a
dynamic number of options doesn’t resemble pure
HTML much in a template, what-
ever we do with it.
18.1.5 The select problem
It would be easier if we had a way to set the <select> element’s value similar to the
value attributes of the <input> element. There is no value attribute on a <select> ele-
ment, so we can’t do this:
3
<select value="Warm">
<option>Cold</option>
<option>Warm</option>
<option>Hot</option>
</select>
Except, actually we can do it, or something similar.
One way is to use some extra JavaScript. But is it really worth the possible com-
plications of using JavaScript just to make the template more readable?
Another is to post-process the template, replacing the previous example with this:
<select>
<option>Cold</option>
<option selected="selected">Warm</option>
<option>Hot</option>
</select>
But post-processing is also extra work and complexity, and we are trying hard to keep
it simple. So we’re back to adding a conditional
selected attribute to each and
every menu
<option> element.
The alternative is to generate the entire select element. It’s not a major liability. The
only thing the template designer loses is the ability to style the individual select ele-
ment differently from the others. And generating the element is not hard to do; in fact,
we can use the existing capability in
HTML_QuickForm.
Let’s have both options: generate the entire element or just variables so all the
HTML code can be in the template.
Now it turns out that we need the Renderer after all, to generate
HTML for the sin-
gle elements. Listing 18.1 shows how this works.
3
The XForms recommendation solves the problem by keeping all the existing values—for all form con-
trols—in a separate model section instead of having value attributes on the controls themselves.
IMPLEMENTING THE SOLUTION 419
require_once 'HTML/QuickForm.php';
require_once 'HTML/QuickForm/Renderer/Default.php';
require_once 'HTML/QuickForm/text.php';
$element = new HTML_QuickForm_text('headline');
$renderer = new HTML_QuickForm_Renderer_Default;
$renderer->setElementTemplate("{element}");
$element->accept($renderer);
print $renderer->toHtml();
All of the files—the main QuickForm file, Renderer, and text input element—have
to be included separately.
QuickForm elements can be created and used independently of an actual form.
That is what we do in this example. We use the default Renderer; the one that gener-
ates
HTML. When we use the form object itself, we don’t need to think about the Ren-
derer, since the form object will create it for us to generate
HTML. But with an
element, we have to create the Renderer.
By default, the Renderer generates
HTML table row and cell tags around the ele-
ment. We want to prevent that, since we want to mix the element freely with other
HTML markup. Fortunately, HTML_QuickForm has the ability to set a template for
a single element. For our purposes, we reduce the template to just the element itself.
The element object receives the Renderer in the
accept() method and makes the
Renderer do the job of generating
HTML. Finally, we get the generated HTML code
from the Renderer.
Now that we know in a general sense what we need to implement, let’s see how we
can do it.
18.2 IMPLEMENTING THE SOLUTION
We are using an existing library package to implement something similar on top of it.
This will typically involve design patterns like Decorator, Adapter, Facade, and the
various factory patterns. These patterns are noninvasive: they can be used to provide
the interface and behavior we want without altering the underlying libraries.
In this section, we’ll start by designing a general way to wrap the
HTML_QuickForm input elements. Then we’ll study how the various input con-
trols can be implemented in this way. These elements have to be created, so we’ll
look into that next. Validation also needs to be taken care of, and we need to know
how to use the form object when defining a form in a template. Since there is not
enough space to make everything complete, we end the chapter by discussing some
ideas on further development.
Listing 18.1 Using a QuickForm Renderer for a single element
420 CHAPTER 18 FORM HANDLING
18.2.1 Wrapping the HTML_QuickForm elements
We want the form element objects to have the features we need from
HTML_QuickForm and yet be easy to use in a template. That means we have to both
use some methods from the QuickForm element and add some methods of our own.
That’s a job for one of those undignified Decorators that cannot be redecorated
because they change the interface too much. Figure 18.3 shows the structure we’re
looking for. We have to be able to set and get the value of the element, but the imple-
mentation will vary depending on the type of element. We also want to be able to get
the name of the element and to generate complete
HTML in case we need it. And we
will use the QuickForm default renderer even though it might seem like overkill for
just a single element.
Listing 18.2 shows the code for the abstract input control. The
asHtml() method
is basically the same code as in listing 18.1.
abstract class AbstractInputControl {
protected $quickFormElement;
abstract public function setValue($value);
abstract public function getValue();
public function asHtml() {
$renderer = new HTML_QuickForm_Renderer_Default;
$renderer->setElementTemplate("{element}");
$this->quickFormElement->accept($renderer);
return $renderer->toHtml();
}
public function getName() {
return $this->quickFormElement->getName();
}
}
Figure 18.3
How our input control wraps
the Quickfom element
Listing 18.2 The input control parent class acts as a Decorator for the
HTML_QuickForm element and also uses a default Renderer to gen-
erate HTML for the element
IMPLEMENTING THE SOLUTION 421
We want to be able to get both the value and the name of the element. The
get-
Name()
method is the same for all element types, but getValue() needs to be in
the child classes, since there are minor differences in how they work.
18.2.2 Input controls
The input controls are different in principle; this fact is what our abstractions express.
This means that they have to be handled differently. Text input elements (text areas
and text input boxes) are relatively simple, but need validation. Select menus come in
two flavors: single and multiple selection. Radio buttons are especially difficult, since
HTML_QuickForm has no explicit support for such features as setting the value of a
radio button group.
Text input elements
Text input fields need validation. So do select fields, but not in quite the same way.
(Menus and the like cannot be filled in incorrectly by the user, but this can be
bypassed by sending an
HTTP request by some other means than the form that’s
intended for it. But to simplify our job for now, we’ll assume that we’re doing valida-
tion for usability only, which means that text input elements are the only ones on our
radar screen.) We must be able to specify the validation type and the message to be
displayed if validation fails. We’ll look at how to make
HTML_QuickForm do the
actual validation later; for now, we’ll do the basic part, using the QuickForm object as
a data container whose values can be accessed in a template.
Listing 18.3 is a TextInput class that does this somewhat basic job.
class TextInput extends AbstractInputControl
{
protected $quickFormElement;
private $validation;
private $message;
public function __construct(
$quickFormElement,$validation,$message) {
$this->validation = $validation;
$this->message = $message;
$this->quickFormElement = $quickFormElement;
}
public function setValue($value) {
$this->quickFormElement->setValue($value);
}
public function getValue() {
return $this->quickFormElement->getValue();
}
Listing 18.3 A TextInput class that contains an HTML_QuickForm_text object
b
The element we’re decorating
c
Validation type and
message
d
Pass everything
in the
constructor
e
Simple
delegation
422 CHAPTER 18 FORM HANDLING
public function getLabel() {
return $this->quickFormElement->getLabel();
}
}
b $quickFormElement is the element we’re decorating. It contains the name, label,
value, and potentially other information, but no validation information thus far.
C $validation is the validation type; $message is the message to display if valida-
tion fails.
D All the member variables are set by passing them as arguments to the constructor.
One of these arguments is the QuickForm element object. As we’ve seen in several
cases before, this is a way to create flexibility. We can configure the QuickForm ele-
ment object before inserting it into our own object.
E setValue(), getValue(), and getLabel() just call the decorated Quick-
Form element object in the simplest possible way.
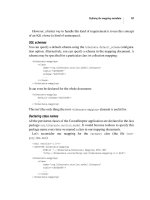
Select menus
Since it has no validation to do, the select menu class is even simpler than the text
input class. But just to make the design clearer, let’s have an abstract class to represent
the similarity between a select menu and a radio button group. We’ll call it Select-
One. That gets us the class design shown in figure 18.4.
The abstract class is simple:
abstract class SelectOne extends AbstractInputControl
{
protected $quickFormElement;
e
Simple
delegation
Figure 18.4
The inheritance hierarchy for the
elements illustrates abstract
similarities and differences
IMPLEMENTING THE SOLUTION 423
public function __construct($quickFormElement) {
$this->quickFormElement = $quickFormElement;
}
abstract public function addOption($text,$value);
}
The SelectMenu class (see listing 18.4) is not much larger, mainly because the
HTML_QuickForm_select object does so much of the job for us.
class SelectMenu extends SelectOne{
protected $quickFormElement;
public function addOption($text,$value) {
$this->quickFormElement->addOption($text,$value);
}
public function setValue($value) {
$this->quickFormElement->setValue($value);
}
public function getValue() {
$values = $this->quickFormElement->getValue();
return $values[0];
}
}
b A select menu is more complex than a text input field in one respect: we need to add
options. But since the QuickForm has this feature already, it’s not hard to implement.
C getValue() in the QuickForm element is based on a different concept than ours.
QuickForm sees all
<select> elements—single-input and multi-input—as two dif-
ferent variations on the same object. We are taking a different and more user-oriented
perspective: A single-select and a multi-select are different, while the single-select is
basically the same as a group of radio buttons.
Because of this mismatch, we won’t use the
getValue() of the QuickForm ele-
ment directly. It returns an array of selected values. Since our class represents an element
that can have only one value, it’s natural to return only the first element in this array.
Radio buttons
Representing a group of radio buttons is somewhat more complex, because there is
no direct support for it in
HTML_QuickForm. There is a class representing a group
of elements and one representing a radio button. But there is no implementation of
the actual workings of a group of radio buttons. Therefore, we need some more code
in this case (see listing 18.5).
Listing 18.4 A SelectMenu class that contains an HTML_QuickForm_select
object
b
Adding
options is
easy
c Single select
returns
single value
424 CHAPTER 18 FORM HANDLING
class RadioButtonGroup extends SelectOne
{
private $value;
private $options = array();
protected $quickFormElement;
public function addOption($text,$value) {
$elements = $this->quickFormElement->getElements();
$element = new HTML_QuickForm_radio(
NULL,$text,NULL,$value);
$elements[] = $element;
$this->quickFormElement->setElements($elements);
$this->options[$value] = $element;
}
public function setValue($value) {
$this->value = $value;
if (!array_key_exists($value,$this->options)) return;
$this->options[$value]->setChecked(TRUE);
}
public function getValue() {
return $this->value;
}
public function options() {
return $this->options;
}
}
b Since HTML_QuickForm does not have a representation of how radio buttons work,
we need to handle more of it ourselves. To make this possible, we keep both the value
and the button objects themselves in instance variables.
C For some reason, there is no way to add an element to a QuickForm group. Instead,
we have to get all the elements as an array, add a new one to the array, and put the
whole array back.
D To set the value of a radio button group, we set the checked property of the radio
button representing that value. We also store the value separately to make it easy to
retrieve.
setValue() for the QuickForm group does something different, which is not what
we need here.
Listing 18.5 A RadioButtonGroup class
b
Keep value and
options separately
c
Add by
replacing
all
d
Set
value
in
both
places
IMPLEMENTING THE SOLUTION 425
18.2.3 Which class creates the form controls?
We haven’t started on the form class yet. Doing the form class requires us to think
about how to create the form elements. It might seem simple to do something similar
to what
HTML_QuickForm does:
$form->addElement('text', 'headline', 'Headline:');
HTML_QuickForm gets this to work even for elements such as <select>, the
menu options being given as an array of data.
But let’s start first with a way to add element objects to a form. We can add the
other, convenient method later if we want to. So this is what we’re going for:
$form->add($element);
Where does $element come from? Since we’re using decorators, construction
becomes complex, with nested constructor calls. This makes it too cumbersome to
use the constructors in client code. We need some creation methods. They could be
in a separate factory class, but let’s keep them in a form class for the time being:
class Form {
public function createTextinput(
$name,$validation,$message,$label='')
{
return new TextInput(
new HTML_QuickForm_text(
$name,$label),$validation,$message);
}
public function createSelect($name) {
return new SelectMenu(
new HTML_QuickForm_select($name));
}
public function createRadioButtons($name) {
return new RadioButtonGroup(
new HTML_QuickForm_group($name));
}
}
The select and radio button groups are created without options, so we’ll have to add
the options manually in the client code:
$radiogroup = $form->createRadioButtons('time');
$radiogroup->addOption('Morning','morning');
$radiogroup->addOption('Now','now');
$form->add($radiogroup);
We’re using the HTML_QuickForm object the same way we did with the elements.
And the method to add the element to the form is simple:
class Form {
public function __construct() {
$this->quickForm = new HTML_QuickForm;
}
426 CHAPTER 18 FORM HANDLING
public function add($control) {
$this->quickForm->addElement($control->getQuickFormElement());
$this->elements[$control->getName()] = $control;
}
}
The QuickForm object gets its QuickForm element, and we’re adding it to our own
array, too. This allows us to get the best of both worlds: we can let QuickForm take care
of validation, while we have control of the element objects we will use in the template.
18.2.4 Validation
But oops, we forgot to add the code to use the validation feature of the QuickForm
object. The way to do that in
HTML_QuickForm is with a method called add-
Rule()
. But since we’re only doing it for text elements, we need to do an if test to
find out what kind of element it is, right?
if ($element instanceof textInput)
$this->getQuickForm->addRule( )
But doing if tests on the types of objects is not recommended by the gurus. It vio-
lates the Liskov substitution principle and the open-closed principle. In plainer
terms, the problem is that every time we add another element type, we need to
change the conditional statement in the Form class. If we keep the behavior in the
element instead, a new element type can handle this by itself with no need to modify
the Form class. The way to achieve that is to pass the form object to the element
object and let it do the following:
class TextField {
public function addQuickFormRuleToForm($form) {
if (!$this->validation) return;
$form->getQuickForm()->addRule(
$this->getName(),
$this->message,
$this->validation,
null,
'client'
);
}
}
Now we can call the method while adding the element to the form:
class Form {
public function add($control) {
$this->quickForm->addElement($control->getQuickFormElement());
$this->elements[$control->getName()] = $control;
$control->addQuickFormRuleToForm($this);
}
}
IMPLEMENTING THE SOLUTION 427
That’s all we need to use
HTML_QuickForm’s validation capabilities. We’ve set up
everything
HTML_QuickForm needs, and now all we need to do is call it:
class Form {
public function getValidationScript() {
return $this->quickForm->getValidationScript();
}
public function validate() {
return $this->quickForm->validate();
}
}
It’s a weakness of the HTML_QuickForm package that it does not let us specify
explicitly what we want to validate. Replacing it with the object-oriented validation
code we developed earlier in this chapter is one way to remedy that weakness.
Another is to do further manipulation to make the
HTML_QuickForm object do our
bidding. It’s not easy, though.
We could try manipulating the inside of the
HTML_QuickForm object to set the
values we want to validate, but there is a high risk that in new versions of
HTML_QuickForm, they would be represented differently, and that might break our
code. The alternative is setting the
$_POST variable and re-creating the QuickForm
object, but it’s odd. It’s not quite like the tail wagging the dog; it’s more like putting
a new tail on the dog with a remote control so that we’ll be able to wag it ourselves.
This illustrates the problems of using a package that has components baked into
it in a way that makes them hard to separate. We do get something for free, but beyond
a certain point, there are diminishing returns: trying to make it bend over backward
to serve our needs becomes less and less productive.
Figure 18.5 summarizes the Form object and its related objects. As mentioned,
the QuickForm elements are used both directly and indirectly, by way of the
QuickForm object.
18.2.5 Using the form object in a template
Now all we need in order to be able to use the Form object to fill in a template is a
simple accessor to get the elements we stashed away in an array outside the
HTML_QuickForm object:
class Form {
public function getElements() {
return $this->elements;
}
}
That is all we need to plug the data into a template. Listing 18.6 shows how.
428 CHAPTER 18 FORM HANDLING
<html>
<head>
<div tal:replace="structure form/getValidationScript" />
</head>
<body>
<span tal:define="draft elements/status/options/draft"/>
<span tal:define="published
elements/status/options/published"/>
<form method="post" onsubmit="return validate_(this);">
<table>
<tr>
<td tal:content="elements/headline/getLabel">
Headline (this is sample text that PHPTAL removes)
</td>
<td>
<input type="text"
name="${elements/headline/getName}"
value="${elements/headline/getValue}" />
</td>
</tr>
<tr>
<td tal:content="elements/category/getLabel">
Category (this is sample text that PHPTAL removes)
</td>
<td tal:content="structure elements/category/asHtml">
<select>
</select>
</td>
</tr>
Figure 18.5 The form object and its related components
Listing 18.6 Plugging form data into a PHPTAL template
J
ava
S
cr
i
pt generate
d
b
y
HTML_QuickForm
b
Abbreviating
long paths
c
Default HTML_QuickForm
function name
d
Simple text
element
e
Let HTML_QuickForm
generate HTML
f
IMPLEMENTING THE SOLUTION 429
<tr>
<td>
<span tal:content="published/getLabel"/>:
<input type="radio" name="${elements/status/getName}"
value="${published/getValue}"
tal:attributes="checked published/getChecked" />
<span tal:content="draft/getLabel"/>:
<input type="radio" name="${elements/status/getName}"
value="${draft/getValue}"
tal:attributes="checked draft/getChecked" />
</td>
</tr>
<tr>
<td tal:content="elements/body/getLabel">
Body (this is sample text that PHPTAL removes)
</td>
<td>
<textarea tal:content="elements/body/getValue"
name="${elements/body/getName}">
</textarea>
</td>
</tr>
</table>
<input type="submit" />
</form>
</body>
</html>
b The JavaScript generated by the HTML_QuickForm package comes complete with
<script> tags, and PHPTAL replaces the <script> tag here with all of that.
C We add these two tal:define elements for convenience to avoid having to enter
the long paths of the radio buttons repeatedly. If we avoid cluttering the template
with this, we can define the paths when we set the variables in the template instead.
D The odd-looking JavaScript function name is what we get from HTML_QuickForm
when we don’t name the form. That will have to be improved if we want more than
one form on a page.
E The typical text input element is simple: just use the label, name, and value from the
form element object.
F We generate the select menu as HTML from the form object. There are <select>
tags as documentation to indicate that there will be a <select> element here. PHP-
TAL
removes them and adds the actual <select> element that is generated and
returned from the
asHtml() method of the element object.
G Unlike the <select> element, we represent the radio buttons with explicit HTML.
elements/status is the object representing the set of radio buttons. pub-
lished
and draft are the objects representing each radio button.
Explicit HTML for
radio buttons
g
430 CHAPTER 18 FORM HANDLING
18.2.6 What next?
We’ve used a mixture of techniques to come up with form handling that does what
it’s supposed to do. It’s transparent: with some knowledge of
PHP and HTML, it’s rel-
atively easy to understand what it does. But it’s still somewhat cumbersome if we
want to do complex groups of radio buttons with actual markup. How can we sim-
plify this still further? We can use ideas similar to those we saw in the section on syn-
chronizing server-side and client-side validation.
Our current way of inserting values into to the template file adds little actual infor-
mation to the
HTML markup. Take this excerpt from listing 18.6:
<td tal:content="elements/headline/getLabel">
Headline (this is sample text that PHPTAL removes)
</td>
<td>
<input type="text"
name="${elements/headline/getName}"
value="${elements/headline/getValue}" />
Repeating the elements/headline path is just a way of making this intelligible
to the template engine. It’s a text input field called
headline; that’s the gist of it.
If we simplify the task by ignoring the label at first, we could generate the above
from this basic markup:
<input type="text" name="headline">
All we would need to do is to pre-process the template using our Form object to gen-
erate the version that can be read by the template engine. The label could be gener-
ated if we use the
HTML <label> tag:
<td>
<label for="headline">Headline</label>
</td>
<td>
<input type="text" name="headline">
We might even try to generate all the form handling code from the HTML form itself
(the pre-template) if we have some way of specifying validation. This is the opposite
of the
HTML_QuickForm approach.
SUMMARY 431
18.3 SUMMARY
The bigger challenges of input validation arise when we want to synchronize server-
side and client-side validation or to handle all aspects of form interaction. The easy
way out in the short term is to use one of the available packages that generate all
the
HTML for a form from an object-oriented representation in PHP code. But to
allow us to maintain the separation between markup and program code, more
advanced strategies are required. Although a complete solution is likely to be a
heavyweight package, we’ve explored some approaches, discovered a more abstract
way of describing form fields, and seen how a standard form-handling package such
as
HTML_QuickForm can be used with other tools for this purpose.
Form handling is the last part of our investigation of the complexities of user inter-
action. In the next chapter, we will start learning about the Data Source Layer of the
application. The first topics are database connection, abstraction, and configuration.
432
CHAPTER 19
Database connection,
abstraction, and
configuration
19.1 Database abstraction 433
19.2 Decorating and adapting database resource objects 438
19.3 Making the database connection available 442
19.4 Summary 448
Databases are a major component of any programmer’s diet. PHP programmers eat
databases for breakfast, not to mention lunch, dinner, and late-night snacks. With
My
SQL in particular (and more recently SimpleSQL), databases have been fast food
for many years: easy to install, deploy, and use.
But as any health fanatic will tell you, frivolous eating is dangerous. The first risk
we run when consuming food is indigestion. The digestive process is supposed to work
painlessly, but sometimes it doesn’t. In programming, we call these bugs. We’re inured
to them, though. We’re not like the people who scream and tear their hair out when-
ever the printer stops working. Those people probably are constitutionally incapable
of working in computer programming.
The next possible obstacle in food consumption is constipation. Something similar
happens in software development when the development process slows down due to
the need for increasingly complex queries. If the application is complex and needs to
store complex data, that’s partly unavoidable. But the more we understand about the
DATABASE ABSTRACTION 433
relationship between data and code, the better equipped we will be to make it work
and keep it working.
Then there’s the more demanding question of how food affects your health in the
long term, or, in our world, of what eventually happens to a project that has no con-
sistent strategy for managing objects, data, and databases. Just as health-care profes-
sionals need to know how foods reduce your risk of heart disease, we want to know
what strategies are most effective for preventing serious trouble in the project.
In this chapter, we will start with the most basic parts. Thinking about fast food
again, we at least want to safeguard delivery and try to eat without littering. Let’s make
sure we know where we keep the phone number for the pizza delivery service. And let’s
not leave our code in a state that resembles the floor of a chimpanzee cage at lunchtime.
In this chapter, we’ll first introduce database abstraction: the ability to treat differ-
ent kinds of databases as if they were the same. Then we’ll discuss how we can adjust
and add to database resources by using adapters and decorators. Finally, we’ll discover
how to make a database connection available wherever it is needed in the application.
Database connections are typical of the need for configuration information in the
application, so we will learn some techniques that are also useful for other data and
objects that need to be globally available.
19.1 DATABASE ABSTRACTION
All relational database management systems (RDBMSes) are basically the same. They
store data in tables and let you manipulate the data using
SQL, a standardized lan-
guage for querying, inserting, and modifying data.
But anyone who has used at least two
RDBMSes knows that there are also differ-
ences. Although most of them support a minimum standard syntax for
SQL, if you
want to do anything not-quite-standard, you might have to do completely different
things for different databases.
For example, most experienced
PHP programmers know the MySQL LIMIT clause.
To get just the first 10 rows, we can do this:
SELECT * FROM Users LIMIT 10;
This is not standard SQL. PostgreSQL has a very similar syntax; other databases gen-
erally don’t. In Transact-
SQL (Sybase and Microsoft), we can use TOP or SET ROW-
COUNT
to limit the number of rows. The equivalent syntax for DB2 is the following:
SELECT * FROM Users FETCH FIRST 10 ROWS ONLY;
This kind of difference may be hard to deal with if you want to switch from one
RDBMS to another, and that is the point of database abstraction. Database abstrac-
tion is a way to make different databases look the same to the application program-
mer by making them available through a similar interface. For example, the Creole
database abstraction package lets you do this:
434 CHAPTER 19 DATABASE CONNECTION, ABSTRACTION, AND CONFIGURATION
$stmt = $conn->createStatement();
$stmt->setLimit(10);
$rs = $stmt->executeQuery("SELECT * FROM Users");
NOTE
This example shows the principle, but beware of the fact that Creole and
similar packages may not support a given database.
You might not think you will ever have to switch databases, but it’s easy to underesti-
mate the likelihood of having to switch. As Joe Celko says in the article I Will Never
Have To Port This Code:
unless you throw out a program within a year of writing it, it’s either go-
ing to be ported [to another RDBMS] or so seriously maintained it might as
well be a port; and I don’t mean that it’s necessarily going to be moved to a
totally different database product. Moving to another release of the same
product is enough to cause problems [Celko].
As always, we don’t want to spend too much time preparing for future events, even if
they’re likely to happen, but using database abstraction is usually not much of a bur-
den. And it will be increasingly convenient as abstraction layers mature.
19.1.1 Prepared statements
A naive
PHP application may contain unescaped SQL statements with embedded
variables:
$result = mysql_query("SELECT name from Products where id = $id");
This is insecure, at least on its face, because variables may come from the user. If the
input is not filtered properly, it leaves the door open to
SQL injection attacks.
The secure principle is to always filter input and escape output. And when you send
a database query from a
PHP program, that is considered output. The basic MySQL
way to solve this is to use mysql_real_escape_string() on all variables:
$result = mysql_query(
"SELECT name from Products where id = ".
mysql_real_escape_string($id));
But it’s better yet to use prepared statements. There are several different implementa-
tions of these; fortunately, they are sufficiently similar that if you’ve learned to use one,
using another is mostly a matter of changing the syntax a bit. Listing 19.1 shows how
to use prepared statements in the Mysqli extension. Mysqli has the advantage of being
widely available, although it is tied to one specific database management system.
$mysqli = new Mysqli(
'localhost','user','password','newsdb');
$stmt = $mysqli->prepare(
"SELECT name from Products where id = ?");
Listing 19.1 Prepared statement example using Mysqli
b
Create Mysqli
connection
c
Prepare the
statement
DATABASE ABSTRACTION 435
$stmt->bind_param("i",$id);
$stmt->execute();
$stmt->bind_result($name);
$stmt->fetch();
$stmt->close();
b Using the object-oriented Mysqli syntax, we start by creating a Mysqli connection
object.
C Then we prepare the statement. The prepare() method returns a prepared state-
ment. This is an object representing a slightly abstracted
SQL statement, with slots or
placeholders that can be filled with values. It can be reused, setting different values in
the slots every time.
In the Mysqli extension, we represent the placeholders with question marks when
we define the prepared statement. This is the most common technique in database
abstraction.
D To specify a value for the parameter, we use bind_param(). The first argument to
the method is the data type (i for integer). The second argument is the value.
exe-
cute()
runs the SQL query using the prepared statement.
E Using bind_result() tells Mysqli that retrieved values are to be assigned to the
$name variable. fetch() makes Mysqli actually assign the variable. Now the prod-
uct name is in the
$name variable.
This way of getting the variables may seem odd. It would probably be more practical
if the
fetch() method just returned the data instead of assigning it to variables. But
for some reason, this is not the way the Mysqli extension works.
The
PHP Data Objects extension (PDO) is superior in several ways, primarily due
to the fact that it allows you to access several different
RDBMSes through the same API.
The
PDO way (or rather one of them; PDO is comfortably flexible) is illustrated
in listing 19.2. It is the same in principle, but many details differ.
try {
$conn = new PDO(
'mysql:dbname=newsdb;host=localhost',
'user',
'password');
}
catch (Exception $e) {
throw new Exception($e->getMessage());
}
$conn->setAttribute(
PDO::ATTR_ERRMODE,
PDO::ERRMODE_EXCEPTION);
$stmt = $conn->prepare(
"SELECT name from Products where id = :id");
d
Add data and
execute
e
Get result in
$name variable
Listing 19.2 Prepared statement example using PDO
b
Create connection,
handle exceptions
c
Throw new, more
secure exception
d
Set PDO to throw
more exceptions
e
Named placeholder
436 CHAPTER 19 DATABASE CONNECTION, ABSTRACTION, AND CONFIGURATION
$stmt->bindParam(':id',$id);
$stmt->execute();
$row = $stmt->fetch();
b Since PDO throws an exception when it fails to connect to the database, we have to
use
try and catch if we want to handle the error. Creating the database connection
object is the same as in the previous example with slightly different syntax.
C Catching the exception is particularly important in this case, since the backtrace that’s
displayed by default shows both the name and the password of the database user. To
handle it, we throw a new exception. That may seem futile, but the difference is that
we avoid the risk of displaying the password. However, the exception will still display
a backtrace including the My
SQL error message that contains the name of the data-
base user.
This means that we need to catch the exception at a higher level of the application
and not show the full backtrace to the user. The advantage of an exception in this case
is that we don’t have to worry about how many levels exist in between. We can catch
the exception somewhere in the code that handles navigation and presentation, and
redirect to an error page.
D Subsequent errors can be handled in the same way if we set up PDO to throw excep-
tions when other errors (such as
SQL syntax errors) occur. Therefore, we set the error
mode. The first argument just tells
PDO that we want to set the error mode; the sec-
ond argument tells
PDO what we want it set to.
E Preparing the statement is the same as in the Mysqli example except that we’re
allowed to use a named placeholder instead of a question mark.
F bindParam() is also similar in that it specifies the value to be inserted into the
slot.
execute() executes the SQL query, and fetch() returns the database row
as an array.
Besides improving security, prepared statements can make query execution more effi-
cient if we reuse a statement object. And although prepared statements may seem
inconvenient (they do require a few extra lines of code), they relieve you of the chore of
having to quote and escape all variables properly. Even if we were to disregard security
and go back to the naive
PHP style, we might find ourselves doing something like this:
$result = mysql_query("SELECT * from Products where name = $name");
This generates an SQL syntax error, since we’ve neglected to put quotes around
$name. And with a long list of variables, the error message may be hard to read. This
is not terribly problematic, but it is inconvenient, and can we avoid it by using pre-
pared statements.
f
Add data
and execute
DATABASE ABSTRACTION 437
19.1.2 Object-oriented database querying
Database querying in
PHP abounds with simple and complex abstraction layers.
There is not one single, unified package that supports all different databases and data-
base features. That’s why we often need to implement some glue of our own to make
the existing packages do our bidding smoothly. To that purpose, it helps to have a
good conceptual understanding of how the existing packages are designed.
Listing 19.3 shows yet another version of the prepared statement package, this time
using Creole, which is inspired by (and very similar to) Java’s
JDBC.
try {
$conn = Creole::getConnection(
"mysql://user:password@localhost/newsdb");
}
catch (Exception $e) {
throw new Exception($e->getMessage());
}
$stmt = $conn->prepareStatement(
"SELECT name from Products where id = ?");
$stmt->setInt(1,$id);
$resultset = $stmt->executeQuery();
$resultset->first();
$name = $resultset->getString('name');
Compared to the earlier examples, the only news here is that there is a separate
ResultSet object. This is a conceptually clean way to think about it. Figure 19.1 is a
slightly abstracted class diagram of this structure. The methods of the ResultSet class
may have any number of different names, often starting with
fetch or get. That’s
why only the responsibilities are noted in the figure.
What
PDO does (see listing 19.2) is merge the prepared statement and the result
set into a single object, although the query and the results from that query are
Listing 19.3 Prepared statement example using Creole
Figure 19.1
Typical conceptual structure
for object-oriented database
querying
438 CHAPTER 19 DATABASE CONNECTION, ABSTRACTION, AND CONFIGURATION
conceptually very different things. That’s not necessarily a practical problem, but mak-
ing the distinction helps us understand it better.
On the other hand, this is an example of the fact that sometimes we need some-
thing slightly different from what the available database objects have to offer. To solve
that problem, we can use decorators and adapters.
19.2 DECORATING AND ADAPTING
DATABASE RESOURCE OBJECTS
What if we want to add something to one of the classes in the design shown in the pre-
vious example? One way is to create child classes, if possible, but the inheritance rela-
tionship involves a degree of coupling that is not ideal when we don’t control the classes
we are inheriting from. The alternative, then, is to use Decorators. We jumped the gun
in chapter 7 by looking at a couple of examples of what Nock calls the Resource Deco-
rator pattern, decorating a
PEAR DB object to log calls and generate exceptions.
One thing to be aware of when decorating the components shown in figure 19.1
is that if you decorate one of the classes, you have to decorate the class that creates it
as well. If we want to decorate the prepared statement, we must decorate the connec-
tion as well, since obviously the standard connection is not capable of returning our
decorated prepared statement. A similar relationship exists between the statement and
the result set.
There are several reasons why we may want to do this:
• Simply to add configuration data to the connection.
• To guard against changes in the underlying layer. For example, if we are using
the Mysqli extension and want to switch to
PDO, we can keep our own classes
and change the way they access the connection, statement, and result set. If it
was a decorator, it’s now an adapter.
• To add features. For example,
PDO has no way of handling dates; we can add
that by using a decorator. Or we could use a Decorator to log queries as in the
example in chapter 7.
The dividing line between Decorator and Adapter is not always clear and we need not
worry about it. A class may well do both, adding features and adjusting the interface
somewhat.
In this section, we’ll do a simple example first: a database connection that reads the
connection parameters from a configuration file. Then we’ll look at the more advanced
challenge of making a database result set act as an
SPL-compatible Iterator so that we
can use it like an array in a
foreach loop.
19.2.1 A simple configured database connection
One of the simplest things we can do is decorate the database connection with a class
that reads a configuration file to get the connection parameters. The basic way to do
DECORATING AND ADAPTING DATABASE RESOURCE OBJECTS 439
this is to let the configuration file contain
PHP code that sets variables. That works
OK for a configuration file if it’s only to be used by administrators who know what
they’re doing, and won’t leave the file with a syntax error that kills the entire applica-
tion. This kind of thing is fairly typical:
$config["db_host"] = "localhost";
$config["db_username"] = "developer";
$config["db_password"] = "secret";
$config["db_database"] = "newsdb";
To make it a little more interesting, we’ll wrap the variables in a function and return
them. Our simple configuration file looks like this, then:
function dbConfig() {
$db = 'newsdb';
$host = 'localhost';
$user = 'developer';
$password = 'secret';
return compact('db','host','user','password');
}
The connection class does little except create a database connection as specified in the
configuration file:
class NewsDatabaseConnection {
private $mysqli;
public function __construct() {
require_once(CONFIG_DIR.'dbconfig.php');
extract(dbConfig());
$this->mysqli = new mysqli($db,$host,$user,$password);
}
public function prepare($sql) {
$this->mysqli->prepare($sql);
}
// Etc., more methods belonging to the connection
}
extract() takes the array created by compact() and turns it back into single
variables.
extract() is interesting, but can cause problems if used indiscriminately.
Used this way, it’s safe. The data we’re extracting does not come from the user, and
we’re releasing the variables into a limited local scope.
CONFIG_DIR is a constant that should contain a directory outside the web root
to protect the configuration file optimally.
The normal procedure for a Decorator is to accept the object it’s decorating as an
argument to the constructor. This one is different in that respect, but otherwise resem-
bles a regular Decorator.