Practical PHP and MySQLBuilding Eight Dynamic Web Applications phần 3 pps
Bạn đang xem bản rút gọn của tài liệu. Xem và tải ngay bản đầy đủ của tài liệu tại đây (6.66 MB, 52 trang )
91
CHAPTER 4 Building a Weblog
TABLE 4-5 The sql variable is built up into an INSERT statement
CONCATENATED ELEMENT SQL STATEMENT
INSERT INTO comments(blog_id,
dateposted, name, comment) VALUES(
INSERT INTO comments(blog_id,
dateposted, name, comment) VALUES(
validentry $INSERT INTO comments(blog_id,
dateposted, name, comment) VALUES(2
, NOW(), ' INSERT INTO comments(blog_id,
dateposted, name, comment)
VALUES(2, 2005-08-10 14:30:00, '
$_POST['name'] INSERT INTO comments(blog_id,
dateposted, name, comment)
VALUES(2, 2005-08-10, 'Bob Smith
', ' INSERT INTO comments(blog_id,
dateposted, name, comment)
VALUES(2, 2005-08-10, 'Bob Smith','
$_POST['comment'] INSERT INTO comments(blog_id,
dateposted, name, comment)
VALUES(2, 2005-08-10, 'Bob Smith',
'I really like your blog. Cool
stuff!
‘); INSERT INTO comments(blog_id,
dateposted, name, comment)
VALUES(2, 2005-08-10, 'Bob Smith',
'I really like your blog. Cool
stuff!');
The next line is the SQL query. This query inserts the data into the database
with an
INSERT statement. A typical INSERT statement looks like this:
INSERT INTO table(field1, field2)
VALUES ('data for field 1', 'data for field 2');
When you construct the SQL statement in your sql variable, you concatenate
the various variables from the form that are accessed with
_POST. To demonstrate
how this fits together, imagine that you are adding a comment to the blog entry with
2 as an ID, at 2:30 p.m. on August 10, 2005. Assume that the user types “Bob
Smith” as the name and “I really like your blog. Cool stuff!” as the comment. Table
4-5 demonstrates how the query is built.
92
Practical PHP and MySQL
The left column lists each part of the code; the right column shows how the con-
tent of the page is built up in the query. As you read the table, remember that num-
bers don’t need single quotes around them (such as the number in
validentry) but
strings (letters and sentences) do.
One part of the code that will be new to you is
NOW(). This is a special MySQL
function that provides the current date and time, and you will use
NOW() to automat-
ically fill the
dateposted field.
The next line in the code—mysql_query($sql);—performs the actual query.
You may have noticed that the line does not include a variable in which to store the
result, such as
$result = mysql_query($sql). The reason is that the query is only
sent; no results are returned. The final line uses the
header() function to redirect to
the current page.
Finally, the
if block is closed, and the else begins (for cases when no Submit
button has been clicked). At the bottom of the page, add the closing code:
</table>
</form>
<?php
}
require("footer.php");
?>
In effect, then, the entire page of HTML is shown if the user didn’t reach
viewentry.php via clicking the Submit button (on the form on that same page!).
BUILDING THE CATEGORY BROWSER
Within a site powered by Blogtastic, a large number of blog entries is going to build.
With so much content available, it is important to have a means of easily browsing
this content. In this section, you create a useful page for users to browse the differ-
ent categories and see which blog entries have been posted in each category.
NOTE
Built-In MySQL Functions
MySQL provides a range of these functions, and you can explore them from
the comfort of phpMyAdmin. When you insert data, a Function drop-down
box lists these different MySQL functions. Experiment with them to get a
better idea of what they do.
93
CHAPTER 4 Building a Weblog
FIGURE 4-7 Click any category to view the entries in that category.
If you think about how this page should be designed, it seems logical to list the
categories and let the user click on one to see any related blog entries (see Figure
4-7). This functionality is similar to a tree view in a file manager: The directories
are listed, and then you click one to see the files and subdirectories.
On index.php and viewentry.php, you made the category a link to a page called
viewcat.php, and the ID of the category was passed as an
id GET variable. To get
started, create a new file called viewcat.php and add the following code:
require("config.php");
if(isset($_GET['id']) == TRUE) {
if(is_numeric($id) == FALSE) {
$error = 1;
}
94
Practical PHP and MySQL
if($error == 1) {
header("Location: " . $config_basedir . "/viewcat.php");
}
else {
$validcat = $_GET['id'];
}
}
else {
$validcat = 0;
}
This code should look familiar; it runs the id variable through the same valida-
tion tests used on viewentry.php. If no variable exists,
validcat is set to 0, but if the
variable is indeed legitimate,
validcat is set to the contents of the GET variable. If
the variable fails the test to check if it is numeric, the page redirects to itself but
without the
id variable.
Select all of the records from the categories table:
else {
$validcat = 0;
}
$sql = "SELECT * FROM categories";
$result = mysql_query($sql);
while($row = mysql_fetch_assoc($result)) {
Add the following code to check each row of the result set and see if $validcat is
the same as the
id variable. If it is, this means that the category is currently selected.
while($row = mysql_fetch_assoc($result)) {
if($validcat == $row['id']) {
echo "<strong>" . $row['cat'] . "</strong><br />";
$entriessql = "SELECT * FROM entries WHERE cat_id = " . $validcat .
" ORDER BY dateposted DESC;";
$entriesres = mysql_query($entriessql);
$numrows_entries = mysql_num_rows($entriesres);
echo "<ul>";
As the while loop iterates through each row, the first line checks if validcat is
the same as the ID from the current row. If it is, the
if block is executed. The first
line inside the
if outputs the name of the category in bold, instead of a link.
The query on the next line gets all blog entries in which
cat_id is equal to
validcat. These entries are requested in descending date order, so the most recent
entry will display at the top of the list. The query is then run, and the returned rows
are counted (to ensure that there are records to show). The final line starts the
unordered list block that contains the results.
95
CHAPTER 4 Building a Weblog
Check to see if any rows exist for the current category and display the relevant
details:
echo "<ul>";
if($numrows_entries == 0) {
echo "<li>No entries!</li>";
}
else {
while($entriesrow = mysql_fetch_assoc($entriesres)) {
echo "<li>" . date("D jS F Y g.iA", strtotime($entriesrow
['dateposted'])) .
" - <a href='viewentry.php?id=" . $entriesrow['id'] . "'>" .
$entriesrow['subject'] ."</a></li>";
}
}
echo "</ul>";
}
If numrows_entries has zero rows, the browser displays a list item with the text
No entries!. If there are rows, another while loop is opened to run through the
results. Inside this
while, a list item that displays the date of the entry and a link to
viewentry.php (using the correct
id value) is created. The subject of the post is the
body of the link.
Finally, you can display the currently unselected categories:
echo "</ul>";
}
else {
echo "<a href='viewcat.php?id=" . $row['id'] . "'>" . $row['cat'] .
"</a><br />";
}
}
require("footer.php");
You now have a complete archive of blog entries organized by category!
DON’T JUST LET ANYONE LOG IN
Everything created so far in this project has been designed to be accessible by any-
one who stumbles across the blog. As such, these pages have no built-in security—
that is, the pages are not restricted to certain users. Because of the open nature and
accessibility of the site, it is recommended that only information suitable for public
consumption is present on these pages. You should avoid adding your credit card
number, personal information, or those embarrassing photos of you at a fancy dress
party. (That is how rumors get started.)
96
Practical PHP and MySQL
Allowing restricted access for the owner to add and remove content is an essen-
tial feature, however. Having to log into phpMyAdmin to add content is not an ideal
solution, so the master plan is to create pages to provide a convenient means of
adding content. You need to provide a way for someone to log in, and the login
details the user enters should match the ones in the logins table. You will use PHP
sessions (covered in Chapter 2) to track the user by sharing variables across differ-
ent pages. If the user successfully logs in, you can set a session variable and then
check to ensure that session variable exists on the restricted pages.
To begin, create a new file called login.php and add the login form:
<form action="<?php echo $SCRIPT_NAME ?>" method="post">
<table>
<tr>
<td>Username</td>
<td><input type="text" name="username"></td>
</tr>
<tr>
<td>Password</td>
<td><input type="password" name="password"></td>
</tr>
<tr>
<td></td>
<td><input type="submit" name="submit" value="Login!"></td>
</tr>
</table>
</form>
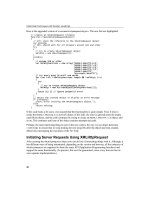
This form contains some familiar-looking text boxes (see Figure 4-8).
You may have noticed that the second
<input> tag uses password as the type.
When you use this type of form element, the contents are disguised as stars or dots
to hide the password from nosey onlookers.
The next step is to process the form and check if the database contains the login
details. Before you do this, however, add the usual introductory code at the start of
the file (before any HTML):
<?php
session_start();
require("config.php");
$db = mysql_connect($dbhost, $dbuser, $dbpassword);
mysql_select_db($dbdatabase, $db);
97
CHAPTER 4 Building a Weblog
FIGURE 4-8 The login form looks like any other form.
NOTE
Forms Feel Insecure, Too
Although forms provide a means for people to securely identify themselves,
the passwords transmitted to the server for processing are sent as plain
text. This is a potential security risk inherent when using forms. The only
solution to this risk is to encrypt form data with JavaScript when the form
button is clicked, a technique beyond this project’s scope.
Add the code that checks if the Submit button has been clicked (again, from the
form you’ve already added):
mysql_select_db($dbdatabase, $db);
if($_POST['submit']) {
98
Practical PHP and MySQL
NOTE
Be Consistant When Naming Variables
Naming session variables in uppercase is not mandatory, but it’s useful
because this helps them to stand out in your code as different types of
variables.
$sql = "SELECT * FROM logins WHERE username = '" . $_POST['username'] .
"' AND password = '" . $_POST['password'] . "';";
$result = mysql_query($sql);
$numrows = mysql_num_rows($result);
The SQL statement is created to check if the username in the logins table is
equal to the
username box in the form and if the password field is equal to the
password box in the form. The query is then run, and the rows are counted. The
number of lines returned from the query indicates whether the details typed were
correct. If the details are correct, a single row is returned—no more, no less. If no
rows are returned, the details do not match.
Add the following code:
$numrows = mysql_num_rows($result);
if($numrows == 1) {
$row = mysql_fetch_assoc($result);
session_register("USERNAME");
session_register("USERID");
$_SESSION['USERNAME'] = $row['username'];
$_SESSION['USERID'] = $row['id'];
header("Location: " . $config_basedir);
}
else {
header("Location: " . $config_basedir . "/login.php?error=1");
}
In the case where the login details are valid, a new session is created.
When using PHP sessions, you must register your session variables. The
session_register() lines create two variables, called USERNAME and USERID.
99
CHAPTER 4 Building a Weblog
The next two lines then use _SESSION (representing the user’s session infor-
mation) to use the variables and store information from the SQL query (the
username and the id) in them. The final line performs a header redirect to
index.php.
If the Submit button has not been clicked, a small chunk of code is run before
the form displays:
header("Location: " . $config_basedir . "/login.php?error=1");
}
}
else {
require("header.php");
if($_GET['error']) {
echo "Incorrect login, please try again!";
}
?>
Include the header.php file and then check to see if there is a GET variable
called
error. If there is, the error message is displayed to indicate that the user
typed an invalid username or password.
At the bottom of the page, after the HTML, add the final bits of code:
}
require("footer.php");
Signing Out the User
With the user now able to log in, you also need to give him the ability to log out—
by destroying the session created on login. Create a new file called logout.php and
add the following code:
<?php
session_start();
session_destroy();
require("config.php");
header("Location: " . $config_basedir);
?>
100
Practical PHP and MySQL
To log out the user, just use the session_destroy() function to delete all the
registered session variables. The session is now destroyed, and the user is no longer
logged in. You can then perform a header redirect to index.php.
Adding Session Support to the Application
With the new member login capability, you can supercharge your current pages to
react differently when a member is logged in. The session variables created in the
login page can be checked, and you can add extra options where appropriate.
Bolting On Options in the Header File
The first file to edit is header.php. In login.php and logout.php, you added ses-
sion_start()
at the beginning of the page. You will use session_start() in most of
your pages, so add it to the top of header.php:
<?php
session_start();
This file already contains a list of links that are available to different parts of
the site. When users are logged in, the Logout link should be visible; if they are not
logged in, the Login link should be visible. Add the following code inside the PHP
block under the categories link:
[<a href="viewcat.php">categories</a>]
<?php
if(isset($_SESSION['USERNAME']) == TRUE) {
NOTE
The Life and Death of a Session
When dealing with session-based code, you should always clear out any
sessions when testing your code. Apart from creating the logout.php script,
another option is to close the Web browser. Sessions will live only for the
duration that the browser is open, and when you close the browser (not
just the window), the session is lost.
When developing your code, closing your browser when you want to clear a
session can be quite frustrating. To relieve the pain, use the Web Developers
Toolbar extension that is available for Mozilla Firefox on all platforms.
Download it from the Mozilla Extensions Web site at http://extension-
room.mozdev.org.
101
CHAPTER 4 Building a Weblog
FIGURE 4-9 Adding contextual links to administer the blog makes the application
easier to use.
echo "[<a href='logout.php'>logout</a>]";
}
else {
echo "[<a href='login.php'>login</a>]";
}
The isset() function is used to check if the USERNAME session variable is set. If
it is, the Logout link is displayed; otherwise, the Login link is displayed.
Use the same method for adding additional links:
else {
echo "[<a href='login.php'>login</a>]";
}
if(isset($_SESSION['USERNAME']) == TRUE) {
echo " - ";
echo "[<a href='addentry.php'>add entry</a>]";
echo "[<a href='addcat.php'>add category</a>]";
}
?>
Adding Links to Update Blog Entries
When using Blogtastic, you will need to edit existing blog entries. Instead of just
adding an Edit Blog Entry link to header.php, it is more intuitive to add an Edit link
next to blog entry subjects. (Later in the project, you will create a file, called upda-
tentry.php, to edit the blog entry.) Using a similar technique of checking if the session
variable exists, add the following code in index.php, after the category and date line:
echo "<i>In <a href='viewcat.php?id=" . $row['cat_id'] ."'>" .
$row['cat'] ."</a> - Posted on " . date("D jS F Y g.iA",
strtotime($row['dateposted'])) ."</i>";
if(isset($_SESSION['USERNAME']) == TRUE) {
echo " [<a href='updateentry.php?id=" . $row['id'] . "'>edit</a>]";
}
The updateentry.php file is passed an id variable that contains the ID of the
blog entry to edit. Copy this same block of code to viewentry.php, after the same line
where the date of the posting is listed. The links are displayed in Figure 4-9.
102
Practical PHP and MySQL
NOTE
Never Assume
It might seem impossible to get to this page without clicking a link, and
wouldn’t that imply the user has already logged in? Although this sounds
logical, someone could still type the URL directly. It’s always better to
explicitly check to ensure the user is logged in, rather than trust other pages
to do that job for you.
ROLLING YOUR OWN CATEGORIES
Adding blog categories is the next part of the game. This page is similar to the page
used to add comments.
First, create the form in a new file called addcat.php:
<form action="<?php echo $SCRIPT_NAME ?>" method="post">
<table>
<tr>
<td>Category</td>
<td><input type="text" name="cat"></td>
</tr>
<tr>
<td></td>
<td><input type="submit" name="submit" value="Add Entry!"></td>
</tr>
</table>
</form>
Add the usual lines of code at the start of the file, before any HTML:
<?php
session_start();
require("config.php");
$db = mysql_connect($dbhost, $dbuser, $dbpassword);
mysql_select_db($dbdatabase, $db);
With this page available to restricted users only, you need to check if the user
is logged in. Do this by checking if one of the session variables exists; if it doesn’t,
redirect to another page:
if(isset($_SESSION['USERNAME']) == FALSE) {
header("Location: " . $config_basedir);
}
103
CHAPTER 4 Building a Weblog
Add the logic for when the user clicks the Submit button:
if(isset($_SESSION['USERNAME']) == FALSE) {
header("Location: " . $config_basedir);
}
if($_POST['submit']) {
$sql = "INSERT INTO categories(cat) VALUES('" . $_POST['cat'] . "');";
mysql_query($sql);
header("Location: " . $config_basedir . " viewcat.php");
}
else {
require("header.php");
?>
Within this code, an INSERT query is created and sent to the database. After the
query is run, the browser redirects to the viewcat.php page to view the newly created
category.
Finally, close the
else and include the footer.php file (all after the form):
<?php
}
require("footer.php");
?>
CREATING NEW BLOG ENTRIES
So far in Blogtastic, the capability to actually add a blog entry has been suspi-
ciously missing. This essential feature requires almost all of the techniques you’ve
seen so far, hence the delay. You are now ready, though, so it’s time to knock out this
page. The page behaves in a similar way to previous pages that added content, but
this page also includes a drop-down combo box that is used to select the category
under which the entry is filed.
Create a new file called addentry.php and start the form:
<h1>Add new entry</h1>
<form action="<?php echo $SCRIPT_NAME ?>" method="post">
<table>
Previously, you added the entire form first, but in this page, the very first form
control will be the special drop-down box just discussed:
104
Practical PHP and MySQL
<tr>
<td>Category</td>
<td>
<select name="cat">
<?php
$catsql = "SELECT * FROM categories;";
$catres = mysql_query($catsql);
while($catrow= mysql_fetch_assoc($catres)) {
echo "<option value='" . $catrow['id']
. "'>" . $catrow['cat'] . "</option>";
}
?>
</select>
</td>
</tr>
The drop-down combo box presents a visual box with a series of options that the
user can select. This involves two basic steps. First, create a
<select> tag that con-
tains the items within the box. Each item is housed within
<option> tags. In these
tags, add the text that you would like to appear in the box (in this case, the category
name) and a
value attribute. This contains the value that is passed when the user
selects an item. Set this attribute to contain the ID of the category item.
In terms of making this work in code, the SQL query selects everything from the
categories table. A loop iterates through the categories that are returned in the
query. Within the
while loop, the <option> tags are created, and the id from the
query is added to the
value attribute.
Complete the rest of the form:
</select>
</td>
</tr>
<tr>
<td>Subject</td>
<td><input type="text" name="subject"></td>
</tr>
<tr>
<td>Body</td>
<td><textarea name="body" rows="10" cols="50"></textarea></td>
</tr>
<tr>
<td></td>
<td><input type="submit" name="submit" value="Add Entry!"></td>
</tr>
</table>
</form>
105
CHAPTER 4 Building a Weblog
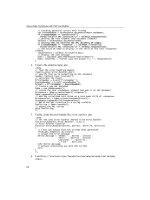
FIGURE 4-10 Adding new blog posts is simple.
The form is shown in Figure 4-10.
Move to the beginning of the file and add the boilerplate introductory code:
<?php
session_start();
require("config.php");
$db = mysql_connect($dbhost, $dbuser, $dbpassword);
mysql_select_db($dbdatabase, $db);
if(isset($_SESSION['USERNAME']) == FALSE) {
header("Location: " . $config_basedir);
}
106
Practical PHP and MySQL
Add the logic that actually processes the form:
if(isset($_SESSION['USERNAME']) == FALSE) {
header("Location: " . $config_basedir);
}
if($_POST['submit']) {
$sql = "INSERT INTO entries(cat_id, dateposted, subject, body)
VALUES(" .
$_POST['cat'] . ", NOW(), '" . $_POST['subject'] . "', '" .
$_POST['body'] . "');";
mysql_query($sql);
header("Location: " . $config_basedir);
}
else {
require("header.php");
?>
This code creates an INSERT query that is very similar to the ones on previous
form-driven pages.
Finally, close the
else block and add the footer.php code:
</tr>
</table>
</form>
<?php
}
require("footer.php");
?>
UPDATE A BLOG ENTRY
The final page is for updating blog entries. Earlier, when you added session support
to Blogtastic, you went through some of the pages and added links to edit a particu-
lar blog entry. The link to edit blog entries was for a page called updateentry.php,
which is passed an
id variable. This ID indicates which record to update.
Instead of adding the form first, on this page you will work from the top to the
bottom.
First, add the boilerplate code:
<?php
session_start();
require("config.php");
107
CHAPTER 4 Building a Weblog
if(isset($_SESSION['USERNAME']) == FALSE) {
header("Location: " . $config_basedir);
}
$db = mysql_connect($dbhost, $dbuser, $dbpassword);
mysql_select_db($dbdatabase, $db);
The next block of code is identical to the validation code written earlier:
if(isset($_GET['id']) == TRUE) {
if(is_numeric($id) == FALSE) {
$error = 1;
}
if($error == 1) {
header("Location: " . $config_basedir);
}
else {
$validentry = $_GET['id'];
}
}
else {
$validentry = 0;
}
Add the code to process the form:
else {
$validentry = 0;
}
if($_POST['submit']) {
$sql = "UPDATE entries SET cat_id = "
. $_POST['cat'] . ", subject = '" .
$_POST['subject'] ."', body = '"
. $_POST['body'] . "' WHERE id = " .
$validentry . ";";
mysql_query($sql);
header("Location: " . $config_basedir . "/viewentry.php?id=" .
$validentry);
}
The SQL query implements an UPDATE command that will update each field in
the database that has the id of
validentry (the validated id variable). The UPDATE
query indicates which table to update (UPDATE entries) and then provides a number
of database field = form element sections. When the query is complete, another
header redirect takes the user to the viewentry.php page with the correct
id variable.
108
Practical PHP and MySQL
If the Submit button has not been clicked, the details of the entry are grabbed
from MySQL so you can populate the form fields, starting with a query:
header("Location: " . $config_basedir
. "/viewentry.php?id=" . $validentry);
}
else {
require("header.php");
$fillsql = "SELECT * FROM entries WHERE id = " . $validentry . ";";
$fillres = mysql_query($fillsql);
$fillrow = mysql_fetch_assoc($fillres);
?>
Next, begin creating the form:
$fillrow = mysql_fetch_assoc($fillres);
?>
<h1>Update entry</h1>
<form action="<?php echo $SCRIPT_NAME . "?id="
. $validentry; ?>" method="post">
<table>
The first part of the form is the category field. You will need to have the chosen
category automatically selected when the page is loaded. To do this, add
selected
at the end of the tag to be selected. An example of this in HTML is shown here (this
is not actually in the project code, so don’t add it):
<select name="example">
<option value="1">Option 1</option>
<option value="2" selected>Option 2</option>
<option value="3">Option 3</option>
</select>
To accomplish this, add the following code to your form:
<form action="<?php echo $SCRIPT_NAME . "?id=" . $validentry; ?>"
method="post">
<table>
<tr>
<td>Category</td>
<td>
109
CHAPTER 4 Building a Weblog
<select name="cat">
<?php
$catsql = "SELECT * FROM categories;";
$catres = mysql_query($catsql);
while($catrow= mysql_fetch_assoc($catres)) {
echo "<option value='" . $catrow['id'] . "'";
if($catrow['id'] == $fillrow['cat_id']) {
echo " selected";
}
echo ">" . $catrow['cat'] . "</option>";
}
?>
</select>
</td>
</tr>
The query is run, and then the while loop iterates through each record. Inside
the
while loop, the <option value=
<id from the record>
is first printed and then
a check is made to see if the category ID of the entry (
fillrow['cat_id']) is the
same as the current category row ID (
catrow['id']). If the values match, "
selected"
(notice the space before the word) is added. After this, the rest of the line
is created:
>category</option>.
In the remaining parts of the form, small PHP blocks add the information from the
query to the value attributes and between the
<textarea> tags to populate the form:
</select>
</td>
</tr>
<tr>
<td>Subject</td>
<td><input type="text" name="subject"
value="<?php echo $fillrow['subject']; ?>">
</td>
</tr>
<tr>
<td>Body</td>
<td><textarea name="body" rows="10" cols="50">
<?php echo $fillrow['body']; ?></textarea></td>
</tr>
<tr>
<td></td>
<td><input type="submit" name="submit" value="Update Entry!"></td>
</tr>
</table>
</form>
110
Practical PHP and MySQL
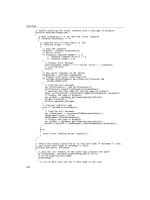
FIGURE 4-11 Updating blog entries uses a similar interface to adding new entries.
Finally, close else and insert the footer:
<?php
}
require("footer.php");
?>
You can see the updated page in Figure 4-11.
SUMMARY
In this project, you created your first full-featured, database-driven Web application.
This application flexed your programming muscles, and covered an entire range of
essential techniques. This included using database queries, adding data to the data-
base, joining tables, updating records, performing validation, managing archived
data, separating code across different pages, and ensuring interface usability.
Aside from providing a fun project to work on, this project also provided a base
in which the rest of the projects in the book are based upon. You learned a number
of skills that will be refined and built upon as you continue though the book. This is
the start of an exciting journey, and reading this means that you have completed a
large and important step. Stretch your fingers, dust off your keyboard, grab a cup of
something hot, and get ready for the next project.
111
Discussion Forums
CHAPTER 5
Discussion forums have become a fundamental part of the Internet. Within these
Web-based message boards, users discuss topics that are cogitated over by a close
community of contributors. And within these discussion forums, Internet users can
become part of a wider community. Discussion forums offer a compelling and inter-
esting challenge to code. Features such as creating categories, forums, and topics;
replying to messages; registering users; and more are common requirements.
After you’ve created a blog, writing the code behind a discussion board is a nat-
ural progression of your skills because it introduces the idea of two-way communi-
cation, as opposed to the relatively one-way perspective offered by a blog. As such,
this chapter provides an important step in your programming experience—every-
one should write some discussion forums at least once!
UNDER THE HOOD
Virtually all discussion forums have a very similar design that involves three pri-
mary entities: categories, forums, and topics. To explain this structure, take a look
at Figure 5-1.
This figure shows a typical phpBB ( installation. phpBB
is a popular Open Source forums engine that adheres to these common usability
methods. In the figure, you can see a list of categories (only one—LUGRadio), and
the category has a number of forums (General Discussion, Ideas for the show, Mir-
rors, and LUGRadio Live). When you click a forum, the forum topics display, as
shown in Figure 5-2.
112
Practical PHP and MySQL
FIGURE 5-1 The front page of a phpBB forum
FIGURE 5-2 The topics list in the General Discussion forum
113
CHAPTER 5 Discussion Forums
FIGURE 5-3 A discussion thread
Category
Forum
LUGRadio
General Discussion
Topic
Help bring Linux to Africa
Original message
Reply
Reply
Messages
FIGURE 5-4
Discussion forums have a number
of distinctive layers.
This figure displays a list of the threads in the forum. A thread is a discussion
that starts with a specific topic. The originator of the thread posts a message, and
the subject of the thread is listed in this screen. To view the messages in a thread,
you click the thread. When you click a thread, a page similar to the one shown in
Figure 5-3 displays.
Forum software has a distinctive set of parts, which combine to create a system
that makes discussion easy. The challenge is to implement your own forum soft-
ware. Figure 5-4 shows how these different parts relate to each other.
BUILDING YOUR OWN FORUMS
In this project, you will concentrate on the essential features that should go into dis-
cussion forum software, including the ability
■ To display categories, forums, and topics.
■ To log in as an administrator.
■ For administrators to add categories and forums.
■ For administrators to delete categories, forums, and topics.
■ To log in as a user.
■ For users to register. When a user fills in the registration form, a verification
e-mail is sent.
■ For users to view a category and forums, and then click a forum to view the
topics. The user can also click a topic to view the thread.
■ For users to post new threads or reply to existing ones.
Although hundreds of extra features could go into this project, adding them
would take an entire book in itself. In this project, you build a core forums engine,
but you can, of course, build additional features into it afterward.
BEFORE YOU BEGIN
This project uses some additional chunks of CSS. Copy stylesheet.css to the
new project directory for this project and add the following lines to the end of
stylesheet.css:
table {
border: thin solid #cccccc;
background: #ffffff;
}
th {
letter-spacing: 2.5px;
background: #eeeeeee;
color: #000000;
text-transform: uppercase;
text-align: center;
border-top: thick solid #eeeeee;
border-bottom: thin solid #cccccc;
}
tr.head {
letter-spacing: 1.5px;
114
Practical PHP and MySQL
categories
id
name
admins
id
username
password
forums
id
cat_id
name
description
users
id
username
password
verifystring
active
topics
id
date
forum_id
user_id
subject
messages
id
date
topic_id
user_id
subject
body
FIGURE 5-5
Database infrastructure
115
CHAPTER 5 Discussion Forums
background: #dddddd;
color: #000000;
text-transform: uppercase;
border-top: thick solid #eeeeee;
border-bottom: thin solid #cccccc;
}
tr.body {
background: #ffffff;
color: #000000;
}
td {
border: thin solid #cccccc;
padding: 10px;
}
CREATING THE DATABASE
Within this project, a variety of tables relate to each other in different ways to store
the different types of content discussed earlier. Figure 5-5 shows the database
infrastructure you will create.