Practical PHP and MySQLBuilding Eight Dynamic Web Applications phần 5 pptx
Bạn đang xem bản rút gọn của tài liệu. Xem và tải ngay bản đầy đủ của tài liệu tại đây (6.64 MB, 52 trang )
195
CHAPTER 6 Creating a Shopping Cart
Deleting Items
The showcart() function contains a link to delete.php, in which you can remove an
item from the shopping cart. By clicking the link, the item is removed from the
orderitems table, and the total price in the orders table is updated.
Create delete.php and begin adding the code:
<?php
require("config.php");
require("db.php");
require("functions.php");
$validid = pf_validate_number($_GET['id'],
"redirect", $config_basedir . "showcart.php");
$itemsql = "SELECT * FROM orderitems WHERE id = "
. $_GET['id'] . ";";
$itemres = mysql_query($itemsql);
$numrows = mysql_num_rows($itemres);
if($numrows == 0) {
header("Location: " . $config_basedir . "showcart.php");
}
$itemrow = mysql_fetch_assoc($itemres);
In this code, the query pulls the item from the orderitems table, and the number
of rows returned is checked. This check prevents someone modifying the URL and
adding
delete.php?id=73 if there is no item with an id of 73. If no rows are
returned, a header redirect jumps to showcart.php. If a row is returned, the script
continues:
$itemrow = mysql_fetch_assoc($itemres);
$prodsql = "SELECT price FROM products
WHERE id = " . $itemrow['product_id'] . ";";
$prodres = mysql_query($prodsql);
$prodrow = mysql_fetch_assoc($prodres);
$sql = "DELETE FROM orderitems WHERE id = " . $_GET['id'];
mysql_query($sql);
In this block, the price of the product is selected first and then a separate query
removes the item from orderitems.
Update the orders table with the new total price:
196
Practical PHP and MySQL
FIGURE 6-6 The shopping cart summary displays a current list of items and the
ability to remove them.
mysql_query($sql);
$totalprice = $prodrow['price'] * $itemrow['quantity'] ;
$updsql = "UPDATE orders SET total = total - "
. $totalprice . " WHERE id = "
. $_SESSION['SESS_ORDERNUM'] . ";";
mysql_query($updres);
header("Location: " . $config_basedir . "/showcart.php");
?>
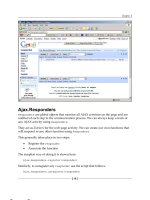
With the cart summary function and pages complete, your browser should show
something similar to the page shown in Figure 6-6.
CHECKING IT OUT
After the user has finished adding items to his shopping cart, the checkout process
can begin. This process involves two steps:
■ Prompt the user for a delivery address. If the user is already logged in, he
should be asked if he wants to use the address he registered or use a differ-
ent address. All addresses should be validated.
■ Prompt the user to choose a payment method, either PayPal or a check.
197
CHAPTER 6 Creating a Shopping Cart
Create checkout-address.php and add the form:
require("header.php");
echo "<h1>Add a delivery address</h1>";
if(isset($_GET['error']) == TRUE) {
echo "<strong>Please fill in the missing
information from the form</strong>";
}
echo "<form action='" . $SCRIPT_NAME . "' method='POST'>";
if($_SESSION['SESS_LOGGEDIN'])
{
?>
<input type="radio" name="addselecBox"
value="1" checked>Use the address from my
account</input><br>
<input type="radio" name="addselecBox"
value="2">Use the address below:</input>
<?php
}
?>
<table>
<tr>
<td>Forename</td>
<td><input type="text" name="forenameBox"></td>
</tr>
<tr>
<td>Surname</td>
<td><input type="text" name="surnameBox"></td>
</tr>
<tr>
<td>House Number, Street</td>
<td><input type="text" name="add1Box"></td>
</tr>
<tr>
<td>Town/City</td>
<td><input type="text" name="add2Box"></td>
</tr>
<tr>
<td>County</td>
<td><input type="text" name="add3Box"></td>
</tr>
<tr>
<td>Postcode</td>
<td><input type="text" name="postcodeBox"></td>
</tr>
<tr>
<td>Phone</td>
<td><input type="text" name="phoneBox"></td>
198
Practical PHP and MySQL
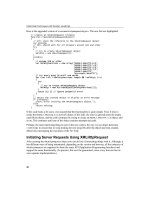
NOTE
Remember that the status can be any of the following values:
0 The user is still shopping.
1 The user has completed the address entry.
2 The user has paid.
10 The administrator has confirmed the order.
</tr>
<tr>
<td>Email</td>
<td><input type="text" name="emailBox"></td>
</tr>
<tr>
<td></td>
<td><input type="submit" name="submit"
value="Add Address (press only once)"></td>
</tr>
</table>
</form>
Before the form is displayed, an if checks if an error GET variable exists. If it
does, an error message is displayed. The script then checks if the user is logged in,
and if so, two radio buttons are added so that the user can choose between the
address he registered and a different address.
Move to the start of the file and add the following code:
<?php
session_start();
require("db.php");
$statussql = "SELECT status FROM orders WHERE id = " .
$_SESSION['SESS_ORDERNUM'];
$statusres = mysql_query($statussql);
$statusrow = mysql_fetch_assoc($statusres);
$status = $statusrow['status'];
The first step is to determine the current status of the order. If the user has
already been through the address stage of the checkout process, redirect the page to
the payment screen. Obtain the status by searching for a record in the orders table
that matches
SESS_ORDERNUM. Then, set the $status variable to the correct status.
If the status is set to
1, the user has already entered an address and the page
redirects to the payment screen. If the status is
2 or higher, the order has been com-
pleted. Redirect the page to the base URL of the site:
199
CHAPTER 6 Creating a Shopping Cart
$status = $statusrow['status'];
if($status == 1) {
header(“Location: “ . $config_basedir . “checkout-pay.php”);
}
if($status >= 2) {
header(“Location: “ . $config_basedir);
}
Begin processing the form:
if($status >= 2) {
header("Location: " . $config_basedir);
}
if($_POST[‘submit’])
{
if($_SESSION[‘SESS_LOGGEDIN’])
{
if($_POST[‘addselecBox’] == 2)
{
if(empty($_POST[‘forenameBox’]) ||
empty($_POST[‘surnameBox’]) ||
empty($_POST[‘add1Box’]) ||
empty($_POST[‘add2Box’]) ||
empty($_POST[‘add3Box’]) ||
empty($_POST[‘postcodeBox’]) ||
empty($_POST[‘phoneBox’]) ||
empty($_POST[‘emailBox’]))
{
header(“Location: “ . $basedir . “checkout-
address.php?error=1”);
exit;
}
The first nested if checks if the user is logged in. A check is then made to
see if the user selected the second radio button (
Use the address below). If so,
the form fields are checked to see if they are empty. If they are, the page is
reloaded with the
error GET variable so that the error message can be dis-
played.
If the form is not empty, add the address to the delivery_addresses table and
update the orders table:
exit;
}
$addsql = "INSERT INTO
delivery_addresses(forename, surname, add1,
add2, add3, postcode, phone, email)
200
Practical PHP and MySQL
VALUES('"
. strip_tags(addslashes(
$_POST['forenameBox'])) . "', '"
. strip_tags(addslashes(
$_POST['surnameBox'])) . "', '"
. strip_tags(addslashes(
$_POST['add1Box'])) . "', '"
. strip_tags(addslashes(
$_POST['add2Box'])) . "', '"
. strip_tags(addslashes(
$_POST['add3Box'])) . "', '"
. strip_tags(addslashes(
$_POST['postcodeBox'])) . "', '"
. strip_tags(addslashes(
$_POST['phoneBox'])) . "', '"
. strip_tags(addslashes(
$_POST['emailBox'])) . "')";
mysql_query($addsql);
$setaddsql = "UPDATE orders SET
delivery_add_id = " . mysql_insert_id() . ",
status = 1 WHERE id = "
. $_SESSION['SESS_ORDERNUM'];
mysql_query($setaddsql);
header("Location: "
. $config_basedir . "checkout-pay.php");
}
The delivery_addresses table contains a list of addresses for unregistered
users and registered users who select a different address. When the information
is added to the table, the
strip_tags() function removes any HTML tags that
may have been added, and the
addslashes() function escapes any quotes.
Finally, the orders table is updated with the
id of the record from
delivery_addresses, and the status is changed to
1. When this is complete, the
page redirects to checkout-pay.php.
If the user is logged in but selects the address on file, the orders table is
updated also:
header("Location: "
. $config_basedir . "checkout-pay.php");
}
else
{
$custsql = "UPDATE orders SET
delivery_add_id = 0, status = 1 WHERE id = " .
$_SESSION['SESS_ORDERNUM'];
mysql_query($custsql);
201
CHAPTER 6 Creating a Shopping Cart
header("Location: " . $config_basedir
. "checkout-pay.php");
}
}
If no user is logged in, the form is validated and the address is added to the
database:
header("Location: " . $config_basedir
. "checkout-pay.php");
}
}
else
{
if(empty($_POST['forenameBox']) ||
empty($_POST['surnameBox']) ||
empty($_POST['add1Box']) ||
empty($_POST['add2Box']) ||
empty($_POST['add3Box']) ||
empty($_POST['postcodeBox']) ||
empty($_POST['phoneBox']) ||
empty($_POST['emailBox']))
{
header("Location: " . "checkout-address.php?error=1");
exit;
}
$addsql = "INSERT INTO
delivery_addresses(forename, surname, add1,
add2, add3, postcode, phone, email)
VALUES('"
. $_POST['forenameBox'] . "', '"
. $_POST['surnameBox'] . "', '"
. $_POST['add1Box'] . "', '"
. $_POST['add2Box'] . "', '"
. $_POST['add3Box'] . "', '"
. $_POST['postcodeBox'] . "', '"
. $_POST['phoneBox'] . "', '"
. $_POST['emailBox'] . "')";
mysql_query($addsql);
$setaddsql = "UPDATE orders
SET delivery_add_id = " . mysql_insert_id()
. ", status = 1 WHERE session = '"
. session_id() . "'";
mysql_query($setaddsql);
header("Location: " . $config_basedir . "checkout-pay.php");
}
}
202
Practical PHP and MySQL
In this block of code, the address is added to the delivery_addresses table, and
the orders table is updated with the delivery_addresses id and the status is set to
1.
Begin the form block:
header("Location: " . $config_basedir . "checkout-pay.php");
}
}
else
{
require("header.php");
echo "<h1>Add a delivery address</h1>";
Finally, add the code after the form:
</table>
</form>
<?php
}
require("footer.php");
?>
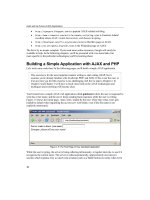
With the address code complete, your browser should display a page similar to
Figure 6-7—when a user is logged in.
FIGURE 6-7 When the user is logged in, the radio buttons prompt users which
address to use.
203
CHAPTER 6 Creating a Shopping Cart
Paying
The final part of the checkout process is to take payment. Dealing with payments on
a Web site can take a variety of different routes: PayPal, NOCHEX, Worldpay, and
more. This project offers two payment methods: PayPal and checks. These two meth-
ods demonstrate how to deal with automatic (PayPal) and manual (check) purchases.
Create a new file called checkout-pay.php and add the form:
<h2>Select a payment method</h2>
<form action='checkout-pay.php' method='POST'>
<table cellspacing=10>
<tr>
<td><h3>PayPal</h3></td>
<td>
This site uses PayPal to accept
Switch/Visa/Mastercard cards. No PayPal account
is required - you simply fill in your credit
card details
and the correct payment will be taken from your account.
</td>
<td><input type="submit"
name="paypalsubmit" value="Pay with PayPal"></td>
</tr>
<tr>
<td><h3>Cheque</h3></td>
<td>
If you would like to pay by cheque, you
can post the cheque for the final
amount to the office.
</td>
<td><input type="submit"
name="chequesubmit" value="Pay by cheque"></td>
</tr>
</table>
</form>
This simple form provides two Submit buttons only—one to pay by PayPal and
the other to pay by check. Processing the form involves two main sections—one for
PayPal and one for the check.
At the top of the file, begin adding the code:
<?php
session_start();
require("db.php");
require("functions.php");
If the user clicks the PayPal button, process the order:
require("functions.php");
204
Practical PHP and MySQL
if($_POST['paypalsubmit'])
{
$upsql = "UPDATE orders SET status = 2, payment
_type = 1 WHERE id = " . $_SESSION['SESS_ORDERNUM'];
$upres = mysql_query($upsql);
$itemssql = "SELECT total FROM orders WHERE
id = " . $_SESSION['SESS_ORDERNUM'];
$itemsres = mysql_query($itemssql);
$row = mysql_fetch_assoc($itemsres);
The orders table is updated to reflect the completion of the order. The status
field is changed to 2 and the payment_type field is set to 1 (PayPal). A query then
gets the total price from the order so that the PayPal link can be constructed later.
Reset the order session:
$row = mysql_fetch_assoc($itemsres);
if($_SESSION['SESS_LOGGEDIN'])
{
unset($_SESSION['SESS_ORDERNUM']);
}
else
{
session_register("SESS_CHANGEID");
$_SESSION['SESS_CHANGEID'] = 1;
}
If the user is logged in, the SESS_ORDERNUM session variable is removed with
unset(). If not, a new session variable called SESS_CHANGEID is created. The next
time header.php is loaded, the code at the top of header.php will regenerate the new
session and id.
Redirect to www.paypal.com with the payment details:
$_SESSION['SESS_CHANGEID'] = 1;
}
header("Location: />cgi-bin/webscr?cmd=_xclick&business=
you%40youraddress.com&item_name="
. urlencode($config_sitename)
. "+Order&item_number=PROD" . $row['id']
."&amount=" . urlencode(sprintf('%.2f',
$row['total'])) . "&no_note=1¤cy_code=GBP&lc=GB&
submit.x=41&submit.y=15");
}
205
CHAPTER 6 Creating a Shopping Cart
PAYPAL VARIABLE SETTING DESCRIPTION
business "you%40youraddress.com&" The name of the business running
the site.
item_name urlencode($config_site-
name) . “+Order”
A small name for the order—in
this case, ‘
<sitename> Order’.
item_number “PROD” . $row[‘id’] A product code. Here you con-
catenate
‘PROD’ and the order
number (
PROD12, for example).
amount urlencode(sprintf(‘%.2f’
, $row[‘total’]))
The amount of the order.
no_note 1 The no_note variable specifies
whether the customer should
specify a note with the payment.
Setting this to
1 indicates that no
note is required.
currency_code GBP The currency type for the
transaction.
lc GB The locale of the transaction.
TABLE 6-4 PayPal variables, explained
On this line, a series of GET variables pass data to the PayPal Web site. These
GET variables are reserved words that PayPal can use to process the order. Table
6-4 explains the purpose of each variable.
It is important to remember that any textual information transmitted as a
GET
variable should be run through urlencode() to escape nonstandard characters.
Start writing the code to process a check payment. The code is similar to the
PayPal code.
header("Location: />cgi-bin/webscr?cmd=_xclick&business=you%40
youraddress.com&item_name="
. urlencode($config_sitename)
. "+Order&item_number=PROD" . $row['id']
."&amount=" . urlencode(sprintf('%.2f',
$row['total'])) . "&no_note=1¤cy
_code=GBP&lc=GB&submit.x=41&submit.y=15");
206
Practical PHP and MySQL
}
else if($_POST['chequesubmit'])
{
$upsql = "UPDATE orders SET status = 2,
payment_type = 2 WHERE id = "
. $_SESSION['SESS_ORDERNUM'];
$upres = mysql_query($upsql);
Here you again update the orders table, but this time the payment_type is 2
instead of 1.
Reset the order as you did previously:
$upres = mysql_query($upsql);
if($_SESSION['SESS_LOGGEDIN'])
{
unset($_SESSION['SESS_ORDERNUM']);
}
else
{
session_register("SESS_CHANGEID");
$_SESSION['SESS_CHANGEID'] = 1;
}
Finally, display the details of where the user should send the check:
$_SESSION['SESS_CHANGEID'] = 1;
}
require("header.php");
?>
<h1>Paying by cheque</h1>
Please make your cheque payable to
<strong><?php echo $config_sitename; ?></strong>.
<p>
Send the cheque to:
<p>
<?php echo $config_sitename; ?><br>
22, This Place,<br>
This town,<br>
This county,<br>
FG43 F3D.<br>
<?php
}
The processing is now complete
Open the block to display the form. Before you reach the form, however, add the
showcart() function to summarize the current cart:
207
CHAPTER 6 Creating a Shopping Cart
<?php
}
else
{
require("header.php");
echo "<h1>Payment</h1>";
showcart();
?>
<h2>Select a payment method</h2>
<form action='checkout-pay.php' method='POST'>
Finally, add the closing code:
</table>
</form>
<?php
}
require("footer.php");
?>
Your brand-new, home-grown payment screen should now resemble Figure 6-8.
FIGURE 6-8 The finished payment screen
208
Practical PHP and MySQL
ADMINISTRATOR PAGES
The administration side of the shopping cart is very simple. The primary function
for the admin is to view and confirm completed orders. When an order has been
confirmed, the administrator has successfully sent out the product.
The first step is to provide an administrator login. Create a new file called
adminlogin.php and add the following code:
<?php
session_start();
require("db.php");
if(isset($_SESSION['SESS_ADMINLOGGEDIN']) == TRUE) {
header("Location: " . $config_basedir);
}
if($_POST['submit'])
{
$loginsql = "SELECT * FROM admins WHERE
username = '" . $_POST['userBox'] . "' AND
password = '" . $_POST['passBox'] . "'";
$loginres = mysql_query($loginsql);
$numrows = mysql_num_rows($loginres);
if($numrows == 1)
{
$loginrow = mysql_fetch_assoc($loginres);
session_register("SESS_ADMINLOGGEDIN");
$_SESSION['SESS_ADMINLOGGEDIN'] = 1;
header("Location: " . $config_basedir . "adminorders.php");
}
else
{
header("Location: "
. $config_basedir
. "adminlogin.php?error=1");
}
}
else
{
require("header.php");
echo "<h1>Admin Login</h1>";
209
CHAPTER 6 Creating a Shopping Cart
if($_GET['error'] == 1) {
echo "<strong>Incorrect username/password!</strong>";
}
?>
<p>
<form action="<?php echo $SCRIPT_NAME; ?>" method="POST">
<table>
<tr>
<td>Username</td>
<td><input type="textbox" name="userBox">
</tr>
<tr>
<td>Password</td>
<td><input type="password" name="passBox">
</tr>
<tr>
<td></td>
<td><input type="submit" name="submit" value="Log in">
</tr>
</table>
</form>
<?php
}
require("footer.php");
?>
Much of this code should look familiar to you. When the admin has successfully
logged in, the
SESS_ADMINLOGGEDIN variable is created.
Logging Out the Administrator
To log out the administrator, create a file called adminlogout.php and add the fol-
lowing code:
<?php
session_start();
require("config.php");
session_unregister("SESS_ADMINLOGGEDIN");
header("Location: " . $config_basedir);
?>
210
Practical PHP and MySQL
As with the normal user logout, you unregister the variable—as opposed to
destroying the entire session. This prevents against the administrator being logged
out completely when logged in as both an admin and a user.
Managing Completed Orders
The main administrator page shows the list of completed orders. The purpose of
this page is to enable an admin to see which orders need products mailed. The
admin can then create the package and confirm the order after it has been
mailed.
This page is fairly straightforward; it simply outputs data from some tables. The
script has two primary states: either displaying orders or confirming them. The
default page displays the orders. If you pass the page
func=conf GET variable and
the order number, the order will be confirmed.
Create a new file called adminorders.php and begin adding the code:
<?php
session_start();
require("config.php");
require("db.php");
require("functions.php");
if(isset($_SESSION['SESS_ADMINLOGGEDIN']) == FALSE) {
header("Location: " . $config_basedir);
}
After the usual introductory code, make a check to see if the func GET variable
exists:
if(isset($_GET['func']) == TRUE) {
if($_GET['func'] != "conf") {
header("Location: " . $config_basedir);
}
$validid = pf_validate_number($_GET['id'],
"redirect", $config_basedir);
$funcsql = "UPDATE orders SET
status = 10 WHERE id = " . $_GET['id'];
mysql_query($funcsql);
header("Location: " . $config_basedir . "adminorders.php");
}
211
CHAPTER 6 Creating a Shopping Cart
If the func GET variable exists, the page redirects when the variable is set to
anything other than
conf; this prevents against a SQL injection attack. Next, the id
GET variable is validated. The order is finally confirmed by updating the orders table
and setting the
status field to 10. The page then redirects to the orders summary.
If no
func GET variable exists, set the page to display completed orders:
else {
require("header.php");
echo "<h1>Outstanding orders</h1>";
$orderssql = "SELECT * FROM orders WHERE status = 2";
$ordersres = mysql_query($orderssql);
$numrows = mysql_num_rows($ordersres);
if($numrows == 0)
{
echo "<strong>No orders</strong>";
}
else
{
echo "<table cellspacing=10>";
while($row = mysql_fetch_assoc($ordersres))
{
echo "<tr>";
echo "<td>[<a
href='adminorderdetails.php?id=" . $row['id']
. "'>View</a>]</td>";
echo "<td>"
. date("D jS F Y g.iA", strtotime($row['date']))
. "</td>";
echo "<td>";
if($row['registered'] == 1)
{
echo "Registered Customer";
}
else
{
echo "Non-Registered Customer";
}
echo "</td>";
echo "<td>£" . sprintf('%.2f',
$row['total']) . "</td>";
echo "<td>";
if($row['payment_type'] == 1)
{
212
Practical PHP and MySQL
echo "PayPal";
}
else
{
echo "Cheque";
}
echo "</td>";
echo "<td><a
href='adminorders.php?func=conf&id=" . $row['id']
. "'>Confirm Payment</a></td>";
echo "</tr>";
}
echo "</table>";
}
}
require("footer.php");
?>
If all went well, the completed orders summary should look similar to the page
shown Figure 6-9.
FIGURE 6-9 The outstanding orders page provides a simple means of viewing
orders that need products sent out.
213
CHAPTER 6 Creating a Shopping Cart
Viewing a Specific Order
For the administrator to get the postal address for a particular order, she needs to
view the specific details for the order. This next page lists the order information
(order number, address, products purchased, payment method, and so on).
Create a new file called adminorderdetails.php and add the following code:
<?php
session_start();
require("config.php");
require("functions.php");
if(isset($_SESSION['SESS_ADMINLOGGEDIN']) == FALSE) {
header("Location: " . $basedir);
}
$validid = pf_validate_number($_GET['id'],
"redirect", $config_basedir . "adminorders.php");
require("header.php");
echo "<h1>Order Details</h1>";
echo "<a href='adminorders.php'><— go back
to the main orders screen</a>";
$ordsql = "SELECT * from orders WHERE id = " . $validid;
$ordres = mysql_query($ordsql);
$ordrow = mysql_fetch_assoc($ordres);
echo "<table cellpadding=10>";
echo "<tr><td><strong>Order Number</strong>
</td><td>" . $ordrow['id'] . "</td>";
echo "<tr><td><strong>Date of order</strong>
</td><td>" . date('D jS F Y g.iA',
strtotime($ordrow['date'])) . "</td>";
echo "<tr><td><strong>Payment Type</strong></td><td>";
if($ordrow['payment_type'] == 1)
{
echo "PayPal";
}
else
{
echo "Cheque";
}
echo "</td>";
echo "</table>";
214
Practical PHP and MySQL
if($ordrow['delivery_add_id'] == 0)
{
$addsql = "SELECT * FROM customers
WHERE id = " . $ordrow['customer_id'];
$addres = mysql_query($addsql);
}
else
{
$addsql = "SELECT * FROM delivery_addresses
WHERE id = " . $ordrow['delivery_add_id'];
$addres = mysql_query($addsql);
}
$addrow = mysql_fetch_assoc($addres);
echo "<table cellpadding=10>";
echo "<tr>";
echo "<td><strong>Address</strong></td>";
echo "<td>" . $addrow['forename'] . " "
. $addrow['surname'] . "<br>";
echo $addrow['add1'] . "<br>";
echo $addrow['add2'] . "<br>";
echo $addrow['add3'] . "<br>";
echo $addrow['postcode'] . "<br>";
echo "<br>";
if($ordrow['delivery_add_id'] == 0)
{
echo "<i>Address from member account</i>";
}
else
{
echo "<i>Different delivery address</i>";
}
echo "</td></tr>";
echo "<tr><td><strong>Phone</strong></td><td>"
. $addrow['phone'] . "</td></tr>";
echo "<tr><td><strong>Email</strong></td>
<td><a href='mailto:" . $addrow['email'] . "'>"
. $addrow['email'] . "</a></td></tr>";
echo "</table>";
$itemssql = "SELECT products.*, orderitems.*,
orderitems.id AS itemid FROM products, orderitems
WHERE orderitems.product_id = products.id AND order
_id = " . $validid;
$itemsres = mysql_query($itemssql);
$itemnumrows = mysql_num_rows($itemsres);
215
CHAPTER 6 Creating a Shopping Cart
echo "<h1>Products Purchased</h1>";
echo "<table cellpadding=10>";
echo "<th></th>";
echo "<th>Product</th>";
echo "<th>Quantity</th>";
echo "<th>Price</th>";
echo "<th>Total</th>";
while($itemsrow = mysql_fetch_assoc($itemsres))
{
$quantitytotal = $itemsrow['price']
* $itemsrow['quantity'];
echo "<tr>";
if(empty($itemsrow['image'])) {
echo "<td><img
src='./productimages/dummy.jpg' width='50' alt='"
. $itemsrow['name'] . "'></td>";
}
else {
echo "<td><img src='./productimages/"
. $itemsrow['image'] . "' width='50' alt='"
. $itemsrow['name'] . "'></td>";
}
echo "<td>" . $itemsrow['name'] . "</td>";
echo "<td>" . $itemsrow['quantity'] . " x </td>";
echo "<td><strong>£" . sprintf('%.2f',
$itemsrow['price']) . "</strong></td>";
echo "<td><strong>£" . sprintf('%.2f',
$quantitytotal) . "</strong></td>";
echo "</tr>";
}
echo "<tr>";
echo "<td></td>";
echo "<td></td>";
echo "<td></td>";
echo "<td>TOTAL</td>";
echo "<td><strong>£" . sprintf('%.2f', $total)
. "</strong></td>";
echo "</tr>";
echo "</table>";
require("footer.php");
?>
216
Practical PHP and MySQL
FIGURE 6-10 The order summary in the admin interface
This code should look familiar you to you; it simply displays details from the
orders, orderitems, and delivery_addresses tables.
The completed page should look like the one shown in Figure 6-10.
SUMMARY
Within this project, a number of different skills are tied together to create a consis-
tent product. Although you scratched only the surface of the possible features you
could add to a shopping cart system, you developed the core functionality. You
could make a huge range of possible additions, including the following:
■ Send confirmation emails to the user and the admin when an order is complete.
■ Provide a random product box on the front page. This could be used to dis-
play an image of a product to attract users.
217
CHAPTER 6 Creating a Shopping Cart
■ Create a ratings system in which users can review a product.
■ Create a comments and reviews system so that users can leave their thoughts
on how effective a product is.
■ Create sales reports.
You can develop each of these possible additions by using the skills already
covered in this book. Just sit back, sketch an initial idea of how to code the feature,
and then hack it in.
This page intentionally left blank
219
Building an Online
Auction Site
CHAPTER 7
If you wander around the Internet, you will likely find only a handful of people who
have never visited or used eBay. This popular auction site has become part and par-
cel of Internet life for many users, and an afternoon can be easily whiled away
browsing for all sorts of items.
In this chapter, you will create your own auction site. Rather than creating a
successor to eBay, the aim of this project is to teach you many of the concepts
involved in coding an auction site. And many of these concepts come in handy
when working with other projects. An example of this is the core feature of dealing
with bids. You can apply the same logic used to deal with bidding to online voting
sites, polls, quizzes, and more. As such, the benefit of this chapter is not so much
the product you have at the end, but the journey you traveled to create it.
PROJECT OVERVIEW
This project implements the following core features of an auction site:
■ The page displays a series of different categories for different types of items.
■ On the front page, a list of items will be available for all categories. The user
can click a category name to view items within it. Only items before the bid
deadline are displayed.
■ The user can register and log in to the site.
■ The user can view an item—complete with pictures—and place a bid.
■ The users can add items—complete with pictures—to the site.
■ When an auction is complete, the owner of the item and the winning bidder
receive email messages that include the details of the closing auction.