Practical PHP and MySQLBuilding Eight Dynamic Web Applications phần 8 pot
Bạn đang xem bản rút gọn của tài liệu. Xem và tải ngay bản đầy đủ của tài liệu tại đây (6.65 MB, 52 trang )
351
CHAPTER 9 FAQ Content Management System
For a normal user, only the questions within the subject(s) that he owns should
be returned:
$modqsql = "SELECT questions.*, users.username FROM users
INNER JOIN questions on questions.addedby_id=users.id INNER JOIN
topics on questions.topic_id=topics.id INNER JOIN subjects on
topics.subject_id=subjects.id WHERE questions.active = 0;";
}
else {
$modqsql = "SELECT questions.*, users.username FROM users
inner join questions on questions.addedby_id=users.id inner join
topics on questions.topic_id=topics.id inner join subjects on
topics.subject_id=subjects.id WHERE questions.active = 0 AND
subjects.owner_id = " . $_SESSION['SESS_USERID'] . ";";
}
Run the relevant query:
$modqsql = "SELECT questions.*, users.username FROM users
inner join questions on questions.addedby_id=users.id inner join
topics on questions.topic_id=topics.id inner join subjects on
topics.subject_id=subjects.id WHERE questions.active = 0 AND
subjects.owner_id = " . $_SESSION['SESS_USERID'] . ";";
}
$modresult = mysql_query($modqsql);
Create a table and add the table headings:
$modresult = mysql_query($modqsql);
echo "<h1>Questions submitted for moderation</h1>";
echo "<table cellspacing='0' cellpadding='5'>";
echo "<tr>";
echo "<th>Subject</th>";
echo "<th>Topic</th>";
echo "<th>Question</th>";
echo "<th>Submitted By</th>";
echo "<td></td>";
echo "<td></td>";
echo "<td></td>";
echo "</tr>";
If the query returns no results, there are no questions to moderate:
echo "<td></td>";
echo "</tr>";
if(mysql_num_rows($modresult) == 0) {
echo "<tr>";
352
Practical PHP and MySQL
echo "<td colspan=7>No questions to moderate</td>";
echo "</tr>";
}
If there are rows to moderate, display the questions:
echo "</tr>";
}
while($row = mysql_fetch_assoc($modresult)) {
$subsql = "SELECT topics.name, subjects.subject FROM topics,
subjects WHERE topics.subject_id = subjects.id AND topics.id = "
. $row['topic_id'] . ";";
$subresult = mysql_query($subsql);
$subrow = mysql_fetch_assoc($subresult);
echo "<tr>";
echo "<td>" . $subrow['subject'] . "</td>";
echo "<td>" . $subrow['name'] . "</td>";
echo "<td>" . $row['question'] . "</td>";
echo "<td>" . $row['username'] . "</td>";
echo "<td><a href='adminmodquestions.php?func=details&id="
. $row['id'] . "'>Details</a></td>";
echo "<td><a href='adminmodquestions.php?func=allow&id="
. $row['id'] . "'>Allow</a></td>";
echo "<td><a href='adminmodquestions.php?func=deny&id="
. $row['id'] . "'>Deny</a></td>";
echo "</tr>";
}
echo "</table>";
break;
This block displays the results from the query and adds the Details, Allow, and
Deny links. Each link adds the
func GET variable and the relevant switch block to
which the link points to (for example,
func=details accesses the details block), as
well as the
id of the question (for example, id=2).
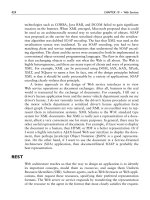
The details Block
The details block displays details about the current question. This block is pre-
sented like the block shown in Figure 9-12.
Add the following code:
echo "</table>";
break;
case "details":
require("header.php");
353
CHAPTER 9 FAQ Content Management System
FIGURE 9-12 The details link provides a convenient way of viewing the answer to
the question.
$validid = set_validid();
$sql = "SELECT questions.*, topics.name, subjects.subject FROM
questions INNER JOIN topics ON questions.topic_id = topics.id INNER
JOIN subjects ON topics.subject_id = subjects.id
WHERE questions.id = " . $validid . ";";
$result = mysql_query($sql);
$row = mysql_fetch_assoc($result);
You first run this query to gather the details about the submitted question. This
query performs an inner join to gather the question details, the topic name, and the
subject name.
Display the gathered information:
$row = mysql_fetch_assoc($result);
echo "<h1>Submitted question details</h1>";
echo "<table border='0' cellspacing='0' cellpadding='5'>";
echo "<tr>";
echo "<td><b>Subject</b></td>";
echo "<td>" . $row['subject'] . "</td>";
echo "</tr>";
echo "<tr>";
echo "<td><b>Topic</b></td>";
echo "<td>" . $row['name'] . "</td>";
echo "</tr>";
echo "<tr>";
echo "<td><b>Question</b></td>";
echo "<td>" . $row['question'] . "</td>";
echo "</tr>";
echo "<tr>";
echo "<td><b>Answer</b></td>";
echo "<td>" . $row['answer'] . "</td>";
echo "</tr>";
echo "<tr>";
echo "<td colspan=2>";
354
Practical PHP and MySQL
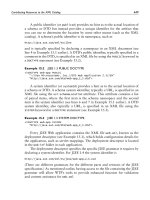
FIGURE 9-13 Before denying a question, be sure this is what
the user wants.
echo "<a href='adminmodquestions.php?func=main'>⇐
Back to questions</a>";
echo " • ";
echo "<a href='adminmodquestions.php?func=allow&id="
. $row['id'] . "'>Allow</a> ";
echo " • ";
echo " <a href='adminmodquestions.php?func=deny&id="
. $row['id'] . "'>Deny</a>";
echo "</td>";
echo "</tr>";
echo "</table>";
break;
The allow Block
To accept a question, add the allow block:
echo "</table>";
break;
case "allow":
$validid = set_validid();
$modqsql = "UPDATE questions SET active = 1 WHERE id = "
. $validid . ";";
$modqq = mysql_query($modqsql);
header("Location: " . $config_basedir
. "adminmodquestions.php?func=main");
break;
This block updates the question and sets the active field to 1 to make the ques-
tion live. The page then redirects to the
main block of adminmodquestions.php.
The deny Block
To deny a question, the process is split into two parts. The first part asks the user if
she is sure that she wants to reject the question. See Figure 9-13.
Add the code for this section:
355
CHAPTER 9 FAQ Content Management System
header("Location: " . $config_basedir .
"adminmodquestions.php?func=main");
break;
case "deny":
require("header.php");
$validid = set_validid();
echo "<h1>Are you sure that you want to reject this
question?</h1>";
echo "<p>[<a href='" . $SCRIPT_NAME . "?func=denyconf&id="
. $validid . "'>Yes</a>] [<a href='" . $SCRIPT_NAME
. "?func=main'>No</a>]";
break;
This block provides two links. The No link simply links back to the main sec-
tion of the current script, and the Yes link links to the
denyconf section.
The denyconf Block
To confirm the cold, hard reality of denying a question, add the denyconf block:
echo "<p>[<a href='" . $SCRIPT_NAME . "?func=denyconf&id="
. $validid . "'>Yes</a>] [<a href='" . $SCRIPT_NAME
. "?func=main'>No</a>]";
break;
case "denyconf":
$validid = set_validid();
$delsql = "DELETE FROM questions WHERE id = " . $_GET['id']
. ";";
$delq = mysql_query($delsql);
header("Location: " . $config_basedir
. "adminmodquestions.php?func=main");
break;
This block deletes the question from the questions table and then redirects back
to the
main section to display the other moderated questions.
Finally, close the
switch and add the footer file:
header("Location: " . $config_basedir
. "adminmodquestions.php?func=main");
break;
}
require("footer.php");
?>
356
Practical PHP and MySQL
MANAGING SUBJECTS
Subjects are the core foundation of the content that this project manages, and are
very similar to Categories in the blog project in Chapter 4. Managing subjects is
something that you naturally only want the administrator to be able to do. If you
were to give a regular user the run of the subjects, anything could happen.
The capabilities to add and delete subjects are important pieces of functional-
ity to create, but deleting is a capability with which you should take special care.
By using InnoDB tables in MySQL, any accidental deletions of a subject cause all
of the child topics and questions to be deleted also. As such, be very careful when
working through this section.
Adding Subjects
Adding a subject to the database is as simple as creating a form and adding the con-
tents of the form to the database. Create a new file called addsubject.php and add
the following code:
<h1>Add a new subject</h1>
<form action="<?php echo $SCRIPT_NAME; ?>" method="post">
<table cellpadding="5">
<tr>
<td>Subject</td>
<td><input type="text" name="subject"></td>
</tr>
<tr>
<td>Owner</td>
<td>
This code adds a form and a table to lay out the form elements. After adding the
subject text box, display a combo box so that a subject owner can be chosen:
<td>Owner</td>
<td>
<select name="owner">
<option value="0">—- No Owner —-</option>
<?php
$sql = "SELECT * FROM users ORDER BY username ASC;";
$result = mysql_query($sql);
while($row = mysql_fetch_assoc($result)) {
echo "<option value='" . $row['id'] . "'>"
. $row['username'] . "</option>";
}
?>
</select>
357
CHAPTER 9 FAQ Content Management System
A select box is created, and the first entry (which returns the value 0) is added
to provide a No Owner option. The other entries in the select box are added from the
query.
Complete the form:
?>
</select>
</td>
</tr>
<tr>
<td>Description Blurb</td>
<td><textarea name="blurb" cols=50 rows=10></textarea></td>
</tr>
<tr>
<td></td>
<td><input type="submit" name="submit" value="Add Subject!"></td>
</tr>
</table>
</form>
With the form finished, it’s time to process it. Jump to the start of the file and
add the following code:
<?php
session_start();
require("db.php");
require("functions.php");
if(isset($_SESSION['SESS_ADMINUSER']) == FALSE) {
header("Location: " . $config_basedir . "adminlogin.php");
}
You first protect the page so that only the administrator can access it. Check if
the Submit button was clicked and begin the processing:
header("Location: " . $config_basedir . "adminlogin.php");
}
if($_POST['submit']) {
$subsql = "INSERT INTO subjects(subject, blurb, owner_id) VALUES("
. "'" . pf_fix_slashes($_POST['subject'])
. "', '" . pf_fix_slashes($_POST['blurb'])
. "'," . $_POST['owner']
. ");";
mysql_query($subsql);
header("Location: " . $config_basedir);
}
358
Practical PHP and MySQL
FIGURE 9-14
If No Owner is selected, 0 is added to
the owner_id field in the questions
table.
Inside this block an INSERT statement adds the form data to the database. Add
the
else that encases the main form:
header("Location: " . $config_basedir);
}
else {
require("header.php");
?>
<h1>Add a new subject</h1>
<form action="<?php echo $SCRIPT_NAME; ?>" method="post">
Finally, after the form, close the else and add the footer file:
</table>
</form>
<?php
}
require("footer.php");
?>
The completed page should look like the one shown in Figure 9-14.
Deleting Subjects
When logged in as an administrator, a user deletes content by clicking the little X
links. These links hook up with a page to delete the type of content the X is next to.
If you take a look at the list of subjects, you will see that the X next to each subject
links to deletesubject.php and passes the script the id of the subject to be deleted.
359
CHAPTER 9 FAQ Content Management System
NOTE
Cascading Fun and Games
Remember that when a subject is deleted, all topics and questions within
that subject are deleted also. The code for the cascading delete was added
when you set up your tables.
When deletesubject.php is first loaded, the user is prompted to confirm that he
wants to delete the subject. If he clicks the Yes link, the page reloads but includes
a
conf GET variable. If this variable is present, the subject is deleted.
Create deletesubject.php and add the following code:
<?php
session_start();
require("db.php");
require("functions.php");
if($_SESSION['SESS_ADMIN']) {
header("Location: " . $config_basedir);
}
if(pf_check_number($_GET['subject']) == TRUE) {
$validsubject = $_GET['subject'];
}
else {
header("Location: " . $config_basedir);
}
First, the code validates the subject GET variable that was passed to the page.
Next a check is made to see if the
conf GET variable exists (remember that this is
added when the user confirms deletion of the subject):
header("Location: " . $config_basedir);
}
if($_GET['conf']) {
$delsql = "DELETE FROM subjects WHERE id = " . $validsubject . ";";
mysql_query($delsql);
360
Practical PHP and MySQL
header("Location: " . $config_basedir);
}
else {
require("header.php");
echo "<h1>Are you sure you want to delete this subject?</h1>";
echo "<p>[<a href='" . $SCRIPT_NAME . "?conf=1&subject="
. $validsubject . "'>Yes</a>] [<a href='" . $config_basedir
. "'>No</a>]";
}
If the variable exists, the subject is deleted and the page redirects back to the
base page. Otherwise, the question is displayed.
Finally, add the footer file:
echo "<p>[<a href='" . $SCRIPT_NAME . "?conf=1&subject=" .
$validsubject . "'>Yes</a>] [<a href='" . $config_basedir . "'>No</a>]";
}
require("footer.php");
?>
MANAGING TOPICS
When adding topics to the system, the script needs to work both for normal users
who own subjects and for the administrator. The practical differences between a
normal user and the admin are mainly in the subjects to which they have access.
The administrator can choose any subject to add to a topic, whereas a normal user
can choose only the subjects he owns.
Adding Topics
Create a new file called addtopic.php and start the form:
<h1>Add a new topic</h1>
<form action="<?php echo $SCRIPT_NAME; ?>" method="post">
<table cellpadding="5">
<tr>
<td>Subject</td>
To display the selection of subjects in the combo box, add the following code:
<td>Subject</td>
<td>
<?php
if($_SESSION['SESS_ADMINUSER']) {
361
CHAPTER 9 FAQ Content Management System
$sql = "SELECT * FROM subjects ORDER BY subject ASC;";
$result = mysql_query($sql);
}
else {
$sql = "SELECT * FROM subjects WHERE owner_id = "
. $_SESSION['SESS_USERID'] . " ORDER BY subject ASC;";
$result = mysql_query($sql);
}
echo "<select name='subject'>";
while($row = mysql_fetch_assoc($result)) {
echo "<option value='" . $row['id'] . "'>"
. $row['subject'] . "</option>";
}
echo "</select>";
?>
In this code, a check is made to see if the administrator is logged in. If he is, all
subjects are displayed; otherwise, only the subjects owned by the current user are
displayed.
Complete the rest of the form:
echo "</select>";
?>
</td>
</tr>
<tr>
<td>Topic</td>
<td><input type="text" name="name"></td>
</tr>
<tr>
<td></td>
<td><input type="submit" name="submit" value="Add Subject!"></td>
</tr>
</table>
</form>
With the form ready, jump to the beginning of the file and add the following code:
<?php
session_start();
require("db.php");
require("functions.php");
362
Practical PHP and MySQL
You now need to protect this file from unauthorized use. This is more challeng-
ing because both the administrator and users who own subjects can use the file.
Unauthorized users include people not logged in and those users who don’t own a
subject.
The solution is to perform checks to see if the current user is a valid user. If the
user is a valid user, the
$auth variable is set to 1. After these tests, the $auth vari-
able is checked. If
$auth is not equal to 1, the page is redirected.
Add the checks:
require("functions.php");
if(isset($_SESSION['SESS_ADMINUSER']) == TRUE) {
$auth = 1;
}
if(isset($_SESSION['SESS_USERNAME']) == TRUE) {
$authsql = "SELECT * FROM subjects WHERE owner_id = "
. $_SESSION['SESS_USERID'] . " ORDER BY subject ASC;";
$authresult = mysql_query($authsql);
$authnumrows = mysql_num_rows($authresult);
if($authnumrows >= 1) {
$auth = 1;
}
}
The first check identifies whether the administrator is logged in. If he is, $auth
is set to 1. The next check identifies whether a user is logged in and then performs
a query to see that user owns any subjects. If the query returns one or more rows,
$auth is set to 1.
Check the value of
$auth:
$auth = 1;
}
}
if($auth != 1) {
header("Location: " . $config_basedir);
}
If $auth is not equal (!=) to 1, the page redirects.
363
CHAPTER 9 FAQ Content Management System
Process the form:
header("Location: " . $config_basedir);
}
if($_POST['submit']) {
$sql = "INSERT INTO topics(subject_id, name) VALUES("
. "'" . $_POST['subject']
. "', '" . pf_fix_slashes($_POST['name'])
. "');";
mysql_query($sql);
header("Location: " . $config_basedir . "index.php?subject="
. $_POST['subject']);
}
else {
require("header.php");
?>
<h1>Add a new topic</h1>
<form action="<?php echo $SCRIPT_NAME; ?>" method="post">
This block uses a simple INSERT statement to add the values to the database.
The page then redirects to index.php and passes it the
subject GET variable to dis-
play the subject information.
After the form, close the
else block and add the footer file:
</table>
</form>
<?php
}
require("footer.php");
?>
Getting Rid of Topics
Deleting a topic is virtually identical to deleting a subject. The X next to the topic
links to deletetopic.php and the code is very similar (see Example 9-9).
364
Practical PHP and MySQL
EXAMPLE 9-9 The delete topic code is very similar to deleting a subject.
<?php
session_start();
require("db.php");
require("functions.php");
if(isset($_SESSION['SESS_ADMINUSER']) == FALSE) {
header("Location: " . $config_basedir);
}
if(pf_check_number($_GET['topic']) == TRUE) {
$validtopic = $_GET['topic'];
}
else {
header("Location: " . $config_basedir);
}
if($_GET['conf']) {
$delsql = "DELETE FROM topics WHERE id = " . $validtopic . ";";
mysql_query($delsql);
header("Location: " . $config_basedir);
}
else {
require("header.php");
echo "<h1>Are you sure you want to delete this topic?</h1>";
echo "<p>[<a href='" . $SCRIPT_NAME . "?conf=1&topic="
. $validtopic . "'>Yes</a>] [<a href='" . $config_basedir
. "'>No</a>]";
}
require("footer.php");
?>
SUBJECT OWNERSHIP
Subject ownership is a key feature in this project. Not only does it encourage users
to roll up their sleeves and get involved, it also decentralizes the source of the con-
tent so that a range of different users can maintain the site.
In this part of the project, you manage ownership requests, request moderation,
and the removal of ownership. Three scripts manage these different needs.
365
CHAPTER 9 FAQ Content Management System
FIGURE 9-15 Any user is welcome to apply for ownership of a subject.
Applying for Ownership of a Subject
If a subject in the system has no owner, the subject information page contains a link
that invites users to apply for ownership of the event. When this link is clicked, the
user is presented with the page shown in Figure 9-15.
This page is very simple. The user types the reasons she feels that she should
be trusted to own the page and then clicks the Submit (Apply!) button. The page
then informs the applicant that a response will be emailed when the administrator
has made a decision.
Create a new file called applysubowner.php and start adding the code:
<?php
session_start();
require("config.php");
require("functions.php");
366
Practical PHP and MySQL
if(pf_check_number($_GET['subject']) == TRUE) {
$validsubject = $_GET['subject'];
}
else {
header("Location: " . $config_basedir);
}
require("header.php");
The file begins by validating the subject GET variable.
Add the code to process the form, which consists of a single text box:
require("header.php");
if($_POST['submit']) {
$appsql = "SELECT * FROM mod_subowner WHERE sub_id = "
. $validsubject . " AND user_id = '" . $_SESSION['SESS_USERID']
. "';";
$appresult = mysql_query($appsql);
if(mysql_num_rows($appresult) == 0) {
$inssql = "INSERT INTO mod_subowner(sub_id, user_id, reasons)
VALUES(" . $_GET['subject'] . "," . $_SESSION['SESS_USERID'] . ",'"
. pf_fix_slashes($_POST['reasons']) . "');";
mysql_query($inssql);
echo "<h1>Application Submitted</h1>";
echo "Your application has been submitted. You will be
emailed with the decision.";
}
else {
echo "<h1>Already Applied</h1>";
echo "<p>You have already made an application for this
subject.</p>";
}
}
In this block, a check is first made to see if the current user has already applied
for ownership. If the query returns no rows, this is the first application and a query
is constructed to add the user id, subject id, and reasons to the mod_subowner
table.
If the query returns one or more rows, the user has already applied for owner-
ship and a message is displayed to indicate this.
Now you can begin to display the form. Before you do this, perform a query to
grab the name of the subject:
echo "<p>You have already made an application for this
subject.</p>";
367
CHAPTER 9 FAQ Content Management System
}
}
else {
$subsql = "SELECT subject FROM subjects WHERE id = "
. $validsubject . ";";
$subresult = mysql_query($subsql);
$subrow = mysql_fetch_assoc($subresult);
?>
The name of the subject from this query is used in the text of the page.
Add this text and the form:
$subrow = mysql_fetch_assoc($subresult);
?>
<h1>Application for ownership of <i><?php echo $subrow['subject'];
?></i></h1>
<p>You have applied to maintain the subject <strong><?php echo
$subrow['subject']; ?></strong>.</p>
<p>
The procedure to apply to own a subject is as follows:
<ul>
<li>Fill in is Subject Ownership application form.</li>
<li>The contents of this form will be submitted to the site
adminstrator approval.</li>
<li>You will be notified in your Account Homepage of the
administrators decision.</li>
</ul>
</p>
<p>
When you fill out the Reasons box below, it is advised that you
indicate why you should be given
the ownership of the subject. What can you bring to the subject
in terms of time and knowledge? Can
you ensure the subject questions are clear and well structured?
</p>
<form action="applysubowner.php?subject=<?php echo $validsubject;
?>" method="POST">
<table cellpadding=5 cellspacing=5>
<tr>
<td>Reasons</td>
<td><textarea name="reasons" cols="50" rows="10"></textarea></td>
</tr>
<tr>
<td></td>
<td><input type="submit" name="submit" value="Apply!"></td>
</tr>
</table>
</form>
368
Practical PHP and MySQL
FIGURE 9-16 The administrator can easily tend to requests.
With the form complete, add the closing code:
</table>
</form>
<?php
}
require("footer.php");
?>
Moderating Ownership Requests
Moderation of the subject ownership requests is very similar to the moderation of
the questions earlier in the project. The administrator is presented with a list of
requests, which he can accept or deny, as shown in Figure 9-16.
In the question moderation script, the func GET variable was used to choose
which mode the page was working in. A switch statement checked this variable,
and the relevant code was executed.
369
CHAPTER 9 FAQ Content Management System
The same technique is used in this page, which includes the following four
sections:
■ main. This section displays the ownership requests.
■ allow. If the Allow link is clicked, this section is run and authorizes the own-
ership request.
■ deny. If the Deny link is clicked, this section prompts the administrator to be
sure that he wants to deny the request.
■ denyconf. If the administrator clicks the Yes link in the deny section, the
denyconf section deletes the request from the database.
Create a new file called adminmodsubown.php and add the following code:
<?php
session_start();
if(!$_SESSION['SESS_ADMINUSER']) {
header("Location: " . $config_basedir);
}
require("db.php");
require("functions.php");
function set_validid() {
if(pf_check_number($_GET['id']) == TRUE) {
return $_GET['id'];
}
else {
header("Location: " . $config_basedir);
}
}
You again create a function to manage the validation across the different switch
blocks. This works the same as in the question moderation script.
Open the
switch statement:
header("Location: " . $config_basedir);
}
}
switch($_GET['func']) {
370
Practical PHP and MySQL
The main Block
The first block to add is main, which displays the list of ownership requests. This list
of requests allows the user to see who wants to have ownership of a particular subject.
switch($_GET['func']) {
case "main":
require("header.php");
$subssql = "SELECT subjects.subject, subjects.id FROM subjects
INNER JOIN mod_subowner ON subjects.id = mod_subowner.sub_id
GROUP BY subjects.id;";
$subsresult = mysql_query($subssql);
$subsnumrows = mysql_num_rows($subsresult);
echo "<h1>Subjects and Ownership</h1>";
This code runs a query to gather the names of all the subjects that have had
ownership requests. If the query returns no rows, display a message:
echo "<h1>Subjects and Ownership</h1>";
if($subsnumrows == 0) {
echo "No requests have been made.";
}
If rows are returned, execute the else:
echo "No requests have been made.";
}
else {
while($subsrow = mysql_fetch_assoc($subsresult)) {
$reqsql = "SELECT users.id AS userid, users.username,
mod_subowner.* FROM users INNER JOIN mod_subowner ON
mod_subowner.user_id = users.id WHERE mod_subowner.sub_id = "
. $subsrow['id'] . ";";
$reqresult = mysql_query($reqsql);
A while loop is opened to loop through each subject. A second query performs
a join to get the usernames for the ownership requests.
Start a table to hold the content:
$reqresult = mysql_query($reqsql);
echo "<table class='visible' cellpadding=10
cellspacing=0>";
371
CHAPTER 9 FAQ Content Management System
echo "<tr><th class'visible' colspan='4'>
Ownership requests for <i>" . $subsrow['subject']
. "</i></th></tr>";
Create another while loop to loop through the second query’s set of results:
echo "<tr><th class'visible' colspan='4'>
Ownership requests for <i>" . $subsrow['subject']
. "</i></th></tr>";
while($reqrow = mysql_fetch_assoc($reqresult)) {
echo "<tr>";
echo "<td>Requested by <strong>"
. $reqrow['username'] . "</strong></td>";
echo "<td>" . $reqrow['reasons'] . "</td>";
echo "<td><a href='" . $SCRIPT_NAME
. "?func=accept&id=" . $reqrow['id'] . "'>Accept</a></td>";
echo "<td><a href='" . $SCRIPT_NAME
. "?func=deny&id=" . $reqrow['id'] . "'>Deny</a></td>";
echo "</tr>";
}
echo "</table>";
echo "<br/>";
}
}
break;
The combination of the second while inside the first while means that for each
subject, the ownership requests will be grouped in a table. This makes choosing the
best request much easier.
The accept Block
Accepting an ownership request involves three steps:
■ The user is sent an email to indicate she has been chosen as the new subject
owner.
■ The subjects table is updated with the id of the new owner.
■ All entries in the mod_subown table for that particular subject are deleted.
This ensures any competing applications for ownership are removed.
Add the following code:
372
Practical PHP and MySQL
}
break;
case "accept":
$validid = set_validid();
$sql = "SELECT mod_subowner.sub_id, subjects.subject,
users.id AS userid, users.username, users.email FROM
mod_subowner INNER JOIN subjects ON
mod_subowner.sub_id = subjects.id LEFT JOIN users ON
mod_subowner.user_id = users.id WHERE mod_subowner.id = "
. $validid . ";";
$result = mysql_query($sql);
$row = mysql_fetch_assoc($result);
$numrows = mysql_num_rows($result);
This query selects the subject id, subject name, user id, username, and email
address that correlate to the subject id and owner id in the mod_subown table. This
query involves two joins. The first join connects the mod_subowner and subjects
tables, and the second join connects the mod_subowner and users tables.
To send the email, the same technique from the Auctions project covered in
Chapter 7 is used. First, copy the array variables into some normal variables to add
the information to the body of the email:
$numrows = mysql_num_rows($result);
$mail_username = $row['username'];
$mail_email = $row['email'];
$mail_subject = $row['subject'];
Construct the email using heredoc syntax:
$mail_subject = $row['subject'];
$mail_body=<<<_MESSAGE_
Hi $mail_username,
I am pleased to inform you that you have been accepted as the new
owner of the '$mail_subject' subject.
When you next log into '$config_sitename' you will see the subject
in your Control Panel.
Kind regards,
$config_sitename Administrator
_MESSAGE_;
373
CHAPTER 9 FAQ Content Management System
Use the mail() command to send the email message:
$config_sitename Administrator
_MESSAGE_;
mail($mail_email, "Ownership request for " . $mail_subject
. " accepted!", $mail_body);
The mail() function sends the email to the address in $mail_email, with the
subject
Ownership request for <subject> accepted! and $mail_body (the here-
doc text) as the body of the message.
Update the subjects table to change the
owner_id field to the id of the new owner:
mail($mail_email, "Ownership request for " . $mail_subject . "
accepted!", $mail_body);
$addsql = "UPDATE subjects SET owner_id = " . $row['userid']
. " WHERE id = " . $row['sub_id'] . ";";
mysql_query($addsql);
Finally, delete all entries in the mod_subowner table with the same subject as
the winning request:
mysql_query($addsql);
$delsql = "DELETE FROM mod_subowner WHERE sub_id = "
. $row['sub_id'] . ";";
mysql_query($delsql);
header("Location: " . $config_basedir
. "adminmodsubown.php?func=main");
break;
The deny Block
The deny block is identical to the deny block in the question moderation script:
header("Location: " . $config_basedir
. "adminmodsubown.php?func=main");
break;
case "deny":
$validid = set_validid();
require("header.php");
echo "<h1>Are you sure that you want to deny this request?</h1>";
374
Practical PHP and MySQL
echo "<p>[<a href='adminmodsubown.php?func=denyconf&id="
. $validid . "'>Yes</a>]
[<a href='adminmodsubown.php?func=main'>No</a>]";
break;
This code prompts the user to confirm whether he wants to deny the request. If
the user clicks No, the page redirects to the
main section; otherwise, it redirects to
the
denyconf section.
The denyconf Block
To deny the ownership request, the code follows two steps:
1. Send an email to the user to let him know that his request was denied.
2. Delete the request from the mod_subowner table.
This section borrows heavily from the
allow section. The code simply changes
the text of the email body that is sent and the content to be deleted:
echo "<p>[<a href='adminmodsubown.php?func=denyconf&id="
. $validid . "'>Yes</a>]
[<a href='adminmodsubown.php?func=main'>No</a>]";
break;
case "denyconf":
$validid = set_validid();
$sql = "SELECT mod_subowner.sub_id, subjects.subject, users.id
AS userid, users.username, users.email FROM mod_subowner
INNER JOIN subjects ON mod_subowner.sub_id = subjects.id
LEFT JOIN users ON mod_subowner.user_id = users.id
WHERE mod_subowner.id = " . $validid . ";";
$result = mysql_query($sql);
$row = mysql_fetch_assoc($result);
$numrows = mysql_num_rows($result);
$mail_username = $row['username'];
$mail_email = $row['email'];
$mail_subject = $row['subject'];
$mail_body=<<<_MESSAGE_
Hi $mail_username,
I am writing to inform you that your request for ownership of
the '$mail_subject' subject has been declined.
Better luck next time!
375
CHAPTER 9 FAQ Content Management System
Kind regards,
$config_sitename Administrator
_MESSAGE_;
mail($mail_email, "Ownership request for " . $mail_subject
. " denied!", $mail_body);
$delsql = "DELETE FROM mod_subowner WHERE id = " . $validid
. ";";
mysql_query($delsql);
header("Location: " . $config_basedir
. "adminmodsubown.php?func=main");
break;
With the sections complete, close the switch block and add the footer file:
header("Location: " . $config_basedir
. "adminmodsubown.php?func=main");
break;
}
require("footer.php");
?>
Removing Ownership
At some point in the future, it is likely that an owner of a subject may not have the
time or inclination to continue contributing. In this case, you want to ensure that an
owner can easily orphan a subject if needed.
To make this as simple as possible, in the control panel you add an option to
remove ownership, as seen in Figure 9-17.
To orphan the subject, the subject id passed to the page is used to run a
query to change the
owner_id field in the subjects table to 0. Before this query
happens, however, another confirmation question is displayed to prevent any
accidents.
FIGURE 9-17
The remove ownership link
is passed the subject id.