Intermediate System Administration for the Solaris 10 Operating Student Guide phần 4 pot
Bạn đang xem bản rút gọn của tài liệu. Xem và tải ngay bản đầy đủ của tài liệu tại đây (397.43 KB, 73 trang )
5-1
Copyright 2005 Sun Microsystems, Inc. All Rights Reserved. Sun Services, Revision A.1
Module 5
PerformingMountsandUnmounts
Objectives
Upon completion of this module, you should be able to:
● Identify mounting basics
● Perform mounts
● Perform unmounts
● Access a mounted diskette, CD-ROM, or DVD
● Restrict access to a mounted diskette, CD-ROM, or DVD
● Access a diskette, CD-ROM, or DVD without Volume Management
(vold)
The course map in Figure 5-1 shows how this module fits into the current
instructional goal.
Figure 5-1 Course Map
Working With Mounting Basics
5-2 Intermediate System Administration for the Solaris™ 10 Operating System
Copyright 2005 Sun Microsystems, Inc. All Rights Reserved. Sun Services, Revision A.1
Working With Mounting Basics
In the Solaris OS, you use the mounting process to attach individual file
systems to their mount points on the directory hierarchy. This action
makes a file system accessible to the system and to the users.
You use the unmounting process to detach a file system from its mount
point in the directory hierarchy. This action makes a file system
unavailable to the system or users.
After you have created a file system by using the newfs command, you
must attach it to the Solaris OS directory hierarchy at a mount point. A
mount point is a directory that is the point of connection for a file system.
File systems are commonly referred to by the names of their mount
points, for example, the / (root) file system or the /usr file system.
Working With Mounting Basics
Performing Mounts and Unmounts 5-3
Copyright 2005 Sun Microsystems, Inc. All Rights Reserved. Sun Services, Revision A.1
Figure 5-2 shows how the directory hierarchy spans from one file system
to the next.
Figure 5-2 File Systems and Mount Points
File systems do not contain their own mount point directories.
Working With Mounting Basics
5-4 Intermediate System Administration for the Solaris™ 10 Operating System
Copyright 2005 Sun Microsystems, Inc. All Rights Reserved. Sun Services, Revision A.1
Determining Which File Systems Are Currently
Mounted
You can determine which file systems are currently mounted by using the
mount command or the df command.
The df command displays the amount of disk space occupied by
mounted or unmounted file systems and, depending on the options used,
displays both locally mounted and virtual file system information.
The mount command, which is located in the /usr/sbin directory,
maintains a table of currently mounted file systems in the /etc/mnttab
file. When the mount command is used without arguments, it lists all of
the mounted file systems in the /etc/mnttab directory. When used with
only a partial argument list, the command searches the /etc/vfstab file
for an entry that supplies the missing arguments.
Note – Options to the mount command are discussed later in this module.
Note – While system administrators typically use the /usr/sbin/mount
command, the system boot scripts use the /sbin/mount command.
Mounting a File System Automatically
The Solaris OS provides several methods for automating file system
mounts.
The Solaris OS creates a default /etc/vfstab file during software
installation, based on your selections. However, you can edit the
/etc/vfstab file whenever file system entries need to be added or
modified.
Note – The automounter can mount network file systems on demand.
Working With Mounting Basics
Performing Mounts and Unmounts 5-5
Copyright 2005 Sun Microsystems, Inc. All Rights Reserved. Sun Services, Revision A.1
Introducing the Virtual File System Table: /etc/vfstab
The /etc/vfstab file lists all the file systems to be automatically
mounted at system boot time, with the exception of the /etc/mnttab and
/var/run file systems.
The file format includes seven fields per line entry. By default, a tab
separates each field, but any whitespace can be used for separators. The
dash (-) character is used as a placeholder for fields when text arguments
are not appropriate. Commented lines begin with the (#) symbol.
Note – Because the default is to use tabs to separate the fields in the
/etc/vfstab file, the fields often do not line up under their respective
headings. This can lead to some confusion when you are viewing this file
in a terminal window.
An example of a /etc/vfstab file follows:
# more /etc/vfstab
#device device mount FS fsck mount
mount
#to mount to fsck point type pass at boot
options
#
fd - /dev/fd fd - no -
/proc - /proc proc - no -
/dev/dsk/c0t0d0s1 - - swap - no -
/dev/dsk/c0t0d0s0 /dev/rdsk/c0t0d0s0 / ufs 1 no -
/dev/dsk/c0t0d0s6 /dev/rdsk/c0t0d0s6 /usr ufs 1 no -
/dev/dsk/c0t0d0s3 /dev/rdsk/c0t0d0s3 /var ufs 1 no -
/dev/dsk/c0t0d0s7 /dev/rdsk/c0t0d0s7 /export/home ufs 2 yes -
/devices - /devices devfs - no -
ctfs - /system/contract ctfs - no -
objfs - /system/object objfs - no -
swap - /tmp tmpfs - yes -
#
Working With Mounting Basics
5-6 Intermediate System Administration for the Solaris™ 10 Operating System
Copyright 2005 Sun Microsystems, Inc. All Rights Reserved. Sun Services, Revision A.1
To add a line entry, you need the following information:
device to mount The device to be mounted. For example, a local ufs
file system /dev/dsk/c
#
t
#
d
#
s
#
, or a pseudo file
system /proc.
device to fsck The raw or character device checked by the file
system check program (fsck) if applicable. Pseudo
and distributed file systems have a dash (-) in this
field.
mount point The name of the directory that serves as the attach
mount point in the Solaris OS directory hierarchy.
FS type The type of file system to be mounted.
fsck pass The pass number used by the fsck command to
decide whether to check a file system. When the
field contains a (-), the file system is not checked.
When the field contains a zero, UFS file systems are
not checked, however, non-UFS file systems are
checked. When the field contains a value greater
than zero, the file system is always checked.
All file systems with a value of 1 in this field are
checked one at a time in the order they appear in
the vfstab file. When the fsck command is run on
multiple UFS file systems that have fsck pass
values greater than 1 and the preen option (-o p)
is used, the fsck command automatically checks
the file systems on different disks in parallel to
maximize efficiency. Otherwise, the value of the
pass number does not have any effect.
mount at boot Enter yes to enable the mountall command to
mount the file systems at boot time. Enter no to
prevent a file system mount at boot time.
Working With Mounting Basics
Performing Mounts and Unmounts 5-7
Copyright 2005 Sun Microsystems, Inc. All Rights Reserved. Sun Services, Revision A.1
Note – For / (root), /usr, and /var (if it is a separate file system) file
systems, the mount at boot field value is specified as no. The kernel
mounts these file systems as part of the boot sequence before the
mountall command is run. SMF mounts the file systems as specified
under the /lib/svc/method directory beginning with fs
mount options A comma-separated list of options passed to the
mount command. A dash (-) indicates the use of
default mount options.
Working With Mounting Basics
5-8 Intermediate System Administration for the Solaris™ 10 Operating System
Copyright 2005 Sun Microsystems, Inc. All Rights Reserved. Sun Services, Revision A.1
Introducing the /etc/mnttab File
The /etc/mnttab file is an mntfs file system that provides read-only
information directly from the kernel about mounted file systems on the
local host.
Each time a file system is mounted, the mount command adds an entry to
this file. Whenever a file system is unmounted, its entry is removed from
the /etc/mnttab file.
The /var/run file system is a tmpfs mounted file system in the Solaris
OS. It is the repository for temporary operating system files that are not
needed across system reboots in this Solaris OS release. It is mounted as a
pseudo file system rather than a disk-based file system.
The /var/run directory requires no administration. For security reasons,
it is owned by the root user.
The /tmp directory continues to be a tmpfs mounted file system in the
Solaris OS. It is the repository for temporary user and application files
that are not needed across system reboots. It is a pseudo file system rather
than a disk-based file system.
Device Name The name of the device that is mounted at the mount
point. This block device is where the file system is
physically located.
Mount Point The mount point or directory name where the file
system is to be attached within the / (root) file system
(for example, /usr, /opt).
Mount Options The list of mount options in effect for the file system.
dev=
number
The major and minor device number of the mounted
file system.
Date and Time
Mounted
The date and time that the file system was mounted to
the directory hierarchy.
Working With Mounting Basics
Performing Mounts and Unmounts 5-9
Copyright 2005 Sun Microsystems, Inc. All Rights Reserved. Sun Services, Revision A.1
The following examples show two ways to display currently mounted file
systems.
# more /etc/mnttab
/dev/dsk/c0t0d0s0 / ufs
rw,intr,largefiles,logging,xattr,onerror=panic,dev=2200008 1098604644
/devices /devices devfs dev=4a80000 1098604620
ctfs /system/contract ctfs dev=4ac0001 1098604620
proc /proc proc dev=4b00000 1098604620
mnttab /etc/mnttab mntfs dev=4b40001 1098604620
swap /etc/svc/volatile tmpfs xattr,dev=4b80001 1098604620
objfs /system/object objfs dev=4bc0001 1098604620
/dev/dsk/c0t0d0s6 /usr ufs
rw,intr,largefiles,logging,xattr,onerror=panic,dev=220000e 1098604645
fd /dev/fd fd rw,dev=4d40001 1098604645
/dev/dsk/c0t0d0s3 /var ufs
rw,intr,largefiles,logging,xattr,onerror=panic,dev=220000b 1098604647
swap /var/run tmpfs xattr,dev=4b80002 1098604647
swap /tmp tmpfs xattr,dev=4b80003 1098604647
/dev/dsk/c0t0d0s7 /export/home ufs
rw,intr,largefiles,logging,xattr,onerror=panic,dev=220000f 1098604661
-hosts /net autofs nosuid,indirect,ignore,nobrowse,dev=4dc0001
1098604678
auto_home /home autofs indirect,ignore,nobrowse,dev=4dc0002
1098604678
sys-01:vold(pid491) /vol nfs ignore,noquota,dev=4e00001
1098604701
# mount
/ on /dev/dsk/c0t0d0s0
read/write/setuid/devices/intr/largefiles/logging/xattr/onerror=panic/dev=220000
8 on Sun Oct 24 08:57:24 2004
/devices on /devices read/write/setuid/devices/dev=4a80000 on Sun Oct 24
08:57:00 2004
/system/contract on ctfs read/write/setuid/devices/dev=4ac0001 on Sun Oct 24
08:57:00 2004
/proc on proc read/write/setuid/devices/dev=4b00000 on Sun Oct 24 08:57:00 2004
/etc/mnttab on mnttab read/write/setuid/devices/dev=4b40001 on Sun Oct 24
08:57:00 2004
/etc/svc/volatile on swap read/write/setuid/devices/xattr/dev=4b80001 on Sun Oct
24 08:57:00 2004
/system/object on objfs read/write/setuid/devices/dev=4bc0001 on Sun Oct 24
08:57:00 2004
/usr on /dev/dsk/c0t0d0s6
read/write/setuid/devices/intr/largefiles/logging/xattr/onerror=panic/dev=220000
e on Sun Oct 24 08:57:25 2004
/dev/fd on fd read/write/setuid/devices/dev=4d40001 on Sun Oct 24 08:57:25 2004
/var on /dev/dsk/c0t0d0s3
read/write/setuid/devices/intr/largefiles/logging/xattr/onerror=panic/dev=220000
b on Sun Oct 24 08:57:27 2004
Working With Mounting Basics
5-10 Intermediate System Administration for the Solaris™ 10 Operating System
Copyright 2005 Sun Microsystems, Inc. All Rights Reserved. Sun Services, Revision A.1
/var/run on swap read/write/setuid/devices/xattr/dev=4b80002 on Sun Oct 24
08:57:27 2004
/tmp on swap read/write/setuid/devices/xattr/dev=4b80003 on Sun Oct 24 08:57:27
2004
/export/home on /dev/dsk/c0t0d0s7
read/write/setuid/devices/intr/largefiles/logging/xattr/onerror=panic/dev=220000
f on Sun Oct 24 08:57:41 2004
Performing Mounts
Performing Mounts and Unmounts 5-11
Copyright 2005 Sun Microsystems, Inc. All Rights Reserved. Sun Services, Revision A.1
Performing Mounts
You can mount file systems manually by running the mount command, or
the system can automatically mount file systems at boot time after
consulting the /etc/vfstab file.
Mounting a Local File System Manually
The mount command not only lists which file systems are currently
mounted, it also provides you with a method for mounting file systems.
Default Behavior of the mount Command
To mount a local file system manually, you need to know the name of the
device where the file system resides and its mount point path name.
Perform the command:
# mount /dev/dsk/c0t0d0s7 /export/home
In this example, the default action mounts the file system with the
following options: read/write, setuid, intr, logging, largefiles,
xattr, and onerror.
The following list explains the default options for the mount command.
read/write Indicates whether reads and writes are allowed on
the file system.
setuid Permits the execution of setuid programs in the
file system.
intr/nointr Allows and forbids keyboard interrupts to kill a
process that is waiting for an operation on a locked
file system.
logging Indicates that logging is enabled for the ufs file
system. This is the default for the Solaris 10 OS.
largefiles Allows for the creation of files larger than 2 Gbytes.
A file system mounted with this option can contain
files larger than 2 Gbytes.
xattr Supports extended attributes not found in
standard UNIX filesystems.
Performing Mounts
5-12 Intermediate System Administration for the Solaris™ 10 Operating System
Copyright 2005 Sun Microsystems, Inc. All Rights Reserved. Sun Services, Revision A.1
Note – Due to file system overhead, the largest file size that can be created
is approximately 1 Tbyte. The data capacity of a 1 Tbyte file system is
approximately 1 Tbyte minus 0.5% overhead and the recommended 1%
free space.
The /etc/vfstab file provides you with another important feature.
Because the /etc/vfstab file contains the mapping between the mount
point and the actual device name, the root user can manually mount a
file system specifying only the mount point on the command line.
# mount /export/home
Using the mount Command Options
When you are using mount options on the command line, remember that
the options are preceded by the -o flag. When you are using multiple
options, enter them as a comma-separated list following the -o flag.
mount -o
option,option, device_name mount_point
Note – Mount options are described in detail in the man page for the
mount_ufs command.
onerror=
action
Specifies the action that the ufs file system should
take to recover from an internal inconsistency on a
file system. An action can be specified as:
panic — Causes a forced system shutdown. This is
the default.
lock — Applies a file system lock to the file
system.
umount — Forcibly unmounts the file system.
Performing Mounts
Performing Mounts and Unmounts 5-13
Copyright 2005 Sun Microsystems, Inc. All Rights Reserved. Sun Services, Revision A.1
Some options used to mount local file systems include: ro, nosetuid,
noatime, nolargefiles, and nologging.
● ro – Mounts the file system as read-only.
The following is an example using this option on the command line:
# mount -o ro /dev/dsk/c0t0d0s7 /export/home
● nosuid – Prohibits the execution of setuid programs in the file
system. This does not restrict the creation of setuid programs.
The following example shows the use of multiple options on the
command line:
# mount -o ro,nosuid /dev/dsk/c0t0d0s7 /export/home
● noatime – Suppresses the time-last-accessed modification on inodes,
which reduces disk activity on a file system where access times are
not important. Specifying this option generally improves file access
times and boosts overall performance, for example:
# mount -o noatime /dev/dsk/c0t0d0s7 /export/home
● nolargefiles – Prevents a file system that contains one or more
“large files” from being mounted, for example:
# mount -o nolargefiles /dev/dsk/c0t0d0s7 /export/home
Use of the nolargefiles option fails if the file system to be
mounted contains a large file or did contain a large file at one time.
If the file system currently contains a large file and the root user
needs to mount it with this option, then the large file must be located
and moved or removed from the file system. Then you must execute
the fsck command manually to update the superblock information.
The mount also fails if the file system at one time contained a large
file, even though it was moved or removed. You must execute the
fsck command to clear the old information and allow the file
system to be mounted.
Performing Mounts
5-14 Intermediate System Administration for the Solaris™ 10 Operating System
Copyright 2005 Sun Microsystems, Inc. All Rights Reserved. Sun Services, Revision A.1
Mounting All File Systems Manually
The /etc/vfstab file is read by the /usr/sbin/mountall command
during the system boot sequence and mounts all file systems that have a
yes in the mount at boot field.
The root user can use the mountall command to mount manually every
file system in the /etc/vfstab file that has a yes in the mount at boot
field, for example:
# mountall
To mount only the local file systems listed in the /etc/vfstab file,
execute:
# mountall -l
During the boot sequence, the fsck utility checks each local file system in
the /etc/vfstab file that has a device to fsck entry and an fsck pass
number greater than 0. The utility determines if the file system is in a
usable state to be safely mounted.
If the fsck utility determines that the file system is in an unusable state
(for example, corrupted), the fsck utility repairs it before the mount is
attempted. The system attempts to mount any local file systems that have
a - (dash) or 0 (zero) entry in the fsck pass field without checking the file
system itself.
Performing Mounts
Performing Mounts and Unmounts 5-15
Copyright 2005 Sun Microsystems, Inc. All Rights Reserved. Sun Services, Revision A.1
Mounting a New File System
To add a new disk to the system, prepare the disk to hold a file system,
and mount the file system, perform these general steps:
1. Set up the disk hardware, which might include setting address
switches and connecting cables.
2. Perform a reconfiguration boot or run the devfsadm utility to add
support for the new disk.
3. Use the format utility to partition the disk into one or more slices.
4. Create a new file system on one slice by using the newfs command.
5. Create a mount point for the file system by using the mkdir
command to create a new directory in the / (root) file system.
# mkdir /data
6. Mount the new file system manually by using the mount command.
# mount /dev/dsk/c1t3d0s7 /data
7. Use the mount command to determine if the file system is mounted.
# mount
(Some output is omitted.)
/data on /dev/dsk/c1t3d0s7
read/write/setuid/devices/intr/largefiles/logging/xattr/onerror=panic/dev
=800027 on Sun Oct 24 11:55:34 2004
8. Edit the /etc/vfstab file to add a line entry for the new file system.
# vi /etc/vfstab
fd - /dev/fd fd - no -
/proc - /proc proc - no -
/dev/dsk/c0t0d0s1 - - swap - no -
/dev/dsk/c0t0d0s0 /dev/rdsk/c0t0d0s0 / ufs 1 no -
/dev/dsk/c0t0d0s6 /dev/rdsk/c0t0d0s6 /usr ufs 1 no -
/dev/dsk/c0t0d0s3 /dev/rdsk/c0t0d0s3 /var ufs 1 no -
/dev/dsk/c0t0d0s7 /dev/rdsk/c0t0d0s7 /export/home ufs 2 yes -
/devices - /devices devfs - no -
ctfs - /system/contract ctfs - no -
objfs - /system/object objfs - no -
swap - /tmp tmpfs - yes -
/dev/dsk/c1t3d0s7 /dev/rdsk/c1t3d0s7 /data ufs 2 yes -
#
The file system automatically mounts whenever the system boots.
Performing Mounts
5-16 Intermediate System Administration for the Solaris™ 10 Operating System
Copyright 2005 Sun Microsystems, Inc. All Rights Reserved. Sun Services, Revision A.1
Mounting Different Types of File Systems
Different file system types have unique properties that affect how the
mount command functions.
By default, the mount command assumes it is mounting a ufs-type file
system. However, when you are mounting a different type of file system,
you might have to specify its type on the command line.
You use the -F option with the mount command to specify the type of file
system mounted. The file system type must be determinable from the
/etc/vfstab, /etc/default/fs,or/etc/dfs/fstypes files.
Determining a File System’s Type
Because the mount commands need the file system type to function
properly, the file system type must be explicitly specified or determined
by searching the following files:
● The /etc/vfstab file for the FS type field
● The /etc/default/fs file for a local file system type
● The /etc/dfs/fstypes file for a remote file system type
If the file system’s type has not been explicitly specified on the command
line using the mount -F
FStype
option, the mount command examines
the /etc/vfstab file to determine the file system’s type. The mount
command makes this determination by using the file system’s block
device name, raw device name, or mount point directory name.
If the mount command cannot determine the file system’s type by
searching the /etc/vfstab file, the mount command uses the default file
system type specified in either the /etc/default/fs file or the
/etc/dfs/fstypes file, depending on whether the file system is local or
remote.
The default local file system type is specified in the /etc/default/fs file
by the line entry LOCAL=
fstype
.
LOCAL=ufs
Performing Mounts
Performing Mounts and Unmounts 5-17
Copyright 2005 Sun Microsystems, Inc. All Rights Reserved. Sun Services, Revision A.1
The first line entry in the /etc/dfs/fstypes file determines the default
remote file system type.
nfs NFS Utilities
autofs AUTOFS Utilities
cachefs CACHEFS Utilities
Using the fstyp Command
You can also use the fstyp command with the raw device name of the
disk slice to determine a file system’s type.
# fstyp /dev/rdsk/c0t0d0s7
ufs
Specifying an hsfs File System Type
To mount a file system that resides on a CD-ROM when the Volume
Management (vold) services (vold) are stopped, as the root user,
perform the command:
# mount -F hsfs -o ro /dev/dsk/c0t6d0s0 /cdrom
In this example, the file system type is hsfs, the file system resides on
disk slice /dev/dsk/c0t6d0s0, and the mount point /cdrom is a
preexisting directory in the Solaris OS.
Specifying a pcfs File System Type
To mount a file system that resides on a diskette when the Volume
Management (vold) services are stopped, perform the commands:
# mkdir /pcfs
# mount -F pcfs /dev/diskette /pcfs
In this example, the file system type is pcfs. This file system resides on
the device /dev/diskette, and the mount point is /pcfs.
Performing Unmounts
5-18 Intermediate System Administration for the Solaris™ 10 Operating System
Copyright 2005 Sun Microsystems, Inc. All Rights Reserved. Sun Services, Revision A.1
Performing Unmounts
A file system is commonly unmounted if it needs to be checked and
repaired by the fsck command, or if it needs to be backed up completely.
Unmounting a File System
Some file system administration tasks cannot be performed on mounted
file systems.
To unmount a file system to prepare it for system maintenance, use the
umount command.
Unmounting a file system by using the umount command removes it from
the file system mount point and deletes its entry from the /etc/mnttab
file.
Note – Notify users before unmounting a file system that they are
currently accessing.
To unmount a file system manually by using the directory mount point,
perform the command:
# umount /export/home
To unmount a file system manually by using the logical disk device name,
perform the command:
# umount /dev/dsk/c0t0d0s7
Performing Unmounts
Performing Mounts and Unmounts 5-19
Copyright 2005 Sun Microsystems, Inc. All Rights Reserved. Sun Services, Revision A.1
Unmounting All File Systems
The /etc/mnttab file is read by the /usr/sbin/umountall command
during the system shutdown sequence or when umountall is invoked
from the command line. The umountall unmounts all file systems
specified in the vfstab file except / (root), /usr, /proc, /dev/fd, /var,
/var/run, and /tmp.
Run the umountall command as the root user when you want to
unmount manually all the file systems listed in the /etc/mnttab file, for
example:
# umountall
To unmount only the local file systems listed in the /etc/mnttab file,
perform the command:
# umountall -l
To verify that a file system or a number of file systems have been
unmounted, invoke the mount command and check the output.
Unmounting a Busy File System
Any file system that is busy is not available for unmounting. Both the
umount and umountall commands display the error message:
umount:
file_system_name
busy
A file system is considered to be busy if one of the following conditions
exists:
● A program is accessing a file or directory in the file system
● A user is accessing a directory or file in the file system
● A program has a file open in that file system
● The file is being shared
There are two methods to make a file system available for unmounting if
it is busy:
● fuser command – Lists all of the processes that are accessing the file
system and kills them if necessary
● umount -f command – Forces the unmount of a file system
Performing Unmounts
5-20 Intermediate System Administration for the Solaris™ 10 Operating System
Copyright 2005 Sun Microsystems, Inc. All Rights Reserved. Sun Services, Revision A.1
Note – The fuser command displays the process IDs of all processes
currently using the specified file system. Each process ID is followed by a
letter code. These letter codes are described in the man page for this
command.
Using the fuser Command
To stop all processes that are currently accessing a file system, follow
these steps:
1. As the root user, list all of the processes that are accessing the file
system. Use the following command to identify which processes
need to be terminated.
# fuser -cu
mount_point
This command displays the name of the file system and the user
login name for each process currently active in the file system.
2. Kill all processes accessing the file system.
# fuser -ck
mount_point
A SIGKILL message is sent to each process that is using the file
system.
3. Verify that there are no processes accessing the file system.
# fuser -c
mount_point
4. Unmount the file system.
# umount
mount_point
Using the umount -f Command
As the root user, you can unmount a file system, even if it is busy, by
using the -f (force) option with the umount command. The following is
the format for this command:
umount -f
mount_point
The file system is unmounted even if it contains open files. A forced
unmount can result in loss of data and in zombie processes that are left
running on the system. However, it is particularly useful for unmounting
a shared file system if the remote file server is nonfunctional.
Performing Unmounts
Performing Mounts and Unmounts 5-21
Copyright 2005 Sun Microsystems, Inc. All Rights Reserved. Sun Services, Revision A.1
Repairing Important Files if Boot Fails
The following procedure describes how to boot from the Solaris OS
software CD-ROM or DVD to edit a misconfigured /etc/vfstab file.
1. Insert the Solaris 10 OS Software 1 of 4 CD-ROM into the CD-ROM
drive.
2. Execute a single-user boot from the CD-ROM or DVD.
ok boot cdrom -s
Boot device: /pci@1f,0/pci@1,1/ide@3/cdrom@2,0:f File and args -s
SunOS Release 5.10 Generic 64 bit
Copyright 1983-2004 by Sun Microsystems, Inc. All rights reserved.
Booting to milestone "milestone/single-user:default"
Configuring /dev and /devices
Use is subject to license terms
Using RPC Bootparams for network configuration information.
Skipping interface hme0
-
INIT: SINGLE USER MODE
#
Note – Performing a single-user boot operation from this software
CD-ROM creates an in-memory copy of the /root file system, which
supports your ability to perform administrative tasks.
3. Use the fsck command on the faulty / (root) partition to check and
repair any potential problems in the file system and make the device
writable.
# fsck /dev/rdsk/c0t0d0s0
4. If the fsck command is successful, mount the / (root) file system on
the /a directory to gain access to the file system on disk.
# mount /dev/dsk/c0t0d0s0 /a
5. Set and export the TERM variable, which enables the vi editor to
work properly.
# TERM=sun
# export TERM
6. Edit the /etc/vfstab file, and correct any problems. Then exit the
file.
# vi /a/etc/vfstab
:wq!
Performing Unmounts
5-22 Intermediate System Administration for the Solaris™ 10 Operating System
Copyright 2005 Sun Microsystems, Inc. All Rights Reserved. Sun Services, Revision A.1
7. Unmount the file system.
# cd /
# umount /a
8. Reboot the system.
# init 6
Accessing Mounted Diskettes, CD-ROMs or DVDs
Performing Mounts and Unmounts 5-23
Copyright 2005 Sun Microsystems, Inc. All Rights Reserved. Sun Services, Revision A.1
Accessing Mounted Diskettes, CD-ROMs or DVDs
To provide access to file systems on diskettes and CD-ROMs, the Solaris
OS provides users a standard interface referred to as Volume Management
(vold).
Note – The Solaris 10 OS includes support for additional removable
media such as DVDs, Jaz drives, and Zip drives. For more information on
using these devices, see the resources available on the Solaris 10
Documentation CD or visit http:/docs.sun.com to access online
documentation.
Volume Management vold provides two major benefits:
● It automatically mounts removable media for both the root user and
non-root users.
● It can give other systems on the network automatic access to any
removable media currently inserted in the local system.
The Volume Management (vold) service is controlled by the
/usr/sbin/vold daemon. On a default install, this service is always
running on the system so that it can automatically manage diskettes and
CD-ROMs for regular users.
Volume Management (vold) features automatic detection of CD-ROMs.
However, it does not detect the presence of a diskette that has been
inserted in the drive until the volcheck command is run. This command
instructs the vold daemon to check the diskette drive for any inserted
media. Volume Management (vold) can mount ufs, pcfs, hsfs, and udfs
file systems.
Accessing Mounted Diskettes, CD-ROMs or DVDs
5-24 Intermediate System Administration for the Solaris™ 10 Operating System
Copyright 2005 Sun Microsystems, Inc. All Rights Reserved. Sun Services, Revision A.1
Using Volume Management (vold)
To make working with diskettes and CD-ROMs simple for your users,
each device is easy to mount and mounts at an easy-to-remember
location.
If the vold daemon detects that the mounted device contains a file
system, then the device is mounted at the directory location.
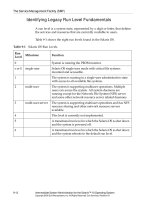
Table 5-1 lists the directory locations of mounted devices that contain file
systems.
If the vold daemon detects that the mounted device does not contain a
file system, the device is accessible through a path.
Table 5-2 lists the paths for mounted devices that do not contain file
systems.
Table 5-1 Directory Locations
Media Device Access File Systems On
First diskette drive /floppy/floppy0
First CD-ROM or DVD
drive
/cdrom/cdrom0
First Jaz drive /rmdisk/jaz0
First Zip drive /rmdrive/zip0
First PCMCIA card /pcmem0
Table 5-2 Paths for Accessing Devices
Media Device Access Raw Device On
First diskette drive /vol/dev/aliases/floppy0
First CD-ROM or DVD
drive
/vol/dev/aliases/cdrom0
First Jaz drive /vol/dev/aliases/jaz0
First Zip drive /vol/dev/aliases/zip0
First PCMCIA card /vol/dev/aliases/pcmem0