Intermediate System Administration for the Solaris 10 Operating Student Guide phần 6 pps
Bạn đang xem bản rút gọn của tài liệu. Xem và tải ngay bản đầy đủ của tài liệu tại đây (459.13 KB, 73 trang )
The Service Management Facility (SMF)
9-12 Intermediate System Administration for the Solaris™ 10 Operating System
Copyright 2005 Sun Microsystems, Inc. All Rights Reserved. Sun Services, Revision A.1
Identifying Legacy Run Level Fundamentals
A run level is a system state, represented by a digit or letter, that defines
the services and resources that are currently available to users.
Table 9-1 shows the eight run levels found in the Solaris OS.
Table 9-1 Solaris OS Run Levels
Run
Level
Milestone Function
0 System is running the PROM monitor.
s or S single-user Solaris OS single-user mode with critical file systems
mounted and accessible.
1 The system is running in a single-user administrative state
with access to all available file systems.
2 multi-user The system is supporting multiuser operations. Multiple
users can access the system. All system daemons are
running except for the Network File System (NFS) server
and some other network resource server related daemons.
3 multi-user-server The system is supporting multiuser operations and has NFS
resource sharing and other network resource servers
available.
4 This level is currently not implemented.
5 A transitional run level in which the Solaris OS is shut down
and the system is powered off.
6 A transitional run level in which the Solaris OS is shut down
and the system reboots to the default run level.
The Service Management Facility (SMF)
Performing Boot and Shutdown Procedures 9-13
Copyright 2005 Sun Microsystems, Inc. All Rights Reserved. Sun Services, Revision A.1
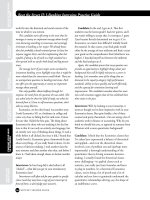
Determining a System’s Current Run Level
To determine the current run level of a system, use the who -r command.
Figure 9-4 shows output from the command.
Figure 9-4 The System’s Current Run Level
Changing Run Levels
Run levels are sometimes referred to as init states because the init
command can be used to transition between run levels. The init
command passes the required run level to svc.startd.
You can use the init command to manually initiate run-level transitions.
You can also change run levels with the shutdown, halt, reboot, and
poweroff commands. In addition, the svcadm command, can be used to
change the run level that a system will boot to, by selecting the milestone
to achieve.
Note – Prior to Solaris 10 OS, the init daemon was responsible for
starting and stopping system services. Starting with Solaris 10 OS, this
role is now the responsibility of the svc.startd daemon. The init
daemon initializes stream modules, configures socket transport providers,
sets up the system for a correct response to a power fail shutdown, and
starts the svc.startd daemon.
Identifying the Phases of the Boot Process
9-14 Intermediate System Administration for the Solaris™ 10 Operating System
Copyright 2005 Sun Microsystems, Inc. All Rights Reserved. Sun Services, Revision A.1
Identifying the Phases of the Boot Process
In general, when a system is powered on, the PROM monitor runs a POST
procedure that checks the hardware and memory on the system. If no
errors are found, and the auto-boot? parameter is set to true, the
system begins the boot process.
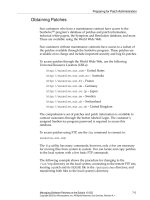
The entire boot process is described by five distinct phases:
● The boot PROM phase
● The boot programs phase
● The kernel initialization phase
● The init phase
● The svc.startd phase
Figure 9-5 shows the phases of the boot process.
Figure 9-5 Phases of the Boot Process
init
Identifying the Phases of the Boot Process
Performing Boot and Shutdown Procedures 9-15
Copyright 2005 Sun Microsystems, Inc. All Rights Reserved. Sun Services, Revision A.1
Boot PROM Phase
The boot PROM performs the following steps during the first part of the
boot sequence:
● The PROM runs the POST.
The boot PROM firmware runs the POST to verify the system’s
hardware and memory. It then begins its boot sequence upon
successful completion of the self-test diagnostics.
● The PROM displays the system identification banner.
The model type, processor type and speed, keyboard status, PROM
revision number, amount of installed random access memory
(RAM), NVRAM serial number, Ethernet address, and host ID are
displayed.
● The boot PROM determines the boot device by reading the PROM
parameter boot-device.
● The boot PROM reads the disk label located at Sector 0 on the
default boot device.
● The boot PROM finds the boot program from the default boot device
programmed into the PROM.
The boot PROM program reads a system’s primary boot program
called bootblk (located at Sectors 1 through 15) that contains a
UNIX file system (UFS) file system reader. (The bootblk program is
placed on the disk by the installboot command during system
installation.)
The boot command loads the bootblk program from its location on
the boot device into memory.
Identifying the Phases of the Boot Process
9-16 Intermediate System Administration for the Solaris™ 10 Operating System
Copyright 2005 Sun Microsystems, Inc. All Rights Reserved. Sun Services, Revision A.1
Boot Programs Phase
The following describes the boot programs phase:
● The bootblk program loads the secondary boot program, ufsboot,
from the boot device into memory.
The path to ufsboot is recorded in the bootblk program, which is
installed by the installboot command.
● The ufsboot program locates and loads the appropriate two-part
kernel.
The core of the kernel is two pieces of static code called genunix
and unix, where genunix is the platform-independent generic
kernel file and unix is the platform-specific kernel file.
When ufsboot loads these two files into memory, they are combined
to form the running kernel.
On a system running in 64-bit mode, the two-part kernel is located
in the directory:
/platform/‘uname -m‘/kernel/sparcv9
Note – Solaris 10 for SPARC only runs on 64-bit systems.
Note – To determine the platform name (for example, the system
hardware class), type the uname -m command. For example, when you
type this command on an Ultra 10 workstation, the console displays
sun4u.
The kernel Initialization Phase
The following describes the kernel initialization phase:
● The kernel reads its configuration file, called /etc/system.
● The kernel initializes itself and begins loading modules.
The kernel uses the ufsboot command to load the files. When it has
loaded enough modules to mount the / (root) file system, it unmaps
the ufsboot program and continues.
● The kernel starts the /etc/init daemon.
Identifying the Phases of the Boot Process
Performing Boot and Shutdown Procedures 9-17
Copyright 2005 Sun Microsystems, Inc. All Rights Reserved. Sun Services, Revision A.1
Note – The /etc/init file is a symbolic link to /sbin/init.
The SunOS™ kernel is a small static core, consisting of genunix and unix
and many dynamically loadable kernel modules.
Modules can consist of device drivers, binary files to support file systems,
and streams, as well as other module types used for specific tasks within
the system.
The modules that make up the kernel typically reside in the directories
/kernel and /usr/kernel. Platform-dependent modules reside in the
/platform/‘uname -m‘/kernel and /platform/‘uname -i‘/kernel
directories.
The following describes the types of module subdirectories contained in
the /kernel, /usr/kernel, /platform/‘uname -m‘/kernel,or
/platform/‘uname -i‘/kernel directories:
● drv/sparcv9 – Device drivers
● exec/sparcv9 – Executable file formats
● fs/sparcv9 – File system types, for example, ufs, nfs, and proc
● misc/sparcv9 – Miscellaneous modules, for example, usb
● sched/sparcv9 – Scheduling classes (process execution scheduling)
● strmod/sparcv9 – Streams modules (generalized connection
between users and device drivers)
● sys/sparcv9 – System calls (defined interfaces for applications to
use)
The /kernel/drv/sparcv9 directory contains all of the device drivers
that are used for system boot. The /usr/kernel/drv/sparcv9 directory
is used for all other device drivers.
Modules are loaded automatically as needed either at boot time or on
demand, if requested by an application. When a module is no longer in
use, it might be unloaded on the basis that the memory it uses is needed
for another task.
After the boot process is complete, device drivers are loaded when
devices, such as tape devices, are accessed. This process is called
autoconfiguration because some kernel driver modules are loaded
automatically when needed.
Identifying the Phases of the Boot Process
9-18 Intermediate System Administration for the Solaris™ 10 Operating System
Copyright 2005 Sun Microsystems, Inc. All Rights Reserved. Sun Services, Revision A.1
Upon initial or reconfiguration boot, the system does a self-test and
checks for all devices that are attached.
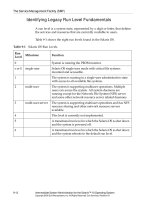
The advantage of this dynamic kernel arrangement is that the overall
size of the kernel is smaller, which makes more efficient use of memory
and allows for simpler modification and tuning. Figure 9-6 shows this
arrangement.
Figure 9-6 Dynamic kernel Arrangement
Note – The sparcv9 CPU is the type of CPU that supports 64-bit
processing.
The /etc/system File and Kernel Configuration
Caution – The Solaris OS builds the kernel based upon the size of the
system (memory, CPUs, and so on). In almost all cases, the performance of
the default kernel that is built is quite adequate to handle most day to day
activities on the system. Any modifications should be made with extreme
caution.
The /etc/system file is the control file for modifying which modules and
parameters are to be loaded by the kernel at boot time. By default, all lines
in this file are commented out.
fs
sched
Identifying the Phases of the Boot Process
Performing Boot and Shutdown Procedures 9-19
Copyright 2005 Sun Microsystems, Inc. All Rights Reserved. Sun Services, Revision A.1
Modifying the kernel’s behavior (or configuration) requires editing the
/etc/system file. Altering this file allows you to modify the kernel’s
treatment of loadable modules as well as to modify kernel parameters for
some performance tuning.
The ufsboot program contains a list of default loadable kernel modules
that are loaded at boot time. However, you can override this list by
modifying the /etc/system file to control which modules, as well as
which parameters, are loaded.
All changes to this file take effect after a reboot.
The /etc/system file can explicitly control:
● The search path for default kernel modules to be loaded at boot time
● The root file system type and device
● The modules that are excluded from loading automatically at boot
time
● The modules to be forcibly loaded at boot time, rather that at first
access
● The new values to override the default kernel parameter values
Note – Command lines must be 80 characters or less in length, and
comment lines must begin with an asterisk (*) and end with a newline
character.
Identifying the Phases of the Boot Process
9-20 Intermediate System Administration for the Solaris™ 10 Operating System
Copyright 2005 Sun Microsystems, Inc. All Rights Reserved. Sun Services, Revision A.1
The /etc/system file is divided into five distinct sections:
● moddir:
Sets the search path for default loadable kernel modules. You can list
together multiple directories to search, delimited either by blank
spaces or colons. If the module is not found in the first directory, the
second directory is searched, and so on.
● root device and root file system configuration:
Sets the root file system type to the listed value. The default is
rootfs:ufs.
Sets the root device. The default is the physical path name of the
device on which the boot program resides. The physical path name is
platform dependent and configuration dependent. The following is
an example path:
rootdev:/sbus@1,f8000000/esp@0,800000/sd@3,0:a
● exclude:
Does not allow the loadable kernel modules to be loaded during
kernel initialization, for example:
exclude: sys/shmsys
● forceload:
Forces the kernel modules to be loaded during kernel initialization,
for example:
forceload: drv/vx
The default action is to load a kernel module automatically when its
services are first accessed during runtime by a user or an application.
● set:
Changes kernel parameters to modify the operation of the system,
for example:
set maxusers=40
Identifying the Phases of the Boot Process
Performing Boot and Shutdown Procedures 9-21
Copyright 2005 Sun Microsystems, Inc. All Rights Reserved. Sun Services, Revision A.1
Editing the /etc/system File
Caution – Before you edit the /etc/system file, you should make a
backup copy. If you enter incorrect values in this file, the system might
not be able to boot.
The following example shows how to copy the original /etc/system file
to a backup file and then edit the /etc/system file.
# cp /etc/system /etc/system.orig
# vi /etc/system
If a boot process fails because of an unusable /etc/system file, issue the
interactive boot command: boot -a. When you are requested to enter
the name of the system file, type in the name of your backup system
file, or, alternatively, enter /dev/null for a null configuration file.
ok boot -a
Enter filename [kernel/sparcv9/unix]: <Return>
Enter default directory for modules [/platform ]: <Return>
Name of system file [etc/system]: etc/system.orig - or - /dev/null
root filesystem type [ufs]: <Return>
Enter physical name of root device [/ ]: <Return>
(further boot messages omitted)
Identifying the Phases of the Boot Process
9-22 Intermediate System Administration for the Solaris™ 10 Operating System
Copyright 2005 Sun Microsystems, Inc. All Rights Reserved. Sun Services, Revision A.1
The init Phase
The next to the last phase of the boot process is the init phase. During
this phase, the init daemon starts the svc.startd daemon that is
responsible for starting and stopping services as requested. The
/sbin/init phase uses information stored in the /etc/inittab file.
The /etc/inittab File
Each line in the /etc/inittab file contains the following four fields:
id:rstate:action:process
Table 9-2 describes the fields in an inittab entry.
The following example shows the default inittab file installed with the
Solaris 10 OS. The lines of output are described after the example:
ap::sysinit:/sbin/autopush -f /etc/iu.ap
sp::sysinit:/sbin/soconfig -f /etc/sock2path
smf::sysinit:/lib/svc/bin/svc.startd>/dev/msglog 2<>/dev/msglog
</dev/console
p3:s1234:powerfail:/usr/sbin/shutdown -y -i5 -g0 >/dev/msglog
2<>/dev/msglog
Note – Message output from rc scripts is directed to the /dev/msglog
file. Prior to the Solaris 8 OS, all of these messages were written to the
/dev/console file. The /dev/msglog file is used for message output
collection from system startup or background applications.
Table 9-2 Fields in the inittab File
Field Description
id Two character identifier for the entry
rstate Run levels to which this entry applies
action Defines how the process listed should be run
For a description of the action keywords see
man inittab
process Defines the command to execute
Identifying the Phases of the Boot Process
Performing Boot and Shutdown Procedures 9-23
Copyright 2005 Sun Microsystems, Inc. All Rights Reserved. Sun Services, Revision A.1
Table 9-3 shows an explanation for each action keyword.
Information about additional action keywords is available in the
inittab man page.The following describes each of the lines in the
/etc/inittab file in order:
1. Initializes the STREAMS modules used for communication services.
2. Configures the socket transport providers for network connections.
3. Initializes the svc.startd daemon for SMF.
4. Describes a power fail shutdown.
Table 9-3 The action Field Keywords
Keyword Explanation
sysinit Executes the process before the init process tries to
access the console, for example, the console login
prompt. The init process waits for completion of the
process before it continues to read the inittab file.
powerfail Executes the process only if the init process receives a
power fail signal.
Identifying the Phases of the Boot Process
9-24 Intermediate System Administration for the Solaris™ 10 Operating System
Copyright 2005 Sun Microsystems, Inc. All Rights Reserved. Sun Services, Revision A.1
The svc.startd Daemon
The svc.startd daemon is the master process starter and restarter for
SMF. This daemon takes on the role of starting the appropriate processes
for the achieved run level. This was previously the responsibility of the
init process.
The svc.startd daemon uses information in the repository to
determine the required milestone and then starts to process the manifests
located in the /var/svc/manifest directory.
The /var/svc/manifest/milestone directory contains Extensible
Markup Language (XML) files which describe the dependencies for this
milestone. Recall that a milestone is made up of multiple SMF services.
Files in the /var/svc/manifest/milestone directory:
● single-user.xml
● multi-user.xml
● multi-user-server.xml
● network.xml
● name-services.xml
● sysconfig.xml
These.xml files might refer to other.xml files in subdirectories below
/var/svc/manifest that contain commands to run, such as:
● /sbin/rc2
● /lib/svc/method/fs-local
Identifying the Phases of the Boot Process
Performing Boot and Shutdown Procedures 9-25
Copyright 2005 Sun Microsystems, Inc. All Rights Reserved. Sun Services, Revision A.1
Controlling Legacy Boot Processes
The Solaris OS provides a series of Legacy scripts to stop and start
processes typically associated with run levels or milestones.
The /sbin Directory
Each run level has an associated script located in the /sbin directory, with
some scripts hard-linked to each other.
The scripts are executed by the svc.startd daemon to set up variables,
test conditions, and make calls to other scripts that start and stop
processes for that run level.
The rc0, rc5, and rc6 scripts are hard-linked to each other. Notice that
each script is assigned the same inode number. The following is an
example of the hard links:
# ls -li /sbin/rc*
2317 -rwxr r 3 root sys 1983 Dec 22 18:06 rc0
2318 -rwxr r 1 root sys 2242 Dec 22 18:06 rc1
2319 -rwxr r 1 root sys 2536 Dec 22 18:06 rc2
2320 -rwxr r 1 root sys 2567 Dec 22 18:06 rc3
2317 -rwxr r 3 root sys 1983 Dec 22 18:06 rc5
2317 -rwxr r 3 root sys 1983 Dec 22 18:06 rc6
2321 -rwxr r 1 root sys 5125 Dec 22 18:06 rcS
The Solaris OS provides the same series of rc scripts in the /etc directory
for backward compatibility. These scripts are symbolic link files to the rc
scripts in the /sbin directory. The following example shows this
connection:
# ls -l /etc/rc?
ls -l rc?
lrwxrwxrwx 1 root root 11 Oct 12 17:15 rc0 -> /sbin/rc0
lrwxrwxrwx 1 root root 11 Oct 12 17:15 rc1 -> /sbin/rc1
lrwxrwxrwx 1 root root 11 Oct 12 17:15 rc2 -> /sbin/rc2
lrwxrwxrwx 1 root root 11 Oct 12 17:15 rc3 -> /sbin/rc3
lrwxrwxrwx 1 root root 11 Oct 12 17:15 rc5 -> /sbin/rc5
lrwxrwxrwx 1 root root 11 Oct 12 17:15 rc6 -> /sbin/rc6
lrwxrwxrwx 1 root root 11 Oct 12 17:15 rcS -> /sbin/rcS
rcm:
total 2
drwxr-xr-x 2 root sys 512 Oct 12 17:18 scripts
Identifying the Phases of the Boot Process
9-26 Intermediate System Administration for the Solaris™ 10 Operating System
Copyright 2005 Sun Microsystems, Inc. All Rights Reserved. Sun Services, Revision A.1
Table 9-4 summarizes the tasks performed by each of the /sbin scripts.
Table 9-4 Run Control Scripts and Their Functions
Script Function
/sbin/rc0 Runs the /etc/rc0.d/K* scripts and the /etc/rc0.d/S* scripts to stop
system services and daemons.
Start scripts should only perform fast system cleanup functions.
/sbin/rc1 Runs the /etc/rc1.d/S* scripts to perform the following tasks:
• Stops system services and daemons
• Terminates certain running application processes
• Unmounts all remote file systems
/sbin/rc2 Runs the/etc/rc2.d/K* scripts and the /etc/rc2.d/S* scripts to start
certain application daemons.
/sbin/rc3 Runs the /etc/rc3.d/K* scripts and the /etc/rc3.d/S* scripts to start
certain application daemons.
Note: The K scripts are not normally present in the /etc/rc3.d
directory, although if they were present, they would be run.
/sbin/rc5
/sbin/rc6
Runs the /etc/rc0.d/K* scripts and then the /etc/rc0.d/S* scripts to
perform the following tasks:
• Stops system services and daemons
• Starts scripts that should only perform fast system cleanup functions
/sbin/rcS Runs the /etc/rcS.d scripts to bring up the system to run level S, and
establish a minimal network.
Identifying the Phases of the Boot Process
Performing Boot and Shutdown Procedures 9-27
Copyright 2005 Sun Microsystems, Inc. All Rights Reserved. Sun Services, Revision A.1
The /etc/rc
#
.d Directories
The /etc/rc
#
.d directories contain scripts that start and stop system
processes for that run level.
Figure 9-7 shows an example of /etc/rc
#
.d directories.
Figure 9-7
The /etc/rc
#
.d directories, for example /etc/rc2.d, contain scripts to
start and stop processes for run level 2. The following output shows a
partial list of these scripts.
# ls -l /etc/rc2.d
total 130
-rwxr r 6 root sys 324 Dec 10 11:26 K03samba
-rwxr r 5 root sys 824 May 27 2004 K05appserv
(some output omitted)
-rwxr r 5 root sys 2329 Dec 11 08:52 S94ncalogd
-rwxr r 2 root sys 733 Dec 11 08:54 S98deallocate
-rwxr r 5 root sys 1023 Dec 11 08:53 S99audit
-rwxr r 5 root sys 2804 Dec 7 20:52 S99dtlogin
Identifying the Phases of the Boot Process
9-28 Intermediate System Administration for the Solaris™ 10 Operating System
Copyright 2005 Sun Microsystems, Inc. All Rights Reserved. Sun Services, Revision A.1
Start Run Control Scripts
The /etc/rc
#
.d start scripts are always run in the sort order shown by
the ls command. The files that begin with S are run to start a system
process. These scripts are called by the appropriate /sbin/
rc#
and this
script passes the argument “start” to them if their names do not end in
.sh. There are no arguments passed to .sh scripts. These files have names
in the form of:
S
##name-of-script
For example, the S99dtlogin script starts the graphical login process.
Stop Run Control Scripts
The /etc/rc
#
.d stop scripts (also referred to as the kill scripts) are
always run in the sort order shown by the ls command. The files that
begin with K are run to stop or kill a system process. These scripts are
called by the appropriate /sbin/rc
#
, and this script passes the argument
“stop” to them if their names do not end in .sh.
These files have names in the form of:
K
##name-of-script
For example, the K03samba script stops the Samba server.
Note – File names that begin with a lowercase k or s are ignored, and are
not executed. To disable a script, rename it with the appropriate lowercase
letter.
Identifying the Phases of the Boot Process
Performing Boot and Shutdown Procedures 9-29
Copyright 2005 Sun Microsystems, Inc. All Rights Reserved. Sun Services, Revision A.1
The /etc/init.d Directory
Run control scripts are located in the /etc/init.d directory.
The run control script /etc/init.d/samba is hard-linked to the
corresponding run control script /etc/rc3.d/S90samba, as shown by the
ls commands:
# cd /etc/init.d
# ls -i samba
4715 samba
# cd /etc/rc3.d
# ls -i S90samba
4715 samba
You can stop a process or start a process without changing the system’s
run level.
For example, to stop and restart the samba file and print sharing service,
run the following command with a start or stop argument:
# /etc/init.d/samba start
# /etc/init.d/samba stop
Identifying the Phases of the Boot Process
9-30 Intermediate System Administration for the Solaris™ 10 Operating System
Copyright 2005 Sun Microsystems, Inc. All Rights Reserved. Sun Services, Revision A.1
Stopping and Starting Services Using SMF
Commands
Listing Services With the svcs Command
The svcs command is used to monitor SMF services. It is useful for
examining the status of services, and for following the dependency
relationship between services.
# svcs
STATE STIME FMRI
legacy_run 13:45:11 lrc:/etc/rcS_d/S29wrsmcfg
legacy_run 13:45:37 lrc:/etc/rc2_d/S10lu
legacy_run 13:45:38 lrc:/etc/rc2_d/S20sysetup
legacy_run 13:45:38 lrc:/etc/rc2_d/S40llc2
legacy_run 13:45:38 lrc:/etc/rc2_d/S42ncakmod
legacy_run 13:45:39 lrc:/etc/rc2_d/S47pppd
(output omitted)
online 13:45:36 svc:/network/smtp:sendmail
online 13:45:38 svc:/network/ssh:default
online 13:45:38 svc:/system/fmd:default
online 13:45:38 svc:/application/print/server:default
online 13:45:39 svc:/application/print/rfc1179:default
online 13:45:41 svc:/application/print/ipp-listener:default
online 13:45:45 svc:/milestone/multi-user:default
online 13:45:53 svc:/milestone/multi-user-server:default
online 13:45:54 svc:/system/zones:default
online 8:46:25 svc:/system/filesystem/local:default
online 8:46:26 svc:/network/inetd:default
online 8:46:32 svc:/network/rpc/meta:tcp
online 8:46:32 svc:/system/mdmonitor:default
online 8:46:38 svc:/milestone/multi-user:default
online 13:14:35 svc:/network/telnet:default
maintenance 8:46:21 svc:/network/rpc/keyserv:default
The svcs command can also be used to examine the status of a specific
service instance. For example:
# svcs svc:/system/console-login:default
STATE STIME FMRI
online 14:38:27 svc:/system/console-login:default
#
Identifying the Phases of the Boot Process
Performing Boot and Shutdown Procedures 9-31
Copyright 2005 Sun Microsystems, Inc. All Rights Reserved. Sun Services, Revision A.1
It is also possible to examine the dependency relationships of services
using the svcs command by using the -d and the -D options. The -d
option shows what other services the named service is dependent on. The
-D option shows what other services depend on the named service.
The following example shows what the service dependencies are for the
filesystem/local:default service instance:
# svcs -d svc:/system/filesystem/local:default
STATE STIME FMRI
online 14:38:15 svc:/system/filesystem/minimal:default
online 14:38:26 svc:/milestone/single-user:default
#
The following example shows what services the multi-user:default
milestone depends on, or requires to run:
# svcs -d milestone/multi-user:default
STATE STIME FMRI
online 13:44:53 svc:/milestone/name-services:default
online 13:45:12 svc:/milestone/single-user:default
online 13:45:13 svc:/system/filesystem/local:default
online 13:45:15 svc:/network/rpc/bind:default
online 13:45:16 svc:/milestone/sysconfig:default
online 13:45:17 svc:/system/utmp:default
online 13:45:19 svc:/network/inetd:default
online 13:45:31 svc:/network/nfs/client:default
online 13:45:34 svc:/system/system-log:default
online 13:45:36 svc:/network/smtp:sendmail
#
Identifying the Phases of the Boot Process
9-32 Intermediate System Administration for the Solaris™ 10 Operating System
Copyright 2005 Sun Microsystems, Inc. All Rights Reserved. Sun Services, Revision A.1
The following example shows what other services depend on the
system/filesystem/local service:
# svcs -D svc:/system/filesystem/local
STATE STIME FMRI
disabled 13:44:50 svc:/network/inetd-upgrade:default
disabled 13:44:51 svc:/network/nfs/server:default
disabled 13:45:10 svc:/application/management/webmin:default
disabled 13:45:12 svc:/application/gdm2-login:default
online 13:45:14 svc:/system/sysidtool:net
online 13:45:14 svc:/system/cron:default
online 13:45:16 svc:/system/sysidtool:system
online 13:45:16 svc:/network/nfs/status:default
online 13:45:17 svc:/system/sac:default
online 13:45:19 svc:/network/inetd:default
online 13:45:21 svc:/application/font/fc-cache:default
online 13:45:34 svc:/system/filesystem/autofs:default
online 13:45:34 svc:/system/system-log:default
online 13:45:35 svc:/system/dumpadm:default
online 13:45:36 svc:/network/smtp:sendmail
online 13:45:38 svc:/network/ssh:default
online 13:45:38 svc:/application/print/server:default
online 13:45:45 svc:/milestone/multi-user:default
#
Identifying the Phases of the Boot Process
Performing Boot and Shutdown Procedures 9-33
Copyright 2005 Sun Microsystems, Inc. All Rights Reserved. Sun Services, Revision A.1
Changing Service States Using the svcadm Command
The svcadm command can be used to change the state of services
managed by SMF. For example, to verify the status of the cron service:
# pgrep -fl cron
180 /usr/sbin/cron
#
# svcs cron
STATE STIME FMRI
online 14:38:30 svc:/system/cron:default
# svcadm -v disable system/cron:default
svc:/system/cron:default disabled.
# svcs cron
STATE STIME FMRI
disabled 20:35:25 svc:/system/cron:default
# pgrep -fl cron
#
# svcadm -v enable system/cron:default
svc:/system/cron:default enabled.
# svcs cron
STATE STIME FMRI
online 20:35:59 svc:/system/cron:default
#
# pgrep -fl cron
180 /usr/sbin/cron
#
Disabling the cron service with the svcadm -v disable command
disables the service permanently until it is enabled from the command
line. You can disable the service temporarily until the next reboot by using
the -t option.
# svcadm -v disable -t system/cron:default
svc:/system/cron:default temporarily disabled.
Identifying the Phases of the Boot Process
9-34 Intermediate System Administration for the Solaris™ 10 Operating System
Copyright 2005 Sun Microsystems, Inc. All Rights Reserved. Sun Services, Revision A.1
Using svcs to Determine Why Services are Not
Running
The svcs command can also be used to troubleshoot why services are not
running.
# svcs -x cron
svc:/system/cron:default (clock daemon (cron))
State: disabled since Fri Feb 25 15:05:47 2005
Reason: Temporarily disabled by an administrator.
See: /> See: cron(1M)
See: crontab(1)
See: /var/svc/log/system-cron:default.log
Impact: This service is not running.
The cron service has been temporarily disabled by the administrator.
Further information about the service can be found in the
/var/svc/log/system-cron:default.log log file, and at
/>Identifying the Phases of the Boot Process
Performing Boot and Shutdown Procedures 9-35
Copyright 2005 Sun Microsystems, Inc. All Rights Reserved. Sun Services, Revision A.1
Manipulating Services That Are Not Managed by SMF
If the FMRI prefix for a service is lrc, then that service is not currently
managed by SMF. In order to start and stop the service without changing
run levels, the script associated with that service has to be run manually.
The script to run a legacy service, non-SMF managed, is in /etc/init.d.
For example, to stop and start the vold volume manager daemon:
# svcs | grep vol
legacy_run 14:38:57 lrc:/etc/rc3_d/S81volmgt
# pgrep -lf vold
480 /usr/sbin/vold
# ls /etc/init.d/volmgt
/etc/init.d/volmgt
# pgrep -lf vold
#
# /etc/init.d/volmgt start
volume management starting.
# pgrep -lf vold
1070 /usr/sbin/vold
# svcs | grep vol
legacy_run 14:38:57 lrc:/etc/rc3_d/S81volmgt
#
Identifying the Phases of the Boot Process
9-36 Intermediate System Administration for the Solaris™ 10 Operating System
Copyright 2005 Sun Microsystems, Inc. All Rights Reserved. Sun Services, Revision A.1
Creating New Service Scripts
You can create new scripts to start and stop additional processes or
services to customize a system.
For example, to eliminate the requirement for a manual start of a database
server, you could create a script to start the database server automatically
after the appropriate network services have started.
You could then create another script to terminate this service and shut
down the database server before the network services are stopped.
The correct procedure is to incorporate the new service into the SMF. This
procedure can be quite complex. The general steps required are detailed
in the following list:
● Determine the process for starting and stopping your service.
● Establish a name for the service, and the category this service falls
into.
● Determine whether your service runs multiple instances.
● Identify any dependency relationships between this service and any
other services.
● If a script is required to start and stop the process, create the script
and place it in a local directory such as /usr/local/svc/method.
● Create a service manifest file for your service. This file describes the
service and any dependency relationships. Service manifests are
pulled into the repository either by using the svccfg command or
at boot time.
● Incorporate the script into the SMF using the svccfg utility.