Intermediate System Administration for the Solaris 10 Operating Student Guide phần 2 ppt
Bạn đang xem bản rút gọn của tài liệu. Xem và tải ngay bản đầy đủ của tài liệu tại đây (1.02 MB, 73 trang )
Using Hard Links
2-20 Intermediate System Administration for the Solaris™ 10 Operating System
Copyright 2005 Sun Microsystems, Inc. All Rights Reserved. Sun Services, Revision A.1
Using Hard Links
This section defines hard links and describes how to use them.
Introducing Hard Links
A hard link is the association between a file name and an inode. A hard
link is not a separate type of file. Every type of file uses at least one hard
link. Every entry in a directory constitutes a hard link. Think of every file
name as a hard link to an inode. When you create a file, using the touch
command, for example, a new directory entry is created that links the file
name you specified with a particular inode. In this way, creating a new
file creates a hard link.
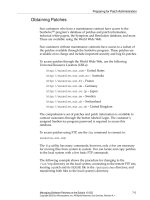
In Figure 2-8, the file called file1 is listed in the directory dir1.Indir1,
the name file1 is associated with inode number 1282. The hard link is
the association between file1 and inode number 1282.
Figure 2-8 Hard Link
Information in each inode keeps count of the number of file names
associated with it. This is called a link count. In the output from the
ls -l command, the link count appears between the column of file
permissions and the column identifying the owner. In the following
example, the file called file1 uses one hard link.
# cd dir1
# touch file1
# ls -l
total 0
-rw-r r 1 root root 0 Sep 23 13:19 file1
Data Blocks
Data Blocks
file1 = Inode 1282
Inode 1282Inode 1282 Inode 4221Inode 4221
file1 dir1
Using Hard Links
Introducing the Solaris™ 10 OS Directory Hierarchy 2-21
Copyright 2005 Sun Microsystems, Inc. All Rights Reserved. Sun Services, Revision A.1
Creating New Hard Links
A new hard link for a file name increments the link count in the
associated inode.
In the following example, inode 1282 now has two hard links, one for
file1 and the other for file2. The ls -li command lists the inode
number in the left-most column. The find -inum command locates files
and directories that have the same inode numbers.
# ln file1 file2
# ls -l
total 0
-rw-r r 2 root root 0 Sep 23 13:19 file1
-rw-r r 2 root root 0 Sep 23 13:19 file2
# ls -li
total 0
1282 -rw-r r 2 root root 0 Sep 23 13:19 file1
1282 -rw-r r 2 root root 0 Sep 23 13:19 file2
# find . -inum 1282
./file1
./file2
The ln command creates new hard links to regular files.
For example, the ln file1 file2 command creates a new directory
entry called file2. The file2 file is associated with the same inode that
is associated with file1.
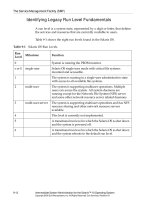
Figure 2-9 shows the result of the ln command. Two file names are
associated with inode number 1282. Unlike symbolic links, hard links
cannot span file systems.
Figure 2-9 File Names Associated With an Inode Number
Data Blocks
Data Blocks
file1 = Inode 1282
file2 = Inode 1282
Inode 1282Inode 1282 Inode 4221Inode 4221
file1
file2 dir1
Using Hard Links
2-22 Intermediate System Administration for the Solaris™ 10 Operating System
Copyright 2005 Sun Microsystems, Inc. All Rights Reserved. Sun Services, Revision A.1
Removing Hard Links
Deleting one of the files has no effect on the other file. The link count
decrements accordingly.
The following example shows how deleting file1 from the previous
example has no effect on file2.
# rm file1
# ls -li
total 0
1282 -rw-r r 1 root root 0 Sep 23 13:19 file2
Performing the Exercises
Introducing the Solaris™ 10 OS Directory Hierarchy 2-23
Copyright 2005 Sun Microsystems, Inc. All Rights Reserved. Sun Services, Revision A.1
Performing the Exercises
You have the option to complete any one of three versions of a lab. To
decide which to choose, consult the following descriptions of the levels:
● Level 1 – This version of the lab provides the least amount of
guidance. Each bulleted paragraph provides a task description, but
you must determine your own way of accomplishing each task.
● Level 2 – This version of the lab provides more guidance. Although
each step describes what you should do, you must determine which
commands (and options) to input.
● Level 3 – This version of the lab is the easiest to accomplish because
each step provides exactly what you should input to the system. This
level also includes the task solutions for all three levels.
Exercise: Identifying File Types (Level 1)
2-24 Intermediate System Administration for the Solaris™ 10 Operating System
Copyright 2005 Sun Microsystems, Inc. All Rights Reserved. Sun Services, Revision A.1
Exercise: Identifying File Types (Level 1)
In this exercise, you complete the following tasks:
● Navigate within the directory hierarchy
● Identify different types of files
Preparation
Refer to the lecture notes as necessary to perform the following steps and
answer the following questions.
Remote Lab Data Center (RLDC)
In addition to being able to use local classroom equipment, this lab has
also been designed to use equipment located in a remote lab data center.
Directions for accessing and using this resource can be found at:
/>Ask your instructor for the particular SSH (Secure Shell) configuration file
you should use to access the appropriate remote equipment for this
exercise.
Tasks
Complete the following tasks:
● Identify the first symbolic link listed in the / (root) directory. Record
the symbolic link’s size and the name of the file it references. Identify
the types of files found in the/dev/dsk directory and the types of
files that the symbolic links reference, if any. Identify the types of
files found in the /dev/pts directory and the types of files that the
symbolic links reference, if any.
(Steps 1–5 in Level 2 lab)
Exercise: Identifying File Types (Level 1)
Introducing the Solaris™ 10 OS Directory Hierarchy 2-25
Copyright 2005 Sun Microsystems, Inc. All Rights Reserved. Sun Services, Revision A.1
● Identify the types of files found in the /etc/init.d directory.
Record the inode number and link count for the volmgt file. Use the
find command to locate all other files below the /etc directory that
use the same inode as volmgt.
(Steps 6–8 in Level 2 lab)
● Create a directory called /testdir. In this directory, create a file and
a symbolic link that points to the file. Determine if the two files use
the same or a different inode.
Create a directory called newdir within the /testdir directory.
Identify the inode it uses, its link count, and the name of any other
file that uses the same inode as the newdir directory.
Create another directory below the newdir directory. Determine how
the link count for the newdir directory changes, and find any new
file that uses the same inode as the newdir directory.
(Steps 9–14 in Level 2 lab)
Exercise: Identifying File Types (Level 2)
2-26 Intermediate System Administration for the Solaris™ 10 Operating System
Copyright 2005 Sun Microsystems, Inc. All Rights Reserved. Sun Services, Revision A.1
Exercise: Identifying File Types (Level 2)
In this exercise, you complete the following tasks:
● Navigate within the directory hierarchy
● Identify different types of files
Preparation
Refer to the lecture notes as necessary to perform the following steps and
answer the following questions.
Remote Lab Data Center (RLDC)
In addition to being able to use local classroom equipment, this lab has
also been designed to use equipment located in a remote lab data center.
Directions for accessing and using this resource can be found at:
/>Ask your instructor for the particular SSH (Secure Shell) configuration file
you should use to access the appropriate remote equipment for this
exercise.
Task Summary
Complete the following tasks:
● Identify the first symbolic link listed in the / (root) directory. Record
the symbolic link’s size and the name of the file it references. Identify
the types of files found in the/dev/dsk directory and the types of
files that the symbolic links reference, if any. Identify the types of
files found in the /dev/pts directory and the types of files that the
symbolic links reference, if any.
● Identify the types of files found in the /etc/init.d directory.
Record the inode number and link count for the volmgt file. Use the
find command to locate all other files below the /etc directory that
use the same inode as volmgt.
● Create a directory called /testdir. In this directory, create a file and
a symbolic link that points to the file. Determine if the two files use
the same or a different inode.
Exercise: Identifying File Types (Level 2)
Introducing the Solaris™ 10 OS Directory Hierarchy 2-27
Copyright 2005 Sun Microsystems, Inc. All Rights Reserved. Sun Services, Revision A.1
Create a directory called newdir within the /testdir directory.
Identify the inode it uses, its link count, and the name of any other
file that uses the same inode as the newdir directory.
Create another directory below the newdir directory. Determine how
the link count for the newdir directory changes, and find any new
file that uses the same inode as the newdir directory.
Exercise: Identifying File Types (Level 2)
2-28 Intermediate System Administration for the Solaris™ 10 Operating System
Copyright 2005 Sun Microsystems, Inc. All Rights Reserved. Sun Services, Revision A.1
Tasks
Complete the following steps:
1. Log in as the root user, and open a terminal window. In the / (root)
directory, perform a long listing and record the name of the first
symbolic link listed.
2. What is the size in bytes of the link you found in Step 1? How many
characters are there in the name of the file to which this link points?
3. Change to the /dev/dsk directory. Record the file types that you find
in this directory.
4. Use the appropriate options for the ls command to display
information for the files that are referenced by the files in the
/dev/dsk directory. Record the file types reported.
5. Change to the /dev/pts directory, and use the same commands you
used in Steps 3 and 4 for the /dev/dsk directory. Record the file
types you find.
6. Change to the /etc/init.d directory, and identify the type of file in
this directory.
7. How many hard links are associated with the /etc/init.d/volmgt
file? What is the inode number associated with this file?
8. Find the number of files in the /etc directory, or below, that have the
same inode number as that used by the /etc/init.d/volmgt file.
9. Create a new directory called /testdir. Create a file in this directory
called file1. Create a symbolic link called link1 that points to
file1.
10. List file1 and the link1 symbolic link. Do these files use the same
or different inodes?
11. In the /testdir directory, create a new directory called newdir.
What is the number of hard links associated with the newdir
directory? What is the inode number associated with the newdir
directory?
12. List all files, including hidden files, that exist in the newdir
directory. Which of these files uses the same inode as the newdir
directory?
13. Create a new directory called dir2 below the newdir directory. What
happens to the link count for the newdir directory?
14. Use the ls command with appropriate options to find the new file
name that uses the same inode as the newdir directory. Record the
name of the new file.
Exercise: Identifying File Types (Level 3)
Introducing the Solaris™ 10 OS Directory Hierarchy 2-29
Copyright 2005 Sun Microsystems, Inc. All Rights Reserved. Sun Services, Revision A.1
Exercise: Identifying File Types (Level 3)
In this exercise, you complete the following tasks:
● Navigate within the directory hierarchy
● Identify different types of files
Preparation
Refer to the lecture notes as necessary to perform the following steps and
answer the following questions.
Remote Lab Data Center (RLDC)
In addition to being able to use local classroom equipment, this lab has
also been designed to use equipment located in a remote lab data center.
Directions for accessing and using this resource can be found at:
/>Ask your instructor for the particular SSH (Secure Shell) configuration file
you should use to access the appropriate remote equipment for this
exercise.
Task Summary
In this exercise, you accomplish the following:
● Identify the first symbolic link listed in the
/
(root) directory. Record
the symbolic link’s size and the name of the file it references. Identify
the types of files found in the/dev/dsk directory and the types of
files that the symbolic links reference, if any. Identify the types of
files found in the /dev/pts directory and the types of files that the
symbolic links reference, if any.
● Identify the types of files found in the /etc/init.d directory.
Record the inode number and link count for the volmgt file. Use the
find command to locate all other files below the /etc directory that
use the same inode as volmgt.
● Create a directory called /testdir. In this directory, create a file and
a symbolic link that points to the file. Determine if the two files use
the same or a different inode.
Exercise: Identifying File Types (Level 3)
2-30 Intermediate System Administration for the Solaris™ 10 Operating System
Copyright 2005 Sun Microsystems, Inc. All Rights Reserved. Sun Services, Revision A.1
Create a directory called newdir within the /testdir directory.
Identify the inode it uses, its link count, and the name of any other
file that uses the same inode as the newdir directory.
Create another directory below the newdir directory. Determine how
the link count for the newdir directory changes, and find any new
file that uses the same inode as the newdir directory.
Exercise: Identifying File Types (Level 3)
Introducing the Solaris™ 10 OS Directory Hierarchy 2-31
Copyright 2005 Sun Microsystems, Inc. All Rights Reserved. Sun Services, Revision A.1
Tasks and Solutions
Complete the following steps:
1. Log in as the root user, and open a terminal window. In the / (root)
directory, perform a long listing, and record the name of the first
symbolic link listed.
# cd /
# ls -l
The /bin symbolic link should be the first link listed in the / (root)
directory.
2. What is the size in bytes of the link you found in Step 1? How many
characters are there in the name of the file to which this link points?
The /bin symbolic link contains 9 bytes of data and points to ./usr/bin.
3. Change to the /dev/dsk directory. Record the file types that you find
in this directory.
# cd /dev/dsk
# ls -l
The /dev/dsk directory contains symbolic links.
4. Use the appropriate options of the ls command to display
information for the files referenced by the files in the /dev/dsk
directory. Record the file types reported.
# ls -lL
The symbolic links in the /dev/dsk directory point to block-special device
files.
5. Change to the /dev/pts directory, and use the same commands you
used in Steps 3 and 4 for the /dev/dsk directory. Record the file
types you find.
# cd /dev/pts
# ls -l
# ls -lL
The /dev/pts directory contains symbolic links.
The symbolic links in the /dev/pts directory point to character-special
device files.
6. Change to the /etc/init.d directory, and identify the type of file in
this directory.
# cd /etc/init.d ; ls -l
The /etc/init.d directory contains regular files.
Exercise: Identifying File Types (Level 3)
2-32 Intermediate System Administration for the Solaris™ 10 Operating System
Copyright 2005 Sun Microsystems, Inc. All Rights Reserved. Sun Services, Revision A.1
7. How many hard links are associated with the /etc/init.d/volmgt
file? What is the inode number associated with this file?
# ls -li volmgt
The /etc/init.d/volmgt file has six hard links associated with it. The
inode number varies among different systems.
8. Find the number of files in the /etc directory or below that have the
same inode number as that used by the /etc/init.d/volmgt file. In
this example, the inode number is 21449.
# ls -i /etc/init.d/volmgt
21449 -rwxr r 6 root sys 473 Sep 3 15:37 volmgt
# find /etc -inum 21449 -exec ls -i {} \;
Six files, including /etc/init.d/volmgt, use the same inode number.
They are:
21449 /etc/init.d/volmgt
21449 /etc/rc0.d/K05volmgt
21449 /etc/rc1.d/K05volmgt
21449 /etc/rc2.d/K05volmgt
21449 /etc/rc3.d/S81volmgt
21449 /etc/rcS.d/K05volmgt
9. Create a new directory called /testdir. Create a file in this directory
called file1. Create a symbolic link called link1 that points to
file1.
# mkdir /testdir
# cd /testdir
# touch file1
# ln -s file1 link1
10. List file1 and the link1 symbolic link. Do these files use the same
or different inodes?
# ls -li
These two files use two different inodes.
11. In the /testdir directory, create a new directory called newdir.
What is the number of hard links associated with the newdir
directory? What is the inode number associated with the newdir
directory?
# mkdir newdir
# ls -ldi newdir
The link count for the newdir directory is two. The inode number varies
among different systems.
Exercise: Identifying File Types (Level 3)
Introducing the Solaris™ 10 OS Directory Hierarchy 2-33
Copyright 2005 Sun Microsystems, Inc. All Rights Reserved. Sun Services, Revision A.1
12. List all files, including hidden files, that exist in the newdir
directory. Which of these files uses the same inode as the newdir
directory?
# ls -lia newdir
The file called dot (
.
) uses the same inode as the newdir directory.
13. Create a new directory called dir2 below the newdir directory. What
happens to the link count for the newdir directory?
# mkdir newdir/dir2
# ls -ldi newdir
The link count increases from two to three.
14. Use the ls command with appropriate options to find the new file
name that uses the same inode as the newdir directory. Record the
name of the new file.
# ls -laRi newdir
The newdir/dir2/ file uses the same inode as the newdir directory.
Exercise Summary
2-34 Intermediate System Administration for the Solaris™ 10 Operating System
Copyright 2005 Sun Microsystems, Inc. All Rights Reserved. Sun Services, Revision A.1
Exercise Summary
?
!
Discussion – Take a few minutes to discuss what experiences, issues, or
discoveries you had during the lab exercise.
● Experiences
● Interpretations
● Conclusions
● Applications
3-1
Copyright 2005 Sun Microsystems, Inc. All Rights Reserved. Sun Services, Revision A.1
Module 3
ManagingLocalDiskDevices
Objectives
Upon completion of this module, you should be able to:
● Describe the basic architecture of a disk
● Describe the naming conventions for devices
● List devices
● Reconfigure devices
● Perform hard disk partitioning
● Manage disk labels
● Describe the Solaris Management Console
● Partition a disk by using the Solaris Management Console
The course map in Figure 3-1 shows how this module fits into the current
instructional goal.
Figure 3-1 Course Map
Introducing the Basic Architecture of a Disk
3-2 Intermediate System Administration for the Solaris™ 10 Operating System
Copyright 2005 Sun Microsystems, Inc. All Rights Reserved. Sun Services, Revision A.1
Introducing the Basic Architecture of a Disk
A disk device has physical components and logical components. The
physical components include disk platters and read/write heads. The
logical components include disk slices, cylinders, tracks, and sectors.
Physical Disk Structure
A disk is physically composed of a series of flat, magnetically coated
platters that are stacked on a spindle. The spindle turns while the
read/write heads move as a single unit radially, reading and writing data
on the platters.
Figure 3-2 identifies the parts of a disk.
Figure 3-2 Components of a Disk
Introducing the Basic Architecture of a Disk
Managing Local Disk Devices 3-3
Copyright 2005 Sun Microsystems, Inc. All Rights Reserved. Sun Services, Revision A.1
The following list describes the physical components of a disk:
● The disk storage area is composed of one or more platters.
● The platters rotate.
● The head actuator arm moves the read/write heads as a unit
radially.
● The read/write heads read and write data on the magnetic surface
on both sides of the platters.
Data Organization on Disk Platters
Figure 3-3 shows the logical components of a disk platter.
Figure 3-3 Data Organization on Disk Platters
Introducing the Basic Architecture of a Disk
3-4 Intermediate System Administration for the Solaris™ 10 Operating System
Copyright 2005 Sun Microsystems, Inc. All Rights Reserved. Sun Services, Revision A.1
A disk platter is divided into sectors, tracks, and cylinders.
The number of sectors per track varies with the radius of a track on the
platter. The outermost tracks are larger and can hold more sectors than the
inner tracks.
Because a disk spins continuously and the read/write heads move as a
single unit, the most efficient seeking occurs when the sectors to be read
from or written to are located in a single cylinder.
Disk Slices
Disks are logically divided into individual partitions known as disk slices.
Disk slices are groupings of cylinders that are commonly used to organize
data by function.
For example, one slice can store critical system files and programs while
another slice on the same disk can store user-created files.
Note – Grouping cylinders into slices is done to organize data, facilitate
backups, and provide swap space.
A disk under the Solaris OS can be divided into eight slices that are
labeled Slice 0 through Slice 7.
By convention, Slice 2 represents the entire disk. Slice 2 maintains
important data about the entire disk, such as the size of the actual disk
and the total number of cylinders available for the storage of files and
directories.
Sector The smallest addressable unit on a platter. One sector
can hold 512 bytes of data. Sectors are also known as
disk blocks.
Track A series of sectors positioned end-to-end in a circular
path.
Cylinder A stack of tracks.
Introducing the Basic Architecture of a Disk
Managing Local Disk Devices 3-5
Copyright 2005 Sun Microsystems, Inc. All Rights Reserved. Sun Services, Revision A.1
A starting cylinder and an ending cylinder define each slice. These
cylinder boundaries determine the size of a slice.
Figure 3-4 shows how disk slices might reside on a disk.
Figure 3-4 Cylinders and Slices
Introducing the Basic Architecture of a Disk
3-6 Intermediate System Administration for the Solaris™ 10 Operating System
Copyright 2005 Sun Microsystems, Inc. All Rights Reserved. Sun Services, Revision A.1
Table 3-1 shows disk slices and the different file systems they could hold.
Table 3-1 Disk Slices
Slice Name Function
0 / The root directory’s system files
1 swap Swap area
2 Entire disk
5 /opt Optional software
6 /usr System executables and programs
7 /export/home User files and directories
Introducing the Basic Architecture of a Disk
Managing Local Disk Devices 3-7
Copyright 2005 Sun Microsystems, Inc. All Rights Reserved. Sun Services, Revision A.1
Figure 3-5 shows a possible configuration convention for organizing data.
The example disk is divided into slices that logically organize the data on
the boot disk.
Figure 3-5 Top View of Five Configured Disk Slices
Introducing the Basic Architecture of a Disk
3-8 Intermediate System Administration for the Solaris™ 10 Operating System
Copyright 2005 Sun Microsystems, Inc. All Rights Reserved. Sun Services, Revision A.1
Disk Slice Naming Convention
An eight-character string typically represents the full name of a slice. The
string includes the controller number, the target number, the disk number,
and the slice number.
The embedded SCSI configuration and the integrated device electronics
(IDE) configuration represent the disk slice naming conventions across
two different architectures. The disk number is always set to d0 with
embedded SCSI disks.
Figure 3-6 shows the string that represents the full name of a disk slice.
Figure 3-6 Disk Slice Naming Conventions
Controller number Identifies the host bus adapter (HBA), which
controls communications between the system and
disk unit. The HBA takes care of sending and
receiving both commands and data to the device.
The controller number is assigned in sequential
order, such as c0, c1, c2, and so on.
Target number Target numbers, such as t0, t1, t2, and t3,
correspond to a unique hardware address that is
assigned to each disk, tape, or CD-ROM. Some
external disk drives have an address switch
located on the rear panel. Some internal disks have
address pins that are jumpered to assign that
disk’s target number.
Disk number The disk number is also known as the logical unit
number (LUN). This number reflects the number
of disks at the target location.
Slice number A slice number ranging from 0 to 7.
Introducing the Basic Architecture of a Disk
Managing Local Disk Devices 3-9
Copyright 2005 Sun Microsystems, Inc. All Rights Reserved. Sun Services, Revision A.1
Figure 3-7 shows the configuration of the SCSI architecture.
Figure 3-7 Embedded SCSI Configuration
Figure 3-8 shows the configuration of the IDE architecture.
Figure 3-8 IDE Configuration
c0
t0 t1 t6
d0 d0 d0
c0t0d0s0
c0t0d0s1
c0t1d0s5
c0t1d0s6
c0t6d0s0
c0t6d0s6
d0
c0
t0 t1
t2 t3
d0
d0 d0
c0t2d0s0
c0t3d0s0
c0t0d0s0
c0t1d0s0
Introducing Solaris OS Device Naming Conventions
3-10 Intermediate System Administration for the Solaris™ 10 Operating System
Copyright 2005 Sun Microsystems, Inc. All Rights Reserved. Sun Services, Revision A.1
Introducing Solaris OS Device Naming Conventions
In the Solaris OS, all devices are represented by three different types of
names, depending on how the device is being referenced:
● Logical device names
● Physical device names
● Instance names
Logical Device Names
Logical disk device names are symbolic links to the physical device names
kept in the /devices directory. Logical device names are used primarily
to refer to a device when you are entering commands on the command
line. All logical device names are kept in the /dev directory. The logical
device names contain the controller number, target number, disk number,
and slice number.
Every disk device has an entry in both the /dev/dsk and /dev/rdsk
directories for the block and character disk devices, respectively. To
display the entries in the /dev/dsk directory, perform the command:
# ls /dev/dsk
c0t0d0s0 c0t0d0s4 c0t2d0s0 c0t2d0s4 c1t1d0s0 c1t1d0s4
c0t0d0s1 c0t0d0s5 c0t2d0s1 c0t2d0s5 c1t1d0s1 c1t1d0s5
c0t0d0s2 c0t0d0s6 c0t2d0s2 c0t2d0s6 c1t1d0s2 c1t1d0s6
c0t0d0s3 c0t0d0s7 c0t2d0s3 c0t2d0s7 c1t1d0s3 c1t1d0s7
● c0t0d0s0 through c0t0d0s7 – Identifies the device names for disk
Slices 0 through 7 for a disk that is attached to Controller 0, at
Target 0, on Disk Unit 0.
● c0t2d0s0 through c0t2d0s7 – Identifies the device names for disk
Slices 0 through 7 for a disk that is attached to Controller 0, at
Target 2, on Disk Unit 0.
● c1t1d0s0 through c1t1d0s7 – Identifies the device names for disk
Slices 0 through 7 for a disk that is attached to Controller 1, at
Target 1, on Disk Unit 0.