Programming C# 2nd Edition phần 7 pdf
Bạn đang xem bản rút gọn của tài liệu. Xem và tải ngay bản đầy đủ của tài liệu tại đây (1.09 MB, 59 trang )
Programming C#, 2nd Edition
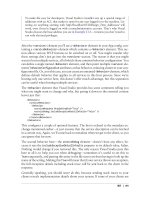
Figure 14-7. The ADO update form
This form consists of a list box (lbCustomers), a button for Update (btnUpdate), an
associated text box (txtCustomerName), and a Delete button (btnDelete). There is also a set
of eight text fields that are used in conjunction with the New button (btnNew). These text
fields represent eight of the fields in the Customers table in the Northwind database. There is
also a label (lblMessage) that you can use for writing messages to the user (it currently says
Press New, Update, or Delete).
14.6.1 Accessing the Data
First, create the DataAdapter object and the DataSet as private member variables, along with
the DataTable:
private SqlDataAdapter dataAdapter;
private DataSet dataSet;
private DataTable dataTable;
This enables you to refer to these objects from various member methods. Start by creating
strings for the connection and the command that will get you the table you need:
string connectionString = "server=(local)\\NetSDK;" +
"Trusted_Connection=yes; database=northwind";
string commandString = "Select * from Customers";
These strings are passed as parameters to the SqlDataAdapter constructor:
dataAdapter =
new SqlDataAdapter(commandString, connectionString);
A DataAdapter may have four SQL commands associated with it. Right now, we have only
one: dataAdapter.SelectCommand. The InitializeCommands( ) method creates the
remaining
three:
InsertCommand,
UpdateCommand,
and
DeleteCommand.
InitializeCommands( ) uses the AddParms method to associate a column in each SQL
command with the columns in the modified rows:
349
Programming C#, 2nd Edition
private void AddParms(SqlCommand cmd, params string[] cols) {
// Add each parameter
foreach (String column in cols) {
cmd.Parameters.Add(
"@" + column, SqlDbType.Char, 0, column);
}
}
InitializeCommands( ) creates each SQL command in turn, using placeholders that
correspond to the column argument passed to AddParm( ):
private void InitializeCommands( )
{
// Reuse the SelectCommand's Connection.
SqlConnection connection =
(SqlConnection) dataAdapter.SelectCommand.Connection;
// Create an explicit, reusable insert command
dataAdapter.InsertCommand = connection.CreateCommand( );
dataAdapter.InsertCommand.CommandText =
"Insert into customers " +
"(CustomerId, CompanyName, ContactName, ContactTitle, " +
" Address, City, PostalCode, Phone) " +
"values(@CustomerId, @CompanyName, @ContactName, " +
"
@ContactTitle, @Address, @City, @PostalCode, @Phone)";
AddParms(dataAdapter.InsertCommand,
"CustomerId", "CompanyName", "ContactName", "ContactTitle",
"Address", "City", "PostalCode", "Phone");
// Create an explicit update command
dataAdapter.UpdateCommand = connection.CreateCommand( );
dataAdapter.UpdateCommand.CommandText = "update Customers " +
"set CompanyName = @CompanyName where CustomerID = @CustomerId";
AddParms(dataAdapter.UpdateCommand, "CompanyName", "CustomerID");
}
// Create an explicit delete command
dataAdapter.DeleteCommand = connection.CreateCommand( );
dataAdapter.DeleteCommand.CommandText =
"delete from customers where customerID = @CustomerId";
AddParms(dataAdapter.DeleteCommand, "CustomerID");
The DataAdapter uses these three commands to modify the table when you invoke Update(
).
Back in the constructor, you can now create the DataSet and fill it with the SqlDataAdapter
object you've just created:
dataSet = new DataSet( );
dataAdapter.Fill(DataSet,"Customers");
Display the table contents by calling the PopulateLB( ) method, which is a private method
that fills the list box from the contents of the single table in the DataSet:
350
Programming C#, 2nd Edition
you created the DataSet, you could have used the TableMappings( ) method to change the
names of the columns.
Having edited the column, you are ready to check to make sure there are no errors. First,
extract all the changes made to the DataSet (in this case, there will be only one change) using
the GetChanges( ) method, passing in a DataRowState enumeration to indicate that you
want only those rows that have been modified. GetChanges( ) returns a new DataSet object:
DataSet dataSetChanged =
dataSet.GetChanges(DataRowState.Modified);
Now you can check for errors. To simplify the code, I've included a flag to indicate that all is
OK. If you find any errors, rather than trying to fix them, just set the flag to false and don't
make the updates:
bool okayFlag = true;
if (dataSetChanged.HasErrors)
{
okayFlag = false;
string msg = "Error in row with customer ID ";
foreach (DataTable theTable in dataSetChanged.Tables)
{
if (theTable.HasErrors)
{
DataRow[] errorRows = theTable.GetErrors( );
foreach (DataRow theRow in errorRows)
{
msg = msg + theRow["CustomerID"];
}
}
}
}
lblMessage.Text = msg;
First test to see whether the new data record set has any errors by checking the HasErrors
property. If HasErrors is true, there are errors; set the Boolean okayFlag to false, and then
go on to discover where the error lies. To do so, iterate through all the tables in the new
database (in this case, there is only one); if a table has errors, you'll get an array of all the
rows in that table with errors (shown here as the errorRows array).
Then iterate through the array of rows with errors, handling each in turn. In this case, you just
update the message on the dialog box; however, in a production environment you might
interact with the user to fix the problem.
If the okayFlag is still true after testing HasErrors, there were no errors and you are ready
to update the database:
if (okayFlag)
{
dataAdapter.Update(dataSetChanged,"Customers");
352
Programming C#, 2nd Edition
This causes the DataAdapter object to create the necessary command text to update the
database. Next, update the message:
lblMessage.Text = "Updated " +
Application.DoEvents( );
targetRow["CompanyName"];
You now must tell the DataSet to accept the changes and then repopulate the list box from
the DataSet:
dataSet.AcceptChanges( );
PopulateLB( );
If okayFlag is false, there are errors; in this example, we'd just reject the changes:
else
dataSet.RejectChanges( );
14.6.3 Deleting a Record
The code for handling the Delete button is even simpler. First, get the target row:
DataRow targetRow =
dataTable.Rows[lbCustomers.SelectedIndex];
and form the delete message:
string msg = targetRow["CompanyName"] + " deleted. ";
You don't want to show the message until the row is deleted, but you need to get it now
because after you delete the row it will be too late!
You're now ready to mark the row for deletion:
targetRow.Delete( );
Calling AcceptChanges( ) on the DataSet causes AcceptChanges( )
to be called on each table within the DataSet. This in turn causes
AcceptChanges( ) to be called on each row in those tables. Thus the
one call to dataSet.AcceptChanges( ) cascades down through all the
contained tables and rows.
Next, you need to call Update() and AcceptChanges( ), and then refresh the list box.
However, if this operation fails, the row will still be marked for deletion. If you then try to
issue a legitimate command, such as an insertion, update, or another deletion, the
DataAdapter will try to commit the erroneous deletion again, and the whole batch will fail
because of that delete. In order to avert this situation, wrap the remaining operations in a try
block and call RejectChanges( ) if they fail:
353
Programming C#, 2nd Edition
// update the database
try
{
dataAdapter.Update(dataSet,"Customers");
dataSet.AcceptChanges( );
// repopulate the list box without the deleted record
PopulateLB( );
// inform the user
lblMessage.Text = msg;
Application.DoEvents( );
}
catch (SqlException ex)
{
dataSet.RejectChanges( );
MessageBox.Show(ex.Message);
}
Deleting records from the Customers database might cause an exception
if the record deleted is constrained by database integrity rules. For
example, if a customer has orders in the Orders table, you cannot delete
the customer until you delete the orders. To solve this, the following
example will create new Customer records that you can then delete at
will.
14.6.4 Creating New Records
To create a new record, the user will fill in the fields and press the New button. This will fire
the btnNew_Click event, which is tied to the btnNew_Click event handling method:
btnNew.Click += new System.EventHandler (this.btnNew_Click);
In the event handler, call DataTable.NewRow( ), which asks the table for a new DataRow
object:
DataRow newRow = dataTable.NewRow( );
This is very elegant because the new row that the DataTable produces has all the necessary
DataColumns for this table. You can just fill in the columns you care about, taking the text
from the user interface (UI):
newRow["CustomerID"] = txtCompanyID.Text;
newRow["CompanyName"] = txtCompanyName.Text;
newRow["ContactName"] = txtContactName.Text;
newRow["ContactTitle"] = txtContactTitle.Text;
newRow["Address"] = txtAddress.Text;
newRow["City"] = txtCity.Text;
newRow["PostalCode"] = txtZip.Text;
newRow["Phone"] = txtPhone.Text;
Now that the row is fully populated, just add it back to the table:
dataTable.Rows.Add(newRow);
354
Programming C#, 2nd Edition
The table resides within the DataSet, so all you have to do is tell the DataAdapter object to
update the database with the DataSet and accept the changes:
dataAdapter.Update(dataSet,"Customers");
dataSet.AcceptChanges( );
Next, update the user interface:
lblMessage.Text = "Updated!";
Application.DoEvents( );
You can now repopulate the list box with your new added row and clear the text fields so that
you're ready for another new record:
PopulateLB( );
ClearFields( );
ClearFields( ) is a private method that simply sets all the text fields to empty strings. That
method and the entire program are shown in Example 14-6.
Example 14-6. Updating, deleting, and adding records
using System;
using System.Drawing;
using System.Collections;
using System.ComponentModel;
using System.Windows.Forms;
using System.Data;
using System.Data.SqlClient;
namespace ProgrammingCSharpWindows.Form
{
public class ADOForm1 : System.Windows.Forms.Form
{
private System.ComponentModel.Container components;
private System.Windows.Forms.Label label9;
private System.Windows.Forms.TextBox txtPhone;
private System.Windows.Forms.Label label8;
private System.Windows.Forms.TextBox txtContactTitle;
private System.Windows.Forms.Label label7;
private System.Windows.Forms.TextBox txtZip;
private System.Windows.Forms.Label label6;
private System.Windows.Forms.TextBox txtCity;
private System.Windows.Forms.Label label5;
private System.Windows.Forms.TextBox txtAddress;
private System.Windows.Forms.Label label4;
private System.Windows.Forms.TextBox txtContactName;
private System.Windows.Forms.Label label3;
private System.Windows.Forms.TextBox txtCompanyName;
private System.Windows.Forms.Label label2;
private System.Windows.Forms.TextBox txtCompanyID;
private System.Windows.Forms.Label label1;
private System.Windows.Forms.Button btnNew;
private System.Windows.Forms.TextBox txtCustomerName;
private System.Windows.Forms.Button btnUpdate;
private System.Windows.Forms.Label lblMessage;
private System.Windows.Forms.Button btnDelete;
private System.Windows.Forms.ListBox lbCustomers;
355
Programming C#, 2nd Edition
// the DataSet, DataAdapter, and DataTable are members
// so that we can access them from any member method.
private SqlDataAdapter dataAdapter;
private DataSet dataSet;
private DataTable dataTable;
public ADOForm1( )
{
InitializeComponent( );
string connectionString = "server=(local)\\NetSDK;" +
"Trusted_Connection=yes; database=northwind";
string commandString = "Select * from Customers";
dataAdapter =
new SqlDataAdapter(commandString, connectionString);
InitializeCommands( );
}
dataSet = new DataSet( );
dataAdapter.Fill(dataSet,"Customers");
PopulateLB( );
private void AddParms(SqlCommand cmd, params string[] cols) {
// Add each parameter
foreach (String column in cols) {
cmd.Parameters.Add(
"@" + column, SqlDbType.Char, 0, column);
}
}
private void InitializeCommands( )
{
// Reuse the SelectCommand's Connection.
SqlConnection connection =
(SqlConnection) dataAdapter.SelectCommand.Connection;
// Create an explicit, reusable insert command
dataAdapter.InsertCommand = connection.CreateCommand( );
dataAdapter.InsertCommand.CommandText =
"Insert into customers " +
"(CustomerId, CompanyName, ContactName, ContactTitle, " +
" Address, City, PostalCode, Phone) " +
"values(@CustomerId, @CompanyName, @ContactName, " +
"
@ContactTitle, @Address, @City, @PostalCode, @Phone)";
AddParms(dataAdapter.InsertCommand,
"CustomerId", "CompanyName", "ContactName", "ContactTitle",
"Address", "City", "PostalCode", "Phone");
// Create an explicit update command
dataAdapter.UpdateCommand = connection.CreateCommand( );
dataAdapter.UpdateCommand.CommandText = "update Customers " +
"set CompanyName = @CompanyName where CustomerID = @CustomerId";
AddParms(dataAdapter.UpdateCommand, "CompanyName", "CustomerID");
}
// Create an explicit delete command
dataAdapter.DeleteCommand = connection.CreateCommand( );
dataAdapter.DeleteCommand.CommandText =
"delete from customers where customerID = @CustomerId";
AddParms(dataAdapter.DeleteCommand, "CustomerID");
356
Programming C#, 2nd Edition
// fill the list box with columns from the Customers table
private void PopulateLB( )
{
dataTable = dataSet.Tables[0];
lbCustomers.Items.Clear( );
foreach (DataRow dataRow in dataTable.Rows)
{
lbCustomers.Items.Add(
dataRow["CompanyName"] + " (" +
dataRow["ContactName"] + ")" );
}
}
protected override void Dispose(bool disposing)
{
if (disposing)
{
if (components == null)
{
components.Dispose( );
}
}
base.Dispose(disposing);
}
private void InitializeComponent( )
{
this.components = new System.ComponentModel.Container ( );
this.txtCustomerName = new System.Windows.Forms.TextBox ( );
this.txtCity = new System.Windows.Forms.TextBox ( );
this.txtCompanyID = new System.Windows.Forms.TextBox ( );
this.lblMessage = new System.Windows.Forms.Label ( );
this.btnUpdate = new System.Windows.Forms.Button ( );
this.txtContactName = new System.Windows.Forms.TextBox ( );
this.txtZip = new System.Windows.Forms.TextBox ( );
this.btnDelete = new System.Windows.Forms.Button ( );
this.txtContactTitle = new System.Windows.Forms.TextBox ( );
this.txtAddress = new System.Windows.Forms.TextBox ( );
this.txtCompanyName = new System.Windows.Forms.TextBox ( );
this.label5 = new System.Windows.Forms.Label ( );
this.label6 = new System.Windows.Forms.Label ( );
this.label7 = new System.Windows.Forms.Label ( );
this.label8 = new System.Windows.Forms.Label ( );
this.label9 = new System.Windows.Forms.Label ( );
this.label4 = new System.Windows.Forms.Label ( );
this.lbCustomers = new System.Windows.Forms.ListBox ( );
this.txtPhone = new System.Windows.Forms.TextBox ( );
this.btnNew = new System.Windows.Forms.Button ( );
this.label1 = new System.Windows.Forms.Label ( );
this.label2 = new System.Windows.Forms.Label ( );
this.label3 = new System.Windows.Forms.Label ( );
//@this.TrayHeight = 0;
//@this.TrayLargeIcon = false;
//@this.TrayAutoArrange = true;
txtCustomerName.Location = new System.Drawing.Point (256, 120);
txtCustomerName.TabIndex = 4;
txtCustomerName.Size = new System.Drawing.Size (160, 20);
txtCity.Location = new System.Drawing.Point (384, 245);
txtCity.TabIndex = 15;
txtCity.Size = new System.Drawing.Size (160, 20);
357
Programming C#, 2nd Edition
txtCompanyID.Location = new System.Drawing.Point (136, 216);
txtCompanyID.TabIndex = 7;
txtCompanyID.Size = new System.Drawing.Size (160, 20);
lblMessage.Location = new System.Drawing.Point (32, 368);
lblMessage.Text = "Press New, Update or Delete";
lblMessage.Size = new System.Drawing.Size (416, 48);
lblMessage.TabIndex = 1;
btnUpdate.Location = new System.Drawing.Point (32, 120);
btnUpdate.Size = new System.Drawing.Size (75, 23);
btnUpdate.TabIndex = 0;
btnUpdate.Text = "Update";
btnUpdate.Click +=
new System.EventHandler (this.btnUpdate_Click);
txtContactName.Location = new System.Drawing.Point (136, 274);
txtContactName.TabIndex = 11;
txtContactName.Size = new System.Drawing.Size (160, 20);
txtZip.Location = new System.Drawing.Point (384, 274);
txtZip.TabIndex = 17;
txtZip.Size = new System.Drawing.Size (160, 20);
btnDelete.Location = new System.Drawing.Point (472, 120);
btnDelete.Size = new System.Drawing.Size (75, 23);
btnDelete.TabIndex = 2;
btnDelete.Text = "Delete";
btnDelete.Click +=
new System.EventHandler (this.btnDelete_Click);
txtContactTitle.Location = new System.Drawing.Point (136, 303);
txtContactTitle.TabIndex = 12;
txtContactTitle.Size = new System.Drawing.Size (160, 20);
txtAddress.Location = new System.Drawing.Point (384, 216);
txtAddress.TabIndex = 13;
txtAddress.Size = new System.Drawing.Size (160, 20);
txtCompanyName.Location = new System.Drawing.Point (136, 245);
txtCompanyName.TabIndex = 9;
txtCompanyName.Size = new System.Drawing.Size (160, 20);
label5.Location = new System.Drawing.Point (320, 252);
label5.Text = "City";
label5.Size = new System.Drawing.Size (48, 16);
label5.TabIndex = 14;
label6.Location = new System.Drawing.Point (320, 284);
label6.Text = "Zip";
label6.Size = new System.Drawing.Size (40, 16);
label6.TabIndex = 16;
label7.Location = new System.Drawing.Point (40, 312);
label7.Text = "Contact Title";
label7.Size = new System.Drawing.Size (88, 16);
label7.TabIndex = 28;
label8.Location = new System.Drawing.Point (320, 312);
label8.Text = "Phone";
label8.Size = new System.Drawing.Size (56, 16);
label8.TabIndex = 20;
label9.Location = new System.Drawing.Point (120, 120);
label9.Text = "New Customer Name:";
label9.Size = new System.Drawing.Size (120, 24);
label9.TabIndex = 22;
label4.Location = new System.Drawing.Point (320, 224);
label4.Text = "Address";
label4.Size = new System.Drawing.Size (56, 16);
label4.TabIndex = 26;
lbCustomers.Location = new System.Drawing.Point (32, 16);
lbCustomers.Size = new System.Drawing.Size (512, 95);
lbCustomers.TabIndex = 3;
358
Programming C#, 2nd Edition
}
txtPhone.Location = new System.Drawing.Point (384, 303);
txtPhone.TabIndex = 18;
txtPhone.Size = new System.Drawing.Size (160, 20);
btnNew.Location = new System.Drawing.Point (472, 336);
btnNew.Size = new System.Drawing.Size (75, 23);
btnNew.TabIndex = 25;
btnNew.Text = "New";
btnNew.Click += new System.EventHandler (this.btnNew_Click);
label1.Location = new System.Drawing.Point (40, 224);
label1.Text = "Company ID";
label1.Size = new System.Drawing.Size (88, 16);
label1.TabIndex = 6;
label2.Location = new System.Drawing.Point (40, 252);
label2.Text = "Company Name";
label2.Size = new System.Drawing.Size (88, 16);
label2.TabIndex = 8;
label3.Location = new System.Drawing.Point (40, 284);
label3.Text = "Contact Name";
label3.Size = new System.Drawing.Size (88, 16);
label3.TabIndex = 10;
this.Text = "Customers Update Form";
this.AutoScaleBaseSize = new System.Drawing.Size (5, 13);
this.ClientSize = new System.Drawing.Size (584, 421);
this.Controls.Add (this.label9);
this.Controls.Add (this.txtPhone);
this.Controls.Add (this.label8);
this.Controls.Add (this.txtContactTitle);
this.Controls.Add (this.label7);
this.Controls.Add (this.txtZip);
this.Controls.Add (this.label6);
this.Controls.Add (this.txtCity);
this.Controls.Add (this.label5);
this.Controls.Add (this.txtAddress);
this.Controls.Add (this.label4);
this.Controls.Add (this.txtContactName);
this.Controls.Add (this.label3);
this.Controls.Add (this.txtCompanyName);
this.Controls.Add (this.label2);
this.Controls.Add (this.txtCompanyID);
this.Controls.Add (this.label1);
this.Controls.Add (this.btnNew);
this.Controls.Add (this.txtCustomerName);
this.Controls.Add (this.btnUpdate);
this.Controls.Add (this.lblMessage);
this.Controls.Add (this.btnDelete);
this.Controls.Add (this.lbCustomers);
// handle the new button click
protected void btnNew_Click (object sender, System.EventArgs e)
{
// create a new row, populate it
DataRow newRow = dataTable.NewRow( );
newRow["CustomerID"]
= txtCompanyID.Text;
newRow["CompanyName"] = txtCompanyName.Text;
newRow["ContactName"] = txtContactName.Text;
newRow["ContactTitle"] = txtContactTitle.Text;
newRow["Address"]
= txtAddress.Text;
newRow["City"]
= txtCity.Text;
newRow["PostalCode"]
= txtZip.Text;
newRow["Phone"]
= txtPhone.Text;
359
Programming C#, 2nd Edition
// add the new row to the table
dataTable.Rows.Add(newRow);
// update the database
try
{
dataAdapter.Update(dataSet,"Customers");
dataSet.AcceptChanges( );
// inform the user
lblMessage.Text = "Updated!";
Application.DoEvents( );
// repopulate the list box
PopulateLB( );
// clear all the text fields
ClearFields( );
}
catch (SqlException ex)
{
dataSet.RejectChanges( );
MessageBox.Show(ex.Message);
}
}
// set all the text fields to empty strings
private void ClearFields( )
{
txtCompanyID.Text = "";
txtCompanyName.Text = "";
txtContactName.Text = "";
txtContactTitle.Text = "";
txtAddress.Text = "";
txtCity.Text = "";
txtZip.Text = "";
txtPhone.Text = "";
}
// handle the update button click
protected void btnUpdate_Click (object sender, System.EventArgs e)
{
// get the selected row
DataRow targetRow = dataTable.Rows[lbCustomers.SelectedIndex];
// inform the user
lblMessage.Text = "Updating " +
Application.DoEvents( );
targetRow["CompanyName"];
// edit the row
targetRow.BeginEdit( );
targetRow["CompanyName"] = txtCustomerName.Text;
targetRow.EndEdit( );
// get each row that changed
DataSet dataSetChanged =
dataSet.GetChanges(DataRowState.Modified);
360
Programming C#, 2nd Edition
// test to make sure all the changed rows are without errors
bool okayFlag = true;
if (dataSetChanged.HasErrors)
{
okayFlag = false;
string msg = "Error in row with customer ID ";
// examine each table in the changed DataSet
foreach (DataTable theTable in dataSetChanged.Tables)
{
// if any table has errors, find out which rows
if (theTable.HasErrors)
{
// get the rows with errors
DataRow[] errorRows = theTable.GetErrors( );
// iterate through the errors and correct
// (in our case, just identify)
foreach (DataRow theRow in errorRows)
{
msg = msg + theRow["CustomerID"];
}
}
}
lblMessage.Text = msg;
}
// if we have no errors
if (okayFlag)
{
// update the database
dataAdapter.Update(dataSetChanged,"Customers");
// inform the user
lblMessage.Text = "Updated " +
Application.DoEvents( );
targetRow["CompanyName"];
// accept the changes and repopulate the list box
dataSet.AcceptChanges( );
PopulateLB( );
}
}
else // if we had errors, reject the changes
dataSet.RejectChanges( );
// handle the delete button click
protected void btnDelete_Click (object sender, System.EventArgs e)
{
// get the selected row
DataRow targetRow = dataTable.Rows[lbCustomers.SelectedIndex];
// prepare message for user
string msg = targetRow["CompanyName"] + " deleted. ";
// delete the selected row
targetRow.Delete( );
361
Programming C#, 2nd Edition
// update the database
try
{
dataAdapter.Update(dataSet,"Customers");
dataSet.AcceptChanges( );
// repopulate the list box without the deleted record
PopulateLB( );
// inform the user
lblMessage.Text = msg;
Application.DoEvents( );
}
catch (SqlException ex)
{
dataSet.RejectChanges( );
MessageBox.Show(ex.Message);
}
}
}
}
public static void Main(string[] args)
{
Application.Run(new ADOForm1( ));
}
Figure 14-8 shows the filled-out form just before pressing the New button and Figure 14-9
shows the form immediately after adding the new record.
Figure 14-8. Getting ready to add a new record
362
Programming C#, 2nd Edition
Figure 14-9. After adding the new record
Note that the new record is appended to the end of the list and the text fields are cleared.
14.7 ADO.NET and XML
In this chapter, I have demonstrated the kinds of data access that users have come to expect
from ADO and shown how the new ADO.NET data access framework provides such support
through its class libraries. I would be remiss, however, if I failed to mention that ADO.NET
also provides complete support for XML. Most interesting is its support for presenting the
contents of a data set as either a collection of tables, as we have explored in this chapter, or as
an XML document.
The tight integration of ADO.NET and XML and its applications are beyond the scope of this
book, but complete information can be found in the .NET Framework SDK Reference.
363
Programming C#, 2nd Edition
Chapter 15. Programming Web Applications with
Web Forms
Rather than writing traditional Windows desktop and client-server applications, more and
more developers are now writing web-based applications, even when their software is for
desktop use. There are many obvious advantages. For one, you do not have to create as much
of the user interface; you can let Internet Explorer and Netscape Navigator handle a lot of it
for you. Another, perhaps bigger advantage is that distribution of revisions is faster, easier,
and less expensive. When I worked at an online network that predated the Web, we estimated
our cost of distribution for each upgrade at $1 million per diskette (remember diskettes?).
Web applications have virtually zero distribution cost. The third advantage of web
applications is distributed processing. With a web-based application, it is far easier to provide
server-side processing. The Web provides standardized protocols (e.g., HTTP, HTML, and
XML) to facilitate building n-tier applications.
The .NET technology for building web applications (and dynamic web sites) is ASP.NET,
which provides a rich collection of types for building web applications in its System.Web and
System.Web.UI namespaces. In this chapter, the focus is on where ASP.NET and C#
programming intersect: the creation of Web Forms. (For coverage of ASP.NET alone, see my
upcoming book, Programming ASP.NET, O'Reilly, 2002.)
Web Forms bring Rapid Application Development (RAD) techniques (such as those used in
Windows Forms) to the development of web applications. As with Windows Forms, drag and
drop controls onto a form and write the supporting code either inline or in code-behind pages.
With Web Forms, however, the application is deployed to a web server, and users interact
with the application through a standard browser.
15.1 Understanding Web Forms
Web Forms implement a programming model in which web pages are dynamically generated
on a web server for delivery to a browser over the Internet. They are, in some ways, the
successor to ASP pages, and they marry ASP technology with traditional programming.
With Web Forms, you create an HTML page with static content, and you write C# code to
generate dynamic content. The C# code runs on the server, and the data produced is integrated
with your static HTML to create the web page. What is sent to the browser is standard HTML.
Web Forms are designed to run on any browser, with the server rendering the correct
browser-compliant HTML. You can do the programming for the logic of the Web Form in
any .NET language. I will of course use C#, which is arguably the language of choice, though
some ASP developers who have used VBScript might opt for VB.NET.
Just as with Windows Forms, you can create Web Forms in Notepad (or another editor of
your choice) rather than in Visual Studio. Many developers will choose to do so, but Visual
Studio makes the process of designing and testing Web Forms much easier.
Web Forms divide the user interface into two parts: the visual part or user interface (UI), and
the logic that lies behind it. This is very similar to developing Windows Forms as shown in
Chapter 14, but with Web Forms the UI page and the code are in separate files.
364
Programming C#, 2nd Edition
The UI page is stored in a file with the extension .aspx. The logic (code) for that page can be
stored in a separate code-behind C# source file. When you run the form, the code-behind class
file runs and dynamically creates the HTML sent to the client browser. This code makes use
of the rich Web Forms types found in the System.Web and System.Web.UI namespaces of the
.NET Framework Class Library (FCL).
With Visual Studio, Web Forms programming couldn't be simpler: open a form, drag some
controls onto it, and write the code to handle events. Presto! You've written a web application.
On the other hand, even with Visual Studio writing a robust and complete web application can
be a daunting task. Web Forms offer a very rich UI; the number and complexity of web
controls have greatly multiplied in recent years, and user expectations about the look and feel
of web applications have risen accordingly.
In addition, web applications are inherently distributed. Typically, the client will not be in the
same building as the server. For most web applications, you must take network latency,
bandwidth, and network server performance into account when creating the UI; a round trip
from client to host might take a few seconds.
15.1.1 Web Form Events
Web Forms are event-driven. An event is an object that encapsulates the idea that "something
happened." An event is generated (or raised) when the user presses a button, or selects from a
list box, or otherwise interacts with the UI. Events can also be generated by the system
starting or finishing work. For example, open a file for reading, and the system raises an event
when the file has been read into memory.
The method that responds to the event is called the event handler. Event handlers are written
in C# in the code-behind page and are associated with controls in the HTML page through
control attributes.
Event handlers are delegates (see Chapter 12). By convention, ASP.NET event handlers
return void and take two parameters. The first parameter represents the object raising the
event. The second, called the event argument , contains information specific to the event, if
any. For most events, the event argument is of type EventArgs, which does not expose any
properties. For some controls, the event argument might be of a type derived from EventArgs
that can expose properties specific to that event type.
In web applications, most events are typically handled on the server and, therefore, require a
round trip. ASP.NET only supports a limited set of events, such as button clicks and text
changes. These are events that the user might expect to cause a significant change, as opposed
to Windows events (such as mouse-over) that might happen many times during a single userdriven task.
15.1.1.1 Postback versus non-postback events
Postback events are those that cause the form to be posted back to the server immediately.
These include click type events, such as the Button Click event. In contrast, many events
(typically change events) are considered non-postback in that the form is not posted back to
the server immediately. Instead, these events are cached by the control until the next time that
365
Programming C#, 2nd Edition
a postback event occurs. You can force controls with non-postback events to behave in a
postback manner by setting their AutoPostBack property to true.
15.1.1.2 State
A web application's State is the current value of all the controls and variables for the current
user in the current session. The Web is inherently a "stateless" environment. This means that
every post to the server loses the state from previous posts, unless the developer takes great
pains to preserve this session knowledge. ASP.NET, however, provides support for
maintaining the state of a user's session.
Whenever a page is posted to the server, it is re-created by the server from scratch before it is
returned to the browser. ASP.NET provides a mechanism that automatically maintains state
for server controls. Thus, if you provide a list and the user has made a selection, that selection
is preserved after the page is posted back to the server and redrawn on the client.
15.1.2 Web Form Life Cycle
Every request for a page made from a web server causes a chain of events at the server. These
events, from beginning to end, constitute the life cycle of the page and all its components. The
life cycle begins with a request for the page, which causes the server to load it. When the
request is complete, the page is unloaded. From one end of the life cycle to the other, the goal
is to render appropriate HTML output back to the requesting browser. The life cycle of a page
is marked by the following events, each of which you can handle yourself or leave to default
handling by the ASP.NET server:
Initialize
Initialize is the first phase in the life cycle for any page or control. It is here that any
settings needed for the duration of the incoming request are initialized.
Load ViewState
The ViewState property of the control is populated. The ViewState information
comes from a hidden variable on the control, used to persist the state across round
trips to the server. The input string from this hidden variable is parsed by the page
framework, and the ViewState property is set. This can be modified via the
LoadViewState( ) method. This allows ASP.NET to manage the state of your
control across page loads so that each control is not reset to its default state each time
the page is posted.
Process Postback Data
During this phase, the data sent to the server in the posting is processed. If any of this
data results in a requirement to update the ViewState, that update is performed via the
LoadPostData( ) method.
366
Programming C#, 2nd Edition
Figure 15-1. Creating a project in the New Project window of Visual Studio .NET
Visual Studio places nearly all the files it creates for the project in a folder within your local
machine's default web site -- for example, c:\Inetpub\wwwroot\ProgrammingCSharpWeb.
In Visual Studio .NET, a solution is a set of projects; each project will
create a dynamic link library (DLL) or an executable (EXE). All
projects are created in the context of a solution, and solutions are
managed by .sln and .suo files.
The solution files and other Visual Studio-specific files are stored in <drive>\Documents and
Settings\<user name>\My Documents\Visual Studio Projects (where <drive> and
<user name> are specific to your machine).
You must have IIS and the FrontPage Server extensions installed on
your computer to use Web Forms. To configure the FrontPage Server
extensions, open the Internet Service Manager and right-click the web
site. Select All Tasks
Configure Server Extensions. For further
information, please check />When the application is created, Visual Studio places a number of files in your project. The
Web Form itself is stored in a file named WebForm1.aspx. This file will contain only HTML.
A second, equally important file, WebForm1.aspx.cs, stores the C# associated with your form;
this is the code-behind file.
Notice that the code-behind file does not appear in the Solution Explorer. To see the codebehind (.cs) file, you must place the cursor within Visual Studio .NET, right-click the form,
and choose "View Code" in the pop-up menu. You can now tab back and forth between the
form itself, WebForm1.aspx, and the C# code-behind file, WebForm1.aspx.cs. When viewing
the form, WebForm1.aspx, you can choose between Design mode and HTML mode by
368
Programming C#, 2nd Edition
clicking the tabs at the bottom of the Editor window. Design mode lets you drag controls onto
your form; HTML mode allows you to view and edit the HTML code directly.
Let's take a closer look at the .aspx and code-behind files that Visual Studio creates. Start by
renaming WebForm1.aspx to HelloWeb.aspx. To do this, close WebForm1.aspx, and then
right-click its name in the Solution Explorer. Choose Rename and enter the name
HelloWeb.aspx. After you rename it, open HelloWeb.aspx and view the code; you will find
that the code-behind file has been renamed as well to HelloWeb.aspx.cs.
When you create a new Web Form application, Visual Studio .NET will generate a bit of
boilerplate code to get you started, as shown in Example 15-1.
Example 15-1. Wizard-generated code for a Web Form
<%@ Page language="c#"
Codebehind="HelloWeb.aspx.cs"
AutoEventWireup="false"
Inherits="ProgrammingCSharpWeb.WebForm1" %>
<!DOCTYPE HTML PUBLIC "-//W3C//DTD HTML 4.0 Transitional//EN" >
<html>
<head>
<title>WebForm1</title>
Content="Microsoft Visual Studio 7.0">
<meta name="CODE_LANGUAGE" Content="C#">
<meta name="vs_defaultClientScript" content="JavaScript">
content=" /></head>
<body MS_POSITIONING="GridLayout">
<form id="Form1" method="post" runat="server">
</form>
</body>
</html>
What you see is typical boilerplate HTML except for the first line, which contains the
following ASP.NET code:
<%@ Page language="c#"
Codebehind="HelloWeb.aspx.cs"
AutoEventWireup="false"
Inherits="ProgrammingCSharpWeb.WebForm1" %>
The language attribute indicates that the language used on the code-behind page is C#. The
Codebehind attribute designates that the filename of that page is HelloWeb.cs, and the
Inherits attribute indicates that this page derives from WebForm1. WebForm1 is a class
declared in HelloWeb.cs.
public class WebForm1 : System.Web.UI.Page
369
Programming C#, 2nd Edition
As the C# code makes clear, WebForm1 inherits from System.Web.UI.Page, which is the
class that defines the properties, methods, and events common to all server-side pages.
Returning to the HTML view of HelloWeb.aspx, you see that a form has been specified in the
body of the page using the standard HTML form tag:
<form id="Form1" method="post" runat="server">
Web Forms assumes that you need at least one form to manage the user interaction, and
creates one when you open a project. The attribute runat="server" is the key to the serverside magic. Any tag that includes this attribute is considered a server-side control to be
executed by the ASP.NET framework on the server.
Having created an empty Web Form, the first thing you might want to do is add some text to
the page. By switching to HTML view, you can add script and HTML directly to the file just
as you could with classic ASP. Adding the following line to the body segment of the HTML
page will cause it to display a greeting and the current local time:
Hello World! It is now <% = DateTime.Now.ToString( ) %>
The <% and %> marks work just as they did in classic ASP, indicating that code falls between
them (in this case, C#). The = sign immediately following the opening tag causes ASP.NET to
display the value, just like a call to Response.Write( ). You could just as easily write the
line as:
Hello World! It is now
<% Response.Write(DateTime.Now.ToString( )); %>
Run the page by pressing Ctrl-F5 (or save it and navigate to it in your browser). You should
see the string printed to the browser, as in Figure 15-2.
Figure 15-2. Output generated by the HelloWorld.aspx file
15.3 Adding Controls
You can add server-side controls to a Web Form in two ways: manually (by writing HTML
into the HTML page), or by dragging controls from the toolbox to the Design page. For
example, suppose you want to use buttons to let the user choose one of three Shippers
provided in the Northwinds database. You could write the following HTML into the <form>
element in the HTML window:
370
Programming C#, 2nd Edition
</asp:RadioButton>
</asp:RadioButton>
</asp:RadioButton>
The asp tags declare server-side ASP.NET controls that are replaced with normal HTML
when the server processes the page. When you run the application, the browser displays three
radio buttons in a button group; pressing one will deselect the others.
You can create the same effect more easily by dragging three buttons from the Visual Studio
toolbox onto the Form, as illustrated in Figure 15-3.
Figure 15-3. Dragging buttons onto the Web Form
You can add controls to a page in one of two modes. The default mode is GridLayout. When
you add controls in GridLayout, they are arranged in the browser using absolute positioning
(x and y coordinates).
371
Programming C#, 2nd Edition
The alternative mode is FlowLayout. With FlowLayout, the controls are added to the form
from top to bottom, as in a Microsoft Word document. To change from Grid to Layout or
back, change the pageLayout property of the document in Visual Studio .NET.
Web Forms offer two types of server-side controls. The first is server-side HTML controls,
also called Web Controls. These are standard HTML controls that you tag with the attribute
runat=Server.
The alternative to Web Controls is ASP.NET Server Controls, also called ASP Controls. ASP
Controls have been designed to replace the standard HTML controls. ASP Controls provide a
more consistent object model and more consistently named attributes. For example, with
HTML controls, there are myriad different ways to handle input:
<input type = "radio">
<input type="checkbox">
<input type="button">
<input type="text">
<textarea>
Each of these behaves differently and takes different attributes. The ASP Controls try to
normalize the set of controls, using attributes consistently throughout the ASP control object
model. The ASP Controls that correspond to the preceding HTML server-side controls are:
<asp:RadioButton>
<asp:CheckBox>
<asp:Button>
<asp:TextBox rows="1">
<asp:TextBox rows="5">
The remainder of this chapter focuses on ASP Controls.
15.4 Data Binding
Various technologies have offered programmers the opportunity to bind controls to data so
that as the data is modified, the controls respond automatically. As Rocky used to say to
Bullwinkle, "But that trick never works." Bound controls often provided only limited control
over their look and feel, and performance was usually pretty terrible. The ASP.NET designers
set out to solve these problems and provide a suite of robust data-bound controls, which
simplify display and modification of data, sacrificing neither performance nor control over
the UI.
In the previous section, you hardcoded radio buttons onto a form, one for each of three
Shippers in the Northwinds database. That can't be the best way to do it; if you change
the Shippers in the database, you have to go back and rewire the controls. This section shows
how you can create these controls dynamically and then bind them to data in the database.
You might want to create the radio buttons based on data in the database because you can't
know at design time what text the buttons will have, or even how many buttons you'll need.
To accomplish this, use a RadioButtonList. RadioButtonList is a control that allows you
to create radio buttons programatically; you provide the name and values for the buttons, and
ASP.NET takes care of the plumbing.
372
Programming C#, 2nd Edition
Delete the radio buttons already on the form, and drag and drop a RadioButtonList in their
place. Once it is there, you can use the Properties window to rename it to rbl1.
15.4.1 Setting Initial Properties
Web Forms programming is event-based; you write your code to respond to various events.
Typically, the events you're responding to are user-initiated. For example, when the user
clicks a button, a Button-Click event is generated.
The most important initial event is the Page_Load event, which is fired every time a Web
Form is loaded. When the page is loaded, you want to fill the radio buttons with values from
the database. For example, if you are creating a purchase form, you might create one radio
button for each possible shipping method, such as UPS, FedEx, and so forth. You should
therefore put your code into the Page_Load method to create the buttons.
You only want to load these values into the radio buttons the first time the page is loaded. If
the user clicks a button or takes another action that sends the page back to the server, you do
not want to retrieve the values again when the page is reloaded.
ASP.NET can differentiate the first time the page is displayed from subsequent displays after
a client postback of the page to the server. Every Web Form page has the property
IsPostBack, which will be true if the page is being loaded in response to a client postback,
and false if it is being loaded for the first time.
You can check the value of IsPostBack. If it is false, you know that this is the first time the
page is being displayed, and it's therefore time to get the values out of the database:
protected void Page_Load(object sender, EventArgs e)
{
if (!IsPostBack)
{//... }
}
The arguments to the Page_Load method are the normal arguments for events, as discussed in
Chapter 12.
15.4.2 Connecting to the Database
The code for making the connection to the database and filling a data set will look very
familiar; it is almost identical to what you saw in Chapter 14. There is no difference in
creating a data set for Web Forms and creating a data set for Windows Forms.
Start by declaring the member variables you need:
private
private
private
private
System.Data.SqlClient.SqlConnection myConnection;
System.Data.DataSet myDataSet;
System.Data.SqlClient.SqlCommand myCommand;
System.Data.SqlClient.SqlDataAdapter dataAdapter;
373