Professional ASP.NET 2.0 XML phần 9 pot
Bạn đang xem bản rút gọn của tài liệu. Xem và tải ngay bản đầy đủ của tài liệu tại đây (1.32 MB, 60 trang )
Figure 13-7
Asynchronous Web Service Methods
The previous section discussed how to call Web services asynchronously over HTTP using the client-side
capabilities of the .NET Framework. This approach is an extremely useful way to make calls to a Web
service without locking up your application or spawning a bunch of background threads. This section
discusses asynchronous Web service methods that provide similar capabilities on the server side.
When you invoke a normal, synchronous ASP.NET Web service method, the response for a synchronous
Web method is sent when you return from the method. If it takes a relatively long period of time for a
request to complete, then the thread that is processing the request will be in use until the method call is
done. Unfortunately, most lengthy calls are due to something like a long database query, or perhaps a
call to another Web service. For instance, if you make a Web service call across the Internet, the current
thread waits for the Web service call to complete. The thread has to simply wait around doing nothing
until it hears back from the Web service. In this case, if you can free up the thread to do other work while
waiting for the Web service, you can increase the throughput of your application.
Waiting threads can impact the performance of a Web service because they don’t do
anything productive, such as servicing other requests. To overcome this problem, you
need a way to be able to start a lengthy background process on a server, but return the
current thread to the ASP.NET process pool. When the lengthy background process
completes, you would like to have a callback function invoked so that you can finish
processing the request and somehow signal the completion of the request to ASP.NET.
This is exactly what ASP.NET offers through asynchronous Web methods.
454
Chapter 13
16_596772 ch13.qxd 12/13/05 11:20 PM Page 454
How Asynchronous Web Methods Work
When you write a typical ASP.NET Web service using Web methods, Visual Studio simply compiles your
code to create the assembly that will be called when requests for its Web methods are received. When
your application is first launched, the ASMX handler reflects over your assembly to determine which
Web methods are exposed. For normal, synchronous requests, it is simply a matter of finding which
methods have a WebMethod attribute associated with them, and setting up the logic to call the right
method based on the SOAPAction HTTP header.
For asynchronous requests, during reflection the Web service handler looks for Web methods with a
specific signature that differentiates the method as being asynchronous. In particular, it looks for a pair
of methods that have the following rules:
❑ There is a
BeginXXX and EndXXX Web method where XXX is any string that represents the name
of the method you want to expose.
❑ The
BeginXXX function returns an IAsyncResult interface and takes an AsyncCallback, and
an object as its last two parameters, respectively.
❑ The
EndXXX function takes as its only parameter an IAsyncResult interface.
❑ Both
BeginXXX and EndXXX methods must be flagged with the WebMethod attribute.
If the Web service handler finds two methods that meet all these requirements, it will expose the method
XXX in its WSDL as if it were a normal Web method. The method will accept the parameters defined
before the AsyncCallback parameter in the signature for
BeginXXX as input, and it will return what is
returned by the
EndXXX function. So if you have a Web method whose synchronous declaration looks
like the following:
[WebMethod]
public string SleepForSpecificDuration(int milliseconds)
{ }
An asynchronous declaration will look like the following:
[WebMethod]
public IAsyncResult BeginSleepForSpecificDuration (
int milliseconds, AsyncCallback callback, object s)
{ }
[WebMethod]
public string EndSleepForSpecificDuration (IAsyncResult call)
{ }
The WSDL for both synchronous and asynchronous methods will be the same.
After the Web service handler reflects on an assembly and detects an asynchronous Web method, it must
handle requests for that method differently than it handles synchronous requests. Instead of calling a
simple method, it calls the
BeginXXX method. It deserializes the incoming request into the parameters to
be passed to the function — as it does for synchronous requests — but it also passes the pointer to an
internal callback function as the
AsyncCallback parameter to the BeginXXX method.
455
XML Web Services
16_596772 ch13.qxd 12/13/05 11:20 PM Page 455
Now that you have a general understanding of the asynchronous Web methods, Listing 13-20 shows an
example implementation.
Listing 13-20: Creating Asynchronous Web Service Methods
using System;
using System.Web;
using System.Collections;
using System.Web.Services;
using System.Web.Services.Protocols;
[WebService(Namespace = “ />[WebServiceBinding(ConformsTo = WsiProfiles.BasicProfile1_1)]
public class AsyncWebService : System.Web.Services.WebService
{
public delegate string SleepForSpecificDurationAsyncStub(int milliseconds);
public string SleepForSpecificDuration(int milliseconds)
{
System.Threading.Thread.Sleep(milliseconds);
return “Completed”;
}
public class WebServiceState
{
public object PreviousState;
public SleepForSpecificDurationAsyncStub AsyncStub;
}
[WebMethod]
public IAsyncResult BeginSleepForSpecificDuration(int milliseconds,
AsyncCallback callback, object s)
{
SleepForSpecificDurationAsyncStub stub = new
SleepForSpecificDurationAsyncStub(SleepForSpecificDuration);
WebServiceState state = new WebServiceState();
state.PreviousState = s;
state.AsyncStub = stub;
return stub.BeginInvoke(milliseconds, callback, state);
}
[System.Web.Services.WebMethod]
public string EndSleepForSpecificDuration(IAsyncResult call)
{
WebServiceState state = (WebServiceState)call.AsyncState;
return state.AsyncStub.EndInvoke(call);
}
}
In Listing 13-20, after the Web service handler calls the BeginSleepForSpecificDuration() method,
it will return the thread to the process thread pool so it can handle any other requests that are received.
The
HttpContext for the request will not be released yet. The ASMX handler will wait until the callback
function that it passed to the
BeginSleepForSpecificDuration() function is called for it to finish
processing the request. After the callback function is called, the ASMX handler will call the
EndSleep
456
Chapter 13
16_596772 ch13.qxd 12/13/05 11:20 PM Page 456
ForSpecificDuration() function so that your Web method can complete any processing it needs
to perform, and the return data can be supplied that will be serialized into the SOAP response. Only
when the response is sent after the
EndSleepForSpecificDuration() function returns will the
HttpContext for the request be released.
Controlling XML Serialization Using IXmlSerializable
In .NET V1.x, you had only limited control over how types were serialized using the XmlSerializer.
You could attribute types at design time and you could also override those attributes with new values at
runtime, but it was based on attributes and you never really had complete control over the serialization
process. Now with the release of .NET 2.0, this is no longer true. The
IXmlSerializable interface,
which has been present in the .NET Framework since version 1.x (but meant only for internal use), is
now available for general use, thereby providing you with the ability to have more control over the gen-
erated schema and wire format.
One change that has been introduced with the
IXmlSerializable interface is that the GetSchema()
method should no longer be used. Instead you should use a new attribute named XmlSchemaProvider
to specify the static method that generates and inserts the schema in the XmlSchemaSet for the Web
service. The
ReadXml() method controls reading the serialized format and is handed an XmlReader to
read from the stream and populate the type. The
WriteXml() method controls writing the serialized
format and is handed an
XmlWriter to write out the data to the stream.
Listing 13-21 shows the
Customer class implementing the IXmlSerializable interface.
Listing 13-21: Implementing IXmlSerializable Interface to Customize XML Serialization
using System;
using System.Xml;
using System.Xml.Schema;
using System.Xml.Serialization;
[XmlSchemaProvider(“CreateCustomerSchema”)]
public class Customer : IXmlSerializable
{
private string _firstName;
private string _lastName;
private string _address;
public Customer()
{
An example where you might need this type of control is when streaming large
amounts of data. To enable streaming of data, you have to turn off response buffer-
ing and then chunk the data into discrete blocks of data demarcated with XML ele-
ments.
IXmlSerializable lets you control the schema for this chunking format and
control the reading and writing of this data to the stream with the
ReadXml() and
WriteXml() methods.
457
XML Web Services
16_596772 ch13.qxd 12/13/05 11:20 PM Page 457
}
public Customer(string firstName, string lastName, string address)
{
_firstName = firstName;
_lastName = lastName;
_address = address;
}
public static XmlQualifiedName CreateCustomerSchema(XmlSchemaSet set)
{
XmlSchema schema = new XmlSchema();
schema.Id = “Test”;
schema.TargetNamespace = “urn:types-wrox-com”;
XmlSchemaComplexType type = new XmlSchemaComplexType();
type.Name = “customerType”;
XmlSchemaAttribute firstNameAttr = new XmlSchemaAttribute();
firstNameAttr.Name = “firstName”;
type.Attributes.Add(firstNameAttr);
XmlSchemaAttribute lastNameAttr = new XmlSchemaAttribute();
lastNameAttr.Name = “lastName”;
type.Attributes.Add(lastNameAttr);
XmlSchemaAttribute addressAttr = new XmlSchemaAttribute();
addressAttr.Name = “address”;
type.Attributes.Add(addressAttr);
XmlSchemaElement customerElement = new XmlSchemaElement();
customerElement.Name = “customer”;
XmlQualifiedName name = new XmlQualifiedName(“customerType”,
“urn:types-wrox-com”);
customerElement.SchemaTypeName = name;
schema.Items.Add(type);
schema.Items.Add(customerElement);
set.Add(schema);
return name;
}
public XmlSchema GetSchema()
{
return (null);
}
public void WriteXml(XmlWriter writer)
{
writer.WriteStartElement(“customer”, “urn:wrox-com”);
writer.WriteAttributeString(“firstName”, _firstName);
writer.WriteAttributeString(“lastName”, _lastName);
writer.WriteAttributeString(“address”, _address);
writer.WriteEndElement();
}
public void ReadXml(XmlReader reader)
{
458
Chapter 13
16_596772 ch13.qxd 12/13/05 11:20 PM Page 458
XmlNodeType type = reader.MoveToContent();
if ((type == XmlNodeType.Element) && (reader.LocalName == “customer”))
{
_firstName = reader[“firstName”];
_lastName = reader[“lastName”];
_address = reader[“address”];
}
}
public override string ToString()
{
return (string.Format(“Person [{0} {1}]”));
}
}
In Listing 13-21, the Customer class implements the IXmlSerializable interface and the read/write is
implemented in
ReadXml() and WriteXml() methods, respectively. Note that the Customer class is
decorated with an
XmlSchemaProvider attribute which states that the schema for the serialized form of
Customer class will be provided by the CreateCustomerSchema() method. In the CreateCustomer
Schema()
method, you make up a schema each time and provide it back to the framework.
With the
Customer class in place, you should be able to use that class from a Web service as shown in
Listing 13-22.
Listing 13-22: Utilizing the Customer Class from a Web Service Method
using System;
using System.Web.Services;
using System.Web.Services.Protocols;
[WebService(Namespace = “ />[WebServiceBinding(ConformsTo = WsiProfiles.BasicProfile1_1)]
public class CustomerService : System.Web.Services.WebService
{
public CustomerService ()
{
}
[WebMethod]
public Customer GetCustomer()
{
Customer cust = new Customer(“Thiru”, “Thangarathinam”,
“900 N Rural Road, Chandler, AZ”);
return cust;
}
}
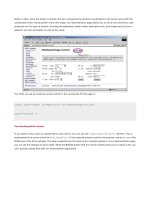
In Listing 13-22, the GetCustomer() method simply creates an instance of the Customer object and
returns it back to the caller. If you test this Web service method using the default Web service test
harness, you should see an output similar to Figure 13-8.
459
XML Web Services
16_596772 ch13.qxd 12/13/05 11:20 PM Page 459
Figure 13-8
Using Schema Importer Extensions
In the .NET Framework 2.0, there is a new namespace named System.Xml.Serialization.Advanced
that supports advanced XML serialization and schema generation scenarios. Currently, this namespace
contains the following types:
❑
SchemaImporterExtension — Allows you to customize the code generated from a WSDL
document
❑
SchemaImporterExtensionCollection — Represents the collection of
SchemaImporterExtension objects
Schema importation occurs whenever a Web service proxy is produced through a tool such as the Add
Web Reference dialog box found in Visual Studio, or by using the
WSDL.exe. Schema importation also
occurs when using the XML Schema Definition Tool (
Xsd.exe) to generate code from a specific XSD
document.
The SchemaImporterExtension Class
The SchemaImporterExtension class allows you to modify the code generated when using any of the
automated tools. For example, you may have an existing class that processes book orders on a system
and you have an existing XSD document that supplies your orders. Using the
SchemaImporter
Extension
class, you can instruct the automated tools to generate code that uses your class. To control
the generation of the code, you must use the classes found in the
System.CodeDom namespace.
You need to go through the following steps to enable the proxy generation tools to use your extensions.
1. Create an implementation of the SchemaImporterExtension class.
2. Use the ImportSchemaType method to write code for the code generator. The method contains
parameters that allow you to examine the intercepted XSD type and create CodeDOM objects
that are used to generate the new CLR code.
460
Chapter 13
16_596772 ch13.qxd 12/13/05 11:20 PM Page 460
3. Optionally, use the ImportAnyElement() method to handle <xsd:any> elements found in the
XSD document.
4. Optionally, use the ImportDefaultValue() method to examine default values found in the
XSD document and return a different default value.
5. Compile your extension into a library.
6. Sign the assembly.
7. Install the assembly in the Global Assembly Cache (GAC).
8. Modify the machine.config file to include the extension.
Now that you understand the steps, the next section examines the creation of a schema importer exten-
sion class.
Creating a Schema Importer Extension Class
Creating a schema importer extension is pretty easy. You simply derive from SchemaImporterExtension
and override the appropriate methods. In most cases, you will override the ImportSchemaType()
method, which perform most of the heavy lifting. Listing 13-23 shows an example in action.
Listing 13-23: Custom Schema Importer Extension for the Customer Class
using System;
using System.CodeDom;
using System.CodeDom.Compiler;
using System.Collections;
using System.Xml;
using System.Xml.Schema;
using System.Xml.Serialization;
using System.Xml.Serialization.Advanced;
namespace SchemaImporterExtensionsLib
{
public sealed class CustomerSchemaImporterExtension : SchemaImporterExtension
{
public override string ImportSchemaType(string name, string ns,
XmlSchemaObject context, XmlSchemas schemas, XmlSchemaImporter importer,
CodeCompileUnit compileUnit, CodeNamespace mainNamespace,
CodeGenerationOptions options, CodeDomProvider codeProvider)
{
if (name.Equals(“Customer”) && ns.Equals(“urn:wrox-com”))
{
CodeTypeDeclaration customer = new CodeTypeDeclaration(“Customer”);
mainNamespace.Types.Add(customer);
CodeMemberField firstNameField = new CodeMemberField(
new CodeTypeReference(typeof(string)),”_firstName”);
customer.Members.Add(firstNameField);
CodeMemberProperty firstNameProperty = new CodeMemberProperty();
firstNameProperty.Attributes = MemberAttributes.Public |
MemberAttributes.Final;
firstNameProperty.GetStatements.Add(new CodeMethodReturnStatement(
new CodeFieldReferenceExpression(new
461
XML Web Services
16_596772 ch13.qxd 12/13/05 11:20 PM Page 461
CodeThisReferenceExpression(), “_firstName”)));
firstNameProperty.Name = “FirstName”;
firstNameProperty.SetStatements.Add(new CodeAssignStatement(
new CodeFieldReferenceExpression(new
CodeThisReferenceExpression(),”_firstName”),
new CodePropertySetValueReferenceExpression()));
firstNameProperty.Type = new CodeTypeReference(typeof(string));
customer.Members.Add(firstNameProperty);
CodeMemberField lastNameField = new CodeMemberField(
new CodeTypeReference(typeof(string)),”_lastName”);
customer.Members.Add(lastNameField);
CodeMemberProperty lastNameProperty = new CodeMemberProperty();
lastNameProperty.Attributes = MemberAttributes.Public |
MemberAttributes.Final;
lastNameProperty.GetStatements.Add(new CodeMethodReturnStatement(
new CodeFieldReferenceExpression(new
CodeThisReferenceExpression(),”_lastName”)));
lastNameProperty.Name = “LastName”;
lastNameProperty.SetStatements.Add(new CodeAssignStatement(
new CodeFieldReferenceExpression(new
CodeThisReferenceExpression(),”_lastName”),
new CodePropertySetValueReferenceExpression()));
lastNameProperty.Type = new CodeTypeReference(typeof(string));
customer.Members.Add(lastNameProperty);
return “Customer”;
}
return null;
}
}
}
In this code example, you can see that the only type this extension can process is the element named
Customer that resides in the namespace,
“urn:wrox-com”. This means that whenever this schema
importer extension finds a type it is responsible for generating custom code, it does so via the Code
DOM provided by the .NET Framework.
Changes to the machine.config File
When a proxy generation tool is used to import a XML Schema, it uses the System.Xml.Serialization
.XmlSchemaImporter
class internally to process the schema elements found in the XML Schema docu-
ment. When created, the
XmlSchemaImporter class loads any schema importer extensions defined in the
underlying configuration. In this instance, by default, all the schema importer extensions are registered in
the machine.config file. The following declaration shows how a schema importer extension is registered in
machine.config.
<configuration>
<system.xml.serialization>
<schemaImporterExtensions>
<add name=”CustomerSchemaExtension”
type=”SchemaImporterExtensionsLib.CustomerSchemaImporterExtension,
462
Chapter 13
16_596772 ch13.qxd 12/13/05 11:20 PM Page 462
SchemaImporterExtensionsLib, Version=1.0.0.0,
Culture=neutral,PublicKeyToken=2489eb64bbbf6741” />
</schemaImporterExtensions>
</system.xml.serialization>
</configuration>
After the extension is registered in the machine.config file, whenever a proxy generation tool encounters
the type
urn:wrox-com:Customer, the custom code (through the ImportSchemaType() method) will
be added to the generated class file.
Miscellaneous Web Service Features in .NET
Framework 2.0
.NET Framework 2.0 provides a number of new features for the Web service developers. Some, which
you have already seen, are the support for WS-I Basic Profile, custom XML serialization through
IXmlSerializable interface, and schema importer extensions. In addition to these features, there are a
couple of minor but important features that deserve a mention. The next few sections give you a run-
down of these features.
Enabling Decompression in a Web Service Client
Now with .NET 2.0, enabling decompression on the client side just requires one line of code. All you
need to do is to set the
EnableDecompression property on an instance of a client proxy class to true,
as follows.
CategoriesService obj = new CategoriesService();
obj.EnableDecompression = true;
This gives the Web clients the capability to interoperate with services that support compression. To dis-
able decompression, set
EnableDecompression to false. Setting this property to false enables the
server to know that decompression is not supported on the client side.
Type Sharing across Proxies
ASP.NET Web services now support proxy type sharing. This feature allows you to share identical types
from different Web services within the client-side proxy class. For example, you can take a type instance
returned from one Web service and pass it to another, and vice versa.
In many real-world scenarios, you may want to factor your application’s functionality into individual
services that group methods that logically fit together. This typically leads to sharing one or more data
types between those Web services. For example, you may have an Order Entry service that returns an
Order object and an Order Status service that takes in an Order object. In this scenario, you can leverage
Custom schema importer extension is useful when the client of a Web service has
custom types that are much richer than those generated by wsdl.exe. Prior to the
.NET Framework 2.0, this was possible only by modifying the generated proxy. But
the problem with this approach was that the changes were lost when the proxy was
regenerated. Schema Importer Extensions can now be developed and registered to
map schema type to the custom type every time the proxy is generated.
463
XML Web Services
16_596772 ch13.qxd 12/13/05 11:20 PM Page 463
the new type sharing feature of .NET 2.0 and provide the client with one Order class that is shared by
the two service proxies. This feature is exposed on wsdl.exe with the
/sharetypes switch. When using
this switch you supply the URLs of two or more WSDL documents on the command line. For example:
wsdl.exe /sharetypes http://localhost/OrderService.asmx?wsdl
http://localhost/OrderStatusService.asmx?wsdl
The code generation engine recognizes when types are equivalent based on their names and name-
spaces, and by comparing their schema definition.
Support for W3C SOAP 1.2
Version 2.0 of the .NET Framework includes support for the W3C SOAP version 1.2 protocol in addition
to the existing SOAP version 1.1 protocol. On the server side, SOAP 1.2 is on by default and can be
turned off via configuration settings in
machine.config or web.config:
<system.web>
<webServices>
<protocols>
<remove name=”HttpSoap12”/>
</protocols>
</webServices>
</system.web>
With both SOAP 1.1 and SOAP 1.2 enabled on the server side, each Web service will support both proto-
cols, allowing the client to choose one of the two protocols. This increases the reach of your Web ser-
vices. On the client side, you can select SOAP 1.1 or 1.2 by setting the
SoapVersion property of the
proxy class. For example:
proxy.SoapVersion = System.Web.Services.Protocols.SoapProtocolVersion.Soap12;
When using wsdl.exe to consume a Web service that supports both SOAP 1.1 and 1.2, you can specify
/protocol: SOAP12 on the command line to generate a proxy class that has its SoapVersion property
set to
SoapProtocolVersion.Soap12. After you set this property, when you invoke the service you
will be using SOAP 1.2.
Summary
This chapter exposed you to the core building blocks of .NET Web services. The chapter began by exam-
ining the creation of a simple Web service and discussed the different attributes used with a Web service.
As you learned, Web services developed using the .NET platform require little more than applying the
WebMethod attribute to each member you want to expose from the XML Web service type. After you
have created any number of
WebMethod-enabled members, you can interact with a Web service through
an intervening proxy. You can either use the
WSDL.exe utility or the Add Web Reference option to gener-
ate such a proxy, which can then be used by a Web service client. You can use this proxy to syn-
chronously and asynchronously invoke a Web service method.
With the extensibility features built into the .NET Framework, you also have the option of leveraging
sophisticated features such as SOAP headers, SOAP extensions, custom XML serialization, and schema
importer extensions while building Web services. Finally, the .NET Framework 2.0 also offers new fea-
tures such as enable decompression, type sharing across proxies, and support for SOAP 1.2.
464
Chapter 13
16_596772 ch13.qxd 12/13/05 11:20 PM Page 464
ASP.NET 2.0 Configuration
When ASP.NET 1.0 was first released, it was lauded for the comprehensive feature set with which it
shipped. The long list of new features included object-oriented programming model, caching, rich
server controls, declarative programming model, and so on; however ASP.NET 1.0 provided only
basic support for configuration management, leaving Notepad pretty much the tool of choice for
configuration management. But now with the release of ASP.NET 2.0, things have dramatically
changed with the suite of new configuration improvements that Web developers and administrators
can take advantage of. As part of this, ASP.NET 2.0 ships with a new configuration management API
that enables users to programmatically build programs or scripts that create, read, and update
web
.config
and machine.config configuration files. In addition, ASP.NET 2.0 also provides a new
comprehensive admin tool that plugs into the existing IIS Administration MMC, enabling an admin-
istrator to graphically read or change any setting within our XML configuration files. This chapter
focuses on the new configuration management API by demonstrating the classes, properties, and
methods of the new API and examples of how to use them from within your ASP.NET applications.
By the end of this chapter, you will have a good understanding of the following:
❑ New configuration sections introduced with ASP.NET 2.0
❑ How to store and retrieve application settings from predefined ASP.NET sections
❑ How to utilize the web.config file settings to write database independent code
❑ How to encrypt and decrypt configuration settings
❑ How to enumerate configuration sections
❑ How to read contents of the configuration section using strongly typed API
❑ How to read contents of the configuration section using raw XML
❑ How to create a custom configuration section and persist its contents onto a
web.config file
❑ Built-in management tools supplied with ASP.NET 2.0 and Visual Studio 2005
The next section starts by exploring the ASP.NET configuration architecture.
17_596772 ch14.qxd 12/13/05 11:08 PM Page 465
ASP.NET Configuration
A web.config file is an XML-based text file that can contain standard XML document elements, including
well-formed tags, comments, text, cdata, and so on. The file may be ANSI, UTF-8, or Unicode; the
system automatically detects the encoding. The root element of a web.config file is always a
<configuration> tag. ASP.NET end-user settings are then encapsulated within the tag, as follows:
<configuration>
<!- Configuration settings would go here. >
</configuration>
ASP.NET configuration settings are represented within configuration tag sections, also nested within a
<configuration> tag (and, optionally, within section group tags). For example, in the following sample,
the tag
<pages> is the configuration section that defines configuration settings for the ASP.NET page
compiler. Configuration section groups allow hierarchical grouping of sections for organizational pur-
poses. For example, all built-in ASP.NET sections belong in the
<system.web> section group. Section
groups may appear inside other section groups.
In the following example, the configuration file contains configuration settings for the built-in
<pages>
ASP.NET section. This section is contained within the built in section group called <system.web>.
<configuration>
<system.web>
<pages enableSessionState=”true” />
</system.web>
</configuration>
Configuration Hierarchy
ASP.NET configuration model inherits settings from server to application through a hierarchical model.
With a hierarchical model, you can specify settings in the
machine.config or web.config file of a parent
application, and those settings will propagate to any child applications. Child applications can inherit from
parent applications, and all applications inherit from the
machine.config file. You can specify settings for
an entire server, single or multiple applications, single or multiple directories, or even a single file. The
following rules apply to the inheritance of configuration settings.
❑ Applications first inherit their settings from the
machine.config file of the server, then from
the
web.config file of any parent applications, and finally from their own web.config file.
❑ The settings in each
web.config file override the settings from the machine.config and
web.config files before it.
Note tag names in a configuration file are case-sensitive and must be typed exactly
as shown. Various attributes and settings for ASP.NET are also case-sensitive and
will not be examined by the configuration runtime if the case does not match.
466
Chapter 14
17_596772 ch14.qxd 12/13/05 11:08 PM Page 466
❑ Inheritance follows the URL of the requested resource and not necessarily the physical structure
of the files.
❑ The
web.config file is a subset of machine.config, written according to the same XML
schema.
❑ The settings in the
machine.config file or a parent application’s web.config file can prevent
settings from being overridden.
❑ The settings can be targeted to a specific directory, application, or file using the location setting.
An application can override most of the default values stored in the
machine.config file by creating
one or more
web.config files. At a minimum, an application creates a web.config file in its root folder.
Although
web.config allows you to override some of the default settings, you cannot override all settings
defined in machine.config. In particular, the information about the ASP.NET process model can be
defined only in a machine-wide manner using the
machine.config file.
ASP.NET 1.x Way of Accessing Configuration Sections
In ASP.NET 1.x, there was only one view of configuration: runtime. That view is implemented by an
object call
System.Configuration.ConfigurationSettings returns configuration sections through
calls to a static method named
GetConfig that takes in the sectionName as an argument. The
sectionName you passed into GetConfig checks to see that the sectionName itself is valid before any
config files are opened.
Things have changed for the better in ASP.NET 2.0. ASP.NET 2.0 ships with a comprehensive manage-
ment API for reading, editing, and creating
web.config file settings. The root class for programmatic
access to the configuration infrastructure is Configuration. Using the static methods of this class, you can
access the
machine.config file and any web.config file defined in the context of the application. The
next section starts by looking at the new configuration sections introduced with ASP.NET 2.0.
ASP.NET 2.0 Configuration Management
Now that you have a general understanding of the ASP.NET configuration architecture, the remainder of
this chapter covers the configuration management functionalities of ASP.NET 2.0. The next section looks
at the new configuration sections introduced with ASP.NET 2.0.
If the application contains child directories, it can define a web.config file for each
folder. The scope of each configuration file is determined in a hierarchical, top-
down manner. The settings actually applied to an application and thus its Web
pages are determined by the sum of the changes that the various
web.config files
in the hierarchy of the application carry. Along this path, any of those
web.config
files can extend, restrict, and override any type of settings defined at an upper level,
including the machine level, unless the setting is restricted to a certain level (such as
process model). If no configuration file exists in an application folder, the settings
valid at the upper level are applied.
467
ASP.NET 2.0 Configuration
17_596772 ch14.qxd 12/13/05 11:08 PM Page 467
New Configuration Sections in ASP.NET 2.0
ASP.NET has added a number of new configuration sections to support the new features of ASP.NET 2.0.
Table 14-1 lists the important ones that you are most likely going to have to work with.
Table 14-1. New Configuration Sections
Section Description
<anonymousIdentification> Configures the built-in mechanism for configuring the ID
assigned to the anonymous user.
<connectionStrings> Declares the connection strings used by the application. Each
connection string is identified by a unique name, which is
used to reference the connection string from the code.
<healthMonitoring> Allows you to configure the health monitoring API, which
provides a set of tools designed to trace the performance of
running applications.
<membership> Allows you to configure providers that are registered to
store and retrieve membership data.
<profile> Allows you to configure how a user profile is persisted.
This section lets you define the schema of the class that rep-
resents the user profile.
<roleManager> Allows you to configure how role information about the
current user will be stored.
<siteMap> Allows you to register the providers supported for storing
site layout. By default, the site map information is stored in
a file called
web.sitemap.
<urlMappings> Allows you to map virtual URLs to physical URLs by pro-
viding a declarative way to transform a physical page into
multiple logical pages.
<webParts> Allows you to configure the settings required for Web parts.
Note that Table 14-1 simply highlights the important newly added configuration sections and it does
not provide an exhaustive list of changes to the configuration schema. In addition to the newly added
sections, the existing ASP.NET 1.x sections such as
<pages>, <compilation>, <httpHandlers>,
<httpModules>, and <sessionState> have also undergone major revisions. For more details, refer
to the .NET Framework documentation.
Classes Mapped to ASP.NET Configuration Sections
ASP.NET 2.0 also provides a number of public configuration classes (one per predefined section) that
expose the contents of the
.config file sections through properties and methods. These classes are all
derived from the
System.Web.InternalSection class, which in turn is derived from the System
.Configuration.ConfigurationSection
class. Table 14-2 provides a representation of these classes
that provide one-to-one mapping with the actual configuration sections in the
web.config file. Note
that all of these classes are contained in the
System.Web.Configuration namespace.
468
Chapter 14
17_596772 ch14.qxd 12/13/05 11:08 PM Page 468
Table 14-2. Configuration Section Classes in web.config File
Class Description
AnonymousIdentificationSection Configures anonymous identification for users
that are not authenticated and represents the
<anonymousIdentification> section in the
web.config file.
AuthenticationSection Configures the authentication for a Web applica-
tion and provides a representation of the
<authentication> section in the web.config
file.
AuthorizationSection Allows you to configure the authorization-related
settings for a Web application and provides a
mapping with the
<authorization> section in
the
web.config file.
CacheSection Allows you to configure the cache settings for the
entire Web application and provides a mapping
with the
<cache> section in the web.config file.
CompilationSection Responsible for all the compilation settings used
by ASP.NET and provides a mapping with the
<compilation> section in the web.config file.
CustomErrorsSection Allows you to configure the ASP.NET custom
errors and provides a mapping with the
<customErrors> section in the web.config file.
GlobalizationSection Allows you to define the configuration settings
that are used to support the globalization infras-
tructure of Web applications. This class provides a
mapping with the
<globalization> section in
the
web.config file.
HealthMonitoringSection Allows you to configure ASP.NET profiles that
determine how health monitoring events are sent
to event providers. This class provides a mapping
with the
<healthmonitoring> section in the
web.config file.
HostingEnvironmentSection Responsible for hosting the server environment
that hosts ASP.NET applications. This class
provides a mapping with the
<hosting
Environment>
section in the web.config file.
HttpCookiesSection Responsible for configuring cookie-related proper-
ties for the Web application and provides a map-
ping with the
<httpCookies> section in the
web.config file.
469
ASP.NET 2.0 Configuration
17_596772 ch14.qxd 12/13/05 11:08 PM Page 469
Class Description
HttpModulesSection Responsible for configuring HTTP modules
within an application and provides a mapping
with the
<httpModules> section in the web.
config
file.
HttpHandlersSection Responsible for mapping incoming URL to
handler classes that are derived from the
IHttpHandler class. This class provides a map-
ping with the
<httpHandlers> section in the
web.config file.
HttpRuntimeSection Allows you to configure the ASP.NET HTTP
runtime by providing a mapping with the
<httpRuntime> section in the web.config file.
IdentitySection Responsible for configuring the Windows identity
used to run a Web application. This class provides
a mapping with the
<identity> section in the
web.config file.
MachineKeySection Responsible for configuring the encryption key
used to encrypt secrets such as forms authentica-
tion tickets and so on. This class provides a map-
ping with the
<machineKey> section in the
web.config file.
MembershipSection Responsible for configuring settings and
providers for the ASP.NET membership system.
This class provides a mapping with the
<membership> section in the web.config file.
PagesSection Responsible for individual ASP.NET page set-
tings. This class provides a mapping with the
<pages> section in the web.config file.
ProcessModelSection Responsible for configuring ASP.NET process
model settings. This class provides a mapping
with the
<processModel> section in the
web.config file.
ProfileSection Responsible for configuring settings and
providers for the ASP.NET role manager. This
class provides a mapping with the
<profile>
section in the web.config file.
SessionPageStateSection Responsible for configuring how session state can
be used to save page viewstate for small devices.
This class provides a mapping with the
<sessionPageState> section in the web.
config
file.
470
Chapter 14
17_596772 ch14.qxd 12/13/05 11:08 PM Page 470
Class Description
SessionStateSection Responsible for configuring the HTTP session
state module, and this class provides a mapping
with the
<sessionState> section in the
web.config file.
SiteMapSection Allows you to define the configuration settings
that are used to support the navigation infrastruc-
ture for configuring, storing, and rendering site
navigation. This class provides a mapping with
the
<siteMap> section in the web.config file.
TraceSection Responsible for configuring the ASP.NET trace
service. This class provides a mapping with the
<trace> element in the web.config file.
TrustSection Allows you to configure the code access security
that is applied to an application. This class pro-
vides a mapping with the
<trust> section in the
web.config file.
UrlMappingsSection Responsible for configuring URL mappings used
by the ASP.NET site navigation system. This class
provides a mapping with the
<urlMappings>
section in the web.config file.
WebPartsSection Responsible for configuring the settings used by
ASP.NET Web parts. This class provides a map-
ping with the
<webParts> section in the
web.config file.
XhtmlConformanceSection Responsible for XHTML conformance settings of
ASP.NET controls. This class provides a mapping
with the
<xhtmlConformance> section in the
web.config file.
These classes expose the attributes of the corresponding section as typed properties, making it easy for
you to read or edit values.
WebConfigurationManager Class
One of the important configuration-related classes is the WebConfigurationManager class that pro-
vides programmatic access to configuration files and configuration sections. This class is contained
in the
System.Web.Configuration namespace and is specifically used for retrieving and updating
configuration settings from a
web.config file. Table 14-3 discusses the properties of the
WebConfigurationManager class.
471
ASP.NET 2.0 Configuration
17_596772 ch14.qxd 12/13/05 11:08 PM Page 471
Table 14-3. Properties of the WebConfigurationManager Class
Property Description
AppSettings Allows you to retrieve the configuration settings stored
in the
<appSettings> section of the web.config file
ConnectionStrings Allows you to retrieve the configuration settings stored
in the
<connectionStrings> section of the web
.config
file
Table 14-4 lists the methods of the
WebConfigurationManager class. Note all these methods are static.
Table 14-4. Methods of the WebConfigurationManager Class
Method Description
GetWebApplicationSection Allows you to retrieve the specified configuration section
for the current Web application’s default configuration
OpenMachineConfiguration Allows you to get reference to the machine.config file
in the form of a Configuration object
OpenMappedMachineConfiguration Allows you to get reference to the machine.config file
in the form of a Configuration object using the specified
file mapping
OpenMappedWebConfiguration Allows you to get reference to the web.config file in the
form of a Configuration object using the specified file
mapping
OpenWebConfiguration Allows you to get reference to the web.config file in the
form of a Configuration object
The major functionality provided by the WebConfigurationManager class falls into three categories.
❑ Easy and effective access to the
appSettings and connectionStrings sections of the current
application’s
web.config file. This is made possible through the introduction of new properties
such as
AppSettings and ConnectionStrings.
Note that in .NET 2.0, there are two main classes used for managing configuration
settings. They are
ConfigurationManager and the WebConfigurationManager.
You should use the
ConfigurationManager if you want to update or add sections to
the
app.config file. You should use the WebConfigurationManager class if you
want to update or add sections to the
web.config file.
472
Chapter 14
17_596772 ch14.qxd 12/13/05 11:08 PM Page 472
❑ Ability to access a specific configuration section from the current application’s web.config file
using methods such as
GetSection(), and GetWebApplicationSection().
❑ Ability to open a configuration file for updating configuration settings. To this end, the
WebConfigurationManager class exposes methods such as OpenMachineConfiguration(),
OpenMappedMachineConfiguration(), OpenWebConfiguration(), and
OpenMappedWebConfiguration().
This chapter discusses most of these properties and methods in detail in the next few sections.
Note that for the examples shown in this chapter, the ASP.NET process account needs sufficient permis-
sions to be able to read and write into the configuration file. For reasons of simplicity, Integrated
Windows authentication for Web site is enabled through IIS and also turned on impersonation for the
Web site using the following configuration settings under the
<system.web> element in the
web.config file.
<identity impersonate=”true”/>
Because of these settings, the ASP.NET code will execute using the credentials of logged on user’s
account instead of using the default ASP.NET (if you are running Windows XP) account. Note that in
production applications, it is recommended that you run your ASP.NET code using a domain account
that has the minimum set of permissions on the server to execute code.
The next section discusses the use of
WebConfigurationManager class in retrieving connection strings
from a
web.config file.
Retrieving Configuration from Predefined Sections
To retrieve configuration settings from within an ASP.NET application, you use the
WebConfigurationManager class. ASP.NET by default provides two predefined sections that can
be used to store configuration information for later retrieval. These sections are as follows:
❑
<appSettings> — Primarily used for storing application settings such as path to an XML Web
Service and so on
❑
<connectionStrings> — As the name suggests, this section is used for storing connection
strings information
In the next few sections, you see how to retrieve values stored in these sections.
Using Application Settings
Configuration files are perfectly suited for storing custom application settings, such as database file
paths, or remote XML Web service URLs. ASP.NET, by default, supports a section named
<appSettings> that can store these settings as name/value pairs. The following example shows how
to retrieve the share location path from an
<appSettings> section.
473
ASP.NET 2.0 Configuration
17_596772 ch14.qxd 12/13/05 11:08 PM Page 473
Listing 14-1: Using WebConfigurationManager Class to Retrieve Application Settings
<%@ Import Namespace=”System.Web.Configuration” %>
<script runat=server language=C# >
void Page_Load(object source, EventArgs e)
{
string shareLocationFromConfig =
WebConfigurationManager.AppSettings[“shareLocation”];
Response.Write(“Retrieved value : “ + shareLocationFromConfig);
//Code to connect to the share for file processing
}
</script>
<html xmlns=” /><head>
<title>
Retrieving Configuration Settings from appSettings section
</title>
</head>
<body>
<form id=”form1” runat=”server”>
<div>
</div>
</form>
</body>
</html>
This code is simple and straightforward. By making a call to the AppSettings property of the
WebConfigurationManager class, the code retrieves the value of the shareLocation key from the
web.config file. Place the following <appSettings> element inside the web.config file.
<appSettings>
<add key=”shareLocation” value=”\\dev-server\share”/>
</appSettings>
If you navigate to the page from the browser, you should see the value of the appSettings element
identified by the key shareLocation displayed in the browser.
Using Connection Strings
Similar to general application settings, ASP.NET provides a configuration section specifically for
storing database connection strings, used by ADO.NET. This configuration section is called
<connectionStrings> and it allows for secure storage and retrieval of database connection strings
through the Configuration API. It is important to note that this is not under the
<appSettings> section.
The following example shows a
<connectionStrings> configuration section for an application that
uses the AdventureWorks sample database.
<configuration>
<connectionStrings>
<add name=”adventureWorks” connectionString=”server=localhost;integrated
474
Chapter 14
17_596772 ch14.qxd 12/13/05 11:08 PM Page 474
security=true;database=AdventureWorks;”/>
</connectionStrings>
<configuration>
After you have the connection string stored in this fashion, you just need one line of code to retrieve that
connection string. Listing 14-2 shows you how to accomplish this.
Listing 14-2: Using WebConfigurationManager Class to Retrieve Connection Strings
<%@ Import Namespace=”System.Data” %>
<%@ Import Namespace=”System.Data.SqlClient” %>
<%@ Import Namespace=”System.Web.Configuration” %>
<script runat=server language=C# >
void Page_Load(object source, EventArgs e)
{
string connString = WebConfigurationManager.
ConnectionStrings[“adventureWorks”].ConnectionString;
using (SqlConnection conn = new SqlConnection(connString))
{
conn.Open();
SqlCommand command = new SqlCommand(“Select * from Person.ContactType”,
conn);
command.CommandType = CommandType.Text;
SqlDataReader reader = command.ExecuteReader();
contactTypeView.DataSource = reader;
contactTypeView.DataBind();
}
}
</script>
<html xmlns=” /><head>
<title>Retrieving Connection Strings from connectionStrings section</title>
</head>
<body>
<form id=”form1” runat=”server”>
<div>
<asp:GridView runat=”server” ID=”contactTypeView”/>
</div>
</form>
</body>
</html>
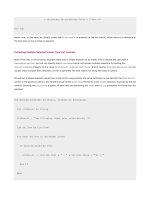
The code retrieves the connection string from the web.config file using the ConnectionStrings property
of the
WebConfigurationManager class; then, it opens up a connection to the AdventureWorks
database and executes a query against
ContactType table. It simply displays the output of the query
execution in a
GridView control. The output produced by Listing 14-2 is shown in Figure 14-1.
475
ASP.NET 2.0 Configuration
17_596772 ch14.qxd 12/13/05 11:08 PM Page 475
Figure 14-1
Use of Expression Builders
Listing 14-2 utilized the
WebConfigurationManager to programmatically retrieve
the connection string. In addition to the programmatic approach, ASP.NET 2.0 also
provides a new declarative approach to retrieve configuration settings using “
$”
expressions. These expressions are new in ASP.NET 2.0, and they allow you to load
connection strings, resources, and other items using a declarative approach. For
example, you can retrieve the same adventureWorks connection string using the syn-
tax
<%$ConnectionStrings:adventureWorks%>. The following is the code that
uses the adventureWorks connection string to retrieve contact type information
through a
SqlDataSource control and then displays the same through a GridView
control.
<asp:SqlDataSource ID=”contactTypeSource” runat=”server”
ConnectionString=”<%$ConnectionStrings:adventureWorks%>”
SelectCommand=”Select * from Person.ContactType”>
</asp:SqlDataSource>
<asp:GridView runat=”server” ID=”authorsView”
DataSourceID=”contactTypeSource”>
</asp:GridView>
476
Chapter 14
17_596772 ch14.qxd 12/13/05 11:08 PM Page 476
Writing Database Provider Independent Code Using web.config Settings
In addition to storing the actual connection string, you can also store the providerName in the
web.config file and use that as a foundation for creating database independent code. For example,
modify the connection string section of the
web.config file to look as follows:
<connectionStrings>
<add name=”adventureWorks” connectionString=”server=localhost;integrated
security=true;database=AdventureWorks;”
providerName=”System.Data.SqlClient”/>
</connectionStrings>
You can use the providerName attribute value to identify the database provider to use. Listing 14-3
demonstrates the use of the
ProviderName property of ConnectionStringSettings class to create
provider independent code.
Listing 14-3: Using providerName Setting to Create Provider Independent
Data Access Code
<%@ Import Namespace=”System.Web.Configuration” %>
<%@ Import Namespace=”System.Data” %>
<%@ Import Namespace=”System.Data.Common” %>
<script runat=”server” language=”C#” >
void Page_Load(object source, EventArgs e)
{
string providerName = WebConfigurationManager.
ConnectionStrings[“adventureWorks”].ProviderName;
DbProviderFactory factory=DbProviderFactories.GetFactory(providerName);
using (DbConnection conn = factory.CreateConnection())
{
string connString = WebConfigurationManager.
ConnectionStrings[“AdventureWorks”].ConnectionString;
conn.ConnectionString = connString;
using (DbDataAdapter adapter = factory.CreateDataAdapter())
{
adapter.SelectCommand = conn.CreateCommand();
adapter.SelectCommand.CommandText = “SELECT * FROM Person.ContactType”;
DataTable table = new DataTable(“ContactType”);
adapter.Fill(table);
contactTypeView.DataSource = table;
contactTypeView.DataBind();
}
}
}
</script>
<html xmlns=” /><head>
<title>
Creating DB provider independant code using providerName setting
</title>
</head>
<body>
<form id=”form1” runat=”server”>
<div>
477
ASP.NET 2.0 Configuration
17_596772 ch14.qxd 12/13/05 11:08 PM Page 477
<asp:GridView runat=”server” ID=”contactTypeView”></asp:GridView>
</div>
</form>
</body>
</html>
In Listing 14-3, by setting the providerName property of the connection string, you connect to the
database generically using ADO.NET provider factories, rather than using code specific to the type of
ADO.NET provider. You retrieve the
providerName by using the following line of code.
string providerName = WebConfigurationManager.
ConnectionStrings[“adventureWorks”].ProviderName;
Use the provider name as an argument to the GetFactory() method of the DbProviderFactories
class.
DbProviderFactory factory = DbProviderFactories.GetFactory(providerName);
After you have a DbProviderFactory object that is specific to the database you are connecting to, you
can use that object to create instances of the
DbConnection, and DbDataAdapter objects that are spe-
cific to the database you are connecting to. These objects are then utilized to open connection to the
database, execute the sql query against the contact type table in the AdventureWorks database, and
finally bind the output of the query execution to the database.
.NET Framework 2.0 has new factory classes that make it easier to write data access code independent
of the database. This is made possible by the introduction of database-independent factory class
named
DbProviderFactory that allows you to create database specific DbConnection and
DbDataAdapter objects to work with specific databases. The provider to use at runtime is obtained by
calling the
GetFactory() static method of the DbProviderFactories class passing in a string uniquely
representing that provider. This string is called Provider Invariant Name and is registered by each
provider in
machine.config. For example, for ODBC provider, it is System.Data.Odbc. The
advantage of this methodology is that it gives you the option of seamlessly working with multiple
providers like OleDb and ODBC without having to lock onto a specific implementation like
SqlClient.
Encrypting and Decrypting Configuration Sections
A powerful feature of the ASP.NET 2.0 Configuration API is its support for encryption. Using this
encryption API, you can almost encrypt and decrypt almost all sections of your configuration files,
including any user-defined sections. There are some exceptions, such as the
<httpRuntime> section,
that needs to be accessed outside of ASP.NET by some IIS ISAPI code and therefore cannot be encrypted.
The encryption API is extremely useful when you are dealing with sensitive data such as usernames and
passwords from within your Web applications. Although ASP.NET configures IIS to prevent browser
access to
web.config files, it is nevertheless a good practice to never store such data as plain text in a
configuration file. Once you encrypt specific sections using the configuration API, those encrypted
values are virtually impossible to read using a text editor.
478
Chapter 14
17_596772 ch14.qxd 12/13/05 11:08 PM Page 478