Professional Eclipse 3 for Java Developers 2006 phần 8 pot
Bạn đang xem bản rút gọn của tài liệu. Xem và tải ngay bản đầy đủ của tài liệu tại đây (682.95 KB, 61 trang )
When the root node Eclipse Platform is selected, you will see some additional functions listed on the
right side of the window. By clicking the Revert to Previous hyperlink you can return to the state of the
platform before you applied the last change to the configuration. If you have previously added features
by simply unpacking them into the \eclipse\ root folder, the Process Detected Changes hyperlink
appears. By clicking this hyperlink you can perform the missing installation steps for such a feature.
Install Handlers
The Eclipse Update Manager can be extended via so-called install handlers. These are Java classes that
implement the interface IInstallHandler from the package org.eclipse.update.core (usually
they extend the standard implementation BaseInstallHandler). The methods of such a class are
called at specific points of the installation or update process and can perform specific actions.
You can predefine an install handler as a global install handler. This is done in the manifest file
plugin.xml of a suitable plug-in at the extension point org.eclipse.update.core
.installHandlers. Alternatively, you can include an install handler in the installation archive.
However, in this case, they can be used only within the current installation (a local install handler).
If you want to use an install handler during the installation of a feature, you must declare it on the
Advanced page of the feature manifest feature.xml (see the section “Creating and Editing Features”).
There you specify, in the Library field, the name of the archive containing the install handler. In the
Handler field, you specify the name of the IInstallHandler class. If you use a global instead of a
local install handler, the Library field remains empty and the Handler field specifies the identification
under which the global install handler was installed.
A typical application of install handlers is for the installation of resources outside the Eclipse platform,
for example, if you want to deploy a specific Java Runtime Environment.
Internationalizing Products
I am wary of writing anything about this topic, because there is an excellent article about international-
ization by Dan Kehn, Scott Fairbrother, and Cam-Thu Le on www.eclipse.org. A short overview
should therefore be sufficient. A practical example is given in the section “Internationalizing the Spell
Checker” of Chapter 13.
Internationalization is often understood as merely translating texts presented to the end user into a
national language. This is certainly an important aspect of internationalization, but it is not the only one.
For example, the meaning of images may differ from culture to culture and so the images should also be
adapted to the target culture. You probably are aware of the confusion that date formats (European vs.
U.S.) can cause. But the placement of GUI elements may also differ from culture to culture. Countries
such as the Arabic nations and Israel, for example, read from right to left, and many Asiatic countries
read from top to bottom. A good example of how things can go wrong was an advertisement for a new
detergent in Arabic countries. It read: “Big effect in very little time” and displayed the dirty laundry on
the left and the clean laundry on the right!
401
Developing Your Own Eclipse-Based Products
14_020059_ch12.qxd 10/8/04 11:31 AM Page 401
Similarly, people may have different expectations of where important form elements should be
positioned. The various lengths of text constants in different languages may also influence the
layout of screen masks.
Despite these layout problems, I will concentrate here on text elements in different languages.
Internationalizing other items such as images and icons as well as currency and date formats can often
be achieved by mapping them onto text strings (image name, format string).
Text Constants in Programs
The simplest case is the internationalization of text constants in programs. In the Java source editor,
Eclipse offers excellent support for this with the context function Source > Externalize Strings. This wiz-
ard creates a list with all string constants used in a compilation unit. Afterward, you can sort these string
constants into three different categories:
❑ Translate. In this case the string constant is moved to a properties file. In the source code, the
string constant is replaced with a call to an access method. This method fetches the string con-
stant at runtime from the properties file with the help of a specified key. In addition, the source
line is suffixed with a comment that looks like this:
//$NON-NLS-1$
This comment indicates that the string constant (now the key) must not be analyzed when the
function Externalize Strings is executed again. For example, the instruction
replaceAction.setText("Replace");
is translated into
replaceAction.setText
Messages.getString("SpellCorrectionView.Replace_5")); //$NON-NLS-1$
❑ Never Translate. The string constant is equipped with a // $NON-NLS-…$ comment, so that it
is not analyzed in future invocations of the function Externalize Strings. For example
manager.add(new Separator("Additions"));
is translated into
manager.add(new Separator("Additions")); //$NON-NLS-1$
❑ Skip. Nothing is changed. The string constant is offered for externalization in future invocations
of the function Externalize Strings.
The wizard performs all the selected replacements in the source file. It also creates a properties file
within the current package that contains the externalized string constants. It also creates a Messages
class that organizes access to the file via the getString() method.
402
Chapter 12
14_020059_ch12.qxd 10/8/04 11:31 AM Page 402
All that remains to do is to translate the properties file into the target language. If you use the Java nam-
ing convention basename_lang_region_variant.properties for the properties file, the Message
class will automatically use the correct properties file, depending on the national language of the target
host platform. You can then add new languages in the form of new properties files without recompiling
a single Java class.
In some cases, it may be necessary to embed program-generated values into the string constants. This
can be done with the help of parameters. These are defined in the string literals in the properties file, in
the following way:
Editor.save.SVG.error=Error saving SVG file {0} in folder {1}
If you use such parameters, it is a good idea to extend the Messages class with a parameterized variant
of the method getString():
public static String getString(String key, Object[] params) {
if (params == null)
return getString(key);
try {
return java.text.MessageFormat.format(getString(key), params);
} catch (Exception e) {
return "!"+key+"!";
}
}
Text Constants in Manifest Files
To internationalize the various manifest files such as plugin.xml, feature.xml, fragment.xml,
site.xml, about.ini, etc. requires a bit more work, because there is no tool support for this task.
Here, you need to create a corresponding properties file for each of these files: plugin.properties,
feature.properties, site.properties, about.properties, etc. The exception is
fragment.xml. Instead of fragment.properties, the file plugin.properties is used.
In the original file, replace the translatable string constants with key strings that are identified via a pre-
fixed % character. In the corresponding properties file, specify the key definition. You can translate these
files into the target language afterward, as discussed in the previous section.
Here is an example of the definition of an Action Set in the manifest file plugin.xml:
label="Check spelling"
You would change this into
label="%checkSpelling"
and include in the plugin.properties file the line
checkSpelling=Check spelling
403
Developing Your Own Eclipse-Based Products
14_020059_ch12.qxd 10/8/04 11:31 AM Page 403
Help Texts and Cheat Sheets
In the case of help pages and Cheat Sheets this approach is not suitable. Instead, you need to
translate the whole page. You must create a separate folder for each language in which to store the
translated pages.
At runtime, the correct folder is selected by evaluating substitution variables. Eclipse understands four
different substitution variables that can modify library paths:
os This variable is replaced by a token representing the current operation
system (linux, macosx, qnx, solaris, win32).
ws This variable is replaced by a token representing the current windowing
system (carbon, gtk, motif, photon, win32).
nl This variable is replaced by the current Java locale.
arch This variable is replaced by a token representing the current processor
architecture (PA_RISC, ppc, sparc, x86).
When you want to test a plug-in that uses these variables, you can set the variables under Window >
Preference > Plug-in Development > Target Environment.
For example, if you specify a Cheat Sheet (see the section “The Help System” in Chapter 11) in
plugin.xml, you can use a substitution variable for the folder name:
contentFile="$nl/vedit.xml"
During execution, the variable $nl is replaced by the current locale, for example by DE_de. The
Cheat Sheet is then fetched from DE_de/vedit.xml.
This works quite similarly for help pages, too. Here you would translate not only the HTML pages but
also the table of contents (toc.xml) and the context associations (contexts.xml), since these files
contain references as well as display texts. References to toc.xml and contexts.xml (for example,
from plugin.xml) would then be prefixed with $nl/. This is normally not required for the references
specified in toc.xml and contexts.xml, since these references are usually specified relative to the
current location.
Unfortunately, this approach has a severe disadvantage: if a specific language package is not available,
Eclipse will simply show nothing instead of the standard English version. Fortunately, there is an alter-
native, which works without substitution variables. This alternative approach relies solely on naming
conventions. If you want, for example, to create help pages and Cheat Sheets in the German language,
you would store them under the directory nl/de (for all German language areas) and nl/de/DE (for
Germany only). At runtime, Eclipse evaluates the Locale information of the JVM and tries to find an
appropriate folder under the nl/ directory. If such a folder is not found, the standard help pages and
Cheat Sheets (usually in English) are used. These pages are not stored under the nl/ directory.
404
Chapter 12
14_020059_ch12.qxd 10/8/04 11:31 AM Page 404
Deploying National Language Resource Bundles
The best method is to deploy language bundles as separate fragments (see “Plug-ins and Fragments”).
To do so, just create a package structure within the new fragment that mirrors the package structure of
the corresponding plug-in. However, the fragment packages contain only the properties files that have
been translated into the target language. The translated nl/ folders are also included in the fragment.
You must mark these folders on the Build page of the manifest editor for inclusion into the deployment
archive (see the section “Deploying a Feature”). An exception to the rule is the plugin_locale.xml files,
which must be stored in the src/ directory instead of the project folder.
Patches
When a product is deployed and then bugs are later discovered, it is often unacceptable for the customer
to reinstall the whole product, especially if the product is large. Download times are lengthy in such
cases, and sometimes an online update is impossible. Fixing bugs by sending CDs to customers is
expensive. Fortunately, Eclipse-based applications have a modular structure that enables a partial
update.
The Eclipse Feature Patch allows exactly that. Instead of redeploying the entire updated feature, you
can create a feature patch that contains only the modified plug-ins. The Eclipse Update Manager is intel-
ligent enough to merge the patch into the installed feature.
To create a Feature Patch, create a new project by choosing File > New > Other > Plug-in Development >
Feature Patch. In the wizard enter a project name, and continue to the next page. There define a patch ID,
a patch name, and the patch provider. Then select the feature to be patched. On the Included Plug-ins
and Fragments page, select the plug-ins and fragments that go into the patch. Then press Finish. The
Feature Patch project is now ready for deployment. It can be deployed like any other feature project.
Summary
In this chapter I have discussed additional concepts required for creating Eclipse-based products. You
should now know what fragments and features are and how they relate to plug-ins. You should be able
to internationalize and customize your application and to deploy such an application.
In the next chapter you will apply the knowledge gained in Chapter 11 and this chapter in a
larger example.
405
Developing Your Own Eclipse-Based Products
14_020059_ch12.qxd 10/8/04 11:31 AM Page 405
14_020059_ch12.qxd 10/8/04 11:31 AM Page 406
Project Three: A Spell
Checker as an Eclipse Plug-in
The third example application is a fully functional spell checker for the Eclipse SDK. An early ver-
sion of this example was published in my book Eclipse 2 for Java Developsers, and the (enhanced)
plug-in that was offered as a separate download became quite popular—so popular that in
Eclipse 3 the Java editor was equipped with an integrated spell checker.
The spell checker presented here, however, is more versatile. It can perform spell checking not
only in Java sources but in any editor and text widget. And it can be extended with plug-ins so
that it can intelligently spell-check text formats such as Java, C++, JavaScript, HTML, PHP, JSP,
and so on. For the purpose of this book, I present a stripped-down version (no checking while
typing, no overriding of preferences on the project level) due to space limitations. The full version,
including source code, is available at www.wrox.com (see also Appendix C).
During the implementation of this spell checker I demonstrate the following plug-in development
techniques:
❑ Definition of a plug-in manifest
❑ Integration of third-party JARs into your own plug-ins
❑ Use of the API for the ITextEditor interface and the MultiEditor class
❑ Addition of menu items to the menu structure of the Eclipse workbench
❑ Addition of menu items to the context menu of editors
❑ Addition of tool buttons to the toolbar of the Eclipse workbench
❑ Association of actions with keyboard shortcuts
❑ Implementation of a workbench view (for correction proposals)
13
13
15_020059_ch13.qxd 10/8/04 12:49 PM Page 407
❑ Creation of a view toolbar and a view menu
❑ Location and opening of view instances
❑ Creation of new preference pages
❑ Creation of a help system, including table of contents, context-sensitive help (InfoPops), and
active help
❑ Internationalization of a plug-in
I also show how to write a plug-in that can be extended by others. The spell-checking functionality will
not be implemented in the form of a single plug-in but as a group of cooperating plug-ins. Different
spell-checking strategies for different document types can be implemented as required and installed
separately. To do this, the spell checker base plug-in defines its own extension points. These points allow
the addition of file type–specific plug-ins. As an example I will show the implementation of an extension
plug-in for spell checking in JavaScript source files. This gives the end user the optional ability to
perform spell checking in Javadoc comments, non-Javadoc comments, and string literals. When I
implement this plug-in, I will demonstrate the following techniques:
❑ Definition of an extension point, including a schema
❑ Definition of dependencies between plug-ins
❑ Integration of help systems from several plug-ins
The Spell Checker Core Classes
The core classes of the spell checker consist of the a spell checking engine (which we take from an exist-
ing Open Source project), and classes that construct a framework in which later add-ons may plug in.
This framework is, in particular, responsible for implementing a GUI (Spell Correction View, actions,
preference pages), for controlling the spell-checking engine, and for managing additional plug-ins.
The Engine
I don’t implement the core spell checking classes myself but instead use the engine of the jazzy spell
checker. This engine is completely implemented in Java and is available as an Open Source project at
sourceforge.net/projects/jazzy. The algorithms used in this engine belong to the most effective
current spell-checking algorithms.
I use version 0.5 of jazzy here. The archive jazzy-0.5-bin.zip also contains the source code. In
addition, the dictionary english.0.zip is required, which is also available on the SourceForge Web site.
The jazzy archive also contains the JAR file jazzy-core.jar. This is the archive that you will need for your
project. It contains the packages com.swabunga.spell.engine and com.swabunga.spell.event.
408
Chapter 13
15_020059_ch13.qxd 10/8/04 12:49 PM Page 408
Overview
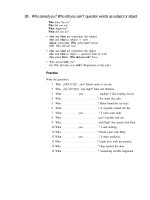
Figure 13.1 shows the most important classes in the spell checker and how they interact (the numbers
in parentheses indicate the sequence of method calls). In addition, there are the Plugin class, the classes
for managing the preferences, and the classes for configuring the spell-checking engine. The spell-
checking process is initiated by the CheckSpellingActionDelegate class. The
SpellCheckManager class acts as a central controller. The SpellCheckCorrectionView class dis-
plays spelling errors and interacts with the end user. The DocumentWordTokenizer class is used by
the jazzy engine to tokenize a document into single words. The SpellCheckingTarget class acts as a
common view on editors and text widgets. It provides the text content of these objects in the form of
IDocument instances to the other classes and is concerned with text selection and text replacement.
409
Project Three: A Spell Checker as an Eclipse Plug-in
CheckSpellingActionDelegate
SpellCheckManager
SpellCorrectionView
DocumentWordTokenizer
jazzy-Engine
SpellCheckingTarget
checkDocument (1)
getSelection(2)
getDocument(3)
checkSpelling(5)
setInput(9)
(wait)
spellingError(7)
setSelection(8)
init(4)
nextWord(6)
replaceWord(11)
replaceWord(12)
replaceText(13)
notify(14)
ignore/add/replace/cancel
(via SpellCheckingEvent)
(10)
Figure 13.1
15_020059_ch13.qxd 10/8/04 12:49 PM Page 409
Setting Up the Project
First, you want to make sure that the functions for plug-in development are enabled in your Eclipse
platform. Go to Window > Configure Activities and mark Plug-in Development.
Next, you must set up the target platform. Testing and debugging a plug-in does not happen in the
development platform but in a separate Eclipse session. The configuration of this platform can differ
considerably from the configuration of the development platform. For example, you may want to run
the new plug-in in the minimal Eclipse runtime environment, that is, in a platform that does not have a
Java IDE or a PDE. So you must first determine with which plug-ins your target platform is equipped.
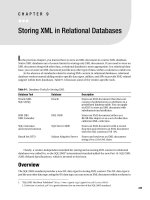
You can do this with the function Window > Preferences > Plug-in Development > Target Platform
(Figure 13.2). You can exclude certain plug-ins during the configuration of the target platform, and
you can include other plug-ins that are not in the Eclipse workspace by clicking the Not In Workspace
button.
410
Chapter 13
Figure 13.2
In this case, you may want to test the spell checker plug-in in an environment that is equipped with a
Java IDE and a PDE, since you want to use the spell-checking facility in the editors of those features.
Therefore, you need to checkmark all plug-ins of the target platform with the exception of the example
plug-ins and the source code plug-ins.
If you have already installed the spell checker plug-in into your development platform, you should also
disable all of the plug-ins that start with com.bdaum.SpellChecker in order to avoid conflicts.
Instead of modifying the global preferences for the target platform, another possibility is to later create a
special Run configuration for the new plug-in. To do so, invoke Run > Run and press the New button
to create a new configuration for a runtime workbench. On the Plug-ins page, you may select from vari-
ous options. When you mark the Choose Plug-ins and Fragments to Launch option from the list, you
15_020059_ch13.qxd 10/8/04 12:49 PM Page 410
may select individual plug-ins for inclusion into the test platform. If you want to use the minimum num-
ber of plug-ins for running your plug-in, proceed as follows:
1. Press the Deselect All button.
2. Now mark the Workspace Plug-ins check box (or only the plug-ins that you want to test).
3. Press the Add Required Plug-ins button. This will mark all plug-ins that are required for run-
ning the plug-ins selected in the previous step.
But now let’s return from this excursion and create the project. In contrast to the first two example
applications, you don’t create a Java project for this example. Instead, you need to switch to the Plug-in
Development perspective and select File > New > Plug-in Project. This wizard leads you step-by-step
through the creation of a plug-in project:
1. On the second wizard page, enter the project’s name. This will also be the identification of the
plug-in. You should therefore choose a name that is not being used by the manufacturers of
other plug-ins. Common practice is to prefix the plug-in with the identification of the authoring
organization. I have named the plug-in com.bdaum.SpellChecker in this case.
2. On the next page, select Java Project and leave all other controls at their default values.
3. On the next page, enter a provider name. Make sure that the options Generate the Java Class
That Controls the Plug-in’s Life Cycle and This Plug-in Will Make Contributions to the UI are
checked.
4. On the next page, checkmark the option Create a Plug-in Using One of the Templates and select
Custom Plug-in Wizard. This will allow you to generate large parts of the new plug-in from
existing templates.
5. On the next page, checkmark the options Hello World Action Set, Help Table of Contents,
Preference Page, and View. Remove the check marks from all other options.
Now you need to configure the generators for these templates. On the following pages, enter the details:
❑ On the Sample Action Set page, change Action Class Name to CheckSpellingActionDelegate.
❑ On the Sample Help Table of Contents page, change Label of Table of Contents to Spell
Checker. Checkmark the Primary option because this is the main table of contents for the spell
checker feature. Remove the check marks of all categories because you want to create only a sin-
gle table of contents with no nested tocs.
❑ On the Sample Preference Page page, change Page Class Name to
DefaultSpellCheckerPreferencePage. Under Page Name enter %Spelling. The % charac-
ter indicates that this is not display text but a key that still needs to be resolved into display text
when the project is internationalized (see “Text Constants in Manifest Files” later in this chapter).
❑ On the Main View Settings page, change View Class Name to SpellCorrectionView. Under
View Name, enter %Spell. Under View Category Id, enter com.bdaum.SpellChecker
.views, and under View Category Name, enter %Spell_Checker. (The view category identi-
fies the group under which the new view appears when the function Window > Show View is
invoked.) Select Table Viewer as the viewer type (this table will later contain the correction pro-
posals). In addition, uncheck the option Add the View to the Resource Perspective. The view
therefore remains invisible initially—it will appear only when the spell checker is in use.
❑ On the View Features page, uncheck the option Add Support for Sorting.
411
Project Three: A Spell Checker as an Eclipse Plug-in
15_020059_ch13.qxd 10/8/04 12:49 PM Page 411
When you press the Finish button, Eclipse opens the new plug-in the plugin.xml manifest in the
PDE editor. Eclipse has also generated the packages com.bdaum.SpellChecker, com.bdaum
.SpellChecker.actions, com.bdaum.SpellChecker.preferences, and
com.bdaum.SpellChecker.views with the classes SpellCheckerPlugin,
CheckSpellingActionDelegate, DefaultSpellCheckerPreferencePage, and
SpellCorrectionView. You now have the base classes for the new plug-in, and you may
now modify and complete these classes.
The Plug-in Configuration
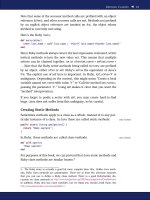
Next you need to describe some more details of the new plug-in in the manifest file plugin.xml. If this
file is not yet open, you can double-click it to open it. Figure 13.3 shows the Overview page of the plug-
in manifest. Since you are going to define your own extension point for this plug-in, you will also need
to define a schema (see the section “The Schema documentTokenizer.exsd”).
412
Chapter 13
Figure 13.3
15_020059_ch13.qxd 10/8/04 12:49 PM Page 412
The Manifest plugin.xml
The following source code shows the manifest in its nearly final state. All changes and additions applied
manually are printed in bold. Now, what do you need to change?
<?xml version="1.0" encoding="UTF-8"?>
<?eclipse version="3.0"?>
<plugin
id="com.bdaum.SpellChecker"
name="SpellChecker Plug-in"
version="1.0.0"
provider-name="bdaum industrial communications"
class="com.bdaum.SpellChecker.SpellCheckerPlugin">
On the Runtime page of the PDE editor, change the suggested archive name to SpellChecker.jar.
Also add the imported JAR file jazzy-core.jar to the list of required libraries. On the lower-right
section of this page, checkmark the option Export the Whole Library for Both Libraries. This allows later
extensions to use the classes defined in these libraries.
<runtime>
<library name="SpellChecker.jar">
<export name="*"/>
</library>
<library name="jazzy-core.jar">
<export name="*"/>
</library>
</runtime>
The spell checker plug-in requires a few other plug-ins for its operation. You can add these
plug-ins to the Dependencies page. First, there are the basic plug-ins for the Eclipse runtime:
org.eclipse.core.resources and org.eclipse.core.runtime. Second, you will need the
basic plug-ins for the user interface of the Eclipse IDE, org.eclipse.ui and org.eclipse.ui.ide.
Third, because the plug-in deals with text editors and text processing, you will also need the plug-ins
org.eclipse.jface.text and org.eclipse.ui.workbench.texteditor. And finally, the
plug-in for help support, org.eclipse.help, is required, too, because the spell checker plug-in will
offer help to the end user.
For the plug-ins org.eclipse.core.runtime, org.eclipse.ui, org.eclipse.jface.text,
and org.eclipse.help mark the option Re-export the Dependency. This will make these plug-ins
available to all plug-ins that specify com.bdaum.SpellChecker as a required plug-in.
<requires>
<import plugin="org.eclipse.core.resources"/>
<import plugin="org.eclipse.core.runtime"
export="true"/>
<import plugin="org.eclipse.ui" export="true"/>
<import plugin="org.eclipse.ui.ide"/>
<import plugin="org.eclipse.jface.text" export="true"/>
<import plugin="org.eclipse.ui.workbench.texteditor"/>
<import plugin="org.eclipse.help" export="true"/>
</requires>
413
Project Three: A Spell Checker as an Eclipse Plug-in
15_020059_ch13.qxd 10/8/04 12:49 PM Page 413
On the Extension Points page, you need to define a new extension point, documentTokenizer. This
extension point will allow you and others to add extensions for specific text formats later, such as a plug-
in for Java source code spell checking (see the section “A Plug-in for Java Properties”). The name of this
extension point is chosen on the basis that later extensions will consist more or less of specific tokenizers
that break the text into single words following file type–specific rules.
<extension-point id="documentTokenizer"
name="Document Tokenizer"
schema="schema/documentTokenizer.exsd"/>
Now turn your attention to the Extensions page. You need to make the generated example action more
concrete. The current spell-checking plug-in contains only a single action, Check Spelling.
❑ In particular, you need to set a display text (label), an explanation text (tooltip), an icon for the
disabled state (disabledIcon), and an icon for the enabled state (hoverIcon). It is easier to define
these settings when the referenced icons already exist in an appropriate folder (see the section
“Managing Images”). Also, the Action Set gets a new name.
❑ Define a new toolbarPath com.bdaum.SpellChecker.spell_checker, so that the action
will appear in a separate group in the workbench’s toolbar.
❑ For menubarPath specify the value edit/spelling. Consequently, the action will appear
under the Edit menu.
❑ By not specifying a value for the enablesFor attribute, you ensure that the action’s enabling
does not depend on the number of selected resources but is controlled programmatically.
❑ Specify a definitionId to establish a reference to the following command extension.
❑ Under helpContextId define the anchor point for context-sensitive help (InfoPop).
<extension point="org.eclipse.ui.actionSets">
<actionSet id="com.bdaum.SpellChecker.actionSet"
label="%Spell_Checker" visible="true">
<action id="com.bdaum.SpellChecker.action1" class=
"com.bdaum.SpellChecker.actions.CheckSpellingActionDelegate"
label="%Check_Spelling"
tooltip="%Checks_any_text"
disabledIcon="icons/full/dlcl16/check.gif"
hoverIcon="icons/full/clcl16/check.gif"
icon="icons/full/clcl16/check.gif"
toolbarPath="com.bdaum.SpellChecker.spell_checker/Check"
menubarPath="edit/spelling"
definitionId="com.bdaum.SpellChecker.check_spelling"
helpContextId="com.bdaum.SpellChecker.action_context">
</action>
</actionSet>
</extension>
The specification of command extensions (org.eclipse.ui.commands) allows end users to configure
the perspectives of the workbench with actions contributed by plug-ins. In addition, command exten-
sions allow you to define key bindings that may later be modified by the end user.
414
Chapter 13
15_020059_ch13.qxd 10/8/04 12:49 PM Page 414
First, define a command and associate it with the org.eclipse.ui.category.textEditor
category. Thus, the command will later be listed under the Text Editing category when the function
Window > Preferences > Workbench > Keys is invoked. Note that the ID of the command must match
the definitionId of the action defined previously.
Second, define two key bindings: one for the global context and one for the text editor context. This will
assign the F9 function key to the spell-checking action both in generic windows and during text editing.
If you want, you may define additional key bindings for other configurations such as the emacs configu-
ration (org.eclipse.ui.emacsAcceleratorConfiguration).
<extension id="com.bdaum.SpellChecker.commands"
name="%Spell_Checker_Command"
point="org.eclipse.ui.commands">
<command name="%Check_Spelling"
category="org.eclipse.ui.category.textEditor"
description="%Starts_spell_checking"
id="com.bdaum.SpellChecker.check_spelling">
</command>
<keyBinding keySequence="F9"
contextId="org.eclipse.ui.globalScope"
commandId="com.bdaum.SpellChecker.check_spelling"
keyConfigurationId=
"org.eclipse.ui.defaultAcceleratorConfiguration">
</keyBinding>
<keyBinding keySequence="F9"
contextId="org.eclipse.ui.textEditorScope"
commandId="com.bdaum.SpellChecker.check_spelling"
keyConfigurationId=
"org.eclipse.ui.defaultAcceleratorConfiguration">
</keyBinding>
</extension>
The spell-checking function should also be accessible via the context menu of the editors. You can do this
by defining an extension for the extension point org.eclipse.ui.popupMenus and adding
viewerContributions to this extension. Unfortunately, there is no way to add a function to any edi-
tor type that may later be installed into the platform by other plug-ins. The only thing you can do is to
define viewer contributions to the most common editor types. You associate viewer contributions to edi-
tors by specifying a targetId. When an editor is initialized, it sets this menu ID with the method
setEditorContextMenuId(). The mother of all text editors, the AbstractTextEditor class, sets
the menu ID #EditorContext. The subclass TextEditor overrides this with
#TextEditorContext, and the subclass CompilationUnitEditor, which acts as an ancestor of
source code editors such as the Java editor, overrides this menu ID with
#CompilationUnitEditorContext. By specifying these three IDs, you should cover a wide range of
editors, indeed.
<extension point="org.eclipse.ui.popupMenus">
<viewerContribution id="com.bdaum.SpellChecker.editorContextMenu"
targetID="#CompilationUnitEditorContext">
<action id="com.bdaum.SpellChecker.check_spelling_in_context1"
label="%Check_Spelling"
icon="icons/full/clcl16/check.gif"
415
Project Three: A Spell Checker as an Eclipse Plug-in
15_020059_ch13.qxd 10/8/04 12:49 PM Page 415
helpContextId="com.bdaum.SpellChecker.action_context"
class="com.bdaum.SpellChecker.actions.CheckSpellingActionDelegate"
menubarPath="additions">
</action>
</viewerContribution>
<viewerContribution id="com.bdaum.SpellChecker.editorContextMenu"
targetID="#TextEditorContext">
<action id="com.bdaum.SpellChecker.check_spelling_in_context2"
label="%Check_Spelling"
icon="icons/full/clcl16/check.gif"
helpContextId="com.bdaum.SpellChecker.action_context"
class="com.bdaum.SpellChecker.actions.CheckSpellingActionDelegate"
menubarPath="additions">
</action>
</viewerContribution>
<viewerContribution targetID="#EditorContext"
id="com.bdaum.SpellChecker.editorContextMenu">
<action id="com.bdaum.SpellChecker.check_spelling_in_context3"
label="%Check_Spelling"
icon="icons/full/clcl16/check.gif"
helpContextId="com.bdaum.SpellChecker.action_context"
class="com.bdaum.SpellChecker.actions.CheckSpellingActionDelegate"
menubarPath="additions">
</action>
</viewerContribution>
</extension>
Of course, the spell-checking action should appear in the Resource perspective as soon as the
spell-checking feature is installed into an Eclipse platform. You can achieve this by defining a
perspective extension (org.eclipse.ui.perspectiveExtensions) for the Resource perspective,
as shown in the following code.
In addition, the code defines the position and the size of the Spell Correction View relative to the
Tasks View.
<extension point="org.eclipse.ui.perspectiveExtensions">
<perspectiveExtension targetID="org.eclipse.ui.resourcePerspective">
<actionSet id="com.bdaum.SpellChecker.actionSet">
</actionSet>
</perspectiveExtension>
<perspectiveExtension targetID="org.eclipse.ui.resourcePerspective">
<view id="com.bdaum.SpellChecker.views.SpellCorrectionView"
ratio="0.5"
relative="org.eclipse.ui.views.TaskList"
relationship="right">
</view>
</perspectiveExtension>
</extension>
416
Chapter 13
15_020059_ch13.qxd 10/8/04 12:49 PM Page 416
For the Spell Correction View itself, you need only add an icon definition.
<extension point="org.eclipse.ui.views">
<category id="com.bdaum.SpellChecker.views"
name="%Spell_Checker">
</category>
<view name="%Spell"
icon="icons/basic/correction_view.gif"
category="com.bdaum.SpellChecker.views"
class="com.bdaum.SpellChecker.views.SpellCorrectionView"
id="com.bdaum.SpellChecker.views.SpellCorrectionView">
</view>
</extension>
No changes are required for the preferences extension and the help table of contents extension.
<extension point="org.eclipse.ui.preferencePages">
<page id="com.bdaum.SpellChecker.preferences.defaultPreferences"
name="%Spelling"
class=
"com.bdaum.SpellChecker.preferences.DefaultSpellCheckerPreferencePage">
</page>
</extension>
<extension point="org.eclipse.help.toc">
<toc file="toc.xml" primary="true">
</toc>
</extension>
Finally, add an extension for the support of context-sensitive help. The help associations are defined in
the contexts.xml file, as explained in Context-Sensitive Help.
<extension point="org.eclipse.help.contexts">
<contexts file="contexts.xml">
</contexts>
</extension>
</plugin>
The Schema documentTokenizer.exsd
The schema documentTokenizer.exsd describes the extension point documentTokenizer, which
was created in the previous section. It was generated by the manifest editor; now you need only
417
Project Three: A Spell Checker as an Eclipse Plug-in
15_020059_ch13.qxd 10/8/04 12:49 PM Page 417
complete it. The completed schema is shown in Listing 13.1 (I shortened it a bit by removing the docu-
mentation sections).
First, the schema consists of the usual extension root element. Besides the attributes point, id, and
name, such an extension may—in this case—contain an unlimited number of tokenizer elements.
These tokenizer elements are equipped with the following attributes:
Element Attribute
name Name of the tokenizer.
id Identification of the tokenizer.
class A class that must extend the class
AbstractDocumentWordTokenizer.
preferences The class implementing the tokenizer’s preferences. This class must
extend the class SpellCheckerPreferences. If this attribute is
omitted, the default spell-checking preferences will be used for this
tokenizer.
extensions A list of file extensions for which this tokenizer should be activated.
<?xml version='1.0' encoding='UTF-8'?>
<! Schema file written by PDE >
<schema targetNamespace="SpellChecker">
<annotation>
<appInfo>
<meta.schema plugin="SpellChecker"
id="documentTokenizer"
name="Document Tokenizer"/>
</appInfo>
</annotation>
<element name="extension">
<complexType>
<sequence>
<element ref="tokenizer" minOccurs="1"
maxOccurs="unbounded"/>
</sequence>
<attribute name="point" type="string" use="required">
</attribute>
<attribute name="id" type="string">
</attribute>
<attribute name="name" type="string">
</attribute>
</complexType>
</element>
<element name="tokenizer">
<complexType>
<attribute name="name" type="string" use="required">
</attribute>
418
Chapter 13
Listing 13.1 (Continues)
15_020059_ch13.qxd 10/8/04 12:49 PM Page 418
<attribute name="id" type="string" use="required">
</attribute>
<attribute name="class" type="string" use="required">
<annotation>
<appInfo>
<meta.attribute kind="java" basedOn=
"com.bdaum.SpellChecker.AbstractDocumentWordTokenizer"/>
</appInfo>
</annotation>
</attribute>
<attribute name="preferences" type="string">
<annotation>
<appInfo>
<meta.attribute kind="java"/>
</appInfo>
</annotation>
</attribute>
<attribute name="extensions" type="string" use="required">
</attribute>
</complexType>
</element>
</schema>
Listing 13.1 (Continued)
Imported Files
Before continuing with the plug-in’s Java classes, you should make the spell checker engine, jazzy-
core.jar, available to your project. This time, you don’t add the JAR as an external JAR to the project
but import the complete JAR into the project (Import from File System). Then invoke the project’s
Properties context function and add this JAR to the Java Build Path by pressing the Add Jars… button.
This approach makes it easier to later integrate this JAR file into the deployment archive. On the Order
and Export page, checkmark the jazzy-core.jar file to make it available to later plug-ins.
In addition, you need a dictionary. Directly under the project, create a new folder called dict. Then
unpack the english.0.zip file that you downloaded from the SourceForge site and import the
english.0 file into the new folder. You can do this with a drag-and-drop mouse action.
The Plugin Class
The generated SpellCheckerPlugin class serves as the Java representation of the plug-in. On initial-
ization of the plug-in, a single instance of this class is created. This instance can be obtained via the static
method getDefault(). This class is therefore well suited to be a central registry that can be accessed
from anywhere in the plug-in. It also provides methods for obtaining information about the plug-in.
419
Project Three: A Spell Checker as an Eclipse Plug-in
15_020059_ch13.qxd 10/8/04 12:49 PM Page 419
package com.bdaum.SpellChecker;
import java.io.IOException;
import java.net.URL;
import org.eclipse.core.runtime.IStatus;
import org.eclipse.core.runtime.Platform;
import org.eclipse.core.runtime.Status;
import org.eclipse.jface.preference.IPreferenceStore;
import org.eclipse.ui.plugin.AbstractUIPlugin;
import com.bdaum.SpellChecker.actions.CheckSpellingActionDelegate;
import com.bdaum.SpellChecker.preferences.SpellCheckerPreferences;
/**
* This class cares for the initialization of preferences and
* acts as a central registry for core components such as
* SpellCheckManager and CheckSpellingActionDelegate.
*/
public class SpellCheckerPlugin extends AbstractUIPlugin {
The DEFAULTDICT and USERDICT constants describe the storage location of the English default dictio-
nary and the user dictionary relative to the storage location of the plug-in. Then you need a few fields to
hold instances of SpellCheckerPreferences, SpellCheckerManager, and
CheckSpellingActionDelegate. Also, the field spThread is used to hold an instance of the spell-
checking thread. By registering the spell-checking thread in a central location, you can later easily con-
trol the proper serialization of competing spell-checking actions.
// Default dictionaries
private static final String DEFAULTDICT = "dict/english.0";
private static final String USERDICT = "dict/user.dict";
// The singleton
private static SpellCheckerPlugin plugin;
// Default preferences
private SpellCheckerPreferences preferences;
// Active SpellCheckManager
private SpellCheckManager manager;
// Active ActionDelegate
private CheckSpellingActionDelegate spellCheckingActionDelegate;
// Spell checking thread
private Thread spThread;
The constructor of this class, SpellCheckerPlugin(), must set the system property jazzy.config
to the value com.bdaum.SpellChecker.SpellCheckConfiguration. This tells the configuration
model of the jazzy engine to fetch the configuration data not from the jazzy.properties files but
instead from the class SpellCheckConfiguration, which you will implement later.
/**
* The Constructor.
*/
public SpellCheckerPlugin() {
super();
plugin = this;
420
Chapter 13
15_020059_ch13.qxd 10/8/04 12:49 PM Page 420
// Set configuration for jazzy engine. We make jazzy fetch
// the configuration from our own configuration
// implementation.
System.setProperty("jazzy.config",
"com.bdaum.SpellChecker.SpellCheckConfiguration");
}
/**
* Returns the plug-in singleton
*/
public static SpellCheckerPlugin getDefault() {
return plugin;
}
The utility method getId() fetches the plug-in identification string from the plug-in descriptor as it
was defined in the manifest file plugin.xml.
/**
* Fetches the plug-in identification.
*
* @return String – the identification.
*/
public static String getId() {
return getDefault().getBundle().getSymbolicName();
}
The following methods are used to resolve the relative dictionary paths just defined into absolute path
names. Please note that the dictionary is not in the Eclipse workspace but belongs to the installation files
located in the plug-in directory.
To retrieve the location of these files, you must first fetch the OSGi bundle. This bundle contains general
information about the plug-in, as well as the URLs of its various components. However, this URL is
given in a format that only Eclipse can interpret correctly: it starts with the protocol specification
platform:. To resolve this URL into a conventional file URL (a URL beginning with file:), you must
first apply the resolve() method.
Dictionary URL
The getPreferences() method returns the one and only instance of the
SpellCheckerPreferences class. If it does not exist yet, a new instance is created.
/**
* Returns the absolute
* path of the default dictionary file.
*
* @return String - Default dictionary file path
*/
public static String getDefaultDictionaryFileName() {
return getDefaultDictionaryFileName(DEFAULTDICT);
}
421
Project Three: A Spell Checker as an Eclipse Plug-in
15_020059_ch13.qxd 10/8/04 12:49 PM Page 421
/**
* Returns the absolute
* path of the default user dictionary file.
*
* @return String - Default dictionary file path
*/
public static String getDefaultUserDictFileName() {
return getDefaultDictionaryFileName(USERDICT);
}
private static String getDefaultDictionaryFileName(
String filename) {
// First, fetch the URL of the plug-in.
URL pluginURL = getDefault().getBundle().getEntry(filename);
// This URL starts with the pseudo protocol "plugin:"
// Therefore resolve this URL into a real URL
try {
URL resolvedURL = Platform.resolve(pluginURL);
// Extract the path information
return resolvedURL.getPath();
} catch (IOException e) {
logError(4, Messages.getString(
"SpellCheckerPlugin.Error_resolving_dictionary_URL"),
e);
}
return null;
}
You must also provide some code to initialize the default values of the preferences. Remember that when
the Eclipse platform is started, only the manifest files of the various plug-ins are interpreted, but no
plug-in–specific code is executed. The preference store is therefore not initialized at that time.
However, the Plugin class invokes initializeDefaultPreferences() during the very first call
of the getPluginPreferences() method. You can override this method to apply the necessary
initializations. It delegates the initialization of the preference values to the
SpellCheckerPreferences class.
Initializing Preferences
The getManager() method returns the one and only instance of the spell-checking manager. If it does
not exist yet, a new instance is created.
/**
* Returns the preferences of this plug-in
*/
public SpellCheckerPreferences getPreferences() {
if (preferences == null)
preferences = new SpellCheckerPreferences();
return plugin.preferences;
}
/**
422
Chapter 13
15_020059_ch13.qxd 10/8/04 12:49 PM Page 422
* Initialization of the PreferenceStore
*
* @param store - the plug-in's preference store
*/
protected void initializeDefaultPreferences(
IPreferenceStore store) {
getPreferences().initializeDefaults(store);
}
The Manager
The manager mediates the communication between the user interface and the spell-checking engine.
To be able to access this manager from all classes, an instance of the manager is stored here in the plug-in
instance. During its very first call, getManager() creates an instance of the SpellCheckManager
class. This lazy creation ensures that this component is created only when it is actually needed.
/**
* Returns the manager.
*
* @return SpellCheckManager
*/
public static SpellCheckManager getManager() {
// Create SpellCheckManager instance if necessary
if (plugin.manager == null)
plugin.manager = new SpellCheckManager();
return plugin.manager;
}
The spellCheckingActionDelegate field with its get…() and set…() access methods acts as a
registry for the ActionDelegate instance created by the workbench. You will need these methods later
in the context of active help (see the section “Active Help”).
/**
* Registers the active SpellCheckingActionDelegate.
*
* @param delegate - active SpellCheckingActionDelegate
*/
public static void setSpellCheckingActionDelegate(
CheckSpellingActionDelegate delegate) {
plugin.spellCheckingActionDelegate = delegate;
}
/**
* Returns the currently active SpellCheckingActionDelegate.
*
* @return CheckSpellingActionDelegate - active action
* delegate
*/
public static CheckSpellingActionDelegate
getSpellCheckingActionDelegate() {
return plugin.spellCheckingActionDelegate;
}
423
Project Three: A Spell Checker as an Eclipse Plug-in
15_020059_ch13.qxd 10/8/04 12:49 PM Page 423
The static methods isPending() and startThread() are used to determine whether the spell-
checking thread is currently active and to start a new thread.
/**
* Checks if there is a pending spell checking thread
*
* @return - true if a thread is pending
*/
public static boolean isPending() {
return (plugin.spThread != null && plugin.spThread.isAlive());
}
/**
* Starts a new synchronous spell checking thread
*
* @param thread - the new thread
*/
public static void startThread(Thread thread) {
plugin.spThread = thread;
thread.start();
}
Finally, the static method logError() is used to write error messages into the log file of the Eclipse
platform. Within a plug-in scenario, this should always be the preferred way to report internal errors
instead of writing to the Java console System.err. You can obtain the log file instance from the plug-in
singleton via the getLog() method.
/**
* Writes internal errors to log file.
*
* @param code - Plug-in specific error code
* @param message - message text
* @param ex - Throwable that caused the error or null.
*/
public static void logError(
int code, String message, Throwable ex) {
getDefault().getLog().log(
new Status(IStatus.ERROR, getId(), code, message, ex));
}
}
The Check Spelling Action
The Check Spelling action can be applied to editor text areas as well as to other editable text widgets of
the type Text or StyledText. This chapter discusses the CheckSpellingActionDelegate class
that acts as a proxy for the Check Spelling action and the SpellCheckingTarget class that acts as an
umbrella class for the various concrete targets of the action.
424
Chapter 13
15_020059_ch13.qxd 10/8/04 12:49 PM Page 424
The SpellCheckingTarget Class
The Eclipse platform hosts a wide variety of editors such as simple text editors and the Java editor but
also more complex editors such as the PDE manifest editor and the PDE schema editor. In Chapter 11,
the section “The Architecture of the Eclipse Workbench” shows the hierarchy of editor types used in
Eclipse. The common root type, IEditorPart, has only a tiny API that does not offer enough function-
ality for spell-checking purposes, while the various concrete editor implementations have differing APIs
for accessing the editor contents. For this reason, I opted to introduce the umbrella class
SpellCheckingTarget, which implements a consistent API for the editor functions required for spell-
checking purposes. An additional benefit is that this class can even represent editor-less spell-checking
targets such as text fields in dialog boxes.
package com.bdaum.SpellChecker;
import java.lang.reflect.Method;
import org.eclipse.jface.text.*;
import org.eclipse.jface.viewers.ISelection;
import org.eclipse.jface.viewers.ISelectionProvider;
import org.eclipse.swt.custom.StyledText;
import org.eclipse.swt.events.ModifyEvent;
import org.eclipse.swt.events.ModifyListener;
import org.eclipse.swt.graphics.Point;
import org.eclipse.swt.widgets.Control;
import org.eclipse.swt.widgets.Text;
import org.eclipse.ui.IEditorInput;
import org.eclipse.ui.IEditorPart;
import org.eclipse.ui.IWorkbenchPart;
import org.eclipse.ui.texteditor.IDocumentProvider;
import org.eclipse.ui.texteditor.ITextEditor;
public class SpellCheckingTarget implements ModifyListener {
private static final Class[] NOPARMS = new Class[0];
private static final Object[] NOARGS = new Object[0];
private static final Point NOSELECTION = new Point(0, 0);
A SpellCheckerTarget instance maintains references to the target editor (which may be null), to the
target widget, and to the tokenizer used to analyze the text. For editor spell-checking targets, it deter-
mines the selection provider and the document provider from the target editor. For spell-checking tar-
gets without a document provider, an auxiliary document instance is created.
// The target editor or null
public IEditorPart editor;
// The target widget or null
public Control textArea;
// Indicated if target is editable
public boolean isEditable = true;
// The document tokenizer associated with this target
public AbstractDocumentWordTokenizer tokenizer;
425
Project Three: A Spell Checker as an Eclipse Plug-in
15_020059_ch13.qxd 10/8/04 12:49 PM Page 425