Red Hat Linux unleashed Second Edition phần 2 ppt
Bạn đang xem bản rút gọn của tài liệu. Xem và tải ngay bản đầy đủ của tài liệu tại đây (650.04 KB, 71 trang )
Configuring Other Servers
P
ART II
46
preferred. Why? Because sync updates the inodes of your files, or structure representations of
each of your files. If you exit Linux without updating this information, Linux could lose track
of your files on disk, and that spells disaster!
NOTE
The only time you’ll want to risk shutting down Linux through a hard reset or the power-off
switch on your computer is if you can’t quickly kill a destructive process, such as an
accidental rm -fr /*.
By now you should know that exiting Linux properly can help you avoid problems with your
system. But what happens if something goes wrong? In the next section you’ll learn about
preventive measures, how to maintain your filesystem, and how to recover and overcome
problems.
When the System Crashes
The best time to deal with a system crash is before the crash happens. This means being pre-
pared with a good backup plan, good backups, emergency boot disks, or copies of important
files. These issues are covered in this section, along with tips and hints for maintaining your
filesystem integrity and system security.
First, here are some Do’s and Don’ts to avoid problems:
■ Don’t use Linux as the root user.
■ Do make a backup after a clean install and setup.
■ Do create a set of emergency boot disks with your current kernel.
■ Don’t just turn off your computer when done.
■ Do use the
shutdown command.
■ Do consider using an uninterruptible power supply.
■ Don’t disable
e2fsck in /etc/rc.d/rc.sysinit.
■ Do use
fsck or badblocks to check floppies.
■ Don’t run
fsck on mounted filesystems.
■ Do make backups of important files on floppy disks.
■ Don’t worry about fragmentation of your Linux partitions.
■ Do use your filesystem tools.
■ Don’t fill your hard drive with unnecessary programs.
■ Do consider using flash RAM.
■ Do read Lars Wirzenius’s Linux System Administrators’ Guide 0.5.
System Startup and Shutdown
C
HAPTER 4
47
4
SYSTEM
STARTUP
AND
SHUTDOWN
Running as Root
Don’t use Linux as root all the time! Although you might be tempted, there are some very good
reasons not to. First, even though you might have aliased the
rm command to rm -i in your
.bashrc file, a simple # rm -fr /* will not only wipe out your Linux system, but also any DOS
or Windows partitions if mounted under
/mnt. Instead, create a user for yourself and use the su
command when you need to do things as the root operator. If you have programs that need to
run SUID root, see Phil Hughes’s article, “Safely Running Programs as
root,” in the May 1997
issue of Linux Journal.
Creating a Boot Disk
One of the first things you should do following a clean install and setup is to make a boot disk,
using the current Linux kernel on your computer. You should always have a working copy in
case you screw up when recompiling the kernel. Here’s one quick way to not only make a copy
of your current kernel, but also create an emergency boot disk. First, make sure your kernel
points to your root device. You can check this on a recently built kernel with
# rdev zImage
Next, format a disk in your floppy drive using fdformat (assuming a 1.44MB drive A:):
# fdformat /dev/fd0H1440
Next, copy your kernel to the disk with
# dd if=zImage of=/dev/fd0
Now, assuming your computer is set to look at the floppy first, try rebooting with your boot
disk with
# shutdown -r now
But you should also have a backup set of emergency boot disks that include not just the kernel,
but also a minimal filesystem to get you started on the road to recovery. There are some excel-
lent guides, scripts, and software to help you do this. (See “For More Information” at the end
of this chapter.)
Generally, the approach is to create two disks, with one containing a kernel, and the other
containing a compressed filesystem with a minimal directory of files, including file utilities.
But guess what? Because you’re a Red Hat Linux user, you don’t have to! Read on to find out
why.
Ackpht! Argggh! I’ve Deleted My Document!
If you accidentally delete a text file, don’t panic! There’s a handy tip, called “Desperate person’s
text file undelete,” from Paul Anderson’s “The Linux Tips HOWTO,” courtesy of Michael
Hamilton.
Configuring Other Servers
P
ART II
48
Assuming you remember some of the text, know which partition the file was on, and have a
spare partition with some room, you should be able to recover a good portion of the file.
Hamilton’s approach uses the
egrep and strings commands. For example, if you lose a 100-
line file with the phrase “Xena,” followed by “Lawless,” and have room on your DOS parti-
tion:
# egrep -100 ‘Xena.+Lawless’ /dev/hda3 > /mnt/dos/lucy
Then you can look for the text with
# strings /mnt/dos/lucy | less
Your File Toolbox
You should also learn about and know how to use some of the file tools included with Red Hat
Linux. While
e2fsck is run automagically from the rc.sysinit script, it can be helpful in diag-
nosing and fixing problems. Other commands, such as
dumpe2fs and debugfs, provide detailed
technical information concerning your Linux filesystem, while others, such as
badblocks, can
be helpful if you have a non-IDE hard drive.
Here’s a list of just some of the programs available:
e2fsck
Most Linux users choose to use the second extended filesystem, and with good reason: e2fs is
robust, efficient, speedy, and relatively impervious to fragmentation. This command has a
plethora of options aimed at helping you check and repair your filesystem. For safety’s sake,
unmount the partition and then try
# e2fsck -p /dev/hda3
to automatically repair the partition /dev/hda3.
badblocks
This command will search a device for bad blocks, and also has a number of options; but be-
ware of the
-w option, as it is a “write-mode” test and will destroy data on a partition.
fsck
This command is similar to e2fsck, as it checks and repairs Linux filesystems. Be sure to read
its man page, as the
-P option can be harmful.
dump
and
restore
The dump command can be used for filesystem backup, as it searches your files that need to be
backed up.
dump will also do remote backups. The companion program is restore, which also
works across networks.
System Startup and Shutdown
C
HAPTER 4
49
4
SYSTEM
STARTUP
AND
SHUTDOWN
dumpe2fs
This command will dump your filesystem information. You’ll get the inode count, block count,
block size, last mount, and write time. Running
dumpe2fs on a 450MB partition will generate
a 26,000-character report. An interesting part of the report is the mount and maximum mount
count, which determines when
e2fsck is run on a partition when Linux starts.
tune2fs
If you just have to mess with your system’s performance, you can use this command to adjust
its tunable parameters—but only if you have an
ext2 filesystem. Use this command to adjust
when
e2fsck is run on your partition, but don’t do it when the partition is mounted!
mke2fs
Linux hackers will be familiar with this program, which creates a Linux second extended
filesystem on a partition. And you might need it too, if you want to create compressed filesystems
on emergency disks, or if you install a new hard drive.
debugfs
This is an ext2 filesystem debugger, with 34 built-in commands. If you call it with
# debugfs /dev/hda3
you can examine your filesystem in read-only mode.
Each of these utilities can help you maintain, diagnose, and repair a filesystem. But what if you
can’t boot? Read on!
Red Hat to the Rescue! When the System Won’t Boot
There are a number of reasons why a Linux system might not boot. If you recall the earlier
example of making a boot disk, you know that the
rdev command is used to set the root de-
vice. Building a new kernel, and then trying to use LILO or
LOADLIN to load the new kernel,
won’t work unless you’ve done this. You’ll also have problems if you’ve rebuilt the kernel and
hard-coded in the wrong root device.
I told you earlier that you’ll appreciate being a Red Hat user. Here’s another good reason: You
get a set of emergency boot disks with your Red Hat distribution. If your system won’t boot,
here’s how to possibly recover your system:
First, boot Linux from your Red Hat Linux boot disk. Next, at the
boot: prompt, type boot:
rescue
, which will load a kernel from the disk. Follow the prompts, and when asked, insert the
second disk, called “Supplemental Disk.” A bar graph will show loading progress of a com-
pressed filesystem, and you’ll end up with a
# prompt.
Configuring Other Servers
P
ART II
50
Under the sbin and usr/bin directories, you’ll find a minimal set of programs. The idea is to
at least get you to the point where you can try to check your existing partitions, and possibly
mount your drive. For example, if you have a Linux partition on
/dev/hda3, you can try
# mount -t ext2 /dev/hda3 tmp
to mount your partition under tmp, and then attempt a fix. If you’ve installed Red Hat Linux,
and for some reason your system won’t boot, and you don’t have your Red Hat boot disks, you
can also try booting from your Red Hat Linux CD-ROM. Reboot your computer to DOS,
change directory to the CD-ROM and then
DOSUTILS, and then type AUTOBOOT, which will execute
the
AUTOBOOT.BAT batch file and put you into the Red Hat installation process.
As a final note, you should remember that if you add another hard drive to your Linux system,
be sure to make an entry for its partition in
/etc/fstab so the drive will automatically be mounted
when you next start your system.
For More Information
For information regarding the Linux boot process, a host of handy tips on building boot disks,
pointers to boot disk packages, and a number of helpful scripts, see Tom Fawcett and Graham
Chapman’s “Linux Bootdisk HOWTO” under
/usr/doc/HOWTO or at />mdw/linux.html
.
You should also look for the following rescue packages and other helpful utilities at
http://
sunsite.unc.edu/pub/Linux/system/recovery
:
■ Scott Burkett’s Bootkit
■ Oleg Kibirev’s CatRescue
■ Thomas Heiling’s Rescue Shell Scripts
■ Karel Kubat’s SAR—Search and Rescue
■ Tom Fawcett’s YARD
Read the man pages for the following commands on your Red Hat Linux system:
■
badblocks
■ debugfs
■ dump
■ dumpe2fs
■ e2fsck
■ fsck
■ fstab
■ halt
■ hdparm
■ init
System Startup and Shutdown
C
HAPTER 4
51
4
SYSTEM
STARTUP
AND
SHUTDOWN
■ inittab
■ mke2fs
■ mount
■ rdev
■ restore
■ shutdown
■ swapon
■ tune2fs
If you ever lose or destroy your copies of the Red Hat Linux boot disks, you can get replace-
ments at
/>For details on how 4.4BSD boots, see Tabbed Section 1 of 4.4BSD System Manager’s Manual.
For details about other UNIX boot processes, see UNIX Unleashed: System Administrator’s
Edition.
For loads of tips on maintaining your system, and background information about different
Linux filesystems, see Lars Wirzenius’s Linux System Administrators’ Guide 0.5. You’ll find a
copy at
/>If you’re interested in a Linux filesystem defragmenter, check out Stephen Tweedie and Alexei
Vovenko’s defragmenter. You’ll find it at
/>filesystems/defrag-0.6.tar.gz
.
Summary
This chapter covers a number of topics concerning starting and shutting down Linux, includ-
ing the following:
■ How Linux boots
■ How Linux starts
■ What runlevels are and when to use them
■ How to start and stop processes properly
■ How to use Red Hat’s
tksysv runlevel editor
■ How to properly shut down your Linux system
■ How to properly restart your Linux system
■ The do’s and don’ts of maintaining your system
■ How to create a root disk and copy of your kernel
■ How to possibly undelete a file
■ How to possibly recover and remount a Linux partition
Configuring Other Servers
P
ART II
52
Configuring and Building Kernels
C
HAPTER 5
53
5
C
ONFIGURING
AND
BUILDING
KERNELS
Configuring and
Building Kernels
by Steve Shah
5
IN THIS CHAPTER
■ An Introduction to the Linux Kernel 54
■ Configuring the Linux Kernel 58
■ Building the Kernel 70
■ Installing the Kernel 72
■ Recovering from Faulty Kernels 73
Configuring Other Servers
P
ART II
54
The kernel is the program that is loaded at boot time which provides an interface between the
user-level programs and the hardware. Its functionality includes performing the actual task
switching that occurs in multitasking systems, handling requests to read and write to disks,
dealing with the network interface, and managing memory. It is these functions that give Linux
its underlying behavior seen throughout the system.
Technically, Linux is only the kernel. The programs that surround it, such as the compilers,
editors, windowing managers, and so on, make up the distribution. (For example, Red Hat
Linux is considered a distribution of Linux.) Therefore, several different distributions of Linux
exist, but the kernel remains common among them.
The kernel is important because it is the glue that holds everything together. Working as a
central command post for the system, it manages all the programs running, their memory al-
location, their means of accessing the disk, and so on. Without the kernel, there is no Linux.
The default kernel that comes on the CD-ROM is the 2.0.30 kernel. This kernel, which is
automatically installed, contains support for a large number of devices, thereby making it flex-
ible. Unless you have a particularly unusual configuration, the standard issue kernel with Red
Hat should work on your machine without any changes.
Although the standard issue kernel will work, you might need to add support for a new device
or simply pare down the list of devices the kernel supports so that it takes less memory. Either
way, you will need to step through the kernel configuration process.
WARNING
Recompiling a new kernel can be potentially dangerous. By doing so, you can easily deny
yourself access to the system, so be sure to follow all the safety tips in this chapter. Being
locked out of your own machine because of a silly mistake is one of the most frustrating
results than can occur.
At the very least, you should have a boot disk ready. Test it and verify that it comes up as
you expect it to. Be familiar with the commands necessary to mount the root partition, make
changes to key files (for example, /etc/lilo.conf), and rerun LILO.
An Introduction to the Linux Kernel
Now that you have an understanding of what the kernel does, you might find a need to
reconfigure and build it. In this section, I discuss the preamble to the process: acquiring the
source code and installing it in the correct place.
Configuring and Building Kernels
C
HAPTER 5
55
5
C
ONFIGURING
AND
BUILDING
KERNELS
Acquiring the Source Tree
The CD-ROM that comes with this book contains an RPM for the kernel source tree. To use
it, simply install it using the
rpm package. You can find updated versions of the kernel source at
www.redhat.com or from one of the following:
■
■ />■ />■ />The source tree comes in one large file titled linux-X.X.XX.tar.gz, where X.X.XX is the version
number of the kernel. For this example, you will use version 2.0.30.
NOTE
Version numbers in Linux have more significance than what may appear to you at first
glance. To understand what I mean, look at the kernel used in this chapter—2.0.30.
The version number is broken up into three parts: the major number, the minor number,
and the revision number. The major version number—2 in this kernel—rarely changes.
Every time the number increases, major improvements have been made in the kernel,
and upgrades are definitely warranted.
The minor number—0 in this kernel—indicates the kernel’s stability. Even-numbered kernels
(for example, 0, 2, 4, and so on) are considered stable production-quality kernels, whereas
odd-numbered kernels (for example, 1, 3, 5, and so on) are development kernels. When a
kernel reaches a production version, no more features are added, and the only changes
made to it are to fix any last-minute bugs.
In contrast, odd-numbered kernels are actively being worked on. They contain experimental
code and feature the latest developments. The side effect of these added features is the
instability that may exist in them. Sometimes they are stable; other times they have critical
flaws. Odd-numbered kernels should be used only on systems on which users are comfort-
able trying out new features and can accept downtime incurred by frequent kernel up-
grades.
The last number, which is the revision number, indicates the current patch level for this
version of the release. During the development phase, new versions can be released as
often as twice a week.
If you decide to download a more recent source tree instead of using the version on the
CD-ROM, you need to decompress and untar it. You should do so in the
/usr/src directory
because symbolic links from
/usr/include have already been set up. By manipulating the
Configuring Other Servers
P
ART II
56
/usr/src directory so that /usr/src/linux always points to the most recent kernel, you don’t
have to fix the
/usr/include directories every time you compile a new kernel. (See the follow-
ing tip.)
To unpack the kernel, simply run
tar xzf linux-2.0.30.tar.gz
where linux-2.0.30.tar.gz is the name of the kernel you downloaded. This line decompresses
and untars the kernel into the
/usr/src/linux directory.
TIP
If you have an older kernel in place, you might not want to remove the previous source
tree. After all, if you need to revert back to it, not having to download it again would be
nice! Instead, create a new directory titled linux-2.0.30, where 2.0.30 is the version
number of the new kernel. Then create a symbolic link from /usr/src/linux to /usr/src/
linux-2.0.30. By doing so, you can easily repoint the symbolic link to new kernels as they
are released. As a side benefit, your /usr/include directories can always remain pointed
to /usr/src/linux.
If this is the first kernel you’ve compiled, be sure to take a few minutes to read the /usr/src/
linux/README
file. It contains up-to-the-minute details about the exact kernel you are working
with as well as problem reporting information.
TIP
Due to the amount of concurrent development done in the Linux community, you might find
that not all the drivers provided with the Linux kernel are the latest. If you have problems
with a particular device, searching on the Internet to see whether a more recent version of
the driver is available is often worthwhile.
For example, if you are having problems with the 3Com 3C59x driver, a quick peek at the
source code shows that you can reach the author of the driver, Donald Becker, at linux-
Searching on the keywords linux vortex on the AltaVista
search engine (www.altavista.digital.com) turns up the primary Web site for the
development of this driver ( />vortex.html) from which you can download the latest version and include it into your
source tree.
Configuring and Building Kernels
C
HAPTER 5
57
5
C
ONFIGURING
AND
BUILDING
KERNELS
Patching the Source Tree
As each new version of the source tree is released, a corresponding patch also is released con-
taining the differences between the two versions. The patch, as you can imagine, is much smaller
than the entire new source tree, thereby making it a much quicker upgrade.
When you’re patching the Linux kernel, keep in mind that patches apply to only one particu-
lar version of the Linux kernel. For example, if you have the 2.0.27 kernel, the only patch that
will apply to it is for the 2.0.28 kernel. If you want to bring your kernel up to version 2.0.30,
you will need to apply three patches: 2.0.28, 2.0.29, and 2.0.30. The patch files are available
in the same directories as the kernel sources at the FTP and Web sites mentioned previously in
this chapter.
After you download a patch, you need to use a combination of the tar and patch programs to
make the changes. Begin by moving the patch into the
/usr/src directory. After it is there, run
the commands
cd /usr/src
gzip -cd patch-XX.gz | patch -p0
where XX is the version number of the patch you are applying. For example, you would apply
the following to the 2.0.29 kernel:
cd /usr/src
gzip -cd patch-2.0.30.gz | patch -p0
After you apply the patch, check for any files ending in .rej in the /usr/src/linux directory.
If you find such files there, verify that you applied the patch correctly. If you are sure you patched
correctly, watch for an update patch within a day or two. If an error occurs with the patch file,
a new version of the patch will appear.
Modules
Modules are chunks of the kernel that are not permanently loaded into memory at boot time.
Instead, they are loaded on demand and after a period of non-use are removed from memory.
Modules are commonly used for networking code on a machine that is not permanently con-
nected, supporting devices not often used, and so on. Although you can make even commonly
used kernel code a module, you might find that the overhead in reloading it often outweighs
the benefits of it being removed from memory when not in use.
The Linux kernel as of version 2.0 has easy-to-use support for modules. Modules have, for all
practical purposes, become transparent in their operation. If you are curious about the details
of their operation, read the documentation that comes with the
insmod, rmmod, ksyms, and lsmod
programs.
Configuring Other Servers
P
ART II
58
Configuring the Linux Kernel
Now that you have the kernel source tree unpacked and ready to go in /usr/src/linux, you
can begin the configuration.
WARNING
Before making any key changes to a system, such as installing a new kernel, you should
have a boot disk ready. In the unfortunate event that you misconfigure something (and
everybody does eventually), you will need a way to get back into your system.
If you are only compiling a new kernel and not making any other key changes, you can
simplify the emergency rescue process by making a backup of the kernel and modules on
the root partition. Modify the /etc/lilo.conf file to allow you to boot to your currently
working kernel as an option. This step is important because not all new kernels work as
advertised, especially if you are compiling a development kernel. Booting another kernel
right off your root partition is substantially easier than booting off floppies to regain control.
You can configure the Linux kernel in one of three ways. The first (and original) method is to
use the
make config command. It provides you with a text-based interface for answering all the
configuration options. You are prompted for all the options you need to set up your kernel.
The text-based interface is a good backup for instances in which you don’t have fancy screen
control (for example, your console is an old terminal for which you don’t have a
termcap set-
ting); hence, you should be familiar with it.
More likely, however, you will have a standard PC console. If so, you can use the
make menuconfig
command, which provides all the kernel options in an easy-to-use menu. For the sample con-
figuration in this chapter, you will use the
make xconfig command, which provides a full graphical
interface to all the kernel options.
Starting the Configuration
For the sample configuration, assume that the system is a generic Pentium class PC with an
EIDE hard drive, IDE CD-ROM, an Adaptec 2940 SCSI card, and a 3Com 3C905 Ethernet
card. The system is being configured as a server, so use a stock 2.0.30 kernel. (Remember: Never
use development kernels on production systems!)
To start the configuration tool, change into the directory
/usr/src/linux and invoke the fol-
lowing command:
make xconfig
After a brief pause (some text will scroll down your screen), a window like the one shown in
Figure 5.1 appears.
Configuring and Building Kernels
C
HAPTER 5
59
5
C
ONFIGURING
AND
BUILDING
KERNELS
FIGURE 5.1.
Kernel configuration
main menu.
The menu options, which are centered in the middle of the window, start with Code maturity
level options and end with Kernel hacking. By using the four buttons below the menu, you can
load or save configurations to disk for further work.
Stepping Through the Menus
Under each top-level menu in this opening window is a list of options that you can tag to ei-
ther compile into the kernel, compile as a module, or not include at all. Remember that each
option that you elect to compile into the kernel makes the kernel a little larger, thereby requir-
ing more memory. Therefore, include only what you need, but be sure to include key system
functions into the kernel such as network drivers and filesystem support for your boot drive.
Essentially, you should add any feature you will need on a constant basis. Features that are not
often used, such as PPP support, are best compiled as modules.
To start, take a close look at the menu under Code maturity level options. Begin by clicking
that menu. This action brings up the Code maturity level options window, as shown in Fig-
ure 5.2.
Configuring Other Servers
P
ART II
60
FIGURE 5.2.
The Code maturity
level options menu.
At the top of the window is the title of the menu, and below the title is the list of options. This
menu has only one option, Prompt for development and/or incomplete code/drivers.
To the left of this window are your choices for this particular option. The three choices for
each option are
y for Yes, m for Module, and n for No. Selecting Yes means that the option will
be compiled into the kernel and always be loaded. If you choose Module, the kernel will load
that segment of code on demand. (For example, when you initiate a PPP connection, the cor-
responding PPP code is loaded.) As you can imagine, choosing the No option excludes this
option from the kernel altogether.
As you can see in the current window, the Module option is faded out (grayed or dimmed). In
this case, this particular option by itself doesn’t add or remove anything from the kernel but
instead serves as a guide to the rest of the configuration options. Because the kernel you are
compiling is going for use in a server, you should not try any experimental code, so be sure this
option is set to No. Any experimental sections of the kernel will then be automatically grayed,
thus making them not available for use.
As you go through the configuration, you’ll likely come across options that you don’t know.
As you upgrade kernels, you will find that these options are typically new ones that someone
has recently added but that are not well publicized. You can select a help option that is located
at the right of each option. Clicking the Help button opens another window describing the
option. Simply click the OK button to close the help window.
After you finish working with this menu, you can take one of three actions. You can click the
Main Menu button to close the current window and return to the menu shown in Figure 5.1,
you can click the Next button to go to the next configuration submenu, or you can click the
Prev button to go to the previous configuration submenu. Because Code maturity level options
is the first configuration submenu, the Prev button is faded out in this window, leaving you
access only to the Main Menu and Next buttons. Go ahead and click Next now.
Loadable Module Support
As I discussed earlier, loadable modules are chunks of the kernel that are loaded on demand.
This feature gives you the benefit of being able to support features not often used without tak-
ing up additional memory during periods of non-use.
The Loadable module support submenu in this particular kernel version consists of three options,
as you can see in Figure 5.3.
Configuring and Building Kernels
C
HAPTER 5
61
5
C
ONFIGURING
AND
BUILDING
KERNELS
FIGURE 5.3.
The Loadable module
support menu.
You need to choose the first option, Enable loadable module support, if you want to be able to
make lesser-used features of the kernel loadable modules. Leave this option marked as Yes un-
less you have a specific reason not to have moduleless kernel. Tagging it No dims the other two
options.
The next option, Set version information on all symbols for modules, allows you to use mod-
ules that were originally compiled for a different version of the kernel in the current kernel if
they are compatible. You should leave this option tagged Yes.
The last option, Kernel daemon support, you’ll definitely want to leave tagged Yes if you are
using modules. This way, the
kerneld program can automatically load modules on demand
instead of forcing you to explicitly load and unload modules by hand.
General Setup
On the General setup submenu, shown in Figure 5.4, you can configure several key elements
of the kernel. With these options, assume that they should be tagged Yes with the notable ex-
ception of Limit memory to low 16MB, which should be tagged No.
FIGURE 5.4.
The General setup
menu.
You should turn on the first option, Kernel math emulation, only if you are compiling a kernel
on a CPU with no math coprocessor chip. This feature is applicable only to systems with i386dx,
Configuring Other Servers
P
ART II
62
i386sx, or i486sx chips and no corresponding math coprocessors. All Pentium class machines
have math coprocessor support built into them. Selecting Yes for this option increases the ker-
nel size by 45 kilobytes. Kernel math support cannot be compiled as a module.
If you plan to attach your machine to any kind of network, whether a LAN or via modem, you
need to select Yes for Networking support. Because Networking support determines whether
other options will be presented to you later and is not a feature in itself, you cannot select the
Module option for it.
Some older motherboards had problems working with memory greater than 16MB. If your
system exhibits this behavior, you should set Limit memory to low 16MB to Yes. Otherwise,
leave it tagged No.
TIP
If you have over 64MB of memory in your system, you need to pass this information
explicitly to the kernel. You do so by using the mem=XXXM option at the boot: prompt, where
XXX is the amount of RAM you have in megabytes. See Chapter 3, “LILO,” on configuring
LILO to set this option as part of your default boot process.
Unless you know for sure that all the programs you plan to run on the system do not require
InterProcess Communication (IPC, a method by which two programs running concurrently
on one system can communicate with one another), you should set System V IPC to Yes. Many
programs do not work unless this option is turned on. Because of the tight integration that is
required between IPC and the kernel, this option cannot be compiled as a module.
When Linux was first created, programs that it could run had to in
a.out format. (Programs
are known as binaries in UNIX.) This format specifies how each program is structured inter-
nally and how the kernel needs to process the program while loading it into memory. For sev-
eral reasons, the Linux development community decided to move to the ELF format. All
recent development has been using the ELF with
a.out quickly fading out of use. However, to
ensure maximum compatibility with other programs, you should set both the Kernel support
for
a.out binaries and Kernel support for ELF binaries to Yes.
Because you opted not to use any experimental code in the Code maturity level options submenu,
the option for kernel support of Java binaries is dimmed here.
The next-to-last option, Compile kernel as ELF - if your GCC is ELF-GCC, should be tagged
Yes. GCC, which is the GNU C compiler, has supported the generation for ELF binaries for
quite some time now. The version that ships with this book definitely has support.
The last option on this window, Processor type, is a little different from the others. As you can
imagine, this option doesn’t require a Yes/No answer but instead a list of processors for which
Configuring and Building Kernels
C
HAPTER 5
63
5
C
ONFIGURING
AND
BUILDING
KERNELS
the compiler can optimize the kernel. To select your processor type, click the button to the left
of the option (in Figure 5.4, this button is labeled Pentium) to generate a drop-down box with
a list of processors. Click the processor type you have (or the closest one), and you’re set.
Floppy, IDE, and Other Block Devices
The Floppy, IDE, and other block devices submenu lists the options you have for basic device
support for IDE and floppies as well as some older drive types (for example, MFM and RLL).
As the kernel evolves, these options will change slightly.
You definitely should select Yes for Normal floppy disk support because you will have no way
of accessing your floppy drives without it. Don’t select No for this option because you’re look-
ing for a way to secure your floppies from nonroot users; instead change the permissions on
/dev/fd0 to 0600.
If you have an IDE hard drive (like the sample system does), you should select Yes for En-
hanced IDE/MFM/RLL disk/cdrom/tape support. Selecting No dims all the IDE options in
the rest of the submenu. Because you’re using this option, the next option (Old harddisk (MFM/
RLL/IDE) driver) is dimmed.
The remainder of the IDE options are for support for specific chipsets. This information varies
from machine to machine. When you’re in doubt, selecting Yes for these options doesn’t hurt,
but it will result in a larger kernel. Each driver will automatically probe the system at boot time
to determine whether it should or should not be activated.
You can select Yes for Loopback device support if you have a special need to mount a file as a
filesystem (for example, for testing an ISO9660 image before burning it to a CD). You should
also select Yes for Loopback device support if you intend on using the Common Desktop
Environment. For most people, however, this option should be tagged No.
The Multiple devices driver support option turns on a special driver that allows you to connect
multiple partitions (even on different disks) together to work as one large partition. Unless you
are a systems administrator configuring this item, you should set this option to No. If you plan
to set up this feature, be sure to read the
./drivers/block/README.md file in the Linux source
tree. The options for using Linear (append) mode and RAID-0 (striping) mode are applicable
only if you plan to use Multiple devices driver support.
RAM disk support is provided in the kernel to allow you to create virtual filesystems in your
system’s memory. This feature is really useful only if you are creating a special kernel for use on
boot disks. For most instances, select No for RAM disk support. Doing so automatically dims
the Initial RAM disk (initrd) support option.
Unless you have a very old hard disk that you need to use with this machine, you should leave
the XT harddisk support option tagged No. If you do need to support a very old hard disk,
seriously consider making the investment in upgrading the device to something more current—
if not for your performance, at least for the safety of the data.
Configuring Other Servers
P
ART II
64
Networking Options
Because of the rate at which network technology evolves, covering specifics is difficult because
they become outdated too quickly. For this section on the Networking options, I’ll cover the
basics along with some security notes. For specific features, you should check the help box at-
tached to each option on the Networking options submenu.
Before getting into details, you should have a clear idea of what sorts of networking features
you expect your machine to offer. If your machine will spend a great deal of its time serving or
as a user’s desktop machine, you should keep the network configuration simple and not provide
any elaborate services. On the other hand, if the machine is destined to become a gateway/
proxy service, you should pay attention to the details.
NOTE
Because of the rapid developments in the networking industry, many options are still
experimental code. As a result, many of the Networking options will be dimmed if you
opted not to use any experimental code in the kernel. Don’t be alarmed.
Assuming that you do want to join the network, you must turn on two of the options. The
first, of course, is TCP/IP networking. Tagging this option No dims all the other options. The
other option you must turn on is IP: syn cookies. Enabling this option is especially important
if you are going to be attached to the Internet in one way or another because it provides protec-
tion against SYN attacks. (For additional details on SYN attacks as well as a various other
security-related issues, visit the CERT home page at
.)
The essence of many of the Networking options is the ability to configure Linux to act as ei-
ther a router or a firewall. To access the firewalling options, be sure to enable the Network
firewall, Network aliasing, and IP: forwarding/gatewaying options. If you plan to use your Linux
machine in this fashion, you will probably want to enable the IP: accounting and IP: optimize
as router not host options.
If you have trouble connecting to your Linux machine via Telnet from an older DOS system,
you might want to select Yes for IP: PC/TCP compatibility mode. Turning on this option allows
Linux to communicate with the older (and broken) software on the DOS side. The IP: Disable
Path MTU Discovery (normally enabled) option can also be a cause of problems with older
systems. Normally, Linux starts by sending larger packets of data across the network. If it finds
a machine that cannot handle the larger size, it brings the size down until everyone is happy.
Some older DOS machines with poorly written software don’t handle this technique well and
need to have this option disabled. If that is the case, check Yes for this option.
The IP: Reverse ARP option is useful if machines on the network use Address Resolution Pro-
tocol (ARP) to determine the network’s IP address based on its Ethernet address. (Typically,
Configuring and Building Kernels
C
HAPTER 5
65
5
C
ONFIGURING
AND
BUILDING
KERNELS
this client is diskless.) Enabling this option allows Linux to answer such queries. Look into
running
rarp for further information about this protocol.
Another security issue you will need to contend with (especially if you are attached to the In-
ternet) is source routed frames. IP allows for a machine originating a packet to specify the exact
path of a packet from source to destination. This capability is rarely useful and is often used as
a method of attacking machines across the Internet. Unless you are sure of what you’re doing,
you should select Yes for the IP: Drop source routed frames option.
Along with these TCP/IP-centric options are a few other protocol options such as IPX and
AppleTalk. If you work in a heterogeneous environment with Macintoshes and Windows/
Novell-based PCs, you might want to enable these options, but doing so isn’t required as long
as the other machines can talk TCP/IP. The most common use of enabling AppleTalk, for
example, is to be able to use AppleTalk-based printers.
SCSI Support
If you plan to use any SCSI chains on your system, you should select either Yes or Module for
all the options on the SCSI support submenu, as shown in Figure 5.5. (If you’re using SCSI
disks, Yes is a better option.)
FIGURE 5.5.
The SCSI support
menu.
The only option worth explicitly mentioning on this submenu is Verbose SCSI error reporting
(kernel size +=12K), which, when enabled, gives detailed error messages in the event of a failure
somewhere along the way. Although selecting this option costs some memory, it is often worth-
while when you need to debug an error condition quickly.
Because the sample system requires SCSI, select Yes for all options except SCSI CD-ROM
support because you’re using an IDE CD-ROM. If you are also using a SCSI CD-ROM, you
might want to select the Module option because most systems access the CD-ROM infrequently.
SCSI Low-Level Drivers
Obviously, if you don’t select Yes to SCSI in the SCSI support submenu, the SCSI low-level
drivers submenu isn’t relevant to you.
Configuring Other Servers
P
ART II
66
Like the submenu in Network support, the list of SCSI drivers supported by Linux increases
regularly. For every SCSI card you have in your system, simply tag the option either as Yes if
you intend to make heavy use of it or Module if it will have occasional only use (for example,
a SCSI tape drive).
After you select the driver you want, be sure to read the corresponding help. It might contain
information about where to obtain current drivers and bug fixes (if any are available).
Network Device Support
The Network device support submenu lists the drivers available for networking. This list in-
cludes the necessary drivers to control Ethernet cards, PPP connections, SLIP, Token Ring,
and so on.
You must select Yes for the first option, Network device support, if you want to select any of
the other options. Otherwise, checking No dims the other options.
The next option, Dummy net driver support, provides dummy network interfaces. This capa-
bility is often used for machines providing virtual domains in which each virtual interface re-
ceives its own IP address.
The last general option is for EQL support. EQL is a means by which two modems using PPP
or SLIP can work together to provide double the transfer speed. Your choice for this option is
based on the fact that the machine you are connecting to can also support this capability. Unless
you know you will be providing this support, be sure to check No for the EQL (serial line load
balancing) support option.
The remainder of the options in this submenu are for specific network interfaces. Note that
some of them are questions designed to make other options available to you. For example, if
you select Yes for the 3Com cards option, all the 3Com cards that are supported become avail-
able for you to select.
ISDN Subsystem
The ISDN subsystem submenu doesn’t provide many options for ISDN users to configure.
Most people should select No for the first option, ISDN support. Doing so dims the other
options in the submenu.
If you do need ISDN support, begin by selecting Yes for the first option. This way, you can
configure the other items on the submenu. Because of the nature of ISDN, be sure to find out
whether your provider supports some of the options that Linux supports (for example, VJ-
compression with synchronous PPP).
CD-ROM Drivers
On the CD-ROM drivers submenu, you can select the option to support non-SCSI/IDE/ATAPI
CD-ROM drives. As with the other lists of drivers, you need to select Yes only for the devices
that you have attached to your system.
Configuring and Building Kernels
C
HAPTER 5
67
5
C
ONFIGURING
AND
BUILDING
KERNELS
Filesystems
Linux has a great deal of support for other filesystems, thereby allowing you to use disks from
other systems without any conversion process. The most notable support is for the DOS-based
filesystems.
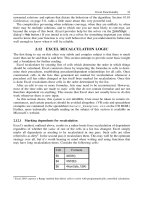
As of the 2.0.30 kernel, the following filesystems on the Filesystems submenu are available for
your use:
Filesystem Description
Minix This original Linux filesystem is still used by boot disks
and common floppy disks. This option should be tagged
Yes.
Extended fs This first successor to the Minix is no longer used. There
is no good reason to enable support for this filesystem.
Second extended fs This is the current default Linux filesystem. You should
definitely select Yes for this option. Remember: Your
root filesystem cannot be a module.
xiafs filesystem This filesystem was introduced at the same time as the
Second extended fs as a replacement for the Extended fs;
however, it never really caught on and is rarely used
today. Unless you have a specific need, you should select
No for this option.
DOS FAT fs This particular option isn’t a filesystem but a foundation
for other FAT-based filesystems such as MS-DOS FAT,
VFAT (Windows 95), and
umsdos support.
MS-DOS FAT fs If you want to be able to access DOS-based systems
from Linux, you need to set this option to Yes. This
capability is especially useful for dual boot systems.
VFAT (Windows 95) fs VFAT is the upgrade from the original MS-DOS FAT
structure; it includes support for long filenames. Again,
if you are in a dual boot situation, having this capability
is a good idea.
umsdos This UNIX-like filesystem resides on top of the standard
MS-DOS format. This capability is useful if you want to
run Linux over your DOS partition occasionally. For a
serious system, you should not need this support. (Red
Hat Linux does not support running on a
umsdos
filesystem.)
continues
Configuring Other Servers
P
ART II
68
/proc To simplify access to system information, the /proc
filesystem was created to provide an intuitive interface.
Although it appears to exist on your hard disk, it doesn’t
take up any actual space. Many programs rely on your
having this capability in place, so be sure to include
support for it.
NFS The Network File System (NFS) support is needed if
you intend to access remote filesystems through this
standard protocol. For a server, this capability is a must.
SMB This network protocol was developed for Windows for
Workgroups (also known as LanManager). This capabil-
ity is useful only if you need to have direct access to
Windows 95 or NT files as part of your filesystem. For
most people, this option should be tagged No. For a
server, you might want to select Module for this option
because you never know where you’re going to have to
connect your machine.
NCP NetWare support is done through the NCP protocol.
Like SMB, this capability isn’t terribly useful for most
people; however, if you are in the process of
transitioning away from NetWare, selecting this option
is a useful way to provide a seamless transition.
ISO9660 The ISO9660 filesystem is necessary if you intend to use
CD-ROMs because many CD-ROMs are encoded in
this format. If you have a CD-ROM attached to your
machine, be sure to select Yes for this option.
OS/2 HPFS Support for the OS/2 filesystem, HPFS, is read-only
under Linux. Most people should select No for this
option.
System V and Coherent These two filesystems are from very old versions of
UNIX and are useful only as means of transitioning old
data to new filesystems. Most people should select No
for this option.
Amiga FFS The Amiga support is still considered experimental code
and should be used with caution.
UFS UFS is available on several other UNIX systems, most
notably Solaris and SunOS. (Under SunOS, it was
known as 4.2.) The support for this filesystem is read-
only.
Filesystem Description
Configuring and Building Kernels
C
HAPTER 5
69
5
C
ONFIGURING
AND
BUILDING
KERNELS
NOTE
If you plan to access a filesystem over the network, you do not need to support the remote
filesystem directly. You do need to support NFS, however. For example, if you intend to
mount a disk residing on a Solaris system, you do not need UFS support, only NFS.
The Quota support option on this submenu is for people who need to limit the amount of disk
space being used by each user. Currently, this capability is supported only with the second
extended filesystem (
ext2).
The last option in this submenu is for Mandatory lock support. Typically, file locking is done
at the application level; however, there is an attempt to force locks on all files with this feature.
As of the 2.0.30 kernel, the additional software to support this feature isn’t available, so do not
enable this option unless you are certain as to what you are doing.
Character Devices
Character devices work in a different manner than block devices. Block devices are typically
disks, tape drives, and so on that transfer data in large chunks. In contrast, character devices
transfer only one byte of data at a time; hence, they are typically keyboards, mice, serial ports,
and so on.
As its name implies, the Character devices submenu is for the configuration of character de-
vices in the kernel. This configuration is usually for your mouse, serial ports, and parallel ports,
but a few unusual devices fall under this category as well.
To get basic support for your serial ports, you need to set the Standard/generic serial support
option to Yes or Module. Unless you have a specific serial card such as an 8-port card, you do
not need any additional serial support.
If you plan to use your printer or connect to a network via PLIP, be sure to set Parallel printer
support to Yes also.
Mouse support comes in two flavors. You can use serial mice or bus mice. If you use serial
mice, you do not need to explicitly turn on the Mouse Support option because the Standard/
Generic serial support covers this capability. If you use a bus mouse, you need to set Mouse
Support (not serial mice) to Yes and indicate which particular mouse you have attached to the
machine.
The remaining options in the Character devices submenu are unusual and often unused fea-
tures or hardware. Unless you explicitly know that your system uses them, select No for these
options.
Configuring Other Servers
P
ART II
70
Sound
NOTE
Before you attempt to configure kernel support for your sound card, be sure you have the
correct IRQ and I/O Base Memory address.
To enable sound card support in the kernel, begin by selecting Yes for the first option for Sound
card support in the Sound submenu. By doing so, you can select which sound card you have in
your system.
After you select Yes for the appropriate sound card in your system, scroll down to the section
for providing the appropriate IRQ, DMA, and Base I/O address information. Although the
information required varies from card to card, you should be able to get this information from
the manual or the on-card jumper settings.
Kernel Hacking
Because the Linux kernel is available in source code form, many people have taken an interest
in its underlying functionality for one reason or another. To facilitate these people, additional
debugging information can be compiled into the kernel by selecting Yes for the Kernel profil-
ing support option.
As part of the profiling support, many functions are invoked with the intention of trying to
force them to fail. This capability is useful during development to ensure that all possible paths
of execution are exercised and tested. The result is a kernel that is less stable; hence, unless you
truly understand the hows and whys of the kernel, you should leave the Kernel profiling support
option tagged No.
Final Notes About Configuration
Configuring a kernel can be tricky. Be ready to spend some time learning the options and the
effects each option has on others. You can easily misconfigure a kernel, so don’t feel bad if
integrating a new feature correctly takes a few tries. As with any learning endeavor, as you gain
experience, you will be able to get the job done right more quickly and with less heartache.
After you set all your options, be sure to save the configuration and not just quit without saving.
The options are then written to a file that is read as part of the compilation. Based on your
selections, only what is necessary is compiled.
Building the Kernel
Now that you have a configured kernel, you are ready to compile it. In comparison, the entire
process, known as building the kernel, is much easier than the configuration process.