Beginning ASP.NET 1.1 with Visual C# .NET 2003 phần 4 pot
Bạn đang xem bản rút gọn của tài liệu. Xem và tải ngay bản đầy đủ của tài liệu tại đây (2.07 MB, 90 trang )
.NET Objects
So far, this chapter has looked at creating classes and objects. Earlier, we talked about everything in .NET
being an object. This is a core point to remember because it will aid you considerably in understanding
.NET. Let's look at a couple of topics to understand how objects are organized and used within .NET.
Namespaces
Namespaces provide a logical separation for classes. The first step towards understanding objects in
.NET is to understand namespaces. If you look at the number of classes that come as a part of .NET,
you'll see why – there are more than 3000 classes! Having that number of classes without any form of
structure would be really difficult to manage, especially when searching through documentation. There
are a couple of places you can look at the available namespaces. The first is the documentation that
comes with .NET as shown in Figure 7-8:
Figure 7-8
Observe the number of namespaces and how they have been broken down. Knowing the classes that
belong in which namespace is essential, not only to help you look up documentation, but also to know
about the namespaces to import into an ASP.NET page.
The Class Browser
Another useful tool is the class browser application, which is available if you have installed and
configured the .NET Framework SDK samples. To access this, navigate to
http://localhost/quickstart/aspplus and scroll to the bottom where you'll see a link to Sample Applications
and A Class Browser Application. Running this sample shows Figure 7-9:
243
Objects
Figure 7-9
On the left you see the namespace; selecting one of these will display the classes in the namespace on the
right side of the screen. Selecting an individual class will show its members. See Figure 7-10:
Figure 7-10
244
Chapter 7
This figure shows all the members of a class – the constructors, properties, methods, and events. It also
shows the object hierarchy (the inheritance used) and the implementation (classes implemented).
Summary
This chapter covered the fundamentals and some complex topics surrounding classes. You could go
deeper into objects and other complex topics, but these are really outside the scope of the book. We've
looked at what objects are, and how OOP is beneficial.
Features such as inheritance and abstraction provide many benefits to programmers, such as reduction
in development time, improved stability of applications, and better structure. These techniques were
used to create some sample classes to show how they work and to see how properties and methods can
easily be added to a class.
This chapter also discussed advanced topics such as overloading and interfaces. The chapter ended with
a quick look at how classes are organized in .NET, and how you can find out what is in a namespace and
a class.
Now it's time to turn attention to data; the next chapter will look at how data can be retrieved from a
database and displayed in your pages.
Exercises
1. The examples covered in the chapter have modelled some simple characteristics of real - world
objects, such as animals. Think about other real world objects that, when turned into classes,
would be useful in programming.
2. In the Animal class, where the Walk() method accepts an argument of type int, expand this to
use this integer as the speed of walking. Think about how you'd store that speed and what
you'd do with it.
3. With the results of Exercise 2, think about how you'd add validation to the speed to ensure that
it doesn't exceed certain set limits.
4. Describe the main differences between class inheritance and interfaces. When would you use
one over the other?
5. Create a class called PieceOfString with a single read/write property (of type int) called
Length. Create an instance of the class and set the Length to 16. Now you can answer that age
old question "How long is a piece of string?"
245
Objects
8
Reading from Databases
So far, you've learnt a lot about programming, and seen those techniques in use in a variety of Web
pages. Now it's time to turn our attention to one of the most important topics of building
Web sites – data. Whatever the type of site you aim to build, data plays an important part. From a
personal site (perhaps a vacation diary or a photo album), to a corporate e-commerce site,
data is key!
There are numerous ways to store data, but most sites use a database. In this chapter, we're going to
look at data stored in databases, and show how easily it can be used on Web pages. For this we are
going to use ADO.NET, which is the data access technology that comes as part of the .NET
Framework.
If the thought of databases sounds complex and scary, don't worry. We're going to show you just
how easy this can be. In particular, we'll be looking at:
❑ Basics of databases and how they work
❑ How to create simple data pages using Web Matrix
❑ Different ADO.NET classes used for fetching data
❑ Basics of ADO.NET and how it fetches data
❑ How to use Web Matrix to simplify developing data access pages
Let's develop some basic understanding of databases first.
Understanding Databases
Understanding some basics about databases is crucial to using data in your pages. You don't need
to be a database expert, but there are certain things you will need to know in order to work with
data in .NET. For a start, you need to understand how data is stored. All types of data on a
computer are stored in files of some sort. Text files, for example, are simple files and just contain
plain text. Spreadsheets, on the other hand, are complex files containing not only the entered text and
numbers, but also details about the data, such as what the columns contain, how they are formatted, and
so on.
Databases also fall into the category of complex files. When using Microsoft Access, you have an MDB
file – this is a database file, but you can't tell anything about the data from the file itself. You need a way
to get to the data, either using Microsoft Access itself, or as we are going to do, using the .NET data
classes. Before you can access the data, you need to know how it is stored internally.
Tables
Within a database, data is stored in tables – these are the key components of all databases. A table is like a
spreadsheet, with rows and columns. You generally have multiple tables for multiple things – each
distinct type of data is stored separately, and tables are often linked together.
Let's look at an example that should make this easier to visualize. Consider an ordering system, for
example, where you store details of customers and the goods they've ordered. The following table shows
rows of customer orders, with columns (or fields) each piece of order information:
Customer Address Order Date Order Item Quantity Item Cost
John 15 High
Street
Brumingham
England
UK
01/07/2003 Widget 10 3.50
John 15 High
Street
Brumingham
England
UK
01/07/2003 Doodad 5 2.95
John 15 High
Street
Brumingham
England
UK
01/08/2003 Thingy 1 15.98
Chris 25 Easterly
Way
Cradiff
Wales
UK
01/08/2003 Widget 1 3.50
Dave 2 Middle
Lane
Oxborough
England
UK
01/09/2003 Doodad 2 2.95
248
Chapter 8
This is the sort of thing you'd see in a spreadsheet, but there are a couple of big problems with this. For a
start, we have repeated information. John, for example, has his address shown three times. What
happens if he moves house? You'd have to change the address everywhere it occurs. Dave has two
addresses, but notice they are slightly different. Which one is correct? Are neither correct?
To get around these problems, we use a process called Normalization.
Normalization
This is the process of separating repeated information into separate tables. There are whole books
dedicated to database design, but we only need to look at the simplest case. A good beginner book on
database design is Database Design for Mere Mortals: A Hands On Guide to Relational Database Design, by
Michael J. Hernandez
What we need to do is split the previous table into three tables, one for each unique piece of information
–
Customers, Orders, and OrderDetails. To link the three new tables together, we create ID columns
that uniquely identify each row. For example, we could create a column called
CustomerID in the
Customers table. To link the Customers table to the Orders table, we also add this CustomerID to the
Orders table. Let's look at our tables now.
The
Customers table is as follows:
The
Orders table is as follows:
CustomerID Customer Address
1 John 15 High Street
Brumingham
England UK
2 Chris 25 Easterly Way
Cradiff
Wales UK
3 Dave 2 Middle Lane
Oxborough
England UK
Customer Address Order Date Order Item Quantity Item Cost
Dave 3 Middle
Lane
Oxborough
England
UK
01/09/2003 Thingamajig 1 8.50
249
Reading from Databases
The OrderDetails table is as follows:
We now have three tables that can be linked together by their ID fields as shown in Figure 8-1:
Figure 8-1
We now have links between the tables. The
CustomerID field in the Orders table is used to identify
which customer the order is for. Similarly, the
OrderID field in the OrderDetails table identifies which
order a particular order line belongs to.
The unique key in a table is defined as its Primary Key – it's what uniquely defines a row. When used in
another table it is called the Foreign Key, so called because it's a key, but one to a foreign table. The
OrderDetailsID OrderID Order Item Quantity Item Cost
1 1 Widget 10 3.50
2 1 Doodad 5 2.95
3 2 Thingy 1 15.98
4 3 Widget 1 3.50
5 4 Doodad 2 2.95
6 4 Thingamajig 1 8.50
OrderID CustomerID OrderDate
1 1 01/07/2003
2 1 01/08/2003
3 2 01/08/2003
4 3 01/09/2003
250
Chapter 8
foreign key is simply a column that is the primary key in another table. Because the values of the
primary key and the foreign key will be the same, we can use them to link the tables together. This
linking of the tables is done in Structured Query Language (SQL), usually as a query or a stored procedure.
SQL and Stored Procedures
Queries are the way in which we deal with data in a database, either to extract data or to manipulate it.
We can use an SQL statement or a stored procedure, which is an SQL statement wrapped to provide a
simple name. It's worth noting that a stored procedure is actually more than just wrapping an SQL
statement in a name, but that's a good enough description for what we need.
In Chapter 5 when we looked at functions, we had a function name encapsulating some code statements.
Think of a stored procedure in a similar way – it wraps a set of SQL statements, allowing us to use the
name of the stored procedure to run those SQL statements. We're not going to focus much on this topic
as it's outside the scope of this book.
To learn more about SQL, read SQL for Dummies (ISBN 0-7645-4075-0) by John Wiley & Sons Inc.
Here are a few reasons why you should always use stored procedures instead of direct SQL:
❑
Security: Using the .NET data classes with stored procedures protects you against certain forms
of hacking.
❑
Speed: Stored procedures are optimised the first time they are called, and then the optimised
code is used in subsequent calls.
❑
Separation: It keeps the SQL separate from your code.
In the remainder of this book, we'll actually be using a mixture of SQL and stored procedures for the
simple reason that sometimes it's easier to use SQL in the context of an example. Remember, our focus is
on ASP.NET. We'll be using Microsoft Access for the samples, and although Access doesn't support
stored procedures, its use of stored queries is equivalent.
Let's get on with some examples.
The Web Matrix Data Explorer
You've already seen how powerful Web Matrix is for creating Web pages, and this power extends to
working with data. Where you've used the
Workspace Explorer in the top right hand corner of Web
Matrix to work with files, you can use the
Data Explorer to work with data. This provides ways of
creating databases, connecting to existing ones, and working with tables and queries. Let's give this a go.
Try It Out Connecting to a Database
1. Select the Data Explorer tab, and click the Add Database Connection button – the one that's second
in from the right, and will be the only one highlighted, as shown in Figure 8-2, if you haven't
already got a database connection open:
251
Reading from Databases
Figure 8-2
2. Select Access Database from the window that appears and press OK.
3. Enter the following into the Data File text area (use a central location for the database, so that we
can reuse it later in the book):
C:\BegASPNET11\data\Northwind.mdb
4. Press OK to connect to the database. This is the Northwind database, one of the sample
databases that ships with Microsoft Access.
5. Figure 8-3 shows the tables contained in this database:
Figure 8-3
252
Chapter 8
You can double-click on these to open the table, and see and change the data. One thing you might
notice is that you don't see any queries – that's because Web Matrix doesn't support queries in Access.
When connecting to SQL Server, you'll see the stored procedures – you can even create and edit
them – but for Access, you are limited to tables only.
How It Works
There's nothing really to explain about how it works. What we are doing is simply creating a connection
to a database that Web Matrix can use. This isn't required for ASP.NET to fetch data from databases, but
Web Matrix has some great ways to generate code for you, so you don't have to do as much coding.
Creating Data Pages
Pages that display data can be created in a number of ways, and let's first look at the three ways that
Web Matrix uses to save you coding. This is the quickest way to get data into your pages and saves a
great deal of time. However, what it might not do is give you the knowledge to access databases without
using Web Matrix. After we've seen the easy ways, we'll look at the .NET classes that deal with data.
This way you'll have techniques to work with and without Web Matrix.
Displaying Data Using the Data Explorer
You've already seen how easy connecting to a database is using the Data Explorer. Creating pages
directly from this explorer is even easier – all you have to do is drag the table name and drop it onto a
page. This will automatically create a connection on the page and a fully functional data grid. Let's give
this a go.
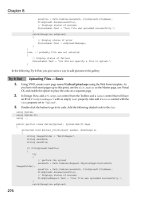
Try It Out Creating a Grid
1.
Create a new ASP.NET page called Grid1.aspx.
2. From the Data Explorer, drag the Suppliers table onto your empty page as shown in
Figure 8-4:
Figure 8-4
253
Reading from Databases
3. Save the page and run it as shown in Figure 8-5:
Figure 8-5
Amazing! A sortable grid full of data and you didn't have to write even a single line of code!
How It Works
The workings rely on two controls – the AccessDataSourceControl that provides the connection to
the database, and an
MxDataGrid, which is a Web Matrix control (also covered in Chapter 10) that
displays the data. Looking at the HTML view for these controls gives you a good idea of what they do.
Let's start with the
AccessDataSourceControl:
<wmx:AccessDataSourceControl id="AccessDataSourceControl2"
runat="server" SelectCommand="SELECT * FROM [Suppliers]"
ConnectionString="Provider=Microsoft.Jet.OLEDB.4.0; Ole DB Services=-4;
Data Source=C:\BegASPNET11\data\Northwind.mdb"></wmx:AccessDataSourceControl>
The first thing to notice is the way the control is declared. You're used to seeing asp: at the beginning of
controls, but not
wmx:. This prefix is the namespace – remember the previous chapter where we said that
namespaces provide a separation between classes. In this case, these controls are part of Web Matrix, and
have thus been given a namespace that is different from the standard server controls.
Apart from the
id and runat, two other attributes provide the details regarding which database to
connect to and what data to fetch:
❑ The
SelectCommand: Defines the SQL that will return the required data – in this case, it's all
rows and columns from the
Suppliers table. This is the default since we dragged this table,
but we can customize the
SelectCommand to return only selected rows or columns.
❑ The
ConnectionString: Defines the OLEDB connection string. You only need to worry about
the bit with the path of the database file – the
Data Source bit (if you move the file, you'll need
to change this). The other parts of the
ConnectionString just define the type of database and
254
Chapter 8
some database specific features. You don't need to know about these specifically (they are fully
documented in the .NET help files); just copy them if you ever need to use them again.
At this stage, you have enough details to connect to a database and fetch data, but don't have any way to
display it. For that we are going to use the
MxDataGrid control:
<wmx:MxDataGrid id="MxDataGrid2" runat="server"
DataSourceControlID="AccessDataSourceControl2" BorderColor="#CCCCCC"
AllowSorting="true" DataMember="Suppliers" AllowPaging="true"
BackColor="White" CellPadding="3" DataKeyField="SupplierID"
BorderWidth="1px" BorderStyle="None">
<PagerStyle horizontalalign="Center" forecolor="#000066"
backcolor="White" mode="NumericPages"></PagerStyle>
<FooterStyle forecolor="#000066" backcolor="White"></FooterStyle>
<SelectedItemStyle font-bold="true" forecolor="White"
backcolor="#669999"></SelectedItemStyle>
<ItemStyle forecolor="#000066"></ItemStyle>
<HeaderStyle font-bold="true" forecolor="White"
backcolor="#006699"></HeaderStyle>
</wmx:MxDataGrid>
This may seem complex but is actually very simple. Let's look at all of the attributes:
As part of the grid, we also have some style elements:
Attribute Description
DataSourceControlID
This contains the ID of the data source control from
which data will be fetched. In this case, it's the ID of
the AccessDataSourceControl we described
earlier.
BorderColor
This is the color of the grid border.
AllowSorting
Indicates whether or not the grid will support sorting.
DataMember
This contains the database table name.
AllowPaging
Indicates whether or not the grid supports paging.
The default number of rows in a page is 10, and this
can be changed with the PageSize attribute.
BackColor
This is the background color for the grid.
CellPadding
This defines the amount of padding between grid
cells. A higher number means the cells will be spaced
further apart.
DataKeyField
This is the primary key of the table.
BorderWidth
This is how wide the border of the grid is. Here it is 1
pixel (px stands for pixel), which is a thin border.
BorderStyle
This is the style of the border.
255
Reading from Databases
❑ PagerStyle: Defines the style of the pager section. In our grid, this is the last row showing the
page numbers, but it appears before the footer if a footer row is being shown.
❑
FooterStyle: Defines the style of the footer row. In our grid, we aren't showing a footer, but
the style is set so that the footer will look correct if it is shown.
❑
SelectedItemStyle: Defines the style of items when they are selected. Our grid isn't selectable
by default, but like the
FooterStyle the default style is set in case item selection is added.
❑
ItemStyle: Defines the style for each row of data in the grid.
❑
HeaderStyle: Defines the style for the header row, where the column names are shown.
That's all there is to this example – two controls that are linked together. When the page is loaded, the
AccessDataSourceControl connects to the database and runs the command. The MxDataGrid then
fetches the data stored by the data source control and constructs a grid around it. In fact, the grid is the
most complex piece of code here because of all the properties being set - purely to change the look. At its
simplest, you could have the following:
<wmx:MxDataGrid id="MxDataGrid2" runat="server"
DataSourceControlID="AccessDataSourceControl2">
</wmx:MxDataGrid>
This only contains the attributes required to display data.
Displaying Data Using the Web Matrix Template Pages
You've probably noticed a number of template pages when you add a new page in Web Matrix – some of
those are for data reports. These provide a simple way to get more functionality into grids than the
example earlier used.
The supplied template pages are as follows:
❑
Simple Data Report: Gives a simple grid without paging or sorting
❑ Filtered Data Report: Gives a grid with a filter option, so you can select the rows displayed
❑ Data Report with Paging: Gives a grid with paging enabled
❑ Data Report with Paging and Sorting: Gives a grid with paging and column sorting enabled
❑ Master – Detail Grids: Gives two grids, representing a master table and a child table
❑ Editable Grid: Gives a grid allowing updates to the data
❑ Simple Stored Procedure: Gives a grid that uses a stored procedure for its data source
All of these supplied templates connect to a SQL Server database, and need modification if they are to be
used with a different database. However, they provide a quick way to get pages constructed, allowing
you to make a few simple changes to get what you need, rather than coding from scratch.
Let's look at one of these - the report with paging and sorting.
256
Chapter 8
Try It Out Creating a Data Page
1.
Create a new page using the Data Pages templates. Pick the Data Report with Paging and Sorting,
and call it
SortPage.aspx.
2. In the design window, select the All tab and change this line:
<%@ import Namespace="System.Data.SqlClient" %>
To:
<%@ import Namespace ="System.Data.OleDb" %>
If this is not done, errors will be encountered while loading the page.
3. In the design window, select the Code tab, find the BindGrid() subroutine, and change the
code so it looks like the following:
void BindGrid()
{
// TODO: update the ConnectionString value for your application
string ConnectionString = "Provider=Microsoft.Jet.OLEDB.4.0; " +
"Data Source=C:\BegASPNet11\data\Northwind.mdb";
string CommandText;
// TODO: update the CommandText value for your application
if (SortField == String.Empty)
CommandText = "select * from Suppliers order by CompanyName";
else
CommandText = "select * from Suppliers order by " + SortField;
OleDbConnection myConnection = new OleDbConnection(ConnectionString);
OleDbDataAdapter myCommand = new OleDbDataAdapter(CommandText,
myConnection);
DataSet ds = new DataSet();
myCommand.Fill(ds);
DataGrid1.DataSource = ds;
DataGrid1.DataBind();
}
Use a different path if you've installed the samples in a directory other than C:\BegASPNET11.
4. Save the file and run it; you'll see something like Figure 8-6:
257
Reading from Databases
Figure 8-6
This isn't much different from the drag and drop approach we used in the first example, but it uses the
.NET data classes and a
DataGrid control, rather than the Web Matrix controls
(
AccessDataSourceControl and MxDataGrid). It means this technique will work even if Web Matrix
isn't installed on the server running the page. Let's see how it works.
How It Works
The first thing to look at is the namespace change:
<%@ import Namespace="System.Data.OleDb" %>
By default, the data pages are configured to use SQL Server and therefore use the SqlClient
namespace. Since we are using Access, we have to use the OleDb namespace.
Now let's look at the declaration of the grid itself. We won't show all the properties, as some are to do
with the visual style. Instead, we'll concentrate on those that are related to the code we'll see:
<asp:datagrid id="DataGrid1" runat="server"
AllowPaging="true" PageSize="6" OnPageIndexChanged="DataGrid_Page"
AllowSorting="true" OnSortCommand="DataGrid_Sort">
Here we have the following properties defined:
❑
AllowPaging: When set to true, allows the grid to page the results. This works in a way
similar to the
MxDataGrid where the page numbers are shown at the bottom of the grid.
❑ PageSize: Defines the number of rows to show per page.
❑ OnPageIndexChanged: Defines the event procedure to call when the page number is changed.
When a page number link is clicked, the procedure defined here is run.
258
Chapter 8
❑ AllowSorting: Allows the grid to sort the rows on the basis of column selections. Setting this
to
true enables links on the column headings.
❑
OnSortCommand: Defines the event procedure to call when a column heading is clicked.
Now let's look at the code that uses this grid, starting with the
Page_Load() event:
void Page_Load(object sender, EventArgs e)
{
if (!Page.IsPostBack) {
// Databind the data grid on the first request only
// (on postback, rebind only in paging and sorting commands)
BindGrid();
}
}
Here we are calling the BindGrid() routine, but only if this is the first time the page has been loaded.
This ensures that the grid, in its initial state, displays data in a default sort order. You'll see how this
works as we go through the code.
Next, we have two events for the grid. The first is for when a page is selected on the grid, and is the
event procedure defined in the
OnPageIndexChanged attribute:
void DataGrid_Page(object sender, DataGridPageChangedEventArgs e)
{
DataGrid1.CurrentPageIndex = e.NewPageIndex;
BindGrid();
}
Notice that the second argument to this procedure is of type DataGridPageChangedEventArgs. This is
automatically sent by ASP.NET and contains two properties, of which we are interested in only
one –
NewPageIndex. This identifies the number of the page selected, so we set the CurrentPageIndex
property of the grid to the selected page number. We then call the BindGrid() routine to re-fetch the
data and bind it to the grid. Later, we'll look at why you need to do this.
The second event procedure is for sorting the grid, and is defined in the
OnSortCommand attribute:
void DataGrid_Sort(object sender, DataGridSortCommandEventArgs e)
{
DataGrid1.CurrentPageIndex = 0;
SortField = e.SortExpression;
BindGrid();
}
The second argument for this procedure is of type DataGridSortCommandEventArgs, which contains
the expression on which the grid is being sorted. In this case, this is automatically set by the
DataGrid
as the column headings are sortable, and so contains the column name.
The first line sets the
CurrentPageIndex of the grid to 0, having the effect of starting the grid at page 1.
We do this because we are re-sorting. We then set
SortField to the sorted field, and rebind the grid.
Notice that
SortField hasn't been declared as a variable – in fact it's a property. This might seem
confusing because properties are always attached to objects, prompting the question what object is this
259
Reading from Databases
one attached to. Well, since it hasn't got a named object, ASP.NET takes this as being a property of the
current
Page. By default, a Page doesn't have a SortField property, so we define one:
protected String SortField {
get {
object o = ViewState["SortField"];
return (o == null) ? String.Empty : (String)o;
}
set {
ViewState["SortField"] = value;
}
}
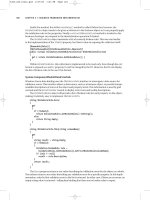
The interesting point is that we haven't defined a class. Because we are coding within an ASP.NET page,
the
Page is a class, so all we are doing is adding a property to the page (for the purpose of referencing
the sorted field later when we bind the grid). When the page is run, ASP.NET adds your code to the class
for the page. It's not like the examples in the previous chapter, where we were creating a separate
class – here we want our property to be part of the same class as the rest of the code.
The
get part of the property first fetches the sort value from the ViewState into an object variable (all
items in
ViewState are returned as objects), and then checks to see if the object is null. This would be
the case if the sort hasn't been defined, such as the first time the page is loaded. If it is
null, then an
empty string is returned, otherwise the object is converted to a string with the
(String) cast and that is
returned. This is a perfectly safe conversion because we know that the
ViewState for this item only
contains a string, as that's what the
set part of the property does. ViewState was covered in Chapter 6.
Using
String.Empty is a special way of defining an empty string, and avoids having to use open and
close quotation marks next to each other, where it's often difficult to see if there is a space between the
quotation marks.
Now let's look at the
BindGrid() routine:
void BindGrid() {
The first two lines define string variables to hold the connection string and the text for the command to
run. Notice that the connection string has been changed to an Access one:
string ConnectionString = "Provider=Microsoft.Jet.OLEDB.4.0; " +
"Data Source=C:\BegASPNet11\data\Northwind.mdb";
string CommandText;
The use of the @ symbol before part of the string tells the C# compiler to treat the string exactly as it is
typed. We need to do this because in C#, the backward slash character (
\) is treated as an escape
sequence, indicating that the following character is something special. To avoid this we can either use to
slash characters together (
\\), meaning we really want a slash character, or use the @ symbol. Later in the
chapter, you'll see examples of the
\\ style.
Next, we check the
SortField property to see if we are sorting the data in the order selected by the user
(that is, if the user has clicked one of the column headings). This is accessing the
SortField property of
the
Page and therefore calls the get part of the property. If the sort order hasn't been defined, the
String.Empty is the value of SortField. So we set the command string to order by the CompanyName.
If a sort string has been set, then we use that as the sort order. In either case, we are simply selecting all
rows and columns from the
Suppliers table:
260
Chapter 8
if (SortField == String.Empty)
CommandText = "select * from Suppliers order by CompanyName";
else
CommandText = "select * from Suppliers order by " + SortField;
These commands use SQL statements, but we could equally have used stored queries or stored
procedures. In practice, you should use stored queries, but using SQL directly here means we don't have
to create the stored query – since we're concentrating on ASP.NET we don't want to distract ourselves
with the stored procedure. We'll be looking at stored procedures later in the chapter.
Now we come to the part where we connect to the database. Don't worry too much about this
code – although we are going to explain it, we're not going to go into too much detail in this section, as
we'll be going over the theory later. To define the connection we use an
OleDbConnection object, and as
part of the instantiation we pass in the connection string details. This tells ASP.NET which database to
connect to, but doesn't actually open the connection. It defines where to connect to when we are ready to
connect:
OleDbConnection myConnection = new OleDbConnection(ConnectionString);
Now we use an OleDbDataAdapter to define the command to run – this will be the SELECT query to
fetch the data. The data adapter performs two functions. It provides the link between the database and
the
DataSet. It is also how data is fetched from and sent to the database (we'll be looking at the
DataAdapter in detail in the next chapter). The two arguments we pass in are the command text to run
the SQL statement, and the connection object. These define which command to run and which database
to run it against:
OleDbDataAdapter myCommand = new OleDbDataAdapter(CommandText,
myConnection);
Note that we still haven't connected to the database and fetched any data, as we've nowhere to store that
data. For that we use a
DataSet object, which you can think of as a mini database (it's not actually a
mini database, but that descriptions works well for the moment). It provides a place for the data to be
held while we manipulate it:
DataSet ds = new DataSet();
Now that we have all of the pieces in place (the connection, the command to run, and a place to put the
data), we can go ahead and fetch the data. For that we use the
Fill() method of the data adapter,
passing in the
DataSet. This opens the database connection, runs the command, places the data into the
DataSet, and then closes the database connection.
myCommand.Fill(ds);
The data is now in our DataSet so we can use it as the DataSource for the grid, and bind the grid:
DataGrid1.DataSource = ds;
DataGrid1.DataBind();
}
This may look like a complex set of procedures, but it's actually a simple set of steps that is used many
times when you need to fetch data. You'll be seeing this many times during this book, and we'll go over
its theory later so you really understand what's happening. For now though, let's look at another way to
save time, by using the Web Matrix Code Wizards.
261
Reading from Databases
Displaying Data Using the Code Wizards
There are times where both the drag and drop from the Data Explorer and the template pages cannot
provide you with exactly what you need. Perhaps you'd like to customize the query, or just add a
routine to fetch data to an already existing page. The code wizards allow you to add code routines to a
page, giving you a finer control of the data being fetched or updated. Let's give this a go.
Try It Out Creating a Data Page
1.
Create a new blank ASP.NET page called CodeWizard.aspx.
2. Switch to Code view and you'll notice that the Toolbox now shows Code Wizards as shown in
Figure 8-7:
Figure 8-7
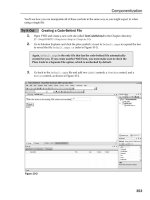
3. Pick the SELECT Data Method and drag it from the Toolbox, dropping it into your code window.
This starts the wizard, and the first screen as shown in Figure 8-8 is where you pick the database
to connect:
Figure 8-8
262
Chapter 8
4. The drop-down list shows configured data sources (from the Data Explorer) as well as an option
to create a new connection. Pick the existing connection and press
Next to go to the screen
shown in Figure 8-9:
Figure 8-9
Now you can select the columns you wish to show. You can pick multiple columns (the
* means
all columns from the table) from multiple tables. You simply select them individually. However,
when picking columns from multiple tables, you must join the tables. Remember our discussion
of linked tables and keys from the beginning of the chapter – you need the primary and foreign
key to join the tables.
5. Select the Products table and the ProductName column, and the Categories table and the
CategoryName column. Notice the Preview pane at the bottom of the window shows the SQL
statement, but without the tables joined together, as shown in Figure 8-10:
Figure 8-10
6. To join these tables together, we need a WHERE clause, so press the WHERE button to open the
WHERE Clause Builder window.
7. Select your options the same as shown in Figure 8-11:
263
Reading from Databases
Figure 8-11
8. Click OK and you'll see the WHERE clause part of the window is filled in as shown in
Figure 8-12:
Figure 8-12
9. Press the Next button, and on the Query Preview window press the Test Query button:
Figure 8-13
264
Chapter 8
You can see just the required columns in Figure 8-13.
10. Press Next.
11. From the Name Method window, change the name textbox to GetProductsDataSet. Make sure
the radio button at the bottom is set to
DataSet and press Finish. We'll look at the DataReader
later in the chapter.
12. Once the code has been added, you want a way to display it. You can do this by switching to
Design view and dragging a DataGrid onto the page.
13. Switch to Code view and add the following code, after the GetProductsDataSet function:
void Page_Load(Object sender, EventArgs e)
{
DataGrid1.DataSource = GetProductsDataSet();
DataGrid1.DataBind();
}
14. Save the page and run it – you should see Figure 8-14:
Figure 8-14
You can see how we now only have two columns and from two different tables. Let's see how this
works.
How It Works
The key to this is the wizard that allows you to build up an SQL statement. This is great if you are a
newcomer to SQL as you don't have to understand how the SQL language works. Perhaps the most
important part of this wizard is the
WHERE Clause Builder shown in Figure 8-11.
265
Reading from Databases
This is where (pun intended) we add the WHERE part of the SQL statement, and this is what filters the
rows and joins tables together. We've selected the
Join option allowing us to specify the primary key
(
CategoryID in the Categories table) and the foreign key (CategoryID in the Products table). The
WHERE clause becomes:
WHERE [Categories].[CategoryID] = [Products].[CategoryID]
If we wanted to add a third table, perhaps Suppliers, we could use an AND clause. Once you've
declared one
WHERE clause, the WHERE button has a different name – AND Clause as shown in
Figure 8-15:
Figure 8-15
Pressing the
AND Clause button shows the same WHERE Clause Builder, but this time you'd set the link
between the
Suppliers and Products tables as shown in Figure 8-16:
Figure 8-16
266
Chapter 8