Linux System Administration phần 5 pps
Bạn đang xem bản rút gọn của tài liệu. Xem và tải ngay bản đầy đủ của tài liệu tại đây (906.94 KB, 50 trang )
You can use Gnome RPM in a similar manner to update, delete, or query RPM packages. GUI
configuration utilities in other distributions, such as Caldera and SuSE, differ in details but have
similar functionality.
Installing a Debian Package
Debian, Xandros (formerly Corel), and Libranet Linux all use Debian packages rather than RPMs.
Debian packages are incompatible with RPM packages, but the basic principles of operation are the
same. Like RPMs, Debian packages include dependency information, and the Debian package
utilities maintain a database of installed packages, files, and so on. You use the dpkg command to
install a Debian package. This command's syntax is similar to that of rpm:
dpkg [options][action] [package−files|package−name]
The action is the action to be taken; common actions are summarized in Table 8.3. The options
(Table 8.4) modify the behavior of the action, much like the options to rpm.
Table 8.3: dpkg Primary Actions
dpkg Action Description
−i or −−install Installs a package.
−−configure Reconfigures an installed package: Runs the
post−installation script to set site−specific options.
−r or −P or −−remove or −−purge Removes a package.
−p or −−print−avail Displays information about a package.
−l pattern or −−list pattern Lists all installed packages whose names match
pattern.
−L or −−listfiles Lists the installed files associated with a package.
−C or −−audit Searches for partially installed packages and suggests
what to do with them.
Table 8.4: Options to Fine−Tune dpkg Actions
dpkg Option Used with
Actions
Description
−−root=dir All Modifies the Linux system using a root directory
located at dir. Can be used to maintain one Linux
installation discrete from another one, say during OS
installation or emergency maintenance.
−B or −−auto−deconfigure −r Disables packages that rely upon one being removed.
−−force−things Assorted Forces specific actions to be taken. Consult the dpkg
man page for details of things this option does.
−−ignore−depends=package −i, −r Ignores dependency information for the specified
package.
−−no−act −i, −r Checks for dependencies, conflicts, and other
problems without actually installing the package.
−−recursive −i Installs all packages, matching the package name
wildcard in the specified directory and all
subdirectories.
189
−G −i Doesn't install the package if a newer version of the
same package is already installed.
−E or −−skip−same−version −i Doesn't install the package if the same version of the
package is already installed.
As an example, consider the following command, which installs the samba_2.0.7−3.4_i386.deb
package:
# dpkg −i samba_2.0.7−3.4_i386.deb
If you're upgrading a package, you may need to remove an old package. To do this, use the −r
option to dpkg, as in
# dpkg −r samba
Note It's possible to use both RPM and Debian packages on one computer, and in fact
some distributions (such as Xandros/Corel Linux) explicitly support this
configuration. Using both package formats reduces the benefits of both, however,
because the two may introduce conflicting packages and they cannot share their
dependency information. It's therefore best to use just one package format.
The Debian package system includes a set of utilities known collectively as the Advanced Package
Tool (APT). The most important program in this package is apt−get, which you can use to
automatically or semiautomatically maintain a system. This tool is described briefly in the upcoming
section, "Update Utilities."
Some Debian−based Linux distributions, such as Xandros/Corel Linux, include GUI front−ends to
dpkg; they're similar to the Gnome RPM program for RPM−based systems. If you're more
comfortable with GUI tools than with command−line tools, you can use the GUI tools much as you'd
use Gnome RPM.
Installing a Tarball
If you have Slackware Linux or another distribution that uses tarballs, you can install software by
using the Linux tar utility. You can also use this method if you want to install a tarball on a Linux
distribution that uses a package management tool. We recommend using RPM or Debian packages
whenever possible, however.
WarningWhen installing a program over an older version on Slackware Linux, the new files should
overwrite the old ones. If you install a tarball on a system that normally uses packages,
however, or if you install a tarball that was created using a different directory structure
than what your current system uses, you may end up with duplicate files. This can cause
confusion, because you might end up using the old binaries after installing the new ones.
You should therefore remove the old package as well as you can before installing a binary
tarball. Check the directory structure inside a tarball by typing tar tvfz package.tgz. This
command displays all the files in the tarball, including their complete paths.
Tarball installation is a fairly straightforward matter. As root, you issue commands similar to the
following, which install the files from the samba.tgz file located in the /root directory:
# cd /
# tar xvfz /root/samba.tgz
190
Note that the first command (cd /) is important; without it, you'll install the files under the directory
you're currently in, not in the usual directory tree. (It is possible, however, that the tarball might have
to be installed under some directory other than /, in which case you should follow the directions that
come with the package.)
Note Chapter 9 describes the tar utility in greater detail.
Administrator's Logbook: Binary Tarball Installation
System: E12345678
Action: Installed Samba from binary tarball, samba.tgz. Files located in /opt/samba.
Compiling Source Code
It's frequently desirable or necessary to compile a program from source code. Situations when you
might want to do this include the following:
You can't find a binary package for the program. This is particularly likely when you run
Linux on a non−x86 system, such as a Macintosh.
•
The binary packages you've found rely upon different support libraries than what you have.
Recompiling often works around this problem, although sometimes the source code itself
requires libraries other than what you have.
•
You want to enable options that are not used in the available binary packages. These
options may optimize a package for your computer or add functionality.
•
You want to modify the source code. If there's a bug that's been fixed since the last binary
package was released, or if you want to add a feature or modify a program in some way, you
have little choice but to compile from source code.
•
In the first two cases, you can often compile from a source RPM, which is an RPM file containing
source code. It's also possible to create Debian packages from source code, given appropriate
control files. In the latter two cases, it's easiest to obtain a source tarball, make your modifications,
and install directly from the compiled code. Creating a package from modified or optimized source
code is seldom worthwhile for a one−computer installation. If you maintain several Linux computers,
though, you might want to read the RPM HOWTO document or Ed Bailey's Maximum RPM to learn
how to generate a binary RPM from a source code tarball. You can then install the customized
package on all your computers after compiling it on just one system.
Compiling from Packages
Source RPM files are identified by the presence of .src. in the filename, rather than .i386. or some
other architecture identifier. For example, samba−2.2.3a−6.src.rpm is the source RPM for the
Samba package that comes with Red Hat 7.3; samba−2.2.3a−6.i386.rpm is the matching binary for
x86 computers. If you wanted to compile the source RPM on Yellow Dog Linux (for Macintosh and
other PPC−based systems), the result would be samba−2.2.3a−6.ppc.rpm.
Note Some non−source RPM files are architecture independent. These can contain
documentation, fonts, scripts, and so on. They're identified by a .noarch. filename
component. These RPMs can be installed on systems using any CPU.
191
To compile a source RPM package, you add the −−rebuild operation to the rpm command, thus:
# rpm −−rebuild samba−2.2.3a−6.src.rpm
If all goes well, you'll see a series of compilation commands run as a result. These may take
anywhere from a few seconds to several hours to run, depending on the package and your
computer's speed. On a typical 500MHz Intel−architecture computer, most packages compile in a
few minutes.
Building a package requires that you have necessary support libraries installed—not just the
libraries required by the final binary package, but also the matching development libraries. These
libraries aren't always included in source RPM dependency information, so it's not unusual to see a
compile operation fail because of a missing library. If this happens, examine the error message and
then check the list of requirements on the program's home page. With luck, the failure message will
bear some resemblance to a requirement listed on the package's home page. You can then locate
an appropriate development RPM (which usually contains devel in its name), install it, and try again.
Tip You can often use the command rpm −qpi packagefile to locate the program's home page.
The package maintainer often has a home page, as well.
Once a package has successfully compiled, you'll find one or more matching binary RPM files in the
/usr/src directory tree. Most distributions name a directory in this tree after themselves, such as
/usr/src/redhat on Red Hat systems. This directory contains an RPMS directory, which in turn has
one or more subdirectories named after the architecture, such as i386 or ppc. (Most packages built
on Intel−architecture computers place binaries in the i386 subdirectory, but some use i586 or some
other name.) The RPM files you find in this subdirectory are binary packages that you can install
just like any other binary RPM. Most source RPMs create one binary RPM file when built, but some
generate multiple binary RPM files.
Administrator's Logbook: RPM Source File Installation
System: E12345678
Action: Compiled Samba 2.2.3a from source RPM & installed resulting binary RPM.
It's possible to compile a Debian package from source code, but the process is somewhat different
for this. Instead of a binary Debian package, you must locate and use a control file, which you can
use in conjunction with a regular source code tarball.
Compiling Tarballs
If you don't want to or can't create a package file, you can compile source code from an original
source tarball and install the compiled software directly. You then give up the advantages of RPM or
Debian packages, however. Whenever possible, it's best to use a binary package or to create your
own binary package from a source package, rather than install directly from a source tarball.
Note Some administrators prefer using original source tarballs because they know the source code
hasn't been modified by the package maintainer, as is quite common with RPM (including
source RPM) files.
192
You can unpack a tarball using a command like tar xvzf sourcecode.tgz. This usually produces a
subdirectory containing the source code distribution. You can unpack this tarball in a convenient
location in your home directory, in the /root directory, in the /usr/src directory, or somewhere else.
Some operations involved in compiling and installing the code may require root privileges, though,
so you might not want to use your home directory.
Unfortunately, it's impossible to provide a single procedure that's both complete and accurate for all
source code tarballs. This is because no two source code packages are exactly alike; each
developer has his or her own style and preferences in compilation and installation procedures.
Some elements are quite commonly included, however:
Documentation Most source tarballs have one or more documentation files.
Sometimes these appear in a subdirectory called doc or documentation. Other times
there's a README or INSTALL file, or OS−specific files (README.linux, for
instance). Read the ones that are appropriate.
Configuration options Most large programs are complex enough that they require
precompilation configuration for your OS or architecture. This is often handled
through a script called configure. The script checks for the presence of critical
libraries, compiler quirks, and so on, and creates a file called Makefile that will
ultimately control compilation. A few programs accomplish the same goal through
some other means, such as typing make config. Sometimes you must answer
questions or pass additional parameters to a configuration script.
Compilation To compile a package, you must usually type make. For some
packages, you must issue individual make commands for each of several
subcomponents, as in make main. The compilation process can take anywhere from
a few seconds to several hours, depending on the package and your computer's
speed.
Installation Small packages sometimes rely on you to do the installation; you must
copy the compiled binary files to /usr/local/bin or some other convenient location.
You may also need to copy man page files, configuration files, and so on. The
package's documentation will include the details you need. Other packages have a
script called install or a make option (usually typing make install) to do the job.
Post−installation configuration After installing the software, you may need to
configure it for your system by editing configuration files. These may be located in
users' home directories, in /etc, or elsewhere. The program's documentation should
provide details.
The traditional location for packages compiled locally is in the /usr/local directory tree—/usr/local/bin
for binaries, /usr/local/man for man pages, and so on. This placement ensures that installing a
program from a source tarball won't interfere with package−based programs, which typically go
elsewhere in the /usr tree. Most source tarballs include default installation scripts that place their
contents in /usr/local, but a few don't follow this convention. Check the program's documentation to
find out where it installs.
Administrator's Logbook: Source Code Package Installation
System: E12345678
193
Action: Compiled & installed Samba 2.2.3a. Located in /usr/local/samba.
Kernel Compilation
The Linux kernel is a particularly critical and complex component on any Linux system. It therefore
deserves special consideration in any discussion of software installation and maintenance. Although
you can install a precompiled updated kernel much as you can other precompiled packages, doing
your own kernel compilation offers certain advantages, as described shortly.
The kernel compilation and installation process has its own quirks, so this section covers the
process in detail, starting at setting the compilation options and proceeding through rebooting the
computer to use the new kernel.
Why Compile Your Kernel?
With any luck, your computer booted and ran immediately after you installed Linux on it. This fact
means that the Linux kernel provided with the distribution works. Why, then, should you go to the
bother of compiling a new kernel? The most important advantages to custom kernel compilation are:
Architecture optimization The kernel includes optimization options for each of
several classes of CPU—80386, 80486, and so on. Most distributions ship with
kernels that are optimized for 80386 CPUs. By compiling a kernel for your particular
CPU model, you can squeeze a little extra speed out of your system.
Removing unnecessary drivers The default kernel includes drivers for a wide
variety of hardware components. In most cases, these drivers do no harm because
they're compiled as modules (separate driver files), which aren't loaded unless
necessary. A few are compiled into the kernel proper, however. These consume
memory unnecessarily, thus degrading system performance slightly.
Adding drivers You may need to add a new or experimental driver to your system.
This may be necessary if you're using an unusually new component, or if there's a
bug fix that's not yet been integrated into the main kernel tree. Such changes often
require you to patch the kernel—to replace one or more kernel source code files. For
details on how to do this, check with the site that provides the new driver.
Changing options You may want to change options related to drivers, in order to
optimize performance or improve reliability. As you examine the kernel configuration
procedure, you'll see many examples of such options.
Upgrading the kernel You may want to run the latest version of the kernel.
Sometimes you can obtain an upgrade in precompiled form, but occasionally you'll
have to compile a kernel from source code.
Of course, kernel compilation isn't without its drawbacks. It takes time to configure and compile a
kernel. It's also possible that the kernel you compile won't work. Be sure to leave yourself a way to
boot using the old kernel, or you'll have a hard time booting your system after a failed upgrade.
(This chapter describes how to boot the computer into either the old or the new kernel.)
194
On the whole, compiling your own kernel is something that every Linux system administrator should
be able to do, even if it's not something you do on every system you maintain. Using a
custom−compiled kernel helps you optimize your system and use cutting−edge drivers, which can
give your system an advantage. In some cases, this is the only way you can get certain features to
work (as with drivers for particularly new hardware).
Obtaining a Kernel
Before you can compile a kernel, you must obtain one. As for other software packages, you obtain a
kernel either precompiled or in source code form; and in RPM, Debian package, or tarball form. We
favor installing a kernel from source tarball form, because it allows you to be sure you're working
from an original standard base. Kernel RPMs, in particular, are often modified in various ways.
Although these modifications can sometimes be useful, they can also interfere with the smooth
installation of patches should they be needed. (On the other hand, the kernels distributed as RPMs
sometimes include the very patches you might want to install, thus simplifying matters.)
One of the best places to look for a kernel is This site includes links to
"official" kernel source tarballs. You can also find kernel files on major FTP sites, such as
If you want to use an RPM or Debian package, check for kernel source code files
from your distribution's maintainer. If you use an RPM or Debian kernel package, you may need to
download two files: one with the kernel source code proper, and one with the kernel header files.
Tarballs typically include both sets of files in a single tarball.
A complete 2.4.18 kernel tarball is 29MB in size; a 2.5.5 kernel tarball is 33MB. (Kernels are also
available in bzipped tar files, which are somewhat smaller than the traditional gzipped tar files. You
use bzip2 to uncompress these files rather than gzip.) Because of their large size, these kernel files
may take quite some time to download.
Once you've downloaded the kernel tarball, you can unpack it in the /usr/src directory. The tarball
creates or installs to a directory called linux.
Warning If /usr/src already has a directory called linux, you should rename it to something else and
create a new linux directory for the new source package. This will prevent problems
caused by unpacking a new source tree over an old one, which can create
inconsistencies that cause compilation failures.
You can unpack a kernel tarball just as you would any other source code tarball:
# tar xvzf ~/linux−2.4.18.tar.gz
If your source tarball uses bzip2 compression, you can use a command similar to the following to
extract it:
# tar xvf ~/linux−2.4.18.tar.bz2 −−use−compress−program bzip2
Kernel Configuration Options
Once you've extracted your kernel tarball, you can proceed to configure it. Use any of the following
three commands to accomplish this task:
make config This command runs a text−based configuration tool that asks you
specific questions about each and every configuration option. You can't skip around
195
arbitrarily from one option to another, so this method is quite awkward.
make menuconfig Like make config, this option presents a text−based configuration
tool. The make menuconfig tool uses text−mode menus, though, so you can skip
from one option to another. This is a good way to configure the kernel if you're using
a text−based console login.
make xconfig This command also uses menus for configuration, but the menus are
X−based, so you can configure the kernel using mouse clicks in X.
The kernel configuration options are arranged in groups. If you use make menuconfig or make
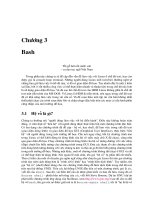
xconfig, you can select one group to see a list of items in that group, as shown in Figure 8.2.
Groups often have subgroups, so you may need to examine quite a few menus before you find a
particular driver or option.
Figure 8.2: Kernel compilation options are arranged hierarchically, with each main−menu option
generating its own menu, which is displayed in a separate window when make xconfig is used.
Note A new kernel configuration tool, CML2 ( is under development
and should be integrated into the Linux kernel as part of the 2.5.x kernel series. This may
change many details of kernel configuration, but the basic principles should remain
unchanged.
Describing every available kernel configuration option would be quite tedious, as well as inevitably
incomplete, because options are constantly being added and changed. Therefore, Table 8.5 merely
presents an overview of the main kernel headings in the 2.4.x kernel series. The 2.5.x kernel series
is new enough at the time of this writing that its contents are almost certain to change in the near
future.
Kernel Version Numbers
Each Linux kernel has a version number of the form x.y.z.
The x number is the major version number, and in 2002 this number is 2.•
196
The y number denotes an important change to the kernel and has a special meaning.
Even−numbered y values are considered stable—they're unlikely to contain major bugs, and
they don't change much from one minor release to another. An odd y number denotes a
development kernel, which contains features that are experimental. Development kernels
may be unstable and may change substantially over time. Unless you're desperate to use a
feature introduced in a development kernel, you shouldn't use one of these.
•
The z number represents a minor change within a given stable or development kernel. In
stable kernels, these represent minor bug fixes and occasionally the addition of important
new (but well−tested) drivers. Within development kernels, incrementing z numbers
represent major bug fixes, added features, changes, and (being realistic) bug introductions.
•
When Linus Torvalds believes that a development kernel is becoming stable and contains the
features he wants in that kernel, he calls a code freeze, after which point only bug fixes are added.
When the kernel stabilizes enough, a new stable release is made based on the last development
kernel in a series (a number of test releases may exist leading to this new stable release). At this
writing, the current stable kernel version is 2.4.18, and the latest development kernel is 2.5.5. This
development series will eventually lead to the release of a 2.6.0 or 3.0.0 kernel.
Table 8.5: Linux 2.4.x Kernel Configuration Options
Kernel Configuration Menu
Item
Subsumed Options
Code Maturity Level Options This menu provides options allowing you to select experimental
drivers and features.
Loadable Module Support Modern kernels typically include many features in loadable modules
(separate driver files). This menu lets you enable support for these
modules and set a couple of options related to it.
Processor Type and
Features
You can configure the system to optimize the kernel for your
particular CPU, as well as enable CPU−related options such as
floating−point emulation (which is not required for modern CPUs).
General Setup This menu contains an assortment of miscellaneous options that
don't fit anywhere else, such as types of binary program files
supported by the kernel and power management features.
Memory Technology Devices
(MTD)
This menu allows you to enable support for certain types of
specialized memory storage devices, such as flash ROMs. Chances
are you don't need this support on a workstation or server.
Parallel Port Support Here you can add support for parallel−port hardware (typically used
for printers and occasionally for scanners, removable disk drives, and
other devices). Support for specific devices must be added in various
other menus.
Plug and Play Configuration The 2.4.x kernel includes support for ISA plug−and−play (PnP)
cards. Prior kernels relied upon an external utility, isapnp, to
configure these cards. You can use the kernel support or the old
isapnp utility, whichever you prefer.
Block Devices Block devices are devices such as hard disks whose contents are
read in blocks of multiple bytes. This menu controls floppy disks,
parallel−port−based removable disks, and a few other block devices.
Some block devices, including most hard disks, are covered in other
197
menus.
Multi−Device Support Logical Volume Management (LVM) and Redundant Arrays of
Independent Disks (RAID) are advanced disk management
techniques that can simplify partition resizing, increase disk
performance, or improve disk reliability. The configuration of these
options is beyond the scope of this book, but they can be enabled
from this kernel configuration menu.
Networking Options You can configure an array of TCP/IP networking options from this
menu, as well as enable other networking stacks, such as DDP (used
for AppleTalk networks) and IPX (used for Novell networks). Network
hardware is configured in another menu.
Telephony Support This menu lets you configure specialized hardware for using the
Internet as a means of linking telephones.
ATA/IDE/MFM/RLL Support Most x86 computers today use EIDE hard disks, and you enable
drivers for these devices from this menu. Related older disk drivers
are also enabled from this menu, as are drivers for EIDE CD−ROMs,
tape drives, and so on.
Kernel Configuration Menu
Item
Subsumed Options
SCSI Support Here you enable support for SCSI host adapters and specific SCSI
devices (disks, CD−ROM drives, and so on).
Fusion MPT device support The Fusion MPT device is a unique mix of SCSI, IEEE 1394, and
Ethernet hardware. You activate support for it from this menu.
IEEE 1394 (FireWire)
Support
This menu allows you to enable support for the new IEEE 1394
(a.k.a. FireWire) interface protocol, which is used for some video and
disk devices.
I2O Device Support This menu allows you to use I2O devices. Intelligent Input/Output
(I2O) is a new scheme that allows device drivers to be broken into
OS−specific and device−specific parts.
Network Device Support This menu contains options for enabling support of specific network
hardware devices. This includes PPP, which is used for dial−up
Internet connections.
Amateur Radio Support You can connect multiple computers via special radio devices, some
of which are supported by Linux through drivers in this menu.
IrDA (Infrared) Support Linux supports some infrared communications protocols, which are
often used by notebook and handheld computers. You can enable
these protocols and hardware in this menu.
ISDN Subsystem Integrated Services Digital Network (ISDN) is a method of
communicating at up to 128Kbps over telephone lines. You can
enable support for ISDN cards in this menu.
Old CD−ROM Drivers (not
SCSI, not IDE)
Some old CD−ROM devices used proprietary interfaces. Linux
supports these cards, but you must enable appropriate support with
the settings in this menu. If you use a modern EIDE or SCSI
CD−ROM, you do not need to enable any of these options.
Input Core Support If you want to use a USB keyboard or mouse, enable support for
these devices in this menu. You can also set a few other input device
options here.
Character Devices Character devices, in contrast to block devices, allow input/output
one byte (character) at a time. Enable support for such devices
198
(serial ports, mice, and joysticks, for instance) in this menu.
Multimedia Devices If you have a video input or radio card in the computer, check this
menu for drivers.
File Systems This menu has options for supporting specific filesystems such as
Linux's native ext2fs or Windows's FAT.
Console Drivers In this menu you can set options relating to how Linux handles its
basic text−mode display.
Sound You can configure your sound card drivers in this menu.
USB Support If your system uses any USB devices, you can enable support for
USB—and for specific devices—in this menu. You need basic USB
support from this menu when using the Input Core Support keyboard
or mouse drivers described earlier.
Bluetooth Support Bluetooth is a short−range wireless technology intended for
keyboards, printers, and the like. You can enable support for this
technology in this menu.
Kernel Hacking This menu provides options that give you some control over the
system even if it crashes. It's useful primarily to kernel programmers.
You should take some time to examine the kernel configuration options. Each option has an
associated Help item (see Figure 8.2). When you select it, you can see help text about the
configuration option in question—at least, usually (sometimes the text is missing, particularly for
new features).
Most kernel features have three compilation options: Y, M, and N. The Y and N stand for Yes and
No, referring to compiling the option directly into the kernel or not compiling it at all. M stands for
Module. When you select this option, the driver is compiled as a separate driver file, which you can
load and unload at will. (Linux can normally auto−load modules, so using modules is transparent.)
Modules help save memory because these drivers need not be constantly loaded. Loading modules
takes a small amount of time, however, and occasionally a module may not load correctly. It's
generally best to compile features that you expect to use most or all of the time directly into the
kernel, and load occasional−use features as modules. For instance, on a network server, you'd
compile your network card's driver into the kernel, but you might leave the floppy disk driver as a
module.
When you're done configuring the kernel, click Save and Exit in the main menu to save your
configuration. The configuration program responds with a message telling you to type make dep to
continue the compilation process; it then exits.
Compiling the Kernel
Once the kernel is compiled, you need to run several commands in succession:
# make dep
# make bzImage
# make modules
The first of these creates dependency information, so that the compiler knows each component's
dependencies and can compile components as appropriate. This process typically takes a minute or
two.
The second command, make bzImage, compiles the Linux kernel proper. The result of running
make bzImage is a kernel file located in /usr/src/linux/arch/i386/boot (i386 will be something else on
199
non−x86 computers). This file is called bzImage. Running make bzImage typically takes from
several minutes to over an hour.
Tip If you're using a computer with little RAM, try closing large memory−hungry programs, such as
Netscape, before compiling the kernel. On particularly small systems, closing down X entirely
can speed up kernel compilation.
The make modules command compiles the kernel module files. Depending on how many items you
elected to compile as modules and the speed of your hardware, this process may take anywhere
from a minute or two to over an hour.
If all these make commands execute without reporting any errors, you have a new kernel. It is not
yet installed on the computer, however. That involves several additional steps.
Installing the Kernel and Modules
The kernel file proper, bzImage, must be placed somewhere suitable for booting. In principle, this
can be anywhere on the hard disk. Most Linux computers use either the Linux Loader (LILO) or the
Grand Unified Boot Loader (GRUB) to boot the kernel. Many of the steps for configuring these tools
are identical.
The 1024−Cylinder Boundary
Versions of LILO prior to 21.3 suffered from the drawback that they could not boot a Linux kernel if
that kernel resided above the 1024−cylinder boundary. The standard BIOS calls can't read beyond
the 1024th cylinder, and because LILO uses the BIOS, LILO can't read past that point, either. LILO
21.3 and later, however, can work around this problem on modern BIOSs (most of those released
since 1998) by using extended BIOS calls that can read past the 1024th cylinder. GRUB has always
been able to use these extended BIOS calls.
If you're using an old BIOS, you can create a small (5–20MB) partition below the 1024th cylinder
and place the kernel in that partition. Typically, this partition is mounted as /boot. Even if you don't
create such a partition, the Linux kernel often resides in the /boot directory.
Moving the Kernel and Installing Modules
To place the kernel file in /boot, you can issue a simple cp or mv command:
# cp /usr/src/linux/arch/i386/boot/bzImage /boot/bzImage−2.4.18
This example copies the bzImage kernel file to a new name. It's a good way to make sure you can
easily identify the kernel version, particularly if you experiment with different kernel versions or
kernel options.
Installation of the kernel modules is handled by another make command in the kernel source
directory: make modules_install. This command copies all the compiled kernel modules into a
subdirectory of /lib/modules named after the kernel version—for instance, /lib/modules/2.4.18.
Configuring LILO
Systems that use LILO frequently present a prompt that reads lilo: at boot time. You type an OS or
kernel label to boot it. Some LILO configurations use menus, though, and these can be harder to
200
distinguish from GRUB configurations based solely on boot−time behavior. Once you've booted, try
checking your system for files called /etc/lilo.conf and /boot/grub/grub.conf; if only one is present,
chances are your system uses the like−named boot loader.
If your system uses LILO, you can tell LILO about your new kernel by editing /etc/lilo.conf, the LILO
configuration file. This file should contain a group of lines resembling the following:
image=/boot/vmlinuz−2.4.18−3
label=linux
initrd=/boot/initrd−2.4.18−3.img
read−only
root=/dev/hda7
This group of lines identifies the boot kernel (vmlinux−2.4.18−3 in this example), provides a label for
the kernel (linux), and sets assorted other options. You should duplicate this set of lines and then
edit one of the two sets. Change two things:
Alter the image= line to point to the bzImage kernel file you've compiled and placed in the
/boot directory.
•
Modify the label= entry. You might call the new kernel linux−2418, for example.•
Warning Do not simply change the existing boot description in lilo.conf. If you do so and if your new
kernel is flawed in some important way—for instance, if it lacks support for your boot disk
or filesystem—you won't be able to boot Linux. Duplicating the original entry and
modifying one copy ensures that you'll be able to boot into the old kernel if necessary.
After you save the new lilo.conf file, type lilo to reinstall LILO with the new settings. The lilo program
should respond by displaying a series of Added messages, one for each label provided in
/etc/lilo.conf.
Configuring GRUB
In broad strokes, GRUB configuration is like LILO configuration, but many details differ. The GRUB
configuration file is /boot/grub/grub.conf, and like /etc/lilo.conf, it contains groups of lines that define
Linux (or other OS) boot options. Here's an example from a Red Hat 7.3 system:
title Red Hat Linux (2.4.18−3)
root (hd0,4)
kernel /vmlinuz−2.4.18−3 ro root=/dev/hda11
initrd /initrd−2.4.18−3.img
As with LILO configuration, you can add a kernel by duplicating these lines. You must then modify
one of the two copies: Change the title line to give the new entry a unique title, and the kernel line to
point the system to your new kernel.
After you change /boot/grub/grub.conf, there's no need to reinstall GRUB in the boot sector, as
there is for LILO by typing lilo. You should be able to reboot and see the new option in the GRUB
menu.
Testing Your New Kernel
At this point, you're ready to test your new kernel. To do so, shut down the computer and reboot.
When the system reboots, one of two things will happen, depending on how LILO or GRUB is
configured:
201
You'll see a prompt reading lilo:. If this happens, type the name for the new kernel
image—this is what you entered on the label= line in /etc/lilo.conf.
•
You'll see a list of kernel images and OSes. You should be able to select the new kernel
image from this list by using the keyboard arrow keys and then pressing Enter.
•
If all goes well, your new kernel will boot and your system will start up normally. You should then
test all your system's hardware devices to be sure the kernel and its modules are working correctly.
Try out your CD−ROM drive, floppy disk, modem, and so on. If you have problems with a device,
recheck your kernel configuration options.
Administrator's Logbook: Replacing a Kernel
System: E12345678
Action: Upgraded kernel from 2.4.7 to 2.4.18.
Important options: Included Symbios 53c8xx SCSI and DEC Tulip drivers in kernel file proper;
omitted unused EIDE drivers.
Boot options: Kernel file is /boot/bzImage−2.4.18; booted from GRUB as Linux with 2.4.18 kernel.
Checking for OS Updates
One particularly critical aspect of software installation is keeping your system up−to−date. As
described in this section, OS updates are important for keeping your system secure and bug−free.
Most distributions maintain Web pages or FTP sites from which you can download OS updates, and
there are other sites you can check for updated software.
The Importance of OS Updates
In late 1999, a bug was discovered in named, the DNS server run on many Linux systems and
included in the package called BIND. This bug allowed anybody to break into a computer running
named and acquire root privileges. The next several months saw countless systems compromised
as script kiddies (delinquents with little real skill) broke into computers running the standard BIND
package. During most of this period, however, fixed versions of named were readily available on
most distributions' Web pages. Had administrators spent five minutes locating, obtaining, and
installing the updated server, they would have saved hours of frustration rebuilding compromised
systems.
Of course, today's Linux distributions don't ship with that compromised version of named; their
packages have been updated to fix the bug. The point is that one must protect against bugs in
important programs that can open holes in a system's security. A security problem might be
discovered tomorrow in a server you run today. If so, your system can be compromised. Indeed, if
your system is always connected to the Internet, it's extremely likely that it will be compromised
under those circumstances. Given the fact that security flaws are common, it's important that you
keep your system's servers and other programs up−to−date.
Security problems aren't restricted to servers. Non−server programs are also often flawed. If your
system has multiple users, these bugs can be exploited to gain root access. The fact that the
compromise is local in origin doesn't simplify your task; you must clean up the problem, most likely
202
by wiping all data and restoring from a backup or reinstalling the OS.
In addition to security−related problems, bugs sometimes affect system stability or the reliability of
specific programs. Fortunately, most core Linux programs are well tested and contain few glaring
stability problems. Nonetheless, minor problems do occasionally crop up, so updating your system
can be quite worthwhile.
On occasion, you may need to upgrade an entire system. You might be running Red Hat 7.0 and
want to upgrade to Red Hat 7.3, for example. A major upgrade like this is usually done in response
to new features rather than minor bug fixes. Red Hat 7.3, for instance, uses the 2.4.18 kernel and
XFree86 4.2 rather than the 2.2.16 kernel and XFree86 4.0. These changes are very important if
you need features offered by the 2.4.18 kernel or XFree86 4.2. Most Linux distributions offer ways
to upgrade the OS as a whole, typically through the usual installation routines. These go through
and replace every updated package, and then reboot into the updated OS.
WarningAll package updates, and particularly whole−OS updates, have the potential to introduce
problems. The most common glitches produced by updates relate to configuration files,
because the updates often replace your carefully tuned configuration files with default
files. You should therefore always back up a package's configuration files before updating
the package. In the case of a whole−OS update, back up the entire /etc directory. Your
administrative log files, too, can be important in making your system work again,
particularly when the updated package requires a different configuration file format. Good
notes on how you've configured one package can help you get its replacement in working
order.
Locating Updates for Your Distribution
Most Linux distributors maintain Web pages or FTP sites with information on and links to updated
packages. Table 8.6 summarizes the locations of these sites for many common distributions. Some
of these sites are quite minimal, offering just a few updated packages and little or nothing in the way
of explanation concerning the nature of the problems fixed. Others provide extensive information on
the seriousness of problems, so you can better judge which packages are worth updating and which
are not.
Table 8.6: URLs for Major Linux Distribution Updates
Distribution Update URL
Caldera and
/>Debian />Libranet />Mandrake ux−mandrake.com/en/security/
Red Hat />Slackware />SuSE />TurboLinux />Xandros/Corel />Yellow Dog />203
Your distribution maintainer is usually the best source of updates for critical system components
such as libc, XFree86, and major servers. By using an update provided by your distribution
maintainer, you can be reasonably certain that the update won't conflict with or cause problems for
other packages that come with the distribution. In cases such as the following, however, you may
want or need to look elsewhere for updates.
Unavailable updates If your distribution's maintainer is slow in producing updates,
you may have little choice but to look elsewhere when you learn of a problem with an
important package.
Prior self−updates If you've previously updated a package using another source,
you may want to stick with that source rather than return to the distribution
maintainer's package. Presumably you've already worked through any compatibility
issues, and it may be a nuisance to have to do this again if you revert to the original
supplier.
Package substitutions You might decide to replace a standard package with an
altogether different program that provides similar functionality. For instance, if you
use Postfix to replace sendmail on a Red Hat Linux 7.3 system, you won't find Postfix
updates on Red Hat's Web site.
Package additions Just as with substituted packages, you won't find updates for
programs that don't ship with the original distribution. For example, you'll have to turn
to Sun ( for StarOffice updates.
Kernel updates As described earlier in "Obtaining a Kernel," the Linux kernel can be
updated via prepackaged files, but it's often beneficial to compile the kernel yourself
from original source code.
Even if you don't intend to go to third parties or to official home pages for specific programs, you
should consult sources other than your distribution's errata Web page for information on important
security flaws and bug fixes. You will often learn of critical updates and security issues from such
sources. Following are three of note.
Security newsgroups The Usenet newsgroups comp.security.unix,
comp.os.linux.security, and others devoted to specific products can alert you to
important security issues. If you read these groups on a daily basis and take action
based on important alerts you read there, you can greatly enhance your system's
security.
Security Web pages There are many Web sites devoted to security issues. Some
helpful ones include and
/>Product Web pages Check the Web pages for important individual packages to
learn about updates. Although news about security−related updates should appear
quickly on other forums, reports of feature changes and other updates may not travel
so quickly. Nonetheless, some of these updates may be important for you. You'll
need to decide for yourself which packages are important enough to monitor in this
way, and how often.
Maintaining an up−to−date system can take a great deal of effort. In most cases, it's best to
204
concentrate on security updates and updates to packages that are of most importance to your
particular system. Occasionally updating the entire OS may also make sense, but this is a fairly
major task and is frequently unnecessary. (Even in 2002, Red Hat 5.2—a distribution that's roughly
three years old—is still adequate for many purposes, although it needs many individual package
updates to be secure.)
Administrator's Logbook: Updating Programs
System: E1234567
Action: Updated samba−2.0.3 to samba−2.2.3a to provide support for Windows 2000 clients.
Update Utilities
Linux distributions are increasingly shipping with utilities designed to help you automatically or
semiautomatically update your software. These programs can help you keep your system up to date
with minimal fuss, but they're not without their drawbacks. Examples include the following:
APT The Debian APT package, mentioned earlier, consults a database of packages
and compares entries in the database to packages on your system. APT is part of a
standard Debian installation, but there are ports of it to RPM−based systems—check
for details.
Red Hat's Update Agent Red Hat ships with a program it calls Update Agent to help
you keep your system up−to−date. This package is quite complex; consult
for more information.
YaST and YaST2 The SuSE text−mode and GUI administration tools include the
ability to check SuSE's Web site for information on package updates, and to
automatically update your system with the latest packages.
Because it's available on a wide variety of platforms, we describe APT in slightly more detail here.
To use it, follow these steps:
If necessary, install the APT package. It's usually installed on Debian systems by default, but
for RPM−based systems, you must obtain and install it.
1.
Edit the /etc/apt/sources.list file to include a pointer to an appropriate Web or FTP site with
information relevant for your distribution. For instance, the following line works for Debian
systems (consult the package documentation for information on sites for specific
RPM−based distributions):
deb stable main contrib non−free
2.
Type apt−get update to have the system retrieve an up−to−date package list.3.
Type apt−get −s −u upgrade to obtain a report on packages for which updates are
available.
4.
Type apt−get upgrade to obtain and install all the packages found in step 4.5.
WarningStep 5 is potentially risky, because it effectively gives control of your system to whomever
maintains the package update database. Updated packages occasionally introduce bugs,
so performing a mass update isn't without its risks. You might prefer upgrading individual
205
packages by typing apt−get upgrade package−name for only those packages you want
to update.
Tip You can include steps 3 and 4 in a daily cron job, and send the results to your user
account, to obtain a daily report on updated packages. You can then decide which you
want to install.
Other package update tools work in a similar way, and have similar caveats, although they often
work in GUI mode rather than in the command−line mode favored by APT. No matter what tool you
use, one limitation is that they support only those upgrades that are officially sanctioned by your
distribution maintainer. You'll need to use other methods to update third−party packages.
In Sum
Installing, removing, and updating programs are very important tasks for any Linux system
administrator. Most Linux systems today use the RPM or Debian package formats, both of which
allow for easy package handling by maintaining a database of packages and the individual files
associated with these packages. When necessary, you can build a package file from source code,
or install software without using an RPM or Debian package. This approach is particularly useful for
the Linux kernel itself, which can benefit more than other programs from customizations unique to
each computer. In all cases, ensuring that your programs are up−to−date requires some effort,
because you must keep an eye on important security developments as well as watch for the
addition of features you might want to make available on your system.
206
Chapter 9: Backup and Restore
Overview
One of the most important system administration tasks is to reliably create and verify backups.
Failure to do so might go unnoticed for several weeks or even months; unglamorous tasks like
backups tend to slip through the cracks all too often. The first time a system on the backup list fails
and there is no backup from which to restore it, however, you can count the seconds before
someone gets a very serious reprimand—perhaps to the point of losing the job entirely. This might
seem excessive, but if the data is valuable enough to make the backup list, you can bet that
someone will miss it if it's gone.
If you work for a software company or any company that stores the working version of its "product"
on the computers under your administrative control, backups are especially critical. Hundreds or
thousands of employee−hours might be lost if the system failed without a recent backup. A system
administrator is expected to prevent such loss and will probably not hold that title for long if unable
to do so. Think of it as health insurance for your computers. You wouldn't go without health
insurance, and neither should your computers.
Backup Strategies
Defining a backup strategy means deciding how much information you need to back up, and how
often. At one extreme are full backups which, as you might guess, back up everything. If you do a
full backup every night, you'll certainly be able to restore anything to the state it was in the previous
night. But this is very time consuming and requires significantly higher media consumption than
other methods, since you will be backing up everything every night. An alternative is the incremental
backup, including only those files that have changed (or are likely to have changed) since the last
backup. Most administrators try to develop backup strategies that combine these two methods,
reducing the time expended backing up the system without sacrificing the ability to restore most of
what was lost.
In addition to formal backups of a computer or network, you may want to archive specific data. For
instance, you might want to store data from scientific experiments, the files associated with a project
you've just completed, or the home directory of a user. Such archives are typically done on an
as−needed basis, and may work best with different hardware than you use to back up an entire
computer or network.
Combining Full and Incremental Backups
Including incremental backups in your strategy saves a great deal of time and effort. Much of the
data on your system (whether a network or a single computer) is static. If data hasn't changed since
the last reliable backup, any time spent backing it up is a waste. There are two ways to determine
which files to include on an incremental backup. The first is to use commands that look for files
newer than the date of the last full backup. The second method is to determine which data is most
likely to be changed and to include this data, whether actually changed or not, on the incremental
backup.
Most backup strategies combine full backups with incremental backups (often referred to as daily
backups), to cover the more dynamic data. Typically each night, when the system's workload is at
its lowest, a backup of one of these forms is performed.
207
One plan, illustrated in Table 9.1, is to rotate between four sets of tapes (or whichever medium you
choose; we'll look at the backup media options shortly). Starting with set 1, do a full backup on
Sunday when system usage is likely to be at its lowest and do an incremental backup every other
day of that first week. Move to tape set 2 for the next week, doing the full backup on Sunday as
before. Move on to tape sets 3 and 4 as appropriate. At the end of the fourth set, store the tape from
Sunday of week 4 as the monthly backup and replace that tape with a new one. Other than the
monthly tape, reuse the tapes from the previous month for the next sequence. Once a year, archive
a monthly tape as the archive for that year.
Table 9.1: Backup Plan with Full and Incremental Backups
Sun Mon Tue Wed Thu Fri Sat
week1 F I I I I I I
week2 F I I I I I I
week3 F I I I I I I
week4 F I I I I I I
This method has several advantages. Since it takes four weeks for the level 0 backup tape to get
recycled, restoring the system to the status from a specific day of the month requires only that you
dump from the latest full backup tape and then from the latest incremental. Typically, the missing or
errant file will be discovered within the month covered by the tape. If not, check the monthly tape.
There are a few isolated scenarios that might not be covered; any file changed after the previous
night's backup and deleted before the next night's would lose any of those changes, but this is a
very solid plan overall.
Including Differential Backups
The term differential backup is sometimes used to refer to a backup consisting of all files that have
changed since the previous backup at any level. This differs from an incremental backup, which
includes everything that has changed since the last full backup, because the immediately previous
backup might be a full backup, an incremental backup, or another differential backup. This type of
backup is illustrated in Table 9.2. In view of the savings in time over the full/incremental plan shown
above, it certainly merits consideration.
Table 9.2: Backup Plan with Full and Differential Backups
Sun Mon Tue Wed Thu Fri Sat
week1 F D D D D D D
week2 F D D D D D D
week3 F D D D D D D
week4 F D D D D D D
Comparing this method to that shown in Table 9.1, you can see that we have replaced the
incremental backups with differential backups. The problem with doing this is that you now have to
restore multiple backups if the system goes down on any other day than Sunday after the full
backup, in order to get the system back to its previous state. For instance, if the system went down
on a Friday night, you would have to load the previous Sunday's full backup and the differential
backups for the following Monday through Friday. While the backup itself takes less time, restoring
actually takes much longer. Table 9.3 illustrates an alternative strategy, combining all three backup
methods.
208
Table 9.3: Backup Plan with Full, Incremental, and Differential Backups
Sun Mon Tue Wed Thu Fri Sat
week1 F D D I D D D
week2 F D D I D D D
week3 F D D I D D D
week4 F D D I D D D
This version adds an incremental backup on Wednesdays. Since an incremental backup is
available, if a problem occurred after Wednesday's backup, you could restore the previous full
backup and the incremental backup from that day. Otherwise, you would have to restore the most
recent full backup, the latest incremental tape if one has been made since the full backup, and then
any differential backups made since the incremental (or since the full backup if no incremental
exists). To clarify, if the system went down on Tuesday night after the backups ran, you'd have to
restore three tapes: Sunday's full backup, Monday's differential backup, and Tuesday's differential
backup. If the system went down on Friday night, you'd have to restore four tapes: Sunday's full
backup, Wednesday's incremental backup, and Thursday's and Friday's differential backups.
Data−Specific Backups
There may also be a need for data−specific backups, which target data that has been added to the
system and are performed on a routine basis like once or twice a month. This technique is often
used for specific types of data for which long−term storage requirements might be different. For
example, a company's payroll accounting data might be entered on the 15th and the last day of
every month. If this data is simply included in an incremental backup, it will be written over within a
month. The archived monthly backup would capture the previous month's end−of−month payroll but
would not capture the mid−month payroll at all. The company might need to keep the data for the
two payroll days, saving several months' or even years' worth of data. A separate backup of this
data might be done on the 15th and the last day of the month, after the data is considered to be
stable, and archived independently.
Basically, a backup strategy must be fitted to the computer system for which it is being designed. A
little forethought will save a great deal of grief in the long run. Consider the types of data, whether
the data is static or dynamic, and any known fluxes in the system, and create a backup plan that will
ensure that all concerns are met.
Backup Media
What medium should you use for backups? Choose a media type based upon how much data you'll
be archiving, whether or not you intend to do unattended backups, how much money you have to
spend on new hardware and media, and what hardware you already have available to you. The
options are almost endless, and the costs are highly variable. In most cases that we've
encountered, the hardware on hand was what we used. After some great technological leap, you
might convince the boss that some new hardware is in order.
The options we'll discuss in the following sections include a variety of tape formats, CD−R backups,
floptical disks, Bernoulli boxes and other removable drives, or even floppy disks. You should choose
what makes the most sense for the system you're protecting given the resources at your disposal.
209
Tapes
Tapes are generally considered to be the best backup medium in terms of capacity and cost.
Additionally, with the size of hard drives ever increasing, tape is the only real alternative for
unassisted backup, since most other options require media switching. Tape drives may be internal
or external. Often companies purchase internal drives for servers to facilitate automatic backups
and external drives to be shared among several workstations. Instead of sharing an external drive,
it's also possible to use one computer as a backup server for an entire network. Such a system can
use NFS, Samba, or other tools to back up remote machines.
There are many different types of tape available. If you don't already have a tape drive and decide
to use this backup approach, you'll want to consider which type of tape you'd like to use. Tape
capacity is an important factor. Determine the space required for a full backup and increase it by at
least 50 percent to determine what type of tape best meets your requirements. Keep in mind that
there are autoloaders to allow unattended backups across multiple tapes. Another factor is what
backup software package you intend to use; of course, the list of equipment supported by the
package you choose will limit your choices. Here are some of the most common choices:
8mm helical scan•
4mm helical scan (DAT)•
quarter−inch cartridge linear tape (QIC)•
Travan (a QIC derivative)•
Helical Scan
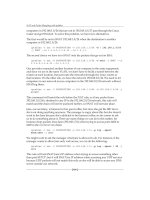
Helical scan tapes use a rotating head/drum assembly to read and write, as illustrated in Figure 9.1.
The head writes "swipes" on the diagonal instead of parallel to the tape's edge.
Figure 9.1: Helical scan
This is the same method used by VCR tapes. The 4mm helical scan tapes are very similar to digital
audio tapes (DATs), but have slightly different magnetic tape properties, and so aren't reliably
interchangeable. There is an 8mm version as well, which is similar to 8mm videotape. Most helical
scan drives do internal data compression. Hardware data compression reduces the CPU load on
the computer if you want to compress your backups, and it is more reliable than the compression
used with some backup packages, such as tar. Any compression technique produces uneven
amounts of compression, though; text tends to compress well, whereas binary formats don't
compress as well, and some precompressed data (such as GIF images) may actually increase in
size if "compressed" again.
210
Warning Many tape drive manufacturers, whether their products have hardware compression or
not, quote estimated compressed capacities for their drives. If you don't use compression,
or if your data aren't as compressible as the manufacturer assumes, you won't get the
rated capacity from these drives.
Helical−scan drives typically start at about $500 and go up in price to well over $1,000.
Low−capacity DAT tapes cost less than $10, but higher capacity tapes cost $30 or more.
QIC and Travan Linear Tape
Quarter−inch cartridge linear tape (QIC) was developed in 1972 by the 3M Corporation (now called
Imation). More recently, 3M released a QIC variant known as Travan, which dominates the low end
of the tape marketplace in 2002. QIC and Travan tapes, like helical−scan tapes, look and work
much like audio−tape cassettes, with two reels inside, one taking up tape and the other holding it.
The difference from helical−scan technology is that linear tape technologies write data in parallel
bands that lie perpendicular to the length of the tape, rather than at an angle. This configuration
simplifies the design of the tape head, thus reducing the cost of the tape drive. It's more difficult to
achieve high data densities with this design, though.
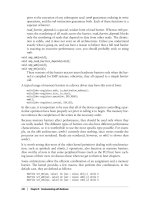
The reels are driven by a belt that is built into the cartridge. A capstan, a metal rod that projects
from the drive motor, presses the tape against a rubber drive wheel. As shown in Figure 9.2, the
head contains a write head with a read head on either side. The write head writes data
longitudinally, and one read head (depending upon the direction the tape is running) attempts to
verify the data that has just been written. If the data passes verification by the read head, the buffer
is flushed and filled with new data from the system memory. If errors are found, the segment is
rewritten on the next length of tape. (Very low−end QIC and Travan devices lack this
read−after−write capability, and so are less reliable.) Capacity is added by adding more tracks.
Capacities vary from a few megabytes for obsolete devices sold in the 1980s to over 10GB for
modern devices.
211
Figure 9.2: Reading and writing linear tape
Compared to helical−scan drives, QIC and Travan drives are noisy. Neither type has a clear
advantage in capacity or reliability (although each type has its proponents who claim a reliability
advantage). QIC and Travan drives cover a wider range of capacities and budgets, though, with
low−end devices being less reliable and lower in capacity. As a general rule, QIC and Travan drives
are less expensive to buy than are helical−scan drives, with prices starting at $200 or less.
High−end units can cost over $1,000, though. The QIC and Travan tapes are more expensive,
starting at $30 or so. This makes QIC and Travan a good choice if you expect to buy few tapes, but
helical−scan drives may be better if you plan to buy many tapes.
Newer Options
Recent developments have provided new types of tape for higher−end systems. Among these are
digital linear tape (DLT) in a single or multiple configuration, Mammoth (8mm) drives in a single or
multiple configuration, Advanced Intelligent Tape (AIT) drives in a single or multiple configuration,
and robotic storage management systems, which run without any human intervention. These
systems are quite nice to have, but the cost is often prohibitive.
Digital Linear Tape
Digital linear tape drives vary in capacity and configuration from the low−end 10GB drives to the
newer automated DLT tape libraries, which can store 1.5 Terabytes of data (compressed among up
to 48 drives).
DLT drives use 0.5"−wide metal particle tapes; these are 60 percent wider than 8mm. Data is
recorded in a serpentine pattern on parallel tracks grouped into pairs. As shown in Figure 9.3, the
tape is passed through a head guide assembly (HGA), which consists of a boomerang−shaped
aluminum plate with six large bearing−mounted guides arranged in an arc. The tape is gently guided
by a leader strip and wound onto a take−up reel without the recorded side of the tape ever touching
a roller. There are also mechanisms that continually clean the tape as it passes, to increase tape
life.
212
Figure 9.3: The digital linear tape (DLT) drive mechanism
A track is recorded using the entire length of the tape, and then heads are repositioned and another
full−length path is laid down on the return trip. Some newer DLT tape drives record two channels
simultaneously using two read/write elements in the head, effectively doubling the transfer rate
possible at a given drive speed and recording density. DLT technology uses a file mark index
located at the logical end of the tape to minimize search time.
When we checked prices recently, a DLT library cost about $12,000—out of reach for most of us.
Single−tape DLT drives are more in line with DAT prices, starting at a bit over $1,000. Still, if you
have the need for high−capacity, reliable storage, there are few systems that can beat it. The cost
per MB of data stored is actually quite reasonable.
Mammoth
Exabyte's Mammoth drive is another viable option for higher capacity storage. The 5.25" half−height
Mammoth drives can read almost all of the earlier versions of Exabyte 8mm tapes in addition to the
higher 20/40GB tapes they were designed to use. The Mammoth drives are also available in library
213