Sams Teach Yourself Database Programming with Visual C++ 6 in 21 Days phần 5 docx
Bạn đang xem bản rút gọn của tài liệu. Xem và tải ngay bản đầy đủ của tài liệu tại đây (1.62 MB, 39 trang )
running on different computers
The presentation layer, which performs translations such as ASCII to EBCDIC or CR to CR/LF, data compression,
and data encryption
●
The application layer, which provides high-level functions such as device redirection, remote file access, remote
printer access, and interprocess communication
●
NOTE
The designers of the OSI model carefully crafted the interfaces between the OSI layers so that
the layers would be independent. The interfaces were created in such a way as to enable the
implementation of one layer to be changed without the need to change the implementation of
its neighboring layers.
The OSI model has proven to be very successful. Disparate computer systems can now readily communicate with each
other using this layered approach.
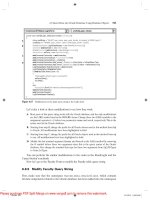
TCP/IP is a protocol that adheres to the OSI model. Figure 11.2 illustrates how the layers of TCP/IP map to the layers of
the OSI model.
Figure 11.2 : How TCP/IP layers correspond to the OSI model.
TCP/IP is the protocol of the Internet. As you will see later, the nature of TCP/IP and the nature of the OSI model figure
prominently in the way multitier applications are developed.
Layered Architecture for Multitier Applications
When you build multitier applications, you can apply important lessons from the OSI model to make your applications
successful.
NOTE
When you build multitier applications, you must carefully craft the interfaces between the
tiers so that the tiers are independent. You need to create the interfaces in such a way that the
implementation of one tier can be changed without the need to change the implementation of
its neighboring tiers.
Interfaces and abstractions are the two pillars on which multitier applications rest. Each tier that provides an effective level
of abstraction has interfaces that are understandable and distinct. Distinct interfaces between the tiers enable the tiers to be
updated independently of each other.
In traditional C++ development, programmers typically attempt to create layered architectures by using C++ classes. The
classes provide the abstractions, and the public member functions provide the interfaces.
The C++ approach is good but is hampered by the fact that the C++ classes are usually compiled into Windows EXEs and
DLLs, without using COM interfaces. As you discovered in Day 9, "Understanding COM," Windows EXEs and DLLs
that don't support COM interfaces are invariably bound together by build-time dependencies. A non-COM Windows EXE
file and the DLL files it uses must all come from the appropriate build of the software.
Any time you have build-time dependencies between binaries in an application, you have a monolithic application. In a
multitier application, you might have client pieces running on hundreds of computers. You don't want to have to update all
the software on every client machine every time you make some small alteration to the software.
NOTE
In multitier applications, you want to avoid build-time dependencies between the tiers. You
want to be able to update the software on one tier without having to update the software on its
neighboring tiers.
Teach Yourself Database Programming with Visual C++ 6 in 21 days Day 11-Multitier Architectures
(3 of 17) [9/22/1999 1:44:28 AM]
Simpo PDF Merge and Split Unregistered Version -
This issue of being required to update all the client machines is a frequent problem in traditional client/server applications.
In many client/server systems, even a small change in the server software can necessitate a massive update of all the client
software.
These massive client software updates are often caused by the build-time dependencies between EXEs and DLLs, which
make it impossible to update one binary without updating them all.
Another feature in client/server applications that exacerbates the need to update all the client software every time is fat
client software. Fat client software does not refer to software you write for fat clients. Rather, a fat client is a piece of
software that runs on a client computer and contains both code to process data and code to present it to the user.
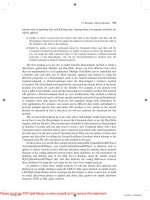
As you can see in Figure 11.3, fat clients contain business logic. This business logic may include code for formulas or
rules to perform calculations on business data, or it may include code that accesses tables and fields directly in a business
database.
Figure 11.3 : Client/server architecture with fat clients.
Note in Figure 11.3 that the UI portion of the client tier communicates directly with the database. This occurs in client
applications that use direct SQL statements and/or databound controls, which tie fields and records in the database directly
to elements of the user interface.
Thin is in
Thin client software is software that runs on client machines and contains only UI (or presentation) code. With thin clients,
the need to update all the client computers every time the application is updated is greatly reduced. Thin clients enable you
to change server software components without having to update all the client software every time. A simple multitier
architecture is illustrated in Figure 11.4.
As you can see in Figure 11.4, multitier applications use thin clients that do not contain business logic. The business logic
is typically moved to a middletier of some sort. In some multitier applications, the middletier software runs on its own
machine. In other multitier applications, the middle-tier software runs on the same machine as the data-tier software.
Figure 11.4 : Multitier architecture.
A good example of a thin client is a Web browser. All that a Web browser typically does is presentation. Contrast a Web
browser with ADOMFC1.EXE, the MFC application you have been working on in this book. As you know,
ADOMFC1.EXE performs more than just presentation tasks.
ADOMFC1.EXE uses ADO to connect with the database and then issues SQL statements to SELECT, UPDATE, INSERT,
and DELETE data from tables in the database. ADOMFC1.EXE has intimate knowledge of the database. The code in
ADOMFC1.EXE knows the names of the tables and their fields, and the relationships between the tables. If the database
schema were to change, ADOMFC1.EXE would very likely need to be changed as well.
ADOMFC1.EXE is a fat client. ADOMFC1.EXE illustrates the requirement for client software to be frequently updated in
client/server systems. If ADOMFC1.EXE were installed as the client software for a client/server application, a small
change in the database could necessitate an update of all the instances of ADOMFC1.EXE on the client machines.
The nature of the connection that ADOMFC1.EXE uses with the database also increases its interdependence with the data
tier. When ADOMFC1.EXE uses the ADO Connection object to make a connection to a database such as SQL Server, it
makes an interprocess communication (IPC) connection with the database. The interprocess communication mechanism is
Teach Yourself Database Programming with Visual C++ 6 in 21 days Day 11-Multitier Architectures
(4 of 17) [9/22/1999 1:44:28 AM]
Simpo PDF Merge and Split Unregistered Version -
typically named pipes or TCP/IP sockets.
It was mentioned earlier that the nature of TCP/IP and the OSI model figures prominently in the way multitier applications
are developed. Here's how.
Interprocess communication with named pipes and/or sockets is done at the OSI application layer. For security reasons,
interprocess communication is typically not used over the Internet. Using interprocess communications between software
tiers makes a wide-open connection and enables a broad interface between the software tiers.
An IPC connection can be thought of as a hard-wired connection to the database that enables ADOMFC1.EXE and the
database to have a high level of interaction. ADOMFC1.EXE can modify data in the database almost instantaneously.
Round trips between ADOMFC1.EXE and the database happen relatively fast. ADOMFC1.EXE can scroll through large
sets of records very quickly. ADOMFC1.EXE can also lock records and open transactions in the database and keep them
as long as it likes.
Interprocess communication between software tiers enables a broad interface between the tiers. However, a broad
interface between tiers is not always desirable if you want the tiers to be somewhat independent of each other.
Web browsers and Web servers use the HTTP protocol, which is a connectionless protocol built on TCP/IP. HTTP also
operates at the application layer of the OSI model. However, using HTTP for communications between software tiers
provides a much narrower interface between the tiers than named pipes or TCP/IP sockets do. A client application can't
make an IPC connection to a database with HTTP. This means an application that uses HTTP can't enjoy the high level of
interactivity with the database that an IPC connection would provide. HTTP's narrower interface, in effect, forces the
software tiers to be more independent of each other.
Web Browsers as Thin Clients
Web browsers can make a good client tier. Because Web browsers perform only UI tasks and the interface between the
Web browser and the Web server (HTTP) is so distinct, the Web browser and the Web server can be quite independent of
each other in terms of software update requirements.
Web browsers can be used for applications that run on the Internet (more specifically, the World Wide Web) and also can
be used in applications that run over a LAN in an intranet. The term intranet is used to describe the application of Internet
technologies on internal corporate networks. With an intranet, you can have a Web server that is internal to your corporate
LAN, and information from that Web server can be accessed by machines on the LAN that runs Web browsers.
Multitier applications that use Web browsers as clients use a Web server such as Microsoft (IIS) in their middle tier. In
such applications, Microsoft Transaction Server (MTS) is sometimes used in conjunction with IIS on the middle tier. You
will explore MTS tomorrow.
Multitier applications that use Web browsers and IIS typically use an RDBMS, such as SQL Server or Oracle, as the data
tier. Later today, you will use a middle-tier software component that retrieves data from the database and sends it through
IIS to software on the client tier.
Tomorrow you will write your own component that runs under MTS and IIS. You will be able to use this component on
the middle tier to send data from a database to browsers over HTTP, as well as to fat DCOM clients such as
ADOMFC1.EXE.
Database Data and the Internet
If you do use a Web browser for the client piece of your multitier application, how do you get the data from the database
to the Web browser?
Teach Yourself Database Programming with Visual C++ 6 in 21 days Day 11-Multitier Architectures
(5 of 17) [9/22/1999 1:44:29 AM]
Simpo PDF Merge and Split Unregistered Version -
CGI-The Original Technique for Interfacing Databases with Web Servers
The tools for using a Web browser as the UI to a database application have been evolving rapidly. Figure 11.5 shows how
it was done in the early days of the Web.
Figure 11.5 : Interfacing a Web browser to a database by using CGI.
As you can see from Figure 11.5, you could write a CGI application, which is an EXE that accepts and fulfills requests
from the Web server for data from the database. One drawback of CGI is the fact that for every concurrent user that is
hitting your Web server, the Web server has to launch another instance of the CGI EXE. Launching an EXE for each
concurrent user can put a strain on the Web server machine.
DLLs and Server Scripts-An Improved Technique for Interfacing Databases with
Web Servers
Microsoft and Netscape each developed their own improvements to the CGI model. In the improved models, a DLL that
runs in the Web server's process space is used instead of a CGI EXE. This is illustrated in Figure 11.6.
Figure 11.6 : Interfacing a Web browser to a database by using DLLs.
In the case of Microsoft IIS, the DLLs that provide an interface between IIS and a database are called ISAPI DLLs.
Because DLLs run in the Web server's process, they place a lighter load on the Web server machine than CGI EXEs.
Microsoft has developed a technology called Active Server Pages (ASP), which is built on its ISAPI DLL technology.
ASP has a server-side script interpreter that enables you to run JScript and VBScript scripts on the Web server. These
scripts can make calls to COM servers and send the results out through the Web server to Web browsers. The ASP
technology is illustrated in Figure 11.7.
Figure 11.7 : Interfacing a Web browser to a database by using ASP.
As you can see in Figure 11.7, an ASP script can call a COM server that can communicate with a database. The ASP script
can then send the data from the database out through the Web server to Web browsers. Later today, you will use ASP to
communicate database data to Web browsers.
The XML Files
Extensible Markup Language (XML) provides a way to describe and exchange data in Web-based applications. XML
complements Hypertext Markup Language (HTML). HTML enables the displaying of data, whereas XML provides ways
to describe and transmit data.
XML enables metadata, or data about data, to be imbedded with data and sent over the Web. You could think of XML as a
way to describe and transmit data in an HTML-like format.
As of this writing, XML is still making its way through the standards process. XML is in its infancy now, but it will
become a vital technology in multitier applications in the future.
Listing 11.1 shows some XML code. The intent here is to give you a feel for what XML looks like.
Listing 11.1 A High-level Wrapper Function in MSADO15.TLI
1: <?XML version="1.0" encoding="UTF-8" ?>
2: <Sales>
Teach Yourself Database Programming with Visual C++ 6 in 21 days Day 11-Multitier Architectures
(6 of 17) [9/22/1999 1:44:29 AM]
Simpo PDF Merge and Split Unregistered Version -
3: <s:schema id='SalesSchema'>
4:
5: <elementType id="custnumber">
6: <string/>
7: </elementType>
8:
9: <elementType id="Customer">
10: <element id="c1" type="#custnumber"/>
11: <key id="k1"><keyPart href="#c1"/></key>
12: </elementType>
13:
14: <elementType id="buyer">
15: <string/>
16: <foreignKey range="#Customer" key="#k1"/>
17: </elementType>
18:
19: <elementType id="partnumber">
20: <string/>
21: </elementType>
22:
23: <elementType id="Purchase">
24: <element type="#partnumber"/>
25: <element type="#buyer" occurs="ONEORMORE"/>
26: </elementType>
27:
28: </s:schema>
29:
30: <Customer><custnumber>Cust003</custnumber></Customer>
31:
32: <Customer><custnumber>Cust938</custnumber></Customer>
33:
34: <Customer><custnumber>Cust501</custnumber></Customer>
35:
36: <Purchase>
37: <buyer>Cust003</buyer>
38: <buyer>Cust938</buyer>
39: <partnumber>CLAP-003</partnumber>
40: </Purchase>
41:
42: <Purchase>
43: <buyer>Cust501</buyer>
44: <buyer>Cust938</buyer>
45: <partnumber>MIC-92823</partnumber>
46: </Purchase>
47:
48: </Sales>
Listing 11.1 illustrates how data from a relational database could be represented in XML. XML is text-based, and as you
can see, is similar to HTML.
Line 1 indicates the version of XML. XML code is rigidly nested. An XML document is made up of XML elements, each
of which consists of a start tag, such as <Sales> in line 2, and an end tag, such as </Sales> in line 48. The
information between the two tags is referred to as the contents.
Teach Yourself Database Programming with Visual C++ 6 in 21 days Day 11-Multitier Architectures
(7 of 17) [9/22/1999 1:44:29 AM]
Simpo PDF Merge and Split Unregistered Version -
Tags annotate XML code as they do HTML code. In HTML, each tag indicates how something should look. However, in
XML each tag indicates what something means.
Line 3 is the start tag for the schema called "SalesSchema". Line 28 is the end tag for the schema. A schema in XML
is similar to a schema in a relational database. Lines 3-28 declare a schema that relates buyers and partnumbers in a
one-to-many relationship called Purchases. You will recall that you explored database design and data relationships in
Day 7. (In a relational database that corresponds to the XML schema in Listing 11.1, Purchases would be a table that
contains two fields: partnumber and buyer.)
To declare the one-to-many relationship, lines 5-26 contain a series of elementType declarations. Lines 5-7 declare a
class (or element type) with an id of "custnumber" that has a data type of string. Lines 9-12 declare an element
type of "Customer" that has custnumber as an element (or field). Note that custnumber is the key field. (In real
life, the Customer element type would have additional fields, but they are not shown here for simplicity.)
Lines 14-17 declare an element type of "buyer", which has a Customer as a foreign key field. Lines 19-21 declare a
partnumber element type that is string data. Lines 23-26 declare an element type of "Purchase", which contains a
partnumber and a buyer. You will notice that in line 25, buyer is indicated as ONEORMORE, meaning there can be
multiple buyers per partnumber.
Line 28 marks the end of the schema. The information that comes after line 28 is the actual data. This XML data conforms
to the XML schema, like records in a database.
Lines 30-34 are three instances (or records) of customers. Lines 36-46 are two instances of Purchases. Each purchase
lists the partnumber and the customers who bought it. If you were to place the Purchases information in a table
in a relational database, the table would consist of two fields (partnumber and buyer) and would contain four records.
A full explanation of how to parse and process XML code is beyond the scope of this book. However, you could begin to
get your feet wet with XML by entering the code in Listing 11.1 into an XML file. You could then use the XML parsing
sample(s) from Microsoft's Web site to process it.
To enter Listing 11.1 into an XML file, run Visual Studio, select the File, New menu, and tell it to create a new HTML
page. (The HTML page needn't be part of any of your projects in Visual Studio.) Then type in the code in Listing 11.1 and
save it as an XML file.
Currently, IE4 is the only XML-aware browser. Other Web browsers currently cannot read XML files.
A potentially useful tool for XML is the Microsoft XSL Processor. The XSL Processor takes XML code and converts it to
HTML that can be displayed in almost any browser. This is illustrated in Figure 11.8.
Figure 11.8 : Using XLS with XML to get HTML.
Microsoft offers an XSL command-line utility and an XSL ActiveX control to make it easy and productive to get HTML
from XML.
You can find more information on XML and XSL by pointing your Web browser to
You will find information and documentation on XML, as well as sample
programs for parsing and processing XML code. You can obtain further XML development information as part of the
Microsoft Internet Client SDK at />What Color of Edsel Would You Like?
So far today, you've read about using Web browsers as the client piece of multitier database applications. This, of course,
means putting database data into HTML and sending it to Web browsers. In actual practice, using HTML to display data
from a database can make a pretty lame user interface. Listing 11.2 shows a typical model for displaying and processing
database data in HTML.
NOTE
Teach Yourself Database Programming with Visual C++ 6 in 21 days Day 11-Multitier Architectures
(8 of 17) [9/22/1999 1:44:29 AM]
Simpo PDF Merge and Split Unregistered Version -
A full explanation of HTML is beyond the scope of this work. Listing 11.2 is intended merely
to familiarize you with some of the limitations of using HTML-based Web pages as the UI
for a database application.
To enter Listing 11.2 into an HTML file, run Visual Studio, select the File, New menu, and tell it to create a new HTML
page. (The HTML page needn't be part of any of your projects in Visual Studio.) Then type in the code in Listing 11.2 and
save it as an HTM file. You can view the page in IE4 by entering the full path and filename of the HTM file in the IE4
Address text box.
Listing 11.2 Database Data in HTML
1: <HTML>
2: <HEAD>
3: <TITLE>Database Data in HTML</TITLE>
4: </HEAD>
5: <BODY>
6: <CENTER>
7: <H1>Database Data</H1>
8: <BR>
9: <TABLE BORDER=1 WIDTH=80%>
10: <THEAD>
11: <TR>
12: <TH>Field 1</TH>
13: <TH>Field 2</TH>
14: </TR>
15: <TBODY>
16: <TR>
17: <TD>Record 1, Field 1 contents.</TD>
18: <TD>Record 1, Field 2 contents.</TD>
19: </TR>
20: <TR>
21: <TD>Record 2, Field 1 contents.</TD>
22: <TD>Record 2, Field 2 contents.</TD>
23: </TR>
24: <TR>
25: <TD>Record 3, Field 1 contents.</TD>
26: <TD>Record 3, Field 2 contents.</TD>
27: </TR>
28: </TABLE>
29: <BR>
30: <TABLE>
31: <TR>
32: <TD>Field 1:<TD><INPUT NAME=Field1 SIZE=30>
33: <TD>Field 2:<TD><INPUT NAME=Field2 SIZE=30>
34: </TR>
35: </TABLE>
36:
37: <BR>
38: <INPUT TYPE=BUTTON NAME="Update" VALUE="Save Changes">
Teach Yourself Database Programming with Visual C++ 6 in 21 days Day 11-Multitier Architectures
(9 of 17) [9/22/1999 1:44:29 AM]
Simpo PDF Merge and Split Unregistered Version -
39: </CENTER>
40:
41: <SCRIPT LANGUAGE="VBScript">
42: SUB Update_OnClick
43: MsgBox "Do some processing to update: " + Field1.Value +
" and " + Field2.Value
44: END SUB
45: </SCRIPT>
46: </BODY>
47: </HTML>
In browser/database applications, data from a database is typically placed in static HTML tables for the browser to display
to the user. Lines 1-28 in Listing 11.2 are standard HTML for displaying a table of data.
Lines 30-35 place two text boxes on the page. Line 38 puts a button on the page. Lines 41-45 contain VBScript code with
an Update_OnClick function that executes when the button is clicked.
The user-interface tools in HTML for enabling the user to edit, add, and delete database data are somewhat primitive. The
idea with the page in Listing 11.2 is to display the data from the database in the HTML table and accept user input for
changes to the data by using the two text boxes. When the user clicks the button, the Update_OnClick function would
display the user's input in the HTML table or send the data to the server, or both. Unfortunately, there is no easy way in
HTML to enable the user to navigate to a particular record and edit it. As you can see, HTML makes for a somewhat
primitive data-base UI.
Any changes that the user does make have to be sent to the server singly as they are made or cached in variables in the
HTML page and sent as a batch. Sending the changes singly as they are made might result in lots of time-consuming
round trips between the browser and the server. Caching the variables in the HTML page and sending them as a batch
requires you to write lots of code.
With the lag time of the data's round trips to the Web server, and with browsers' primitive UI tools, your spiffy new
multitier application could end up looking like an Edsel. For all the weaknesses of fat client software, a fat client does give
you database connections that are responsive and quick and state of the art UI programming tools for building an elegant
user interface.
Wouldn't it be nice if there were some way to build a client tier by using Web browsers that have the UI and the data
handling capabilities of fat clients?
Fortunately, there is a way you can get these fat client capabilities in a browser. You can use the IE4 browser, with
ActiveX controls for the UI and with ADO Remote Data Service (RDS) to handle the data on the client and middle tiers.
Using ActiveX Controls and RDS to Build Elegant Thin
Clients
You can use a variety of ActiveX controls to provide an elegant UI in IE4. These ActiveX controls are available from
Microsoft and from a number of independent software vendors (ISVs). Evaluation versions of many of the controls can be
downloaded for free from the vendor's Web sites. These ActiveX controls enable you to create a modern and complete UI
in the IE4 browser. You will use one such ActiveX control today.
To enable robust data handling in a browser, Microsoft offers Remote Data Service. RDS is included in Microsoft's Data
Access Components (MDAC). When you install MDAC, RDS is installed automatically. You will find instructions for
setting up RDS by searching the Platform SDK documentation (in MSDN) for a document titled "Setting Up Remote Data
Service."
NOTE
Teach Yourself Database Programming with Visual C++ 6 in 21 days Day 11-Multitier Architectures
(10 of 17) [9/22/1999 1:44:29 AM]
Simpo PDF Merge and Split Unregistered Version -
You need to install the RDS Address Book sample to get a particular ActiveX control
required for your work today. The Sheridan grid control is an ActiveX control that (as of this
writing) is included in the RDS Address Book sample.
The code that you will write today uses the Sheridan grid control. If you are unable to obtain the Sheridan grid control in
the RDS samples, you can download a trial version of the Sheridan Data Widgets at />To test your installation of RDS, type in the code shown in Listing 11.3 and save it as an ASP file. To enter Listing 11.3
into an ASP file, run Visual Studio, select the File, New menu, and tell it to create a new Active Server Page. (The ASP
page needn't be part of any of your projects in Visual Studio.) Then type in the code in Listing 11.3 and save it as an ASP
file. Call it something like ClientTier.ASP. You can view the page in IE4 by entering the Web address of the ASP file in
the IE4 Address text box.
To run the code in Listing 11.3, you must have IIS or Personal Web Server running on your machine. See the
"Setting Up Remote Data Service" document in the Platform SDK documentation for more information.
Listing 11.3 A Database Client UI with the ActiveX Grid Control and RDS
1: <HTML>
2: <HEAD>
3: <TITLE>Client Tier</TITLE>
4: </HEAD>
5: <CENTER>
6: <H1>Remote Data Service and Sheridan Grid Control</H1>
7: <BR>
8:
9: <OBJECT ID="GRID" WIDTH=600 HEIGHT=200 Datasrc="#ADC"
10: CODEBASE="http://<%=Request.ServerVariables("SERVER_NAME")%>
11: /MSADC/Samples/ssdatb32.cab"
12: CLASSID="CLSID:AC05DC80-7DF1-11d0-839E-00A024A94B3A">
13: <PARAM NAME="_Version" VALUE="131072">
14: <PARAM NAME="BackColor" VALUE="-2147483643">
15: <PARAM NAME="BackColorOdd" VALUE="-2147483643">
16: <PARAM NAME="ForeColorEven" VALUE="0">
17: </OBJECT>
18:
19: <OBJECT classid="clsid:BD96C556-65A3-11D0-983A-00C04FC29E33"
20: ID=ADC HEIGHT=1 WIDTH = 1>
21: </OBJECT>
22:
23: <BR>
24: <BR>
25: <BR>
26: <INPUT TYPE=BUTTON NAME="Execute" VALUE="Execute">
27: <INPUT TYPE=BUTTON NAME="MoveFirst" VALUE="MoveFirst">
28: <INPUT TYPE=BUTTON NAME="MovePrevious" VALUE="MovePrevious">
29: <INPUT TYPE=BUTTON NAME="MoveNext" VALUE="MoveNext">
30: <INPUT TYPE=BUTTON NAME="MoveLast" VALUE="MoveLast"> <BR><BR>
31: <INPUT TYPE=BUTTON NAME="Update" VALUE="Update">
32: <INPUT TYPE=BUTTON NAME="Cancel" VALUE="Cancel">
Teach Yourself Database Programming with Visual C++ 6 in 21 days Day 11-Multitier Architectures
(11 of 17) [9/22/1999 1:44:29 AM]
Simpo PDF Merge and Split Unregistered Version -
33: </CENTER>
34:
35: <SCRIPT LANGUAGE= "VBScript">
36:
37: SUB MoveFirst_onClick
38: ADC.Recordset.MoveFirst
39: END SUB
40:
41: SUB MovePrevious_onClick
42: On Error Resume Next
43: ADC.Recordset.MovePrevious
44: IF ERR.Number <> 0 THEN
45: ERR.Clear
46: END IF
47: END SUB
48:
49: SUB MoveNext_onClick
50: On Error Resume Next
51: ADC.Recordset.MoveNext
52: IF ERR.Number <> 0 THEN
52: ERR.Clear
53: END IF
54: END SUB
55:
56: SUB MoveLast_onClick
57: ADC.Recordset.MoveLast
58: END SUB
59:
60: SUB Update_onClick
61: ADC.SubmitChanges
62: ADC.Refresh
63: Grid.Rebind
64: END SUB
65:
66: SUB Cancel_onClick
67: ADC.CancelUpdate
68: ADC.Refresh
69: Grid.Rebind
70: END SUB
71:
72: SUB Execute_onClick
73: ADC.Server = "http://<%=Request.ServerVariables("SERVER_NAME")%>"
74: ADC.Connect = "DSN=OrdersDb"
75: ADC.SQL = "Select * from Products"
76: ADC.Refresh
77: Grid.Rebind
78: END SUB
79:
80: </SCRIPT>
81: </BODY>
82: </HTML>
Teach Yourself Database Programming with Visual C++ 6 in 21 days Day 11-Multitier Architectures
(12 of 17) [9/22/1999 1:44:29 AM]
Simpo PDF Merge and Split Unregistered Version -
Lines 1-7 in Listing 11.3 put up the title for the window and a heading. Lines 9-17 place the Sheridan ActiveX grid control
in the page. Lines 19-21 place the Microsoft RDS DataControl (also called the Advanced Data Control or ADC) into the
page. Lines 26-32 place several buttons on the page to enable the user to interact with the UI. Lines 35-80 contain
VBScript code for handling button presses by the user. Lines 80-82 end the tags to indicate the end of the page.
The Microsoft RDS DataControl (ADC) is an ActiveX control that is instantiated on the client machine in the
browser's process. When the user presses the execute button, lines 73-75 set the Server, Connect, and SQL properties in
the ADC. Line 76 calls the ADC Refresh method. This method uses the Server, Connect, and SQL properties to tell
the middle tier to connect to the database and issue the SQL query. The ADC then retrieves the records and caches them
on the client machine.
Line 77 tells the grid control to rebind to the records. The grid actually does more than just display them. The grid enables
the user to navigate through the records, using the code in lines 37 through 58. The user can edit the records' contents in
the grid. The user can cancel those changes by clicking the Cancel button, which executes the code in lines 66-70. The
user can commit the changes by clicking the Update button, which executes the code in lines 60-64. The output of Listing
11.3 is shown in Figure 11.9.
Figure 11.9 : The client tier page in IE4.
What happens behind the scenes with Remote Data Services is quite amazing. Figure 11.10 shows the architecture of
RDS.
Figure 11.10: The RDS architecture.
Following is an explanation of the sequence in a typical RDS operation:
A thin client, such as a browser, running on a client tier machine creates a local instance of the
RDS.DataControl (perhaps it is bound to a grid control running in the browser).
1.
When the user makes a request for the data, RDS.DataControl creates a remote instance of
RDSServer.DataFactory on the middle-tier machine and issues a query to the DataFactory object.
2.
The DataFactory object on the middle-tier machine uses OLE DB or ODBC to query the database on the
data-tier machine.
3.
The database processes the query and sends all the records to the DataFactory object on the middle-tier
machine.
4.
The DataFactory object stores all the records from the query in an OLE DB row set, called the server-side
cache, which resides on the middle-tier machine.
5.
The DataFactory places an ADO Recordset interface on the row set and sends it to the client machine as the
RDS.DataControl requests it.
6.
If configured to do so, with large amounts of data the RDS.DataControl can cause the grid control to become
interactive very soon after the DataFactory begins sending data to the client machine.
7.
Step 7 mentions a capability that RDS provides that could be crucial for applications that process large amounts of data.
RDS enables the results of queries to be sent asynchronously.
The RDS.DataControl can be configured to retrieve data in the background or asynchronously. If the
RDS.DataControl is retrieving the data in the background and the user tells it to MoveLast (move to the last record),
user interactivity will cease until all the data is retrieved. If the RDS.DataControl is retrieving the data
asynchronously and the user tells it to MoveLast, user interactivity will continue. The RDS.DataControl will move
to the most recent record received and will continue to retrieve data asynchronously.
You can enable the asynchronous capabilities of RDS by using the code shown in Listing 11.4. Create a new ASP page for
this code. Call it something like ClientTierAsync.ASP.
Listing 11.4 RDS Asynchronous Operations
Teach Yourself Database Programming with Visual C++ 6 in 21 days Day 11-Multitier Architectures
(13 of 17) [9/22/1999 1:44:29 AM]
Simpo PDF Merge and Split Unregistered Version -
1: <HTML>
2: <HEAD>
3: <TITLE>Client Tier</TITLE>
4: </HEAD>
5: <CENTER>
6: <H1>Remote Data Service and Sheridan Grid Control</H1>
7: <BR>
8:
9: <OBJECT ID="GRID" WIDTH=600 HEIGHT=200 Data 10: CODEBASE="http://<%=Request.ServerVariables("SERVER_NAME")%>
11: /MSADC/Samples/ssdatb32.cab"
12: CLASSID="CLSID:AC05DC80-7DF1-11d0-839E-00A024A94B3A">
13: <PARAM NAME="_Version" VALUE="131072">
14: <PARAM NAME="BackColor" VALUE="-2147483643">
15: <PARAM NAME="BackColorOdd" VALUE="-2147483643">
16: <PARAM NAME="ForeColorEven" VALUE="0">
17: </OBJECT>
18:
19: <OBJECT classid="clsid:BD96C556-65A3-11D0-983A-00C04FC29E33"
20: ID=ADC HEIGHT=1 WIDTH = 1>
21: </OBJECT>
22:
23: <BR>
24: <BR>
25: <BR>
26: <INPUT TYPE=BUTTON NAME="Execute" VALUE="Execute">
27: <INPUT TYPE=BUTTON NAME="MoveFirst" VALUE="MoveFirst">
28: <INPUT TYPE=BUTTON NAME="MovePrevious" VALUE="MovePrevious">
29: <INPUT TYPE=BUTTON NAME="MoveNext" VALUE="MoveNext">
30: <INPUT TYPE=BUTTON NAME="MoveLast" VALUE="MoveLast"> <BR><BR>
31: <INPUT TYPE=BUTTON NAME="Update" VALUE="Update">
32: <INPUT TYPE=BUTTON NAME="Cancel" VALUE="Cancel">
33: <BR>
34: <INPUT TYPE=TEXT NAME=RsState SIZE =25>
35: </CENTER>
36:
37: <SCRIPT LANGUAGE= "VBScript">
38:
39: Const adcExecSync = 1
40: Const adcExecAsync = 2
41:
42: Const adcFetchUpFront = 1
43: Const adcFetchBackground = 2
44: Const adcFetchAsync = 3
45:
46: Const adcReadyStateLoaded = 2
47: Const adcReadyStateInteractive = 3
48: Const adcReadyStateComplete = 4
49:
50: SUB ADC_OnReadyStateChange
51: Select case ADC.ReadyState
52: case adcReadyStateLoaded: RsState.Value = "Loaded"
53: case adcReadyStateInteractive: RsState.Value = "Interactive"
Teach Yourself Database Programming with Visual C++ 6 in 21 days Day 11-Multitier Architectures
(14 of 17) [9/22/1999 1:44:29 AM]
Simpo PDF Merge and Split Unregistered Version -
54: case adcReadyStateComplete: RsState.Value = "Complete"
55: END Select
56: END SUB
57:
58: SUB MoveFirst_onClick
59: ADC.Recordset.MoveFirst
60: END SUB
61:
62: SUB MovePrevious_onClick
63: On Error Resume Next
64: ADC.Recordset.MovePrevious
65: IF ERR.Number <> 0 THEN
66: ERR.Clear
67: END IF
68: END SUB
69:
70: SUB MoveNext_onClick
71: On Error Resume Next
72: ADC.Recordset.MoveNext
73: IF ERR.Number <> 0 THEN
74: ERR.Clear
75: END IF
76: END SUB
77:
78: SUB MoveLast_onClick
79: ADC.Recordset.MoveLast
80: END SUB
81:
82: SUB Update_onClick
83: ADC.SubmitChanges
84: ADC.Refresh
85: Grid.Rebind
86: END SUB
87:
88: SUB Cancel_onClick
89: ADC.CancelUpdate
90: ADC.Refresh
91: Grid.Rebind
92: END SUB
93:
94: SUB Execute_onClick
95: ADC.ExecuteOptions = adcExecAsync
96: ADC.FetchOptions = adcFetchAsync
97: ADC.Server = "http://<%=Request.ServerVariables("SERVER_NAME")%>"
98: ADC.Connect = "DSN=OrdersDb"
99: ADC.SQL = "Select * from Products"
100: ADC.Refresh
101: Grid.Rebind
102: END SUB
103:
104: </SCRIPT>
105: </BODY>
106: </HTML>
Teach Yourself Database Programming with Visual C++ 6 in 21 days Day 11-Multitier Architectures
(15 of 17) [9/22/1999 1:44:29 AM]
Simpo PDF Merge and Split Unregistered Version -
The code in Listing 11.4 enables you to experiment with the asynchronous capabilities of RDS. To help understand what
is happening with the asynchronous data transfer, refer again to Figure 11.10.
The code in Listing 11.4 is identical to the code in Listing 11.3, with a few additions. Line 34 adds a text box that will
report on the status of the Recordset in the ADC. Lines 39-48 are constants that were copied from the RDS type library
(in MSADCO.DLL). Lines 50-56 define a function that is executed automatically whenever the status of the ADC
Recordset changes. Lines 95 and 96 set the ADC to asynchronous operation before the query is issued.
One apparent problem with the RDS DataControl is the fact that the client program will issue queries directly to the
database. It would appear that the client application has direct knowledge of the database. However, it is important to
remember that the code for the client tier actually exists on the middle tier in ASP files. Changing the database might
necessitate changing the ASP files, but not the software on the client machines.
A level of abstraction could be created using stored procedures and views in the database. These database stored
procedures and views could provide an interface layer to the RDS clients, underneath which the implementation of the
database structure could change.
A potential problem with RDS is in the area of security. The DataFactory object on the middle tier enables anyone
who can obtain a DSN, username, and password to issue SQL statements to the database. Those SQL statements could
include DELETE statements to erase data in the database. For this reason, RDS is typically not used on the Internet. It
could enable anyone with a browser to delete your data. Rather, RDS finds its greatest application in corporate intranets
where the users are more trusted and security can be controlled more easily.
You can also use the RDS DataControl in your C++ programs. The ADC code and the type library reside in
MSADCO.DLL. You can use the #import directive with MSADCO.DLL just as you do with MSADO15.DLL. The
RDS DataControl interface is listed as IBindMgr in the type library.
Summary
Multitier applications promise easier updates and maintenance than traditional client/server applications. The tools for
building multitier applications have evolved rapidly over the past few years. XML is a technology that will be widely used
in the future to transmit data in multitier applications. Some of the more recent developments, such as ActiveX controls
and RDS, promise to enable client/server-type development in an intranet environment.
Q&A
Q Can I use XML in C++ programs?
A Yes. You can use the XML parser from Microsoft to parse XML documents in C++ programs and retrieve their
contents. In other words, you can use the XML parser to read the schema of XML documents and then read the
data that the XML documents contain. There is at least one sample C++ program for XML parsing on the
Microsoft Web site.
Q Why is it so difficult to use HTML to build a UI for a database application?
A The UI for a database application typically requires that the data be displayed in a table and that the user be able
to navigate through the table and edit the content of rows in the table as needed. HTML does not provide these
capabilities. This is why it is necessary to use an ActiveX control, such as a grid control, to build a good
database UI.
Q Do I have to use an ODBC DSN with the RDS DataControl, or can I specify an OLE DB provider?
A
You can use OLE DB providers as well as ODBC data sources with the RDS DataControl. To use an OLE
DB provider, you would use "Provider=" and specify the name of the provider and the particular OLE DB
data source.
Teach Yourself Database Programming with Visual C++ 6 in 21 days Day 11-Multitier Architectures
(16 of 17) [9/22/1999 1:44:29 AM]
Simpo PDF Merge and Split Unregistered Version -
Workshop
The Workshop quiz questions test your understanding of today's material. (The answers appear in Appendix F,
"Answers.") The exercises encourage you to apply the information you learned today to real-life situations.
Quiz
What are the two pillars on which multitier architectures rest?1.
Why are thin client programs often more desirable than fat client programs?2.
How does the purpose of XML differ from the purpose of HTML?3.
What COM objects are instantiated, and where are they instantiated, in a typical RDS application?4.
What is the security risk posed by the RDS COM servers?5.
Exercises
Create a table in your database that contains 10,000 records and query it with RDS to become familiar with the
asynchronous operation of RDS.
1.
Create a new MFC application that uses #import with MSADCO.DLL. Make this C++ application use the ADO
DataControl to perform a function that is similar to the ASP code in Listing 11.4.
2.
© Copyright, Sams Publishing. All rights reserved.
Teach Yourself Database Programming with Visual C++ 6 in 21 days Day 11-Multitier Architectures
(17 of 17) [9/22/1999 1:44:29 AM]
Simpo PDF Merge and Split Unregistered Version -
Teach Yourself Database Programming
with Visual C++ 6 in 21 days
Day 12
Using Microsoft Transaction Server to
Build Scalable Applications
The Infrastructure for Multitier Applications●
Using MTS to Build Multitier Applications
Where to Find MTS and How to Install It❍
How MTS Works in Multitier Applications❍
Managing MTS Components by Using Packages❍
Creating an MTS Component, Using Visual C++ and the ATL❍
Using the OLE-COM Viewer to Instantiate Your Component❍
Using the Windows Scripting Host to Test your Component❍
Testing Your Component in an Active Server Page❍
Installing Your Component in MTS❍
Calling Your MTS Component from an Active Server Page❍
Debugging MTS Components❍
●
Summary●
Q&A●
Workshop
Quiz❍
Exercises❍
●
Building a multitier application can be a daunting task. Implementing the application logic is just one part of the development
process. Multitier applications require a sophisticated infrastructure. This infrastructure often includes code to synchronize access to
server resources, manage server connections and thread pools, enforce security, and so on.
Without using Microsoft Transaction Server (MTS), application developers must build the infrastructure for multitier applications
themselves. However, by using MTS, developers can take advantage of the infrastructure that MTS provides and are free to
concentrate on implementing the application instead of its infrastructure.
Today you will learn
The infrastructure required for scalable, multitier applications●
Teach Yourself Database Programming with Visual C++ 6 in 21 days Using Microsoft Transaction Server to Build Scalable Applications
(1 of 15) [9/22/1999 1:44:44 AM]
Simpo PDF Merge and Split Unregistered Version -
The foundation and infrastructure that MTS provides for multitier applications●
How to create MTS components and how to use them in applications●
Ways to integrate MTS components with IIS and Web browsers●
How to debug MTS components●
How to send ADO Recordset objects between the tiers and components of a multitier application●
NOTE
Today's development work utilizes Microsoft Transaction Server (MTS), Microsoft Internet
Information Sever (IIS), and Internet Explorer version 4.0 (IE4). If you have access to MTS,
IE4, and IIS (or Microsoft Personal Web Server, which is compatible with IIS), you will be
able to perform all the programming tasks described today. If not, you will have to learn some
of these techniques without being able to try them yourself.
The Infrastructure for Multitier Applications
The move to multitier applications is being driven by the need for business applications that
Are component-based and extensible●
Can handle large quantities of data being accessed by large numbers of concurrent users●
Are secure and provide for the safety and security of important data●
Are accessible to users who might be in diverse locations and are using the application over a LAN, WAN, or the Web●
Building applications with these characteristics requires lots of code. The infrastructure, or plumbing (which includes the code for
communications, resource allocation, security, and so on), has to be in place before the developer can build the application.
Developers who build multitier applications from scratch have found that building the infrastructure can be the most challenging and
time-consuming portion of the project. In other words, building the plumbing can be a significant part of the development effort.
The plumbing for a multitier application typically must include code that
Communicates with client applications over the Web, a WAN, or a LAN●
Instantiates objects and resources on the server on behalf of each client●
Queues client requests●
Manages objects' lifetimes on the server●
Tracks each user's identity and state●
Pools threads so that the server (or the middle-tier) doesn't have to dedicate a thread to each user●
Prevents unauthorized access to the application or to the data●
Manages transactions to assure the successful processing of each client's work●
Pools database connections so that the server doesn't have to dedicate a database connection to each user●
This plumbing has to exist for multitier applications to work. That means that someone has to write it.
Developers who build their own plumbing for multitier applications typically must rebuild the plumbing (or parts of it) each time
they build a new application. For each application, they must spend a significant portion of their time writing code that is not really
part of the application.
Developers who build their own plumbing also have limited opportunities to use third-party components in their applications. For the
use of third-party components in multitier applications, a common component framework must be in place, and the components and
the plumbing must be compatible.
The Component Object Model (COM) provides a component framework. However, COM by itself does not provide sufficient
plumbing for building multitier applications. In practice, COM by itself provides the framework for only a single tier of an
application.
NOTE
Teach Yourself Database Programming with Visual C++ 6 in 21 days Using Microsoft Transaction Server to Build Scalable Applications
(2 of 15) [9/22/1999 1:44:44 AM]
Simpo PDF Merge and Split Unregistered Version -
DCOM does provide the means to instantiate COM objects on different machines across a
LAN. However, this capability alone does not provide a complete foundation for building
multitier applications. Instantiating objects on a server is only part of the plumbing that a
multitier application needs.
COM provides a component framework for a single tier in an application. To use COM components in a multitier application, the
application must have plumbing that is compatible with COM.
MTS provides plumbing for multitier applications that is compatible with COM. COM provides the framework for using components
in a single tier, and MTS provides the plumbing for these components to be used across tiers in a multitier application.
Using MTS to Build Multitier Applications
Microsoft Transaction Server extends COM to provide a multitier application framework that can shelter you from the complexities
of multitier development. MTS handles object instantiation at the server, process and thread management, synchronization of shared
resources, and security. MTS also supports transactions to ensure atomic updates and consistency.
Where to Find MTS and How to Install It
MTS is included in the Windows NT 4.0 Option Pack. MTS requires
Windows NT 4.0 or Windows 98 (or Windows 95 with DCOM support)●
A hard disk with a minimum of 30MB available space●
A CD-ROM drive●
At least 32MB of RAM●
You can install MTS on your computer by using the Windows NT 4.0 Option Pack Setup program. You can install MTS with or
without IIS and the other Option Pack components.
To install MTS
Run the Option Pack Setup program.1.
Choose Custom Install.2.
Select (but do not uncheck) the check box for Transaction Server.3.
Click Show Subcomponents.4.
Check Transaction Server Core Components. This will also install the Microsoft Management Console. Note that choosing the
Development Option also installs the Data Access components.
5.
Click OK for the Setup program to do the install.6.
The Windows NT 4.0 Option Pack and MTS also are available as part of the Visual Studio Enterprise Edition Server Setup options.
Select Server Setup; then select BackOffice Setup. Then you can select NT Option Pack as an installation option (along with SQL
server, and so on.)
How MTS Works in Multitier Applications
To use MTS in a multitier application, you build the business logic and functionality of your application into a set of COM in-process
servers. (An in-process COM server is a COM server that resides in a DLL.) Each of these COM servers performs some function or
well-defined set of functions in your application.
The client programs in your application call these COM servers. The client programs do not perform any communications with a
database server directly. The COM servers constitute a middle tier that the client programs call. This multitier architecture is
illustrated in Figure 12.1.
Figure 12.1 : Multitier architecture.
In-process COM servers by themselves can't provide an adequate middle tier. MTS extends COM by providing a wrapper for COM
servers. You install these in-process COM servers in MTS, and MTS wraps them and gives them additional functionality. This
additional functionality makes it possible for these COM servers to be used effectively as a middle tier in a multitier application.
Figure 12.2 illustrates the role of MTS in multitier applications.
Teach Yourself Database Programming with Visual C++ 6 in 21 days Using Microsoft Transaction Server to Build Scalable Applications
(3 of 15) [9/22/1999 1:44:44 AM]
Simpo PDF Merge and Split Unregistered Version -
Figure 12.2 : MTS in multitier applications.
MTS wraps and extends the COM servers by intercepting the calls to them from client applications. MTS does this by causing the
Registry entries for COM servers to point to the MTS runtime environment, instead of to the COM server's DLL. You will recall
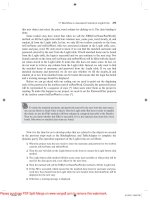
from Day 9, "Understanding COM," that the location of a COM server's binary (EXE or DLL) is stored in the Registry. Figure 12.3
shows a sample Registry entry for an in-process COM.
Figure 12.3 : The Registry entry for an in-process COM server.
You can see in Figure 12.3 that the InprocServer32 key for this particular CLSID points to RDSATLMTS1.DLL (the filename
derives from the fact that this example experiments with RDS, ATL, and MTS) in the WorkInProgress\RDSATLMTS1\Debug
directory on the C drive.
As you will recall from Day 9, when a client application requests a pointer to an interface to a COM server (using the CLSID), the
system locates the binary and loads it if necessary. The system then calls the class factory in the binary to create an instance of the
COM server (if an instance needs to be created) and returns to the client a pointer to an interface to the COM server. (Refer to Figure
9.5 for an illustration of this process.)
When you install an in-process COM server in MTS, the COM server becomes an MTS component. The Registry entry for that COM
server is changed so that it no longer points to the DLL in which the COM server resides. Instead, the Registry points to MTX.EXE,
which is the MTS application binary. This is illustrated in Figure 12.4.
Figure 12.4 : The Registry entry for an in-process COM server installed in MTS.
You can see in Figure 12.4 that a LocalServer32 key that points to C:\WINNT\System32\mtx.exe has been added. Following the
filename and pathname is a /p: command-line argument followed by a GUID. You can't see it in Figure 12.4, but the entry for the
InprocServer32 key has been emptied so that it no longer points to the COM server's DLL.
This change in the Registry means that when a client application references this COM server's CLSID to obtain an interface pointer
to the COM server, the system does not look for and load the COM server's DLL. Instead, MTX.EXE is located by the system (and
loaded if necessary) and is passed the /p: command-line argument followed by the GUID shown in Figure 12.4.
Remember that an MTS component is a COM server that has been installed in MTS. The GUID passed on the command line
represents the particular MTS package that contains this MTS component. An MTS package is a collection of MTS components that
run in the same process.
Managing MTS Components by Using Packages
MTS components are organized into MTS packages. Packages in MTS enable process isolation and security to be established for sets
of components. Process isolation ensures that a poorly written component, which could cause errors at runtime, cannot bring down
other processes running on that machine. MTS package security ensures that only authorized users can access your application.
To learn about MTS packages, and to begin today's development work, you will need to create your own package in MTS. Run the
Transaction Server Explorer, which (on NT) you can run by selecting the Start, Programs, Windows NT 4.0 Option Pack, Microsoft
Transaction Server, Transaction Server Explorer menu. The Transaction Server Explorer runs inside the Microsoft Management
Console and is shown in Figure 12.5.
Figure 12.5 : The Transaction Server Explorer.
The tree control in the left pane enables you to navigate among the various MTS objects. You can double-click each element (or click
the plus sign beside each element) in the tree control to expand it to view its children. The Transaction Server Explorer in Figure 12.5
has been expanded to show installed MTS packages.
Create your own package in MTS by right-clicking the Packages Installed folder and selecting the New Packages menu. You are
presented with the first window of a wizard that will help you create your package. This window is shown in Figure 12.6.
Figure 12.6 : Using Package Wizard to create an empty MTS package.
When you install a COM server in MTS, you specify which package it is to be installed in. You can create new packages anytime
you need to in MTS.
NOTE
Teach Yourself Database Programming with Visual C++ 6 in 21 days Using Microsoft Transaction Server to Build Scalable Applications
(4 of 15) [9/22/1999 1:44:44 AM]
Simpo PDF Merge and Split Unregistered Version -
MTS security is not as fully implemented under Windows 95 and Windows 98 as it is under
Windows NT. The following explanation of how to create your own MTS package under NT
might contain steps for setting up security that do not apply under Windows 95 and Windows
98.
Click the Create an Empty Package button. In the next window, you are prompted for the name of the package, which you can call
MyFirst or some other appropriate name. Press the Next button. You will then be presented with a window to specify the identity
under which this package will run. This window is shown in Figure 12.7.
Figure 12.7 : Using Package Wizard to set the package identity.
The default is to run the package under the currently logged-on user's identity. The alternative is to hard-code the package to always
run under a user identity that you specify. For your work today, use the default setting of the current user's identity for your package.
Click the Finish button to create the package.
Your package should appear in the tree control in the Transaction Server Explorer. Select it by clicking it, and you should see that the
package contains two folders, one for components and one for roles. The Components folder will contain the in-process COM server
that you will create and install later today. The Roles folder enables you to specify security to limit user access to the package and its
components.
You can set the properties of your MTS package by right-clicking its element in the tree control and selecting the Properties menu
from the context menu. This will show the Properties window for your package. The contents of the General tab are shown in Figure
12.8.
Figure 12.8 : Package properties- the General tab.
The Properties window in Figure 12.8 shows the name of the package, a description (which you can assign), and the GUID that
uniquely identifies this package. This is the GUID that appears in the Registry as the /p: argument with MTX.EXE for the COM
servers installed in this package.
Select the Security tab, which enables you to turn on and off security for this package. There is a check box titled Enable
Authorization Checking that you should leave unchecked to leave security off for your package while you are learning MTS.
The Advanced tab enables you to specify how long the components in your package should live on the server after being used and
released by client applications. The default values are fine for now.
The Identity tab is the same one you saw on the Package Wizard. Use the default setting of the current user's identity for your
package.
The Activation tab enables you to specify where (in which process) the components in your package should be instantiated. The
Activation tab is shown in Figure 12.9.
Figure 12.9 : Package properties- the Activation tab.
The Library Package activation type is available only for client applications that run on the computer on which the package and
components are installed. In other words, the client application and the components have to be on the same machine. Selecting this
option causes the components to be instantiated in the client application's address space.
The Server Package activation type causes the components to be instantiated in a server process on the MTS machine. In other
words, the package runs in its own process on the MTS machine. The Server Package activation type provides process isolation. It
also enables MTS to enforce security, manage resource sharing, and track the usage of components in the package. Select Server
Package activation for your package.
Creating an MTS Component, Using Visual C++ and the ATL
Now it is time to create your first MTS component. Run Visual Studio and select the File, New menu. On the Project tab, specify an
ATL COM AppWizard project. The New Project window is shown in Figure 12.10.
Figure 12.10: The new ATL COM AppWizard project window.
Call the project MTSComp1, as shown in Figure 12.10, or use whatever name you think is appropriate. Figure 12.10 shows the
project being placed in the c:\tysdbvc\mtscomp1 directory. If that directory already exists on your machine, you will need to use a
different directory. Click the OK button.
Teach Yourself Database Programming with Visual C++ 6 in 21 days Using Microsoft Transaction Server to Build Scalable Applications
(5 of 15) [9/22/1999 1:44:44 AM]
Simpo PDF Merge and Split Unregistered Version -
The next window is the ATL COM AppWizard-Step 1 of 1 window. It is shown in Figure 12.11.
Figure 12.11: The ATL COM AppWizard-Step 1 of 1 window.
Specify merging of proxy/stub code and support for MTS, as shown in Figure 12.11. Click the Finish button and then the OK button
for the wizard to create the project.
Select the Insert menu and the New ATL Object menu choice to specify an MS Transaction Server object as shown in Figure 12.12.
Figure 12.12: Using the ATL Object Wizard.
Click the Next button. The ATL Object Wizard Properties window will appear. Under the Names tab, specify a short name of
Component1.
Under the MTS tab, specify a dual interface. Also, enable the check boxes for Support IObjectControl and Can Be Pooled, as shown
in Figure 12.13.
Figure 12.13: The ATL Object Wizard Properties window and the MTS tab.
The IObjectControl and Can Be Pooled options tell MTS that your component should be returned to an instance pool after
deactivation, rather than be destroyed. This enables MTS to provide access to your component in a very efficient manner as multiple
client applications create and free your object. MTS provides efficient access to your component by using thread pooling and
database connection pooling.
Click the OK button to generate the object. The CComponent1 class will appear in the tree view in the ClassView tab of the
project workspace in Visual Studio. The IComponent1 interface will also appear there.
To add a function to your component, right-click the IComponent1 interface and choose Add Method from the context menu. The
Add Method to Interface dialog will be displayed, as shown in Figure 12.14.
Figure 12.14: Adding the ReturnHello method to an interface.
As Figure 12.14 shows, you should specify a method name of ReturnHello and the following parameters:
[out, retval] BSTR* bstrHello
Using [out, retval] tells the system that the bstrHello parameter needs to be marshaled from the server to the client and
that this parameter is the return value of the function.
Click the OK button to add the method. Click the plus sign next to the IComponent1 interface, and you should see the
ReturnHello method listed. Double-click the ReturnHello method to view the MTSComp1.IDL file that the ATL Wizard
created for you. This IDL code declares the interface to IComponent1.
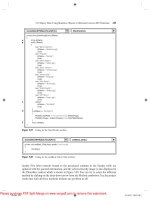
Click the plus sign next to the CComponent1 class. The IComponent1 interface will be listed there, as well as four other
functions and a data member for the CComponent1 class. Click the plus sign next to the IComponent1 interface under the
CComponent1 class, and you will see the ReturnHello function listed there, as shown in Figure 12.15.
Figure 12.15: The ReturnHello function in Component1.CPP.
Double-click the ReturnHello function under the IComponent1 interface under the CComponent1 class to open the
Component1.CPP, as shown in Figure 12.15. This is where you implement the code for IComponent1. Change the code in the
ReturnHello function so that it matches the code shown in Listing 12.1.
Listing 12.1 The RETURNHELLO Function in Component1.CPP
1: STDMETHODIMP CComponent1::ReturnHello(BSTR *bstrHello)
2: {
3: *bstrHello = _bstr_t("Hello");
4: return S_OK;
5: }
Teach Yourself Database Programming with Visual C++ 6 in 21 days Using Microsoft Transaction Server to Build Scalable Applications
(6 of 15) [9/22/1999 1:44:44 AM]
Simpo PDF Merge and Split Unregistered Version -
The ATL Object Wizard generated lines 1, 2, 4, and 5. You add the code in line 3 that assigns a temporary _bstr_t instance to the
pMyBSTR argument. You will also need to add
#include <comdef.h>
to Component1.CPP so that you can use the _bstr_t class. Build the project, which should compile and link with no errors or
warnings. When you build the project, Visual Studio will register the COM server for you.
NOTE
To build any of the release versions of this project, you might need to remove the
_ATL_MIN_CRT preprocessor definition from the compiler settings for those configurations.
Search your Visual C++ documentation on _ATL_MIN_CRT, for details.
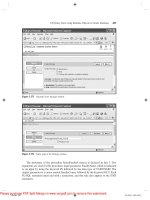
Using the OLE-COM Viewer to Instantiate Your Component
Before installing your component in MTS, you would be wise to test it. There are several ways for you to verify that your COM
component works.
First, you will want to ensure that the system can instantiate your component. The easiest way to do this is to use the OLE-COM
Object Viewer. You will recall from Day 10, "Database Client Technologies and the Secrets of ADO," that you can find the
OLE-COM Object Viewer under the Microsoft Visual Studio 6.0 Tools menu. The menu OLE-COM Viewer is called OLE View.
Run the OLE-COM Object viewer and expand the Object Classes, Grouped by Component Category elements of the tree control in
the left pane. Expand the Automation Objects element. Under the Automation Objects in the left pane, you should see all the
Automation objects that are registered on your system.
Scroll down until you find Component1 Class. If you don't see Component1 there, it probably is not registered. Visual Studio
registers it for you after every successful build, so it should be there if you are doing this on your build machine. If you ever need to
register the component manually (perhaps on another machine), you can run regsvr32 mtscomp1.DLL from the DOS prompt to
register it.
Click Component1 Class, and the right pane of the OLE-COM Viewer will display the Registry entry for your Component1.
Right-click Component1 in the left pane and select Create Instance from the context menu. The Component1 Class element in the
tree control will appear in bold text, and the IComponent1, IDispatch, and IUnkown interfaces will appear under it, as shown
in Figure 12.16.
Figure 12.16: Using the OLE-COM viewer to instantiate a COM object.
If this works, you know that your Component1 is registered properly and that the system can instantiate it. Release the instance of
the Component1 you just created, by right-clicking Component1 Class and selecting Release Instance from the context menu.
Using the Windows Scripting Host to Test your Component
One of the easiest ways to exercise a function in your component is to write a simple script that calls it.
Until recently, the only scripting language that Windows supported was the MS-DOS command language. Compared to the scripting
languages available on other platforms, the MS-DOS command language has very limited features and capabilities.
Microsoft has greatly expanded the scripting language support on the Win32 platform by introducing the ActiveX scripting
architecture. Microsoft provides three hosts for running scripts in the ActiveX scripting architecture:
Microsoft Internet Explorer (IE4), which enables scripts to be executed on client machines from within HTML pages●
Internet Information Server (IIS) and Active Server Pages (ASP), which enable server-side scripting for use over the Internet
or an intranet
●
Windows Scripting Host (WSH), which enables you to write scripts and execute them directly on the Windows desktop or at
the MS-DOS prompt
●
The Windows-based host is called WSCRIPT.EXE and enables you to run scripts directly from the Windows desktop by
Teach Yourself Database Programming with Visual C++ 6 in 21 days Using Microsoft Transaction Server to Build Scalable Applications
(7 of 15) [9/22/1999 1:44:44 AM]
Simpo PDF Merge and Split Unregistered Version -
double-clicking a script file. The command prompt-based host is CSCRIPT.EXE and enables you to run scripts from the MS-DOS
prompt by simply entering the name of the script file.
WSH is included in the NT 4.0 Option Pack, Windows 98, Windows NT Workstation version 5.0, and Windows NT Server version
5.0.
Microsoft provides Visual Basic Script (VBScript) and Java Script scripting engines for WSH. Support for other script languages,
such as Perl, TCL, REXX, and Python, is (or will be) provided for WSH by third-party companies.
To write a script that exercises your component, create a text file and save it as Comptest.VBS. The VBS extension is important
because the extension tells WSH which scripting language to use. (VBS stands for VBScript.) Enter the code shown in Listing 12.2
in Comptest.VBS.
Listing 12.2 The VBScript File for Exercising COMPONENT1
1: dim comp1
2: set comp1 = WScript.CreateObject("MTSComp1.Component1.1")
3: myStr = comp1.ReturnHello
4: WScript.Echo "Result of ReturnHello: " & myStr
Line 1 in Listing 12.2 defines a variable called comp1 that can hold a COM object. Line 2 calls the WScript.CreateObject
function to instantiate your component. Line 3 declares a variable called myStr and stores the results of a call to your component's
ReturnHello function. Line 4 displays the resulting string in a message box.
You can execute your Comptest.VBS script by double-clicking the file in Windows Explorer or by entering cscript
Comptest.VBS at the DOS prompt in the directory that contains the file. It should run with no errors and display Result of
ReturnHello: Hello in a message box. Testing your component with a script is one way for you to know that your component
is registered properly and that the code for your component works.
Testing Your Component in an Active Server Page
You can also call your component from within an Active Server Page. However, you must make some additional entries in the
Registry for IE4 to allow your component to run in its process.
IE4 has its own security to help ensure that the ActiveX (COM) components it runs are not malicious. A component must be
registered as safe for scripting and safe for initialization, or IE4 will not run it. Therefore, you need to register Component1 as
being safe for scripting and initialization. You do this by creating a text file that has a .REG extension, such as marksafe.REG,
and that contains the code shown in Listing 12.3.
Listing 12.3 A REG File to Mark Your Component Safe for Scripting and Initialization
1: REGEDIT4
2: [HKEY_CLASSES_ROOT\CLSID\<GUID>\Implemented Categories\
{7DD95801-9882-11CF-9FA9-00AA006C42C4}]
3: [HKEY_CLASSES_ROOT\CLSID\<GUID>\Implemented Categories\
{7DD95802-9882-11CF-9FA9-00AA006C42C4}]
Replace the text that says <GUID> in lines 2 and 3 of Listing 12.3 with the CLSID for your Component1. You can obtain the
CLSID for your Component1 from several places.
One easy way to obtain the CLSID for your Component1 is to use the OLE-COM Viewer. Right-click Component1 Class and
select Copy CLSID to Clipboard from the context menu. (After doing this you can exit OLE-COM Viewer.)
You can then paste the CLSID into the REG file. To add these entries to the Registry database on your machine, simply double-click
the REG file in Windows Explorer.
In Visual Studio, create a new Active Server Page (the file does not need to be added to a project). Enter the code shown in Listing
12.4 and save the file as ClientTierForMTS.ASP.
Teach Yourself Database Programming with Visual C++ 6 in 21 days Using Microsoft Transaction Server to Build Scalable Applications
(8 of 15) [9/22/1999 1:44:44 AM]
Simpo PDF Merge and Split Unregistered Version -
Listing 12.4 The ClientTierForMTS.ASP to Run COMPONENT1 from an Active Server Page
1: <HTML>
2: <HEAD>
3: <TITLE>Client Tier</TITLE>
4: </HEAD>
5: <CENTER>
6: <H1>Browser Client for MTS Component</H1>
7:
8: <! RDS.DataSpace ><OBJECT ID="ADS1" WIDTH=1 HEIGHT=1
9: CLASSID="CLSID:BD96C556-65A3-11D0-983A-00C04FC29E36">
10: </OBJECT>
11:
12: <BR>
13: <BR>
14: <INPUT TYPE=BUTTON NAME="ReturnHello" VALUE="Return Hello">
15: <INPUT NAME=ReturnedHello SIZE=10>
16: </CENTER>
17:
18: <SCRIPT LANGUAGE= "VBScript">
19:
20: SUB ReturnHello_OnClick
21:
22: Dim objMyCustomBusinessObject
23: Set objMyCustomBusinessObject =
ADS1.CreateObject("MTSComp1.Component1.1", "")
24:
25: ReturnedHello.Value = objMyCustomBusinessObject.ReturnHello
26:
27: Set objMyCustomBusinessObject = Nothing
28:
29: END SUB
30:
31: </SCRIPT>
32: </BODY>
33: </HTML>
Lines 1- 7 and 32-33 are simple HTML. Lines 11-17 contain normal HTML code that creates a ReturnHello button and a text box.
Lines 8-10 create an instance of the Remote Data Services (RDS) DataSpace object. The database space object is used to create
client-side proxies of COM components that exist on a server or middle-tier machine. RDS supports four protocols over which it can
instantiate and call COM objects: HTTP, HTTPS, DCOM, and in-process.
Lines 18 through 31 contain VBScript code that uses the DataSpace object to instantiate your Component1, call its
ReturnHello method, and display the results in the text box.
Line 23 calls the DataSpace CreateObject function to instantiate Component1. As you can see, the second argument passed
to the CreateObject function is "". This tells the CreateObject function that the COM component is installed on this
machine and to run it as an in-process COM server. You can specify a machine name in the form, "machine name" to have the
CreateObject function instantiate the COM component over DCOM. You can specify "HTTPS://webservername" or
"HTTP://webservername" to have the CreateObject function instantiate the COM component over an HTTP connection to
a Web server.
Before you can have the DataSpace CreateObject function instantiate your component over HTTP or DCOM, you must add
the Prog ID of your component (MTSComp1.Component1.1) as a key under the following Registry key:
HKEY_LOCAL_MACHINE\SYSTEM\CurrentControlSet\Services\W3SVC\Parameters\ADCLaunch
Teach Yourself Database Programming with Visual C++ 6 in 21 days Using Microsoft Transaction Server to Build Scalable Applications
(9 of 15) [9/22/1999 1:44:44 AM]
Simpo PDF Merge and Split Unregistered Version -
To run the ASP shown in Listing 12.4, place the ASP file in a directory that is accessible to IIS (IIS will need to be running on the
machine). Run IE4 and enter the HTTP address of that directory, followed by the ASP filename. The page should load with no errors.
When you click the ReturnHello button, Component1 will be called, and Hello will be displayed in the text box.
Note that you have not yet installed your component in MTS. The ability to instantiate and call your COM component over DCOM
and HTTP from a browser is provided by RDS. When you install your component in MTS, it will not change the ASP code in Listing
12.4. Rather, MTS will simply make your Component1 more robust and secure when it executes on the middle-tier machine.
Installing Your Component in MTS
Now you need to install your COM server in MTS. Click the plus sign next to the MyFirst package in Transaction Server Explorer;
then click the Components folder under the MyFirst package in the tree control. Right-click the Components folder and select the
New Component menu. This will run the Component Wizard, shown in Figure 12.17.
Figure 12.17: The MTS Component Wizard.
As you can see in Figure 12.17, there is a button to install new components and a button to import components that are already
registered. The button to import components that are already registered will open a window that displays all the COM servers
registered on your computer. The button to install new components opens the window shown in Figure 12.18. Click the button to
install new components.
Figure 12.18: The Install Components window in the MTS Component Wizard.
Click the Add Files button and navigate to the directory that contains the MTSComp1.DLL file for the COM server that you just built
and select the DLL. The Install Components window should show that it found Component1, which is the COM server in your
DLL. Click the Finish button to install Component1 in MTS.
You should now be able to see MTSComp1.Component1 in the MyFirst package. The installed component looks like a bowling ball
with an X on it, as shown in Figure 12.19.
Figure 12.19: The MTSComp1.Compone nt1 in the Transaction Server Explorer.
Using the View menu, you can see various kinds of information about the components. One interesting view is the Status view.
Select the Status view, and you will be able to see information on whether MTSComp1.Component1 has been activated, how many
objects of it are instantiated, and how many are handling calls from client applications. These values should all be blank now, but
when a client application calls your MTSComp1.Component1, you will be able to see that the object is instantiated by using this
view.
Calling Your MTS Component from an Active Server Page
You can use MTS components in Active Server Pages (ASP). However, there are two things you need to do to your Component1
MTS component to enable it to be used from an ASP.
First, just to ensure that the MTS security doesn't get in your way during development, you need to make sure it is not enabled for
your Component1. You do this by right-clicking the bowling ball for Component1 and selecting Properties from its context
menu. Under the Security tab, uncheck the Enable Authorization Checking check box, as shown in Figure 12.20, and press the OK
button.
Figure 12.20: Disabling security authorization checking for Component1.
Secondly, you need to mark the component safe for scripting and initialization again. When you installed Component1 in MTS, the
Registry entry was modified, and the entries that mark Component1 as safe for scripting and initialization were removed. You can
put the safe-for-scripting and initialization entries back in the Registry for your component by simply double-clicking the
marksafe.REG file in Windows Explorer. After you mark Component1 safe again, you might want to refresh the MyFirst package
in Transaction Server Explorer, just to make sure that MTS is feeling good about things with your component.
It is important to refresh the MTS settings for components each time you recompile your project or make changes to its Registry
settings. Refreshing component settings prevents your component Registry settings from being rewritten.
To refresh your component settings, in the left pane of the Transaction Server Explorer, select My Computer. On the Action menu,
click Refresh All Components. This updates MTS with any changes to the System Registry, component CLSIDs, or interface
identifiers (IIDs). You can also refresh components by selecting the computer in the left pane of the Explorer and clicking the
Teach Yourself Database Programming with Visual C++ 6 in 21 days Using Microsoft Transaction Server to Build Scalable Applications
(10 of 15) [9/22/1999 1:44:44 AM]
Simpo PDF Merge and Split Unregistered Version -