KDE 2/Qt Programming Bible phần 3 pdf
Bạn đang xem bản rút gọn của tài liệu. Xem và tải ngay bản đầy đủ của tài liệu tại đây (324 KB, 74 trang )
127
Chapter 6 ✦ Menus and Toolbars
The method createStatusBar() on line 36 calls statusBar() to create and
install a widget capable of displaying a single line of text. Your program has access
to the text of the status bar, so it can keep it constantly updated. Unlike the toolbar
and the menu bar, the status bar cannot be moved to another location.
The method
createToolBar() on line 41 creates a toolbar by calling toolBar()
on line 43. An ID number is required as an argument because your application can
have as many toolbars as you would like. You supply the ID number and, if there is
no toolbar with that ID, one is created and returned. Using the same ID number will
always return the same toolbar. For this example, a pixmap is used to create a sin-
gle toolbar button.
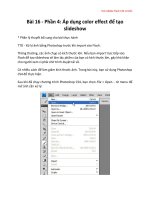
The toolbar can be moved outside of its parent window. Figure 6-3 shows the result
of using the handle at the left end of the toolbar to “tear off” the menu from its par-
ent window and establish it as its own stand-alone window.
Figure 6-3: Tear-off menus and toolbars
The method named slotExit() on line 47 is called whenever the user selects Exit
from the menu. You may need to do some kind of cleanup here and save currently
unsaved data, but this example simply calls the
exit() method in the application.
The global variable named
kapp always contains a pointer to the KApplication
object.
The slot method named
queryClose() on line 51 is called when the figure X in the
upper right corner of the application’s frame is selected. If this slot returns
TRUE,
the application is immediately closed. If it returns
FALSE, no action will be taken
(the signal from the X button will be ignored).
This is the skeleton of an application. Allowing
KTMainWindow to do most of the
work, your top-level window can be very sophisticated with only a few lines of
code. The rest of this chapter describes the details of configuring the menu bar
and toolbars, and displaying information via the status bar.
4682-1 ch06.f.qc 11/13/00 14:10 Page 127
128
Part I ✦ Getting Started
The Menu Bar
Basically, a menu is a collection of buttons with a slot attached to each one. The
dynamics of a menu simplifies access to the buttons by making a specific subset of
them available at any one time. There are different ways of organizing and decorat-
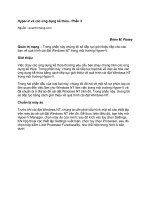
ing the buttons. The following example creates the window shown in Figure 6-4.
This menu bar was contrived to demonstrate the different things you can use in
the construction of a menu.
Figure 6-4: An application
with a menu bar at the top
The header file mostly contains declarations of slots that will be called whenever a
menu button is selected, but there is also some private data that is needed to track
the status of menu buttons that are toggled from one state to another. The
MenuMain
class inherits from the KTMainWindow class, so it already has the capability to dis-
play and manage a menu.
MenuMain Header
1 /* menumain.h */
2 #ifndef MENUMAIN_H
3 #define MENUMAIN_H
4
5 #include <ktmainwindow.h>
6 #include <kmenubar.h>
7 #include <ktoolbar.h>
8 #include <kstatusbar.h>
9
10 class MenuMain: public KTMainWindow
11 {
12 Q_OBJECT
13 public:
14 MenuMain();
15 private:
16 QPopupMenu *checkPopup;
17 int enableColorsID;
18 int enableGraphicsID;
19 private slots:
20 void slotExit();
21 bool queryClose();
22 void slotNew();
23 void slotSave();
4682-1 ch06.f.qc 11/13/00 14:10 Page 128
129
Chapter 6 ✦ Menus and Toolbars
24 void slotSaveAs();
25 void slotClose();
26 void slotLogo();
27 void slotSub();
28 void slotEnableColors();
29 void slotEnableGraphics();
30 private:
31 void createMainWidget();
32 void createMenu();
33 };
34
35 #endif
MenuMain
1 /* menumain.cpp */
2 #include <kapp.h>
3 #include <khelpmenu.h>
4 #include <kcmdlineargs.h>
5 #include <qpushbutton.h>
6 #include <qwhatsthis.h>
7 #include “menumain.h”
8
9 int main(int argc,char **argv)
10 {
11 KCmdLineArgs::init(argc,argv,”menumain”,
12 “Menu Main”,”0.0”);
13 KApplication app;
14 MenuMain *menumain = new MenuMain();
15 menumain->show();
16 return(app.exec());
17 }
18 MenuMain::MenuMain() : KTMainWindow()
19 {
20 createMainWidget();
21 createMenu();
22 }
23 void MenuMain::createMainWidget()
24 {
25 QPushButton *button =
26 new QPushButton(“Top Level\nWidget”,this);
27 QWhatsThis::add(button,
28 “Button\n\n”
29 “This button is used as the top\n”
30 “level widget for this example. It\n”
31 “is very safe to click the button\n”
32 “because it doesn’t do anything.\n”);
33 setView(button);
34 }
35 void MenuMain::createMenu()
36 {
4682-1 ch06.f.qc 11/13/00 14:10 Page 129
130
Part I ✦ Getting Started
37 QPopupMenu *popup;
38 QPopupMenu *popup2;
39 QPixmap pixmap;
40 KMenuBar *menubar = menuBar();
41
42 popup = new QPopupMenu();
43 popup->insertItem(“&New”,this,
44 SLOT(slotNew()),ALT+Key_N);
45 popup->insertItem(“&Save”,this,
46 SLOT(slotSave()),CTRL+Key_S);
47 popup->insertItem(“Save As”,this,
48 SLOT(slotSaveAs()),CTRL+SHIFT+Key_S);
49 pixmap.load(“flag.png”);
50 QIconSet iconset(pixmap);
51 popup->insertItem(iconset,”Close”,this,
52 SLOT(slotClose()));
53 popup->insertSeparator();
54 popup->insertItem(“Exit”,this,
55 SLOT(slotExit()),ALT+Key_X);
56 menubar->insertItem(“&File”,popup);
57
58 checkPopup = new QPopupMenu();
59 checkPopup->setCheckable(TRUE);
60 enableColorsID = checkPopup->insertItem(
61 “Enable Colors”,this,SLOT(slotEnableColors()));
62 checkPopup->setItemChecked(enableColorsID,TRUE);
63 enableGraphicsID = checkPopup->insertItem(
64 “Enable Graphics”,this,
65 SLOT(slotEnableGraphics()));
66 checkPopup->setItemChecked(enableGraphicsID,FALSE);
67 menubar->insertItem(“&Toggles”,checkPopup);
68
69 popup = new QPopupMenu();
70 pixmap.load(“tinylogo.png”);
71 popup->insertItem(pixmap,this,SLOT(slotLogo()));
72 pixmap.load(“qtlogo.png”);
73 popup->insertItem(pixmap,this,SLOT(slotLogo()));
74 menubar->insertItem(“&Pixmaps”,popup);
75
76 popup = new QPopupMenu();
77 popup2 = new QPopupMenu();
78 popup2->insertItem(“Horizontal”,this,SLOT(slotSub()));
79 popup2->insertItem(“Vertical”,this,SLOT(slotSub()));
80 popup->insertItem(“Orientation ”,popup2);
81 menubar->insertItem(“Submenu”,popup);
82
83 KHelpMenu *help = new KHelpMenu(this,
84 “Text that will appear in\n”
85 “a very simple About box”);
86 popup = help->menu();
4682-1 ch06.f.qc 11/13/00 14:10 Page 130
131
Chapter 6 ✦ Menus and Toolbars
87 menubar->insertItem(“&Help”,popup);
88 }
89 void MenuMain::slotExit()
90 {
91 kapp->exit(0);
92 }
93 bool MenuMain::queryClose()
94 {
95 return(TRUE);
96 }
97 void MenuMain::slotEnableColors()
98 {
99 if(checkPopup->isItemChecked(enableColorsID))
100 checkPopup->setItemChecked(enableColorsID,FALSE);
101 else
102 checkPopup->setItemChecked(enableColorsID,TRUE);
103 }
104 void MenuMain::slotEnableGraphics()
105 {
106 if(checkPopup->isItemChecked(enableGraphicsID))
107 checkPopup->setItemChecked(enableGraphicsID,FALSE);
108 else
109 checkPopup->setItemChecked(enableGraphicsID,TRUE);
110 }
111 void MenuMain::slotNew() {}
112 void MenuMain::slotSave() {}
113 void MenuMain::slotSaveAs() {}
114 void MenuMain::slotClose() {}
115 void MenuMain::slotLogo() {}
116 void MenuMain::slotSub() {}
The mainline of the program, beginning on line 10, creates a MenuMain object, dis-
plays it, and calls
exec() to wait for input. The constructor of MenuMain, beginning
on line 15, calls
createMainWidget() to provide a widget to act as the main win-
dow, and then calls
createMenu() to add the menu bar to the top of the window.
The method
createMainWidget(), beginning on line 23, creates a pushbutton and
installs it as the main window of the application. The button is installed by the call
to
setView() on line 33. The call to QWhatsThis::add() on line 27 is called to
relate some descriptive text with the button— the user can display the text from
the Help menu.
The method
createMenu() beginning on line 35 creates the menu bar and all of its
members. There is one menu bar inside the
KTMainWindow widget, and its address
is retrieved and stored in the
menubar pointer on line 37. Actually, the menu bar
does not exist until the
menuBar() method is called, but subsequent menuBar()
calls return the same menu bar pointer.
4682-1 ch06.f.qc 11/13/00 14:10 Page 131
132
Part I ✦ Getting Started
Each button appearing on the menu bar represents one QPopupMenu object. The
first one is created on line 42 and added to the menu bar on line 56. Between lines
42 and 56 a number of items are inserted in the pop-up menu, resulting in a menu
that looks like the one shown in Figure 6-5.
Figure 6-5: A menu with icons
and accelerators
The call to insertItem() on line 56 specifies that the name of the menu be “File,”
and the accelerator key be Alt-F. That is, writing the label as “&File” instead of sim-
ply “File” results in the letter being underlined when it is displayed; and pressing
the Alt-F key combination will cause the menu to appear, just as if you had selected
it with the mouse. The up and down arrow keys can be used to locate a member of
the menu; and the Return or Enter key will select it, just as if you had clicked it with
the mouse.
The item labeled “New” is created with the call to
insertItem() on line 43. The
accelerator key is specified by the constant value
ALT+Key_N. This is a shortcut for
selecting the menu item; whenever the application has the keyboard focus, typing
ALT-N produces the same result as selecting the New entry with the mouse. The
accelerator key appears on the right, as you can see in Figure 6-5. Notice that the
ampersand preceding the letter N causes it to be underlined; however, unlike the
menu bar, this does not automatically assign an accelerator key. You can underline,
or not underline, as you choose. The “Save As” selection has an accelerator key, but
does not have a letter underlined.
The accelerator keys are specified by special values that specify the key and its
modifiers. Three modifiers are available: ALT, CTRL, and SHIFT. You can use none,
one, two, or all three of them in combination with a key. For example, the “Save As”
entry defined on line 47 uses both the CTRL and SHIFT modifiers. Many keys can
be used for accelerators. The following list contains some of the more commonly
used keys.
There are more keys defined than will appear on any one keyboard, but most of the
ones in this list are common enough that they should be useful, although I have
never seen a keyboard with 35 function keys. If you have some special keys that you
would like to use, look in the source of the Qt header file named
qnamespace.h,
where you will find more than 230 keys listed.
4682-1 ch06.f.qc 11/13/00 14:10 Page 132
133
Chapter 6 ✦ Menus and Toolbars
Key_0 through Key_9 Key_Down Key_Period
Key_Apostrophe Key_End Key_Plus
Key_Asterisk Key_Enter Key_Print
Key_A through Key_Z Key_Equal Key_QuoteDbl
Key_Backslash Key_Escape Key_Return
Key_BackSpace Key_F1 through Key_F35 Key_Right
Key_Backspace Key_Home Key_ScrollLock
Key_BraceLeft Key_Insert Key_Semicolon
Key_BraceRight Key_Left Key_Slash
Key_BracketLeft Key_Minus Key_Space
Key_BracketRight Key_Next Key_SysReq
Key_CapsLock Key_NumLock Key_Tab
Key_Colon Key_PageDown Key_Underscore
Key_Comma Key_PageUp Key_Up
Key_Delete
The Close menu item defined on lines 49 through 52 is shown in Figure 6-5 with an
icon displayed on its left. To do this, the first step is to create a pixmap containing
the graphics. This is done on line 49 by loading the data from the local disk file
named
flag.png. The second step is to create a QIconSet object from the pixmap,
as is done on line 50. The menu item itself is created by the call to
insertItem()
on line 48, with the QIconSet inserted as the first argument; otherwise, the argu-
ments are the same as before.
Chapter 13, “Graphic Manipulation,” describes other ways to create pixmaps.
To complete the File menu, line 53 inserts the horizontal separator line that
appears between Close and Exit. Lines 54 and 55 create the Exit menu member.
Figure 6-6 shows a menu with a pair of checkable buttons that can be toggled on
and off. The checkmark appears only when the button has been toggled on. In the
figure, the Enable Colors button is on and the Enable Graphics button is off.
Figure 6-6: A menu with toggle buttons
Cross-
Reference
4682-1 ch06.f.qc 11/13/00 14:10 Page 133
134
Part I ✦ Getting Started
The Toggles menu is created on line 58 and inserted into the menu bar on line 74.
The call to
setCheckable() on line 59 configures the pop-up menu so that all of
its items can be toggled on and off. This way, you can turn any item on the pop-up
menu into a toggled item simply by toggling it on and off.
The actual toggling is not automatic. The two slots for the toggle buttons — on lines
97 through 110— check the current state of the toggle by calling
isItemCheck(),
and then call
setItemChecked() to toggle it to the other state. Because of the
arguments required to toggle buttons in the slot methods, it was necessary to store
a pointer to the pop-up menu, along with the ID numbers of the two buttons, on
lines 16 through 18 of the header file. The ID numbers are the return values from
itemInsert(), on lines 60 and 63, and are the only way you can address a specific
item inside a pop-up menu.
Instead of text, you can decorate your menus with pixmaps. Figure 6-7 shows a
menu using pixmaps for buttons. They work just like the text menu buttons, so they
can have accelerator keys and be toggle buttons. In the figure, you can see that one
pixmap is larger than the other — it is up to you to size your pixmaps, because each
menu item will expand to accommodate whatever you give to it.
Figure 6-7: A menu using
pixmaps for buttons
The pop-up menu with the pixmaps is created on lines 70 through 74. Notice that
the same
QPixmap object is used for both of the buttons — this works because the
insertItem() method makes its own local copy. The only difference between a
pixmap and a text button is the type of the first argument — on lines 71 and 73, a
QPixmap object reference is the first argument.
A submenu can be created by inserting one pop-up menu into another as one of its
items. Lines 76 through 81 create a second pop-up menu, named
popup2, and insert
it into its parent menu with the label “Orientation ” The resulting menu, when
selected, looks like the one shown in Figure 6-8.
Figure 6-8: A menu with a submenu
4682-1 ch06.f.qc 11/13/00 14:10 Page 134
135
Chapter 6 ✦ Menus and Toolbars
The KHelpMenu object is created on line 80 and installed as the rightmost member
of the menu bar on lines 86 and 87. The resulting menu is shown in Figure 6-9.
Figure 6-9: The layout of the standard
help menu
The “Contents” item, with the accelerator key F1, will display help text. The text
itself is provided by you as an HTML file. The name of the file depends on the name
of the application. For this example, named
menumain, the index file of the help tree
for the English version is as follows:
/usr/doc/kde/HTML/en/menumain/index.html
The “What’s This” menu item will switch your application into a mode in which
every widget on display can be selected to display explanatory text about itself.
In this example, the call to the static method
QWhatsThis on line 24 inserts the
explanatory text into the button used as the main window. Making the selection
from the menu changes the cursor to a question mark that, when used to select an
item, will display the text. The text is displayed in a window with a simple border
and a yellow background, as shown in Figure 6-10.
Figure 6-10: Text displayed as a
response to “What’s this?”
The two bottom buttons on the menu are the About boxes. The default About box
for the application is a simple block of text with an OK button, and there is a stan-
dard About box with information about the current version of KDE.
You can use
KHelpMenu and replace the built-in About box with one of your own. To
do this, extend the
KHelpMenu class and include a slot named aboutApplication().
Instead of popping up the default About box, this slot will be executed — and you can
create your own About box and display it.
4682-1 ch06.f.qc 11/13/00 14:10 Page 135
136
Part I ✦ Getting Started
You can find some examples of creating About boxes in Chapter 5.
Pop-up Menus
A QPopupMenu object does not need to be connected to a QMenuBar. A menu can be
popped up in the middle of a widget. All your application has to do is specify the
location and call the
show() method. The following example responds to the right
mouse button by displaying a pop-up menu, as shown in Figure 6-11.
Figure 6-11: A menu pops up from
the middle of a widget
MenuPopup Header
1 /* menupopup.h */
2 #ifndef MENUPOPUP_H
3 #define MENUPOPUP_H
4
5 #include <qpopupmenu.h>
6
7 class MenuPopup: public QWidget
8 {
9 Q_OBJECT
10 public:
11 MenuPopup(QWidget *parent=0,const char *name=0);
12 protected:
13 virtual void mousePressEvent(QMouseEvent *event);
14 private:
15 QPopupMenu *popup;
16 private slots:
17 void slotStub();
18 };
19
20 #endif
On line 7, the class MenuPopup uses QWidget as its base class. And, because it is
a widget, it inherits the virtual protected method
mousePressEvent(), which
is called whenever the mouse pointer is within the widget and a mouse button is
pressed.
Cross-
Reference
4682-1 ch06.f.qc 11/13/00 14:10 Page 136
137
Chapter 6 ✦ Menus and Toolbars
MenuPopup
1 /* menupopup.cpp */
2 #include <kapp.h>
3 #include “menupopup.h”
4
5 int main(int argc,char **argv)
6 {
7 KApplication app(argc,argv,”setxy”);
8 MenuPopup menupopup;
9 menupopup.show();
10 app.setMainWidget(&menupopup);
11 return(app.exec());
12 }
13
14 MenuPopup::MenuPopup(QWidget *parent,const char *name)
15 : QWidget(parent,name)
16 {
17 setMinimumSize(90,40);
18 resize(200,100);
19
20 popup = new QPopupMenu(this);
21 popup->insertItem(“Activate”,this,SLOT(slotStub()));
22 popup->insertItem(“Deactivate”,this,SLOT(slotStub()));
23 popup->insertItem(“Arrange”,this,SLOT(slotStub()));
24 popup->insertSeparator();
25 popup->insertSeparator();
26 popup->insertItem(“Logout”,this,SLOT(slotStub()));
27 }
28
29 void MenuPopup::mousePressEvent(QMouseEvent *event)
30 {
31 if(event->button() == RightButton) {
32 popup->move(x() + event->x(),y() + event->y());
33 popup->exec();
34 }
35 }
36 void MenuPopup::slotStub() {}
The constructor of MenuPopup, beginning on line 14, creates a QPopupMenu object
and stores its address in
popup, found on line 15 in the class definition. It isn’t
required, but the parent widget of the
QPopupMenu is normally the widget that pops
up the menu. Lines 21 through 26 insert the items into the menu.
The virtual method
mousePressedEvent() on line 29 overrides the one in the par-
ent
QWidget class. The method is called whenever a mouse button is clicked. The
test on line 31 determines whether the right mouse button is the one selected; if so,
the call to
move() positions the menu and the call to exec() pops it up. The coor-
dinate position, supplied to the call to
move() on line 32, is the sum of the x and
y coordinates of the parent widget and those of the mouse pointer. The resulting
coordinate is the location of the mouse on the screen, causing the menu to appear
directly beneath the mouse.
4682-1 ch06.f.qc 11/13/00 14:10 Page 137
138
Part I ✦ Getting Started
The Toolbar
KTMainWindow will manage as many toolbars as you care to insert into it. By default,
they will appear at the top of the window in the order that you insert them. If there is
also a menu, the toolbars will appear beneath it. And you can have more things in a
toolbar than just button icons. The following example, shown in Figure 6-12, installs
two toolbars containing buttons, separators, a combo box, and even a label widget.
Figure 6-12: A pair of toolbars
containing several items
ToolbarMain Header
1 /* toolbarmain.h */
2 #ifndef TOOLBARMAIN_H
3 #define TOOLBARMAIN_H
4
5 #include <ktmainwindow.h>
6 #include <ktoolbar.h>
7
8 class ToolbarMain: public KTMainWindow
9 {
10 Q_OBJECT
11 public:
12 ToolbarMain();
13 private slots:
14 void slotExit();
15 void slotStub();
16 void slotFont(int index);
17 bool queryClose();
18 private:
19 void createMainWidget();
20 void createToolBarOne();
21 void createToolBarTwo();
22 };
23
24 #endif
Because it is KTMainWindow that manages the toolbars, the class ToolbarMain is
defined as a subclass of
KTMainWindow on line 8. The slots defined on lines 14
through 16 receive calls when toolbar items are selected. The slot
queryClose()
on line 17 is used by the system to ask your application for permission to close it.
4682-1 ch06.f.qc 11/13/00 14:10 Page 138
139
Chapter 6 ✦ Menus and Toolbars
ToolbarMain
1 /* toolbarmain.cpp */
2 #include <kapp.h>
3 #include <qpushbutton.h>
4 #include <qstrlist.h>
5 #include <qcstring.h>
6 #include “toolbarmain.h”
7
8 int main(int argc,char **argv)
9 {
10 KApplication app(argc,argv,”toolbarmain”);
11 ToolbarMain *toolbarmain = new ToolbarMain();
12 toolbarmain->show();
13 return(app.exec());
14 }
15 ToolbarMain::ToolbarMain() : KTMainWindow()
16 {
17 createMainWidget();
18 createToolBarOne();
19 createToolBarTwo();
20 }
21 void ToolbarMain::createMainWidget()
22 {
23 QPushButton *button =
24 new QPushButton(“Top Level\nWidget”,this);
25 setView(button);
26 }
27 void ToolbarMain::createToolBarOne()
28 {
29 QPixmap fpix(“flag.png”);
30 QPixmap rpix(“redo.png”);
31 QPixmap upix(“undo.png”);
32 QPixmap spix(“stop.png”);
33 QPixmap epix(“exit.png”);
34
35 KToolBar *toolbar = toolBar(1);
36 toolbar->insertButton(fpix,5,SIGNAL(clicked()),
37 this,SLOT(slotStub()),TRUE,”Flag As Used”);
38 toolbar->insertButton(rpix,6,SIGNAL(clicked()),
39 this,SLOT(slotStub()),TRUE,”Redo”);
40 toolbar->insertButton(upix,7,SIGNAL(clicked()),
41 this,SLOT(slotStub()),TRUE,”Undo”);
42 toolbar->insertSeparator();
43 toolbar->insertButton(spix,7,SIGNAL(clicked()),
44 this,SLOT(slotStub()),TRUE,”Stop”);
45 toolbar->insertButton(epix,8,SIGNAL(clicked()),
46 this,SLOT(slotExit()),TRUE,”Exit Program”);
47 }
48 void ToolbarMain::createToolBarTwo()
49 {
4682-1 ch06.f.qc 11/13/00 14:10 Page 139
140
Part I ✦ Getting Started
50 QPixmap fpix(“bottom.png”);
51 KToolBar *toolbar = toolBar(2);
52 toolbar->insertButton(fpix,10,SIGNAL(clicked()),
53 this,SLOT(slotStub()),TRUE,”Go To Bottom”);
54
55 toolbar->insertLineSeparator();
56
57 QStrList *list = new QStrList();
58 list->insert(0,”Courier”);
59 list->insert(1,”Times Roman”);
60 list->insert(2,”Arial”);
61 toolbar->insertCombo(list,11,FALSE,
62 SIGNAL(activated(int)),
63 this,SLOT(slotFont(int)),
64 TRUE,”Select Font”,110);
65
66 toolbar->insertSeparator();
67
68 QLabel *label = new QLabel(“Any Widget”,toolbar);
69 toolbar->insertWidget(12,90,label);
70 }
71 void ToolbarMain::slotExit()
72 {
73 kapp->exit(0);
74 }
75 bool ToolbarMain::queryClose()
76 {
77 return(TRUE);
78 }
79 void ToolbarMain::slotStub() {}
80 void ToolbarMain::slotFont(int index) {}
The ToolbarMain constructor, beginning on line 15, calls methods to create a
widget for the main window and a pair of toolbars. The main widget created in
the method
createMainWidget() found on line 21 is simply a pushbutton.
Toolbar number one (the top toolbar) is created in the method
createToolBar
One()
on line 27. As shown previously in Figure 6-12, each member of this toolbar
has its own pixmap. The pixmaps are loaded from files on lines 29 through 33. The
KToolBar is created by calling the method toolBar() that this class inherited
from
KTMainWindow. Unlike the menu creation method described earlier, the
toolBar() method creates and returns a new toolbar every time you call it. And
the toolbar it returns to you has already been inserted into
KTMainWindow as part
of the display.
There is a small space between the third and fourth members of the top toolbar.
This space is inserted by the call to
insertSeparator() on line 42. If you want a
wider space, you can insert more separators.
4682-1 ch06.f.qc 11/13/00 14:10 Page 140
141
Chapter 6 ✦ Menus and Toolbars
The second toolbar, created by the method createToolBarTwo() on line 48, con-
tains more than simple toolbar buttons. A normal toolbar button is added by the
call to
insertButton() on line 52; and just to its right, a vertical line separator is
inserted with the call to
insertLineSeparator() on line 55.
An array of strings is inserted into a
QStrList object with calls to insert() on lines
58 through 60, and the array is used to install a combo box in the toolbar by calling
insertCombo() on line 61. Internally, KToolBar creates a standard QComboBox to
manage the list, so most of the information passed to
insertCombo() is passed on to
the
QComboBox. The insert() methods on lines 58 through 60 define the combo box
text, and assign an ID number to each one. The call to
insertCombo() on line 61
specifies that the list be used to create the
QComboBox, that it has an ID number of 11,
and that it is not writeable by the user. The signal is
activated() and the slot is
slotFont(), and they both have an int argument so that the ID number of the
selection can be passed to the slot method. The
TRUE argument specifies that the
QComboBox is to be enabled. The string “Select Font” specifies the text of the tooltip,
and the number 110 specifies the width in pixels.
The combo box in this example calls the slot with the ID number, but it is possible
to use the character string instead. To do this, use the method activated
(String &) as the signal, and slotFont(String &) as the slot.
You can install any widget into a toolbar. If, for example, you want to have more
control over the
QComboBox than you would have by calling insertCombo(), you
can create your own combo box and install it by calling
insertWidget(). The code
on lines 68 and 69 creates and installs a label. Notice that the label doesn’t respond
to the mouse the way the other items do. When you are installing a widget, the tool-
bar assumes you have set up all of the signals and slots you will need to get your
responses.
The Status Bar
There is an optional KStatusBar widget included as part of KTMainWindow. It is
normally displayed at the bottom of the window, and it can be used by your appli-
cation to display, and continuously update, a line of text. The following example,
shown in Figure 6-13, uses a status bar to display the current value of an internal
counter that is incremented and decremented by a pair of buttons.
Figure 6-13: A status bar tracking a value
Note
4682-1 ch06.f.qc 11/13/00 14:10 Page 141
142
Part I ✦ Getting Started
StatusBarMain Header
1 /* statusbarmain.h */
2 #ifndef STATUSBARMAIN_H
3 #define STATUSBARMAIN_H
4
5 #include <ktmainwindow.h>
6 #include <kstatusbar.h>
7
8 class StatusBarMain: public KTMainWindow
9 {
10 Q_OBJECT
11 public:
12 StatusBarMain();
13 private:
14 int counter;
15 KStatusBar *status;
16 private slots:
17 bool queryClose();
18 void slotAddOne();
19 void slotSubtractOne();
20 private:
21 void createMainWidget();
22 void createStatusBar();
23 };
24
25 #endif
The class StatusBarMain, defined beginning on line 8, inherits from the KTMain
Window
class, which means it inherits a KStatusBar. The value to be tracked is
defined as
counter on line 14; and, for convenient access, the KStatusBar pointer
will be stored in
status, defined on line 15.
StatusBarMain
1 /* statusbarmain.cpp */
2 #include <kapp.h>
3 #include <qpushbutton.h>
4 #include <kcontainer.h>
5 #include “statusbarmain.h”
6
7 int main(int argc,char **argv)
8 {
9 KApplication app(argc,argv,”statusbarmain”);
10 StatusBarMain *statusbarmain = new StatusBarMain();
11 statusbarmain->show();
12 return(app.exec());
13 }
14 StatusBarMain::StatusBarMain() : KTMainWindow()
15 {
16 counter = 0;
4682-1 ch06.f.qc 11/13/00 14:10 Page 142
143
Chapter 6 ✦ Menus and Toolbars
17 createMainWidget();
18 createStatusBar();
19 }
20 void StatusBarMain::createMainWidget()
21 {
22 KContainerLayout *layout =
23 new KContainerLayout(this,”layout”);
24 layout->setOrientation(KContainerLayout::Vertical);
25
26 QPushButton *button;
27 button = new QPushButton(“Add One”,this);
28 connect(button,SIGNAL(clicked()),
29 this,SLOT(slotAddOne()));
30 layout->packStart(button);
31 button = new QPushButton(“Subtract One”,this);
32 connect(button,SIGNAL(clicked()),
33 this,SLOT(slotSubtractOne()));
34 layout->packStart(button);
35
36 layout->sizeToFit();
37 setView(layout);
38 }
39 void StatusBarMain::createStatusBar()
40 {
41 status = statusBar();
42 status->insertItem(QString(“>>”),1);
43 status->insertItem(QString(“Add or Subtract”),2);
44 }
45 void StatusBarMain::slotAddOne()
46 {
47 status->changeItem(
48 QString(“Plus 1 = %1”).arg(++counter),2);
49 }
50 void StatusBarMain::slotSubtractOne()
51 {
52 status->changeItem(
53 QString(“Minus 1 = %1”).arg( counter),2);
54 }
55 bool StatusBarMain::queryClose()
56 {
57 return(TRUE);
58 }
The mainline of the program creates a StatusBarMain object, which, because it
inherits from
KTMainWindow, automatically becomes the top-level window of the
application. The
StatusBarMain constructor, beginning on line 14, initializes the
internal counter value to zero, and then creates the main widget and installs the
initial text of the status bar.
4682-1 ch06.f.qc 11/13/00 14:10 Page 143
144
Part I ✦ Getting Started
The method createMainWidget() beginning on line 20 uses a KContainerLayout
widget to hold the two buttons, as shown previously in Figure 6-13. One button is
connected to the slot method
slotAddOne() and the other is connected to
slotSubtractOne().
The status bar itself is initialized in the method
createStatusBar() on line 39.
The call to
statusBar() instantiates the status bar and returns a pointer to it.
Because there can only be one
KStatusBar in a KTMainWindow, subsequent calls
to
statusBar() will return the address of the same status bar object. In fact, if you
are only going to need access to the status bar from inside this class, there is no
need to save the pointer yourself because it can always be retrieved.
Lines 42 and 43 call the
insertItem() method of the status bar to insert the dis-
played string. The string is inserted in two parts (there can be more), and each one
is assigned an ID number. The strings will each be displayed in the order in which
you add them, and the ID numbers are needed if you wish to change them. This way,
you can change part of the string without the necessity of changing all of it. For
example, the slot method
slotAddOne() on line 45 is called whenever the “Add”
button is selected, causing the counter to be incremented; and the status bar text
with ID number 2 is replaced by the call to
changeItem(). The text with the ID num-
ber 1 is not changed. Similarly, the “Subtract” button executes
slotSubtractOne()
on line 50, which decrements the counter and changes only the text of ID number 2.
The arg() methods of the QString class are used to format various data types
into strings. Examples of all the data types, and the formatting options, are
described in Chapter 16, which discusses some of the utility classes.
You can break the displayed string into as many text segments (or, if you prefer,
text items) as you wish, and work with each one individually. You can also call the
KStatusBar method clear() to remove the text from all the ID numbers.
Summary
The KTMainWindow class is a special top-level window containing code that can be
used to supply the user with access to the facilities of the application, and to keep
the user informed of the application’s current status.
✦ A menu bar can be displayed at either the top or bottom of the top-level win-
dow. At the user’s discretion, it can be torn off the top-level window and
appear as a separate entity on the screen.
✦ Any window can have a menu pop up under control of the mouse or key-
board. Making a selection from this menu, or clicking the mouse on another
location, will remove the menu from the display.
Note
4682-1 ch06.f.qc 11/13/00 14:10 Page 144
145
Chapter 6 ✦ Menus and Toolbars
✦ A number of toolbars can be individually positioned on any of the four sides
of the top-level window, or each one can be torn off to appear as an indepen-
dent item on the screen.
✦ A status bar, with constantly updated text, can be made to appear at the bot-
tom of the top-level window.
Chapter 7 describes widgets that can be used to create and display related collec-
tions, such as a group of radio buttons that can all interact with one another so that
only one of them can be selected at any one time, or a combo box that allows the
user to select one or more items from a list.
✦✦✦
4682-1 ch06.f.qc 11/13/00 14:10 Page 145
4682-1 ch06.f.qc 11/13/00 14:10 Page 146
Grouping
Widgets
T
his chapter examines several of the widgets and contain-
ers that can be used to solve some of the problems that
often arise when windows are being laid out. For example,
it is possible to create a single widget that holds a set of
buttons, and to have all these buttons attached to the same
slot. There is a need to relate radio buttons to one another
because selecting one of them causes the others in the group
to become deselected. Sometimes groups of widgets are
related by the function they perform, and there is a way
to draw a frame around them so you can indicate this to
the user.
KButtonBox
It is very common to have a row of buttons across the bottom
of a dialog window. The class
KButtonBox is a container wid-
get that simplifies the task of positioning the row of buttons.
The following example uses a
KButtonBox to manage three
buttons arranged horizontally:
1 /* hbuttonbox.cpp */
2 #include <kapp.h>
3 #include <kbuttonbox.h>
4
5 int main(int argc,char **argv)
6 {
7 QPushButton *button1;
8 QPushButton *button2;
9 QPushButton *button3;
10 KApplication
app(argc,argv,”vbuttonbox”);
11
12 KButtonBox *box =
13 new
KButtonBox(0,KButtonBox::HORIZONTAL,25,15);
7
7
CHAPTER
✦✦✦✦
In This Chapter
Organizing a set of
buttons to work with
a single slot
Interlinking a set
of radio buttons
Relating a set of
check buttons
Enabling the frames
built into some
widgets
Decorating your
widgets with frames
Sliding separator
bars to resize
multiple widgets
✦✦✦✦
4682-1 ch07.f.qc 11/13/00 14:11 Page 147
148
Part I ✦ Getting Started
14 button1 = box->addButton(“First Button”);
15 button2 = box->addButton(“Second Button”);
16 button3 = box->addButton(“Third Button”);
17 box->layout();
18 box->show();
19 box->resize(10,10);
20
21 app.setMainWidget(box);
22 return(app.exec());
23 }
The button box is created on lines 12 and 13. The first argument is normally
the address of the parent widget, but because this example is using it as a top-
level window, it has no parent. The second argument specifies the orientation of
the buttons —
HORIZONTAL or VERTICAL. The two last arguments specify the mini-
mum spacing to be inserted around the buttons. The first number specifies the
minimum distance in pixels between each button and the edge of the
KButtonBox.
The second number specifies the distance in pixels between the buttons. The result
is the row of buttons shown in Figure 7-1.
Figure 7-1: Three buttons contained in a
KButtonBox
The calls to addButton() on lines 14 through 16 create the buttons — that is, the
KButtonBox creates each button and returns a pointer to it. To keep the example
simple, the buttons are not connected to slots. The call to
layout() on line 17 is
necessary because it tells the
KButtonBox that you are not going to be adding any-
thing else and that it should go ahead and configure itself. Lines 18 and 19 are the
same as for any other widget — the
KButtonBox is instructed to display itself (and,
thus, all its contents); and it is sized in such a way that it assumes its minimum
height and width.
The buttons in Figure 7-1 are all the same size. If you would rather have the width
of the buttons vary according to the length of the text they contain, you can specify
this as the second argument to the
addButton() method. For example, the follow-
ing code causes the buttons to vary in width according to the text they contain:
button1 = box->addButton(“First Button”,TRUE);
button2 = box->addButton(“Second Button”,TRUE);
button3 = box->addButton(“Third Button”,TRUE);
Making this second argument FALSE (the default) will cause KButtonBox to deter-
mine the size of the widest button and resize the others to match it.
4682-1 ch07.f.qc 11/13/00 14:11 Page 148
149
Chapter 7 ✦ Grouping Widgets
Rarely does the width of the KButtonBox match exactly the width of the dialog that
contains it, so you may want to specify how and where it stretches itself to fit. The
layout at the top of Figure 7-2 shows the default stretch, with all the buttons on
the left. The layout at the bottom of the figure shows what happens if you specify
a stretch point.
Figure 7-2: A KButtonBox with and without stretch defined
To do this, insert the stretch point between two buttons as follows:
button1 = box->addButton(“First Button”);
button2 = box->addButton(“Second Button”);
box->addStretch(1)
button3 = box->addButton(“Third Button”);
The stretching is done the same as it is for the containers discussed in Chapter 3.
That is, you can add as many stretch points as you like; and each one will stretch
in proportion to the others — the proportions are determined by the value of the
argument in
addStretch().
With a single change, the previous example can be converted to a vertical orientation.
Change the second argument on the constructor to
VERTICAL:
KButtonBox *box =
new KButtonBox(0,KButtonBox::VERTICAL,25,15);
The resulting window is shown in Figure 7-3. The space separating the buttons from
the edges and from one another are specified in the same way. When the window is
stretched vertically, the
KButtonBox will simply insert space at the bottom, or at
whatever locations you specify for stretching.
Figure 7-3: A KButtonBox with vertical orientation
4682-1 ch07.f.qc 11/13/00 14:11 Page 149
150
Part I ✦ Getting Started
Grouping Buttons with a Single Slot
A QButtonGroup object can be used to organize a group of buttons either horizon-
tally or vertically. Each button added to the group is assigned an ID number and
you can, if you wish, use a single slot method for all of the buttons. While you can
create a
QButtonGroup directly, it is simpler to use either a QHButtonGroup or a
QVButtonGroup, depending on whether you want the buttons to be arranged hori-
zontally or vertically. A
QButtonGroup is also a QFrame, so you can use the QFrame
method calls to change the appearance of the grouping.
The following example contains four buttons inside a horizontal
QButtonGroup.
Beneath the row of buttons, as shown in Figure 7-4, is a label that has its text
updated as each button is pushed.
Figure 7-4: The QHButtonGroup
widget organizes buttons horizontally.
HorizPush Header
1 /* horizpush.h */
2 #ifndef HORIZPUSH_H
3 #define HORIZPUSH_H
4
5 #include <qwidget.h>
6 #include <qlabel.h>
7
8 class HorizPush: public QWidget
9 {
10 Q_OBJECT
11 public:
12 HorizPush(QWidget *parent=0,const char *name=0);
13 private:
14 QLabel *label;
15 enum ButtonChoice { SetColor, Configure, Clear, Exit };
16 private slots:
17 void slotButton(int ID);
18 };
19
20 #endif
The label declared on line 14 is the one that displays the text at the bottom of the
window. The enumerated list on line 15 is used as the ID numbers attached to each
of the buttons so the slot method can determine which button was clicked.
4682-1 ch07.f.qc 11/13/00 14:11 Page 150
151
Chapter 7 ✦ Grouping Widgets
HorizPush
1 /* horizpush.cpp */
2 #include <kapp.h>
3 #include <qlayout.h>
4 #include <qhbuttongroup.h>
5 #include <qpushbutton.h>
6 #include “horizpush.h”
7
8 int main(int argc,char **argv)
9 {
10 KApplication app(argc,argv,”horizpush”);
11 HorizPush *horizpush = new HorizPush();
12 horizpush->show();
13 app.setMainWidget(horizpush);
14 return(app.exec());
15 }
16
17 HorizPush::HorizPush(QWidget *parent,const char *name)
18 : QWidget(parent,name)
19 {
20 QPushButton *button;
21 QVBoxLayout *layout = new QVBoxLayout(this,5);
22
23 QHButtonGroup *group = new QHButtonGroup(this,”hg1”);
24 button = new QPushButton(“Set Color”,group);
25 group->insert(button,SetColor);
26 button = new QPushButton(“Configure”,group);
27 group->insert(button,Configure);
28 button = new QPushButton(“Clear”,group);
29 group->insert(button,Clear);
30 button = new QPushButton(“Exit”,group);
31 group->insert(button,Exit);
32 connect(group,SIGNAL(clicked(int)),
33 this,SLOT(slotButton(int)));
34 layout->addWidget(group);
35
36 label = new QLabel(“ “,this);
37 layout->addWidget(label);
38
39 resize(10,10);
40 layout->activate();
41 }
42 void HorizPush::slotButton(int ID)
43 {
44 switch(ID) {
45 case SetColor:
46 label->setText(“Set Color button pressed”);
47 break;
48 case Configure:
49 label->setText(“Configure button pressed”);
50 break;
4682-1 ch07.f.qc 11/13/00 14:11 Page 151