microsoft visual basic game programming for teens phần 2 ppt
Bạn đang xem bản rút gọn của tài liệu. Xem và tải ngay bản đầy đủ của tài liệu tại đây (889.51 KB, 40 trang )
4. Archer/Scout Class
5. Mage Class
This is just a glimpse at a larger game that you have an opportunity to create in this book!
Of course, you can tweak and modify the game to suit your own imagination and you will
have the technical know-how after reading this book to do just that.
Chapter 1
■
Getting Started with Visual Basic20
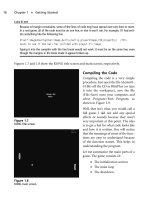
Figure 1.21 The Mage
character class.
Figure 1.20 The Archer
character class.
Summary
This chapter has introduced you to the main concepts that you learn in the book. Here
you learned how to take the first step toward writing games with Visual Basic by includ-
ing support for the DirectX type library. You then learned how to determine whether the
DirectX installation is working, so you can reference the DirectX components from within
Visual Basic. This chapter was short on details but tall on ideas, presenting a glimpse of
the Celtic Crusader game, an RPG that you create while following along in this book from
one chapter to the next, learning new game programming topics. The next chapter shows
you how to write your first DirectX program, which is the first step toward starting this
great-looking game.
Summary 21
This page intentionally left blank
T
his chapter takes you through the process of writing a complete program that
loads a bitmap file and displays the image on the screen using Direct3D.You learn
all about surfaces in this chapter, as well as how to tap into DirectX. You need to
learn about several DirectX components, which appear in this chapter, because they are
used throughout the rest of the book. You might be surprised to learn that Direct3D is
used to draw bitmaps on the screen, but the truth is, Direct3D is just as good for making
2D games (like Age of Mythology and Civilization III) as it is for 3D games (like Doom 3).
Before you get started working on a role-playing game, you need to start with the basics
of how to set up Direct3D for drawing 2D graphics on the screen. This chapter shows you
how to do just that.
■
Initializing DirectX
■
Loading and displaying a bitmap file
Initializing DirectX
Although you may already know some programming, I have to assume that you are a
complete beginner, which is a challenge, because I don’t want to explain things you
already know, but also don’t want this material to be too difficult. It’s like walking a
tightrope, a fine line where I want to make it understandable for a beginner, but chal-
lenging at the same time. In my experience, the best way to accomplish both goals is by
covering the easy stuff early on (like in this chapter), and then gradually build up to more
challenging subjects later on. I recommend you read each chapter in order. Then, if you
want to learn more about a certain subject, you can go back after you have finished the
book. In more advanced books you find chapters that don’t explain everything and that
assume you understand, because you need to know a lot of things in advance (called pre-
requisites) just to draw a pixel on the screen.
23
Your First
DirectX Program
chapter 2
Creating a New Project
Start by creating a new project in Visual Basic and adding a reference to the DirectX 8 type
library, which you just learned about in the first chapter.
1. If you haven’t already fired up Visual Basic, do that now.
You should see the New Project dialog come up. If it doesn’t, then open the File
menu and select New Project to open it; this was covered in the last chapter.
2. Visual Basic should create a new project for you and add a new form to the project
called Form1.
Now, the most important step here, again, is to add DirectX support to your
program.
3. Do this by opening the Project menu and selecting References.
4. Then search for DirectX 8 for Visual Basic Type Library from the list and click the
checkbox.
5. Close the dialog.
Your program now has DirectX support, as you learned in the last chapter. If, for some
reason, you do not see “DirectX 8 for Visual Basic Type Library” in the list of components,
then you may need to install the DirectX SDK (which is provided on the CD-ROM under
\DirectX). This may be the case if you are still using an older OS like Windows 2000. If
you are using Windows XP or later, then you automatically have DirectX 8 installed, and
you may just need the Visual Basic type library. I have included this on the CD-ROM as
well, under \DirectX (look for dx8vbsdk.exe to install it). You do not need the complete
DirectX SDK to write DirectX programs with Visual Basic.
The DirectX and Direct3D Objects
Now it’s time to write some code. The easiest way to get started is to double-click some-
where on
Form1
. That opens the code window and adds a
Form_Load
subroutine to the pro-
gram (which you also learned about already in the previous chapter, but I’m going over it
to refresh your memory).
First, you must declare and create a variable for the primary DirectX object:
Dim dx As DirectX8
Set dx = New DirectX8
This main object controls all the other DirectX components that your program uses. For
example, to create the Direct3D object, you must use the DirectX object to create it:
Dim d3d As Direct3D8
Set d3d = dx.Direct3DCreate()
Chapter 2
■
Your First DirectX Program24
See how that works? First you created the DirectX object, and then you used it to create
the Direct3D object by calling the
Direct3DCreate
function, available only in the DirectX
object. You can’t just call this function from anywhere, because it is built into the
DirectX object (which I have called
dx
). Since the
Direct3DCreate
function is located inside
an object, it is properly called a method.
I have always found it confusing to call subroutines and functions by a different name just
because they are inside a class or object or something else. To keep the discussion simple,
I like to just call them subroutines and functions. Although, you should keep in mind that
many people prefer to call subroutines procedures instead, which is more in line with other
programming languages. Since Visual Basic uses Function to define a function, and Sub
to define a procedure, I will just use the term Subroutine because I personally think that is
easier to understand.
Here is an example of a function, so you get an idea about what I’m talking about:
Function DoThis() As Boolean
MsgBox “I’m doing this!”
DoThis = True
End Function
Now let me show you an example of a subroutine:
Sub DoThat()
MsgBox “I’m doing that!”
End Sub
Do you see how the function has
As Boolean
as part of the first line, while the subroutine
doesn’t have that? Functions are different from subroutines because a function must
return a value, while a subroutine just does something and doesn’t return anything. In
case you were wondering, Sub comes from the ancient version of the BASIC language,
which had a GOSUB command that would jump to a different line in the program (yes,
BASIC code used to have line numbers) and then the RETURN command told BASIC to
return to part of the program right after the GOSUB line. Here is an example:
10 PRINT “Hi, this is a BASIC program.”
20 PRINT “Line numbers are dumb.”
30 PRINT “I’m going to run a subroutine ”
40 GOSUB 100
50 PRINT “I’m baaaaaaaack!”
60 END
100 PRINT “This is a subroutine.”
110 RETURN
Initializing DirectX 25
This sort of thing is completely irrelevant today, but it is interesting to know why Visual
Basic uses the term Sub to define what all other programming languages just call a proce-
dure. If I accidentally say procedure somewhere in the book, don’t have a cow—it means
the same thing as subroutine. But you don’t care either way, right? You just want to make
your own version of Fable and I’m wasting time here?
This does bring back some fond memories from a while back when I was mainly using
DarkBASIC for all of my games. This is a really cool programming language (which comes
with a complete editor and compiler and everything in one package) that you should
check out. In case you are interested, I wrote a book with a good friend of mine who works
as a professional game programmer (he worked on games like Hot Wheels and Real War);
the book is called Beginner’s Guide to DarkBASIC Game Programming. Okay, moving
along (I didn’t realize you learned so fast, so I’ll pick up the pace.)
Creating the Primary Device
After you have taken care of the DirectX and Direct3D objects, you need to create a vari-
able to take care of the Direct3D device, which represents the video card. Initializing the
device takes a little more than just creating a variable for it. The device has to be config-
ured so Direct3D knows how you plan to use it. This is where you set things like the screen
resolution, color depth, windowed or full-screen mode; and if you’re doing 3D, you also
have to set up the 3D rendering options as well (which I won’t bother doing here).
tip
A
double buffer
—also called
back buffer
—is a duplicate of the screen, stored in memory, where
you send all graphics output to. By working with this scratch pad in memory, and then drawing the
whole double buffer to the screen all at once, you greatly improve the quality of the game, reduc-
ing flicker and screen refresh problems.
There are a lot of options here, so I’m just going to show you the presentation parameters
needed for each program instead of going over all of the options up front. First create a
variable:
Dim d3dpp As D3DPRESENT_PARAMETERS
Then use
d3dpp
to set the presentation parameters that you want to use for Direct3D. For
starters, here is how you set the parameters for a simple Direct3D program that has an
automatically updated double buffer:
d3dpp.hDeviceWindow = Me.hWnd
d3dpp.BackBufferCount = 1
d3dpp.BackBufferWidth = 640
d3dpp.BackBufferHeight = 480
Chapter 2
■
Your First DirectX Program26
d3dpp.SwapEffect = D3DSWAPEFFECT_DISCARD
d3dpp.Windowed = 1
d3d.GetAdapterDisplayMode D3DADAPTER_DEFAULT, dispmode
d3dpp.BackBufferFormat = dispmode.Format
The last two lines are very important, and if not included the program won’t run at all!
Gack! (That’s the sound I make when my programs crash.) You can set the format your-
self, as there are a lot of options for the display screen settings, but using the current color
depth of the Windows desktop is the safest way to ensure the program runs. I know it’s
ridiculous today to think about this, but it’s possible, however unlikely, that some PCs in
the world don’t have a 32-bit video card (especially in some countries where new hard-
ware is difficult to come by). So, you could just configure Direct3D to use the best video
mode, but it’s better to use the current format.
The rest of the presentation parameters are pretty obvious. Set the window handle
(
hDeviceWindow
) to point to
Form1
. Then you set the back buffer count, width, and height
(the back buffer is the same as a double buffer). Now you can actually create the Direct3D
device:
Set d3ddev = d3d.CreateDevice( _
D3DADAPTER_DEFAULT, _
D3DDEVTYPE_HAL, _
hWnd, _
D3DCREATE_SOFTWARE_VERTEXPROCESSING, _
d3dpp)
This sort of ugly-looking code shows the five parameters, each listed on a separate line so
the function is easier to read. I don’t want you to even worry about what these parameters
mean or what they do at this point. For one thing, they are primarily related to doing 3D
(and this book focuses on doing 2D) and another thing, it’s too soon to be concerned with
such details.
In Visual Basic, when you want to split a line, you use the _ (underscore) character at the
end of one line, and then you can continue on the next line. I do this a lot in the book so
the code won’t wrap around like this:
Set d3ddev = d3d.CreateDevice(D3DADAPTER_DEFAULT, D3DDEVTYPE_HAL, hWnd,
D3DCREATE_SOFTWARE_VERTEXPROCESSING, d3dpp)
That might save some space, but it’s more difficult to explain and definitely makes it
harder to change the function parameters. It is always preferable to write code that is eas-
ier to read, rather than writing code that takes up less space. The compiler doesn’t care
what the code looks like, so you should make it as easy to read as possible. I’ve had prob-
lems reading my own code many times over the years; I’ll write a program and then come
back to it a couple years later and won’t be able to understand any of it! For this reason, I
Initializing DirectX 27
make all of my code easier to read and insert a lot of comments (usually above each block
of code that does something important). Okay, that is all there is to initializing Direct3D
in your program, and at this point, Direct3D takes over your program (so to speak).
caution
If you set
d3dpp.Windowed = 0
, then Direct3D immediately switches to full-screen mode. If you don’t
have some sort of code in your program to catch the Escape key or something, then you are stuck—
the only solution left to you is to Ctrl+Alt+Del, bring up the Task Manager, and then kill the process
(which shuts down Visual Basic as well). Don’t try setting
d3dpp.Windowed = 0
until you have some
code in your program to let it escape. I always include a way that terminates the program by either
pressing the Escape key or closing the window. It is best to develop a game in windowed mode
until it’s finished, and then switch to full screen before you distribute it.
What can you do after DirectX has been initialized? The sky’s the limit, really. This is the
point where you start drawing graphics on the screen and is the starting point for your
game. For this first program, I’ll just have you clear the screen with a certain color and
then refresh the screen. The next program (later in this chapter) shows you how to take it
to the next step, loading a bitmap file and displaying it on the screen.
The
InitDirectX
Program
The
InitDirectX
program is shown in the following listing. When you run the program, it
looks like Figure 2.1.
‘
‘ Visual Basic Game Programming for Teens
‘ Chapter 2 - InitDirectX program
‘
Dim dx As DirectX8
Dim d3d As Direct3D8
Dim d3dpp As D3DPRESENT_PARAMETERS
Dim dispmode As D3DDISPLAYMODE
Dim d3ddev As Direct3DDevice8
Private Sub Form_Load()
‘create the DirectX object
Set dx = New DirectX8
‘create the Direct3D object
Set d3d = dx.Direct3DCreate()
Chapter 2
■
Your First DirectX Program28
‘set the display device parameters for windowed mode
d3dpp.hDeviceWindow = Me.hWnd
d3dpp.BackBufferCount = 1
d3dpp.BackBufferWidth = 640
d3dpp.BackBufferHeight = 480
d3dpp.SwapEffect = D3DSWAPEFFECT_DISCARD
d3dpp.Windowed = 1
d3d.GetAdapterDisplayMode D3DADAPTER_DEFAULT, dispmode
d3dpp.BackBufferFormat = dispmode.Format
‘create the Direct3D primary device
Set d3ddev = d3d.CreateDevice( _
D3DADAPTER_DEFAULT, _
D3DDEVTYPE_HAL, _
hWnd, _
D3DCREATE_SOFTWARE_VERTEXPROCESSING, _
d3dpp)
End Sub
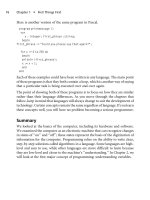
Initializing DirectX 29
Figure 2.1 The
InitDirectX
program reminds me of the game Birth of the Federation.
Private Sub Form_Paint()
‘clear the window with red color
d3ddev.Clear 0, ByVal 0, D3DCLEAR_TARGET, RGB(255, 0, 0), 1#, 0
‘refresh the window
d3ddev.Present ByVal 0, ByVal 0, 0, ByVal 0
End Sub
Private Sub Form_QueryUnload(Cancel As Integer, UnloadMode As Integer)
Shutdown
End Sub
Private Sub Form_KeyDown(KeyCode As Integer, Shift As Integer)
If KeyCode = 27 Then Shutdown
End Sub
Private Sub Shutdown()
Set d3ddev = Nothing
Set d3d = Nothing
Set dx = Nothing
End
End Sub
Loading and Displaying a Bitmap File
The ability to load a bitmap file is at the core of a game, and is an absolutely essential,
make-or-break, mission-critical thing that just has to work or the game might as well be
running on Pioneer 11 out beyond the orbit of Pluto. (Yeah, maybe it runs, but you won’t
see anything.)
By the way, did you know that NASA now has a project in the works called Interstellar
Probe? You can read about it at You know, sometimes I get
the feeling that programming a game is more of a challenge than programming a NASA
spacecraft. But since I have never done the latter, I can’t really justify that feeling.
The New LoadBitmap Project
The
InitDirectX
program was a good starting point as far as showing you how to write the
initialization code for Direct3D, but it didn’t do anything at all. Let’s take it a little further
by writing some new code that loads a bitmap file and displays the image on the screen.
This chapter does not fully go into the use of bitmaps, as that is reserved for a future chap-
ter. However, I will show you how to load a bitmap and then copy it to the back buffer,
which is then displayed on the screen. This program has DirectX initialization code in a
Chapter 2
■
Your First DirectX Program30
special subroutine that you can reuse in future programs. The program uses some con-
stants you can easily change to adjust how the program runs. Speaking of which, the pro-
gram is shown in Figure 2.2.
I recommend starting with a new, blank project for this program, rather than modifying
the last program, because a lot of the code is different. Create a new project in Visual Basic;
go into Project, References and select the reference to DirectX 8 for Visual Basic Type
Library to add DirectX support to the program. You can then open the code window for
Form1
and get started on the program.
Variables
Let me go over it from a top-down fashion, explaining the code as if you are reading it,
because that is easier to follow. First you have the program comment, constants, and vari-
able definitions:
‘
‘ Visual Basic Game Programming for Teens
‘ Chapter 2 - LoadBitmap program
‘
Loading and Displaying a Bitmap File 31
Figure 2.2 The
LoadBitmap
program demonstrates how to use Direct3D surfaces.
Const SCREENWIDTH As Long = 640
Const SCREENHEIGHT As Long = 480
Const FULLSCREEN As Boolean = False
Const C_BLACK As Long = &H0
Const C_RED As Long = &HFF0000
‘the DirectX objects
Dim dx As DirectX8
Dim d3d As Direct3D8
Dim d3dx As New D3DX8
Dim dispmode As D3DDISPLAYMODE
Dim d3dpp As D3DPRESENT_PARAMETERS
Dim d3ddev As Direct3DDevice8
‘some surfaces
Dim backbuffer As Direct3DSurface8
Dim surface As Direct3DSurface8
As you can see, this code is quite a bit of an improvement over the last program that you
worked on just a few minutes ago, so you’re making good progress already! First, I have
declared some constants at the top. These are values that you can easily change at the top
of the program, affecting things like the resolution and windowed mode. I’ve also created
two color constants so it’s easier to change the background clearing color (and you use
color in other areas later on). Next, you see two groups of variables: the DirectX objects
and some surfaces are defined. The surface variables are something new that you haven’t
seen before.
Direct3DSurface8
is a class, just like
DirectX8
,
Direct3D8
, and
D3DX8
(which is just a helper
class that includes a function for loading bitmap files). Classes are an object-oriented pro-
gramming (OOP) concept. I don’t want to get into OOP in this book, because it might be
a better way to write code, but adds confusion that I’m not willing to inject into the equa-
tion of your learning process at this point. If you are dissatisfied with that explanation
(and have a little more experience with Visual Basic than the average reader), then I can
recommend my previous book for you, titled Visual Basic Game Programming with
DirectX. That book uses OOP extensively in every chapter and builds a complete game
library out of classes that you can use to create 2D or 3D games (and many sample games
are included). This is a rather large book that is not for beginners—it covers things like
multiplayer programming with DirectPlay (including how to build a game server), 3D
collision detection, and many other subjects. In many ways, the book you are now hold-
ing is better because it is focused on a single game and does include something the more
advanced book doesn’t cover: Direct3D surfaces. I recommend that book only if you fin-
ish this book and want to learn how to program in Visual Basic with OOP.
Chapter 2
■
Your First DirectX Program32
Program Startup
Let’s look at the
Form_Load
subroutine next. (This is an event that runs automatically when
the form is first displayed by Visual Basic.)
Private Sub Form_Load()
‘set up the main form
Form1.Caption = “LoadBitmap”
Form1.ScaleMode = 3
Form1.Width = Screen.TwipsPerPixelX * (SCREENWIDTH + 12)
Form1.Height = Screen.TwipsPerPixelY * (SCREENHEIGHT + 30)
Form1.Show
‘initialize Direct3D
InitDirect3D Me.hwnd, SCREENWIDTH, SCREENHEIGHT, FULLSCREEN
‘get reference to the back buffer
Set backbuffer = d3ddev.GetBackBuffer(0, D3DBACKBUFFER_TYPE_MONO)
‘load the bitmap file
Set surface = LoadSurface(App.Path & “\sky.bmp”)
End Sub
Some new code in
Form_Load
requires some explanation. The first group of code sets some
properties for
Form1
that are important in a game in general. The Caption property iden-
tifies the program.
ScaleMode
,
Width
, and
Height
are used to set the form’s size. The
Screen.TwipsPerPixelX
and
Screen.TwipsPerPixelY
properties return twip values (which dif-
fers with each video card and is related to dot pitch). The original goal was to provide a
way to measure the screen in a way that is equivalent to a printed page. As a result, Visual
Basic scales objects on a form using twips rather than pixels, and so you just want to
change the scale mode to pixels. Along with some additional space for the border around
the form, this code sets the form so it is sized correctly for your requested resolution
(using
SCREENWIDTH
and
SCREENHEIGHT
). Finally, the form is displayed with the Show subrou-
tine.
The next line of code calls a subroutine (that I wrote) called
InitDirect3D
, which I’ll show
you in a minute. The next two lines are very interesting.
GetBackBuffer
is a function that
returns a reference to the back buffer, which is handled automatically by Direct3D accord-
ing to the settings you specified for the presentation parameters. Next, you see a call to
LoadSurface
with the filename for a bitmap file. That is a custom function that I wrote just
for loading a bitmap and returning it as a
Direct3DSurface8
object. If you are confused at
this point, don’t worry—I realize it’s all new information and it is explained again as you
Loading and Displaying a Bitmap File 33
move along from one chapter to the next. I don’t expect you to remember anything after
just reading about it one time, but prefer to use repetition to teach something new.
Initializing Direct3D
Next comes the
InitDirect3D
subroutine, as promised. This subroutine has some error-
checking code, so it displays an error message in a message box if an error occurs while
initializing Direct3D (another reason to stick with windowed mode while working on a
game, because you will not see a message box when the game is running full screen). As
you can see, it’s a lot easier to sneak in error handling when a section of code is stuffed
into a separate subroutine or function like this case. If you look at the code line by line,
you realize it’s exactly the same code you saw in the previous program example, but it now
includes all of the error-handling as well, so the program actually displays an error mes-
sage rather than just crashing when there’s a problem. The code here also makes use of the
constants you saw at the top of the program listing.
Public Sub InitDirect3D( _
ByVal hwnd As Long, _
ByVal lWidth As Long, _
ByVal lHeight As Long, _
ByVal bFullscreen As Boolean)
‘catch any errors here
On Local Error GoTo fatal_error
‘create the DirectX object
Set dx = New DirectX8
‘create the Direct3D object
Set d3d = dx.Direct3DCreate()
If d3d Is Nothing Then
MsgBox “Error initializing Direct3D!”
Shutdown
End If
‘tell D3D to use the current color depth
d3d.GetAdapterDisplayMode D3DADAPTER_DEFAULT, dispmode
‘set the display settings used to create the device
Dim d3dpp As D3DPRESENT_PARAMETERS
d3dpp.hDeviceWindow = hwnd
d3dpp.BackBufferCount = 1
d3dpp.BackBufferWidth = lWidth
Chapter 2
■
Your First DirectX Program34
d3dpp.BackBufferHeight = lHeight
d3dpp.SwapEffect = D3DSWAPEFFECT_COPY_VSYNC
d3dpp.BackBufferFormat = dispmode.Format
‘set windowed or fullscreen mode
If bFullscreen Then
d3dpp.Windowed = 0
Else
d3dpp.Windowed = 1
End If
‘chapter 9
d3dpp.MultiSampleType = D3DMULTISAMPLE_NONE
d3dpp.AutoDepthStencilFormat = D3DFMT_D32
‘create the D3D primary device
Set d3ddev = d3d.CreateDevice( _
D3DADAPTER_DEFAULT, _
D3DDEVTYPE_HAL, _
hwnd, _
D3DCREATE_SOFTWARE_VERTEXPROCESSING, _
d3dpp)
If d3ddev Is Nothing Then
MsgBox “Error creating the Direct3D device!”
Shutdown
End If
Exit Sub
fatal_error:
MsgBox “Critical error in Start_Direct3D!”
Shutdown
End Sub
Loading a Bitmap File
Now you come to perhaps the most difficult part of the program: the code that loads a
bitmap file into a Direct3D surface object. This is a pretty advanced topic for just the sec-
ond chapter, don’t you think? Well, like I said before, I want to keep the discussion chal-
lenging while ramping up the difficulty level little by little. (This actually mirrors the
leveling up of an RPG character, if you think about it!)
Loading and Displaying a Bitmap File 35
The
LoadSurface
function accepts a filename parameter and returns a reference to a surface
object that you must declare first, before calling the function. Remember, here is how I
defined the variable:
Dim surface As Direct3DSurface8
Here is the code that actually calls the
LoadSurface
function, which you may recall was
located in
Form_Load
:
‘load the bitmap file
Set surface = LoadSurface(App.Path & “\sky.bmp”)
When you take a look at the code that actually loads a bitmap file, it’s rather simple
because you can use the
LoadSurfaceFromFile
function. The only drawback is that you have
to create the surface in memory before loading the bitmap file, because the surface must
exist first. That complicates things! If all you had to do was call the
LoadSurfaceFromFile
function, it would be very simple to load a bitmap file into a surface. That is not the case,
so it’s good that I have put this code inside a function. Thanks to this function, you can
load a bitmap file into memory as a Direct3D surface, with just a single line of code (with
error handling).
Private Function LoadSurface(ByVal filename As String) As Direct3DSurface8
On Local Error GoTo fatal_error
Dim surf As Direct3DSurface8
‘return error by default
Set LoadSurface = Nothing
‘create the new surface
Set surf = d3ddev.CreateImageSurface(SCREENWIDTH, SCREENHEIGHT, dispmode.Format)
If surf Is Nothing Then
MsgBox “Error creating surface!”
Exit Function
End If
‘load surface from file
d3dx.LoadSurfaceFromFile _
surf, _
ByVal 0, _
ByVal 0, _
filename, _
ByVal 0, _
D3DX_DEFAULT, _
0, _
ByVal 0
Chapter 2
■
Your First DirectX Program36
If surf Is Nothing Then
MsgBox “Error loading “ & filename & “!”
Exit Function
End If
‘return the new surface
Set LoadSurface = surf
fatal_error:
Exit Function
End Function
Drawing the Bitmap
Okay, the hard part is done and there’s just some minor code left to be written to get this
program finished. The last bit of code includes the
Form_Paint
event (which is run anytime
the form window changes) that displays the image after it has been loaded. The
Form_Key-
Down
and
Form_QueryUnload
events, with the help of
Shutdown
, clean up when you try to end
the program.
One thing that requires some explanation here is the
CopyRects
subroutine. This is used to
copy one surface onto another surface, and is quite versatile. It allows you to specify the
exact rectangle to copy from as well as the exact rectangle to copy to within the destina-
tion surface.
CopyRects
is the workhorse for Direct3D surfaces.
Private Sub Form_Paint()
‘copy the bitmap image to the backbuffer
d3ddev.CopyRects surface, ByVal 0, 0, backbuffer, ByVal 0
‘draw the back buffer on the screen
d3ddev.Present ByVal 0, ByVal 0, 0, ByVal 0
End Sub
Private Sub Form_KeyDown(KeyCode As Integer, Shift As Integer)
If KeyCode = 27 Then Shutdown
End Sub
Private Sub Form_QueryUnload(Cancel As Integer, UnloadMode As Integer)
Shutdown
End Sub
Loading and Displaying a Bitmap File 37
Private Sub Shutdown()
Set surface = Nothing
Set d3ddev = Nothing
Set d3d = Nothing
Set dx = Nothing
End
End Sub
Level Up
Congratulations, your character has gained a level! This chapter was very important to
your understanding of how to interface with DirectX from Visual Basic. You learned some
critical concepts, such as how to initialize the DirectX and Direct3D objects and how to
create a surface in memory that can hold a bitmap file. This chapter provided you with
two reusable subroutines called
InitDirect3D
and
LoadSurface
that come in handy in future
chapters.
Chapter 2
■
Your First DirectX Program38
Y
ou might think it strange to break the game design coverage pace set in the previ-
ous chapter, but that is exactly what this chapter is about, and for a good reason.
Designing a game is no simple task that should be thrown together after the
source code has been nearly completed. The design should direct what code gets written
and what the game world looks like.
Here is a breakdown of the major topics in this chapter:
■
Designing the RPG world
■
The player’s character (PC)
■
The non-player characters (NPCs)
■
Weapons and armor
■
Magic
■
Communication
■
Combat
The Quest-Based Storyline
You can learn a lot about your subconscious motivations and creative impulses by design-
ing a game with pencil and paper. I get so much enjoyment out of the design process that
my enthusiasm gets the best of me and I want to jump into the code and start writing the
game! At the same time, I enjoy drawing even though I’m not a very good artist. (I can’t
draw people or living creatures at all, so I don’t even try.)
39
Designing the Game
chapter 3
note
For a complete discussion of how to design a role-playing game, see
Swords & Circuitry: A
Designer’s Guide to Computer Role-Playing Games
by Neal and Jana Hallford. I also recommend
Character Development and Storytelling for Games
by Lee Sheldon if you are interested in learning
how to create realistic storylines and characters for your games.
It’s important to put as much on paper as possible before you start writing source code. It
is good to get started on the artwork for a game while doing the design, as that helps you
realize what is possible and somewhat helps with the creative process. If you start work-
ing on a game without any design at all, at worst it ends up being left unfinished, at best
it is a clinical game (meaning it is functional but lacks substance).
Celtic Crusader is based in 9th-century Ireland, a country occupied by Vikings. The
Vikings were not just barbarous raiders, although this game’s story is about Viking occu-
pation in Ireland and generally depicts Vikings as the bad guys. The Viking civilization was
spread across a much wider area than even the Roman Empire, although it was not as
strong and not based entirely on military conquest. The Vikings were explorers and
traders who settled lands, such as Iceland and Greenland, that had never before been vis-
ited by humans. Although humans had migrated to North and South America at around
this time, the Vikings are also credited as being the first Europeans to discover and settle
North America. (Actually, the Viking settlers in Greenland were the first Canadians.)
The storyline is usually not as important as are the quests, which is what drives the story
forward. Your character does not have a specific goal, because nothing in life is that clearly
defined. Instead, the game develops while your character develops, mainly by fighting ani-
mals and fantasy creatures, as well as the occasional Viking raiding party. Your character’s
attributes determine how good he is in combat. (See “The Player’s Character [PC]” sec-
tion later in this chapter.) The quests in the game are based on events in certain parts of
the map, which I explain next.
note
Celtic Crusader will not be a fully-featured RPG, since that would require much more work than is
possible in this book. But by the end of this book, you will have a very functional and customizable
RPG engine that you may use as a basis to implement the concepts presented in this chapter.
Designing the RPG World
The game world in Celtic Crusader is based on the island country of Ireland. I chose this
land because it has a rich mythology going back over 2,000 years, providing a huge pool
of possible plot elements for the storyline and subquests in a game. I had thought of
Chapter 3
■
Designing the Game40
basing the game on ancient America, designing a game around the Mayan or Incan civi-
lizations, but decided to go with Ireland because it is easier to design a smallish game story
around an island. That also makes it possible to set boundaries on the game map limiting
the player’s movement (as opposed to putting mountains or some sort of no-man’s land
at the boundary of a land-locked game world).
There is a lot to be said for a randomly generated world, or a world based on a completely
fictional land with no historical basis, because that allows you (the game’s designer) to let
loose with your imagination to create a world that does not influence, nor is affected by,
the “real world.” Generating a random world is definitely possible, but I don’t like the ran-
dom factor because it prevents me from designing the game around real locations in the
world. Celtic Crusader has characters that are from specific towns based on character
class, and I want those towns to be real places on the map, not just generated locations in
a random world. The goal is to build a game that has a lot of replay value by offering
strong character development rather than anonymous random combat. The fact of the
matter is, most people love a good story. Giving your game a good story with believable
characters makes it far more fun to play than a randomly generated world, even if the
same characters appear in that fictional world.
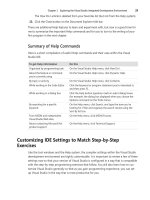
Map of the World
Figure 3.1 shows the map of the world in Celtic Crusader as a traditional hand-drawn
illustration. This rough sketch represents Ireland in the 9th century when the Vikings
invaded England and Ireland from their empire in Norway, Denmark, and Sweden.
This map shows Viking towns (a V inside a square), Irish towns (an I inside a circle), and
ruins (an R inside a triangle), to give you an idea about how quests are based on the game
world itself rather than by some random quest-generation system. In reality, I have taken
some creative liberties with the true historical significance of the towns shown in this
map. The Irish “towns” were, in reality, monasteries that the Vikings either did not dis-
cover or did not plunder for one reason or another. The ruins shown on the map are, in
fact, monasteries that the Vikings had plundered (by stealing all gold, silver, and valuables
they could find). I thought the idea of a plundered monastery lent itself well to a ruin
(filled with evil creatures). The ruins in Celtic Crusader are based somewhat on historical
fact (which I believe really helps with the story), with the idea being that the plundered
monasteries, by becoming ruins, have been invaded by vile monsters that are not gener-
ally found elsewhere in the game.
The ruins are basically a training ground where the player’s character gains experience,
goes up in levels, and acquires gold to buy better equipment in the towns. The goal with
this game engine is to have certain parts of the map cause a new map to load, with the
player inserted into a certain part of the new map. However, I have found that this is a very
Designing the RPG World 41
difficult thing to do without causing the source code to grow in complexity (and I want
to keep this game on the simple side). Therefore, the towns in the game world are repre-
sented on the map itself rather than as a warp type of system that enters and exits the
towns. I really like this idea better because it keeps the suspense of disbelief going.
Chapter 3
■
Designing the Game42
Figure 3.1 Hand-drawn illustration of the world in Celtic Crusader, based in Ireland.
note
Suspense of disbelief
is a term that describes one’s immersion in a fictional setting. You may have
experienced this while reading a good book or while playing a good game: You lose track of the
real world around you and become totally immersed in the book or game. This is a very good thing
and you should strive to achieve it with your game. Anything that takes away the player’s suspense
of disbelief should be removed from the game. A clunky user interface, a difficult combat system,
an overload of information on the screen all lead to ruining the player’s immersion.
By taking the hand-drawn map and scanning it into the computer, I have been able to
clean it up and turn it into a digital version of this game’s world. That world is shown in
Figure 3.2.
My goal is to teach you how to create an RPG as well as an RPG game engine that you can
customize for your own vision and imagination for a game. I want to give you just enough
to get the job done, avoiding doing everything for you, so you are motivated to improve
the game.
While you’re working on a game like this, always consider ways to make whatever you’re
working on reusable. If you are constructing a player creation screen, think of ways to
make the screen dynamic and flexible, without hard-coding anything specific. It is a good
idea to keep things concrete and solidly built in the game, but not to the point where it’s
impossible to modify later. If you have buttons on the screen that the player needs to click
with the mouse, make those buttons easy to move around: Use constants at the top of the
source code for that particular screen. Another option is to make everything in your game
skinnable. You know, skins are all the rage in user interfaces today, and most music play-
ers for your PC support skinning. This is a process where the program controls can be
repositioned and the images used to represent those controls can be modified—with
some fantastic results. Why not take that excellent design methodology with you in the
design of a game and make it totally customizable by storing skins and settings in files
outside of the source code for the game? This excellent concept may be beyond the scope
of this short book, but I want you to keep it in mind while you are working.
Figure 3.3 shows my design for the scrolling game world. The player’s sprite remains in
the center of the screen at all time, with the world scrolling underfoot. With this design in
mind, the map has to be laid out so there is room around the borders for the player to
reach the edge of the map. In other words, when the player reaches the ocean, the map
needs to have ocean squares going out a little so the player can walk right up to the
seashore. I explain how this works more in Chapter 5, “Level Editing with Mappy.” The
eight-way scrolling of the map is perfect for the sprites in this game, which have been ren-
dered with animation in eight directions.
Designing the RPG World 43
Regions
There are four provinces, or regions, in the version of Ireland represented in this game:
Leinster, Munster, Connaught, and Ulster. It is not crucial, but I have always found that a
background story and historical depth make a game far more compelling for the player,
Chapter 3
■
Designing the Game44
Figure 3.2 The hand-drawn map has been scanned and converted to a digital map.