Visual C# Game Programming for Teens phần 10 docx
Bạn đang xem bản rút gọn của tài liệu. Xem và tải ngay bản đầy đủ của tài liệu tại đây (1004.46 KB, 40 trang )
must be made (cooperatively between the designer and programmer, if more
than one person is working on the game): How will items be identified in the
dungeon levels? Will the item name just be added to
Data1, or the item number,
or some sort of code?
This is really up to you, but I will give you some pointers on just one way to do
it. We already know where the item will be located in the level because it will be
added right over the top of the tile it belongs to. So, really, all we need is the item
name. I’m not even sure if quantity is needed! Do we ever want to add like 50
magic rings or hatchets? No, I don’t think so! You can if you want, it’s no big
deal to just use one of the other data fields for quantity. I’m going to use a code
word, “ITEM,” to mean that an item should be dropped at that tile location. The
Data2 field will contain the item name. See Figure 14.9.
Figure 14.8
The gold has been added to the dungeon like monster loot.
Treasure Caches 405
To add items to the dungeon automatically based on tile properties adds a huge
element of design power to the game engine! The code to search for the “ITEM”
flag and add the associated item to the dungeon will be similar to the code used
to position the player. But, instead of breaking when the first item is found, as
was done with the player spawn tile, this code needs to keep going and scan the
tile records of the entire level. See Figure 14.10.
for (int y = 0; y < 128; y++)
{
for (int x = 0; x < 128; x++)
{
Item it = null;
Level.tilemapStruct tile = game.World.getTile(x, y);
if (tile.data1.ToUpper() == "ITEM" && tile.data2 != "")
{
Figure 14.9
A “Long Bow” item has been added to a dungeon tile.
406 Chapter 14
n
Populating the Dungeon
it = game.Items.getItem(tile.data2);
DropTreasureItem(ref it, x*32, y*32);
}
}
}
Tip
Some of the item artwork is obviously too large for the dungeon. It’s an easy matter to shrink the
drop image to a manageable size that better corresponds with the dungeon, but you may not want
to change the inventory image because the inventory uses a fixed icon size. Even so, it will still
work with smaller images, so that’s entirely up to you.
Monster Spawns
Dungeon Crawler now has all the code we need to position the player at a spawn
point, and to add items and gold to the dungeon at any desired tile. All of this
Figure 14.10
Adding items to the dungeon automatically via the level data.
Monster Spawns 407
code will just make it that much easier to add monsters to the level as well. Like
the items, we can add a monster manually one at a time, or use a tile data field.
The latter is definitely preferred because then a designer can create the levels
without having to dig into any code!
Tip
There’s no combat in this chapter’s examples, nor do the monsters move. The point is just to
demonstrate how to position things inside the level.
Adding Monsters
First, we’ll see how to add a single monster manually in code. This example just
creates a small array with room for 10 monsters for starters.
monsters = new Character[10];
monsters[0] = new Character(ref game);
monsters[0].Load("zombie.char");
monsters[0].Position = new PointF(1 * 32, 4 * 32);
Combat is not a priority right now, so combat code has been stripped out of the
doMonsters() function. Not to worry, it will be back in the next chapter. Figure
14.11 shows that a zombie has been added to the dungeon at tile location 2,5.
private void doMonsters()
{
PointF relativePos;
PointF heroCenter;
PointF monsterCenter;
heroCenter = game.Hero.CenterPos;
for (int n = 0; n < monsters.Length; n++)
{
if (monsters[n] != null)
{
//is monster in view?
if (monsters[n].X > game.World.ScrollPos.X &&
monsters[n].X < game.World.ScrollPos.X + 23 * 32 &&
monsters[n].Y > game.World.ScrollPos.Y &&
monsters[n].Y < game.World.ScrollPos.Y + 17 * 32)
{
//get relative position on screen
relativePos = new PointF(
408 Chapter 14
n
Populating the Dungeon
Math.Abs(game.World.ScrollPos.X - monsters[n].X),
Math.Abs(game.World.ScrollPos.Y - monsters[n].Y));
//get center
monsterCenter = relativePos;
monsterCenter.X += monsters[n].GetSprite.Width / 2;
monsterCenter.Y += monsters[n].GetSprite.Height / 2;
//draw the monster sprite
monsters[n].Draw(relativePos);
}
}
}
}
Figure 14.11
A zombie! Uhhhnnnnn! Brains!
Monster Spawns 409
Monsters by Design
That wa s a no-brainer. Next, we’ll add monsters using tile data. What shall the
data field flag be called for monsters? Oh, I don’t know, how about “MON-
STER”? Now, the second piece of data we need to know in order to add a
monster is the .char file. For the example, I’m just using zombie.char, but feel
free to use whatever file you want. And, of course, for a polished game the
monsters will be selectively added to specific rooms and locations (usually to
guard treasure!). Figure 14.12 shows the editor with a bunch of monster tile data
entered. This is not looking good for our player. Fortunately, the monsters don’t
know how to move in this disabled example.
This will be a limited example with support for only 10 monsters, so if you edit
the level file and make every tile a monster spawn, it just won’t work. Don’tdo
Figure 14.12
Adding a bunch of zombie flags to the level.
410 Chapter 14
n
Populating the Dungeon
that. You could start a zombie apocalypse. Don’t force me to write an apocalypse
handler into the code! Figure 14.13 shows our heroic but scared player character
facing a horde. He really needs decent gear.
int count = 0;
for (int y = 0; y < 128; y++)
{
for (int x = 0; x < 128; x++)
{
Level.tilemapStruct tile = game.World.getTile(x, y);
if (tile.data1.ToUpper() == "MONSTER" && tile.data2 != "")
{
monsters[count] = new Character(ref game);
monsters[count].Load(tile.data2);
monsters[count].Position = new PointF((x-1) * 32, (y-1) * 32);
count++;
Figure 14.13
Uhh, a little help here? (
If it’s not too much trouble!
)
Monster Spawns 411
}
}
}
Level Up!
We have a custom level editor and an engine that talks to it. What more is there
to say? The hard stuff is done. All we have to do now is make improvements and
tie some things together and add a story, a title screen, and so forth. The final
chapter wraps these things up.
412 Chapter 14
n
Populating the Dungeon
Deep Places of the World
“Be on your guard. There are older and fouler things than Orcs in the deep places
of the world.”
—Gandalf, The Fellowship of the Ring, J.R.R. Tolkien
This final chapter covers several important concepts that will give the dungeon
crawler engine some much-needed polish. My goal is to make it as easy as
possible for you to create your own RPG, by giving just enough information in
the example to show how things work, but without going so far into the
gameplay that it’s difficult to understand how the sample game works. I
wouldn’t call this a complete game by any means; it is an RPG engine. The
gameplay is up to you! Among the topics covered are a line-of-sight (LOS) object
visibility algorithm; a lantern that lights up the area near the player; character
generation; and Lua script support. The final example includes these features
and more, including loading and saving the game and rudimentary monster A.I.
Along the way, many small but significant improvements have been made to the
classes (especially the
Game class) to accommodate these new requirements of the
engine. All of the editors are in the runtime folder for the game in this chapter’s
resource files (www.courseptr.com/downloads) for easy access, so if you want to
make changes to the game, just fire up the editors and start editing. You have all
the tools you need to build your own game, and we will just go over a few new
ones in this final chapter.
Here is a quick summary of what we’ll cover:
Chapter 15
413
n Line of sight
n Torch light radius
n Scroller optimizations
n Lua script language
n Finishing touches
Going Deeper
Everything is starting to really take shape in the dungeon crawler engine. Now
we can add treasure and items and monsters in code or via the level editor data.
The monsters aren’t too bright yet, but they just need some A.I. code to make
them move and attack which will be handled in the last chapter. There’s one big
issue that I want to address because it’s a stable of this genre—line of sight.
A really complex game engine would hide everything that isn’t directly in the
player’s line of sight. We could create a node search system to determine
whether an object or monster is visible to the player, and then hide them if they
are behind a wall or around a corner. But, I was thinking about a simpler way to
handle line of sight. Well, simple is a relative term; what I think of as simple, you
might have a hard time understanding, and vice versa! How do you tell when
something is in view? Well, the only practical way to handle that is to use the
collidable property, because we have no other way of identifying walls or
obstacles.
Collidable could be used for a small statue or water fountain or
something solid that you can see past but not walk through, so there are
potential problems with
collidable, but in general—and for our game—
collidable is only really used for wall tiles that are impassible.
Line of Sight (Ray Casting)
Our code already checks to see when an object should be drawn when it is in the
current scrolling viewport. But, an item or monster is still drawn even if one or
more walls separate them from the player sprite! Wouldn’t it be really great if
objects only came into view when nothing is obstructing your line of sight? That
would make a big difference in the gameplay, add to replay value, and quite
simply, make the game more scary!
414 Chapter 15
n
Deep Places of the World
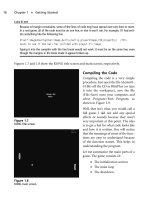
How do you calculate line of sight? Good question! There’s an age-old algorithm
invented long ago by a computer scientist named Bresenham, who figured out a
very fast way to draw lines on a computer screen. Prior to Bresenham,
programmers used trigonometry to draw lines, but Bresenham lines use
if
statements and counters instead, making it much faster. (See Figure 15.1.) Treat
the player’s position as the starting point, and the target object’s position as the
end point, and calculate the points on a line connecting them using whole tiles
for each pixel. There will only be a few steps in the “line” to calculate. At each
step, we check to see whether the tile is collidable, and if any tile is, then we
know the object is not visible to the player.
This technique is more popularly called ray casting.
Another approach is possible. We could simulate firing a bullet from the player
to the monster in a straight line, and actually move it along several pixels at a
time. As the theoretical bullet is moving along, we figure out which tile it is over
at each step, look at the
collidable property of that tile, and deal with that result
in the same way. This avoids the Bresenham algorithm, replacing it with just a
simple direction calculation, and by starting at the center of a tile, that step could
jump one full tile’s worth of pixels (32) at a time. The problem with this second
Figure 15.1
Drawing a line using tiles with the Bresenham algorithm.
Going Deeper 415
solution, although simpler, is that the startup is math heavy—you have to
calculate the angle from the player to the monster using sine and cosine, which
comes out as X and Y velocity values.
Note
For a detailed description of the Bresenham line algorithm, including historical details, take a look
at this Wikipedia article: />For a working example, any kind of object will do, so I’ve stripped out
everything but the essentials, leaving in just enough of the game so that treasure
items are visible as the player walks around, but they can’t be picked up. Here is
a function,
objectIsVisibleLOS(), that treats the tilemap as pixels while
calculating a Bresenham line between the player and any other tile location.
The
objectIsVisibleLOS() function is self-contained, calculating the player’s tile
position automatically, and only requires one parameter—the relative location
on the screen (in pixel coordinates). Since objects beyond the viewport will be
culled anyway, only objects in the viewport need to be tested for line of
sight. The Line of Sight demo project demonstrates the technique, as shown
in Figure 15.2.
private bool objectIsVisibleLOS(PointF target)
{
//get player’s tile position
Point p0 = new Point((int)game.Hero.FootPos.X-8,
(int)game.Hero.FootPos.Y);
Point line0 = p0;
//get target tile position
Point p1 = new Point((int)target.X, (int)target.Y);
Point line1 = p1;
//begin calculating line
bool steep = Math.Abs(p1.Y - p0.Y) > Math.Abs(p1.X - p0.X);
if (steep)
{
//swap points due to steep slope
Point tmpPoint = new Point(p0.X,p0.Y);
p0 = new Point(tmpPoint.Y, tmpPoint.X);
416 Chapter 15
n
Deep Places of the World
tmpPoint = p1;
p1 = new Point(tmpPoint.Y, tmpPoint.X);
}
int deltaX = (int)Math.Abs(p1.X - p0.X);
int deltaY = (int)Math.Abs(p1.Y - p0.Y);
int error = 0;
int deltaError = deltaY;
int yStep = 0, xStep = 0;
int x = p0.X, y = p0.Y;
if (p0.Y < p1.Y) yStep = 4;
else yStep = -4;
if (p0.X < p1.X) xStep = 4;
else xStep = -4;
Figure 15.2
Line of sight (LOS) ray casting is used to hide objects that should not be visible to the player.
Going Deeper 417
int tmpX = 0, tmpY = 0;
while (x != p1.X)
{
x += xStep;
error += deltaError;
//move one along on the Y axis
if ((2*error) > deltaX)
{
y += yStep;
error -= deltaX;
}
//flip the coords if steep
if (steep)
{
tmpX = y;
tmpY = x;
}
else
{
tmpX = x;
tmpY = y;
}
//make sure coords are legal
if (tmpX >= 0 & tmpX < 1280 & tmpY >= 0 & tmpY < 1280 )
{
//is this a collidable tile?
Level.tilemapStruct ts = game.World.getTile(tmpX/32, tmpY/32);
if (ts.collidable) return false;
else
{
//draw this step of path toward target
game.Device.DrawRectangle(Pens.Azure, tmpX + 14,
tmpY + 14, 4, 4);
}
}
else
418 Chapter 15
n
Deep Places of the World
//not legal coords
return false;
}
return true;
}
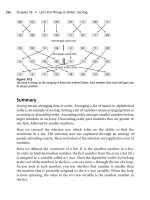
Figure 15.3 shows another view of the demo with the player at the center of the
four walled-off rooms, making it impossible to see what’s inside (there’s an item
in each room). Note that the line-of-sight rays terminate when they reach a
collidable tile, while those without obstruction continue to the target item. This
is not a 100 percent foolp roof algorithm. There are some cases where an object
will be visible when it shouldn’t be, because the algorithm is fast and sometimes
the ray’s points fall in between tiles. One improvement would be to use the
player’s lantern radius and the ray casting line-of-sight algorithm to hide objects
Figure 15.3
The items placed inside the walled rooms are invisible due to LOS.
Going Deeper 419
that are either blocked or outside the player’s viewing range. This is the
technique I recommend using, with both rather than just line of sight alone.
Torch Light Radius
Having line-of-sight culling is a huge improvement over just drawing everything
in the viewport, as far as improving the game’s realism. That, combined with
another new technique in drawing the level—torch light radius—will make the
player truly feel as if he is walking through a dark, dank, cold dungeon. Since
line of sight causes only objects within view to be drawn, we can take advantage
of that with this additional effect to make the player’s experience perfect for this
genre. It goes without saying that dungeons don’t come with halogen lights on
the ceiling—a real underground tunnel and room system would be pitch black,
and the player would have to be carrying a torch—there’s just no way around
that. I’m not a big fan of micro-management, so I just give the player a
permanent torch, but some game designers are cruel enough to cause the torch
to burn out!
The key to making the dungeon level look dark everywhere except near the
player is by using a radius value, highlighting all tiles within a certain range
around the player. All tiles in that range are drawn normally, while all other tiles
are drawn with a level of darkness (perhaps 50 percent white). GDI+ has a
feature that we could use to draw some of the tiles darker that are beyond the
light radius around the player. By using
ImageAttribute, it is possible to set the
gamma level to increase or decrease the lighting of an image. In testing, however,
this proved to be too slow for the game, causing performance to drop
significantly (because the actual pixels of the image were being manipulated).
Instead, we’ll just have to manipulate the artwork. If you are intrigued by the
ImageAttribute approach—don’t be. In practice, anything you can do easily
with artwork is a far better solution than trying to do it in code. Try to keep your
code as straightforward as possible, without all kinds of conditions and options,
and put some requirements on the artwork instead for better results.
The Torch Light demo is shown in Figure 15.4. The first and most obvious
problem with this is the square-shape of the lit area (where it really should be
round in shape). The second problem with this demo is that areas beyond a wall
appear to be lit even though the lantern should not be penetrating the wall. It
420 Chapter 15
n
Deep Places of the World
would seem we need to combine the lantern code with the ray-casting line-of-
sight code for object visibility as well as for lighting. The great thing about this
problem, strange as that may sound, is that we have all the code we need to
make any such changes we want to make—to both object visibility and to the
lighting around the player.
How do you want to tackle it? Are these issues important for your own game
design goals? I can only give you the tools, but you must make the game! These
examples are meant to teach concepts, not to create a fun gameplay experience.
So, use these concepts and the code I’m sharing with you in creative ways while
creating your own dungeon crawler!
The dark tile set is just a copy of the normal palette.bmp image with the
brightness turned down and saved as a new file, palette_dark.bmp. Some
Figure 15.4
Lighting up a small area around the player to sim ulate a lantern.
Going Deeper 421
changes must be made to the Level class to make this work. Another Bitmap
variable is needed to handle the dark tiles:
private Bitmap p_bmpTilesDark;
The loadPalette() function is modified to require both palette filenames:
public bool loadPalette(string lightTiles, string darkTiles, int columns)
{
p_columns = columns;
try {
p_bmpTiles = new Bitmap(lightTiles);
p_bmpTilesDark = new Bitmap(darkTiles);
fillScrollBuffer();
}
catch (Exception) { return false; }
return true;
}
The function fillScrollBuffer() draws the tiles representing the current scroll
buffer. This function is called only when the player moves one full tile width or
height (32 pixels), at which point the buffer must be re-filled with tiles at the
new scroll position. This function, in turn, calls on a helper called
drawTile-
Number()
, to actually do the physical drawing of the tile image. This function has
not changed since the
Level class was originally created.
private void fillScrollBuffer()
{
Point currentTile = new Point((int)p_scrollPos.X / p_tileSize,
(int)p_scrollPos.Y / p_tileSize);
for (int tx = 0; tx < p_windowSize.Width + 1; tx++)
{
for (int ty = 0; ty < p_windowSize.Height + 1; ty++)
{
int rx = currentTile.X + tx;
int ry = currentTile.Y + ty;
int tilenum = p_tilemap[ry * 128 + rx].tilenum;
Point playerTile = p_game.Hero.GetCurrentTilePos();
if ((Math.Abs(rx - (playerTile.X + currentTile.X)) <= 3) &&
(Math.Abs(ry - (playerTile.Y + currentTile.Y)) <= 3))
422 Chapter 15
n
Deep Places of the World
{
//draw tile using light tileset
drawTileNumber(ref p_bmpTiles, tx, ty, tilenum);
}
else
{
//draw tile using dark tileset
drawTileNumber(ref p_bmpTilesDark, tx, ty, tilenum);
}
}
}
}
Even more sophisticated forms of lighting can be adopted, such as using an
adaptation of the line-of-sight code developed recently to cause the light range to
stop when it hits a wall. If you are going for an even more realistic look for your
own game, you might try this. In simple experiments I found it fairly easy to
look for collidable tiles while drawing the lighter tiles. Creative coding could
produce interesting special effects like a flashlight-style light or a lamp light that
swings back and forth as the player walks.
Scroller Optimizations
The scroller engine now built into the Level class is not optimized. In our efforts
to get a scrolling level to move and draw, no concern was given to performance.
But, there is a built-in capability to optimize the scroller which will result in at
least a 10x frame rate increase. Presently, the
fillScrollBuffer() function is
called any time the player moves—even a pixel. This is highly inefficient. But,
again, the important thing is to get a game to work first, then worry about
performance later. Now is that time! By adding the gamma light modifications
to the tile renderer, there is an added strain on the engine to maintain a steady
frame rate. By making a few modifications to the scroller, based on the scroll
buffer image, the game loop will run so much faster!
The first thing we might do to speed up the game is to take a look again at the
doUpdate() and doScrolling() functions. Level.Update() contains user input
code, so we need the scroller to continue as it has for consistent player
movement. But, the problem is
Level.Update() also contains engine-level scroll
buffer code. We could detach the scroll buffer code from the player movement
Going Deeper 423
code so it can be run in a faster part of the engine (outside of the time-limited
user input cycle). We must be careful with changes like this, though, because the
game’s parts are now highly interconnected; detaching any one piece or
changing its behavior might affect other systems.
Another optimization that might be made is to the scroll buffer code. As you
may recall, the scroll buffer is one full tile (32 pixels) larger around the edges
than the screen. The scroll buffer is then shifted in whatever direction the player
is moving until it has moved 32 pixels, at which point the scroll buffer must be
re-filled. In theory! As a matter of fact, that isn’t happening at all—the scroll
buffer is being refilled every step the player makes! Instant 10–20x performance
boost here.
Open up the
Level.Update() function, and down near the bottom there is a
block of code beginning with this:
//fill the scroll buffer only when moving
if (p_scrollPos != p_oldScrollPos || p_game.Hero.Position != p_oldPlayerPos)
At the bottom of that code block is a call to fillScrollBuffer(). This is where
the optimization will be made! Can you figure it out? In fairness, the game works
as is; this is an important but not essential modification. If you need help with it,
come by my forum to chat about it with others —maybe you will be the first
person to figure it out? (www.jharbour.com/forum).
Tip
As a reward, I will give away a free book to the first person who posts a solution to this
optimization!
Lua Script Language
Scripting is a subject that might seem to belong back in Part II, “Building the
Dungeon,” since it is a core engine-level feature. But, until all of the classes were
built for the dungeon crawler engine, there really was nothing we could do with
a script language—which must necessarily be based on existing features within a
game’s source code. A script language can be used to create almost an entire
game, if the engine behind it supports gameplay functions, but until now we
have not had enough of a working example to make use of scripting. The script
424 Chapter 15
n
Deep Places of the World
language of choice here is Lua, which will be briefly introduced along with code
to tie Lua scripts into the game engine.
When you combine the versatility that a data-driven game engine like this one
affords, along with a custom level editor, you already have a great combination
for making a great game. But when you add script support to the mix, things get
even more interesting! We have progressed to the point in both the game and the
editors where, sure, we could get by with the excellent tools and code already in
hand, but I want to raise the cool factor even higher with the addition of
scripting support.
Now, let me disclaim something first: Yes, scripting is cool and adds incredible
power to a game project, but it requires a lot of extra effort to make it work
effectively.
The cool factor is that we can call C# functions from within a Lua script file!
Likewise, we can call Lua functions from our C# code—interpreted Lua
functions! But what about all of the global variables in a Lua source code file?
The variables are automatically handled by the Lua engine when a script file is
loaded. I’m not going to delve into a full-blown tutorial on the Lua language,
because I just don’t have time or space. Instead, we’re just going to use it and
you’ll see how useful a scripting language is by watching it put to use.
Hint
There is one really big drawback to Lua: once you have “seen the light,” you may never go back to
writing a game purely with a compiled language like Basic or C# again! Lua is so compelling that
you’ll wonder how in the world you ever got anything done before you discovered it!
Installing Lua
The key to adding Lua support to our C# code is an open-source project called
LuaInterface, hosted at the LuaForge website: />luainterface/. The sources for LuaInterface are housed in a Google Code
Subversion (SVN) repository at with
support for Visual C# 2008. I have included a project with this chapter that
has the pre-compiled version of LuaInterface ready to use.
Lua Script Language 425
Definition
Lua is the Portuguese word for “Moon.” The official spelling is LUA, with all caps, but I prefer to
spell it without all caps because that leads the reader to assume it’s an acronym rather than a
word.
Installing LuaInterface
After compiling the LuaInterface project, you’ll get a file called LuaInterface.dll
which contains the .NET assembly for the project. You will also need the Lua
runtime library file, lua51.dll. Copy LuaInterface.dll and lua51.dll to any project
that needs Lua support and you’ll be all set. (Note also that these files must
always be distributed with your game.) Whether you compiled it yourself or just
copied it from the chapter resource files, create a new C# project. Then, open the
Project menu and select Add Reference. Locate the LuaInterface.dll file and
select it, as shown in Figure 15.5.
Figure 15.5
Adding the LuaInterface.dll file to the project.
426 Chapter 15
n
Deep Places of the World
Nothing will seem to change in the project. To verify that the component has been
added, open Project, Properties, and bring up the References tab, where you should
see the component among the others available to your project. See Figure 15.6.
Testing LuaInterface
Here is our first short example program that loads a Lua script file. The form for
this program has a
TextBox control, which is used as a simple console for
printing out text from both the Lua script and our Basic code. Figure 15.7 shows
the result of the program.
public partial class Form1 : Form
{
private TextBox textBox1;
public Lua lua;
public Form1()
{
Figure 15.6
List of referenced components in this project.
Lua Script Language 427
InitializeComponent();
}
private void Form1_Load(object sender, EventArgs e)
{
this.Text = "Lua Script Demo";
textBox1 = new TextBox();
textBox1.Dock = DockStyle.Fill;
textBox1.Multiline = true;
textBox1.Font = new Font("System", 14, FontStyle.Regular);
this.Controls.Add(textBox1);
//create lua object
lua = new Lua();
//link a C# function to Lua
lua.RegisterFunction("DoPrint", this, this.GetType().
GetMethod("DoPrint"));
//load lua script file
lua.DoFile("script.lua");
//get globals from lua
string name = lua.GetString("name");
double age = lua.GetNumber("age");
Figure 15.7
We now have Lua script language support for our game.
428 Chapter 15
n
Deep Places of the World
DoPrint("name = " + name);
DoPrint("age = " + age.ToString());
}
//this function is visible to Lua script
public void DoPrint(string text)
{
textBox1.Text += text + "\r\n";
}
}
Hint
The LuaInterface.dll requires the .NET Framework 2.0, not the later versions such as 3.5. If you are
using Visual C# 2010, it will default to the later version of the .NET Framework. To get LuaInterface
to work with your Visual C# 2010 project, you may need to switch to .NET Framework 2.0 (which is
done via Project Properties). You may also need to manually set the target from “ Any CPU” to
“x86” to get the Lua library to work with Visual C# 2010.
First, the TextBox control is created and added to the form with the Multiline
property set to true so the control acts like a console rather than an entry field.
Next, the
LuaInterface.Lua object is created. That object, called lua, is then used
to register a C# function called DoPrint() (note that it must be declared with
public scope in order for Lua to see it!). Next,
lua.DoFile() is called to load the
script code in the script.lua file. This file must be located in the .\bin\Debug
folder where the executable file is created at compile time. So, we can think of a
script file like any game asset file, equivalent to a bitmap file or an audio file.
When
DoFile() is called, that not only opens the script file, it also executes the
code. This is one of the two ways to open a script file. The second way is to use
LoadFile() instead, which simply loads the script into memory, registers the
functions and globals, but does not start executing statements yet.
After the script has been loaded and run, then we can tap into the
lua object to
retrieve globals from the
lua object, as well as call functions in the script code. In
this example, we just grab two globals (
name and age) and print out their values.
This demonstrates that Lua can see our Basic function and call it, and that we
can tap into the globals, which is the most important thing!
Lua Script Language 429