Wireless Home Networking for dummies phần 3 pdf
Bạn đang xem bản rút gọn của tài liệu. Xem và tải ngay bản đầy đủ của tài liệu tại đây (1.14 MB, 39 trang )
Home Phoning (ET Got It Backward!)
Using your home phone lines to network devices together is (you guessed it)
phoneline networking. This is a fairly mature technology having grown up
about the same time as the digital subscriber line (DSL) industry, around the
mid-1990s. Phoneline networking standards have been developed by an
industry group called HomePNA or sometimes just HPNA (Home Phoneline
Networking Association;
www.homepna.org).
You’ll find several types of HPNA available:
ߜ HPNA 1.0: The first HPNA standard operates at a slower speed (1.3 Mbps)
and is disappearing from the shelves.
ߜ HPNA 2.0: Much faster than 1.0, the 2.0 version can reach speeds similar
to those of an Ethernet LAN. It’s advertised as 10 Mbps, but the maxi-
mum speed is actually 16 Mbps. This version is backward compatible
with HPNA 1.0.
ߜ HPNA 3.0: A 3.0 version of the standard that will allow much higher
speeds is in the works. The goal is to reach speeds of up to 128 Mbps ini-
tially, with later versions reaching 240 Mbps — enough speed to carry
even high-definition video signals. These were not available as we write
but are coming soon, so check stores for which version is available when.
Although the newer 2.0 products can talk to older 1.0 ones, having even one
HPNA 1.0 device connected to your phone lines slows all the HPNA 2.0
devices down to 1.3 Mbps. Make sure that all of yours are 2.0 if you want that
technology. (We hate it when we buy five of something only to go home and
find that one of the boxes is an older version — yech!). The new 3.0 version
will have improved backward compatibility so that HPNA 3.0 devices (when
they show up) won’t be slowed down just because older HPNA endpoints are
connected to the phone lines.
HomePNA products are available in several different form factors. You will
likely encounter them in two major ways:
ߜ Built into the AP, router, or other device: These are installed in periph-
eral or entertainment devices (such as Internet-enabled stereos) right
from the factory.
ߜ A standalone adapter: There are HomePNA Ethernet and USB adapters
that are external devices that connect to a computer’s Ethernet or USB
ports by using a cable. You can also get internal Network Interface Card
(NIC) adapters in PC Card and Peripheral Component Interconnect (PCI)
Card formats for laptop and desktop machines.
58
Part I: Wireless Networking Fundamentals
The typical HomePNA interface has a regular RJ-11 phone jack that you plug
into your nearest outlet. The HomePNA system operates on different frequen-
cies than analog or DSL telephone services, so you can simultaneously use a
single phone line for your computer LAN and for all the other things you cur-
rently use it for (making phone calls, sending and receiving faxes, or connect-
ing to the Internet).
To connect your HomePNA endpoints (the computers or audio systems or
other devices using HomePNA in your home) back onto your Internet connec-
tion, you need to connect the HomePNA network through your router to your
Internet connection. The good news here is that HomePNA is built in to many
home routers, such as those from NETGEAR (
www.netgear.com), Linksys
(
www.linksys.com), and 2Wire (www.2wire.com), so if you think that you
might want to use HomePNA, choose your router accordingly.
Network Power(line)!
Companies have been talking about powerline networking for some time, but
only recently have they really gotten it right. In 2002, several networking com-
panies (including Siemens/Efficient Networks [
www.speedstream.com],
Linksys, NETGEAR, and D-Link [
www.d-link.com]) began releasing high-
speed powerline networking products based on a standard known as
HomePlug (
www.homeplug.org).
The powerline networking concept takes a little getting used to. Most of us
are used to plugging an AC adapter or electrical cable into the wall and then
another Ethernet cable into some other networking outlet for the power and
data connections. With HomePlug, those two cables are reduced to one —
the power cable! That electrical cord is your LAN connection, — along with
all the rest of the electrical cabling in your house. Cool, huh? To connect to
your computer, you run an Ethernet cable from the HomePlug device (router,
AP, and so on) to your computer, hub, or switch.
Networking on power lines is no easy task. Power lines are noisy, electrically
speaking, with surges in voltage level and electrical interferences introduced
by all sorts of devices both within and external to the home. The state of the
electrical network in a home is constantly changing as well when devices are
plugged in and turned on. Because of this, the HomePlug standard adopts a
sophisticated and adaptive signal processing algorithm, which is a technique
used to convert data into electrical signals on the power wiring. Because
HomePlug uses higher frequency signals, the technology can avoid some of
the most common sources of noise on the power line.
59
Chapter 3: Bluetooth, HPNA, and HomePlug
The current version of HomePlug can offer up to 14 Mbps networking over
the power line — faster than 802.11b or HomePNA but slower than 802.11g or
a and the higher-speed, wired Ethernet solutions. Besides the speed,
HomePlug offers other benefits:
ߜ Ubiquity: Power outlets are all over your house and are more plentiful
than phone jacks and Ethernet outlets. With HomePlug, every one of the
dozens (or even hundreds) of power outlets in the house becomes a
data-networking jack.
ߜ Integrated: HomePlug can be built right into many networked appli-
ances. The almost legendary Internet refrigerator that we discuss in sev-
eral places in this book is a great concept, but even we don’t have a Cat
5e outlet in the dark nook behind our fridges. However, we do have a
power outlet, and so do you.
ߜ Encrypted: HomePlug has a built-in encryption system. Because power
signals can bleed back into the local power network and because you
might not want to share your LAN with your neighbors, you can turn on
HomePlug’s encryption. In that way, only devices that have your pass-
word can be on the network.
Like the wireless systems that we describe previously, most HomePlug sys-
tems come with encryption turned off by default. We recommend that you
get your network up and running first . . . and then turn on encryption after
you’ve proven to yourself that your network is working.
The most common application for HomePlug is as an Ethernet or a USB
bridge. These devices look and act a lot like the external USB Wi-Fi NICs that
we discuss earlier. You’ll need two of them: one to connect to an Ethernet
port on your router (or any LAN jack in your home) and another to plug into
the wall outlet where you need LAN access.
The bridge typically has a power cord on one side of the box and an Ethernet
or USB connector on the other. Plug the power cord into any wall outlet, plug
the Ethernet or USB into the computer or other networked devices, and you
have a connection. Pat has been using a NETGEAR Powerline Ethernet bridge
like this for a spot in his house that has neither Ethernet nor good wireless
coverage, and he loves it. Danny has a Siemens/Efficient Networks
SpeedStream router connecting his office (where the cable modem is) to a
SpeedStream adapter in the kids’ computing area (where all the screaming
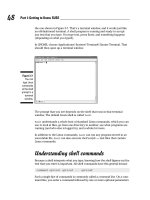
is). Figure 3-5 shows a typical use of HomePlug bridges.
60
Part I: Wireless Networking Fundamentals
Powerline networking through HomePlug is a great complement to a wireless
network, but we probably would never use it to replace our wireless LANs.
Use it where you need it. HomePlug is quick, cheap (bridges cost about $80
each, with prices dropping rapidly), and perfect for networking on demand.
We hinted at this already, but we’ll just come right out and say it. We think
that HomePlug will have a huge effect in the non-computer market — stereos,
TVs, gaming machines, Internet fridges, and other pieces of electronic equip-
ment that might benefit from an Internet connection. And when HomePlug
becomes incorporated into new generations of appliances, you’ll need just a
power cord to make it work.
PC
HomePlug
bridge
HomePlug
bridge
Home router
Cat 5e
Power cable
AC electrical outlet
Figure 3-5:
Plug your
computer
into the
wall — and
that’s all.
61
Chapter 3: Bluetooth, HPNA, and HomePlug
62
Part I: Wireless Networking Fundamentals
Part II
Making Plans
In this part . . .
This part of the book helps you plan for installing your
wireless home network — from deciding what you’ll con-
nect to the network, to making buying decisions, to plan-
ning the actual installation of wireless networking
equipment in your home.
Chapter 4
Planning a Wireless Home
Network
In This Chapter
ᮣ Determining what to connect to your network and where to put it
ᮣ Putting together a wireless home network budget
ᮣ Connecting to the Internet
ᮣ Planning for security
W
e’re sure you’ve heard the sage advice that, “One who does not plan is
doomed to failure.” On the other hand, management guru and author
Peter Drucker says, “Plans are only good intentions unless they immediately
degenerate into hard work.” Because you’re going to be spending your hard-
earned money to buy the equipment necessary for your wireless network, we
assume that you want to do a little planning before you actually start building
your network. But if you prefer to shoot first and aim later, feel free to skip
this chapter and also Chapter 5.
In this chapter, we show you how to plan a wireless home network — from
selecting a wireless technology to deciding what things to connect and where
to connect them to budgeting. You’ll also find out about other issues that you
should consider when planning your home network, including connecting to
the Internet; sharing printers, other peripherals, and fun, non-computer
devices; and security. When you’re ready to begin buying the wireless home
networking parts (if you haven’t done so already), head to Chapter 5 where
we give some detailed advice about buying exactly the equipment that you
need. In Part III, we show you how to set up and install your wireless home
network.
Deciding What Is Connected
to the Network
Believe it or not, some techno-geeks have a computer in every room of their
house. We have some close friends that fit into that category. You probably
don’t own as many computers as we do, but you might own more than one,
and we’re guessing that you have at least one printer and probably other
peripherals as well. You’re wirelessly networking your home for a reason, no
matter whether it’s to share that cool, new color ink jet printer (or scanner or
digital video recorder), or to play your computer-based MP3s on your new
wide-screen TV, or to give every computer in the house always-on access to
the Internet. Whatever the reason, the first thing that you must do when plan-
ning a wireless home network is to determine what you want connected to
the network.
Counting network devices
When deciding how many computers or other network-aware devices that you
want to connect to your network, you can easily get your answer by counting
all the computers and networkable devices that you own — if you have the
dough to buy the necessary parts, that is. Fortunately, the prices for wireless
networking equipment have dropped enough that cost probably won’t deter
you. If someone in your house regularly uses a particular computer to access
the Internet and/or to print information, that computer should probably be
connected to your network. Bottom line: You’ll almost certainly connect to
your network each of your computers that you use regularly.
Don’t forget about your personal digital assistant (PDA), if you’re lucky
enough to own one of those little gems. Wireless adapters are available that
fit into the Compact Flash slot in a typical PDA that enable you to connect
your palm-sized computer to your home network. (Hop to Chapter 3 for the
lowdown on different types of wireless connectivity.)
And if you’re an audiophile or just like to have fun, you should consider
adding your home digital entertainment system to your network so that you
can share MP3 files, play video games, and watch DVDs from anywhere in
your house, wirelessly! (These cool gadgets are covered in Chapters 11
through 13.)
66
Part II: Making Plans
Choosing wired or wireless
You must decide whether you will connect each computer and network-
aware device wirelessly to the network or perhaps connect one or more by a
wired connection. At first glance, this decision might seem obvious. You’d
expect us to always recommend using wireless because this is a book about
wireless networks; however, using both a wired and a wireless connection can
sometimes make the most sense.
Wireless network devices and wired network devices can be used on the
same network. Both talk to the network and to each other using a protocol
known as Ethernet. (You should be getting used to that term by now if you’ve
been reading from the start of the book. If not, read through Chapters 1 and 2
for more about networking technology.)
The obvious and primary benefit of connecting to a network wirelessly is that
you eliminate wires running all over the place. But if two devices are sitting
on the same desk or table — or are within a few feet of each other — connect-
ing them wirelessly might be pointless. You can get Ethernet cables for $5 or
less; an equivalent wireless capability for two devices might top $100 when
everything is said and done. Keep in mind, however, that your computer
must have a wired network adapter installed to be able to make a wired con-
nection to the network. Fortunately, wired network adapters are dirt cheap
these days. Many new computers come with one installed as a standard fea-
ture (at no additional charge).
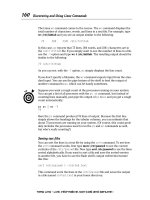
Figure 4-1 shows a simple drawing of a network that connects a wireless PC
to a wired PC through two network devices: an access point (AP) and a hub
or switch. (Recall that your AP connects wireless devices to the rest of the
wired network. A network hub or switch is often used to connect PCs to the
network by a wired connection. In Chapter 1, we describe the purpose of and
differences between APs and hubs and switches.) If you think that it seems
absurd to need two network devices to connect two computers, you’re not
alone. Hardware manufacturers have addressed this issue by creating APs
that have a built-in switch. See the “Choosing an access point” section later in
this chapter for more about these multi-function APs.
HubAP
Wireless PC
PC
Wire
Figure 4-1:
A network
can use
both
wireless
and wired
connections.
67
Chapter 4: Planning a Wireless Home Network
Choosing a wireless technology
After you decide that you want to connect a PC to the network wirelessly,
choose a wireless technology to use. As we discuss extensively in Chapter 2,
the three leading wireless technologies used to connect a computer to a
home network are most often referred to by their technical names: Institute
of Electrical and Electronics Engineers (IEEE) 802.11a, IEEE 802.11b, and IEEE
802.11g. The marketing name for the first two technologies is Wi-Fi, which is a
brand name coined by a wireless trade group. Wi-Fi is supposed to denote
wireless fidelity. Apparently, some marketing guru seems to think that people
still remember the term Hi-Fi, which means high fidelity. We don’t know about
you, but we haven’t heard that term used by normal humans since Wally told
the Beaver to leave his Hi-Fi alone.
The discussion of wireless technology quickly degenerates into a sea of acro-
nyms and techno-speak. If you need a refresher on all this alphabet soup —
or to begin from square one — Chapter 2 is a primer on jargon, abbreviations,
and other nuts-and-bolts issues.
For home users, the three most important practical differences between
IEEE 802.11a, IEEE 802.11b, and IEEE 802.11g networks are speed, price, and
compatibility:
ߜ IEEE 802.11a equipment is typically more expensive than similar IEEE
802.11b equipment but is at least five times faster.
ߜ IEEE 802.11g is as fast as IEEE 802.11a but is almost as cheap as IEEE
802.11b.
ߜ IEEE 802.11a and IEEE 802.11b are not compatible.
ߜ IEEE 802.11b and IEEE 802.11g are compatible.
Because 802.11g is compatible with 802.11b, an AP that includes 802.11g
should work with any 802.11b device as well (at the lower 11 Mbps speed of
802.11b). Thus, you don’t have to look for a dual-mode 802.11b-and-802.11g AP.
If your primary reason for networking the computers in your house is to
enable Internet sharing, IEEE 802.11b is more than fast enough because your
Internet connection probably won’t exceed the 11 Mbps of the 802.11b con-
nection anytime soon; it probably hovers in the sub-1 Mbps range. However,
if you don’t mind spending a little extra money (in some cases, very little
extra), you can be ready for anything that the home electronics and broad-
band Internet services providers can throw at you. And, if you’re a gamer and
into graphics-intensive, multi-user intergalactic battles or dream of watching
real-time streaming video over a broadband connection, your need for speed
will be worth shelling out the extra bucks to get it. Finally, if you plan on
having any servers at home, such as a home server for your DVDs, then
you’ll want the higher bandwidth.
68
Part II: Making Plans
If you want to hedge your bets, look for an AP that can handle both IEEE
802.11a and IEEE 802.11b/g technology standards. Linksys, NETGEAR, D-Link,
and several other leading manufacturers of wireless home networking equip-
ment already offer a/b/g dual-mode, tri-standard wireless devices.
Choosing an access point
The most important and typically most expensive device in a wireless net-
work is the access point (AP; also sometimes called a base station). An AP
acts like a wireless switchboard that connects wireless devices on the net-
work to each other and to the rest of the wired network; it’s required to
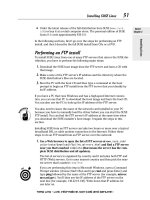
create a wireless home network. Figure 4-2 depicts three PCs connected wire-
lessly to each other through an AP.
Choosing an AP that performs several additional network-oriented services
might also be economical for you. The most popular APs for use in home net-
works are those that can do one or more of the following:
ߜ Connect wired PCs: A switch is an enhanced version of a hub that oper-
ates more efficiently and quickly than a simple hub. By building a switch
inside the AP, you can use the one device to connect PCs to your net-
work by using either wired network adapters or wireless adapters. We
cover hubs and switches in more detail in Chapter 1.
ߜ Assign network addresses: Every computer on a network or on the
Internet has its own address: its Internet Protocol (IP) address.
Computers on the Internet communicate — forwarding e-mail, Web
pages, and the like — by sending data back and forth from IP address to
IP address. A Dynamic Host Configuration Protocol (DHCP) server dynam-
ically assigns private IP addresses to the computers on your home net-
work so that they can communicate. You could use a software utility in
AP
Wireless PCs
Wireless PC
Figure 4-2:
Three PCs
connected
wirelessly to
each other
through
an AP.
69
Chapter 4: Planning a Wireless Home Network
Windows (or Mac OS) to manually assign an IP address to each com-
puter, but that process is tedious and much less flexible than automatic
address assignment.
ߜ Connect to the Internet: With a cable/digital subscriber line (DSL) router
between a broadband modem and your home network, all computers on
the network can access the Internet directly. An AP combined with a
DHCP and cable/DSL router is sometimes called a wireless Internet gate-
way. (See the “Connecting to the Internet” section later in this chapter
for more about the Network Address Translation [NAT] feature that
makes Internet sharing possible and for more on Internet connectivity.)
ߜ Add a print server: A print server enables you to connect a printer
directly to the network rather than connecting it to one of the computers
on the network. See the “Adding printers” section later in this chapter.
ߜ Connect in many ways: The most common method of connecting an AP
to your computer or to the wired portion of your network is through an
Ethernet port, but other options may be much easier to install if your
house isn’t wired with Ethernet cable. If you’ve created a HomePNA
wired network by using the phone lines in your home, look for an AP
that has a HomePNA port. Similarly, if you have set up a HomePlug
wired network using the power lines in your home, shop for an AP with
HomePlug connectivity. (For more on HomePNA and HomePlug, skip to
Chapter 3.)
Access points with HomePlug built into them are very handy when you
want to add a second AP to your network in a remote part of the house
(somewhere that doesn’t get good coverage from your main AP). With
HomePlug, you can plug a small device (like Siemens’ SpeedStream 2521
[
www.speedstream.com]) into the wall and have an instant extra access
point with no special connections at all. (You’ll need to have HomePlug
in your main AP or router to make this work, of course.)
ߜ Provide firewall security: A firewall is a device that basically keeps the
bad guys off your network and out of your computers. We talk a lot more
about firewalls in Chapter 10, but basically, a firewall might be included
in your access point to provide network security.
ߜ Be combined with a modem: If you’re a cable Internet or DSL sub-
scriber, you might be able to use your own modem instead of leasing
one from your Internet service provider (ISP). In that case, consider pur-
chasing a modem that’s also a wireless AP. A cable or DSL modem com-
bined with a wireless Internet gateway is the ultimate solution in terms
of installation convenience and equipment cost savings.
70
Part II: Making Plans
Deciding where to install the AP
If you’ve ever experienced a dreaded dead zone while talking on a cellular
phone, you know how frustrating that can be. Similarly, you should strive to
install your wireless network in a way that eliminates dead wireless network
zones in your house. Ideally, you determine the best placement of your AP so
that no spot in your house is left uncovered; but, if that isn’t possible for
some reason, you should at least find out where, if anywhere, the dead zones
in your house are to optimize your signal coverage.
To achieve optimum signal coverage, the best place to install an AP is near the
center of your home. Think about where you will place the AP when you make
your buying decision. All APs can sit on a shelf or table, but some APs can also
be mounted to a wall or ceiling. When making your AP selection, ensure that it
can be installed where it works best for the configuration of your house as
well as keep the AP out of reach of your little ones or curious pets.
The position of the access point is critical because your entire signal foot-
print emanates from the AP in a known way, centered from on the AP’s
antenna(s). Sometimes not enough consideration is given to the positioning
of the access point because they so often work pretty well out of the box, just
sitting on a table.
Other people install it wrong in the first place. For instance, probably one
of the worst manufacturing decisions ever done to access points was to
put mounting brackets on them. People get the impression that you should
then — duh — mount them on the wall. That’s great except for the fact that,
depending on the antenna you have, you might just kill most of your through-
put. You see, when an antenna is flush up against a wall, as is typical in a wall
mount situation, the signals of the antenna reflect off the wall back at the
antenna, causing interference, and driving down throughput precipitously.
Yech. (But you see, customers WANT their wall mount brackets, so product
managers at wireless LAN companies decided they had to give it to them.)
The best mounting is actually six or more inches off the wall.
The vertical orientation of the mounting point is important as well. Generally,
you have more interference lower to the ground. If you did a cross section of
your house in one-foot intervals, when you get higher and higher, you’d see
less on your map. Thus, signals from an access point located on a shelf low to
the ground are going to find more to run into than the ones that are mounted
higher. Although this might sound like common sense, consider that most
DSL and cable modems are installed by technicians who are used to installing
phone and cable TV lines. How many of these are generally located five feet
off the floor? They’re not; they tend to be along the floorboards and low to
the ground or in the basement. So it’s not surprising that a combined DSL
access point router would be plugged in low to the ground, too.
71
Chapter 4: Planning a Wireless Home Network
See where we are going with this? You don’t care where your cable modem is,
but you should care where your AP functionality is located. And if you have
an integrated product, you’re probably tempted to swap out the cable
modem for the cable modem access point. Simply moving that unit higher
will do a world of good.
Moving an AP out of the line of sight of microwaves, cordless phones, refrig-
erators, and so on is a good idea, too. Mounting the AP in the laundry room
off the kitchen does not make a great deal of sense if you will primarily use
the AP in rooms on the other side of the kitchen. In general, passing through
commonly used interferers (all those metal appliances) like that is not a
smart move.
72
Part II: Making Plans
Wireless interference in the home
Probably the single biggest threat to your home
network is interference in the home. The Federal
Communications Commission (FCC) set aside
certain unlicensed frequencies that could be
used for low-power wireless applications. In
specific frequency bands, manufacturers can
make (and you can use) equipment that doesn’t
require a license from the FCC for the user to
operate. This is different from, say, buying a
50,000-watt radio transmitter and blasting it over
your favorite FM radio frequency band, which
would be a major no-no because those bands
are licensed for certain power levels.
As a result, all sorts of companies have created
products (including cordless phones, wireless
radio frequency [RF] remote controls, wireless
speakers, TV set extenders, and walkie-talkies)
that make use of these frequency bands. If you
have a lot of wireless devices already in your
home, there is a good chance that they might
use some of the same frequency bands that
your home wireless network uses.
Another form of wireless interference comes
from devices that emit energy in the same
bands, such as microwave ovens. If you have
a cordless phone with its base station near
a microwave and you notice that the voice
quality degrades every time that you use the
microwave, that’s because the micro(radio)-
waves are in the same radiation band as your
cordless phone. Motors, refrigerators, and
other home consumer devices do the same
thing.
So what’s the answer? The good news is that
you can deal with almost all of these by know-
ing what to look for and being smart about
where you place your equipment. If your access
point is in the back office and you want to
frequently work in the living room with your
laptop — but your kitchen is in the middle —
you might want to look at adding a second
access point in the living room and link it with
the office via any of a number of alternative
connections options (which we talk about in
Chapter 3) that are immune to the microwave
problems that we mention earlier.
Remember these specific things to look for
when shopping. You’ll see cordless phones
operating primarily in the 900 MHz, 2.4 GHz, and
5 GHz frequencies. The 900 MHz phones pose
no problems, but the 2.4 GHz and 5 GHz phones
will interfere with your wireless network sig-
nals. Just know that cordless phones and home
wireless networks really don’t like each other
very much.
Factors that affect signal strength
Many variables affect whether you get an adequate signal at any given point
in your house, including the following factors:
ߜ Distance from the AP: The further away from the AP, the weaker the
signal. Wi-Fi 802.11b standards, for instance, promise a maximum operat-
ing range of 100 feet at 11 Mbps to 300 feet at 1 Mbps. Indoors, a realistic
range at 11 Mbps is about 60 feet. When 802.11a and 802.11g networks
become more prevalent, their maximum range may vary. Range differs
from vendor to vendor as well.
ߜ The power of the transmitter: Wi-Fi APs transmit at a power output of
less than 30 dBm (one watt).
ߜ The directivity or gain of the antennas attached to the AP and to
wireless network adapters: Different antennas are designed to provide
different radiation patterns. That’s a fancy way of saying that some are
designed to send radio waves in all directions equally, yet others con-
centrate their strength in certain directions. We talk more about this in
Chapter 6, but the thing to keep in mind here is that different brands and
models of access points have different kinds of antennas designed for
different applications. Check out the specifications of the ones that
you’re looking at before you buy them.
ߜ The construction materials used in the walls, floors, and ceilings:
Some construction materials are relatively transparent to radio signals,
but other materials, such as marble, brick, water, paper, bulletproof
glass, concrete, and especially metal, tend to reflect some of the signal,
thus reducing signal strength.
ߜ Your house plan: The physical layout of your house might determine
not only where it’s practical to position an AP, but it also might affect
signal strength because the position of walls, the number of floors, brick
fireplaces, basements, and so on can partially or even completely block
the wireless networks radio signal.
ߜ Client locations: Reception is affected by the distance from the AP to the
rooms in your house where someone will need wireless network access.
ߜ Stationary physical objects: Objects that are permanently installed in
your home, such as metal doors, heating ducts, and brick fireplaces can
block some or all of the signal to particular spots in your house.
ߜ Movable physical objects: Other types of objects, including furniture,
appliances, plants, and even people can also block enough of the signal
to cause the network to slow down or even to lose a good connection.
ߜ APs: Interference can also be caused by the presence of other APs. In
other words, if you’ve got a big house (too big for a single AP to cover),
you have to keep in mind that in parts of the house — like in the area
that’s pretty much directly in between the two APs — you’ll find that the
radio waves from each AP can interfere with the other. Check out the
following section for more information regarding this phenomenon.
73
Chapter 4: Planning a Wireless Home Network
You should attempt to keep a direct line between APs, residential gateways,
and the wireless devices on your network. A wall that is 1.5 feet thick, at a 45°
angle, appears to be almost 3 feet thick. At a 2° angle, it looks over 42 feet
thick. Try to make sure that the AP and wireless adapters are positioned so
that the signal will travel straight through a wall or ceiling for better reception.
RF interference
Nowadays, many devices that once required wires are now wireless, and this
is becoming more prevalent all the time. Some wireless devices use infrared
technology, but many wireless devices, including your wireless network, com-
municate by using radio frequency (RF) waves. As a consequence, the net-
work can be disrupted by RF interference from other devices sharing the
same frequencies used by your wireless network.
Among the devices most likely to interfere with IEEE 802.11b and IEEE 802.11g
networks are microwave ovens and cordless telephones that use the 2.4 GHz
band. The best way to avoid this interference is to place APs and computers
with wireless adapters at least six feet away from the microwave and the base
station of any portable phone that uses the 2.4 GHz band.
Bluetooth devices also use the 2.4 GHz band, but the hop pattern of the Blue-
tooth modulation protocol all but ensures that any interference will be short
enough in duration to be negligible.
Because there are relatively few devices that are trying to share the 5 GHz fre-
quencies used by IEEE 802.11a, your network is less likely to experience RF
interference if it’s using IEEE 802.11a.
You should also try to keep all electric motors and electrical devices that
generate RF noise through their normal operation, such as monitors, refriger-
ators, electric motors, and Universal Power Supply (UPS) units at least three
and preferably six feet away from a wireless network device.
Signal obstacles
Wireless technologies are susceptible to physical obstacles. When you
decide where best to place your AP(s), refer to Table 4-1, which lists obsta-
cles that can affect the strength of your wireless signals. The table lists
common household obstacles (although often overlooked) as well as the
degree to which the obstacle is a hindrance to your wireless network signals.
74
Part II: Making Plans
Table 4-1 Relative Attenuation of RF Obstacles
Obstruction Degree of Attenuation Example
Open space Low Backyard
Wood Low Inner wall; door; floor
Plaster Low Inner wall (older plaster is
lower than newer plaster)
Synthetic materials Low Partitions; home theater
treatments
Cinder block Low Inner wall; outer wall
Asbestos Low Ceiling (older buildings)
Glass Low Non-tinted window
Wire mesh in glass Medium Door; window
Metal tinted glass Medium Tinted window
Human body Medium Groupings of people
(dinner table)
Water Medium Damp wood; aquarium; in-
home water treatments
Bricks Medium Inner wall; outer wall; floor
Marble Medium Inner wall; outer wall; floor
Ceramic High Ceramic tile; ceiling; floor
(metal content
or backing)
Paper High Stack of paper stock, such
as newspaper piles
Concrete High Floor; outer wall; support
pillar
Bulletproof glass High Windows; door
Silvering Very high Mirror
Metal Very high Inner wall; air conditioning;
filing cabinets; reinforced
concrete walls and floors
Source: Intel (www.intel.com/network/connectivity/solutions/wireless/
deploy_site.htm); TeleChoice
75
Chapter 4: Planning a Wireless Home Network
You might want to consider reading Chapter 18 on troubleshooting before
you finish your planning. There are some good tips in that chapter about set-
ting up and tweaking your network.
Adding printers
In addition to your computer(s), you might also want to connect your
printer(s) to the network. Next to sharing an Internet connection, printer
sharing is perhaps the biggest cost-savings reason for building a network of
76
Part II: Making Plans
The RF doughnut
The shape of the radio signal that will be trans-
mitted to the rooms in your home is determined
by the type of antenna that you’ve attached to
the AP. The standard antenna on any AP is an
omnidirectional antenna, which broadcasts its
signal in a spherical shape. The signal pattern
that radiates from a typical omnidirectional
dipole antenna is shaped like a fat doughnut
with a tiny hole in the middle. The hole is directly
above and below the antenna.
The signal goes from the antenna to the floor
above and the floor below, as well as to the floor
on which the AP is located. If your house has
multiple floors, try the second floor first. Most
AP manufacturers claim a range of 100 feet
indoors (at 11 Mbps for IEEE 802.11b or at 54
Mbps for IEEE 802.11a and IEEE 802.11g). To be
conservative, assume a range of 60 feet later-
ally and one floor above or below the AP. Keep
in mind that the signal at the edges of the
“doughnut” and on the floors below or above
the AP will be weaker than the signal nearer the
center and on the same floor as the AP.
Because of this signal pattern, you should try to
place the AP as close to the very center of your
house as is practically possible. Use a drawing of
your house plan to locate the center of the house.
This spot will be your first trial AP location.
Draw a circle with a 60-foot radius on your
house plan, using the trial AP location as the
center of the circle. If your entire house falls
inside the circle, one AP will probably do the
job. Conversely, if some portion of the house is
outside the circle, coverage might be weaker in
that area. You’ll need to experiment to deter-
mine whether you get an adequate signal there.
If you determine that one AP will not cover your
house, you need to decide how best to place
two APs (or even three, as necessary). The
design of your house will determine the best
placement. For a one-level design, start at one
end of the house and determine the best loca-
tion for a 60-foot radius circle that will cover all
the way to the walls. The center of this circle
is the location of the first AP. Then move toward
the other end of the house, drawing 60-foot
radius circles until the house is covered. The
center of each circle will be a trial location of an
AP. If possible, don’t leave any area in the house
uncovered. And especially don’t forget your
garage; before long, you’ll be synchronizing your
wireless network with your car, including send-
ing digital movies and MP3 files. (See Chapter 14
for more about connecting to your car.)
home computers. Rather than buying a printer for every PC, everyone in the
house can share one printer. Or maybe you have one color ink jet printer and
one black-and-white laser printer. If both printers are connected to the net-
work, all computers on the network can potentially print to either printer. Or
perhaps you just want to sit by the pool with your wireless laptop and still be
able to print to the printer up in your bedroom; it’s easy with a network-
attached printer.
You can also share other peripherals, such as network-aware scanners and
fax machines. Leading manufacturers of digital imaging equipment (like
Hewlett-Packard) offer feature-rich, multiple-function peripherals that com-
bine an ink jet or laser printer with a scanner, copier, telephone, answering
machine, and fax machine all-in-one device. If you want to share such a
device over your network, make sure that you buy one that comes with net-
work server software.
Here are two ways to share printers over a wired or wireless network:
ߜ Connect to a computer: The easiest and cheapest way to connect a
printer to the network is to connect a printer to one of the computers on
the network. Windows enables you to share any printer connected to
any Windows computer on the network. (For more on this, read Chap-
ter 11.) The computer to which the printer is connected has to be run-
ning for any other computers on the network to use the printer.
Similarly, if you’re using Apple computers, any computer connected to
the network can print to a printer that’s connected to one of the comput-
ers on the network.
ߜ Print server: Another way to add a printer is through a print server.
Several hardware manufacturers produce print server devices that
enable you to connect one or more printers directly to the network.
Some of these devices connect via a network cable, and others are wire-
less. Many high-end printers even have print server options that install
inside the printer cabinet. For home use, standalone network print
servers are a bit pricey. Surprisingly, some manufacturers bundle a print
server with their cable/DSL router at little or no additional cost. If you
shop around, you can probably find a wireless AP, cable/DSL router, and
print server bundled in one device for less than the cost of some stand-
alone print servers.
You should be able to get your home network printer connections for free.
Obviously, it won’t cost anything to connect a printer to a computer that’s
already connected to the network. Several manufacturers also include a print
server for free with other network devices. If you don’t need one of those
devices, just connect the printer that you want to share to one of the comput-
ers on your home network.
77
Chapter 4: Planning a Wireless Home Network
Figure 4-3 depicts a home network with one printer connected to one of the
PCs on the network and another printer connected to a wireless Internet gate-
way, which is a device that bundles a wireless AP and a cable/DSL router into
a single unit. In this case, the wireless Internet gateway also has a connection
for a printer and acts as a print server. Read through Chapters 1 and 5 for
more information about these devices, what they do, and how to choose
between them.
Connecting your printer to the wireless Internet gateway device is advanta-
geous because a print server permits the printer to stand alone on the net-
work, untethered from any specific computer. When you want to print to a
printer that’s connected directly to a computer on the network, that com-
puter must be present and turned on; and, in many cases, you must have a
user account and appropriate permission to access the shared printer. A
print server makes its printers always available to any computer on the
network — even from poolside.
Adding entertainment and more
When you’re planning your wireless network, don’t forget to plan to add a few
gadgets for fun and relaxation. The wildly popular video-game consoles from
Sony, Microsoft, and Nintendo all offer network connectivity and Internet con-
nectively as well. Don’t forget to consult with the gamers in your household
when planning where you will need network coverage in your home. And
don’t forget to take a look at Chapter 12 for the skinny about connecting your
favorite console to your wireless network, as well as info on network-based,
multi-user PC gaming.
Wireless
PCs
Wireless
Internet
gateway
& printer
server
Printer
Printer
Figure 4-3:
A wireless
home
network
with
wireless
Internet
gateway
and bundled
print server.
78
Part II: Making Plans
An increasing number of consumer electronics devices, such as digital home
entertainment systems, are network aware. Feature-packed home media
servers can store thousands of your favorite MP3s and digital videos and
make them available over the network to all the computers in your house.
Several even include optional wireless networking connectivity. Connecting
the sound and video from your PC to your home theater is even possible —
really. Imagine surfing the Internet on a wide-screen TV! Jump to Chapter 13
for the details about connecting your A/V gear to your wireless home network.
Some of the coolest home electronic technology in recent years enables you
to control the lights, heating, cooling, security system, home entertainment
system, pool, and so on, right from your computer. Equally exciting technol-
ogy enables you to use a home network to set up a highly affordable home
video monitoring system. By hooking these systems to your wireless network
and hooking the network to the Internet, you can make it possible to monitor
and control your home’s utilities and systems, even while away from home.
Check out Chapter 14 for more about these smart home technologies as well
as additional cool things that you can network, such as connecting to your
car or using your network to connect to the world.
Connecting to the Internet
When you get right down to it, the reason why most people build a wireless
network in their home is to share their Internet connection with multiple
computers or devices that they’ve got around the house. That’s why we did
it — and we bet that’s why you’re doing it. We’ve reached the point in our
lives where a computer that’s not constantly connected to a network and to
the Internet is just about useless. We’re not really even exaggerating too
much here. Even things that you do locally (use a spreadsheet program, for
example) can be enhanced by an Internet connection; in that spreadsheet
program, you can link to the Internet to do real-time currency conversions.
What a wireless network brings to the table is true whole-home Internet
access. Particularly when combined with an always-on Internet connection
(which we discuss in just a second) — but even with a regular dialup modem
connection — a wireless network lets you access the Internet from just about
every nook and cranny of the house. Take the laptop out to the back patio,
let a visitor connect from the guest room, or do some work in bed. Whatever
you want to do and wherever you want to do it, a wireless network can
support you.
A wireless home network (or any home network, for that matter) provides
one key element. It uses a NAT router (we describe this later in this section)
to provide Internet access to multiple devices over a single Internet connec-
tion coming into the home. With a NAT router (which will typically be built
into your access point or in a separate home network router), you cannot
79
Chapter 4: Planning a Wireless Home Network
only connect more than one computer to the Internet, but you can simultane-
ously connect multiple computers (and other devices like game consoles) to
the Internet over a single connection. The NAT router has the brains to figure
out which Web page or e-mail or online gaming information is going to which
client (PC/device) on the network.
Not surprisingly, in order to take advantage of this Internet-from-anywhere
access in your home, you’ll need some sort of Internet service and modem.
We’re not going to get into great detail about this topic, but we do want to
make sure that you keep it in mind when you plan your network.
Most people access the Internet from a home computer in these ways:
ߜ Dialup telephone connection
ߜ Digital subscriber line (DSL)
ߜ Cable Internet
ߜ Satellite broadband
DSL, cable, and satellite Internet service are often called broadband Internet
service, which is a term that gets defined differently by just about everyone
in the industry. For our purposes, we define it as a connection that’s faster
than a dialup modem connection (sometimes called narrowband) and which
is always on. That is, you don’t have to use a dialer to get connected, but
instead you have a persistent connection that’s available immediately with-
out any set-up steps necessary for the users (at least after the first time
you’ve set up your connection).
Broadband Internet service providers are busily wiring neighborhoods all
over the United States, but none of the services are available everywhere.
(Satellite is available almost everywhere, but like satellite TV, you need to
meet certain criteria such as having a view to the south: that is, facing the
satellites, which orbit over the equator.) Where it is available, however, grow-
ing numbers of families are experiencing the benefits of always-on and very
fast Internet connectivity.
In some areas of the country, wireless systems are beginning to become avail-
able as a means of connecting to the Internet. Most of these systems use spe-
cial radio systems proprietary to their manufacturers. That is, you buy a
transceiver and an antenna and hook it up on your roof or in a window. But a
few are actually using modified versions of Wi-Fi to provide Internet access to
people’s homes. In either case, you’ll have some sort of modem device that
connects to your AP via a standard Ethernet cable, just like you’d use for a
DSL or cable modem connection.
80
Part II: Making Plans
For the purpose of this discussion of home wireless networks, DSL and cable
Internet are equivalent. If you can get both at your house, shop around for
price and talk to your neighbors about their experiences. You might also
check out
www.broadbandreports.com, which is a Web site where cus-
tomers of a variety of broadband services discuss and compare their experi-
ences. As soon as you splurge for a DSL or cable Internet connection, the PC
that happens to be situated nearest the spot where the installer placed the
DSL or cable modem is at a distinct advantage because it will be the easiest
computer to connect to the modem — and therefore to the Internet. Most
DSL and cable modems connect to the PC through a wired network adapter
card. The best way, therefore, to connect any computer in the home to the
Internet is through a home network.
You have two ways to share an Internet connection over a home network:
ߜ Software-based Internet connection sharing: Windows 98 (and later
versions of Windows) and Mac OS X enable sharing of an Internet con-
nection. Each computer in the network must be set up to connect to the
Internet through the computer that’s connected to the broadband
modem. The disadvantage with this system is that you can’t turn off or
remove the computer that’s connected to the modem without discon-
necting all computers from the Internet. In other words, the computer
that’s connected to the modem must be on for other networked comput-
ers to access the Internet through it.
ߜ Cable/DSL router: By connecting a cable/DSL router between the broad-
band modem and your home network, all computers on the network can
access the Internet without going through another computer. The
Internet connection no longer depends on any computer on the network.
Cable/DSL routers are also DHCP servers and typically include switches.
In fact, the AP and/or the modem can also include a built-in router that
provides instant Internet sharing all in one device.
Read through Chapter 9 for the details on how to set up Internet sharing.
Given the fact that you can buy a router (either as part of an access point or
a separate router) for well under $100 these days (and prices continue to
plummet), we think that it’s really a false economy to skip the router and use
a software-based Internet connection sharing setup. In our minds, at least,
the advantage of the software-based approach (very slightly less money up
front) is outweighed by the disadvantages (requiring the PC to always be on,
lower reliability, and lower performance).
81
Chapter 4: Planning a Wireless Home Network
Both software-based Internet connection sharing and cable/DSL routers
enable all the computers in your home network to share the same network
(IP) address on the Internet. This capability uses network address translation
(NAT). A device that uses the NAT feature is often called a NAT router. The
NAT feature communicates with each computer on the network by using a
private IP address assigned to that local computer, but the router uses a
single public IP address in data that it sends to computers on the Internet. In
other words, no matter how many computers you have in your house sharing
the Internet, they look like only one computer to all the other computers on
the Internet.
Whenever your computer is connected to the Internet, beware the potential
that some malicious hacker will try to attack your computer with a virus or
try to break into your computer to trash your hard drive or steal your per-
sonal information. Because NAT technology hides your computer behind the
NAT server, it adds a measure of protection against hackers, but you should-
n’t rely on it solely for protection against malicious users. You should also
consider purchasing full-featured firewall software that actively looks for and
blocks hacking attempts, unless the AP or router that you purchase provides
that added protection. We talk about these items in more detail in Chapter 10.
As we recommend earlier in the section “Choosing an access point,” try to
choose an AP that also performs several other network-oriented services.
Figure 4-4 depicts a wireless home network using an AP that also provides
DHCP, NAT, a printer server, and switched hub functions in a single stand-
alone unit. This wireless Internet gateway device then connects to the DSL or
cable modem, which in turn connects to the Internet. Such a configuration
provides you with connectivity, sharing, and a little peace of mind, too.
If you already have a wired network and you’ve purchased a cable/DSL router
Internet gateway device without the AP function, you don’t have to replace
the existing device. Just purchase a wireless access point. Figure 4-5 depicts
the network design of a typical wired home network with an AP and wireless
stations added. Each PC in the wired network is connected to the cable/DSL
router, which is also a switch. By connecting the AP to the router, the AP acts
as a bridge between the wireless network segment and the existing wired
network.
82
Part II: Making Plans