Wireless Home Networking for dummies phần 6 ppsx
Bạn đang xem bản rút gọn của tài liệu. Xem và tải ngay bản đầy đủ của tài liệu tại đây (989.43 KB, 39 trang )
Setting Up Internet Connection Sharing
Internet gateways and cable/DSL routers are certainly the easiest way to
accomplish Internet connection sharing, but we know of a more economical
method — software-based sharing using an attached PC. We should say, right
up front, that we think that the hardware approach — that is, using a wireless
Internet gateway or a cable/DSL router — is the best way to go. But if you
really need to save a few bucks (and we mean only a few because you can get
a router for $50 these days), try this approach. It works, but it’s not as good
as the hardware approach because it can affect the performance of both your
network overall as well as the particular computer that you use for Internet
connection sharing. Windows 98 Second Edition (SE) and later versions of
Windows provide a software-based solution for sharing an Internet connec-
tion over a local area network (LAN). This option is available whether you’re
using a wired network, a wireless network, or a combination of the two.
Software-based Internet connection sharing is not efficient if you have more
than four computers trying to share an Internet connection simultaneously.
The cost of a broadband router is far less than the cost of a dedicated com-
puter in most cases. And broadband routers usually contain other features that
this software connection sharing doesn’t offer, such as port forwarding (Port
Address Translation; PAT) to forward incoming requests to specific machines
based on port, as well as offering a demilitarized zone (DMZ). (A DMZ, in the
network world, is a network zone that has no firewall protection — we discuss
this more in Chapter 10.) On the other hand, if you have an extra computer lying
around and have time on your hands to maintain it, software-based Internet
connection sharing could be your best option. (We’re still not convinced.)
When you set up a Windows software-based shared Internet connection, you
select one computer to be the Internet connection host — the computer (run-
ning Windows 98 or later) that is always turned on and always connected to
the Internet so that any other networked computer is able to access the
Internet through it. This Internet connection host computer also must have
two network adapters: one that connects to the Internet and another that
communicates with the local area network. The connection to the Internet
could be through a dialup modem, a broadband modem, or a connection to
another larger network that connects to the Internet. After you complete the
setup wizard, Windows turns the Internet connection server computer into
both a DHCP server and your gateway to your broadband connection and the
Internet.
You need to understand what Windows Internet Connection Sharing does not
do: It does not convert the Internet connection host into a wireless access
point. By contrast, software included with Mac OS 9 and Mac OS X v. 10.2 or
later is capable of turning your AirPort-enabled Mac into an AP.
175
Chapter 9: Setting Up Internet Sharing
Using Windows Internet Connection Sharing software is equivalent to adding
a cable/DSL router to your network. You could, for example, purchase a stand-
alone AP — one that’s not also a router and DHCP server — and attach it to
your PC via an Ethernet port. All wireless PCs in your house can then connect
to the AP, which in turn connects to your host PC. You then connect a dialup
modem to your computer (or perhaps installed inside your computer) or
connect the modem to a second Ethernet port. You can then share your
Internet connection (through the dialup modem or through a broadband
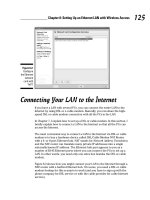
modem) with the computers that connect wirelessly to the AP. Figure 9-9
depicts a wireless home network that uses Windows Internet Connection
Sharing to provide an Internet connection to all wireless PCs on the network.
When using Windows Internet Connection Sharing, the host computer must
always be on, with Windows running, so that the other computers in the
home network can access the Internet. In addition, each of the other comput-
ers on the network must be set up to obtain an IP address automatically,
which we describe in the earlier section “Obtaining an IP Address
Automatically.”
Windows 98 SE and Windows Me
To set up Windows Internet connection sharing in Windows 98 SE or
Windows Me:
1. Choose Start➪Settings➪Control Panel.
2. Double-click the Add/Remove Programs icon in the Control Panel.
Cable/DSL
modem
Internet
Host PC
Wireless
PCs
AP
Ethernet cable
Wireless
Figure 9-9:
A wireless
home
network
using
Windows
Internet
Connection
Sharing to
provide an
Internet
connection
to all
wireless
PCs on the
network.
176
Part III: Installing a Wireless Network
3. When the Add/Remove Programs Properties dialog box appears, click
the Windows Setup tab.
Windows Setup will take a few moments to search your hard drive to
determine what Windows components are currently installed on your
computer.
4. When Windows Setup displays the list of Windows components, high-
light the Internet Tools option but make sure that its check box
remains marked (see Figure 9-10).
5. Click the Details button and then select the Internet Connection
Sharing check box (if it’s not already marked).
6. Click OK twice.
7. Insert the Windows CD when prompted and then click OK again.
8. When the Copying Files dialog box appears, make sure that the drive
letter in the Copying Files From text box is the drive letter assigned to
your CD-ROM drive and then click OK once more.
Windows Setup copies a few files to your computer’s hard drive and
then displays the Internet Connection Sharing Wizard.
9. On the wizard’s opening screen, click Next to display a list of network
adapters (all the adapters ever installed on this computer).
10. Select the network adapter that you plan to use to connect to the
Internet and then click Next.
Figure 9-10:
The
Windows
Setup tab
of the
Add/Remove
Programs
Properties
dialog box in
Windows 98
SE or Me.
177
Chapter 9: Setting Up Internet Sharing
If you’re using a cable or DSL modem, be sure to select the adapter
that’s connected to the cable/DSL modem. If you’re using a dialup
modem, select this modem from the list.
The next screen that appears looks almost the same as the previous
screen but no longer lists the adapter that you selected in this step.
11. Select the adapter that communicates with your network and then
click Next.
If you plan to use your PC as a router for your wireless network, you
should select the Ethernet adapter to which your AP is connected.
12. When the wizard prompts you to create a disk for the client comput-
ers, click Next, insert a floppy disk, and then click OK.
The wizard copies two files to the floppy disk:
icsclset.exe and
ReadMe.txt.
If one of the client computers has been connecting to the Internet
through a dialup connection, you might need to run the
icsclset.exe
program that the wizard copied onto the floppy disk. This program
reconfigures your Web browser to connect to the Internet through the
network adapter rather than through the dialup adapter. Run this pro-
gram after finishing the wizard if you can’t connect to the Internet from
one of the computers on your network.
13. Click Finish to complete the wizard.
When the wizard completes its magic, the PC on which you ran the
wizard is now both a DHCP server and a NAT server (refer to the discus-
sion in Chapter 2) — equivalent to a broadband router. You might need
to restart any PC or AP that is connected to the PC for the changes to
take effect.
The host PC has to be turned on for the other computers sharing its connec-
tion to be able to access the Internet.
To remove Internet connection sharing, repeat Steps 1 through 6 — except
that in Step 5, clear the Internet Connection Sharing check box.
Windows 2000
To set up Internet connection sharing in Windows 2000:
1. Choose Start➪Settings and then click the Network and Dial-up
Connections menu item to display Network and Dial-up Connections
window.
2. Highlight the Local Area Connection item for the network connection
device that will be connected to the Internet.
178
Part III: Installing a Wireless Network
3. Choose File➪Properties to display the Local Area Connection
Properties dialog box.
4. On the Sharing tab, select the Enable Internet Connection Sharing for
This Connection check box, as shown in Figure 9-11, and then click OK.
A pop-up message informs you of the local IP address that will be
assigned to the host computer (192.168.0.1) when it restarts. The mes-
sage also instructs you to set each of the client computer’s TCP/IP set-
tings to obtain an IP address automatically (which we discuss earlier in
this chapter).
5. If you’re that sure you want to enable Internet Sharing, click the Yes
button.
You’re returned to the Network and Dial-up Connections window.
6. Close the Network and Dial-up Connections window.
After completing these steps, this Windows 2000 PC is now both a DHCP
server and a NAT server, equivalent to a broadband router. You might
need to restart any PC or AP that is connected to the PC for the IP
addresses to be reassigned.
To remove Internet connection sharing, display the Sharing tab of the Local
Area Connection Properties dialog box and then clear the Enable Internet
Connection Sharing for This Connection check box.
Figure 9-11:
Enable
Internet
connection
sharing in
Windows
2000.
179
Chapter 9: Setting Up Internet Sharing
Windows XP
To set up Internet connection sharing in Windows XP:
1. Choose Start➪Control Panel.
2. Double-click the Network Connections icon in the Control Panel to dis-
play the Network Connections window.
3. Highlight the Network Connection item for the network device that
you want to use to connect to the Internet and then choose
File➪Properties.
The Local Area Connection Properties dialog box appears.
4. On the Advanced tab, select the Allow Other Network Users to
Connect through This Computer’s Internet Connection check box, as
shown in Figure 9-12.
By default, the Allow Other Network Users to Control or Disable the
Shared Internet Connection check box is selected. Unless you want
other users on the network to be able to enable and disable the shared
connection, clear this check box. For dialup modems, you can also
cause the modem to dial automatically when another computer on the
network attempts to access the Internet.
Using the same process as above on your dialup networking connection,
select the Establish a Dial-up Connection Whenever a Computer on My
Network Attempts to Access the Internet check box. Then click OK. See
Figure 9-12.
You’re returned to the Network Connections window.
Figure 9-12:
Enable
Internet
connection
sharing in
Windows
XP.
180
Part III: Installing a Wireless Network
5. Close the Network Connections window.
When you complete these steps, this Windows XP PC is now both a
DHCP server and a NAT server, equivalent to a broadband router. You
might need to restart any PC or AP that is connected to the PC for the IP
addresses to be reassigned.
To remove Internet connection sharing, display the Advanced tab of the
Local Area Connection Properties dialog box and clear Allow Other Network
Users To Connect through This Computer’s Internet Connection check box.
Mac OS X v. 10.2 (Jaguar)
To set up Internet connection sharing in Mac OS X v. 10.2 or later:
1. From the Apple menu, click System Preferences to display the System
Preferences pane.
2. Click the Sharing icon in the System Preferences panel to display the
Sharing panel.
If you don’t see the Sharing icon, click the Show All button on top of the
System Preferences pane, and it will appear.
3. Click the Internet tab, as shown in Figure 9-13.
Figure 9-13:
The Internet
tab in the
Sharing
pane of
Mac OS X.
181
Chapter 9: Setting Up Internet Sharing
Mac OS X senses which adapter is currently connected to the Internet
and offers an option to share that connection with other computers on
your local network.
4. Click the Start button to start sharing.
5. Close the Sharing panel and the System Preferences panel.
After you complete these steps, this Mac OS X computer is now both a
DHCP server and a NAT server, equivalent to a broadband router. You
might need to restart any computer or AP that is connected to the PC
for the IP addresses to be reassigned.
To remove Internet connection sharing, display the Internet tab of the
Sharing pane in System Preferences and click the Stop button.
The host PC has to be turned on for the other computers sharing its connec-
tion to be able to access the Internet.
182
Part III: Installing a Wireless Network
Chapter 10
Securing Your Wireless Home
Network
In This Chapter
ᮣ Worrying about wireless home network security
ᮣ Understanding Wired Equivalent Privacy (WEP)
ᮣ Getting security on your network
ᮣ Checking out future security enhancements
I
f you read the news — well, at least if you read the same networking news
sources that we do — you’ve probably seen and heard a thing or two (or a
hundred) about wireless local area network (LAN) security. In fact, you really
don’t need to read specialized industry news to hear about this. Many major
newspapers and media outlets — The New York Times, the San Jose Mercury
News, and USA Today, among others — have run feature articles documenting
the insecurity of wireless LANs. Most of these stories have focused on
wardrivers, those folks who park in the lot in front of an office building,
pull out their laptops, and easily get onto corporate networks.
In this chapter, we talk a bit about these security threats and how they might
affect you and your wireless home network. We also (being the helpful types
that we are) give you some good advice on how you can make your wireless
home network more secure. And finally, we talk about some new solutions
that are being developed by the wireless LAN industry to beef up wireless
LAN security.
The advice that we give in this section applies equally to your wireless net-
work, whether it uses 802.11b, a, or g. We’re not going to be specific to any
particular 802.11 technology in this chapter because the steps that you take
to batten down the hatches on your network are virtually identical, regard-
less of which version of 802.11 you choose. (If you’ve missed our discussion
on 802.11 basics, jump back to Chapter 2.)
No network security system is absolutely secure and foolproof. And, as we dis-
cuss in this chapter, Wi-Fi networks have some inherent flaws in their security
systems, which means that even if you fully implement the security system in
Wi-Fi (WEP), a determined individual could still get into your network.
We’re not trying to scare you off here. In a typical residential setting, chances
are good that your network won’t be subjected to some sort of determined
attacker like this. So follow our tips, and you should be just fine.
Assessing the Risks
The biggest advantage of wireless networks — the fact that you can connect
to the network just about anywhere within range of the base station (up to
300 feet) — is also the biggest potential liability. Because the signal is carried
over the air via radio waves, anyone else within range can pick up your net-
work’s signals, too. It’s sort of like putting an extra RJ-45 jack for a wired LAN
out on the sidewalk in front of your house: You’re no longer in control of who
can access it.
184
Part III: Installing a Wireless Network
No security at all!
The vast majority of wireless LAN gear (access
points, network cards, and so on) is shipped to
customers with all the security features turned
off. That’s right: zip, nada, zilch, no security at all.
Just a wide-open access point, sitting there
waiting for anybody who passes by (with a Wi-
Fi–equipped computer, at least) to associate
with the access point and get on your network.
Now this isn’t a bad thing in and of itself; initially
configuring your network with security features
turned off and then enabling the security features
after things are up and running is easier than
doing it the other way ’round. Unfortunately,
many people never take that extra step and acti-
vate their security settings. So a huge number of
access points out there are completely open to
the public (when they are within range, at least).
Folks who’ve spent some time wardriving (which
we describe in this chapter’s introduction) say
that up to 60 percent of all access points that
they encounter have no security methods in
place at all.
Now, we should add that some people pur-
posely leave their access point security off
in order to provide free access to their neigh-
borhoods. (We talk about this in Chapter 16.) But
we find that many people don’t intend to do this
but have done so unknowingly. We’re all for
sharing, but keep in mind that it could get you in
trouble with your broadband provider (who
might cancel your line if you’re sharing with
neighbors). If you don’t want other people on
your network, take the few extra minutes that it
takes to set up your network security. You can
test your network — to make sure WEP is really
enabled — by using a program like Network
Stumbler (which we discuss at length in
Chapter 16).
General Internet security
Before we get into the security of your wireless LAN, we need to talk for a
moment about Internet security in general. Regardless of what type of LAN
you have — wireless, wired, a LAN using powerlines or phonelines, or even no
LAN — when you connect a computer to the Internet, some security risks are
involved. Malicious crackers (the bad guys of the hacker community) can use
all sorts of tools and techniques to get into your computer(s) and wreak havoc.
For example, someone with malicious intent could get into your computer
and steal personal files (such as your bank statements that you’ve down-
loaded using Quicken) or mess with your computer’s settings . . . or even
erase your hard drive. Your computer can even be hijacked (without you
knowing it) as a jumping off point for other people’s nefarious deeds; as a
source of an attack on another computer (the bad guys can launch these
attacks remotely using your computer, making them that much harder to
track down); or even as source for spam e-mailing.
What we’re getting at here is the fact that you need to take a few steps to
secure any computer attached to the Internet. If you have a broadband (digi-
tal subscriber line [DSL], satellite, or cable modem) connection, you really
need to secure your computer(s). The high speed, always-on connections
that these services offer make it easier for a cracker to get into your com-
puter. We recommend that you take three steps to secure your computers
from Internet-based security risks:
ߜ Use and maintain antivirus software. Many attacks on computers don’t
come from someone sitting in a dark room, in front of a computer screen,
actively cracking into your computer. They come from viruses (often
scripts embedded in e-mails or other downloaded files) that take over
parts of your computer’s operating system and do things that you don’t
want your computer doing (like sending a copy of the virus to everyone in
your e-mail address book and then deleting your hard drive). So pick out
your favorite antivirus program and use it. Keep the virus definition files
(the data files that tell your antivirus software what’s a virus and what’s
not) up to date. And for heaven’s sake, use your antivirus program!
ߜ Install a personal firewall on each computer. Personal firewalls are pro-
grams that basically take a look at every Internet connection entering or
leaving your computer and check it against a set of rules to see whether
the connection should be allowed. After you’ve installed a personal fire-
wall program, wait about a day and then look at the log. You’ll be shocked
and amazed at the sheer number of attempted connections to your com-
puter that have been blocked. Most of these attempts are relatively
innocuous, but not all are. If you’ve got broadband, your firewall might
block hundreds of these attempts every day.
We like ZoneAlarm —
www.zonelabs.com — for Windows computers,
and we use the built-in firewall on our Mac OS X computers.
185
Chapter 10: Securing Your Wireless Home Network
ߜ Turn on the firewall functionality in your router. Whether you use a
separate router or one integrated into your wireless access point, it will
have at least some level of firewall functionality built in. Turn this func-
tion on when you set up your router/access point. (It’ll be an obvious
option in the configuration program and might well be on by default.)
We like to have both the router firewall and the personal firewall soft-
ware running on our PCs. It’s the belt-and-suspenders approach, but it
makes our networks more secure.
In Chapter 12, we talk about some situations (particularly when you’re
playing online games over your network) where you need to disable
some of this firewall functionality. We suggest that you do this only
when you must. Otherwise, turn on that firewall — and leave it on.
Some routers use a technology called stateful packet inspection firewalls,
which examine each packet (or individual group) of data coming into the
router to make sure that it was actually something requested by a com-
puter on the network. If your router has this function, we recommend
that you try using it because it’s a more thorough way of performing fire-
wall functions. Others simply use Network Address Translation (NAT,
which we introduce in Chapter 2 and further discuss in Chapter 16) to
perform firewall functions. This isn’t quite as effective as stateful packet
inspection, but it does work quite well.
There’s a lot more to Internet security — like securing your file sharing (if
you’ve enabled that) — that we just don’t have the space to get into. Check
out Chapter 11 for a quick overview on this subject. To get really detailed
about these subjects, we recommend that you take a look at Home Networking
For Dummies, by Kathy Ivens (Wiley Publishing, Inc.) for coverage of those
issues in greater detail.
After you’ve set up your firewall, test it out. Check out this great site that has
a ton of information about Internet security:
www.grc.com. The guy behind
this site, Steve Gibson, is a genius on the topic, and he’s built a great tool
called ShieldsUP!! that lets you run through a series of tests to see how well
your firewall(s) is working. Go to
www.grc.com and test yourself.
Airlink security
The area that we really want to focus on in this chapter is the aspect of net-
work security that’s unique to wireless networks: the airlink security. In other
words, these are the security concerns that have to do with the radio fre-
quencies being beamed around your wireless home network.
Traditionally, computer networks use wires that go from point to point in
your home (or in an office). When you’ve got a wired network, you’ve got
physical control over these wires. You install them, and you know where they
go. The physical connections to a wired LAN are inside your house. You can
186
Part III: Installing a Wireless Network
lock the doors and windows and keep someone else from gaining access to
the network. Of course, you’ve got to keep people from accessing the network
over the Internet, as we mention in the previous section, but locally it would
take an act of breaking and entering by a bad guy to get on your network.
(Sort of like on Alias where they always seem to have to go deep into the
enemy’s facility to tap into anything.)
Wireless LANs turn this premise on its head because you’ve got absolutely no
way of physically securing your network. Now you can do things like go out-
side with a laptop computer and have someone move the access point around
to reduce the amount of signal leaving the house. But that’s really not going
to be 100 percent effective, and it can reduce your coverage within the house.
Or you could join the tinfoil hat brigade (“The CIA is reading my mind!”) and
surround your entire house with a Faraday cage. (Remember those from
physics class? Us neither, but they have something to do with attenuating
electromagnetic fields.)
Some access points have controls that let you limit the amount of power
used to send radio waves over the air. This isn’t a perfect solution (and it can
dramatically reduce your reception in distant parts of the house), but if you
live in a small apartment and are worried about beaming your Wi-Fi signals to
the apartment next door, you might try this.
Basically, what we’re saying here is that the radio waves sent by your wire-
less LAN gear are going to leave your house, and there’s not a darned thing
that you can do about it. Nothing. What you can do, however, is make it diffi-
cult for other people to tune into those radio signals, thus (and more impor-
tantly) making it difficult for those who can tune into them to decode them
and use them to get onto your network (without your authorization) or to
scrutinize your e-mail, Web surfing habits, and so on.
You can take several steps to make your wireless network more secure and to
provide some airlink security on your network. We talk about these in the fol-
lowing sections, and then we discuss some even better methods of securing
wireless LANs that are coming down the pike.
Introducing Wired Equivalent
Privacy (WEP)
The primary line of defense in a Wi-Fi network is Wired Equivalent Privacy
(WEP). WEP is an encryption system, which means that it scrambles — using
the encryption key (or WEP key, in this case) — all the data packets (or indi-
vidual chunks of data) that are sent over the airwaves in your wireless net-
work. Unless someone on the far end has the same key to decrypt the data,
187
Chapter 10: Securing Your Wireless Home Network
he (theoretically) won’t be able to make heads nor tails of it. It’ll be gibber-
ish. So even though your data is beamed right through the side of the house
into that snooper’s PC, it will arrive in an unreadable form.
WEP also has a second security function: Not only does it encrypt your data
being transmitted over the airlink, it also can be used to authenticate users
connecting to the access point. In other words, not only do you need a WEP
key to decode data transmitted over the airlink, but you also need a WEP key
to get your computer connected to the access point in the first place. If an
access point has WEP enabled and you don’t have the key, you can try and
try, but you’ll never get connected to it.
Although the WEP key itself is a long series of numbers and letters, you often
don’t have to make up this key yourself. (It’s harder than you think to just
spew out some random numbers and letters.) Instead, you just have to enter
a pass phrase (some regular English words that you can remember), and the
software will use this pass phrase to generate the key for you.
How about a bit more about WEP?
WEP encrypts your data so that no one can read it unless they have the key.
That’s the theory behind WEP, anyway. WEP has been a part of Wi-Fi net-
works from the beginning. (The developers of Wi-Fi were initially focused on
the business market, where data security has always been a big priority.) The
name itself belies the intentions of the system’s developers; they wanted to
make wireless networks as secure as wired networks.
In order for WEP to work, you must activate WEP on all the Wi-Fi devices in
your network via the client software or configuration program that came with
the hardware. And every device on your network must use the same WEP key
to gain access to the network. (We talk a bit more about how to turn on WEP
in the “Clamping Down on Your Wireless Home Network’s Security” section of
this chapter.)
For the most part, WEP is WEP is WEP. In other words, it doesn’t matter
which vendor made your access point or which vendor made your laptop’s
PC card network adapter — the implementation of WEP is standardized
across vendors. Keep this one difference in mind, however: WEP key length.
Encryption keys are categorized by the number of bits (1s or 0s) used to
create the key. Most Wi-Fi equipment these days uses 128-bit WEP keys, but
some early gear (like the first generation of the Apple AirPort equipment)
supported only a 64-bit WEP key.
A few access points and network adapters on the market even support longer
keys, such as equipment from D-Link, which can support a 256-bit key. Keep in
mind that the longest standard (and common) key is 128 bits. Most equipment
enables you to decide how long to make your WEP key; you can often choose
188
Part III: Installing a Wireless Network
between 64 and 128 bits. Generally, for security purposes, you should pick the
longest key available. If, however, you have some older gear that can’t support
longer WEP key lengths, you can use a shorter key. If you have one network
adapter that can handle only 64-bit keys but you’ve got an access point that
can handle 128-bit keys, you need to set up the access point to use the shorter,
64-bit key length.
You can almost always use a shorter-than-maximum key length (like using a
64-bit key in a 128-bit-capable system), but you can’t go the other way. So if
you set your access point up to use a 128-bit key, your older 64-bit network
adapter won’t be able to connect to it.
What’s wrong with WEP?
WEP sounds like a pretty good deal, doesn’t it? It keeps your data safe while
it’s floating through the ether by encrypting it, and it keeps others off your
access point by not authenticating them. In fact, it’s pretty good. Notice that
we didn’t say that WEP is great or superb or awesome. Just pretty good.
We’re actually being somewhat generous. With the proper tools and enough
network traffic to analyze, a dedicated network cracker can break WEP (or
independently figure out the WEP key by using some mathematical techniques)
in a relatively short time. In the business environment, where a ton of traffic is
traveling over the wireless network and valuable business secrets are part of
this traffic, this is a pretty big deal. The math to break WEP is pretty hard
(you’re not going to do it in your head), but plenty of freely available tools
are on the Web that let a computer do it relatively quickly.
We’re being generous with WEP because we strongly believe that in the home
environment — particularly in the suburbs and other less-than-densely popu-
lated areas — the chances of you having someone who can pick up your sig-
nals AND be motivated to go through all the trouble of breaking your WEP
code are pretty darn slim. No one’s ever tried to do it to us, and we don’t
know any folks who have had this happen to them at home. So we don’t
sweat it all that much.
But we do think that WEP needs to be improved. We use wireless networks at
work too, and we’d like additional security. The final section of this chapter,
“Looking into the Crystal Ball,” talks about some newer systems that are on
the way which will complement or supplant WEP entirely and offer greater
security.
We’re writing Wireless Home Networking For Dummies here, not Secure Office
Wireless Networks For Dummies. More sophisticated security systems are
available now for business networks that can improve upon the security of a
wireless LAN. Many of these systems rely upon using stronger encryption
189
Chapter 10: Securing Your Wireless Home Network
systems called Virtual Private Networks (VPNs), which encrypt all data leav-
ing the PC (not just wireless data) with very strong encryption. You might
even have a VPN system on that work laptop that you bring home with you
every night. VPN is great, and as long as your router supports VPN tunneling,
you should be able to connect to the office network from your home LAN
using your VPN client. But VPN technology is not anywhere close to being
cheap, simple, and user-friendly enough to be something that we’d ever rec-
ommend that you install in your house to secure your wireless LAN.
Clamping Down on Your Wireless
Home Network’s Security
Well, enough of the theory and background. Time to get down to business. In
this section, we discuss some of the key steps that you should take to secure
your wireless network from intruders. None of these steps are difficult, will
drive you crazy, or make your network hard to use. All that’s really required
is the motivation to spend a few extra minutes (after you’ve got everything
up and working) battening down the hatches and getting ready for sea. (Can
you tell that Pat used to be in the Navy?)
The key steps in securing your wireless network, as we see them, are the
following:
1. Change all the default values on your network.
2. Enable WEP.
3. Close your network to outsiders (if your access point supports this).
Hundreds of different access points and network adapters are available on
the market. Each has its own unique configuration software. (At least each
vendor does; and often, different models from the same vendor have different
configuration systems.) You need to RTFM (Read the Fine Manual!). We’re
going to give you some generic advice on what to do here, but you really,
really, really need to pick up the manual and read it before you do this to
your network. Every vendor has slightly different terminology and different
ways of doing things. If you mess up, you might temporarily lose wireless
access to your access point. (You should still be able to plug a computer in
with an Ethernet cable to gain access to the configuration system.) You might
even have to reset your access point and start over from scratch. So follow
the vendor’s directions (as painful at that may be — there’s a reason why
people buy For Dummies books). We tell you the main steps that you need to
take to secure your network; your manual will give you the exact line-by-line
directions on how to implement these steps on your equipment.
190
Part III: Installing a Wireless Network
Most access points also have some wired connections available — Ethernet
ports that you can use to connect your computer to the access point. You can
almost always use this wired connection to run the access point configuration
software. When you’re setting up security, we recommend making a wired con-
nection and doing all your access point configuration in this manner. That way,
you can avoid accidentally blocking yourself from the access point when your
settings begin to take effect.
Getting rid of the defaults
It’s incredibly common to go to a Web site like Netstumbler.com, look at the
results of someone’s Wi-Fi reconnoitering trip around their neighborhood, and
see dozens of access points with the same exact Service Set Identifier (SSID,
or network name; see Chapter 2). And it’s usually Linksys because Linksys is
the most popular vendor out there. Many folks bring home an access point,
plug it in, turn it on, and then do nothing. They leave everything as it was set
up from the factory. They don’t change any of the default settings.
Well, if you want people to be able to find your access point, there’s
nothing better (short of a sign on the front door; check out our discussion of
warchalking — the practice of leaving marks on sidewalks to point out open
APs — in Chapter 16) than leaving your default SSID broadcasting out there
for the world to see. In some cities, you could probably drive all the way
across town with a laptop set to
Linksys as an SSID and stay connected the
entire time. (We don’t mean to just pick on Linksys here. You could probably
do the same thing with an SSID set to
default, D-Link’s default, or any of the
top vendor’s default settings.)
191
Chapter 10: Securing Your Wireless Home Network
WEP key length: Do the math
If you’re being picky, you might notice that WEP
keys aren’t really as long as their names say
that they are. The first 24 bits of the key are actu-
ally something called an initialization vector,
and the remaining bits comprise the key itself.
Therefore, 128-bit keys are really only 104 bits
long, and 64-bit keys are really only 40 bits long.
So when you enter a 128-bit key (and you do the
math), you’ll see that there are only 26 alphanu-
meric characters (or digits) for you to enter in
the key (4 bits per digit × 26 = 104 bits). This isn’t
something that you really need to know
because everyone adds the 24 initialization
vector bits to the WEP key length number, but
just in case you were curious. . . .
When you begin your security crusade, the first thing that you should do is
to change all the defaults on your access point. At a minimum, you should
change the following:
ߜ Your default SSID
ߜ Your default administrative password
You want to change this password because if you don’t, someone who gains
access to your network can guess at your password and end up changing all
the settings in your access point without you knowing. Heck, if they wanted
to teach you a security lesson — the tough love approach, we guess — they
could even block you out of the network until you reset the access point.
These default passwords are well known and well publicized. Just look on the
Web page of your vendor, and we bet that you’ll find a copy of the user’s
guide for your access point available for download. Anyone who wants to
know them does know them.
When you change the default SSID on your access point to one of your own
making, you’ll also need to change the SSID setting of any computers (or
other devices) that you want to connect to your LAN. To do this, follow the
steps that we discuss in this part’s earlier chapters.
This tip really falls under the category of Internet security (rather than airlink
security), but here goes: Make sure that you turn off the Allow/Enable Remote
Management function (it might not be called this exactly but something like
that). This function is designed to allow people to connect to your access point
over the Internet (if they know your IP address) and do any or all the configura-
tion stuff from a distant location. If you need this turned on (perhaps you have
a home office, and your IT gal wants to be able to configure your access point
remotely), you’ll know it. Otherwise, it’s just a security flaw waiting to happen,
particularly if you haven’t changed your default password. Luckily, most access
points have this set to Off by default, but take the time to make sure that
yours does.
Enabling WEP
After you eliminate the security threats caused by leaving all the defaults in
place (see the preceding section), it’s time to get some encryption going. Get
your WEP on, as the kids say.
We’ve already warned you once, but we’ll do it again, just for kicks: Every
access point has its own system for setting up WEP, and you need to follow
those directions. We can only give generic advice because we have no idea
which access point you’re using.
192
Part III: Installing a Wireless Network
To enable WEP on your wireless network, we suggest that you perform the
following generic steps:
1. Open your access point’s configuration screen.
2. Go to the Wireless, Security, or Encryption tab or section.
We’re being purposely vague here; bear with us.
3. Select the radio button or check box labeled Enable WEP or Enable
Encryption or Configure WEP.
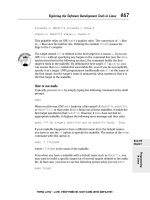
You should see a menu similar to the one shown in Figure 10-1. (This is
for a Siemens SpeedStream access point/router.)
4. Select the check box or the pull-down menu to the appropriate WEP
key length for your network.
We recommend 128-bit keys if all the gear on your network can support
it. (See the earlier section, “How about a bit more about WEP?,” for the
lowdown on WEP keys.)
5. Create your own key if you prefer (we prefer to let the program create
one for us):
a. Type a pass phrase into the Passphrase text box.
b. Click the Generate Keys button.
Figure 10-1:
Setting up
WEP on
a Speed-
Stream
access
point.
193
Chapter 10: Securing Your Wireless Home Network
Remember the pass phrase. Write it down somewhere, and put it some
place where you won’t accidentally throw it away or forget where you
put it. Danny likes to tape his pass phrase note to the box that his Wi-Fi
gear came in so he’ll always be able to track it down.
Whether you created your own key or let the program do it for you, a
key should now have magically appeared in the key text box. Note: Some
systems allow you to set more than one key (usually up to four keys),
such as the system in Figure 10-1. In this case, use Key 1 and set this as
your default key by using the pull-down menu.
Remember this key! Write it down. You’ll need it again when you config-
ure your computers to connect to this access point.
Some access point’s configuration software won’t necessarily show you
the WEP key that you’ve generated — just the pass phrase that you’ve
used to generate it. You’ll need to dig around in the manual and menus
to find a command to display the WEP key itself. (For example, Apple’s
AirPort software shows just the pass phrase; you need to find the
Network Equivalent Password in the Airport Admin Utility to display the
WEP key — in OS X, this is in the Base Station Menu.)
The built-in wireless LAN client software on Windows XP numbers its
four keys from 0–3 instead of 1–4. So if you’re using Key 1 on your access
point, select Key 0 in Windows XP.
6. Click OK to close the WEP configuration window.
You’re done turning on WEP. Congratulations.
Can we repeat ourselves again? Will you indulge us? The preceding steps are
very generic. Yours might vary slightly (or in rare cases, significantly). Read
your user’s guide. It will tell you what to do.
Some access points will make you go through the extra step of requiring all
users to use WEP to connect to the access point. Look for a check box or
pull-down menu on your configuration screen with this option. If you don’t do
this, computers without your network’s WEP key might still be able to con-
nect to your access point.
After you configure WEP on the access point, you must go to each computer on
your network, get into the network adapter’s client software (as we describe in
Chapters 7 and 8), turn on WEP, and enter either the pass phrase or the WEP
key. Typically you’ll find an Enable Security dialog box containing a check box
to turn on security and one to four text boxes for entering the key. Simply
select the check box to enable WEP, enter your key in the appropriate text box,
and then click OK. Figure 10-2 shows this dialog box for a Proxim ORiNOCO PC
Card network adapter; the dialog box that you see is likely to be similar.
194
Part III: Installing a Wireless Network
One area that is consistently confusing when setting up a WEP key — and
often a real pain in the rear end — is the tendency of different vendors to
use different formats for the keys. The most common way to format a key is
to use hexadecimal (hex) characters. This format represents numbers and
letters by using combinations of the numbers 0–9 and the letters A–F. (For
example, the name of Pat’s dog, Opie, would be represented in hexadecimal
as 4f 70 69 65.) A few other vendors use ASCII, which is simply the letters and
numbers on your keyboard.
Although ASCII is an easier-to-understand system for entering WEP codes (it’s
really just plain text), most systems make you use hexadecimal: It’s the stan-
dard. The easiest way to enter hex keys on your computers connecting to
your access point is to use the pass phrase that we discuss previously. If
your network adapter client software lets you do this, do it! If it doesn’t, try
entering the WEP key itself that you wrote down when you generated it (it’s
probably hexadecimal). If that doesn’t work either, you might have to dig into
the user’s manual and see whether you need to add any special codes before
or after the WEP key to make it work. Some software requires you to put the
WEP key inside quotation marks; others might require you to put an 0h or 0x
(that’s a zero and an h or an x character) before the key or an h after it (both
without quotation marks).
Closing your network
The last step that we recommend you take in the process of securing your
wireless home network (if your access point allows it) is to create a closed
network — a network that allows only specific, pre-designated computers and
devices onto it. You can do two things to close down your network, which
makes it harder for strangers to find your network and gain access to it:
Figure 10-2:
Setting up
WEP on an
ORiNOCO
PC Card.
195
Chapter 10: Securing Your Wireless Home Network
ߜ Turn off SSID broadcast: By default, most access points broadcast their
SSID out onto the airwaves. This makes it easier for users to find the net-
work and associate with it. If the SSID is being broadcast and you’re in
range, you should see the SSID on your computer’s network adapter
client software and be able to select it and connect to it. That is, assum-
ing that you have the right WEP key, if WEP is configured on that access
point. When you create a closed network, you turn off this broadcast so
that only people who know the exact name of the access point can con-
nect to it.
You can find access points even if they’re not broadcasting their SSID
(by observing other traffic on the network with a network sniffer pro-
gram), so this is an imperfect security measure — and no substitute for
enabling WEP. But it’s another layer of security for your network. Also, if
you’re in an area where you will have a lot of people coming into your
home and wanting to share your connection, you might not want to
close off the network, thus balancing convenience for your friends
against the small exposure of a more open network.
ߜ Set access control at the MAC layer: Every network adapter in the
world has a unique number assigned to it known as a Media Access
Controller (MAC) address. You can find the MAC address of your net-
work adapter either by looking at it (it’s usually physically printed on
the device) or using software on your computer:
• Open a DOS window and use the
winipcnfg command in
Windows 95/98/Me or the
ipconfig/all command on Windows
NT/2000/XP.
• Look in the Network Control Panel/System Preference on a Mac.
With some access points, you can type in the MAC addresses of all the
devices that you want to connect to your access point and block con-
nections from any other MAC addresses.
Again, if you support MAC layer filtering, you’ll make it harder for
friends to log on to when visiting. If you’ve got some buddies who like
to come over and mooch off your broadband connection, you’ll need to
add their MAC addresses as well, or they won’t be able to get on your
network. Luckily, you need to enter their MAC address only one time to
get them “on the list,” so to speak, so you won’t need to do it every time
they show up — at least until you have to reset the access point (which
shouldn’t be that often).
Neither of these “closed” network approaches is absolutely secure. MAC
addresses can be spoofed (imitated by a device with a different MAC address,
for example), but both are good ways to add to your overall security strategy.
196
Part III: Installing a Wireless Network
Looking Into the Crystal Ball
The limitations of WEP have become a bit of an embarrassment to the wire-
less industry. Although a whole big boatload of businesses has begun using
wireless LANs, many are waiting on the sidelines until security issues are a
bit better sorted out. And although we think that WEP is okay (but not great)
for home use, it’s certainly not good enough for a business that relies upon
the security of its data.
Several efforts are underway to create newer, better, and more secure ways
of protecting wireless LANs . . . efforts that will pay off for home users in the
long run. In this section, we talk about some of the most important of these
efforts and give you a quick overview of them.
This is our “Gaze into the crystal ball and chant voodoo incantations” section
of the chapter. None of this stuff is available yet (although some of it is due in
2003 . . . sometime . . .).
Waiting for WPA
The Institute for Electrical and Electronics Engineers (IEEE — the group that
developed the standards for 802.11 networks; see Chapter 2) is working on a
long-term solution to WEP’s weaknesses (which we discuss in the following
section about 802.11i). In the meantime, the Wi-Fi Alliance (the group of ven-
dors that ensure the compatibility of Wi-Fi gear) has put together its own
interim solution for wireless LAN security called Wi-Fi Protected Access (WPA).
WPA is a new set of forward-compatible encryption and authentication
enhancements for 802.11 networks. Forward-compatible means that WPA will
work with newer systems that are currently being developed by the IEEE.
Other reasons to get excited about WPA include the following features that it
will offer:
ߜ More random encryption techniques: WPA has basically been designed
as an answer for all the current weaknesses of WEP, with significantly
increased encryption techniques. One of WEP’s fatal flaws is that its
encryption is not sufficiently random, meaning that an observer can
more easily find patterns and break the encryption. WPA’s encryption
techniques will basically be more random — and thus harder to break.
ߜ Automatic key changes: WPA also has a huge security advantage in the
fact that it automatically changes the key (although you, as a user, get to
197
Chapter 10: Securing Your Wireless Home Network
keep using the same password to access the system). So by the time a
bad guy has figured out your key, your system would have already
moved on to a new one.
ߜ More user-friendly: WPA will also be easier for consumers to use
because there’s no hexadecimal stuff to deal with . . . just a plain text
password. The idea is to make WPA much easier to deal with than WEP,
which takes a bit of effort to get up and running (depending on how
good your access point’s configuration software is).
ߜ Backward compatibility: The best thing about WPA is that it’s being
designed to be backward compatible, too. Thus, existing Wi-Fi certified
equipment should be able to be upgraded to WPA by just installing a
downloadable software update.
The Wi-Fi alliance expects to begin certifying WPA equipment sometime in
early 2003. (We haven’t seen any yet, but it’s just a matter of time, as we write.)
The future: 802.11i
WPA is a great next step in wireless LAN security (see the preceding section),
but it’s not the end of the road. Well, face it . . . there is no end of the road.
Computers get more powerful, and the bad guys in the black hats who want
to break into the networks get smarter — so no system is going to be immune
to security breakdowns forever. Don’t think of security as something that you
can just figure out and put behind you; security is a continuous trek of
upgrades and refinements — and it always will be.
198
Part III: Installing a Wireless Network
802.1x: The corporate solution
Another new standard that’s being slowly rolled
out into the Wi-Fi world is 802.1x. This isn’t an
encryption system but instead, an authentica-
tion system. An 802.1x system, when built into
an access point, would allow users to connect
to the access point but give them only extremely
limited access (at least initially). In an 802.1x
system, the user would be able to connect to only
a single network port (or service). Specifically,
the only traffic that the user could send over the
network would be to an authentication server,
which would exchange information (such as
passwords and encrypted keys) with the user to
establish that he was actually allowed on the
network. After this authentication process has
been satisfactorily completed, the user is given
full (or partial, depending on what policies the
authentication server has recorded for the user)
access to the network.
802.1x is not something that we expect to see in
any wireless home LAN anytime soon. It’s really
a business-class kind of thing, requiring lots of
fancy servers and professional installation and
configuration. Just thought we’d mention it
because you’ll no doubt hear about it when
you search the Web for wireless LAN security
information.
The next step on this road, after WPA, is 802.11i. This is an entirely new
reconfiguration of wireless LAN security. Unlike WPA, it likely won’t work on
existing access points and network adapters, at least not all aspects of the
system. But sometime down the road, probably in 2004, you should start
seeing new generations of wireless LAN gear that incorporates 802.11i secu-
rity systems.
Perhaps the biggest advance that you’ll see when 802.11i hits the streets is
the system’s adoption of the Advanced Encryption Standard (AES). AES uses
very sophisticated encryption techniques and super-long keys (much bigger
than the 128-bit keys used by WEP) that take a really, really long time (even
with really fast computers) to break. With today’s technology, at least the
technology available to regular people, AES is essentially unbreakable.
802.11i also includes other security measures (like support for 802.1x, which
we discuss in a nearby sidebar) that help really tighten up wireless LAN secu-
rity. So 802.11i should be worth the wait. In the meantime, use what you have
(WEP), and you’ll be fine.
199
Chapter 10: Securing Your Wireless Home Network