Excel 2002 Power Programming with VBA phần 5 pot
Bạn đang xem bản rút gọn của tài liệu. Xem và tải ngay bản đầy đủ của tài liệu tại đây (925.76 KB, 99 trang )
358
Part IV ✦ Working with UserForms
Table 12-1
Codes to Determine the Data Type
Returned by Excel’s InputBox Method
Code Meaning
0 A formula
1 A number
2 A string (text)
4 A logical value (True or False)
8 A cell reference, as a range object
16 An error value, such as #N/A
64 An array of values
Excel’s InputBox method is quite versatile. To allow more than one data type to be
returned, use the sum of the pertinent codes. For example, to display an input box
that can accept text or numbers, set type equal to 3 (that is, 1 + 2, or “number” plus
“text”). If you use 8 for the type argument, the user can enter a cell or range
address manually, or point to a range in the worksheet.
The
EraseRange procedure, which follows, uses the InputBox method to allow the
user to select a range to erase (see Figure 12-2). The user can either type the range
address manually, or use the mouse to select the range in the sheet.
The
InputBox method with a type argument of 8 returns a Range object (note the
Set keyword). This range is then erased (by using the Clear method). The default
value displayed in the input box is the current selection’s address. The
On Error
statement ends the procedure if the input box is canceled.
Sub EraseRange()
Dim UserRange As Range
DefaultRange = Selection.Address
On Error GoTo Canceled
Set UserRange = Application.InputBox _
(Prompt:=”Range to erase:”, _
Title:=”Range Erase”, _
Default:=DefaultRange, _
Type:=8)
UserRange.Clear
UserRange.Select
Canceled:
End Sub
4799-2 ch12.F 6/11/01 9:32 AM Page 358
359
Chapter 12 ✦ Custom Dialog Box Alternatives
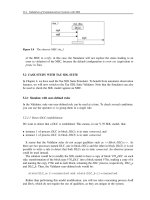
Figure 12-2: Using the InputBox method to specify a range
Yet another advantage of using Excel’s InputBox method is that Excel performs
input validation automatically. In the
GetRange example, if you enter something
other than a range address, Excel displays an informative message and lets the user
try again (see Figure 12-3).
Figure 12-3: Excel’s InputBox method performs
validation automatically.
VBA’s MsgBox Function
VBA’s MsgBox function is an easy way to display a message to the user, or to get a
simple response (such as OK or Cancel). I use the
MsgBox function in many of this
book’s examples as a way to display a variable’s value.
The official syntax for
MsgBox is as follows:
MsgBox(prompt[,buttons][,title][,helpfile, context])
4799-2 ch12.F 6/11/01 9:32 AM Page 359
360
Part IV ✦ Working with UserForms
prompt Required. The text displayed in the message box.
buttons Optional. A numeric expression that determines which
buttons and icon are displayed in the message box. See
Table 12-2.
title Optional. The caption in the message box window.
helpFile, context Optional. The helpfile and help topic.
You can easily customize your message boxes because of the flexibility of the but-
tons argument. (Table 12-2 lists the many constants that you can use for this argu-
ment.) You can specify which buttons to display, whether an icon appears, and
which button is the default.
Table 12-2
Constants Used for Buttons in the MsgBox Function
Constant Value Description
vbOKOnly 0 Display OK button only
vbOKCancel 1 Display OK and Cancel buttons
vbAbortRetryIgnore 2 Display Abort, Retry, and Ignore buttons
vbYesNoCancel 3 Display Yes, No, and Cancel buttons
vbYesNo 4 Display Yes and No buttons
vbRetryCancel 5 Display Retry and Cancel buttons
vbCritical 16 Display Critical Message icon
vbQuestion 32 Display Warning Query icon
vbExclamation 48 Display Warning Message icon
vbInformation 64 Display Information Message icon
vbDefaultButton1 0 First button is default
vbDefaultButton2 256 Second button is default
vbDefaultButton3 512 Third button is default
vbDefaultButton4 768 Fourth button is default
vbSystemModal 4096 All applications are suspended until the user
responds to the message box (may not work under
all conditions)
You can use the MsgBox function by itself (to simply display a message) or assign
its result to a variable. When
MsgBox does return a result, it represents the button
clicked by the user. The following example displays a message and does not return
a result:
4799-2 ch12.F 6/11/01 9:32 AM Page 360
361
Chapter 12 ✦ Custom Dialog Box Alternatives
Sub MsgBoxDemo()
MsgBox “Click OK to continue”
End Sub
To get a response from a message box, you can assign the results of the MsgBox
function to a variable. In the following code, I use some built-in constants
(described in Table 12-3) to make it easier to work with the values returned by
MsgBox:
Sub GetAnswer()
Ans = MsgBox(“Continue?”, vbYesNo)
Select Case Ans
Case vbYes
‘ [code if Ans is Yes]
Case vbNo
‘ [code if Ans is No]
End Select
End Sub
Table 12-3
Constants Used for MsgBox Return Value
Constant Value Button Clicked
vbOK 1OK
vbCancel 2 Cancel
vbAbort 3 Abort
vbRetry 4 Retry
vbIgnore 5 Ignore
vbYes 6Yes
vbNo 7No
Actually, it’s not even necessary to use a variable to utilize the result of a message
box. The following procedure displays a message box with Yes and No buttons. If
the user doesn’t click the Yes button, the procedure ends.
Sub GetAnswer2()
If MsgBox(“Continue?”, vbYesNo) <> vbYes Then Exit Sub
‘ [code if Yes button is not clicked]
End Sub
The following function example uses a combination of constants to display a mes-
sage box with a Yes button, a No button, and a question mark icon; the second but-
ton is designated as the default button (see Figure 12-4). For simplicity, I assigned
these constants to the
Config variable.
4799-2 ch12.F 6/11/01 9:32 AM Page 361
362
Part IV ✦ Working with UserForms
Private Function ContinueProcedure() As Boolean
Dim Config As Integer
Dim Ans As Integer
Config = vbYesNo + vbQuestion + vbDefaultButton2
Ans = MsgBox(“An error occurred. Continue?”, Config)
If Ans = vbYes Then ContinueProcedure = True _
Else ContinueProcedure = False
End Function
The ContinueProcedure function can be called from another procedure. For exam-
ple, the following statement calls the
ContinueProcedure function (which displays
the message box). If the function returns False (that is, the user selects No), the
procedure ends. Otherwise, the next statement would be executed.
If Not ContinueProcedure Then Exit Sub
Figure 12-4: The buttons argument of the MsgBox function
determines which buttons appear.
If you would like to force a line break in the message, use the vbCrLf (or
vbNewLine) constant in the text. The following example displays the message in
three lines:
Sub MultiLine()
Dim Msg As String
Msg = “This is the first line” & vbCrLf
Msg = Msg & “Second line” & vbCrLf
Msg = Msg & “Last line”
MsgBox Msg
End Sub
You can also insert a tab character by using the vbTab constant. The following pro-
cedure uses a message box to display the values in a 20 × 8 range of cells (see
Figure 12-5). It separates the columns by using a vbTab constant, and inserts a new
line by using the
vbCrLF constant. The MsgBox function accepts a maximum string
length of 1,023 characters, which will limit the number of cells you can display.
Sub ShowRange()
Dim Msg As String
Dim r As Integer, c As Integer
Msg = “”
4799-2 ch12.F 6/11/01 9:32 AM Page 362
363
Chapter 12 ✦ Custom Dialog Box Alternatives
For r = 1 To 20
For c = 1 To 8
Msg = Msg & Cells(r, c) & vbTab
Next c
Msg = Msg & vbCrLf
Next r
MsgBox Msg
End Sub
Chapter 15 includes a VBA example that emulates the MsgBox function.
Cross-
Reference
Another Type of Message Box
Excel can access the Windows Scripting Host (Wscript) and display another type of message
box by using the Popup method of the Shell object. This alternative message box differs
from the standard message box in two ways: It can dismiss itself after a specified period of
time; and it’s possible to display the message box with no buttons.
The following example displays a message box. If the user does not dismiss it within five
seconds, it is dismissed automatically.
Sub PopupDemo()
Dim WshShell As IWshShell
Dim Msg As String
Set WshShell = CreateObject(“Wscript.Shell”)
Msg = “This message will self-destruct in 5 seconds.”
Title = “A friendly reminder”
WshShell.Popup Msg, 5, Title, 7 + vbInformation
Set WshShell = Nothing
End Sub
The first Set statement creates the Shell object and assigns it to the WshShell variable.
The first argument for the Popup method represents the text to be displayed. The second
argument specifies the number of seconds to display the message box. The third argument
is the title bar text. The final argument specifies the buttons and icon to be displayed (it
works just like the buttons argument for the MsgBox function).
If you decide to use this alternate message box, be aware that system administrators often
disable the Windows Scripting Host because of the threat of viruses. If the Windows
Scripting Host is disabled, the code will generate an error.
4799-2 ch12.F 6/11/01 9:32 AM Page 363
364
Part IV ✦ Working with UserForms
Figure 12-5: This message box displays text
with tabs and line breaks.
Excel’s GetOpenFilename Method
If your application needs to ask the user for a filename, you can use the InputBox
function. But this approach often leads to typographical errors. A better approach
is to use the
GetOpenFilename method of the Application object, which ensures
that your application gets a valid filename (as well as its complete path).
This method displays the normal Open dialog box (displayed when you select the
File ➪ Open command) but does not actually open the file specified. Rather, the
method returns a string that contains the path and filename selected by the user.
Then you can do whatever you want with the filename. The syntax for this method
is as follows (all arguments are optional):
object.GetOpenFilename(FileFilter, FilterIndex, Title,
ButtonText, MultiSelect)
FileFilter Optional. A string specifying file-filtering criteria.
FilterIndex Optional. The index numbers of the default file-filtering
criteria.
Title Optional. The title of the dialog box. If omitted, the title is
“Open.”
ButtonText For Macintosh only.
MultiSelect Optional. If True, multiple filenames can be selected. The
default value is False.
4799-2 ch12.F 6/11/01 9:32 AM Page 364
365
Chapter 12 ✦ Custom Dialog Box Alternatives
The FileFilter argument determines what appears in the dialog box’s Files of type
drop-down list. The argument consists of pairs of file filter strings followed by the
wildcard file filter specification, with each part and each pair separated by commas.
If omitted, this argument defaults to:
“ All Files (*.*),*.*”
Notice that the first part of this string (All Files (*.*)) is the text displayed in
the Files of type drop-down list. The second part (
*.*) actually determines which
files are displayed.
The following instruction assigns a string to a variable named
Filt. This string can
then be used as a FileFilter argument for the
GetOpenFilename method. In this
case, the dialog box will allow the user to select from four different file types (plus
an “all files” option). Notice that I used VBA’s line continuation sequence to set up
the
Filt variable; doing so makes it much easier to work with this rather compli-
cated argument.
Filt = “Text Files (*.txt),*.txt,” & _
“Lotus Files (*.prn),*.prn,” & _
“Comma Separated Files (*.csv),*.csv,” & _
“ASCII Files (*.asc),*.asc,” & _
“All Files (*.*),*.*”
The FilterIndex argument specifies which FileFilter is the default, and the title argu-
ment is text that is displayed in the title bar. If the multiSelect argument is True, the
user can select multiple files, all of which are returned in an array.
The following example prompts the user for a filename. It defines five file filters.
Sub GetImportFileName()
Dim Filt As String
Dim FilterIndex As Integer
Dim Title As String
Dim FileName As String
‘ Set up list of file filters
Filt = “Text Files (*.txt),*.txt,” & _
“Lotus Files (*.prn),*.prn,” & _
“Comma Separated Files (*.csv),*.csv,” & _
“ASCII Files (*.asc),*.asc,” & _
“All Files (*.*),*.*”
‘ Display *.* by default
FilterIndex = 5
4799-2 ch12.F 6/11/01 9:32 AM Page 365
366
Part IV ✦ Working with UserForms
‘ Set the dialog box caption
Title = “Select a File to Import”
‘ Get the file name
FileName = Application.GetOpenFilename _
(FileFilter:=Filt, _
FilterIndex:=FilterIndex, _
Title:=Title)
‘ Exit if dialog box canceled
If FileName = False Then
MsgBox “No file was selected.”
Exit Sub
End If
‘ Display full path and name of the file
MsgBox “You selected “ & FileName
End Sub
Figure 12-6 shows the dialog box that appears when this procedure is executed.
Figure 12-6: The GetOpenFilename method displays a
customizable dialog box.
The following example is similar to the previous example. The difference is that the
user can press Ctrl or Shift and select multiple files when the dialog box is dis-
played. Notice that I check for the Cancel button click by determining if
FileName
is an array. If the user doesn’t click Cancel, the result is an array that consists of at
least one element. In this example, a list of the selected files is displayed in a mes-
sage box.
4799-2 ch12.F 6/11/01 9:32 AM Page 366
367
Chapter 12 ✦ Custom Dialog Box Alternatives
Sub GetImportFileName2()
Dim Filt As String
Dim FilterIndex As Integer
Dim FileName As Variant
Dim Title As String
Dim i As Integer
Dim Msg As String
‘ Set up list of file filters
Filt = “Text Files (*.txt),*.txt,” & _
“Lotus Files (*.prn),*.prn,” & _
“Comma Separated Files (*.csv),*.csv,” & _
“ASCII Files (*.asc),*.asc,” & _
“All Files (*.*),*.*”
‘ Display *.* by default
FilterIndex = 5
‘ Set the dialog box caption
Title = “Select a File to Import”
‘ Get the file name
FileName = Application.GetOpenFilename _
(FileFilter:=Filt, _
FilterIndex:=FilterIndex, _
Title:=Title, _
MultiSelect:=True)
‘ Exit if dialog box canceled
If Not IsArray(FileName) Then
MsgBox “No file was selected.”
Exit Sub
End If
‘ Display full path and name of the files
For i = LBound(FileName) To UBound(FileName)
Msg = Msg & FileName(i) & vbCrLf
Next i
MsgBox “You selected:” & vbCrLf & Msg
End Sub
Notice that the FileName variable is defined as a variant (not a string, as in the pre-
vious example). This is done because
FileName can, potentially, hold an array
rather than a single file name.
Excel’s GetSaveAsFilename Method
The GetSaveAsFilename method is very similar to the GetOpenFilename method.
It displays a Save As dialog box and lets the user select (or specify) a file. It returns
a filename and path but doesn’t take any action.
The syntax for this method is:
4799-2 ch12.F 6/11/01 9:32 AM Page 367
368
Part IV ✦ Working with UserForms
object.GetSaveAsFilename(InitialFilename, FileFilter,
FilterIndex, Title, ButtonText)
The arguments are:
InitialFilename Optional. Specifies the suggested filename.
FileFilter Optional. A string specifying file-filtering criteria.
FilterIndex Optional. The index number of the default file-filtering
criteria.
Title Optional. The title of the dialog box.
ButtonText For Macintosh only.
Prompting for a Directory
If you need to get a filename, the simplest solution is to use the GetOpenFileName
method, as described above. But if you only need to get a directory name, the solu-
tion will depend on which version of Excel you (and your users) have.
This section describes two ways to prompt for a directory. The first method is more
complicated but works with Excel 97 and later. The second method is much easier
but requires Excel 2002.
Using a Windows API function to select a directory
In this section, I present a function named GetDirectory that displays the dialog
box shown in Figure 12-7 and returns a string that represents the selected directory.
If the user clicks Cancel, the function returns an empty string. This technique will
work with Excel 97 and later versions.
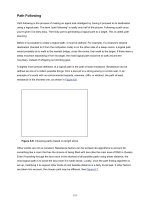
Figure 12-7: Use an API function
to display this dialog box.
4799-2 ch12.F 6/11/01 9:32 AM Page 368
369
Chapter 12 ✦ Custom Dialog Box Alternatives
The GetDirectory function takes one argument, which is optional. This argument
is a string that will be displayed in the dialog box. If the argument is omitted, the
dialog box displays
Select a folder as the message.
The companion CD-ROM contains a workbook that demonstrates this procedure.
Following are the API declarations required at the beginning of the workbook mod-
ule. This function also uses a custom data type, called BROWSEINFO.
‘32-bit API declarations
Declare Function SHGetPathFromIDList Lib “shell32.dll” _
Alias “SHGetPathFromIDListA” (ByVal pidl As Long, ByVal _
pszPath As String) As Long
Declare Function SHBrowseForFolder Lib “shell32.dll” _
Alias “SHBrowseForFolderA” (lpBrowseInfo As BROWSEINFO) _
As Long
Public Type BROWSEINFO
hOwner As Long
pidlRoot As Long
pszDisplayName As String
lpszTitle As String
ulFlags As Long
lpfn As Long
lParam As Long
iImage As Long
End Type
The GetDirectory function follows:
Function GetDirectory(Optional Msg) As String
Dim bInfo As BROWSEINFO
Dim path As String
Dim r As Long, x As Long, pos As Integer
‘ Root folder = Desktop
bInfo.pidlRoot = 0&
‘ Title in the dialog
If IsMissing(Msg) Then
bInfo.lpszTitle = “Select a folder.”
Else
bInfo.lpszTitle = Msg
End If
‘ Type of directory to return
bInfo.ulFlags = &H1
On the
CD-ROM
4799-2 ch12.F 6/11/01 9:32 AM Page 369
370
Part IV ✦ Working with UserForms
‘ Display the dialog
x = SHBrowseForFolder(bInfo)
‘ Parse the result
path = Space$(512)
r = SHGetPathFromIDList(ByVal x, ByVal path)
If r Then
pos = InStr(path, Chr$(0))
GetDirectory = Left(path, pos - 1)
Else
GetDirectory = “”
End If
End Function
The simple procedure that follows demonstrates how to use the GetDirectory
function in your code. Executing this procedure displays the dialog box. When the
user clicks OK the
MsgBox function displays the full path of the selected directory.
If the user clicks Cancel, the message box displays Canceled.
Sub GetAFolder1()
‘ For Excel 97 or later
Dim Msg As String
Dim UserFile As String
Msg = “Please select a location for the backup.”
UserFile = GetDirectory(Msg)
If UserFile = “” Then
MsgBox “Canceled”
Else
MsgBox UserFile
End If
End Sub
Unfortunately, there is no easy way to specify a default or starting directory.
Using the FileDialog object to select a directory
If users of your application all use Excel 2002, you may prefer to use a simpler tech-
nique that makes use of the
FileDialog object.
The FileDialog object is new to Excel 2002. Therefore, this technique will not
work with earlier versions of Excel.
The following procedure displays a dialog box, which allows the user to select a
directory. The selected directory name (or Canceled) is then displayed using the
MsgBox function.
Sub GetAFolder2()
‘ For Excel 2002
With Application.FileDialog(msoFileDialogFolderPicker)
New
Feature
Note
4799-2 ch12.F 6/11/01 9:32 AM Page 370
371
Chapter 12 ✦ Custom Dialog Box Alternatives
.InitialFileName = Application.DefaultFilePath & “\”
.Title = “Please select a location for the backup”
.Show
If .SelectedItems.Count = 0 Then
MsgBox “Canceled”
Else
MsgBox .SelectedItems(1)
End If
End With
End Sub
The FileDialog object lets you specify the starting directory by specifying a value
for the
InitialFileName property. In this case, the code uses Excel’s default file
path as the starting directory.
Displaying Excel’s Built-In Dialog Boxes
Code that you write in VBA can execute Excel’s menu commands. And, if the com-
mand leads to a dialog box, your code can “make choices” in the dialog box
(although the dialog box itself isn’t displayed). For example, the following VBA
statement is equivalent to selecting the Edit ➪ Go To command, specifying range
A1:C3, and clicking OK. But the Go To dialog box never appears (which is what you
want).
Application.Goto Reference:=Range(“A1:C3”)
In some cases, however, you may want to display one of Excel’s built-in dialog
boxes so the end user can make the choices. There are two ways to do this:
✦ Access the
Dialogs collection of the Application object.
✦ Execute a menu item directly.
I discuss each of these techniques in the sections that follow.
Using the Dialogs collection
The Dialogs collection of the Application object consists of 258 members that
represent most of Excel’s built-in dialog boxes. Each has a predefined constant to
make it easy to specify the dialog box that you need. For example, Excel’s Go To
dialog box is represented by the constant
xlDialogFormulaGoto.
Use the Show method to actually display the dialog box. Here’s an example that dis-
plays the Go To dialog box (see Figure 12-8):
Application.Dialogs(xlDialogFormulaGoto).Show
4799-2 ch12.F 6/11/01 9:32 AM Page 371
372
Part IV ✦ Working with UserForms
Figure 12-8: This dialog box was displayed with a
VBA statement.
When the Go To dialog box is shown, the user can specify a named range or enter a
cell address to go to. This dialog box is the one that appears when you choose the
Edit ➪ Go To command (or press F5).
You can also write code to determine how the user dismissed the dialog box. Do
this by using a variable. In the following statement, the
Result variable will be True
if the user clicked OK, and False if the user clicked Cancel or pressed Esc.
Result = Application.Dialogs(xlDialogFormulaGoto).Show
Contrary to what you might expect, the Result variable does not hold the range
that was specified in the Go To dialog box.
It’s important to understand that this feature is not documented very well. The
online help is very sketchy, and it doesn’t mention the fact that displaying one of
Excel’s dialog boxes via VBA code may not always work exactly the same as using a
menu command to display the dialog box. Consequently, you may have to do some
experimentation to make sure your code performs as it should.
In the case of the Go To dialog box, you’ll notice that the Special button is grayed
out when the dialog is shown using a VBA statement. This button normally displays
the Go To Special dialog box. To display the Go To Special dialog box using VBA
code, use this statement:
Application.Dialogs(xlDialogSelectSpecial).Show
Another potential problem is that you can’t display some “tabbed” dialog boxes
correctly. For example, there is no way to show the Format Cells dialog box with the
tabs. Rather, you can only show one tab at a time. The following statement displays
the Alignment tab of the Format Cells dialog box (see Figure 12-9):
Application.Dialogs(xlDialogAlignment).Show
To show other tabs in the Format Cells dialog box, use any of these constants:
xlDialogFormatNumber, xlDialogBorder, xlDialogCellProtection,
xlDialogPatterns, or xlDialogFontProperties. Notice that there is no consis-
tency in the naming of these constants.
4799-2 ch12.F 6/11/01 9:32 AM Page 372
373
Chapter 12 ✦ Custom Dialog Box Alternatives
Figure 12-9: The Alignment tab of the
Format Cells dialog box
Learning more about built-in dialog boxes
You can get a list of all of the dialog box constants by consulting the online help, or
by using the Object Browser. Follow these steps to display the members of the
Dialogs collection in the Object Browser:
1. In a VBA module, press F2 to bring up the Object Browser.
2. In the Object Browser dialog box, select Excel from the top list.
3. Type xlDialog in the second list.
4. Click the binoculars button.
Attempting to display a built-in dialog box in an incorrect context will result in an
error. For example, if you select a series in a chart and then attempt to display the
xlDialogFontProperties dialog box, you’ll get an error message because that
dialog box is not appropriate for that selection.
Using arguments with built-in dialog boxes
Most of the built-in dialog boxes also accept arguments, which (usually) corre-
spond to the controls on the dialog box. For example, the Cell Protection dialog box
(invoked by using the
xlDialogCellProtection constant) uses two arguments:
locked and hidden. If you want to display that dialog box with both of these options
checked, use the following statement:
Application.Dialogs(xlDialogCellProtection).Show True, True
Caution
4799-2 ch12.F 6/11/01 9:32 AM Page 373
374
Part IV ✦ Working with UserForms
The arguments for each of the built-in dialog boxes are listed in the online help. To
locate the help topic, search for Built-In Dialog Box Argument Lists. Unfortunately,
the online help provides no explanation of what the arguments are used for!
According to the help file, the Go To dialog box (invoked by using the
xlDialogFormulaGoTo constant) takes two arguments: reference and corner. The
reference argument is used to provide a default range that appears in the Reference
box. The corner reference is a logical value that specifies whether to display the ref-
erence so it appears in the upper left corner of the window. Here’s an example that
uses both of these arguments:
Application.Dialogs(xlDialogFormulaGoto). _
Show Range(“Z100”), True
As you may have surmised, successfully using the Dialogs collection may require
some trial and error.
Executing a menu item directly
The second technique to display a built-in dialog box requires some knowledge of
toolbars (officially known as
CommandBar objects). For now, be aware that you can
“execute” a menu item. And you can take advantage of the fact that selecting a
menu item displays a dialog box.
I cover CommandBars extensively in Chapters 22 and 23.
The following statement, for example, is equivalent to selecting the Go To menu
item on the Edit menu:
Application.CommandBars(“Worksheet Menu Bar”). _
Controls(“Edit”).Controls(“Go To ”).Execute
This statement, when executed, displays the Go To dialog box. Notice that the
menu item captions must match exactly (including the ellipses after “Go To”).
Unlike using the
Dialogs collection, this technique does not allow you to specify
default values for the dialog boxes.
The examples in this section use language-specific references to the CommandBar
controls. Consequently, these statements will work only in English language ver-
sions of Excel. For applications that will be used with other language versions of
Excel, you can use the FindControl method, along with the Id property for the
command. See Chapter 22 for more information.
Caution
Cross-
Reference
4799-2 ch12.F 6/11/01 9:32 AM Page 374
375
Chapter 12 ✦ Custom Dialog Box Alternatives
In the previous section, I pointed out a problem with accessing the Dialogs collec-
tion: It’s not possible to display a tabbed dialog box. That problem doesn’t exist
when you execute a menu command. The following statement, for example, dis-
plays the Format Cells dialog box (with all of its tabs):
Application.CommandBars(“Worksheet Menu Bar”). _
Controls(“Format”).Controls(“Cells ”).Execute
By the way, the Execute method also works with toolbar controls that don’t dis-
play a dialog box. The following statement, for example, is equivalent to clicking the
Bold button on the Formatting toolbar:
Application.CommandBars(“Formatting”).Controls(“Bold”).Execute
I can’t think of any reason to do this, however. A more efficient way to toggle the
Bold property of the selected cells is to use a statement like this:
Selection.Font.Bold = Not Selection.Font.Bold
Summary
In this chapter, I discussed some built-in tools that may eliminate the need to create
a custom UserForm.
✦✦✦
4799-2 ch12.F 6/11/01 9:32 AM Page 375
4799-2 ch12.F 6/11/01 9:32 AM Page 376
Introducing
UserForms
E
xcel developers have always had the ability to create
custom dialog boxes for their applications. Beginning
with Excel 97, things changed substantially. UserForms have
replaced the clunky old dialog sheets, and you have much
more control over your custom dialog boxes. However, for
compatibility purposes, Excel 97 and later still support Excel
5/95 dialog sheets. The good news is that its much easier to
work with UserForms, and they offer lots of new capabilities.
Excel makes it relatively easy to create custom dialog boxes
for your applications. In fact, you can duplicate the look and
feel of almost all of Excel’s dialog boxes. This chapter pro-
vides an introduction and overview of UserForms.
How Excel Handles Custom Dialog
Boxes
A custom dialog box is created on a UserForm, and you
access UserForms in the Visual Basic Editor.
Following is the typical sequence that you will follow when
you create a UserForm:
1. Insert a new UserForm into your workbook’s VBProject.
2. Write a procedure that will display the UserForm. This
procedure will be located in a VBA module (not in the
code module for the UserForm).
3. Add controls to the UserForm.
4. Adjust some of the properties of the controls you added.
5. Write “event-handler” procedures for the controls.
These procedures, which are located in the code win-
dow for the UserForm, are executed when various
events (such as a button click) occur.
13
13
CHAPTER
✦✦✦✦
In This Chapter
Creating, showing,
and unloading
UserForms
A discussion of the
UserForm controls
available to you
Setting the properties
of UserForm controls
Controlling
UserForms with VBA
procedures
A hands-on example
of creating a
UserForm
An introduction to the
types of events
relevant to UserForms
and controls
Customizing your
control Toolbox
A handy checklist for
creating UserForms
✦✦✦✦
4799-2 ch13.F 6/11/01 9:37 AM Page 377
378
Part IV ✦ Working with UserForms
Inserting a New UserForm
To insert a new UserForm, activate the VBE (Alt+F11), select your workbook’s pro-
ject from the Project window, and select Insert ➪ UserForm. UserForms have names
like
UserForm1, UserForm2, and so on.
You can change the name of a UserForm to make it easier to identify. Select the
form and use the Properties window to change the Name property (press F4 if the
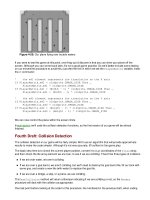
Properties window is not displayed). Figure 13-1 shows the Properties window
when an empty UserForm is selected.
Figure 13-1: The Properties window for an empty UserForm
A workbook can have any number of UserForms, and each UserForm holds a single
custom dialog box.
Displaying a UserForm
To display a UserForm, use the Show method of the UserForm object. The following
procedure, which is contained in a normal VBA module, displays
UserForm1:
Sub ShowForm
UserForm1.Show
End Sub
When the UserForm is displayed, it remains visible on-screen until it is dismissed.
Usually, you’ll add a CommandButton to the UserForm that executes a procedure
that dismisses the UserForm. The procedure can either unload the UserForm (with
Tip
4799-2 ch13.F 6/11/01 9:37 AM Page 378
379
Chapter 13 ✦ Introducing UserForms
the Unload command) or hide the UserForm (with the Hide method of the
UserForm object). This concept will become clearer later in the chapter.
If the name of the UserForm is stored as a string variable, you can use the
Add
method to add the UserForm to the UserForms collection and then use the Show
method of the UserForms collection. Here’s an example that assigns the name of a
UserForm to the
MyForm variable and then displays the UserForm.
MyForm = “UserForm1”
UserForms.Add(MyForm).Show
This technique might be useful if your project contains several UserForms and the
UserForm to be shown is determined by your code.
Adding Controls to a UserForm
To add controls to a UserForm, use the Toolbox (the VBE does not have menu com-
mands that add controls). If the Toolbox is not displayed, select View ➪ Toolbox.
Figure 13-2 shows the Toolbox.
Figure 13-2: Use the Toolbox to add controls to a UserForm.
Just click the Toolbox button that corresponds to the control you want to add, and
then click inside the dialog box to create the control (using its default size). Or, you
can click the control and then drag in the dialog box to specify the dimensions for
the control.
When you add a new control, it is assigned a name that combines the control type
with the numeric sequence for that type of control. For example, if you add a
CommandButton control to an empty UserForm, it is named
CommandButton1. If
you then add a second CommandButton, it is named
CommandButton2.
It’s a good idea to rename all the controls that you will be manipulating with your
VBA code. Doing so lets you refer to meaningful names (such as
ProductListBox), rather than generic names such as ListBox1. To change the
name of a control, use the Properties window in the VBA. Just select the object
and enter a new name.
Tip
4799-2 ch13.F 6/11/01 9:37 AM Page 379
380
Part IV ✦ Working with UserForms
Controls Available to You
In the sections that follow, I briefly describe the controls available to you in the
Toolbox.
Your UserForms can also use other ActiveX controls. See “Customizing the
Toolbox,” later in this chapter.
CheckBox
A CheckBox control is useful for getting a binary choice: yes or no, true or false, on
or off, and so on. When a CheckBox is checked, it has a value of True; when it’s not
checked, the CheckBox’s value is False.
ComboBox
A ComboBox control is similar to a ListBox control. A ComboBox, however, is a
drop-down box, and it displays only one item at a time. Another difference is that
the user may be allowed to enter a value that does not appear in the list of items.
CommandButton
Every dialog box that you create will probably have at least one CommandButton.
Usually, you’ll want to have a CommandButton labeled OK and another labeled
Cancel.
Frame
A Frame control is used to enclose other controls. You do this either for aesthetic
purposes or to logically group a set of controls. A frame is particularly useful when
the dialog box contains more than one set of OptionButton controls.
Image control
An Image control is used to display a graphic image, which can come from a file or
pasted from the clipboard. You might want to use an Image control to display your
company’s logo in a dialog box. The graphics image is stored in the workbook. That
way, if you distribute your workbook to someone else, it is not necessary to include
a copy of the graphics file.
Some graphics files are very large, and using such images can make your work-
book increase dramatically in size. For best results, use graphics sparingly, or use
small graphics files.
Caution
Cross-
Reference
4799-2 ch13.F 6/11/01 9:37 AM Page 380
381
Chapter 13 ✦ Introducing UserForms
Label
A Label control simply displays text in your dialog box.
ListBox
The ListBox control presents a list of items, and the user can select an item (or
multiple items). ListBox controls are very flexible. For example, you can specify a
worksheet range that holds the ListBox items, and this range can consist of multiple
columns. Or you can fill the ListBox with items using VBA.
MultiPage
A MultiPage control lets you create tabbed dialog boxes, like the one that appears
when you choose the Tools➪ Options command. By default, a MultiPage control
has two pages. To add additional pages, right-click a tab and select New Page from
the shortcut menu.
OptionButton
OptionButtons are useful when the user needs to select one item from a small num-
ber of choices. OptionButtons are always used in groups of at least two. When an
OptionButton is selected, the other OptionButtons in its group are unselected.
If your UserForm contains more than one set of OptionButtons, each set of
OptionButtons must have the same
GroupName property value. Otherwise, all
OptionButtons become part of the same set. Alternatively, you can enclose the
OptionButtons in a Frame control, which automatically groups the OptionButtons
contained in the frame.
RefEdit
The RefEdit control is used when you need to let the user select a range in a
worksheet.
ScrollBar
The ScrollBar control is similar to a SpinButton control. The difference is that the
user can drag the ScrollBar’s button to change the control’s value in larger incre-
ments. The ScrollBar control is most useful for selecting a value that extends across
a wide range of possible values.
4799-2 ch13.F 6/11/01 9:37 AM Page 381