Intermediate System Administration for the Solaris 10 Student Guide phần 5 ppsx
Bạn đang xem bản rút gọn của tài liệu. Xem và tải ngay bản đầy đủ của tài liệu tại đây (498.38 KB, 73 trang )
Preparing for Patch Administration
Managing Software Patches on the Solaris 10 OS 7-5
Copyright 2005 SunMicrosystems, Inc. All Rights Reserved. Sun Services, Revision A.1
Obtaining Patches
Sun customers who have a maintenance contract have access to the
SunSolve
SM
program’s database of patches and patch information,
technical white papers, the Symptom and Resolution database, and more.
These are available using the World Wide Web.
Sun customers without maintenance contracts have access to a subset of
the patches available through the SunSolve program. These patches are
available at no charge and include important security and bug fix patches.
To access patches through the World Wide Web, use the following
Universal Resource Locators (URLs):
– United States
– Australia
– France
– Germany
– Japan
– Sweden
– Switzerland
– United Kingdom
The comprehensive set of patches and patch information is available to
contract customers through the button labeled Login. The customer’s
assigned SunService program password is required to access this
database.
To access patches using FTP, use the ftp command to connect to:
sunsolve.sun.com
The ftp utility has many commands; however, only a few are necessary
for moving files from system to system. You can locate and copy patches
to the local system with a few basic FTP commands.
The following example shows the procedure for changing to the
/var/tmp directory on the local system, connecting to the remote FTP site,
locating a patch and its README file in the /pub/patches directory, and
transferring both files to the local system’s directory.
Preparing for Patch Administration
7-6 Intermediate System Administration for the Solaris™ 10 Operating System
Copyright 2005 Sun Microsystems, Inc. All Rights Reserved. Sun Services, Revision A.1
Note – The default mode for an ftp connection is binary mode in Solaris
10 OS. The default mode for an ftp connection in Solaris 8 or earlier
versions is American Standard Code for Information Interchange (ASCII)
mode. You use the bin command to set the FTP transfer mode to binary
mode to transfer binary, image, or a non-text files in these earlier versions
of the OS.
# cd /var/tmp
# ftp sunsolve.sun.com
Connected to sunsolve.sun.com.
(output omitted)
Name (sunsolve:usera): anonymous
331 Guest login ok, send your complete e-mail address as password.
Password:yourpassword
(output omitted)
ftp> bin
200 Type set to I.
ftp> cd /patchroot/reports
ftp> get public_patch_report
(output omitted)
ftp> cd /patchroot/clusters
ftp> get 10_SunAlert_Patch_Cluster.README
(output omitted)
ftp> cd /patchroot/current_unsigned
ftp> mget 112605*
mget 112605-01.zip? y
(output omitted)
mget 112605.readme? y
ftp> bye
Note – To disable interactive prompting during multiple (mget) file
transfers, you can begin a session using ftp -i
sitename
or use the
prompt command at the ftp> prompt.
Preparing Patches for Installation
When patches are downloaded to the local system, you must place the
patches in a temporary directory to prepare them for installation. The
directory commonly used is the /var/tmp directory.
Preparing for Patch Administration
Managing Software Patches on the Solaris 10 OS 7-7
Copyright 2005 Sun Microsystems, Inc. All Rights Reserved. Sun Services, Revision A.1
One of the common reasons for patch installation failure is directory
permission or ownership problems. The /var/tmp directory is open to all
and eliminates any of these types of problems.
The Solaris 7, Solaris 8, Solaris 9, and Solaris 10 OS patches are in zip
format, for example, 105050-01.zip.
Use the unzip command to unpack the patch files.
# /usr/bin/unzip 105050-01.zip
Earlier versions of the Solaris OS used compressed tar files in a tar.Z
format, for example, 101010-01.tar.Z.
Preparing for Patch Administration
7-8 Intermediate System Administration for the Solaris™ 10 Operating System
Copyright 2005 Sun Microsystems, Inc. All Rights Reserved. Sun Services, Revision A.1
Use the zcat command to uncompress the patch files and the tar
command to create the patch directories.
# /usr/bin/zcat 105050-01.tar.Z | tar xvf -
Patch Contents
Figure 7-2 shows the contents of a patch directory after it is extracted from
the zip file.
Figure 7-2 An Extracted Patch Directory
/var/sadm/pkg/pkg_name/pkginfo
/var/sadm/install/contents
/var/sadm/pkg/pkg_name/pkginfo
Installing and Removing Patches
Managing Software Patches on the Solaris 10 OS 7-9
Copyright 2005 Sun Microsystems, Inc. All Rights Reserved. Sun Services, Revision A.1
Installing and Removing Patches
The two most common commands for managing patches are:
● patchadd – Installs uncompressed patches to the Solaris OS
● patchrm – Removes patches installed on the Solaris OS
Additionally, you install cluster patches by using the install_cluster
command. You can also manage patches through the Solaris Management
Console.
Installing a Patch
When a patch is installed, the patchadd command calls the pkgadd
command to install the patch packages.
The following example shows the procedure for patch installation. This
example assumes that the patch to be installed exists in the /var/tmp
directory and has been unzipped or uncompressed for installation.
# cd /var/tmp
# patchadd 105050-01
Checking installed patches
Verifying sufficient filesystem capacity (dry run method)
Installing patch packages
Patch number 105050-01 has been successfully installed.
See /var/sadm/patch/105050-01/log for details.
Patch packages installed:
SUNWhea
Installing and Removing Patches
7-10 Intermediate System Administration for the Solaris™ 10 Operating System
Copyright 2005 Sun Microsystems, Inc. All Rights Reserved. Sun Services, Revision A.1
Figure 7-3 shows those components of the /var/sadm directory that are
updated during the installation of patch 105050-01.
Figure 7-3 Updated /var/sadm Directories
Caution – Patches can be added using the -d (nosave) option to save
space. When this option is used, patchadd does not save copies of the
files being updated or replaced, and therefore cannot be backed out.
Removing a Patch
When you remove a patch, the patchrm command restores all files that
were modified or replaced by that patch, unless:
● The patch was installed with the patchadd -d option (which
instructs the patchadd command not to save copies of files being
updated or replaced)
● The patch is required by another patch
● The patch has been obsoleted by a later patch
README.105050-01
log
undo.Z
105050-01
/
var
sadm
pkg
SUNWcsu
pkginfo
SUNWhea
pkginfo
Save
105050-01
patch
105050-01
Save
Installing and Removing Patches
Managing Software Patches on the Solaris 10 OS 7-11
Copyright 2005 Sun Microsystems, Inc. All Rights Reserved. Sun Services, Revision A.1
The patchrm command calls the pkgadd utility to restore packages that
were saved during the initial patch installation.
The following example shows how to remove a patch by using the
patchrm command.
# patchrm 105050-01
Checking installed packages and patches
Backing out patch 105050-01
Patch 105050-01 has been backed out.
#
Installing Patch Clusters
The patch cluster provides a selected set of patches for a designated
Solaris OS level and is conveniently wrapped for one-step installation.
Patch clusters are usually a set of recommended and security patches.
You should not install cluster patches on systems with limited disk space.
By default, the cluster installation procedure saves the base objects being
patched. Prior to installing the patches, the cluster installation script first
determines if enough system disk space is available in the
/var/sadm/pkg directory to save the base packages and terminates if not
enough space is available.
Caution – You can override the save feature by using the -nosave option
when you are executing the cluster installation script. If you use the
-nosave option, you cannot back out these patches if the need arises.
You can remove individual patches that were installed by the patch
cluster by using the patchrm command. The README file is located in the
specific patch directory under the /var/sadm/patch directory after the
patch has been installed.
Installing and Removing Patches
7-12 Intermediate System Administration for the Solaris™ 10 Operating System
Copyright 2005 Sun Microsystems, Inc. All Rights Reserved. Sun Services, Revision A.1
To install a patch cluster, perform the following steps:
1. Be sure the patch cluster has been unzipped or uncompressed and
extracted if the cluster was received as a tar.Z file.
2. Decide on which method to use to install the cluster—the
recommended default save option or the -nosave option.
3. Change to the directory that contains the patch cluster. Read the
CLUSTER_README file, which contains information about the bundled
set of patches, including:
● Cluster description
● Patches included
● Important notes and warnings
● Save and backout options
● Special install instructions
● Special patch circumstances
● Any notices and other recommendations
Then run the install_cluster script.
# cd 10_Recommended
# ./install_cluster
The installation appears as follows:
Patch cluster install script for Solaris 10 Recommended
*WARNING* SYSTEMS WITH LIMITED DISK SPACE SHOULD *NOT* INSTALL PATCHES:
(Other disk space warning messages omitted.)
Are you ready to continue with install? [y/n]:y
Determining if sufficient save space exists
Sufficient save space exists, continuing
Installing patches located in /tmp/10_Recommended
Using patch_order file for patch installation sequence
Installing 113319-01
(Other patch messages omitted.)
The following patches were not able to be installed:
112875-01
113023-01
For more installation messages refer to the installation logfile:
/var/sadm/install_data/Solaris_10_Recommended_log
Installing and Removing Patches
Managing Software Patches on the Solaris 10 OS 7-13
Copyright 2005 Sun Microsystems, Inc. All Rights Reserved. Sun Services, Revision A.1
Use ’/usr/bin/showrev -p’ to verify installed patch-ids.
Refer to individual patch README files for more patch detail.
Rebooting the system is usually necessary after installation
#
4. Read each individual patch README file to determine if any
additional steps are required to fully install any individual patch.
5. Check the log file if more detail is needed.
Reviewing the log provides information about why the patches
listed above were not able to be installed:
# more /var/sadm/install_data/Solaris_10_Recommended_log
*** Install Solaris 10 Recommended begins Mon Oct 18 14:47:11 BST 2004***
*** PATCHDIR = /tmp/10_Recommended ***
(output omitted)
Installing 112875-01
Checking installed patches
Patch 112875-01 has already been applied.
See patchadd(1M) for instructions.
Installing 113023-01
Checking installed patches
One or more patch packages included in
113023-01 are not installed on this system.
(output omitted)
#
6. Reboot the system for all patches to take effect.
The smpatch Utility
7-14 Intermediate System Administration for the Solaris™ 10 Operating System
Copyright 2005 Sun Microsystems, Inc. All Rights Reserved. Sun Services, Revision A.1
The smpatch Utility
The smpatch utility program allows you to download, apply, and remove
patches on a single system or on multiple systems.
The system on which you run Sun Patch Manager must be running at
least Solaris 8 OS and have the Developer Software Support Group
installed. If your system runs Solaris 8 OS or Solaris 9 OS, it must also
have the Sun Patch Manager 2.0 software installed. If your system runs
Solaris 10 OS and has the Developer Software Support Group installed,
the Sun Patch Manager 2.0 software is included.
The smpatch command can also be used to download the required
patches for your systems from the Sun patch server URL at:
The default location
for downloaded patches is the /var/sadm/spool directory.
The values used by the smpatch command can be displayed using the
following command:
# smpatch get -L patchpro.patch.source patchpro.download.directory
/>/var/sadm/spool
All smpatch commands must be issued on the command line. To obtain
patches from the Sun patch server, your system must be configured to
access the Internet.
The smpatch command can analyze the patch requirements for a system
and automatically patch that system with all appropriate patches.
For further details, refer to man smpatch.
Performing the Exercises
Managing Software Patches on the Solaris 10 OS 7-15
Copyright 2005 Sun Microsystems, Inc. All Rights Reserved. Sun Services, Revision A.1
Performing the Exercises
You have the option to complete any one of three versions of a lab. To
decide which to choose, consult the following descriptions of the levels:
● Level 1 – This version of the lab provides the least amount of
guidance. Each bulleted paragraph provides a task description, but
you must determine your own way of accomplishing each task.
● Level 2 – This version of the lab provides more guidance. Although
each step describes what you should do, you must determine the
commands (and options) to input.
● Level 3 – This version of the lab is the easiest to accomplish because
each step provides exactly what you should input to the system. This
level also includes the task solutions for all three levels.
Exercise: Maintaining Patches (Level 1)
7-16 Intermediate System Administration for the Solaris™ 10 Operating System
Copyright 2005 Sun Microsystems, Inc. All Rights Reserved. Sun Services, Revision A.1
Exercise: Maintaining Patches (Level 1)
In this exercise, you transfer a patch from a classroom server, apply the
patch, and then remove it.
Preparation
Your instructor should provide directions for accessing a patch on a server
that is available to systems in the classroom. Refer to the lecture notes as
necessary to perform the tasks listed.
Remote Lab Data Center (RLDC)
In addition to being able to use local classroom equipment, this lab has
also been designed to use equipment located in a remote lab data center.
Directions for accessing and using this resource can be found at:
/>Ask your instructor for the particular SSH (Secure Shell) configuration file
you should use to access the appropriate remote equipment for this
exercise.
Tasks
Complete the following tasks:
● Create a directory to hold patches. Use the ftp command to transfer
a patch from a classroom server into the directory you create. Unzip
the patch. Verify that no patch has been applied to your system.
Verify that the /var/sadm/patch directory is empty.
● Read the README file associated with the patch to verify which
Solaris OS release is appropriate for the patch. Add the patch, and
verify that it is installed in the /var/sadm/patch directory. View the
log file for this patch.
● Remove the patch you just installed, and verify that it is no longer
applied to the system.
Exercise: Maintaining Patches (Level 2)
Managing Software Patches on the Solaris 10 OS 7-17
Copyright 2005 Sun Microsystems, Inc. All Rights Reserved. Sun Services, Revision A.1
Exercise: Maintaining Patches (Level 2)
In this exercise, you transfer a patch from a classroom server, apply the
patch, and then remove it.
Preparation
Your instructor should provide directions for accessing a patch on a server
that is available to systems in the classroom. Refer to the lecture notes as
necessary to perform the tasks listed.
Remote Lab Data Center (RLDC)
In addition to being able to use local classroom equipment, this lab has
also been designed to use equipment located in a remote lab data center.
Directions for accessing and using this resource can be found at:
/>Ask your instructor for the particular SSH (Secure Shell) configuration file
you should use to access the appropriate remote equipment for this
exercise.
Task Summary
In this exercise, you accomplish the following:
● Create a directory to hold patches. Use the ftp command to transfer
a patch from a classroom server into the directory you create. Unzip
the patch. Verify that no patch has been applied to your system.
Verify that the /var/sadm/patch directory is empty.
● Read the README file associated with the patch to verify which
Solaris OS release is appropriate for the patch. Add the patch, and
verify that it is installed in the /var/sadm/patch directory. View the
log file for this patch.
● Remove the patch you just installed, and verify that it is no longer
applied to the system.
Exercise: Maintaining Patches (Level 2)
7-18 Intermediate System Administration for the Solaris™ 10 Operating System
Copyright 2005 Sun Microsystems, Inc. All Rights Reserved. Sun Services, Revision A.1
Tasks
Complete the following steps:
1. Create a directory to hold patches. Use the binary transfer mode of
the ftp command to transfer a patch from a classroom server into
the directory you created. Your instructor should provide
information about where to find a patch on the server. Close your
ftp connection when you are finished.
Note – The default mode for an ftp connection is binary mode in
Solaris 10 OS. The default mode for an ftp connection in Solaris 8 or
earlier versions is ASCII mode. You use the bin command to set the FTP
transfer mode to binary mode to transfer binary, image, or an non-text
files in these earlier versions of the OS.
2. Use the unzip command to extract the patch from the zip archive.
3. Use the patchadd command to determine if any patches are
currently installed on your system.
4. Verify that the /var/sadm/patch directory is empty.
5. Read the README file that is associated with the patch you unzipped.
Verify the Solaris OS release for which the patch is required.
Solaris OS release:
6. Add the patch.
7. Verify that the patch is installed. What are the packages that the
patch affects?
8. Examine the patch installation log.
9. Remove the patch you just installed. Verify that the patch is no
longer installed.
Exercise: Maintaining Patches (Level 3)
Managing Software Patches on the Solaris 10 OS 7-19
Copyright 2005 Sun Microsystems, Inc. All Rights Reserved. Sun Services, Revision A.1
Exercise: Maintaining Patches (Level 3)
In this exercise, you transfer a patch from a classroom server, apply the
patch, and then remove it.
Preparation
Your instructor should provide directions for accessing a patch on a server
that is available to systems in the classroom. Refer to the lecture notes as
necessary to perform the tasks listed.
Remote Lab Data Center (RLDC)
In addition to being able to use local classroom equipment, this lab has
also been designed to use equipment located in a remote lab data center.
Directions for accessing and using this resource can be found at:
/>Ask your instructor for the particular SSH (Secure Shell) configuration file
you should use to access the appropriate remote equipment for this
exercise.
Task Summary
In this exercise, you accomplish the following:
● Create a directory to hold patches. Use the ftp command to transfer
a patch from a classroom server into the directory you create. Unzip
the patch. Verify that no patch has been applied to your system.
Verify that the /var/sadm/patch directory is empty.
● Read the README file associated with the patch to verify which
Solaris OS release is appropriate for the patch. Add the patch, and
verify that it is installed in the /var/sadm/patch directory. View the
log file for this patch.
● Remove the patch you just installed, and verify that it is no longer
applied to the system.
Exercise: Maintaining Patches (Level 3)
7-20 Intermediate System Administration for the Solaris™ 10 Operating System
Copyright 2005 Sun Microsystems, Inc. All Rights Reserved. Sun Services, Revision A.1
Tasks and Solutions
Complete the following steps:
Note – The default mode for an ftp connection is binary mode in
Solaris 10 OS. The default mode for an ftp connection in Solaris 8 OS or
earlier versions is ASCII mode. You use the bin command to set the FTP
transfer mode to binary mode to transfer binary, image, or an non-text
files in these earlier versions of the OS.
1. Create a directory to hold patches. Use the binary transfer mode of
the ftp command to transfer a patch from a classroom server into
the directory you created. Your instructor should provide
information about where to find a patch on the server. Close your
ftp connection when you are finished. For example:
# cd /var/tmp
# ftp
instructor
(connection and login messages)
ftp> cd /export/patches
ftp> get 112875-01.zip
(ftp messages)
ftp> bye
221 Goodbye.
#
2. Use the unzip command to extract the patch from the zip archive,
for example:
# unzip 112875-01.zip
Archive: 112875-01.zip
creating: 112875-01/
inflating: 112875-01/.diPatch
inflating: 112875-01/patchinfo
creating: 112875-01/SUNWrcmds/
inflating: 112875-01/SUNWrcmds/pkgmap
inflating: 112875-01/SUNWrcmds/pkginfo
creating: 112875-01/SUNWrcmds/install/
inflating: 112875-01/SUNWrcmds/install/checkinstall
inflating: 112875-01/SUNWrcmds/install/copyright
inflating: 112875-01/SUNWrcmds/install/i.none
inflating: 112875-01/SUNWrcmds/install/patch_checkinstall
inflating: 112875-01/SUNWrcmds/install/patch_postinstall
inflating: 112875-01/SUNWrcmds/install/postinstall
inflating: 112875-01/SUNWrcmds/install/preinstall
creating: 112875-01/SUNWrcmds/reloc/
Exercise: Maintaining Patches (Level 3)
Managing Software Patches on the Solaris 10 OS 7-21
Copyright 2005 Sun Microsystems, Inc. All Rights Reserved. Sun Services, Revision A.1
creating: 112875-01/SUNWrcmds/reloc/usr/
creating: 112875-01/SUNWrcmds/reloc/usr/lib/
creating: 112875-01/SUNWrcmds/reloc/usr/lib/netsvc/
creating: 112875-01/SUNWrcmds/reloc/usr/lib/netsvc/rwall/
inflating: 112875-01/SUNWrcmds/reloc/usr/lib/netsvc/rwall/rpc.rwalld
inflating: 112875-01/README.112875-01
#
3. Use the patchadd command to determine if any patches are
currently installed on your system.
# patchadd -p
The patchadd command should display a message.
4. Verify that the /var/sadm/patch directory is empty.
# ls /var/sadm/patch
#
5. Read the README file that is associated with the patch you unzipped.
Verify the Solaris OS release for which the patch is required.
# more 112875-01/README.112875-01
Patch-ID# 112875-01
Keywords: security rpc.rwalld string
Synopsis: SunOS 5.10: patch /usr/lib/netsvc/rwall/rpc.rwalld
Date: Jun/21/2004
(output omitted)
6. Add the patch.
# patchadd 112875-01
Checking installed patches
Verifying sufficient filesystem capacity (dry run method)
Installing patch packages
Patch number 112875-01 has been successfully installed.
See /var/sadm/patch/112875-01/log for details
Patch packages installed:
SUNWrcmds
#
7. Verify that the patch is installed. What are the packages that the
patch affects?
# patchadd -p
Patch: 112875-01 Obsoletes: Requires: Incompatibles: Packages: SUNWrcmds
Exercise: Maintaining Patches (Level 3)
7-22 Intermediate System Administration for the Solaris™ 10 Operating System
Copyright 2005 Sun Microsystems, Inc. All Rights Reserved. Sun Services, Revision A.1
8. Examine the patch installation log file.
# cd /var/sadm/patch/112875-01
# more log
(output omitted)
Installation of <SUNWrcmds> was successful.
9. Remove the patch you just installed. Verify that the patch is no
longer installed.
# cd
# patchrm 112875-01
Checking installed patches
Backing out patch 112875-01
Patch 112875-01 has been backed out.
# patchadd -p
The patchadd -p command should not contain any reference to
112875-01.
Exercise Summary
Managing Software Patches on the Solaris 10 OS 7-23
Copyright 2005 Sun Microsystems, Inc. All Rights Reserved. Sun Services, Revision A.1
Exercise Summary
?
!
Discussion – Take a few minutes to discuss what experiences, issues, or
discoveries you had during the lab exercises.
● Experiences
● Interpretations
● Conclusions
● Applications
Copyright 2005 Sun Microsystems, Inc. All Rights Reserved. Sun Services, Revision A.1
Module 8
ExecutingBootPROMCommands
Objectives
Upon completion of this module, you should be able to:
● Identify boot programmable read-only memory (PROM)
fundamentals
● Use basic boot PROM commands
● Identify the system’s boot device
● Create and remove custom device aliases
● View and change nonvolatile random access memory (NVRAM)
parameters from the shell
● Interrupt an unresponsive system
The course map in Figure 8-1 shows how this module fits into the current
instructional goal.
Figure 8-1 Course Map
Executing
Boot PROM
Commands
Performing System Boot Procedures
Performing
Boot and
Shutdown
Procedures
Introducing Boot PROM Fundamentals
8-2 Intermediate System Administration for the Solaris™ 10 Operating System
Copyright 2005 Sun Microsystems, Inc. All Rights Reserved. Sun Services, Revision A.1
Introducing Boot PROM Fundamentals
All Sun systems have resident boot PROM firmware that provides basic
hardware testing and initialization prior to booting. The boot PROM also
enables you to boot from a wide range of devices. In addition, there is a
user interface that provides several important functions.
The Sun boot PROM has access to a standard set of generic device drivers.
The system needs these drivers to access and control the buses and the
boot device to boot the system properly.
All versions of the OpenBoot™ architecture allow a third-party board to
identify itself and load its own plug-in device driver. Each device
identifies its type and furnishes its plug-in device driver when requested
by the OpenBoot PROM during the system hardware configuration phase
of the boot process.
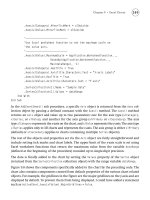
Figure 8-2 shows the identification process.
Figure 8-2 Third-Party Device Identification Process
Introducing Boot PROM Fundamentals
Executing Boot PROM Commands 8-3
Copyright 2005 Sun Microsystems, Inc. All Rights Reserved. Sun Services, Revision A.1
Goal of the OpenBoot™ Architecture Standard
The overall goal of the Institute of Electrical and Electronics Engineers
(IEEE) standard #1275 for the OpenBoot architecture is to provide the
capabilities to do the following:
● Test and initialize system hardware
● Determine the system’s hardware configuration
● Boot the operating system
● Provide an interactive interface for configuration, testing, and
debugging
● Enable the use of third-party devices
Boot PROM
Each Sun SPARC system has a boot PROM chip. This 1-Mbyte chip is
typically located on the same board as the central processing unit (CPU).
Boot PROM chips are usually found in a pluggable socket on older
systems. As of the 3.x PROM, they are permanently soldered to the main
system board.
The Ultra™ workstations use a reprogrammable boot PROM called a
flash PROM (FPROM). The FPROM allows you to load new boot program
data into the PROM by using software, instead of having to replace the
chip.
Desktop systems have a write-protect jumper that must be moved before
you can write to the PROM. You have to move the jumper because the
default position is write-protect. Refer to the Sun Flash PROM Guide for
Workstations and Workgroup Servers - Standalone Version part number
802-3233-27, for the jumper location on your system.
Caution – Many systems have the jumper under an installed frame buffer
or other removable card. Be careful when removing or replacing this card.
The main functions of the boot PROM are to test the system hardware and
to boot the operating system. The boot PROM firmware is referred to as
the monitor program.
Introducing Boot PROM Fundamentals
8-4 Intermediate System Administration for the Solaris™ 10 Operating System
Copyright 2005 Sun Microsystems, Inc. All Rights Reserved. Sun Services, Revision A.1
The boot PROM firmware controls the operation of the system before the
operating system has been booted and the kernel is available. The boot
PROM also provides the user with a user interface and firmware utility
commands, known as the FORTH command set. Commands include the
boot commands, diagnostics commands, and commands to modify the
default configuration.
Note – The boot PROM does not work with the Solaris OS file systems or
files. It handles mainly hardware devices. The OS works with and is
dependent on firmware, but firmware is independent of the OS.
To determine which revision of OpenBoot PROM is running on the
system, perform either the command:
# /usr/platform/‘uname -m‘/sbin/prtdiag -v
or
# prtconf -V
Introducing Boot PROM Fundamentals
Executing Boot PROM Commands 8-5
Copyright 2005 Sun Microsystems, Inc. All Rights Reserved. Sun Services, Revision A.1
System Configuration Information
Another important element in each Sun system is the system
configuration information. The system configuration information includes
the following:
● The Ethernet or MAC address, such as 8:0:20:5d:6f:9e
● The system host ID, such as 805d6f9e
● User-configurable parameters which have been modified from the
default settings
The user-configurable parameters are known as NVRAM variables, or
EEPROM parameters. They allow an administrator to control things such
as the default boot device, the level of Power-on self-test (POST), and so
on.
Depending on the system, one of three different components store the
system configuration information:
● NVRAM chip
● Serial Electronically Erasable Programmable Read Only Memory
(SEEPROM) chip
● System Configuration Card (SCC)
NVRAM Chip
Older systems contain a removable NVRAM chip, normally located on
the main system board. In addition to the system configuration
information, the NVRAM chip contains an integrated lithium battery
which provides battery backup for the configuration information and also
provides the system’s time-of-day (TOD) function.
SEEPROM Chip
Most newer systems contain a non-removable SEEPROM chip, normally
located on the main system board. SEEPROM chips do not require a
battery to maintain the system configuration information.