office 2010 All-in-One For Dummies phần 4 pot
Bạn đang xem bản rút gọn của tài liệu. Xem và tải ngay bản đầy đủ của tài liệu tại đây (3.64 MB, 82 trang )
Book II
Chapter 3
Word Styles
217
Applying Styles to Text and Paragraphs
Experimenting with style sets
A style set is a slight variation on the styles in the template you chose when
you created your document. Style sets include Classic, Elegant, Fancy,
and Modern. Choosing a style set imposes a slightly different look on your
document — you make it classier, more elegant, fancier, or more modern.
All templates, even those you create yourself, offer style sets. Style sets are a
convenient way to experiment with the overall look of a document.
To experiment with style sets, go to the Home tab, click the Change Styles
button, choose Style Set on the drop-down list, and do one of the following:
✦ Choose a new style set: Select a style set on the submenu.
✦ Use the original styles in the template: Choose Reset to Quick Styles
from Template on the submenu.
Choosing which style names
appear on the Style menus
One of the challenges of applying styles is finding the right style to apply
in the Quick Style gallery, Styles pane, or Apply Styles task pane (refer to
Figure 3-2). All three can become crowded with style names. To make finding
and choosing styles names easier, you can decide for yourself which names
appear on the three style menus.
Quick Style gallery
In the Quick Style gallery, remove a style name by right-clicking it and choos-
ing Remove from Quick Style gallery. If you regret removing style names,
click the Change Styles button and choose Style Set➪Reset to Quick Styles
from Template.
Styles pane and Apply styles task pane
To decide for yourself which style names appear in the Styles pane and
Apply Styles task pane, click the Styles group button, and in the Styles pane,
click the Options link (you can find this link near the bottom of the pane).
You see the Style Pane Options dialog box shown in Figure 3-3. Choose
options to tell Word which style names appear in the Styles pane and Apply
Styles task pane:
✦ Select Styles to Show: Choose All Styles to show all style names. The
other options place a subset of names in the window and task pane.
Recommended style names are those Microsoft thinks you need
most often.
16_497487-bk02ch03.indd 21716_497487-bk02ch03.indd 217 3/25/10 8:37 PM3/25/10 8:37 PM
218
Applying Styles to Text and Paragraphs
Figure 3-3:
Deciding
which
names to
put in the
Styles pane
and Apply
Styles task
pane.
✦ Select How List Is Sorted: Choose an option to describe how to list
styles. Except for Based On, these options, I think, are self-explanatory.
The Based On option lists styles in alphabetical order according to
which style each style is based on (later in this chapter, “Creating a style
from the ground up” explains how the Based On setting is used in con-
structing styles).
✦ Select Formatting to Show As Styles: Choose options to declare which
styles to list — those that pertain to paragraph-level formatting, fonts,
and bulleted and numbered lists.
How can you tell which style has been applied
to a paragraph or text? Sometimes you need to
know which style is in play before you decide
whether applying a different style is necessary.
Click the paragraph or text and use these tech-
niques to find out which style was applied to it:
✓ Glance at the Quick Style gallery and
Styles pane to see which style is selected.
The selected style is the one that was
applied to your paragraph or text.
✓ Click the Style Inspector button at the
bottom of the Styles pane. The Style
Inspector pane opens and lists the current
style.
✓ Press Shift+F1. The Reveal Formatting
task pane opens. It lists the style that was
applied to the paragraph or text.
If you’re especially keen to know about styles
in your document, you can make style names
appear to the left of the text in Outline and Draft
view. On the Find tab, choose Options. In the
Word Options dialog box, go to the Advanced
tab and enter .5 or another measurement in
the Style Area Pane Width in Draft and Outline
Views box (look for this box under “Display”).
You can drag the border of the Style Area pane
to enlarge or shrink it.
Determining which style is in use
16_497487-bk02ch03.indd 21816_497487-bk02ch03.indd 218 3/25/10 8:37 PM3/25/10 8:37 PM
Book II
Chapter 3
Word Styles
219
Creating a New Style
✦ Select How Built-In Style Names Are Shown: Choose options to tell how
to handle built-in styles, the obscure styles that Word applies on its own
when you create tables of contents and other self-generating lists.
✦ Apply to this document or to the template as well: Click the Only in
This Document option button to apply your choices only to the docu-
ment you’re working on; click the New Documents Based on This
Template option button to apply your choices to your document and to
all future documents you create with the template you’re using.
Creating a New Style
You can create a new style by creating it from a paragraph or building it
from the ground up. To do a thorough job, build it from the ground up
because styles you create this way can be made part of the template you
are currently working in and can be copied to other templates (later in this
chapter, “Creating and Managing Templates” explains templates).
Creating a style from a paragraph
Follow these steps to create a new style from a paragraph:
1. Click in a paragraph whose formatting you want to turn into a style.
2. Right-click and choose Styles➪Save Selection As a New Quick Style.
You see the Create New Style from Formatting dialog box. You can also
open this dialog box by opening the Quick Style gallery and choosing
Save Selection As a New Quick Style.
3. Enter a name for your new style.
4. Click OK.
A style you create this way becomes a part of the document you’re
working on; it isn’t made part of the template from which you created
your document.
Creating a style from the ground up
To make a style available in documents you will create in the future, make it
part of a template and build it from the ground up. In the Styles pane, click
the New Style button (you can find it at the bottom of the pane). You see the
Create New Style from Formatting dialog box shown in Figure 3-4. Fill in the
dialog box and click OK.
16_497487-bk02ch03.indd 21916_497487-bk02ch03.indd 219 3/25/10 8:37 PM3/25/10 8:37 PM
220
Creating a New Style
Figure 3-4:
Creating
a brand-
spanking-
new style.
Here’s a rundown of the options in the Create New Style from Formatting
dialog box:
✦ Name: Enter a descriptive name for the style.
✦ Style Type: On the drop-down list, choose a style type (“Types of
styles,” earlier in this chapter, describes the style types).
✦ Style Based On: If your new style is similar to a style that is already part
of the template with which you created your document, choose the style
to get a head start on creating the new one. Be warned, however, that
if you or someone else changes the Based On style, your new style will
inherit those changes and be altered as well.
✦ Style for Following Paragraph: Choose a style from the drop-down list
if the style you’re creating is always followed by an existing style. For
example, a new style called Chapter Title might always be followed by
a style called Chapter Intro Paragraph. For convenience, someone who
applies the style you’re creating and presses Enter automatically applies
the style you choose here on the next line of the document. Applying a
style automatically to the following paragraph saves you the trouble of
having to apply the style yourself.
✦ Formatting: Choose options from the menus or click buttons to fashion
or refine your style (you can also click the Format button to do this).
✦ Add to Quick Style List: Select this check box to make the style’s
name appear in the Quick Style gallery, Styles pane, and Apply Styles
task pane.
16_497487-bk02ch03.indd 22016_497487-bk02ch03.indd 220 3/25/10 8:37 PM3/25/10 8:37 PM
Book II
Chapter 3
Word Styles
221
Modifying a Style
✦ Automatically Update: Normally, when you make a formatting change to
a paragraph, the style assigned to the paragraph does not change at all,
but the style does change if you check this box. Checking this box tells
Word to alter the style itself each time you alter a paragraph to which
you’ve assigned the style. With this box checked, all paragraphs in the
document that were assigned the style are altered each time you change
a single paragraph that was assigned the style.
✦ Only in This Document/New Documents Based on This Template: To
make your style a part of the template from which you created your docu-
ment as well as the document itself, click the New Documents Based on
This Template option button. This way, new documents you create that are
based on the template you are using can also make use of the new style.
✦ Format: This is the important one. Click the button and make a format-
ting choice. Word takes you to dialog boxes so that you can create or
refine the style.
Modifying a Style
What if you decide at the end of an 80-page document that all 35 introduc-
tory paragraphs to which you assigned the Intro Para style look funny? If
you clicked the Automatically Update check box in the New Style dialog box
when you created the style, all you have to do is alter a paragraph to which
you assigned the Intro Para style to alter all 35 introductory paragraphs.
However, if you decided against updating styles automatically, you can still
change the introductory paragraphs throughout your document.
Follow these steps to modify a style that isn’t updated automatically:
1. Click in any paragraph, table, or list to which you’ve assigned the
style; if you want to modify a character style, select the characters to
which you’ve assigned the style.
2. In the Styles pane or Apply Styles task pane, make sure that the name
of the style you want to modify is selected.
If the right name isn’t selected, select it now in the Styles pane or Apply
Styles task pane.
3. In the Styles pane, open the style’s drop-down list and choose Modify;
in the Apply Styles task pane, click the Modify button.
You see the Modify Style dialog box. Does the dialog box look familiar? It
is nearly identical to the Create New Style from Formatting dialog box you
used to create the style in the first place (refer to Figure 3-4). The only dif-
ference is that you can’t choose a style type in the Modify Style dialog box.
4. Change the settings in the Modify Styles dialog box and click OK.
The previous section in this chapter explains the settings.
16_497487-bk02ch03.indd 22116_497487-bk02ch03.indd 221 3/25/10 8:37 PM3/25/10 8:37 PM
222
Creating and Managing Templates
After you modify a style, all paragraphs or text to which the style was
assigned are instantly changed. You don’t have to go back and reformat text
and paragraphs throughout your document.
Creating and Managing Templates
As I explain at the start of this chapter, every document you create is
fashioned from a template. The purpose of a template is to store styles for
documents. In the act of creating a document, you choose a template, and
the styles on the template become available to you when you work on your
document (Chapter 1 of this mini-book explains how to choose a template
when you create a new document).
For example, when you double-click the Blank Template icon in the Available
Templates window or press Ctrl+N, you create a document with the Blank
Document template, a relatively simple template with few styles. When you
create a document with a template from Office.com or a template from the
New dialog box, more styles are available to you because these templates
are more sophisticated.
To save time formatting your documents, you are invited to create templates
with styles that you know and love. You can create a new template from
scratch, create a template from a document, or create a template by assem-
bling styles from other templates and documents. Styles in templates, like
styles in documents, can be modified, deleted, and renamed.
Creating a new template
How do you want to create a new template? You can do it from scratch,
create a new template from a document, or assemble styles from other tem-
plates. Read on.
To create a document from a template you created yourself, open the
Available Templates window (on the File tab, choose New) and click the My
Templates icon. The New dialog box opens. Select your template and click
the Open button.
Creating a template from scratch
Follow these steps to create a template from scratch:
1. On the File tab, choose New.
The Available Templates window opens.
16_497487-bk02ch03.indd 22216_497487-bk02ch03.indd 222 3/25/10 8:37 PM3/25/10 8:37 PM
Book II
Chapter 3
Word Styles
223
Creating and Managing Templates
2. Click the My Templates icon to open the New dialog box.
3. Select the Blank Document icon.
4. Select the Template option button.
This option button is located in the lower-right corner of the dialog box.
5. Click OK.
Your template appears in the Word window.
Create, modify, and delete styles as necessary (see “Creating a New Style”
and “Modifying a Style,” earlier in this chapter). Click the Save button to save
your template, and in the Save As dialog box, enter a name for the template
and click the Save button.
Creating a template from a document
If a document has all or most of the styles you want for a template, convert
the document into a template so that you can use the styles in documents
you create in the future. Follow these steps to create a Word template from a
Word document:
1. Open the Word document you will use to create a template.
2. On the File tab, choose Save As.
The Save As dialog box appears.
3. Enter a name for your template.
4. Open the Save As Type menu and choose Word Template.
5. Under Favorite Links, click Templates to see the folder where tem-
plates are stored.
6. Click the Save button.
Probably your new template includes text that it inherited from the docu-
ment it was created from. Delete the text (unless you want it to appear in
documents you create from your new template).
Assembling styles from other documents and templates
The third way to create a new template is to create a template from scratch
and then gather styles from other documents and templates in your new
template. Later in this chapter, “Copying styles from different documents
and templates” explains how to assemble styles into a template.
16_497487-bk02ch03.indd 22316_497487-bk02ch03.indd 223 3/25/10 8:37 PM3/25/10 8:37 PM
224
Creating and Managing Templates
Opening a template so that you can modify it
Open a template the same way you open a document. On the File tab, choose
Open. You see the Open dialog box. Under Favorite Links, click Templates
and then double-click the name of the template. It opens in the Word
window. Style modifications you make in the template become available to
all documents that were fashioned from the template.
Copying styles from different
documents and templates
Suppose that you like a style in one document and you want to copy it to
another so that you can use it there. Or you want to copy it to a template to
make it available to documents created with the template. Read on to find
out how to copy styles between documents and between templates.
Copying a style from one document to another
Copy a style from one document to another when you need the style on a
one-time basis. Follow these steps:
1. Select a paragraph that was assigned the style you want to copy.
Templates are stored in the Templates folder.
To copy, move, or send templates, and to trade
styles between templates, you have to know
where the Templates folder is located on your
computer. Where templates are stored by
default depends on which version of Windows
your computer runs:
✓ Windows 7 and Windows Vista: C:\Users\
Username\AppData\Roaming\
Microsoft\Templates folder.
✓ Windows XP: C:\Documents and
Settings\Username\
Application Data\Microsoft\
Templates folder.
If you’re having trouble finding the Templates
folder, you can find out where it is located with
these techniques:
✓ On the File tab, choose Options. In the Word
Options dialog box, go to the Advanced
Category and scroll to the File Locations
button. Clicking this button opens the File
Locations dialog box, where, under User
Templates, you can see the name of the
folder in which your templates are stored.
✓ On the File tab, choose New. In the
Available Templates window, click the
My Templates icon. The New dialog
box appears. Right-click a template and
choose Properties. The Properties dialog
box lists the location of the folder where
the templates are stored.
Where templates are stored
16_497487-bk02ch03.indd 22416_497487-bk02ch03.indd 224 3/25/10 8:37 PM3/25/10 8:37 PM
Book II
Chapter 3
Word Styles
225
Creating and Managing Templates
Be sure to select the entire paragraph. If you want to copy a character
style, select text to which you have assigned the character style.
2. Press Ctrl+C or right-click and choose Copy to copy the paragraph to
the Clipboard.
3. Switch to the document you want to copy the style to and press Ctrl+V
or click the Paste button on the Home tab.
4. Delete the text you just copied to your document.
The style remains in the Styles pane and Quick Style gallery even though
the text is deleted. You can call upon the style whenever you need it.
Copying styles to a template
Use the Organizer to copy styles from a document to a template or from one
template to another. After making a style a part of a template, you can call
upon the style in other documents. You can call upon it in each document
you create or created with the template. Follow these steps to copy a style
into a template:
1. Open the document or template with the styles you want to copy.
Earlier in this chapter, “Opening a template so that you can modify it”
explains how to open a template.
2. In the Styles pane, click the Manage Styles button.
This button is located at the bottom of the window. The Manage Styles
dialog box appears.
3. Click the Import/Export button.
You see the Organizer dialog box shown in Figure 3-5. Styles in the docu-
ment or template that you opened in Step 1 appear in the In list box on
the left side.
Figure 3-5:
Copying
styles to a
template.
Select the styles you want to copy
Click to close one template and open another
16_497487-bk02ch03.indd 22516_497487-bk02ch03.indd 225 3/25/10 8:37 PM3/25/10 8:37 PM
226
Creating and Managing Templates
4. Click the Close File button on the right side of the dialog box.
The button changes names and becomes the Open File button.
5. Click the Open File button and, in the Open dialog box, find and
select the template to which you want to copy styles; then, click the
Open button.
You can click the Templates button (under Favorite Links) to open the
Templates folder where templates are located. See the sidebar “Where
templates are stored,” earlier in this chapter, if you have trouble finding
the Templates folder.
The names of styles in the template you chose appear on the right side
of the Organizer dialog box.
6. In the Organizer dialog box, Ctrl+click to select the names of styles on
the left side of the dialog box that you want to copy to the template
listed on the right side of the dialog box.
As you click the names, they become highlighted.
7. Click the Copy button.
The names of styles that you copied appear on the right side of the
Organizer dialog box.
8. Click the Close button and click Save when Word asks whether you
want to save the new styles in the template.
It happens in the best of families. You create
or are given a document only to discover that
the wrong template is attached to it. For times
like those, Word gives you the opportunity to
switch templates. Follow these steps:
1. On the Developer tab, click the Document
Template button.
You see the Templates and Add-Ins dialog
box. If the Developer tab isn’t displayed
on your screen, go to the File tab, choose
Options, visit the Customize Ribbon cate-
gory in the Word Options dialog box, select
the Developer check box, and click OK.
2. Click the Attach button to open the Attach
Template dialog box.
3. Find and select the template you want and
click the Open button.
You return to the Templates and Add-ins
dialog box, where the name of the tem-
plate you chose appears in the Document
Template box.
4. Click the Automatically Update Document
Styles check box.
Doing so tells Word to apply the styles from
the new template to your document.
5. Click OK.
Attaching a different template to a document
16_497487-bk02ch03.indd 22616_497487-bk02ch03.indd 226 3/25/10 8:37 PM3/25/10 8:37 PM
Book II
Chapter 3
Word Styles
227
Creating and Managing Templates
Modifying, deleting, and renaming
styles in templates
Modify, delete, and rename styles in a template the same way you do those
tasks to styles in a document (see “Modifying a Style,” earlier in this chap-
ter). However, in the Modify Style dialog box, select the New Documents
Based on This Template option button before clicking OK.
Your style modifications will apply to all documents you create in the future
with your template. For the style modifications to take effect in documents
you already created with your template, tell Word to automatically update
document styles in those documents. Follow these steps:
1. Save and close your template if it is still open.
If any documents you fashioned from the template are open, close them.
2. Open a document that you want to update with the style modifications
you made to the template.
3. Go to the Developer tab.
To display this tab if necessary, open the File tab, choose Options, go to
the Customize Ribbon category in the Word Options dialog box, select
the Developer check box, and click OK.
4. Click the Document Template button.
The Templates and Add-ins dialog box opens. It should list the path to
the Templates folder and the template you modified. If the wrong tem-
plate is listed, click the Attach button and select the correct template in
the Attach Template dialog box.
5. Select the Automatically Update Document Styles check box.
6. Click OK.
16_497487-bk02ch03.indd 22716_497487-bk02ch03.indd 227 3/25/10 8:37 PM3/25/10 8:37 PM
228
Book II: Word
16_497487-bk02ch03.indd 22816_497487-bk02ch03.indd 228 3/25/10 8:37 PM3/25/10 8:37 PM
Chapter 4: Desktop Publishing
with Word
In This Chapter
✓ Considering ways to desktop-publish in Word
✓ Fine-tuning tables
✓ Wrapping text around graphics and other objects
✓ Running text in newspaper-style columns
✓ Putting text boxes in documents
✓ Putting borders on pages
✓ Decorating pages with drop caps and watermarks
✓ Printing landscape documents and on varying sizes of paper
O
nce upon a time, word processors were nothing more than glorified
typewriters. They were good for typing and basic formatting, and not
much else. But over the years, Microsoft Word has become a desktop pub-
lishing program in its own right. This chapter explains a few desktop publish-
ing features that can make your documents stand out in the crowd — columns,
text boxes, page borders, watermarks, and drop caps, to name a few.
Making Use of Charts, Diagrams,
Shapes, Clip Art, and Photos
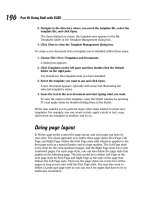
Figure 4-1 shows a newsletter that includes a chart, diagram, shape, clip-
art image, and photo. You are invited to include these items in your Word
documents, and you’ll be glad to know that including them isn’t very much
trouble.
✦ Charts: A chart is an excellent way to present data for comparison pur-
poses. The pie slices, bars, columns, or lines tell readers right away
which business is more productive, for example, or who received the
most votes. Book I, Chapter 6 explains how to create charts.
17_497487-bk02ch04.indd 22917_497487-bk02ch04.indd 229 3/25/10 8:37 PM3/25/10 8:37 PM
230
Constructing the Perfect Table
Figure 4-1:
This
newsletter
includes a
photo, chart,
diagram,
shape, and
clip-art
image.
✦ Diagrams: A diagram allows readers to quickly grasp an idea, relation-
ship, or concept. Instead of explaining an abstract idea, you can portray
it in a diagram. Book I, Chapter 7 explains diagrams.
✦ Shapes and lines: Shapes and lines can also illustrate ideas and con-
cepts. You can also use them for decorative purposes in Word docu-
ments. Book I, Chapter 8 explains how to draw lines, arrows, and shapes.
✦ Clip-art images: Clip-art images make a document livelier. They add a
little color to documents. Book VIII, Chapter 4 explains how to place clip-
art images in documents.
✦ Photos: A well-placed photo or two can make a newsletter or brochure
that much more attractive. Book VIII, Chapter 3 explains how to include
photos in Word documents.
Constructing the Perfect Table
Create a table to present raw data to your readers or plead your case with
numbers and facts. Provided the row labels and column headings are
descriptive, looking up information in a table is the easiest way to find it.
And tables impose order on chaos. What used to be a knotty lump of nonde-
script data can be turned into an orderly statement of fact if the data is pre-
sented in a table. No report is complete without one or two of them.
17_497487-bk02ch04.indd 23017_497487-bk02ch04.indd 230 3/25/10 8:37 PM3/25/10 8:37 PM
Book II
Chapter 4
Desktop Publishing
with Word
231
Constructing the Perfect Table
Book I, Chapter 5 explains how to create a table, as well as how to include
mathematical calculations in Word tables. These pages explain a few table
techniques that pertain strictly to Word documents — repeating the heading
rows, fitting a table on a single page, and turning a list into a table.
Repeating heading rows on subsequent pages
Making sure that the heading row, sometimes called the header row, appears
on a new page if the table breaks across pages is essential. The heading row
Ideally, a table should fit on a single page,
because studying table data that is spread
across two or more pages can be difficult. Here
are some suggestions for fitting a table on a
single page:
✓ Present the table in landscape mode. In
Landscape mode, a page is turned on its
ear so that it is wider than it is tall and
you have room for more columns. To print
in Landscape mode, however, you must
create a new section for the pages in
question. Later in this chapter, “Landscape
Documents” explains how to switch from
portrait to landscape mode.
✓ Shrink the font size. Sometimes shrinking
the font size throughout a table shrinks
the table just enough to fit it on a page. To
shrink fonts throughout a table, go to the
Home tab and click the Shrink Font button
(or press Ctrl+[). Keep shrinking the font
size until the table fits on one page.
✓ Shrink the columns. On the (Table Tools)
Layout tab, click the AutoFit button, and
choose AutoFit Contents on the drop-down
list to make each column only wide enough
to accommodate its widest entry.
✓ Change the orientation of heading row
text. In a top-heavy table in which the
heading row cells contain text and the cells
below contain numbers, you can make the
entire table narrower by changing the ori-
entation of the text in the heading row. To
turn text on its ear, select the cells whose
text needs a turn, go to the (Table Tools)
Layout tab, and click the Text Direction
button. Keep clicking until the text turns
the direction you want.
Chances are, if your table can’t fit on one page,
presenting the information in a table isn’t the best
option. Try presenting it in bulleted or numbered
lists. Or present the information in short para-
graphs under small fourth- or fifth-level headings.
Fitting a table on the page
17_497487-bk02ch04.indd 23117_497487-bk02ch04.indd 231 3/25/10 8:37 PM3/25/10 8:37 PM
232
Constructing the Perfect Table
is the first row in the table, the one that usually describes what is in the
columns below. Without a heading row, readers can’t tell what the informa-
tion in a table means. Follow these steps to make the heading row (or rows)
repeat on the top of each new page that a table appears on:
1. Place the cursor in the heading row or select the heading rows if your
tables includes more than one heading row.
2. On the (Table Tools) Layout tab, click the Repeat Header Rows button
(depending on the size of your screen, you may have to click the Data
button first).
Heading rows appear only in Print Layout view, so don’t worry if you
can’t see them in Draft view.
Turning a list into a table
In order to turn a list into a table, all components of the list — each name,
address, city name, state, and zip code listing, for example — must be sepa-
rated from the next component by a tab space or a comma. Word looks for
tab spaces or commas when it turns a list into a table, and the program
separates data into columns according to where the tab spaces or commas
are located. You have to prepare your list carefully by entering tab spaces or
commas in all the right places before you can turn a list into a table.
Follow these steps to turn a list into a table after you’ve done all the prelimi-
nary work:
1. Select the list.
2. On the Insert tab, click the Table button and choose Convert Text To
Table on the drop-down list.
You see the Convert Text to Table dialog box.
Note the number in the Number of Columns box. It should list the
number of components into which you separated your list. If the number
doesn’t match the number of components, you misplaced a tab entry
or comma in your list. Click Cancel, return to your list, and examine it
to make sure that each line has been divided into the same number of
components.
3. Under Separate Text At, choose the Tabs or Commas option, depend-
ing on which you used to separate the components on the list.
4. Click OK.
You can turn a table into a list by clicking the Convert to Text button on
the (Table Tools) Layout tab (you may have to click the Data button first,
depending on the size of your screen).
17_497487-bk02ch04.indd 23217_497487-bk02ch04.indd 232 3/25/10 8:37 PM3/25/10 8:37 PM
Book II
Chapter 4
Desktop Publishing
with Word
233
Positioning and Wrapping Objects Relative to the Page and Text
Positioning and Wrapping Objects
Relative to the Page and Text
“Object” is just Office’s generic term for a shape, line, text box, clip-art
image, photo, diagram, WordArt image, or chart that you insert in a docu-
ment. Book I, Chapter 8 explains how to manipulate an object — how to
change its size, shape, and other qualities. When you place an object in a
Word document, you have to consider more than its size and shape. You
also have to consider where to position it on the page and how to wrap text
around it. In Word lingo, wrap refers to what text does when it butts heads
with a shape, text box, photo, diagram, or other object. You must be in Print
Layout view to wrap and position objects on a page.
When you insert an object, it lands inline with text. That means it lands
against the left margin and text doesn’t wrap around its side. Before you can
change the position of an object, you must select it and choose a text-wrap-
ping option apart from Inline with Text.
You can decide for yourself how close or far text
is from an object when you wrap text. Select the
object, and on the Format tab, click the Wrap
Text button and choose Edit Wrap Points on the
drop-down list. Small black squares called wrap
points appear around the object. Click and drag
the wrap points to push text away from or bring
text closer to the object in question.
Wrapping text with precision
17_497487-bk02ch04.indd 23317_497487-bk02ch04.indd 233 3/25/10 8:37 PM3/25/10 8:37 PM
234
Positioning and Wrapping Objects Relative to the Page and Text
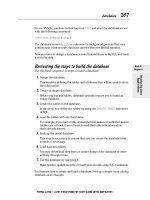
Wrapping text around an object
Figure 4-2 shows the 15 different ways you can wrap text around an object.
Select the object you want to wrap text around, go to the Format tab, and
use one of these techniques to wrap text around the object:
✦ Click the Wrap Text button and choose an option on the drop-down list.
(You may have to click the Arrange button first, depending on the size of
your screen.)
✦ Click the Wrap Text button and choose More Layout Options on the
drop-down list, or click the Size group button and select the Text
Wrapping tab in the Layout dialog box. Then choose a wrapping style
and side around which to wrap text. Figure 4-2 shows what the different
combinations of Wrapping Style and Wrap Text options do.
Wrapped text looks best when it is justified and hyphenated. That way, text
can get closer to the object that is being wrapped.
Figure 4-2:
All the ways
to wrap text
in a Word
document.
Positioning an object on a page
To position an object in a Word page, you can drag it to a new location. As
Book I, Chapter 8 explains in torturous detail, dragging means to select the
object, move the pointer over its perimeter, click when you see the four-
headed arrow, and slide the object to a new location.
To make positioning objects on a page a little easier, Word also offers
Position commands for moving objects. Select your object, go to the Format
17_497487-bk02ch04.indd 23417_497487-bk02ch04.indd 234 3/25/10 8:37 PM3/25/10 8:37 PM
Book II
Chapter 4
Desktop Publishing
with Word
235
Positioning and Wrapping Objects Relative to the Page and Text
tab, and use one of these techniques to move your object precisely into
place:
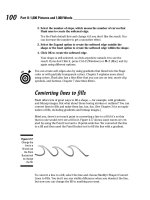
✦ Click the Position button and select a With Text Wrapping option on
the drop-down list, as shown in Figure 4-3. (You may have to click the
Arrange button first, depending on the size of your screen.) These
options position an object squarely in a corner, a side, or the middle of
the page.
✦ Click the Position button and choose More Layout Options on the drop-
down list, or click the Size group button and select the Position tab in
the Layout dialog box. Then choose position options. Go to the Layout
dialog box when you want to place objects in the very same position on
different pages.
Figure 4-3:
The Position
options
place an
object in
one part of
the page.
Select the object Choose a With Text Wrapping option
An object you position with an option on the Position drop-down list trav-
els from page to page if you move the paragraph to which it’s connected.
This happens because, when you insert an object, Word attaches it to the
paragraph where the cursor is located when you make the insertion. If you
move that paragraph to another page or the paragraph gets moved as you
edit text, the object moves right along with the paragraph. You can locate
the paragraph to which an object is connected by clicking the Show/Hide
button on the Home tab and then clicking the object; the anchor symbol
appears beside the paragraph that the object is connected to.
17_497487-bk02ch04.indd 23517_497487-bk02ch04.indd 235 3/25/10 8:37 PM3/25/10 8:37 PM
236
Working with the Drawing Canvas
Working with the Drawing Canvas
As Book I, Chapter 8 explains, shapes and lines are a great way to illustrate
ideas. You can in effect doodle on the page and give readers another insight
into what you want to explain. In Word, however, drawing lines and shapes
is problematic unless you draw them on the drawing canvas.
The drawing canvas works like a corral to hold lines and shapes. After you
create a drawing canvas, you can draw inside it as though you were drawing
on a little page, as shown in Figure 4-4. You can treat the drawing canvas as
an object in its own right. You can move it, along with the things inside it, to
new locations. You can also, by way of the (Drawing Tools) Format tab, give
the drawing canvas an outline shape and fill color. The drawing canvas makes
working with objects on a page, especially lines and shapes, that much easier.
Figure 4-4:
The drawing
canvas —
a corral
for shapes
and lines.
Follow these steps to create a drawing canvas for holding lines and shapes:
1. Place the cursor roughly where you want the drawing canvas to be.
2. Go to the Insert tab.
3. Click the Shapes button and choose New Drawing Canvas.
You can find the New Drawing Canvas command at the bottom of the
Shapes drop-down list. A drawing canvas appears on your screen.
The drawing canvas is an object in its own right. You can wrap text around
it, give it an outline, and give it a color fill. You can drag it to a new location.
To change its size, drag a handle on the side or corner.
17_497487-bk02ch04.indd 23617_497487-bk02ch04.indd 236 3/25/10 8:37 PM3/25/10 8:37 PM
Book II
Chapter 4
Desktop Publishing
with Word
237
Putting Newspaper-Style Columns in a Document
Choosing a Theme for Your Document
When you installed Word on your computer, you also installed a dozen or
more themes. A theme is a colorful, ready-made design for headings and
text. Each theme imposes a slightly different look on a document. If you want
to experiment with themes, more power to you, but be prepared to click the
Undo button and backtrack as you rummage around for the right one.
Staring on the Page Layout tab, follow these instructions to experiment with
themes:
✦ Choosing a new theme: Click the Themes button and choose a theme on
the drop-down list.
✦ Choosing a new set of colors for your theme: Click the Theme Colors
button, slide the pointer over the different color sets on the drop-down
list, and see what effect they have on your document.
✦ Changing the fonts: Click the Theme Fonts button and choose a combi-
nation of fonts on the drop-down list for the headings and text in your
document.
✦ Changing theme effects: Click the Theme Effects button and choose a
theme effect on the drop-down list. A theme effect is a slight refinement
to a theme.
Putting Newspaper-Style Columns in a Document
Columns look great in newsletters and similar documents. And you can pack
a lot of words in columns. I should warn you, however, that the Columns
command is only good for creating columns that appear on the same page.
Running text to the next page with the Columns command can be prob-
lematic. If you’re serious about running text in columns, I suggest either
constructing the columns from text boxes or using Publisher, another Office
program. Book VII explains Publisher.
Sometimes it is easier to create columns by creating a table or by using text
boxes, especially when the columns refer to one another. In a two-column
résumé, for example, the left-hand column often lists job titles (“Facsimile
Engineer”) whose descriptions are found directly across the page in the
right-hand column (“I Xeroxed stuff all day long”). Creating a two-column
résumé with Word’s Columns command would be futile because making the
columns line up is nearly impossible. Each time you add something to the
left-hand column, everything snakes — it gets bumped down in the left-hand
column and the right-hand column as well.
17_497487-bk02ch04.indd 23717_497487-bk02ch04.indd 237 3/25/10 8:37 PM3/25/10 8:37 PM
238
Putting Newspaper-Style Columns in a Document
Doing the preliminary work
Before you put text in newspaper-style columns, write it. Take care of the
spelling, grammar, and everything else first because making text changes to
words after they’ve been arranged in columns is difficult. Columns appear
only in Print Layout view.
Running text into columns
To “columunize” text, select it, go to the Page Layout tab, and click the
Columns button. Then either choose how many columns you want on the
drop-down list or choose More Columns to create columns of different
widths.
You see the Columns dialog box shown in Figure 4-5 if you choose More
Columns. Here are the options in the Columns dialog box:
✦ Preset columns: Select a Presets box to choose a preset number
of columns. Notice that, in some of the boxes, the columns aren’t of
equal width.
Figure 4-5:
Running text
in columns.
✦ Number of columns: If a preset column doesn’t do the trick, enter the
number of columns you want in the Number of Columns box.
✦ Line between columns: A line between columns is mighty elegant and
is difficult to do on your own. Select the Line Between check box to run
lines between columns.
✦ Columns width: If you deselect the Equal Column Width check box, you
can make columns of unequal width. Change the width of each column
by using the Width boxes.
✦ Space between columns: Enter a measurement in the Spacing boxes to
determine how much space appears between columns.
17_497487-bk02ch04.indd 23817_497487-bk02ch04.indd 238 3/25/10 8:37 PM3/25/10 8:37 PM
Book II
Chapter 4
Desktop Publishing
with Word
239
Working with Text Boxes
✦ Start New Column: This check box is for putting empty space in a
column, perhaps to insert a text box or picture. Place the cursor where
you want the empty space to begin, choose This Point Forward on the
Apply To drop-down list, and select the Start New Column check box.
Word creates a new section if you selected text before you columnized it,
and you see your columns in Print Layout view. Chapter 2 of this mini-book
explains sections.
To ”break” a column in the middle and move text to the next column, click where
you want the column to break and press Ctrl+Shift+Enter or go to the Page
Layout tab, click the Breaks button, and choose Column on the drop-down list.
Working with Text Boxes
Put text in a text box when you want a notice or announcement to stand
out on the page. Like other objects, text boxes can be shaded, filled with color,
and given borders, as the examples in Figure 4-6 demonstrate. You can also lay
them over graphics to make for interesting effects. I removed the borders and
the fill color from the text box on the right side of Figure 4-6, but rest assured,
the text in this figure lies squarely in a text box. (Book I, Chapter 8 explains how
to give borders, shading, and color to objects such as text boxes.)
Figure 4-6:
Examples of
text boxes.
You can move a text box around at will on the page until it lands in the right
place. You can even use text boxes as columns and make text jump from one
text box to the next in a document — a nice feature, for example, when you
want a newsletter article on page 1 to be continued on page 2. Instead of cut-
ting and pasting text from page 1 to page 2, Word moves the text for you as
the column on page 1 fills up.
Inserting a text box
To create a text box, go to the Insert tab, click the Text Box button, and use
one of these techniques:
17_497487-bk02ch04.indd 23917_497487-bk02ch04.indd 239 3/25/10 8:37 PM3/25/10 8:37 PM
240
Sprucing Up Your Pages
✦ Choose a ready-made text box: Scroll in the drop-down list and choose
a preformatted text box.
✦ Draw a conventional text box: Choose Draw Text Box on the drop-down
list, and then click and drag to draw the text box. Lines show you how
big it will be when you release the mouse button.
After you insert the text box, you can type text in it and call on all the for-
matting commands on the (Drawing) Format tab. These commands are
explained in Book I, Chapter 8. It also describes how to turn a shape such
as a circle or triangle into a text box (create the shape, right-click it, choose
Add Text, and start typing).
Here’s a neat trick: You can turn the text in a text box on its side so that it
reads from top to bottom or bottom to top, not from left to right. Create a
text box, enter the text, go to the (Drawing Tools) Format tab, click the Text
Direction button, and choose a Rotate option on the drop-down list.
Making text flow from text box to text box
As I mention earlier, you can link text boxes so that the text in the first box
is pushed into the next one when it fills up. To link text boxes, start by creat-
ing all the text boxes that you need. You cannot link one text box to another
if the second text box already has text in it. Starting on the (Drawing Tools)
Format tab, follow these directions to link text boxes:
✦ Creating a forward link: Click a text box and then click the Create Link
button to create a forward link. The pointer changes into a very odd-looking
pointer that is supposed to look like a pitcher. Move the odd-looking
pointer to the next text box in the chain and click there to create a link.
✦ Breaking a link: To break a link, click the text box that is to be the last
in the chain, and then click the Break Link button.
Sprucing Up Your Pages
You can play interior decorator with the pages of a document by putting a
border around pages, splashing color on pages, and taking advantage of the
predesigned cover pages that Word provides for you. Keep reading if making
the pages of your document a little prettier interests you.
Decorating a page with a border
Word offers a means of decorating title pages, certificates, menus, and simi-
lar documents with a page border. Besides lines, you can decorate the sides
17_497487-bk02ch04.indd 24017_497487-bk02ch04.indd 240 3/25/10 8:37 PM3/25/10 8:37 PM
Book II
Chapter 4
Desktop Publishing
with Word
241
Sprucing Up Your Pages
of a page with stars, pieces of cake, and other artwork. If you want to place
a border around a page in the middle of a document, you must create a sec-
tion break where the page is.
Before you create your border, place the cursor on the page where the
border is to appear. Place the cursor on the first page of a document if you
want to put a border around only the first page. If your document is divided
into sections and you want to put borders around certain pages in a section,
place the cursor in the section — either in the first page if you want the bor-
ders to go around it, or in a subsequent page.
With the cursor in the right place, follow these steps to decorate your page
or pages with a border:
1. Go to the Page Layout tab and click the Page Borders button.
You see the Borders and Shading dialog box, as shown in Figure 4-7.
Figure 4-7:
Putting
borders on
pages.
2. Under Setting, choose which kind of border you want.
The Custom setting is for putting borders on one, two, or three sides of
the page, not four. Use the None setting to remove borders.
3. On the Apply To drop-down list, tell Word which page or pages in the
document get borders.
4. Select options to construct the border you want and then click OK.
17_497487-bk02ch04.indd 24117_497487-bk02ch04.indd 241 3/25/10 8:37 PM3/25/10 8:37 PM