o reilly Unix Backup and Recovery phần 8 potx
Bạn đang xem bản rút gọn của tài liệu. Xem và tải ngay bản đầy đủ của tài liệu tại đây (888.23 KB, 73 trang )
setup. Also, if additional EBFs (Sybase patches) or upgrades were installed, they will
have to be reapplied. It is much quicker to restore from a single backup of these
directories.
Restoring from a Hot Backup
Sybase reduces the time it takes to perform a hot backup by saving only the pages that contain
data. It also saves them exactly as they are on the devices and in the order they are found in the
database. Because of this, the recovery requires that the database be re-created with exactly the
same layout it had before the recovery. In other words, if the database was created with a
40-MB default segment and a 10-MB log segment, and at a later point, an additional 40-MB
was added to the default segment, then the database needs to be re-created with a 40-MB
default segment and 10-MB log segment and then altered to add the last 40-MB. Otherwise,
when the load of the hot backup occurs, Sybase will do unpredictable things with the
allocation.
In the previous example, these commands would be
create database mydb on mydefseg = 40, mydefseg = 40
log on mylogseg = 10
alter database mydb on mydefseg = 40
Once the database creation is complete, the full dump of the database needs to be applied using
the load command. The load command has all of the same parameters as the dump command. It
needs to know what to restore, from where to get it, and how to get it from there. To restore
from a tape, use exactly the same parameters as were used to create the tapes.
First, restore the full database backup to the database. This will give you a base point against
which to restore all the transaction logs. Example 16-3 contains a sample load of a full
database dump.
Example 16-3. Sample load database Command
1> load database mydb from '/sybase/backups/mydb.990312.bck'
2> go
Backup Server session id is: 26. Use this value when executing the
'sp_volchanged' system stored procedure after fulfilling any volume change
request from the Backup Server.
Backup Server: 6.28.1.1: Dumpfile name 'mydb9909106EF4 ' section number
0001
mounted on disk file '/sybase/backups/mydb.990312.bck'
Backup Server: 4.58.1.1: Database mydb: 17926 kilobytes LOADed.
Backup Server: 4.58.1.1: Database mydb: 19462 kilobytes LOADed.
Backup Server: 4.58.1.1: Database mydb: 19470 kilobytes LOADed.
Backup Server: 3.42.1.1: LOAD is complete (database mydb).
Use the ONLINE DATABASE command to bring this database online; SQL Server
will not bring it online automatically.
Page 557
If there are no transaction logs for this database, then as the command output says, this database
could be brought online. Enter the online database baddbname command to have Sybase
bring it up and make it available for use.
If there are transaction logs, they will need to be applied to bring the database up to the most
current point possible. Use the load transaction command to apply a transaction log to the
database. To restore the transaction logs for the database mydb in the preceding dump
example, enter the command shown in Example 16-4.
Example 16-4. Sample load transaction Command
1> load transaction mydb from '/sybase/backups/mydb.tlogdmp'
2> go
Backup Server session id is: 28. Use this value when executing the
'sp_volchanged' system stored procedure after fulfilling any volume change
request from the Backup Server.
Backup Server: 6.28.1.1: Dumpfile name 'mydb9909106F49 ' section number
0001 mounted on disk file '/sybase/backups/mydb.tlogdmp'
Backup Server: 4.58.1.1: Database mydb: 24 kilobytes LOADed.
Backup Server: 3.42.1.1: LOAD is complete (database mydb).
Use the ONLINE DATABASE command to bring this database online; SQL Server
will not bring it online automatically.
Repeat the transaction logs loads until there are no more transaction logs to apply. When they
are done, the database has been restored completely and should be brought online using the
online database baddbname command.
Because of a quirk in some versions of Sybase on some platforms, the preceding loads might
not work for using the physical devices. To get by this "feature," you can use logical devices
instead. The only differences in the examples would be changing the physical device to a
logical device after the logical dump device is created. For more information on how to create
logical dump devices, see the definition of dump devices under "The DBA's View," near the
beginning of this chapter.
As of Sybase Version 11.92, a database can now be restored up to a specific point in time as
long as it is covered by a transaction log dump. To specify the time to which the database
should be restored, use the new until_time parameter. This parameter takes a single value of a
time and date in the default format for the data server. For example, to restore a database up to
April 1, 1999, at 12:34:32:650 A.M., first apply the full database dump, then apply all
transaction log dumps up to the one that contains the stop time. With this dump, add until_time,
like this:
load transaction mydb
from '/sybase/backups/mydb.tlogdmp'
with until_time = 'April 1, 1999 at 12:34:32:650AM'
Page 558
Once the database has been restored and brought online, it is important to check all the major
objects in the system and validate the data. Run a number of queries on the database tables to
make sure the data is as it should be and then check the consistency of the database structure
using the dbcc checkalloc.
When all of these checks have been passed, do a full database dump to make sure a consistent
recent backup is on hand in case additional problems arise. Also, it will save time because
none of the transaction logs restored earlier will need to be restored again.
Using the Recovery Procedure
Recovering from a database problem starts with diagnosing exactly what is wrong with the
database. Maybe isql will not connect to the data server, maybe the database is marked
suspect, or maybe an error message in the error log occurs when the data server is started. In
all of these cases and others, something has gone wrong where it had gone right before.
Fortunately, with the proper backups, many of these problems can be fixed and the database
restored to full working order.
Sybase has many parts that are interrelated, but like Sherlock Holmes investigating a mystery,
if we eliminate from consideration the items that are working correctly, only the error-causing
parts will remain. This section provides step-by-step directions to diagnosing and repairing all
of these error-causing parts, and when completed, will leave a fully functional data server.
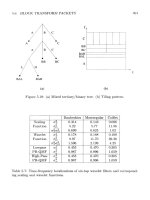
A flowchart that appears at the beginning of these steps (Figure 16-1) should help you in the
recovery process. Each item in the chart is numbered the same as the steps and procedures that
follow. The electronic version of this procedure* contains a flowchart that is an HTML image
map. Each decision or action box in the flowchart is a hyperlink to the appropriate section of
the printed procedure. For more detailed information about individual steps, please consult
Sybase's System Administration documentation, especially the ''Backup and Recovery" chapter.
To begin the investigation, start the data server as it is normally started. If problems show up in
the Sybase error log file or the data server does not come up, start with Step 1 to begin the
recovery/diagnosis procedure.
Step 1: Runfile OK?
Sybase starts up by using the startserver program. This program takes an additional parameter
-f runfilename that is the file containing the server startup command and parameters. If
this file is missing or the path given for the runfile is
* It is available at and on the CD that comes with this book.
Page 559
Figure 16-1.
A Sybase recovery flowchart
Page 560
incorrect, the startserver command will return an error Cannot execute file
runfilename. If the path is incorrect for the file, correct it and start again. If you are unsure
of the path being used, change your directory to the location of the runfile, then run the
command, but specify only the runfile name. Sybase then will try looking in your current default
directory for the file.
If the runfile is OK, proceed to Step 3. If not, go to Step 2.
Step 2: Restore or Re-create Runfile
If the file is missing, it can be re-created fairly easily. There is nothing magical about this file.
It contains the command and parameters to start the server. Example 16-5 contains a sample
runfile for a Unix system.
Example 16-5. Sample Runfile
#!/bin/sh
#
# SQL Server Information:
# Name: SYB_TITANIA
# Master device /sybdata/master.dbf
# Master device size: 10752
# Errorlog: /opt/sybase/logs/SYB_MYDB.errorlog
# Interfaces: /opt/sybase
#
/opt/sybase/bin/dataserver -d/sybdata/master.dbf -sSYB_MYDB \
-e/opt/sybase/logs/SYB_MYDB.errorlog -i/opt/sybase
As seen in the comment lines, dataserver takes a number of different parameters. Again, check
Sybase's documentation for your OS for more details. The most important parameter shown is
the master device. The master device is the primary device used by the master database, and
the master database is one of the keystones of a Sybase server. The master database contains a
majority of the information about all the other databases, devices, and other data server
objects, including the location of the master device. The -s dataservername is how the data
server knows what name to call itself. If this is omitted, Sybase assumes a data server of the
name SYBASE is being started.
The -e errorlog point to the full filename and pathname ofthe data server's error log. During
an install, Sybase defaults to the$SYBASE/install directory. Because this directory containsa
number of important files other than the error log, it is recommended thatthis be changed to
point to another directory, maybe
Page 561
$SYBASE/logs/. Also, if there is more than one data server on the system, the errorlog
filename should be changed. Appending the .errorlog suffix to each data server name provides
each server with its individual errorlog file, making tracking down errors much simpler.
The next parameter to look at is the interface parameter, -i interfacedir. This is the
directory where Sybase can find the interface file. In some systems, there might be two
interface files-one or more for the users to use and one for the Sybase system to use. The
different interface files could contain different selections of server entries, preventing the users
or the data server from accessing all the Sybase servers available. If this parameter is omitted,
Sybase will look in the directory pointed to by $SYBASE environmental variable.
One parameter that is not shown here is the configuration file parameter -c configfile. As of
Version 11, Sybase can be started using a configuration file. This file contains the text of all the
configuration options on the data server and their values. When no -c parameter is specified,
Sybase defaults to the file servername. cfg found in the directory where the data server is
started.
The Origins of the Configuration File
Before Version 11, all configuration parameters were kept only in tables in the master
database. When a configuration option was changed and required a restart of the data
server, the data server might not come up because of this change. Because the server was
not up, there was no way to reset the option except by running a command to reset all the
options to their default values. They then had to be reset to their values before the final
incorrect option change. In other words, a real pain in the you-know-what. Now, the
configuration file contains all these options in an easily edited file. To revert a value
back, a text editor can be used to change the value in the file. When the data server is
next restarted with the reverted values, the data server will restart cleanly.
Two additional parameters can be used with the dataserver program-the version parameter -v
and the single-user mode parameter -m. The version number parameter is handy to use when
you need to see the current version of the database program, and do not want to search for it in
the error log.
The single-user, or maintenance, mode -m is used to bring the data server up so only the sa
account can access the data server. This is required when doing certain recovery procedures
and, in general, when there is a need to prevent user access while maintenance is being done.
Page 562
It is easy to re-create this file by using a text editor to create a script like the preceding one, but
with the values of your data server. Once the file is created and the account that starts the data
server has access to it, run the startserver -f runfile command.
Once you've replaced the runfile, return to Step 1.
Step 3: Able to Get Shared Memory?
Like most database products, Sybase uses shared memory to communicate between data server
processes, process queries, and store sections of the database for quick access. If Sybase is
prevented from acquiring the minimum shared memory it needs, it will fail to come up and
instead will error out with a message like the following:
00:1999/03/21 23:39:02.78 kernel os_create_region: can't allocate
2147479552
bytes
00:1999/03/21 23:39:02.80 kernel kbcreate: couldn't create kernel
region.
00:1999/03/21 23:39:02.80 kernel kistartup: could not create shared
memory
If you are able to get to shared memory, proceed to Step 5. If not,
proceed to Step 4.
Step 4: Free Up Shared Memory or Reconfigure Memory in Configuration File
As mentioned earlier, changes in configuration parameters can cause the Sybase server to need
additional memory. This in turn can require the Sybase server to request a larger shared
memory segment from the OS. There are two things that can prevent this from happening:
1. The maximum shared memory segment size is undersized.
2. There is not enough shared memory on the system to allow this to run.
In the first case, the solution is to increase the maximum shared memory segment value
appropriately for the OS. Because Sybase is supported on many different
Page 563
OSs, how to change this is not shown here. Please refer to the appropriate operating system
Sybase installation manual for further information on setting this value.
In the second case, either shared memory needs to be added to the system, or shared memory
needs to be freed up from other processes. Please contact a system administrator for help in
accomplishing either of these.
You can view the shared memory being used by using the ipcs command. Check the manpages
for the correct usage of the command, but the output should look something like this:
Shared Memory Segments
shmid owner perms bytes nattch status
129 sybase 600 11964416 1
2 sybase 666 1024 3
56 curtis 606 33334342 3
Here, the curtis process has also taken some of the shared memory for itself. By stopping
this process, the shared memory should be freed up. If stopping the process does not free up the
memory, it can be freed using the Unix command ipcrm. Again, check the Unix manpages for
more information on this command on your operating system.
If none of these solutions helps the problem, the changes in the configuration options will need
to be reverted to allow the data server to come up correctly.
If possible, make one change to the configuration options at a
time. Sybase configuration options interact, some causing the system to
need more memory, others less. By making one change at a time, the
configuration option that prevents the system from restarting is known and
can be adjusted accordingly.
Once you have corrected these problems, return to Step 1.
Step 5: Able to Connect to Data Server?
When Sybase starts, it needs the interface file so it can set up all the interprocess and network
communication parameters. This interfaces file is usually named interfaces, interface, or
sql.ini, depending on the operating system.
If you are able to connect, proceed to Step 7. If you are unable to
connect, go to Step 6.
Page 564
Step 6: Check Interface File
If Sybase cannot find the file or there is something wrong with it, Sybase will error out during
startup with a message like one of the following:
00:1999/03/22 00:17:46.54 kernel Could not open interface file
'/opt/sybase/interfaces'
00:1999/03/22 00:22:16.15 kernel Could not find name 'SYB_MYDB' in the
interfaces file /opt/sybase/interfaces
To correct the first error, make sure the interface file is located where the runfile says it should
be located. If the interface file is in a different directory, either adjust the runfile to point to the
correct directory or move the interface file to the directory specified in the runfile.
The second entry means the lines for the data server being started (in this case SYB_MYDB)
cannot be found in the interface file. To fix this problem, add an entry using the appropriate
method for your operating system. Please see the Sybase OS-specific documentation for more
information.
Once the entry is in the correct interface file, rerun the startserver command to see if this has
fixed the problem.
Once you have corrected any problems with the interface file,
return to Step 1.
Step 7: Master Database Initialized?
The master database is the most important database in the system: not only does it contain all
the information about all the other databases but also it is the repository of all information
regarding logins, roles, devices, usages of those devices, and configuration options on the
system. It is imperative that this database comes up correctly. Otherwise, the rest of the data
server would not work at all.
If the master database did initialize, proceed to Step 14. If it did
not, go to Step 8.
Page 565
Step 8: Master Device/File Missing?
The first information that something is wrong with the master database would most likely be the
following error messages displayed during startup:
00:1999/03/22 00:53:48.44 kernel kdconfig: unable to read primary master
device
00:1999/03/22 00:53:48.44 kernel kiconfig: read of config block failed
These lines are preceded by a line that will tell you why the system could not read the primary
master device.
To fix these problems, go to Step 15. If none of the solutions in
that section corrects the problem, you must restore the master database (go
to Step 9).
If there are no problems accessing the master data device, then the problem might be the master
database has been corrupted. This type of problem could show a number of strange symptoms
if the data server was already running. For example, isql will crash with program errors when
trying to connect, or currently running queries will crash.
If strange things like these start happening, the best thing to do is to try to restart the data server.
However, in situations like this, almost all access to the data server will be blocked, so the
isql command shutdown cannot be used normally. Instead, the dataserver process must be
stopped at the operating system level. In Unix, this can be done using the kill command. This
should be used only during extreme situations such as when the data server is consuming all the
processing of the system. Use kill only if nothing else will help, because it could cause
corruption of the databases in the data server.
Once the data server is down, check to make sure memory used by Sybase has been freed. See
Steps 3 and 4 for more information on shared memory. When the shared memory has been
freed, try starting the data server using normal starting procedures.
If the data server fails to start, see if there are errors on the master device in the data server
error log. Go to Step 15 and make sure there are no problems there. If there are, correct the
problem with the device, and try restarting again.
If there are no problems with the physical devices, the master database will need to be
completely recovered from backup.
Page 566
If there are any problems with the physical devices, proceed to
Step 9. Otherwise, proceed to Step 10.
Step 9: Restoring Generic Master Database
Follow these steps to restore the generic master database:
1. Backup server up?
Make sure your backup server is up and running. It will be used later to restore any
backups of the master database and to back up the restored database when the recovery is
finished.
2. Create data device.
Since the master device was corrupted, it must be created anew. Open up the runfile used
to start the Sybase server in a text editor. Note the master device path and the size of the
master device; they will be used in the buildmaster command to re-create the master
device.
To re-create the master device, enter the following buildmaster command or the OS
equivalent needed by the downed server:
buildmaster -d /sybdata/master.dbf -s 8704
The -d option is the master device path and the -s option is the size in pages. For this
example, the master device being created is 17 MB (8704 2-K pages) on
/sybdata/master.dbf.
3. Startup in master recovery mode.
To start the data server in master recovery mode, first make a copy of the current runfile.
Edit this file, and add the -m master recovery mode parameter. When the change is done,
use this file to start the dataserver process with the startserver -f master_runfile
command. This mode will allow the master database's system tables to be updated and
prevent users from accessing the system.
4. Re-create master's entries in usages.
Before anything more can be done to restore the data into the master database, the master
device needs to be restored to the same usage as it was when the last backup of the master
database was performed. Using hardcopies of the system tables sysusages, sysdevices,
and sysdatabases, the entries in sysusages can be re-created with the alter database and
create database commands.
Page 567
To decide if anything needs to be done at this point, examine the dbid column in
sysusages. If more than one entry for dbid equals 1 (see sysdatabases, dbid = 1 = master
db), additional space will need to be added into the master database to make the
sysusages in the server match the one on paper. If there is only one entry, the sysusages
entry does not need any work and you can move on to Step 5, "Add backup server entry
into sysservers."
Example 16-6 through Example 16-8 contain example outputs of the three tables needed
for this restore. The T-SQL statement to extract this information is provided above the
table output.
Example 16-6. sysdatabases
select name, dbid from sysdatabases order by dbid
name dbid
master 1
tempdb 2
model 3
sybsystemprocs 4
sybsyntax 5
mydb 6
Example 16-7. sysusages
select * from sysusages order by vstart
dbid segmap lstart size vstart pad unreservedpgs
1 7 0 1536 4 NULL 112
3 7 0 1024 1540 NULL 608
2 7 0 1024 2564 NULL 608
1 7 1536 1024 3588 NULL 920
5 7 0 1024 4612 NULL 272
1 7 2560 2048 5636 NULL 2048
4 7 0 8192 16777216 NULL 864
6 3 0 5120 67108864 NULL 4720
6 4 5120 2560 83886080 NULL 2552
Example 16-8. sysdevices
select * from sysdevices
low high status cntrltype name phyname
0 10751 3 0 master d_master
67108864 67113983 2 0 mydbdev /sybdata/mydbdev.dbf
83886080 83888639 2 0 mydblogdev /sybdata/mydblogdev.dbf
16777216 16785407 2 0 sysprocsdev /sybdata/sybprocs.dbf
0 1280 16 3 tapedump1 /dev/st0
0 20000 16 4 tapedump2 /dev/st1
Since this is a recovery of the master database, we only have to restore up to the last
master database entry in sysusages. These would be those where dbid
Page 568
= 1, and the vstart is less than or equal to the high value from the master device, master,
in sysdevices. Notice that there are entries between the first and last master db entries on
the master device. When restoring the master database, these entries also must be
duplicated. In this example,
Fortunately, buildmaster has already done part of the work by re-creating the first three
entries that correspond with the master, tempdb, and model databases. In this example,
there are only three entries to restore.
Now that the entries to be restored are known, the work of restoring them with the alter
database and create database commands can begin. Use the dbid value in sysusages to
find out which database entry needs to be added next. In this example, the master database
was extended for an additional 1024 blocks. This equates to 2 MB of space on the master
device. Because the master database already exists, this alter database command must be
used:
alter database master on master = 2
The next entry has a dbid that corresponds to the sybsyntax database. Its segment size is
also 1024, so it size is 2 MB. Since this database has not been created yet the following
create database command must be used:
create database sybsyntax on master = 2
Continuing to the final entry, the dbid signifies that it is another entry for the master
database. The size in this case is 2048 blocks that equal 4 MB (2048/ 512). The next
command to run therefore would be:
alter database master on master = 4
Now that all the entries for the master database are finished, a load can be performed of
the backup, but only after the data server knows about the backup server.
5. Add backup server entry into sysservers.
To be able to do the recovery, the data server needs to know the name of the backup
server. If it is not SYB_BACKUP, an entry will need to be added to sysservers.
Use the following T-SQL command to update an entry into sysservers.
begin transaction
update sysservers
set srvnetname = "BIG_BACKUP"
where srvname = "SYB_BACKUP"
go
/* Make sure the change is correct */
select srvnetname, srvname from sysservers
where srvname = "SYB_BACKUP"
Page 569
/* If the change is correct */
commit transaction
/* If the change is not correct */
rollback transaction
Proceed to Step 10.
Step 10: Recent Dump of Master Database?
If there is a recent dump of the master database, proceed to Step
11. If one does not exist, go to Step 13.
Step 11: Restore Master from Dump
Use the following T-SQL command to load the backup of the master database into the system.
You might have to change the ''from" section of the command to match what is needed for your
operating system and environment. Review the section "Restoring from a Hot Backup" for more
information. When the backup finishes, the data server will shut itself down automatically.
load database master from "/dev/nrmt0"
Proceed to Step 12.
Step 12: Update Number of Devices in the Configuration
When a buildmaster is performed, the configuration options of the system start at their default
values. This can cause problems when the system next comes up because the number of devices
is one of those values. This value needs to be set to the value it was when the backup was
done, or not all the original devices will come up.
Page 570
If the Sybase version of the data server is older than Version 11, follow the procedures in the
Sybase System Administration manual to set the value of "Number of Devices" to the value it
was before the recovery began.
If the version is 11 and later, edit the data server's configuration file and make sure the number
of devices is set correctly. Next, edit the runfile created earlier, adding or modifying the -c
configuration file parameter to point to the proper configuration file.
At this point, the recovery is nearly done, but before the users are allowed back onto the
system, it is best to double-check all the changes made during the recovery. Also, if additional
device or database changes were made since the time of the master database backup, these
changes will all need to be made.
To prevent the users from accessing the system and to allow the system tables to be updated,
again start the data server in master recovery mode. Use the runfile edited in Step 2 in a start
server command appropriate for your operating system.
Proceed to Step 13.
Step 13: Restore System Tables Using disk reinit and disk refit
Once the system comes up, check the system tables sysusages, sysdevices, and sysdatabases
against the backup hardcopies. If there are devices on your hardcopy that are not listed in the
system, then an additional device was added since the master backup was performed. In this
case, a disk reinit will update the sysdevices table from information on the device. If the alter
database or create database commands were run since the last backup, disk refit must be run
to resync the data server with the additional devices and databases available on the system.
disk reinit
The command to resync devices is disk reinit, and it will add a device back into the sysdevices
table without initializing the device itself. To run this command correctly, you will need the
parameters used when the device was first being created with the disk reinit command. The
command syntax is in Example 16-9.
Page 571
Example 16-9. Syntax of disk reinit
begin transaction
disk reinit
name = " device_name",
physname = "physical_name",
vdevno = virtual_device_number,
size = number_of_blocks
[, vstart = virtual_address,
cntrltype = controller_number]
go
/* Review the sysdevices table to make sure it matches with
what is in hard copy */
select * from sysdevices
go
/* If everything matches */
commit transaction
/* If there are differences */
rollback transaction
As you can see, the syntax is exactly like the disk init command except for the word reinit.
Make sure to run this only for devices that do not already appear in the sysdevices table.
disk refit
Once all devices that had been added to the system after the backup have been redefined in
sysdevices, all database additions and changes after the backup can be resynced. The command
to do this is called disk refit. What it does is visit every disk defined on the system and use
system information stored in it to reset thesysusages and sysdatabases tables to what they
should be. The command syntax is in Example 16-10.
Example 16-10. Syntax of disk refit
disk reinit
There are two restrictions on this command. First, it must be run as sa, and second, the system
must be started in single-user mode, or the command will not be allowed. Once the command
finishes running, the system will automatically shut down.
Once either or both of these commands have been run, compare the values in sysusages and
sysdatabases to make sure they match the hardcopy of these tables. If they do not, the system
could come up without all devices and databases being online.
Page 572
For more information on how to run disk refit and disk reinit, see the Sybase System
Administration Guide.
Review sysusages/sysdatabases/sysdevices/syslogins/sysloginroles
Because the master database contains information about all the other databases, it is important
to make sure everything is in working order. Follow these checks to help confirm the fitness of
your newly restored master database:
1. Check the sysdevices, sysusages, and sysdatabases system tables.
2. Review each database, checking all the major tables. Run common selects on these tables
verifying the data inside.
3. Run the dbcc checkalloc command on all databases. For information on how to run this
command, see the section "Database consistency checker: the dbcc utility," earlier in this
chapter.
4. Double-check the ownership and permissions of all databases. If user logins have been
added or deleted since the backup of the master database, these changes will need to be run
against the system again in the same order they were added to the system originally. If these
changes are done out of order, the suids of the logins added will be different than when they
were first added to the system. This will cause a mismatch between the suid controlling the
ownership and permissions in a database and those in the system logins. Because of this, there
could be problems with access to the databases and objects in the data server.
To make sure the suids are the same, compare the hardcopy of the syslogin system table
and the online version of the table. If they do not match, there could be problems. Refer to
Sybase's Security Information Guide for more information on re-creating changes to logins
if the original scripts cannot be found.
Another are of Sybase's security is login roles. The sysloginroles system table contains
information regarding these roles. It is important that this table also is checked to make
sure all roles are the same as before the problem started, otherwise users might not have
the same abilities as before. To make sure they are the same, compare the hardcopy of
sysloginroles system table and the online version of the table. Refer to Sybase's Security
Information Guide to help re-create changes to the system roles if they do not match.
Proceed to Step 25.
Page 573
Step 14: sybsystemprocs Available?
The sybsystemprocs database is where Sybase locates all the system stored procedures. When
a stored procedure is created here, it is available from any database in the data server.
Therefore, when this database is unavailable, many important system stored procedures will be
unavailable, such as sp_help, sp_helpdb, and sp_helpdevices. The rest of the data server
databases will come up as long as they do not have problems, but the functionality of the data
server will be severely degraded.
If sybsystemprocs is available, go to Step 20. Otherwise, go to
Step 15.
Step 15: Problem with Data Devices?
If the data server's error log file shows there are problems initializing a data device, then
follow these procedures to check OS device problems, fix them, and maybe replace them:
1. Check ownership and permissions on devices.
Use the OS commands to check permissions and make sure the process running the Sybase
dataserver program has permissions to read and write to these devices. If they do not,
either change the permissions on the devices or change the user that is running the
dataserver program to one that does have the correct permissions
2. Is the device functioning correctly or does the device even exist?
Sometimes, because of a change in the system, the operating system might no longer "see"
the device. Also, there might be hardware failures or configuration errors that could cause
the device to not appear. Use the appropriate OS procedure to check the device's status
and review all error logs.
3. Is the OS unable to detect device at startup?
Sometimes, when an OS cannot detect a device when a Sybase server is started, the device
will be unavailable, and Sybase will not be able to recover the database. In this case, the
database will be marked "suspect." This flag on the database tells Sybase not to waste any
time trying to recover this database the next time the data server restarts. This is efficient,
but if the device's problems are fixed with the data intact, the database should be able to
come up the next time the system starts.
Page 574
To get around this problem, the "suspect" flag must be cleared from the database.
Unfortunately, there is no easy stored procedure to run to do this. If you are sure the
database will come up OK on a restart, run the T-SQL commands in Example 16-11,
replacing yourdbname with the name of the database the server needs to recover.
Example 16-11. Removing the Suspect Flag
use master
/* Tell dataserver to allow changes to system tables */
sp_configure "allow updates", 1
reconfigure with override
go
/* Change the suspect status bit */
begin transaction
update sysdatdabases /* Only make change */
set status = status - 256 /* Turn the suspect flag (2
8
bit set) off */
where dbname = 'yourdbname' /* only on this database */
and status & 256 = 256 /* and only if flag is set */
go
commit transaction
/* Tell dataserver to not allow changes to system tables */
sp_configure "allow updates", 0
reconfigure
Restart the server at this point. If the database still does not come back on, then something else
must be wrong with the database. Review the data server error log for more information and
possibly contact Sybase support.
If there are still problems with the device files, repeat Step 15,
then proceed to Step 16. If the device files are fine, proceed to Step 17.
Step 16: Replace Device/Disk File
If a drive goes bad, but another one of the same size is available, the new one can be used in
the place of the old in the Sybase database. This is because Sybase uses logical devices that
point to the actual devices.
All databases that were using this device will need to be restored. To find out which databases
these are, run the T-SQL command shown in Example 16-12.
Page 575
Example 16-12. Locating Databases That Use a Particular Device
select sysdevices.name as DevName,
sysdatabases.name as DBName,
sysusages.size/512 as Size
from sysdatabases, sysusages, sysdevices
where
sysdevices.name="BadDeviceName" and
sysdevices.low <= sysusages.vstart and
sysdevices.high >= sysusages.vstart and
sysusages.dbid = sysdatabases.dbid
Example Output:
DevName DBName Size
BusDev1 BillingDB 3
BusDev1 ClientDB 2
This command will work only if the master database at least comes
up.
With this information, the original device must be deleted from the system before the new
device can be added. Before this, all databases that were using this device first must be
dropped from the system. Use the drop database or the dbcc repairdb(dropdb, dbname)
command to drop the databases. Once they are all gone, then the device can be dropped by
using the sp_dropdevice stored procedure.
Once the device is dropped, the new device can be added back into its place. Use the same
disk init command that was used to create the bad device, but replace the physical name of the
bad device with the name of the good device and use a different vdevno. For example, if the
original disk's physical name was /dev/rdsk/c0t2d1s0 with a disk init command of:
disk init
name="BusDev1",
physname="/dev/dsk/c0t2d1s0",
vdevno=6,
size=2048
the new command using the replacement device /dev/dsk/c1t3d0s1 would be:
disk init
name="BusDev1",
physname="/dev/dsk/c1t3d0s1",
vdevno=10,
size=2048
Page 576
Once the device has been restored, then all the databases that were using that device need to be
restored.
Proceed to Step 17.
Step 17: Restore Base sybsystemprocs from sybsystemprocs Script
When the sybsystemprocs database needs to be restored, follow these directions:
1. Find out which devices sybsystemprocs was installed on.
First, try the command sp_helpdb sybsystemprocs to find out how large and on what
device it was created. Most likely this will not work. In that case, run the T-SQL command
in Example 16-13 instead.
Example 16-13. Finding Out Size of Device
select sysdevices.name, sysusages.size/512
from sysdatabases, sysusages, sysdevices
where
sysdatabases.name = "sybsystemprocs" and
sysusages.dbid = sysdatabases.dbid and
sysdevices.low <= sysusages.vstart and
sysdevices.high >= sysusages.vstart
Example output:
name
sysprocsdev 16
2. Drop the sybsystemprocs database.
In case the sybsystemprocs database is corrupt, it is best to drop it and re-create it fresh.
First try the T-SQL command drop database sybsystemprocs. But, if it is not allowed by
the system, use dbcc dbrepair (sybsystemprocs,dropdb) to drop the database.
3. Re-create the sybsystemprocs database on the device shown in the preceding command:
1> create database sybsystemprocs on sysprocsdev= 16MB
4. Run installmaster or restore from backup.
Page 577
If there is a current backup of the sybsystemprocs database, then it can be used to restore
the database with the load command like this:
load database sybsystemprocs from "device"
Use the appropriate OS command for the data server environment.
If there is no backup of the sybsystemprocs database, it will need to be re-created using
the T-SQL script installmaster. This script can be run safely without worry that it will
affect other databases. To run the script, provide it as input to the isql program like this:
isql -U sa -S SYB_MYDB -P mypasswd \
-i $SYBASE/scripts/installmaster
or:
isql -U sa -S SYB_MYDB -pmypasswd \
< $SYBASE/scripts/installmaster
There will be a lot of output from this command, but it can be safely ignored until the
script ends with the message "Loading of the master database is
complete."
5. Add any additional stored procedures/changes.
If additional stored procedures have been added to the system since the backup or since
the initial install, re-create them now using the scripts used to originally create them or by
entering the commands interactively.
6. Check stored procedures.
As with all the other recoveries, it is important to check out the recovery. The following
command will show if the sybsystemprocs database is restored correctly:
sp_helpdb sybsystemprocs
If output describing the sybsystemprocs database is displayed when this is run, then system
stored procedures have been restored correctly. Run any user-defined stored procedures to
confirm they run correctly.
7. Dump the sybsystemprocs database.
Once the database has been restored, make a complete backup of it with the dump
command.
Proceed to Step 18.
Page 578
Step 18: Recent Dump of Database?
If there is no dump of the database to restore, go to Step 25 to
reapply any creation/alteration scripts and load any bcps from the database.
If there is a recent dump, continue to Step 19.
Step 19:Restore from Dump
If the database is still offline at this point, then something is wrong with it internally, and it
should be restored from a backup. Before anything else is done, retrieve information about the
database to use in the re-creation. Enter the command in Example 16-14 to find out about the
allocations used by this database.
Example 16-14. Database Allocations
select sysdevices.name,
size as Blocks,
size/512 as Mbytes
from sysusages, sysdevices, sysdatabases
where sysdatabases.name ="baddbname"and
sysusages.dbid = sysdatabases.dbid and
sysdevices.low <= sysusages.vstart and
sysdevices.high >= sysusages.vstart and
sysdevices.cntrltype = 0
order by vstart
Example Output:
name Blocks Mbytes
device1 1536 3
logdev1 1024 2
device3 2048 4
Take the following steps to do the restore:
1. Drop the database.
First, try to drop the database using this T-SQL command:
drop database baddbname
If this command fails, use this dbcc command to drop the database:
dbcc repairdb (dropdb, baddbname)
To verify the database has been dropped, run the stored procedure sp_helpdb. If the
database is shown in the output, something went wrong with the drop database command.
Page 579
2. Re-create the database.
Using the database allocations determined above, re-create the database using the same
allocations it had. Here is an example based upon the preceding example output:
create database baddbname
on device1 = 3
log on logdev1 = 2
alter database baddbname
on device3 = 4
3. Bring the database online.
At this point, the database has been re-created, but the system will not bring it online until
it is told to. The reason the system does this is it has no way of knowing if there are any
more transaction logs to process. Tell Sybase the database should be brought up by
running the online database baddbname command.
4. Load the database from dumps.
Now reload the database using the most recent database and transaction dumps. First,
apply the full database backup. For our example database, here is an example Unix load
command using the tape device /dev/nrmt0:
load database baddbname from '/dev/nrmt0'
After this completes, apply each transaction log starting with the oldest and finishing with
the newest. The system will not allow load of the transaction logs to occur out of order. In
fact, if any of the logs are missing or corrupt, the rest of the logs cannot be applied. To
load the transaction logs for our preceding example, enter the following command,
repeating it for each transaction dump.
load transaction baddbname from '/dev/nrmt0'
For more information on how to load dumps and transaction logs, please refer to
''Restoring from a Hot Backup," earlier in this chapter.
5. Dump the database.
Whenever a database is restored, run a full backup on the database, and backup the master
database, too. The reason for the backup of the master database is because there was a
removal and creation of a database. Whenever there are major changes to the data server,
back up the master database. Continuing our example, the dump command would be:
dump database baddbname to '/dev/nrmt0'
Page 580
Proceed to Step 25.
Step 20: Is tempdb Available?
Is the tempdb online and available? To see this, review the messages generated when trying to
start the database. There will be error messages complaining about tempdb not being available.
The system will not be able to come up at this point.
If there are error messages, proceed to Step 15 to make sure
tempdb's devices are all available. If tempdb is available, continue to Step
23 to begin checking all the user-defined databases.
Step 21: Model Database Available?
If the model database is online and available, proceed to Step 24. If
it is not, return to Steps 14 and 16. Then proceed to Step 22.
Step 22: Re-create Generic Model Database
The model database is used by the data server when creating all other databases. If a specific
attribute (larger size, tables, permissions, stored procedures) is required in all databases, make
the change first in the model database. Then, from that point on, every database created will
contain this change.
If you have a backup of the model database and you can use the isql use command, then the
database can be restored directly from backup using the load command. If not, then the
database must be restored from scratch. Use the following commands to accomplish this:
1. Run buildmaster.
If there is no backup of the model database available, the buildmaster command can be
used to restore the model database to the same state as when the data server was first
installed. Here is a Unix example:
buildmaster -d/syback/master.dbf -x
Page 581
In this example, the -d parameter is the master database file path, and the -x parameter tells
buildmaster to restore the model database. Be sure to use the appropriate buildmaster
command for your OS. This can be found in the Sybase Utilities manual.
2. If a backup of the model database is available, use it in a load command to restore it from
the backup:
load database model from "/sybackups/model.dmp"
3. If additional changes were made since the last backup, apply them at this point.
4. Back up the model database using the dump command.
Return to Step 18.
Step 23: All Databases Online?
If when the data server is coming up, and an error occurs with any of the devices associated
with that database or something has corrupted the database, the nonsystem database could be
prevented from coming and will be marked "suspect."
To see if all the databases after the system databases are online, review the messages
generated when trying to start the database. There will be error messages complaining about
any databases not being available. Fortunately, because all the system databases are available,
the Sybase server will come up. If this happens, go to Step 15 to make sure all the user
database devices are all available. If all the database are available, then the system is up and
no recovery is required.
If all the databases are online, you are done. If not, return to Step
15.
Step 24: Contact Sybase Support
If you have reached this step, then some problem that might be specific to the OS, version of
Sybase, or other factors is occurring. Please refer to the Sybase System Administration guides
for your OS or contact Sybase support for additional help.
Page 582
Return to Step 1.
Step 25: Reapply Any Additional Scripts or bcps
If any additional scripts had been run on the database since the last dump, then these scripts
need to be run again. Since they are user created, you will need to refer to the user's
instructions on how to run these.
On top of additional scripts, there might be bcp files of data from these databases. Follow the
steps needed to restore these datafiles to the originating database tables. Please refer to
"Logical Backups," the next major section, for information on loading data into the system.
Proceed to Step 26.
Step 26: Review Against Hardcopies
Using hardcopies of the system tables and any important user tables, compare the current data
with the data captured in the hardcopies. If there are discrepancies, then there could be
additional problems with the data server. Refer to the Sybase Administration manuals to find
out if the differences need to be repaired or are OK. Double-check all permissions on the
database if any changes were made in the syslogin or sysrole tables. If there are, correct them
before turning the system over to the user population.
Proceed to Step 27.
Step 27: Dump all Restored Databases
Now that the database has been restored, dump the database to a new dump file. This way a
current dump of the database, including all scripts and data changes, will be saved. This will
help facilitate recovery in case of future problems.
Page 583
Return to Step 1.
Logical Backups
The dump command is a very powerful backup tool, but there are limitations to its abilities.
For one thing, it can only back up all of the database objects together. If a backup of a single
table in the system is needed, this command cannot be used. Also, the dump backups cannot be
used to copy a database between servers running different operating systems; this is because
the backups are copies of the data disk blocks, and these disk blocks are dependent on the
operating system. The need to back up only parts of a database and make them useful on all
types of operating systems is why Sybase created the logical backup utility bcp. This utility
also provides the final piece to make sure all the information needed to restore the data server
is collected.
bcp provides another key feature. Because it refers to the internal structure of the database, it is
an excellent tool to confirm whether there is corruption, while also backing up the data. The
bcp command will error out if it has any problems reading the data out of the system.
The two drawbacks to bcp are that:
• It takes much longer to use it to back up the whole database than it takes with the dump
command.
• Every single object in the database would have to be backed up separately, and any stored
procedures, triggers, or other nondata objects would have to be output using a different method.