Java Data Access—JDBC, JNDI, and JAXP phần 8 pdf
Bạn đang xem bản rút gọn của tài liệu. Xem và tải ngay bản đầy đủ của tài liệu tại đây (394.09 KB, 38 trang )
Fetching data from a rowset
Once you have populated a rowset, you need to extract the data from the rowset before it. To do so you rely
on an inherited RowSet.getXXX() methods; where the XXX refers to the Java data type of the variable into
which you want to place the value.
Just as when using the methods with a ResultSet object, you need to consider datatype issues. For example,
it’s possible to lose data precision by using the wrong getXXX() method on certain data types. You lose a
number’s mantissa when trying to retrieve a SQL DOUBLE into a Java int using the getInt() method.
XRef Chapter 7, “Understanding JDBC Data Types,” provides more information about working
with SQL and Java data types.
Traversing data in a rowset
Because the RowSet interface extends the ResultSet interface, you use its methods for moving around a data
set. In addition, you can also control cursor properties such as scrollability and change sensitivity. A rowset
object inherits all these behaviors and properties from the ResultSet interface. For your convenience, I present
a summary of the cursor−movement methods in Table 16−3.
XRef See Chapter 6, “Working with Result Sets,” for more information about moving through
the data in a RowSet object using the cursor−movement methods. This chapter also
explains how to set transaction−isolation levels and cursor−scrollability characteristics.
Table 16−3: RowSet Cursor−Movement Methods
Method Description
next() Moves the cursor to the next row. Returns true if successful.
previous() Moves the cursor to the previous row. Returns true if
successful.
beforeFirst() Positions the cursor “before−the−first row”. Calling the
getXXX() method immediately after this method will produce
a SQLException.
afterLast() Positions the cursor “after−the−last row”. Calling the
getXXX() method immediately after this method will produce
a SQLException.
first() Moves the cursor to the first row of the result set. Returns true
if successful.
last() Moves the cursor to the last row of the data set. Returns true
if successful.
absolute() Moves the cursor to a specific row relative to the first row of
the data set. Returns true if successful.
relative() Moves the cursor to a specific row relative to the current row.
Returns true if successful.
Chapter 16: Working with JDBC Rowsets
256
MoveToCurrentRow() Moves the cursor to the remembered row.
MoveToInsertRow() Moves the cursor to the insert row.
You are likely quite familiar with the cursor movement methods if you have worked with the ResultSet
object. If not, they are simple, intuitively named methods that move the rowset cursor within its data. The
most common method is next(), which moves the cursor to the next valid row in the data set. You use this
method almost every time you use a rowset.
Like a result set, a rowset has two areas located “before−the−first row” and “after−the−last row” that do not
contain data. The next(), previous(), absolute(), and relative() methods return false when moving the cursor
into these areas. In addition, calling a getXXX() method when the cursor is in either location throws a
SQLException.
Tip Checking the return value from a cursor−movement function helps you track your location
and can help prevent a SQLException.
Controlling scrollable and updateable properties
You can set the scrollability properties of the rowset’s cursor using the setType() method. This method
accepts constants from the ResultSet interface representing the different result set modes. The following lists
the constants and their values:
ResultSet.FORWARD_ONLY creates a rowset in which the cursor can only move forward. Used
mainly by connected−only rowsets such as JdbcRowSet objects.
•
ResultSet.SCROLL_INSENSITIVE creates a scrollable rowset that does not recognize changes to the
underlying data. Most rowsets, especially disconnected ones, use this mode.
•
ResultSet.SCROLL_SENSITIVE creates a scrollable rowset that recognizes changes to the
underlying data.
•
You can set a RowSet object’s concurrency property using the setConcurrency() method. This property
indicates whether or not you can update the rowset data. The default setting does not allow updates.
Nonetheless, you can use either of the following ResultSet interface constants as parameters in the
setConcurrency() method to control the behavior:
ResultSet.CONCUR_READ_ONLY configures the rowset so you cannot update the data.•
ResultSet.CONCUR_UPDATABLE configures the rowset so you can make changes to the data set or
add new records.
•
From the previous discussion it should be evident that a RowSet object inherits most all its cursor movement
and properties from the ResultSet interface. Although you may use different methods to set the properties, the
behavior remains the same.
Setting transaction levels
You can also control the transaction−isolation level of a RowSet object. This setting determines what data a
rowset can access during a transaction. Specifically, it effects whether the rowset can view data from other
transactions.
Once again the RowSet interface relies on the behavior of another JDBC object to meet its needs. In this case,
it uses the transactional settings in the Connection object. Every RowSet object must use a Connection object
internally or else it can’t access the data source. As a result, a RowSet object lets its internal reference to a
Chapter 16: Working with JDBC Rowsets
257
Connection object manage transactional issues.
To set the transaction−isolation level you rely on the setTransactionIsolation() method. It uses a Connection
interface constant as a parameter representing the desired transaction level. The following list describes the
constants you can use:
Connection.TRANSACTION_NONE specifies that the connection does not support transactions.•
Connection.TRANSACTION_READ_UNCOMMITTED allows the rowset to read "dirty," or
uncommitted, data from other transactions.
•
Connection.TRANSACTION_READ_COMMITTED allows the rowset to read only committed data
from other transactions.
•
Connection.TRANSACTION_REPEATABLE_READ prevents a rowset from reading data with
uncommitted data or data that change after a transaction begins.
•
Connection.TRANSACTION_SERIALIZABLE does not allow the rowset to read any data,
committed or uncommitted, from other transactions.
•
As you can see, the RowSet interface takes advantage of existing components to provide functionality. This
also helps flatten the learning curve for using the objects in your applications.
Cleaning up after a RowSet
Just as you do other objects that occupy database resources, you should close a RowSet object once you finish
using it. Calling the RowSet.close() method clears all database resources. Closing the object when you’re
finished with it is especially critical when working with the JdbcRowSet object, as this object maintains a
connection with the server once you call the execute() command. If you don’t explicitly close it, the
connection may persist until either you exit the application or garbage collection occurs.
Objects instantiated from the CachedRowSet and WebRowSet classes connect to the data source as needed.
Nonetheless, you should still explicitly close these objects when you’re finished to eliminate the chance of an
errant connection occurring before garbage collection.
Using the JdbcRowSet Class
The JdbcRowSet object wraps a ResultSet object as a JavaBean component to simplify its use. Its main
advantage is that it abstracts many of the details of connecting and retrieving data from a data source. Once
you populate the rowset, you have all the ResultSet methods at your disposal for working with the data.
Of all the rowset implementations, the JdbcRowSet class is the simplest. As a result, it has some limitations.
First, a JdbcRowSet object only operates as a connected rowset, and therefore it requires a JDBC driver and a
continuous open connection to the database. Remember, the JdbcRowSet class provides a wrapper around a
ResultSet object, which needs a connection to operate as well. This behavior carries over to the JdbcRowSet
object as well. Another restriction is that you cannot serialize a JdbcRowSet object. This means that you can’t
distribute or archive the object.
Despite the limitations, the JdbcRowSet interface provides you with an easy way to extract data from a data
source. To use it, all you need to do is set a few properties and call the execute() method. You move around
and extract data from the rowset with the same methods used in the ResultSet object. Listing 16−1 provides an
Chapter 16: Working with JDBC Rowsets
258
example program using a JdbcRowSet object.
Listing 16−1: JdbcRS.java
package Chapter16;
import java.sql.SQLException;
import sun.jdbc.rowset.JdbcRowSet;
public class JdbcRS {
public static void main(String[] args){
try {
//Instantiate a JdbcRowSet object
JdbcRowSet jrs = new JdbcRowSet();
//Load driver and set connection parameters
Class.forName("oracle.jdbc.driver.OracleDriver");
jrs.setUrl("jdbc:oracle:thin:@localhost:1521:ORCL");
jrs.setUsername("toddt");
jrs.setPassword("mypwd");
//Set and execute the command
String sql;
sql = "SELECT SSN, Name, Salary, Hiredate FROM Employees";
jrs.setCommand(sql);
jrs.execute();
//Display values
while(jrs.next()){
System.out.print("SSN: " + jrs.getInt("ssn"));
System.out.print(", Name: " + jrs.getString("name"));
System.out.print(", Salary: $" + jrs.getDouble("salary"));
System.out.print(", HireDate: " + jrs.getDate("hiredate"));
System.out.println();
}
//Close the resource
jrs.close();
}catch (SQLException se){
se.printStackTrace();
}catch (Exception ex) {
ex.printStackTrace();
}
//Say goodbye
System.out.println("Goodbye!");
}//end main
}// end JdbcRs
The output from Listing 16−1 is as follows:
SSN: 111111111, Name: Todd, Salary: $5000.55, HireDate: 1995−09−16
SSN: 419876541, Name: Larry, Salary: $1500.75, HireDate: 2001−03−05
Chapter 16: Working with JDBC Rowsets
259
SSN: 312654987, Name: Lori, Salary: $2000.95, HireDate: 1999−01−11
SSN: 123456789, Name: Jimmy, Salary: $3080.05, HireDate: 1997−09−07
SSN: 987654321, Name: John, Salary: $4351.27, HireDate: 1996−12−31
Goodbye!
From Listing 16−1 you can see that populating a JdbcRowSet object only requires a few steps. First I make
sure to import a package containing the implementation. In this case I’m using Sun’s reference
implementation, so I use the statement: import sun.JDBC.rowset.JdbcRowSet. I do not need to import any
java.sql classes other than the SQLException class; the JdbcRowSet class encapsulates any additional JDBC
classes it requires.
Next, I instantiate a JdbcRowSet object to use throughout the application. Because this is a connected rowset,
I must register a JDBC driver. As I mentioned in a previous section, you can use either the
DriverManager.registerDriver() or the Class.forName() method to register the JDBC driver. I typically use the
latter because of the flexibility the String parameter provides in terms of specifying the driver name.
After loading the driver I set the JdbcRowSet object’s connection properties. In general, when working with a
RowSet object you need to set only the properties it needs. In this example I must set the JDBC URL,
username, and password. Other implementations, databases, or drivers may require different or additional
parameters.
Next I initialize the command property with the SQL statement I want to execute. In this case I simply set a
String variable, sql, to the SQL statement and pass it into the setCommand() method as a parameter.
Finally, I process the query using the execute() method. Behind the scenes, the JdbcRowSet object builds the
appropriate objects for connecting to the database, executes the SQL statement, and populates the RowSet
object with data. Next I display the results using a while−loop and the next() method. This is the same
technique I use when working with result set data.
As I illustrated in Listing 16−1, using a JdbcRowSet object to retrieve data from a data source requires only a
few objects and steps. Although it is simple to retrieve data using this object, it still requires a database
session. This limits the ways in which you can use this object.
Using the CachedRowSet Class
As you saw in the previous section, the JdbcRowSet class has many benefits but has some limitations as well.
For example, the JdbcRowSet class is a connected rowset that requires a continuous connection with the data
source. Furthermore, you cannot serialize a JdbcRowSet object, which limits your ability to distribute or save
the object. However, you should not consider any of these limitations serious, unless you want to share the
JdbcRowSet object’s data in a distributed architecture.
The CachedRowSet class overcomes those limitations. It provides a disconnected and serializable
implementation of the RowSet interface. To operate in a disconnected state a CachedRowSet object creates a
virtual database by caching the tabular information it receives from the data source. Storing the data internally
makes the object self−contained and thereby allows it to operate while disconnected.
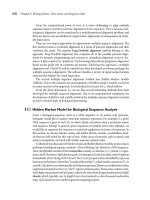
Once you have populated the object with data you can serialize it and share the data with other clients. This
gives you a lot of flexibility in terms of building your application. For example, Figure 16−5 shows how you
might use the object in a J2EE deployment. The figure presents an architecture wherein clients retrieve a
Chapter 16: Working with JDBC Rowsets
260
populated CachedRowSet object from a JNDI data source.
This architecture provides a couple of benefits. First, it minimizes the number of queries to the database. You
need only query the database once to populate the CachedRowSet object. Every client who needs the same
view does not have to query the database. This approach will minimize the impact on database resources if
you have numerous clients.
Secondly, it enables you to distribute the data to mobile users such as sales employees. For example, the
CachedRowSet object can store inventory levels for a product they sell. By taking the inventory object with
them, sales employees can check product levels while disconnected from the network.
Figure 16−5: An example application architecture using CachedRowSet objects
A CachedRowSet object provides both updateable and scrollable cursor benefits as well. Usually these
functions rely on driver implementations. However, because the CachedRowSet object caches its data, it can
act as the "driver" to provide this functionality. As a result, you can use the CachedRowSet class to provide
both updateable and scrollable functionality to drivers that do not support it.
Caution Do not use the CachedRowSet object with large data sets. Large data sets can easily exhaust available
resources, because the objects cache the data in memory.
Although the CachedRowSet class has numerous benefits, it also has some drawbacks and constraints. First,
you may not want to use CachedRowSet objects when working with large data sets. In addition, although you
can update the data sets stored in a CachedRowSet object, transferring the changes to the underlying data
source requires a connection.
Serializing a CachedRowSet object
Listing 16−2 provides an example of how you might use the CachedRowSet class to distribute a disconnected
rowset. In the example I create two methods: writeCachedRowSet() and readCachedRowSet(). The
writeCachedRowSet() method populates and serializes a CachedRowSet object; the readCachedRowSet()
method reads the serialized object from disk and then returns it to the calling method.
The CachedRowSet object returned from the read CachedRowSet() method contains the same data as the
original object serialized to disk. In a real application you would be able to store the serialized CachedRowSet
object in a JNDI data source, or let a Web client download it.
Chapter 16: Working with JDBC Rowsets
261
Listing 16−2: CachedRS.java
package Chapter16;
import java.io.*;
import java.sql.SQLException;
import sun.jdbc.rowset.CachedRowSet;
public class CachedRS {
//Constant to hold file name used to store the CachedRowSet
private final static String CRS_FILE_LOC ="cachedrs.crs";
public static void main(String[] args) throws Exception {
try {
//Create serialized CachedRowSet
writeCachedRowSet();
//Create CachedRowSet from serialized object
CachedRowSet crs = readCachedRowSet();
//Display values
while(crs.next()){
System.out.print("SSN: " + crs.getInt("ssn"));
System.out.print(", Name: " + crs.getString("name"));
System.out.print(", Salary: $" + crs.getDouble("salary"));
System.out.print(", HireDate: " + crs.getDate("hiredate"));
System.out.println();
}
//Close resource
crs.close();
}catch (SQLException se){
se.printStackTrace();
}catch (Exception ex) {
ex.printStackTrace();
}
}//end main
public static void writeCachedRowSet() throws Exception{
//Instantiate a CachedRowSet object, set connection parameters
CachedRowSet crs = new CachedRowSet();
Class.forName("oracle.jdbc.driver.OracleDriver");
crs.setUrl("jdbc:oracle:thin:@localhost:1521:ORCL");
crs.setUsername("toddt");
crs.setPassword("mypwd");
//Set and execute the command. Notice the parameter query.
String sql = "SELECT SSN, Name, Salary, Hiredate ";
sql = sql + "FROM Employees WHERE SSN=?";
crs.setCommand(sql);
crs.setInt(1,111111111);
crs.execute();
//Serialize CachedRowSet object.
FileOutputStream fos = new FileOutputStream(CRS_FILE_LOC);
Chapter 16: Working with JDBC Rowsets
262
ObjectOutputStream out = new ObjectOutputStream(fos);
out.writeObject(crs);
out.close();
crs.close();
}//end writeCachedRowSet()
public static CachedRowSet readCachedRowSet() throws Exception{
//Read serialized CachedRowSet object from storage
FileInputStream fis = new FileInputStream(CRS_FILE_LOC);
ObjectInputStream in = new ObjectInputStream(fis);
CachedRowSet crs = (CachedRowSet)in.readObject();
fis.close();
in.close();
return crs;
}//end readCachedRowSet()
}//end CachedRS
The output from Listing 16−2 is as follows:
SSN: 111111111, Name: Todd, Salary: $5000.55, HireDate: 1995−09−16
Although the CachedRowSet object provides more functionality than a JdbcRowSet object, the configuration
remains the same. You perform the same initial steps — importing packages, loading a driver, and setting the
connection parameters — as in Listing 16−1. Once again, notice that I need to import only the SQLException
and CachedRowSet classes. The CachedRowSet class encapsulates all the required components for
connecting, retrieving, and modifying data. However, I also need a java.io.* package to handle the object
serialization task.
Stepping through the application shows that it is straightforward. I use the writeCachedRowSet() method to
populate a CachedRowSet object and serialize it to a file called cachedrs.crs. (Notice also that I use a
parameter query as my SQL command.) In this example I want only my record from the Employees table. As
with the PreparedStatement object, I use a setXXX() method to supply a value for the parameter. After I set the
parameter, I call the execute() method to populate the CachedRowSet. Next, I serialize the CachedRowSet
object to disk using an ObjectOutputStream object.
Once I save the CachedRowSet object to disk, I call the readCachedRowSet() method to read the saved file
from disk, instantiate a CachedRowSet object, and return the object to the calling main() method. (Notice that
I cast the object read from disk to a CachedRowSet type.) After the method returns, I list the output using my
standard combination of a while−loop and a next() method. The last task is to close the CachedRowSet with
the close() method.
In this example I use the execute() method to populate the CachedRowSet with data. However, I could have
used the CachedRowSet.populate() method instead. This method takes a populated ResultSet object as a
parameter and uses the object to fill its cache. The disadvantage of the populate() method is that you need to
handle all the standard JDBC objects required to execute a simple query. The advantage is that it enables you
to leverage existing methods that return a ResultSet object to build rowsets.
As you can see, the CachedRowSet class packs plenty of flexibility. Not only can you operate without a JDBC
driver, but you can serialize a CachedRowSet object and store it as a file or stream it over a network to a
client. In addition, the CachedRowSet object enables you to update and insert data while disconnected.
Chapter 16: Working with JDBC Rowsets
263
Updating and inserting disconnected rowset data
A disconnected CachedRowSet object doesn’t limit you to viewing its data; you may update or delete existing
rows, or add new rows. Fortunately, you only need to learn one additional method to perform these actions.
The RowSet interface inherits all the other required methods from the ResultSet interface.
A populated CachedRowSet object holds its data in memory, meaning that when you modify or insert a row
the underlying data source is not immediately affected. Instead, the CachedRowSet object maintains both the
new and the original values in memory. To apply the changes to the data source you must call the
acceptChanges() method. Calling this method causes the CachedRowSet object to connect to the data source
and submit the changes. If the changes fail for any reason, a SQLException occurs. The following snippet
demonstrates how to update an existing row in a rowset:
//Populate a CachedRowSet object, crs
String sql = "SELECT * FROM Employees WHERE SSN = ?";
crs.setCommand(sql);
crs.setString(1,’Todd’);
crs.execute();
//Move to first and only row and give myself a raise
crs.first();
crs.updateDouble(3,10000.22);
//Signal changes are finished
crs.updateRow();
//Write records to database
crs.acceptChanges();
To add a new row, you follow the same approach you used for the ResultSet object. First call the
moveToInsertRow() method, inherited from the ResultSet interface, to position the cursor in the "insert row"
buffer. In this area you build the new row. After populating the row’s columns using the updateXXX() method,
call the insertRow() method to place the new row in the rowset’s data set. Call the acceptChanges() method to
commit the changes in the underlying data source.
To better understand how to insert a row into a CachedRowSet object, examine the following snippet (based
on the CachedRowSet object used in the previous example):
//Move cursor to the insert row position
crs.moveToInsertRow();
//Add the data for the new row
crs.updateInt(1,997120987);
crs.updateString(2,"Nathan Dunn");
crs.updateDouble(3,2225.77);
crs.updateDate(4,Date.valueOf("1−1−02"));
crs.updateInt(5,100);
//write the rows to the rowset
crs.insertRow();
//Submit the data to the data source
crs.acceptChanges();
You can easily undo unwanted changes because both the original and changed data exist in memory. To that
end, the CachedRowSet class provides two methods that undo changes. The first method, restoreOriginal(),
Chapter 16: Working with JDBC Rowsets
264
returns the entire rowset to its original values before the updates. This method is equivalent to the SQL
ROLLBACK statement, which voids uncommitted changes. However, you cannot use the restoreOriginal()
method after writing the changes to the data source with acceptChanges().
Caution The acceptChanges() method applies changes to the underlying data source. Once you call the
command, you cannot undo its effects. It is equivalent to the SQL COMMIT statement.
The second method, cancelRowUpdates(), undoes changes to the row you are currently updating. The
CachedRowSet class inherits this command from the ResultSet interface. Therefore, you use it in the same
way. As with the restoreOriginal() method, once you call acceptChanges() the cancelRowUpdates() method
has no effect. The bottom line: Be sure of your changes before calling the acceptChanges() method.
Using the WebRowSet Class
Like its parent class, CachedRowSet, objects instantiated from the WebRowSet class can be serialized and the
file sent across the network to a client. In addition, the WebRowSet object can also operate as a disconnected
rowset. However, the WebRowSet class has the extra benefit of being able to represent itself as an XML
document. You can use the XML file just as you would a serialized CachedRowSet or WebRowSet object.
For example, you can send it to a network client or store it for archival purposes.
In addition to generating an XML file, the WebRowSet object can also use an XML file to populate itself.
Continuing with the example in the previous paragraph, the client can use the XML file you sent to build a
duplicate WebRowSet object. The client can then update the data, generate a new XML file containing the
changes, and send it to a JSP page or servlet, which in turn could update the data source.
Having the rowset represented in XML also gives you flexibility when you need to display the data on
different devices or browsers. You can use XSL to format the XML document to be viewed on thin clients
(such as Web browsers) or on mobile devices (such as WAP phones, PDAs, and handheld computers).
The WebRowSet class also works great in HTTP environments. Figure 16−6 shows an example architecture.
As you can see, the client and the servers exchange XML documents representing WebRowSet objects. In this
architecture, a client requests a data set from the server by accessing a servlet. The servlet uses a WebRowSet
object to query the database and generate an XML document, which it passes back to the client. The client
uses the XML document to populate a local WebRowSet object. Now the client can view or update the data. If
the client updates the data, it uses its WebRowSet object to generate an XML document and return it to the
servlet. Now the servlet can recreate the WebRowSet object from the XML document that it received and
update the database with the client’s changes.
Chapter 16: Working with JDBC Rowsets
265
Figure 16−6: An example of a WebRowSet architecture
Relying on HTTP for the transport protocol provides several advantages. First, it eliminates the security issues
associated with opening non−standard ports in the firewall for communications. Secondly, Web technologies
provide robust and scaleable platforms with which to create applications. Lastly, you avoid issues such as
unreliable connections that can come up on the Internet, which hinders your ability to stream objects or use
RMI technologies to distribute serialized objects.
Because the WebRowSet class extends the CachedRowSet class, you rely on the same methods and properties
for setting connection parameters and populating the rowset. You need only one additional method,
writeXML(), to create an XML file representing the Web rowset. Listing 16−3 provides an example of how to
generate the XML document using a WebRowSet object.
Listing 16−3: WebRS.java
package Chapter16;
import java.io.*;
import java.sql.SQLException;
import sun.jdbc.rowset.WebRowSet;
public class WebRS {
//Constant representing the XML file
private static String WRS_FILE_LOC ="wrs.xml";
public final static void main(String[] args) throws Exception {
try {
//Instantiate a WebRowSet object
WebRowSet wrs = new WebRowSet();
//Load driver and set connection parameters
Class.forName("oracle.jdbc.driver.OracleDriver");
wrs.setUrl("jdbc:oracle:thin:@localhost:1521:ORCL");
wrs.setUsername("toddt");
wrs.setPassword("mypwd");
//Configure command and execute
System.out.println("Connecting to data source and " +
"generating XML document.");
String sql = "SELECT ssn, name FROM Employees";
wrs.setCommand(sql);
Chapter 16: Working with JDBC Rowsets
266
wrs.execute();
//Write XML out to file
System.out.println("Writing XML to file: " + WRS_FILE_LOC);
FileWriter fw = new FileWriter(WRS_FILE_LOC);
wrs.writeXml(fw);
fw.close();
wrs.close();
System.out.println("Finished writing XML file.");
}catch (SQLException se){
se.printStackTrace();
}catch (Exception ex) {
ex.printStackTrace();
}
System.out.println("Goodbye!");
}//end main()
}//end WebRS class
The output from Listing 16−3 is as follows:
Connecting to data source and generating XML document.
Writing XML to file: wrs.xml
Finished writing XML file.
Goodbye!
From the example you can see that the processes of setting the connection and command properties remain the
same as in the other rowset example. In reality, the only difference between this example and Listing 16−2 is
that I create an XML document instead of serializing the RowSet object into a file. To do so I use the
writeXml() method with a FileWriter object as a parameter. This creates the XML document wrs.xml. For
your convenience, Listing 16−4 shows the XML document produced by the application.
Listing 16−4: wrs.xml
<?xml version="1.0" encoding="UTF−8"?>
<!DOCTYPE RowSet PUBLIC ‘−//Sun Microsystems, Inc.
//DTD RowSet//EN’ ‘ /><RowSet>
<properties>
<command>SELECT ssn, name FROM Employees</command>
<concurrency>1007</concurrency>
<datasource><null/></datasource>
<escape−processing>true</escape−processing>
<fetch−direction>0</fetch−direction>
<fetch−size>0</fetch−size>
<isolation−level>2</isolation−level>
<key−columns>
</key−columns>
<map></map>
<max−field−size>0</max−field−size>
<max−rows>0</max−rows>
<query−timeout>0</query−timeout>
<read−only>true</read−only>
<rowset−type>1004</rowset−type>
<show−deleted>false</show−deleted>
Chapter 16: Working with JDBC Rowsets
267
<table−name><null/></table−name>
<url>jdbc:oracle:thin:@localhost:1521:ORCL</url>
</properties>
<metadata>
<column−count>2</column−count>
<column−definition>
<column−index>1</column−index>
<auto−increment>false</auto−increment>
<case−sensitive>false</case−sensitive>
<currency>true</currency>
<nullable>0</nullable>
<signed>true</signed>
<searchable>true</searchable>
<column−display−size>21</column−display−size>
<column−label>SSN</column−label>
<column−name>SSN</column−name>
<schema−name></schema−name>
<column−precision>9</column−precision>
<column−scale>0</column−scale>
<table−name></table−name>
<catalog−name></catalog−name>
<column−type>2</column−type>
<column−type−name>NUMBER</column−type−name>
</column−definition>
<column−definition>
<column−index>2</column−index>
<auto−increment>false</auto−increment>
<case−sensitive>true</case−sensitive>
<currency>false</currency>
<nullable>1</nullable>
<signed>true</signed>
<searchable>true</searchable>
<column−display−size>20</column−display−size>
<column−label>NAME</column−label>
<column−name>NAME</column−name>
<schema−name></schema−name>
<column−precision>20</column−precision>
<column−scale>0</column−scale>
<table−name></table−name>
<catalog−name></catalog−name>
<column−type>12</column−type>
<column−type−name>VARCHAR2</column−type−name>
</column−definition>
</metadata>
<data>
<row>
<col>111111111</col>
<col>Todd</col>
</row>
<row>
<col>419876541</col>
<col>Larry</col>
</row>
<row>
<col>312654987</col>
<col>Lori</col>
</row>
<row>
<col>123456789</col>
<col>Jimmy</col>
Chapter 16: Working with JDBC Rowsets
268
</row>
<row>
<col>987654321</col>
<col>John</col>
</row>
</data>
</RowSet>
Notice that the XML document produced by the WebRowSet class contains not only the query data, but
metadata for the WebRowSet object that generated the XML document. This feature allows different
WebRowSet objects to clone the original object by using the XML document.
For example, consider the <properties> element, whose child elements provide information about the query
used to populate the rowset, the URL, and the concurrency levels. The <metadata> element provides
information about the columns contained in the rowset, such as column name and data type. The <data>
element contains the row data that match the SELECT statement criteria.
Because the XML document provides a self−contained description of a WebRowSet object, you can use it to
populate a new WebRowSet object, as the following snippet demonstrates:
//Define the xml file name
String xmlFile = "wrs.xml";
//Instantiate a WebRowSet
WebRowSet wrsIn = new WebRowSet();
//Create a file reader using the xml file name
FileReader fin = new FileReader(xmlFile);
//Populate the WebRowSet object
wrsIn.readXml(fin);
As you can see, populating a WebRowSet object using an XML requires little effort. You just pass a
FileReader object associated with the target XML file in as a parameter to the readXml() method. Internally,
the WebRowSet object validates the XML document against a DTD to ensure conformance. For the reference
implementation, the DTD’s filename is rowset.dtd, and is included in the distribution. Once the WebRowSet
object populates itself you can traverse or manipulate the data set as usual.
The WebRowSet class provides you with a convenient way to generate XML representing both the data
matching a query and a WebRowSet object. You can use the XML document in many different ways, from
sending it to a thin client to formatting it for display on a browser.
Summary
This chapter provided an overview of how to work with classes implementing the javax.sql.RowSet interface.
In particular, I covered the details of Sun’s reference implementation of the RowSet interface, including the
JdbcRowSet, CachedRowSet, and WebRowSet classes.
This chapter also discusses the following benefits and features associated with rowsets:
Chapter 16: Working with JDBC Rowsets
269
CachedRowSet and WebRowSet objects do not require a connection to the data source to operate.•
You can serialize both the CachedRowSet and WebRowSet objects, and then distribute them to thin
clients over a network.
•
A RowSet object acts as a JavaBean, enabling you to raise events associated with certain activities.•
A RowSet object can open its own connection with the data source, freeing you from having to create
the connection logic for it
•
A WebRowSet class defines a method, writeXml(), for generating XML documents describing the
WebRowSet object and the data it contains.
•
A WebRowSet class defines a method, readXml(), for populating the WebRowSet object using XML
documents adhering to its DTD.
•
As you can see, a RowSet object provides a viable alternative to using the traditional JDBC ResultSet object
when you need to simply retrieve and view query data. Furthermore, some Rowset objects also provide the
added benefit of being able to function while disconnected from the data source, which gives you a lot of
flexibility with regard to how you use the objects. Given the rise in distributed−application development,
JDBC rowset technology should play an important role in designing solutions in the near future.
Chapter 16: Working with JDBC Rowsets
270
Chapter 17: Building Data−centric Web Applications
by Stephen Nobert
In This Chapter
A brief overview of enterprise Web applications•
Using JDBC in servlets•
Using JDBC in JavaServer Pages•
Designing and implementing a JDBC JavaBean for use in a JSP application•
The World Wide Web has dramatically transformed the Internet from a simple means of sharing information
into an essential communication medium. Companies have contributed to this transformation by using the
Web as a global marketplace for their wares and services.
The Web experience no longer consists of a small Web site with a few pages of plain static text. Now, a Web
surfer uses applications that burst with a dizzying array of rich dynamic content, including multimedia.
Additionally, many Web applications offer e−commerce in the form of catalogs and virtual shopping carts.
Consequently, databases are now standard in the Web architecture. They are used to store content,
multimedia, catalogs, shopping carts, user personalization, and so on.
As more people become Web−savvy and e−commerce evolves into a part of our daily life, it becomes more
important that a Web application cater to more people more often. The need for scalable, efficient, and robust
solutions to provide 24−7 service and support will be greater than ever.
Out of the pack of available solutions, Java — and J2EE in particular — has emerged as the clear choice.
J2EE provides businesses with an answer to all their Web application needs. The three most prevalent
components of J2EE that are used in Web applications are JDBC, servlets, and JavaServer Pages (JSP).
This chapter covers three different methods for designing enterprise Web application architectures, two−tier,
three−tier and n−tier. I briefly discuss each. I also discuss servlets and JavaServer Pages and their roles in the
enterprise Web application and J2EE, and how to use JDBC with them. I begin with a discussion of what an
enterprise Web application is and of the two underlying architectures that you can use to design and
implement it.
XRef All the code, graphics, and databases for all the examples in this chapter can be found in the Chapter 17
section of the book’s Web site.
Reviewing Enterprise Web Applications
A Web application is a series of Web pages populated with dynamic and static content, tied together for a
single purpose. Although it seems simple at first, its underpinnings are much more complex. To effectively
design and implement an enterprise−class Web application, that is truly distributable, requires an
understanding of Web architecture.
Regardless of what technology you use to build them, the underlying architecture of Web applications will be
one of three kinds: two−tier, three−tier, and n−tier. This section provides a brief overview of all. I begin with
271
two−tier Web architecture since the three−tier and n−tier Web architectures evolved from it.
Two−tier Web architecture
The architecture behind the Web is a client−server model. The client−server architecture is a classic example
of the two−tier architecture. This is a fairly simple architecture, composed of only two layers or tiers, as
shown in Figure 17−1. Let’s examine the flow of the request−response model over the HyperText Transfer
Protocol (HTTP) using the figure as a map.
The client is a Web browser on a desktop, laptop, or other device such as a PDA, and it resides on the first
tier. This tier may be referred to as the client tier. To request a Web page, the user enters a URL into the Web
browser. The URL specifies the page to retrieve from the desired server, using the specified protocol,
typically HTTP. The Web browser opens an HTTP connection over the Internet to the Web server listening on
the specified server, which resides on the second tier (which I’ll refer to as the server tier). Data stores are
frequently on the second tier as well. In fact, they usually reside on the same machine as the Web server. The
server takes the request, processes it accordingly, generates a response, and sends it back to the client over the
same connection. Upon receiving the entire response, the browser closes the connection and renders the
response as a page. In the case of multimedia and proprietary file formats, the browser may launch the
appropriate plugin.
Figure 17−1: Example of the two−tier Web architecture
In many classic client−server applications, the business logic and presentation logic are commingled on the
server. In other words, the same code that retrieves data from a database also determines how those data will
be displayed on the client. Frequently, all this logic is tightly coupled with the database as well. The two−tier
Web architecture is no different. A Web browser is considered a thin client, in that it does a few things very
Chapter 17: Building Data−centric Web Applications
272
well and does not tell the server how to process the request. It simply requests a URL from a server and
renders the HTML contained in the response as a Web page. The server processes each client request,
applying hard−coded business logic, and then sends an HTML page as the response. The format of the HTML
page was hard−coded and generated by the same code that contained the business logic.
Commingling presentation and business logic results in maintenance and flexibility problems. If the two are
tightly coupled, changing one will break the other. If the schema changes, then so must your presentation.
Moreover, you may want to create separate views of the same data by providing a different presentation for
each view, and this may prove to be very difficult or even impossible because of the tight coupling between
presentation and business logic. Continuing to add functionality and enhancements results in an
unmaintainable and inflexible monolith. To solve the commingling problem, you must keep the presentation
logic separate from the business logic. This is actually harder than it sounds, as the following discussion
shows.
MVC design pattern
When Xerox PARC went public with Smalltalk−80, the world was introduced to the Model−View−Controller
(MVC) design pattern, shown in Figure 17−2. The Model represents the business−logic or data component.
The Controller is the input presentation component, which is the user interface with which the user controls
the model. The View is the output presentation component, which presents the user with a view of the model.
Figure 17−2: The Model−View−Controller (MVC) design pattern
The purpose of the design pattern is to isolate the user interface, or presentation logic, from the business logic.
Although this design pattern was intended to build GUIs, its basic framework can be applied to many different
programming tasks. The designers of the Swing GUI Toolkit Java extension adopted the MVC design pattern
for many of its components. The same data can be presented differently with a JTable, JTree, or third−party
charting component. These components provide different views of the same model.
This design pattern can effectively be applied to Web architectures as well. Applying MVC to the two−tier
Web architecture results in a three−tier Web architecture.
Three−tier Web architecture
To effectively apply the MVC design, you have to separate the presentation logic from the business logic.
Separating the components of the server tier into their own tiers results in a three−tier architecture, shown in
Figure 17−3. The data stores are moved into a third tier, commonly referred to as the data tier. The server tier
is now called the middle tier and it contains all the presentation and business logic. Note that the presentation
and business logic are now separated.
Chapter 17: Building Data−centric Web Applications
273
Figure 17−3: Example of the Three−tier Web architecture
The two−tier architecture works for retrieving static files but does not scale well enough for complex,
distributed, enterprise−class applications involving dynamic content. The components that make up the server
tier are usually tightly coupled — so much so that often you cannot remove or modify even one component
without rebuilding the entire server.
Although the client remains thin, the middle tier remains thick. Making a Web application truly distributive
involves separating all components into their own tier.
n−tier Web architecture
Separating all the components of the middle tier into their own tier results in a completely thin architecture
known as n−tier, shown in Figure 17−4. The n−tier architecture is analogous to MVC in that each tier
represents a separate component. Creating another presentation tier can result in an alternative View.
Developing another input user interface results in a different Controller. All the while, the Model remains
constant.
The beauty of the n−tier architecture is that it can be as divided as necessary. Providing a distributed
architecture that effectively handles all traffic and is fault−tolerant may require that each component be a tier
in itself.
The advantage of multiple tier Web architectures over two−tier architectures is that they scale well. In
Chapter 17: Building Data−centric Web Applications
274
addition, they are more efficient, robust, and maintainable. As I mentioned before, J2EE is the best choice for
multiple−tier Web applications.
J2EE enterprise application framework
J2EE is an enterprise Java application for designing and implementing scalable, efficient, and robust Web
applications using multiple−tier architectures. In a three−tier architecture, all the J2EE components reside in
the middle tier. In the n−tier architecture, each component may reside in its own tier.
Figure 17−5 illustrates J2EE in an n−tier Web architecture. All the J2EE components relevant to my
discussion of Web architectures — JDBC, servlets and JavaServer Pages (JSP) — are an integral part of this
architecture. JDBC provides database connectivity for the middle tiers, servlets provide the business logic,
and JSPs provide the presentation logic.
Java servlets and JavaServer Pages (JSP) are server−side Sun Java technologies used to develop
high−performance and highly scalable enterprise Web applications. Servlets and JSP are Java−based, so they
are inherently platform−independent. You can use both; each has its share of strengths and weaknesses.
In the following sections I discuss servlets and JSPs in more detail. I will also discuss how to use JDBC with
both technologies.
Figure 17−4: Example of the n−tier Web architecture
Chapter 17: Building Data−centric Web Applications
275
Figure 17−5: The J2EE architecture
Using JDBC with Servlets
Using JDBC with servlets is fairly straightforward. Servlets are a Java technology and have access to the
entire Java API, including JDBC. Although there are some performance and design considerations to make,
using JDBC with servlets is the same as using it in any other Java application.
In this section I describe what a servlet is and how to write one. I also present an example that uses JDBC.
Servlet overview
A servlet is a Java class that extends a Web server by performing server−side processing. Servlets are much
more scalable, efficient, and robust than traditional server−side processing paradigms, such as the Common
Gateway Interface (CGI).
Note The official Java Servlet Specification is part of the Java Community Process at Sun. You can find the
specifications at My discussion and code examples conform to the
version 2.2 specification.
Servlets can be scaled from small workstations to a load−balanced and fault−tolerant server cluster. Since
servlets are written in Java, they are inherently platform−independent. Furthermore, servlet containers are
Web−server–independent. Consequently, servlets can be deployed on heterogeneous systems running a
Chapter 17: Building Data−centric Web Applications
276
myriad of operating systems, Web servers, and servlet containers.
Each servlet is loaded only once and each servlet request is run in a separate thread. This provides an obvious
advantage over CGI, which requires the CGI mechanism to spawn a separate process for each request and
loading the appropriate CGI. Furthermore, servlets are superior to CGI with respect to database access.
Servlets can maintain a pool of database connections to multiplex among these threads providing optimal
database−access performance. This eliminates the need to open and close a database connection for each
request, which is necessary in CGI.
XRef Chapter 14, “Using Data Sources and Connection Pooling,” provides more information
about using the connection−pool features available in the javax.sql package.
Being written in Java affords servlets additional advantages. Java is a compiled language, and compiled code
is generally faster than the interpreted code used in other server−side technologies, such as ASP. Furthermore,
a servlet has the entire Java API at its disposal. This alone can make for extremely robust and portable code.
Now that you know what a servlet is, take a look at how one is constructed.
Constructing a JDBC servlet
Building a servlet is simple. You subclass from, or inherit, one of the Servlet classes provided by the Servlet
Java Extension class library, and override the appropriate methods. Since serving up Web content via HTTP is
so common, the class library features the Servlet class, HttpServlet, created for just this niche.
HttpServlet provides you with a set of overridable methods; one method for each HTTP operation. The default
implementation for each method is to return errors or default values. For each HTTP operation you support,
you must override the corresponding method with your own implementation to avoid returning these values.
Generally speaking, if you override all the methods of a servlet based on HttpServlet, you have effectively
created a rudimentary Web server.
Take a look at an example of creating a servlet. Listing 17−1 lists the code for the AllEmployeesServlet
servlet. This servlet simply retrieves information for all employees from a database and formats them in an
HTML table.
Listing 17−1: AllEmployeesServlet.java
// Java Data Access: JDBC, JNDI, and JAXP
// Chapter 17 − Web Applications and Data Access
// AllEmployeesServlet.java
import javax.servlet.*;
import javax.servlet.http.*;
import java.io.*;
import java.sql.*;
public class AllEmployeesServlet extends HttpServlet {
protected void doGet(HttpServletRequest request,
HttpServletResponse response)
throws ServletException, IOException {
response.setContentType("text/html");
PrintWriter out = response.getWriter();
out.println("<html>");
out.println("<head><title>All Employees</title></head>");
out.println("<body>");
out.println("<center><h1>All Employees</h1>");
Chapter 17: Building Data−centric Web Applications
277
Connection conn = null;
Statement stmt = null;
try {
// Load the JDBC−ODBC Driver.
Class.forName("sun.jdbc.odbc.JdbcOdbcDriver");
// Establish a connection to the database.
conn = DriverManager.getConnection("jdbc:odbc:Employees");
// Create a statement.
stmt = conn.createStatement();
// Retrieve the column and direction to sort by.
// By default, sort by SSN in ascending order.
String orderBy = request.getParameter("sort");
if((orderBy == null) || orderBy.equals("")) {
orderBy = "SSN";
}
String orderByDir = request.getParameter("sortdir");
if((orderByDir == null) || orderByDir.equals("")) {
orderByDir = "asc";
}
// Compose the query statement.
String query = "SELECT Employees.SSN, Employees.Name, " +
"Employees.Salary, " +
"Employees.Hiredate, Location.Location " +
"FROM Location " +
"INNER JOIN Employees " +
"ON Location.Loc_Id = Employees.Loc_Id " +
"ORDER BY " + orderBy + " " + orderByDir +
";";
// Execute the query.
ResultSet rs = stmt.executeQuery(query);
out.println("<table border=\"1\">");
out.print("<tr>");
out.print("<th>SSN</th>");
out.print("<th>Name</th>");
out.print("<th>Salary</th>");
out.print("<th>Hiredate</th>");
out.print("<th>Location</th>");
out.println("</tr>");
// Add one row for each employee returned in the result
// set.
while(rs.next()) {
long employeeSSN = rs.getLong("SSN");
String employeeName = rs.getString("Name");
long employeeSalary = rs.getLong("Salary");
Date employeeHiredate = rs.getDate("Hiredate");
String employeeLocation = rs.getString("Location");
out.print("<tr>");
out.print("<td align=\"right\">" + employeeSSN +
"</td>");
out.print("<td>" + employeeName + "</td>");
out.print("<td align=\"right\">" + employeeSalary +
"</td>");
out.print("<td align=\"right\">" + employeeHiredate +
"</td>");
out.print("<td>" + employeeLocation + "</td>");
out.println("</tr>");
}
out.println("</table>");
} catch(SQLException e) {
out.println("<p>An error occured while retrieving " +
Chapter 17: Building Data−centric Web Applications
278
"all employees: " +
"<b>" + e.toString() + "</b></p>");
} catch(ClassNotFoundException e) {
throw(new ServletException(e.toString()));
} finally {
try {
// Close the Statement.
if(stmt != null) {
stmt.close();
}
// Close the Connection.
if(conn != null) {
conn.close();
}
} catch(SQLException ex) {
}
}
out.println("</center>");
out.println("</body>");
out.println("</html>");
out.close();
}
}
Building any servlet requires importing the servlet extension classes. The following lines illustrate this:
import javax.servlet.*;
import javax.servlet.http.*;
import java.io.*;
import java.sql.*;
The first line imports all the basic classes necessary for developing any servlet. The second imports all classes
specific to developing HTTP−based servlets. For my example I also need to import the I/O and JDBC class
libraries, which is detailed in the last two lines.
Next you must subclass the appropriate Servlet class. The following line demonstrates how
AllEmployeesServlet subclasses HttpServlet:
public class AllEmployeesHttpServlet extends HttpServlet {
Finally, you override all the methods corresponding to the HTTP operations you want to support in your
servlet class body. Table 17−1 lists all the overridable
HttpServlet methods and their corresponding HTTP operations. For my example, I choose to support only the
HTTP GET operation, which is the most common type of request made from Web browsers. The method that
corresponds to this operation is doGet(). This method is called for each HTTP GET request received for this
servlet. Therefore, I only override the corresponding doGet() method.
Table 17−1: Overridable HttpServlet Methods
Chapter 17: Building Data−centric Web Applications
279
Method HTTP Operation Description
doGet() HTTP GET Retrieves the requested resource (file or
process result) specified in the URL;
idempotent request.
doPost() HTTP POST Retrieves the requested resource (file or
process result) specified in the request;
non−idempotent request.
doPut() HTTP PUT Puts a resource on the Web server.
doDelete() HTTP DELETE Deletes the specified resource.
doHead() HTTP HEAD Same as GET, except that only the message
headers and not the body are returned.
doOptions() HTTP OPTIONS Queries the Web server’s capabilities or
information about a resource on the server.
doTrace() HTTP TRACE Loopback; returns the request.
The doGet() method has two arguments, request and response. The request argument is an HttpServletRequest
instance that provides access to the client’s request, such as HTTP−specific information as well as the URL
parameters and values. It also contains the name of the content requested by the client. The response argument
is an HttpServletResponse instance that provides the necessary means of responding to the corresponding
request. In addition to the content returned, it provides the additional information necessary for the client to
correctly interpret and process the response.
Ordinarily the doGet() method returns the content specified in the request. This could be an HTML page, a
graphic file, or some other piece of content. In this example I am returning an HTML page that I dynamically
generate. Before I can start generating the HTML, I must first indicate the type of content I will be sending
back. (Content type is also commonly referred to as a MIME type.) Since I am generating straight HTML, the
MIME body I will be sending back will be of type text/html, as shown in the following snippet:
response.setContentType("text/html");
MIME and Binary Content
The Multipart Internet Mail Extension (MIME) was originally developed to provide a standard mechanism to
send binary files over text−only mail systems. Later it was incorporated into HTTP for the same purpose, but
it has been extended to identify all content. A Web server identifies the content it is sending to the client by
specifying the content’s MIME type. If it cannot ascertain the content type it is sending, it defaults to
text/plain. Most MIME types are based on file extensions. Therefore, a Web server can easily determine the
MIME type for a piece of content, simply by looking at the file’s extension.
It has become common practice to store the content for an entire Web site in a database. Frequently, this
content is binary (images and multimedia, for example). Unfortunately, you don’t have the luxury of file
extensions when using BLOB data. To easily identify each piece of content you store in a database, I highly
recommend instituting a mechanism to tag each piece with its corresponding MIME type. This helps eliminate
client−side confusion over the type of a piece of content.
Table 17−2 shows some common binary MIME types.
Chapter 17: Building Data−centric Web Applications
280