excel by example a microsoft excel cookbook for electronics engineers phần 5 pot
Bạn đang xem bản rút gọn của tài liệu. Xem và tải ngay bản đầy đủ của tài liệu tại đây (4.04 MB, 38 trang )
135
Example 8: Resistor Color Code Decoder Using Speech Input
Figure 8-7: Creating a customized toolbar.
Figure 8-8: Placing a button on the new toolbar.
136
Excel by Example
Right-click on this smiley and on the pop-up menu (Figure 8-9), change the Name to
Commence, select Text Only (Always), and Assign Macro assigning the button to the
macro of the same name. Irritatingly, this process may take several right-clicks.
Figure 8-9: Changing button
properties.
We repeat the process for all the colors and the Backup macros until we are left with a tool-
bar that looks like Figure 8-10.
Clicking on any one of the buttons should run the macro updating the bands on the resistor.
We can get rid of the toolbar by clicking the “X” on the top right-hand corner, and make
it reappear (or disappear) by right-clicking on a toolbar and selecting (or deselecting) the
Resistor option. Of course, it is possible to delete entirely by going into Tools | Customize
| Resistor | Delete but I don’t think we should do that just yet.
In Parenthesis: Exporting a Toolbar
Toolbars are normally associated with an Excel installation. They can be inserted into
a workbook for transportation, which is what I hope will happen with this example. In
the customize dialog (Figure 8-7) having selected the Toolbars tab, click on the Attach
button. In the next dialog box that appears, select the desired toolbar (in the “Custom
Toolbars” panel) and click on the Copy>> button between the panels. The toolbar should
be copied to the “Toolbars in Workbook” panel. Click on OK.
Figure 8-10: The Resistor toolbar.
137
Example 8: Resistor Color Code Decoder Using Speech Input
Adding Speech
We now re-enable the Language toolbar using the menu selections Tools | Speech | Speech
Recognition. Ensure that the microphone is in the record state (also the mute button on the
actual microphone, if there is one), click on the Voice Command button and then on the
Tools button. On the drop-down menu, select Add/Delete Words and you will be presented
with the dialog box of Figure 8-11. For each voice command that we are going to use, type
the command word (like “Commence” or “Red”) in the “Word” box, click on Record pro-
nunciation, and annunciate the word. The software then adds the word to the dictionary.
It is more reliable to record the exact word to associate with the macro than to rely on the
speech recognition algorithm to recognize a word by application of rules.
Figure 8-11: Adding
specific words to the word
recognition database.
When all fifteen words (including Evaluate) have been added, close the box. It is time to
try out how this works. Ensure that the Voice Command button is clicked on the Language
toolbar and that the microphone is enabled. Now say the words and the macro should be
executed. Simple enough!
By the way, as suggested by the Speech Recognition documentation, a good microphone re
-
ally does improve the performance.
Evaluate the Color Code
The Evaluate function is far too lengthy to produce here in its entirety. It evaluates a different
set of circumstances for each number of bands. An excerpt for the 4-band case is shown here:
Case 4
‘4 bands
nLegalValue = 0
‘preset value to indicate that the output is legal
‘if set to 1 then this is an illegal value
138
Excel by Example
If Range(“d7”).Value < 10 Then
nForward = Range(“d7”).Value * 10
If Range(“f7”).Value < 10 Then
nForward = nForward + Range(“f7”).Value
If FindValueA(nForward) = 1 Then
‘found value
Else
nLegalValue = 1
End If
Else
‘second digit gold or silver
nLegalValue = 1
End If
Else
nLegalValue = 1
‘to indicate an illegal value
End If
If nLegalValue = 1 Then
Range(“result”).Value = “Forward value not found”
Else
If Range(“h7”).Value = 10 Then
‘silver
nForward = nForward * 0.01 & “R”
Else
If Range(“h7”).Value = 11 Then
‘golde
nForward = nForward * 0.1 & “R”
Else
‘any other value
nForward = nForward * 10 ^ Range(“h7”).Value
If nForward < 1000 Then
nForward = nForward & “R”
Else
If nForward < 1000000 Then
nForward = nForward / 1000 & “K”
Else
nForward = nForward / 1000000 & “M”
End If
End If
End If
End If
‘now for the tolerance
Select Case Range(“j7”).Value
Case 11:
139
Example 8: Resistor Color Code Decoder Using Speech Input
‘gold
Range(“result”).Value = nForward & “ 5%”
Case 10:
‘silver
Range(“result”).Value = nForward & “ 10%”
Case 1:
‘brown
Range(“result”).Value = nForward & “ 1%”
Case 2:
‘red
Range(“result”).Value = nForward & “ 2%”
Case 5:
‘green
Range(“result”).Value = nForward & “ 0.5%”
Case 6:
‘blue
Range(“result”).Value = nForward & “ 0.25%”
Case 7:
‘violet
Range(“result”).Value = nForward & “ 0.1%”
Case Else:
Range(“result”).Value = nForward & “ ??%”
End Select
End If
‘now for reverse
nLegalValue = 0
If Range(“j7”).Value < 10 Then
nForward = Range(“j7”).Value * 10
If Range(“h7”).Value < 10 Then
nForward = nForward + Range(“h7”).Value
If FindValueA(nForward) = 1 Then
‘found value
Else
nLegalValue = 1
End If
Else
‘second digit gold or silver
nLegalValue = 1
End If
Else
nLegalValue = 1
‘to indicate an illegal value
140
Excel by Example
End If
If nLegalValue = 1 Then
Range(“result2”).Value = “Reverse value not found”
Else
If Range(“f7”).Value = 10 Then
‘silver
nForward = nForward * 0.01 & “R”
Else
If Range(“f7”).Value = 11 Then
‘golde
nForward = nForward * 0.1 & “R%”
Else
‘any other value
nForward = nForward * 10 ^ Range(“f7”).Value
If nForward < 1000 Then
nForward = nForward & “R”
Else
If nForward < 1000000 Then
nForward = nForward / 1000 & “K”
Else
nForward = nForward / 1000000 & “M”
End If
End If
End If
End If
‘now for the tolerance
Select Case Range(“d7”).Value
Case 11:
‘gold
Range(“result2”).Value = nForward & “ 5%”
Case 10:
‘silver
Range(“result2”).Value = nForward & “ 10%”
Case 1:
‘brown
Range(“result2”).Value = nForward & “ 1%”
Case 2:
‘red
Range(“result2”).Value = nForward & “ 2%”
Case 5:
‘green
Range(“result2”).Value = nForward & “ 0.5%”
Case 6:
‘blue
Range(“result2”).Value = nForward & “ 0.25%”
141
Example 8: Resistor Color Code Decoder Using Speech Input
Case 7:
‘violet
Range(“result2”).Value = nForward & “ 0.1%”
Case Else:
Range(“result2”).Value = nForward & “ ??%”
End Select
End If
The procedure looks at the first two bands and if they are not gold or silver creates a number
from the value stored within the band cell. The call to function “FindValueA” takes this
number and compares it to all the legal numbers for resistors in the A series. If a match is
found the function returns a value of 1, otherwise it is zero. If a match is found, the third
band is used to scale the resistor value and present it in standard format (for example, 4.7 K),
and then based on the fourth band the tolerance is tacked on to the result.
Since sometimes it is hard to figure out which is the first band and which is the last, the rou
-
tine also reverses the process and evaluates the bands from right to left.
The results are saved in two cells reserved for the forward and the reverse readings.
Obviously, the interpretation of five- and six-band resistors has a few more lines of code and
uses a different series of resistor values, but in principle, they work exactly in the same way.
Of some note in the software is the “exit for” statement. Those of you with “C” experience
will know this as the “break” statement used with a “for” loop in order to break out of the
loop. This is also the first time in this book we have used our own function call. A function
only differs from a procedure in that it returns a value.
Now that the Evaluate macro is complete, we must add the button to the Resistor toolbar in
exactly the same way as before using the Tools | Customize | Commands tab & Macro se-
quence, dragging the button to the toolbar and then changing the name and associating the
macro. (There is a drop-down button on the Resistor toolbar that allows you to add a button
instead of the above technique. It was possibly finger problems on my part, but I could not
get this approach to work with speech recognition.)
Now we are almost ready to roll. You can try it out and see how it works. Obviously you don’t
need to use speech recognition; you can simply click on the toolbar buttons. The toolbar
must be visible in order for the speech recognition to work.
Text to Speech
Not only do you get to talk to your computer, you can get your computer to talk back to you.
You can change the properties of the speaking voice and the output device from the Speech
icon in the Window Control Panel. Click on the Text to speech tab. Once this has been set
to your satisfaction, return to the workbook.
Enable the Text To Speech toolbar by following the menus Tools
| Speech | Show Text To
Speech toolbar. Click on the By Rows button (as seen from the pop-up description) on the
142
Excel by Example
toolbar. Then block cells A15 to C16 and click on the Speak Cells button. The four cells
should be read back to you.
It is simple enough to record this process to a macro called Speak, and the call to it is tucked
in as the last thing to do in the Evaluate function. The only problem is that the Text to
Speech function changes the active cell and that plays havoc with the backup function. We
need to insert a method to record the current location and then restore it after the “Speak”
procedure. We can do that using the following sequence:
vRow = ActiveCell.Row
vColumn = ActiveCell.Column
‘saving current cursor location
Call Speak
‘restoring cursor location
Cells(vRow, vColumn).Select
Figure 8-12: Getting the computer to talk back.
Conclusion
So there you have it. I hope this application is not anachronistic given that the industry is
moving to surface-mount resistors. When I finally find a use for a particular tool, it becomes
obsolete! Isn’t that just the way of the world?
9
E X A M P L E
143
Model Description
Temperature is one of the real-world measurements that is required in electronics and espe-
cially in industrial control. There are many techniques to convert the temperature into an
electronic format. One approach is to use a Resistance Temperature Detector (RTD), which
consists of a wire with a resistance proportional to the temperature. Different metal alloys
have different characteristics and each type is specified by the principal metal in the alloy
and its temperature coefficients. The resistance R
T
is approximated by the Callendar-Van
Dusen equation:
R
T
= R
0
+ α R
0
[T – δ(T/100 – 1) –β (T/100 – 1)(T
3
/100)]
But normally, only the
α coefficient is given and lookup tables are provided. From this equa-
tion it is obvious that the relationship between resistance and temperature is nonlinear.
One of the most common RTD types is made with
platinum wire, with an α of 0.00385,
which has a resistance of 100Ω at 0°C. RTDs are available in 2-, 3- and 4-wire types. The
additional wires are used to null the effect of the resistance of the wires connecting the RTD
to the electronics.
As discussed in an earlier example, the 4–20 mA current loop is very popular as a means of
transmitting an analog signal around a factory floor because of its high noise immunity to
electrically induced noise and its ability to power the sensor (hence the 4 mA offset) while
measuring the signal. At the bottom end of the input range, the current through the loop
driver is controlled to 4 mA, and it will increase to 20 mA at full scale input.
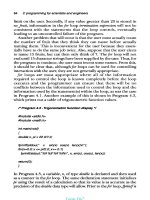
The RTD and current loop are so common that Texas Instruments/Burr-Brown manufacture
an integrated circuit (XTR105) that does the conversion. A basic circuit can be seen in
Figure 9-1.
The XTR105 provides two identical current sources to drive the RTD and a reference resis
-
tor R
Z
. The difference in voltages developed by these currents is amplified and conditioned
to generate the 16 mA range at the output. At the minimum input temperature R
Z
should
be equal to the RTD value so that the input voltage differential is zero. The upper value
RTD to 4–20 mA Converter:
XTR105
144
Excel by Example
is determined by the gain resistor R
G
, and the XTR105 also has the ability to linearize the
output with the addition of another resistor, R
LIN1
.
The relationship between the resistor values is as follows:
R
Z
= R
RTD
at T
min
R
G
= ((2R
1
(R
2
+ R
Z
)) – (4(R
2
R
Z
)))/(R
2
– R
1
)
R
LIN1
= (R
LIN
(R
2
– R
1
))/(2(2R
1
– R
2
– R
Z
))
Where R
1
= RTD resistance at (T
min
+ T
max
)/2,
R
2
= RTD resistance at T
max
R
LIN
= 1KΩ (internal to the XTR105).
Assuming we make this as a product where a customer can order any input temperature
range, it would make an ideal model to implement in Excel.
Acquiring RTD Tables
The first step is to generate the RTD tables in Excel. After a search on the Internet, I ac-
cessed a table in HTML format from www.instrumentation.com (named for the company) for
a platinum RTD, in degrees Celsius. In the browser, I selected Edit | Select All and copied
the selection into a Wordpad file, where I gently massaged it and saved it as a text file which
is on the CD-ROM as table.txt. An extract follows:
-200 18.52 -200
-190 22.83 22.40 21.97 21.54 21.11 20.68 20.25 19.82 19.38 18.95 18.52 -190
-180 27.10 26.67 26.24 25.82 25.39 24.97 24.54 24.11 23.68 23.25 22.83 -180
-170 31.34 30.91 30.49 30.07 29.64 29.22 28.80 28.37 27.95 27.52 27.10 -170
-160 35.54 35.12 34.70 34.28 33.86 33.44 33.02 32.60 32.18 31.76 31.34 -160
-150 39.72 39.31 38.89 38.47 38.05 37.64 37.22 36.80 36.38 35.96 35.54 -150
Figure 9-1: 2-wire RTD to 4-20 mA conversion.
R
G
R
Z
R
L
Power
Supply
I
4–20mA
O
R
LIN1
RTD
R
CM
I
RET
V
in+
V
in–
V
LIN
I
R2
I
R1
I = 0.8mA
R
I =4mA+V *(40/R
)
OI NG
XTR105
145
Example 9: RTD to 4-20 mA Converter: XTR105
In order to get this into Excel, we follow the menu sequence Data | Import External Data |
Import Data, and browse and select the “table.txt” file. We will be faced with Figure 9-2.
Figure 9-2: Importing a text file.
Ensure that the Delimited radio button is selected and click on Next, proceeding to Figure 9-3.
Figure 9-3: Setting delimiters.
146
Excel by Example
Make sure the Space option is checked as a delimiter and click on Finish. The data will ap-
pear as in Figure 9-4.
Figure 9-4: RTD data loaded.
Note that for negative temperatures, the change in the values from left to right corresponds
to the increase in the absolute value of the temperature and is inconsistent with the data
presented for temperatures above zero in terms of a software lookup approach. I looked at
tables provided by several RTD suppliers and quite a few seemed to use this approach. It is
easy enough to use Excel to manipulate the data into a form that we need. Initially we need
to mirror the data, so in cell N4 I entered the formula:
=L4
In O4, I entered the formula:
=K4
and so on, to:
=B4
in cell X4
147
Example 9: RTD to 4-20 mA Converter: XTR105
I then blocked and copied N4 to X4 and pasted them into the range N5 to X23. Having
done this, we no longer need the formula and we should revert to the values. Select the
range N4 to X23 and copy it (<Ctrl> + <C> or through the menus). Then click on Edit |
Paste Special and select Values (Figure 9-5).
Figure 9-5: Paste special, to convert
formulas to values.
Figure 9-6: Values converted.
148
Excel by Example
Figure 9-6 shows the results to date. For the same selection, we cut (<Ctrl> + <X>) and
paste it into the range B4 to L23 overwriting the original order. We block A3 to A22, cut it
and shift it down a row. We delete the last two columns (L and M), add a little formatting
and we are left with Figure 9-7.
Figure 9-7: Completed RTD table.
Lookup RTD Value
The INDEX function has the format:
INDEX(array,row_num,column_num)
We have to manipulate the temperature to locate the correct row and column number. First,
we enter any temperature in cell N1, just to start the process off. Let’s use 125.
The rows increment by ten degrees, so we need to find the row based on the number of tens
in the temperature. To do this we use the INT function. In cell N3, we enter:
=INT(N1/10)
and this returns a number of 12. The columns are based on the remainder of the above divi-
sion. In cell O3 we enter:
=MOD(N1,10)
149
Example 9: RTD to 4-20 mA Converter: XTR105
and it returns 5. We still need to do some manipulation of this. First, the table starts at
–200°C, so we need to add a (200/10) for the offset and also the table (we will define later)
starts at cell B4. For the INDEX function, row 1 column 1 defines cell B4, so we need to add
a 1 to the 20 on the row offset and a 1 to the column offset to align the lookup action with
the actual table.
If we put it all together, we enter in cell N5:
=INDEX(B4:K89,N3+21,O3+1)
We can play around with the value in cell N1 to see that the lookup works correctly.
Creating a Function
What we actually want to do is create a function with the temperature as an argument and
the RTD resistance is returned as the value of the function.
As a programmer, you would immediately think of implementing the project using FOR
loops to help identify the correct cell, but we have seen above that there is a perfectly good
Excel function that can do the job. All we have to do is persuade VBA to use it.
Go to the VBA editor (Macro | Visual Basic Editor or <Alt> + <F11>). Insert a module
(Insert | Module). Change the name of the Project to RTDproject, and the name of the
module to RTDmodule in the module properties window. We need to do this because when
this function is accessed from another workbook, the name must be unique or there may be
a conflict. In the code window for the RTDmodule, add the code as shown below. The result
appears in Figure 9-8.
Function RTDvalue(nTemperature As Integer) As Variant
Dim nItermediate As Variant
Dim nItermediate2 As Variant
nIntermediate = Int(nTemperature / 10)
nIntermediate2 = nTemperature - (10 * nIntermediate)
nIntermediate = nIntermediate + 20 + 1
nIntermediate2 = nIntermediate2 + 1
RTDvalue = Application.WorksheetFunction.Index _
(Range(“[RTD.xls]RTD!b4:k89”), _
nIntermediate, nIntermediate2)
‘add workbook reference to allow usage from
‘another module
‘Note the use of <space>_ to allow line
‘continuation
End Function
150
Excel by Example
The first part of the code recreates the Excel MOD function. The VBA Mod instruction does
not perform in the same way and since they are named the same you cannot access the Excel
function in this case. But VBA can access the Excel INDEX function using the Application.
WorksheetFunction construct.
Accessing a Function
Although we will actually want to access the RTDvalue function from outside the module,
this would be a good point to try and see that the function does indeed work.
On the Excel RTD worksheet, click in cell N7 and then using the menus, click on
Insert |
Function (Figure 9-9) and in the drop-down box select the User Defined category. Select
the RTDvalue function and OK, and this leads to Figure 9-10.
Figure 9-8: Function to lookup the RTD resistance.
151
Example 9: RTD to 4-20 mA Converter: XTR105
Using the expand button, it is possible to actually click on the actual cell needed for the
argument of the function, and click on OK. The cell now should have the same value as cell
N5, which was calculated directly in Excel. Changing the temperature in N1 should lead to
both cells N5 and N7 updating and showing the same value. Notice that there is a preview
of the result in the lower part of Figure 9-10.
It is possible to avoid this Insert Function utility by simply entering the formula in F7:
=RTDvalue(N1)
Figure 9-9: Insert a function.
Figure 9-10: Selecting the input range.
152
Excel by Example
Adding a Help Description to a Function
In Figure 9-9 and Figure 9-10, the comment “No help available” can be changed to provide
something more informative. In the RTD workbook, go through the menus Tools | Macros
| Macros (or <Alt> + <F8>). Only procedures will be found automatically, so we enter the
name RTDvalue manually. We then click on the Options button and add descriptive text as
in Figure 9-11. Click on OK and then Cancel.
Figure 9-11: Adding a help description to a function.
Creating the Model in Excel
Open a new workbook and name it XTR105.xls using the File | Save as sequence. Open
the VBA editor (<Alt> + <F11> or use the menus). In VBA, select Tools | References |
Browse and select type of files to *.xls. Search for and select the “RTD.xls” files (Figure
9-12) and click on Open, followed by Enter.
We only need to do this if the worksheet containing the function (RTD.xls) is not open.
Nevertheless, this will open the worksheet since we require the worksheet to be open in one
form or another during regular operation.
Return to the new workbook and prepare the initial data, naming cells D4 to D7 for the
descriptions in A4 to A7.
153
Example 9: RTD to 4-20 mA Converter: XTR105
Figure 9-13 shows the formulas that are entered to calculate the resistor values (done by
selecting the Formulas option in the Tools | Options | View sequence). The CONVERT
function can be used to convert between many different kinds of units.
Figure 9-12: Finding a function in another workbook.
Figure 9-13: Formulas behind the worksheet of Figure 9-14.
154
Excel by Example
In Parenthesis: CONVERT
The convert function will allow a conversion from one measurement system to another.
Its format is:
CONVERT(number,from_unit,to_unit)
There are many different conversions possible. To see them all, use the Excel Help feature.
The units that will probably interest us are as follows:
Unit Use as Argument
Weight
Gram
“g”
Pound
“lbm”
Temperature
Celsius “C”
Fahrenheit
“F”
Kelvin “K”
Distance
Meter
“m”
Mile “mi”
Inch “in”
Foot “ft”
Yard
“yd”
Angstrom
“ang”
Time
Year
“yr”
Day “day”
Hour “hr”
Minute
“mn”
Second “sec”
Power
Horsepower
“HP”
Watt “W”
Magnetism
Tesla “T”
Gauss “ga”
Orders of Magnitude
peta 10
15
“P”
tera 10
12
“T”
giga 10
9
“G”
mega 10
6
“M”
kilo 10
3
“k”
deci 10
–1
“d”
centi 10
–2
“c”
milli 10
–3
“m”
micro 10
–6
“u”
nano 10
–9
“n”
pico 10
–12
“p”
femto 10
–15
“f”
155
Example 9: RTD to 4-20 mA Converter: XTR105
Figure 9-14 is the actual worksheet with the resistor results shown. The user is expected to
choose Fahrenheit or Celsius, and the minimum and maximum temperature. The resultant
values of R
Z
, R
G
and R
LIN1
are produced in response to these inputs.
Figure 9-14: Initial worksheet.
Standard Resistor Values
Of course, you all know what the next step is going to be! Resistors are only made in dis-
crete values and so we would like to know what values to use. Let’s put the current project
on hold while we investigate a new workbook (NearestValue.xls) that will allow us to look
up the nearest resistor values. The functions return a numeric value rather than text so that
they can be used directly in calculations. This is an interesting workbook since it does not
need any entries on any of the sheets. It is purely an exercise in VBA programming. The four
functions provided in the workbook allow for selection of resistors in the A (NearestValueA)
and B (NearestValueB) series of values, for potentiometers (NearestPot), and a procedure
that converts a number to the normal way of expressing the resistor value (LookupStan-
dardResB).
By the way, if you don’t want to get into the programming, the four functions can be accessed
by simply using the module as an “add-in.” You should then skip to the section titled,
Install-
ing the NearestValues Add-In.
There are several ways of generating a standard value for a given resistor value. The tech-
nique I adopted in the end, while it is a “brute force” approach, allows for simple expansion
for other types of devices.
The code is too large to reproduce here, and anyway you have the source code on the CD, so
I will show a snippet or two in order to elucidate.
The initial part of the function “NearestResistorA” defines the variables used. I found that
I needed the double precision to prevent rounding errors in the value returned. The value
under consideration, provided as an argument to the function, is called CalculatedValue. The
first step in the process is to consider that the CalculatedValue must be greater than 1 Ω and
less than 10 MΩ. If the value is outside this range, an error value is returned. In order for
other Excel functions to interpret this as an error, the CVErr function must be invoked.
156
Excel by Example
In order to simplify the identification of the lookup process, the value is changed to en-
gineering notation. The mantissa is a variable titled StandardForm in the code, and the
exponent is a variable called Power.
Function NearestResistorA(CalculatedValue As Double) As Double
Dim i As Integer
Dim Power As Long
Dim StandardForm As Double
Dim StdFrm As Double
Dim Upper As Double
Dim Lower As Double
If CalculatedValue < 1 Or CalculatedValue > 10000000 Then
‘check for resitors < 1R or > 10M
NearestResistorA = CVErr(xlErrValue)
Else
Power = 1
StandardForm = CalculatedValue
For i = 0 To 6
If StandardForm >= 1 And StandardForm < 10 Then
Exit For
Else
Power = Power * 10
StandardForm = StandardForm / 10
End If
Next i
Using the mantissa as the key, we have a large Select Case statement. It caters for all possible
ranges. On vectoring to any one of the cases, the standard value below the mantissa is stored
on the “Lower” variable and similarly, the value above is stored on the “Upper” variable.
Select Case StandardForm
Case 1 To 1.1
‘set upper and lower to use later
Lower = 1
Upper = 1.1
Case 1.1 To 1.2
Lower = 1.1
Upper = 1.2
Case 1.2 To 1.3
Lower = 1.2
Upper = 1.3
.
.
.
Case 9.1 To 10
Lower = 9.1
Upper = 10
End Select
157
Example 9: RTD to 4-20 mA Converter: XTR105
The next step is to consider which of the Lower or Upper values is closer to the mantissa
and set the variable “StdFrm” to the complete value (that is the mantissa multiplied by the
exponent):
If StandardForm - Lower > Upper - StandardForm Then
StdFrm = Upper
Else
StdFrm = Lower
End If
‘use lower to save the value for later calculation
Lower = StdFrm
StdFrm = StdFrm * Power
In certain ranges, there are some values that are omitted so we need to consider this:
‘now between 1 and 10 there are fewer values
If (StdFrm < 3.9) Or (StdFrm > 1000000) Then
Select Case Lower
Case 1 To 1.1
Lower = 1
Case 1.1 To 1.3
Lower = 1.2
.
.
.
Case Else
Lower = Lower
End Select
StdFrm = Lower * Power
End If
And finally, the return value is set up and the function completed.
NearestResistorA = StdFrm
End If
End Function
The B range of values is implemented in exactly the same way except that of course there are
significantly more values. The function is called NearestResistorB.
The lookup of potentiometers differs since the philosophy of using a variable resistor is differ-
ent. You normally go for the value greater than the calculated value, but otherwise it is much
the same. It is named NearestPot.
Finally, there is also a procedure that will take a number and format it to a standard resistor
notation (as in 2.43 K ohms). It is titled LookupStandardResB.
158
Excel by Example
Creation of Add-In
I will be using these functions in several models in this book, so it seems to me that it is a
likely candidate as an add-in so that it will be readily accessible from any workbook. The in-
ner machinations are irrelevant and using the add-in functionality, they can be hidden.
If it is not already open, open workbook “NearestValue.xls” and go to the VBA editor. Click
on Debug | Compile LookupValue. Then right-click on the LookupValue(NearestValue.
xls) entry in the VBA explorer bringing up Figure 9-15. Enter the information you want
here. If you want, you can click on the Protection tab and fill in the required fields. Since
you already have the source, this would be a pointless exercise for me.
It should be noted that by leaving this add-in unprotected, the code will be visible in all
the workbooks (rather in the VBA environment) where this add-in has been enabled. This
is not a problem, except that it is surprising when first noticed, and it is possible for you to
change it (perhaps inadvertently).
Figure 9-15: Setting properties for the add-in.
Now click on the sequence File | Save As, and save it as a Microsoft Excel Add-In (*.xla)
type. This will automatically save it to the AddIns folder, but of course you can save it to
anywhere you choose. I have added it to the CD-ROM as well.
Installing the NearestValues Add-In
Close the NearestValues workbook and open a new workbook. Click on Tools | Add-Ins
and in the dialog box click on Browse. Locate the “NearestValue.xla” file and click on OK.
159
Example 9: RTD to 4-20 mA Converter: XTR105
While the add-in has now been established for Excel as a whole, it is enabled or disabled in
each individual workbook. As an example for the current model, open the “XTR105.xls”
workbook as well as the “RTD.xls” workbook. Go through the sequence Tools | Add-Ins,
and check the NearestValue option as in Figure 9-16.
Figure 9-16: Installing
an add-in.
Back to the Project At Hand
In the real world, component tolerances will lead to inaccuracies so each unit will have to be
calibrated. To do this, a potentiometer should be placed in series with R
Z
and a second one in
series with R
G
. This leads to four different values; two for the two fixed resistors and two for
the potentiometers in series. Allowing for a 20% adjustment by the potentiometers (±10%),
the result we calculate for R
Zfixed
and R
Gfixed
is 90% of the calculated value. We have set up the
worksheet for the results to be entered in cells G4 to G8 (See Figure 9-19).
The easiest way to insert the function is almost identical to the procedure we used earlier.
Click in cell G4 and click through Insert | Function. Select the user defined category, and
then select the function NearestValueB as in Figure 9-17 and click on OK.