filemaker pro 11 the missing manual phần 2 potx
Bạn đang xem bản rút gọn của tài liệu. Xem và tải ngay bản đầy đủ của tài liệu tại đây (1.54 MB, 91 trang )
67
:
Advanced Find
Techniques
Figure 2-7:
The Edit Saved Finds dialog
box shows all your saved
finds. You can sort the list
with the “View by” pop-up
menu. You can sort alphabet-
ically by name, by creation
order or in a custom order,
by dragging the arrow to
the left of each find’s name.
Use the Duplicate button as
a starting point for creating
a new find that’s similar to
one you’ve already saved.
The Delete button cleans up
finds you won’t be using any
more.
3. Click Edit, double-click the Vocalist find, or simply press Enter.
The Specify Options for the Saved Finds dialog box appears. If you’re changing
the action of the find, it makes sense to change its name. In this case, though,
you’re repairing a find that wasn’t set up correctly, so leave the name the same.
4. Click the Advanced button.
The Specify Find Requests dialog box appears. The actions that create the find
requests are in a list. In this case, there’s only one action, which is equivalent to
a request in a manual find.
5. Click the Find Records action, and then click the Edit button (or double-click
the action).
The Edit Find Request dialog box appears. Here you can change the way this
specific request does its work. Currently, it’s set to search in the Address field
for the word “central”.
6. Click the action in the top list, then scroll the list of fields near the bottom left
of the window until you see the Notes field. Click it.
You’re telling FileMaker to search the Notes field instead of the Street Address
field. The Change button becomes active as soon as you select the field. The
change doesn’t take place until you click the button or press Enter, though.
7. Click into the box on the right marked “Criteria”, and then type vocalist.
You’ve entered the second part of the changed request, which is to search the
field for the word “vocalist”. See Figure 2-8 for the settings.
68
FM P : T M M
Advanced Find
Techniques
Figure 2-8:
This dialog box changes a
find request from searching
the Street Address field for
the word “central” to search-
ing the Notes field for the
word “vocalist.” The Action
pop-up menu lets you choose
between “Find Records” and
“Omit Records”. In a single
request, you can search
more than one field, which is
like setting up an AND condi-
tion in Find mode. Multiple
requests within a single
find are the same as an OR
condition in Find mode.
8. Click Change, and then click OK or Save in all the dialog boxes until you’re
back on your People Detail layout.
If you click Cancel on the last dialog box, then FileMaker warns you that all
your changes will be discarded. Use this technique when you’re not sure if your
settings are correct. Since the Delete button doesn’t warn you before it deletes
a find request or a saved find, you can use this technique instead as a fail-safe.
When you click Cancel, FileMaker discards all the changes you made while the
dialog box was open.
Try out the edited search, by choosing it from the Find pop-up menu or by choosing
Records➝Saved Finds➝“Vocalist (notes field)”. This process involves a lot of steps,
but once you understand the Edit Find Request dialog box, the process is easy. You
can use a slight variation to create a new saved find without performing it first. Just
choose Edit Saved Finds, and then click New instead of selecting an existing find
and editing it.
Tip: Practice creating finds from scratch comes in handy when you start scripting static finds (page 488).
Several find script steps use the Specify Find Requests and Edit Find Request dialog boxes you’ve just
seen.
69
:
Editing What’s in
Your Fields
Editing What’s in Your Fields
Once you’ve found the records you want to work on, it’s time to learn timesaving
and creative ways to revise and format your record text. Each field is actually like a
mini–word processor, with features that you’re familiar with if you’ve ever written
a letter on a computer. You can do basic things like select text, and cut, copy, and
paste. You even have a Find and Replace feature, and flexible text formatting powers.
Drag-and-drop Editing
In addition to copying and pasting, you can drag text from one place to another. But
first, you have to turn it on in FileMaker’s preferences, like so:
1. In Windows, choose Edit➝Preferences. In Mac OS X, choose FileMaker
Pro➝Preferences.
The Preferences dialog box appears.
2. Select “Allow drag and drop text selection”.
If you don’t like using drag and drop, just come back here and turn it off.
3. Click OK.
The dialog box disappears.
Now that dragging is turned on, here’s how it works:
4. Make a new record (Records➝New Record).
Now you’ve got a nice clean work surface.
5. In the Notes field, type FileMaker has editing super power.
Next you’ll drag to fix it.
6. Double-click the word “super”.
The word is highlighted to let you know it’s selected.
7. Drag the selected word between “has” and “editing”.
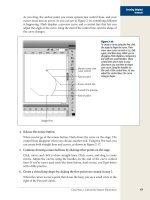
Figuring out where dragged text is going to land can be tricky. If you look
closely, you see that in addition to the text you’re dragging, a little vertical line
moves along under your arrow. You can see this in action in Figure 2-9. (Unless
you have excruciatingly precise mouse movements, you probably have to fix
the spaces between words. Unlike most word processors, FileMaker isn’t smart
enough to figure out where they go for you.)
70
FM P : T M M
Editing What’s in
Your Fields
Figure 2-9:
When you turn on “Allow drag and drop text selection” in Preferences,
FileMaker lets you drag selected text around with the mouse. Here, the
word “super” is being moved after “has” by dragging. The little vertical
line under the arrow shows you exactly where the text will go when you
drop it.
Tip: You can also drag text from one field to another. Instead of moving the text, FileMaker copies it. In
other words, once you let go of the mouse button, the text is both where it started and where you drop
it. If you want this behavior when dragging within a field, then hold down the Ctrl (Option) key while you
drag.
Using the Replace Command
Sometimes the whole reason you performed a find is to change something in several
records. Maybe you just noticed that your data entry person put “New Yorq” on
all the records she entered. The first step to fixing them is to find them. Once your
found set includes the proper records, you could change the City field one record at
a time (especially if you’re billing by the hour). But you use your time better if you
use the Replace Field Contents command. Here’s how it works:
1. Click the City field (it doesn’t matter which record), and then correct the
spelling to “New York”.
You’ve just fixed one of the records. All the others in the found set need the
same fix. (Make sure your cursor is still in the City field or the next step won’t
work.)
2. Choose Records➝Replace Field Contents.
The Replace Field Contents dialog box appears (Figure 2-10). It has a handful of
options that may not make sense to you yet. That’s OK; just choose the first one:
“Replace with”. The new data you just typed is listed beside this option.
3. Click Replace.
FileMaker now updates the City field in every record in the found set. When it’s
done, you’re still sitting on the same record, but if you use the book icon to click
through the records, then you see that they’ve all been changed.
71
:
Editing What’s in
Your Fields
WORKAROUND WORKSHOP
Find and Find Again
Unlike the Find/Replace window in most other programs,
FileMaker’s doesn’t politely step aside. If you try to click in
your database window to switch back to it, then FileMaker
just beeps at you. In fact, you can’t do anything else but find
and replace unless you close the Find/Replace window first.
You can always move the Find/Replace window around the
screen by dragging it, but if your database window is big,
or your screen is small, the Find/Replace window can really
get in the way, keeping the very results it’s finding hidden
behind it. Here are a few pointers to help you cope:
Make sure the Find/Replace window is as small as possible
by dragging the resize handle in the lower-right corner.
Like most windows, it’s resizable, but its smallest size is
almost always big enough.
If you close the Find/Replace window (click Close or press
Esc), then FileMaker keeps the last-found item highlighted.
Since FileMaker remembers all your settings, you can al-
ways open the Find/Replace window again, and then con-
tinue searching where you left off.
Wouldn’t it be great if you could click the buttons in the
Find/Replace window without having it open onscreen?
Fact is, you can. In the Edit➝Find/Replace menu, you see
two handy commands: Find Again and Replace & Find
Again. (They’re grayed out unless you’ve done a Find/
Replace operation, though.)
Choosing these menu commands is just like clicking the
Find Next and Replace & Find buttons in the Find/Replace
dialog box.
FileMaker also offers one more convenient shortcut. If you
have some text already in a field, and you want to find
the next occurrence of the same text, then you can choose
Edit➝Find/Replace➝Find Selected. This one command
does the same thing as copying the text, opening the Find/
Replace window, pasting into the “Find what” box, clicking
Find Next, and then clicking Close. All the other options in
the Find/Replace window stay just as when you last used
them.
These handy commands all have keyboard shortcuts that,
somewhat confusingly, only work when the Find/Replace
dialog box is closed:
• To find the next occurrence (Find Again), just press
Ctrl+G (�-G).
• To replace the currently selected text, and find the
next occurrence (Replace & Find Again), press
Ctrl+Shift+G (Option-�-G).
• To find other occurrences of the selected text, press
Ctrl+Shift+H (Option-�-H).
Note: The Replace Field Contents command can be very dangerous. It really does change every record in
the found set, even if that wasn’t your intent. Make sure you’re absolutely certain you have the right found
set before clicking Replace, because you can’t use the Undo command afterwards. Saving a backup copy
of your database just before using Replace Field Contents is advisable.
72
FM P : T M M
Editing What’s in
Your Fields
Figure 2-10:
The Replace Field Contents dialog box has three op-
tions: “Replace with”, “Replace with serial numbers”,
and “Replace with calculated result”. You’re con-
cerned only with the first option right now. It replaces
the contents of the current field in every record in the
found set with whatever’s in the current record when
you click Replace. So, in the current record, type what
you want to be in every record before you call up
this dialog box. (You’ll learn about serial numbers in
Chapter 3 and calculations in Chapter 8.)
Find and Replace
Like your word processor, FileMaker has a Find and Replace feature. Also as in your
word processor, you can (and should) use Find and Replace tools as often as possible
to automate your editing process and eliminate retyping.
Suppose one of your clients is called MegaBank. For one reason or another, they
decide to change their name to Bay Lout Bank. Unfortunately, you have 27 folks
in your database with the old name, and the name is sprinkled in Company Name
fields, Notes fields, and so on. You could look through your records one by one and
fix them yourself, but you’re never going to become a database maestro that way.
Instead, do a Find/Replace operation.
FileMaker fields can hold a lot of information, and people often put things like let-
ters, emails, product descriptions, and other potentially long documents into a field.
In cases like this, the Find/Replace command is just as useful as it is in your word
processing program.
Since FileMaker has fields and records to worry about, though, its Find/Replace dia-
log box is a little more complicated than what you may be familiar with. Luckily, the
concepts are simple, as shown in Figure 2-11. The Find/Replace dialog box lets you
search for a snippet of text in one field or all fields of one record or all found records.
It can also replace every occurrence of that text with something new—either one at
a time, or all at once.
Note: Don’t confuse Find/Replace with Find mode. Find/Replace is for finding text in one or more fields
and one or more records. Find mode is for finding records. You’ll probably use Find mode much more
often than Find/Replace. For the full story, see the box on page 76.
73
:
Editing What’s in
Your Fields
Figure 2-11:
In FileMaker, you use the same dialog box
both to find text and to find and replace
text. If you aren’t replacing anything, don’t
click any of the Replace buttons. The text
you’re looking for goes in the “Find what”
text box. If you’re replacing it with something
new, type that text in the “Replace with” text
box. (If you want to replace some text with
nothing, making it go away, then leave the
“Replace with” box empty.)
Here’s FileMaker’s version of Find and Replace:
1. Choose Edit➝Find/Replace➝Find/Replace.
The Find/Replace dialog box opens, as shown in Figure 2-11.
Tip: Turning on “Match case” ensures that FileMaker looks for an exact uppercase and lowercase match.
For example, when “Match case” is turned on, “Kite” and “kite” don’t come up as a match. If you turn
on “Match whole words only”, FileMaker eliminates partial word matches. For example, “Drag” matches
“Drag” and not “Dragon.”
2. Under “Search across”, select “All records.”
You’ve just told FileMaker you want it to look through all the records in the
found set.
3. Under “Search within”, select “Current field.”
“Current field” refers to the field you were editing when you opened the Find/
Replace dialog box. If you weren’t clicked into a field when you opened the
dialog box, FileMaker still lets you select the “Current field” option, but it com-
plains when you start the find, so if you want to search a specific field, close the
dialog box, click in your intended field, and then reopen the dialog box. You
can select any combination of Search across and Search within. Here’s how that
shakes out:
• All records and All fields. FileMaker looks through every field on the lay-
out for a match, and repeats the process for each record in the found set.
• Current record and All fields. FileMaker looks through every field on the
layout in the current record only.
• Current record and Current field. FileMaker looks only in the current
field. When it reaches the end of the text in that field, it stops.
74
FM P : T M M
Editing What’s in
Your Fields
• All records and Current field. FileMaker looks through the current field,
and then moves to the next record. It keeps looking through records for
more matches, but it pays attention only to the current field.
4. From the Direction pop-up menu, choose All.
The Direction pop-up menu controls which way FileMaker goes when it starts
its search. To figure out what that means, imagine a long string running through
your database. One end is tied to the first letter of the first field of the first re-
cord in the found set. The other end is tied to the last letter of the last field of the
last found record. This concept is pictured in Figure 2-12.
Figure 2-12:
The Find/Replace command expects you to give it a
direction. To decipher what that means, you have to do
a little visualization. Here’s a picture of the imaginary
string, starting at the beginning of the first record, and
stopping at the end of the last. When you click into a
field, and the insertion point sits there blinking in front
of a letter, it’s marking a spot on the imaginary string.
If you’re not clicked into a field, then FileMaker decides
to mark the string right before the first letter of the first
field of the current record. In this example, your cursor is
sitting right there between “Made” and “Dragon”.
Product Classic Diamond Kite
Color Red and Blue
Description This kite is a classic! It makes a perfect f…
Record #1
Product Hand Made Dragon Kite
Color Yellow and Red
Description From tip to tail, this kite measures a full…
Record #2
Product Eagle Kite
Color White and Black
Description This is our finest kite.
Record #3
• Forward. FileMaker starts looking at your current spot on the string, and
moves forward (towards the end of the string). When it gets to the end, it
beeps.
• Backward. FileMaker starts looking at your current spot on the string, and
moves backward (towards the beginning of the string). When it gets to the
beginning, it beeps.
• All. FileMaker starts off just like a Forward search. When it reaches the end
of the string, instead of beeping, it loops back to the start of the string, and
keeps looking. It finally beeps and stops when it gets back where it started.
Now that you’re through setting all your Find/Replace options, it’s time to de-
cide which button to click:
75
:
Changing Text
Appearance
5. Click Find Next.
• Find Next starts FileMaker looking. When it finds a match, it highlights
the match right in the field. The Find/Replace window stays put, so you
can click Find Next as many times as necessary to find what you’re looking
for, and then click Replace to change it to your replacement text. Click Find
Next again to go to the next match.
• If you feel the need to work more quickly—say you’ve done Find Next and
Replace a couple times, and everything looks in order—click Replace &
Find instead. It replaces the current match, and then finds the next one all
in one step. Repeat as many times as necessary.
• If you’re sure you want every match replaced, then click Replace All, and
FileMaker does the entire find-replace-find-replace dance for you. File-
Maker always asks you if you’re sure about Replace All first, just in case. For
instance, if you have some clients whose last name is Anderson and others
whose company name is Anderson, you may not want to use the Replace
All option. You need to check each occurrence individually to make sure
you don’t accidentally change someone’s last name.
6. When you’re done with the Find/Replace window, click Close.
Note: Find/Replace has no undo, and since you can replace across all records and fields, it can be dan-
gerous. Be careful with this command. Also, it can take a long time because it looks through the individual
words in each field. If you’re searching across all records, and you have lots of records, be prepared to
wait a while as FileMaker does its magic.
Changing Text Appearance
Much like a word processor, FileMaker has commands to set the font, size, style, and
alignment of the text in a field. When a field is active, or you’ve selected some text
in a field, you can choose from any command in the Format menu. Also like a word
processor, you can apply formats to paragraphs of text and you can even create tab
stops within a field.
Text Formatting
You can use all the usual commands (font, size, style, alignment, line spacing, and
text color) individually, or use the handy Formatting bar.
76
FM P : T M M
Changing Text
Appearance
UP TO SPEED
Find with Replace vs. Find/Replace
You may be wondering how Find mode combined with
Replace Field Contents is different from Find/Replace (dis-
cussed earlier in this chapter). In fact, they’re very different,
but deciding which to use can be confusing. Here are some
guidelines:
• Find mode is significantly faster at finding things than
Find/Replace. In Find mode, FileMaker uses some-
thing called an index, which lets it find 10 matching
records out of 293,000 in an instant. Find/Replace,
on the other hand, looks through the fields the same
way you would: one by one. It’s faster than you, but
it still takes time.
• Replace Field Contents always operates on one field
across the entire found set. Find/Replace, on the oth-
er hand, also lets you replace across all fields in just
the current record, as well as all fields in all records
of the found set.
• Replace Field Contents always replaces the entire
contents of the field. You can’t replace every occur-
rence of “teh” with “the” for example. You can only
give a new value that replaces everything in the field.
• Most important, Replace Field Contents assumes
you’ve already found the records you want, and al-
ways modifies every record in the found set. Find/
Replace adds a second layer of searching, as it scours
the record or the found set looking for matches.
So why would you ever use Replace Field Contents? Some-
times you really do want to replace everything in the field
every time, just like in the Company Name example on
page 72. Also, Replace Field Contents is significantly faster
at changing lots of records than Find/Replace. It takes just
a few seconds to accomplish what Find/Replace would
spend several minutes doing.
In general, if you want to find records, use Find mode, but
if you want to find certain bits of text, use Find/Replace.
Likewise, if you want to replace everything in a field in
every record, use Replace Field Contents, but if you want to
replace little bits of text, use Find/Replace. (If you want to
replace little bits of text across thousands of records, study
first, or be prepared to take a vacation while your computer
thinks about it.)
Finally, you have no reason not to mix Find/Replace with
Find mode. Since Find/Replace searches records only in the
found set, you can establish a good found set first to make
your Find/Replace go faster. (For example, if you’re replac-
ing “teh” with “the” in the Notes field, then you may as
well find all the records that have “teh” in their Notes fields
first, since Find mode is so much faster than Find/Replace.)
Each of these text formatting commands lets you override the original formatting
for a field on a record-by-record basis. That is, changing a word to bold on one
record doesn’t affect any words in any other record in the database. So while it can
be handy to make the occasional note stand out (as you see in Figure 2-13), profes-
sional database designers rarely use these commands to format individual chunks of
text. Instead, they change the formatting of a given field in Layout mode. Formatting
performed in Layout mode will apply to every record in the database. You’ll learn
how to do that in Part 2.
77
:
Changing Text
Appearance
Figure 2-13:
The results of a session using the For-
matting bar. The Notes field shows the
formatted text, and the toolbar shows
the font, size, style, and colors chosen.
You can access the toolbar by choosing
View➝Formatting Bar.
Tip: If you change your mind about formatting, and want to put the text back to its normal state, here’s
a trick that lets you do it with four quick keystrokes: Select all the text (Ctrl+A or �-A), cut the selection
(Ctrl+X or �-X), paste it right back in the field (Ctrl+V or �-V), and finally Undo (Ctrl+Z or �-Z). The
pasted text comes back with its ugly formatting at first, but the undo doesn’t remove the text, it removes
the formatting. The same trick works if you paste data in from another source, like Word or an email
message. If the text comes with formatting you want to lose, just do that undo voodoo that you do right
after you paste.
Paragraph Formatting
FileMaker doesn’t stop with text (or character) formatting. It also has some para-
graph formatting tools that come in handy. Well, they’re handy if you can find them.
You have to go through the Line Spacing dialog box to get there. To see the dialog
box in Figure 2-14, choose Format➝Line Spacing➝Other.
There you see all the stuff you’d expect to be able to do to a paragraph in a field. You
can align the paragraph, indent it from the left or the right, and give it a first-line
indent. You can change line spacing and add space above and below a paragraph.
There’s even a handy Apply button so you can examine how it’s going to look before
you close the dialog box. Finally, a Tabs button gives you access to another dialog
box, this time for setting tab stops.
Figure 2-14:
This hidden dialog box can make text
in a field more legible. In your sample
database, you may have noticed how
the text stands a little away from
the left edge of the field border (see
Figure 2-13). That was done on the
layout, but you can add this effect to
a field in one record with the settings
shown above.
78
FM P : T M M
Changing Text
Appearance
Remember, just like text formatting commands, any paragraph formatting you apply
in Browse mode changes only the record and the field that’s active when you choose
the command. This ability comes in handy sometimes, but people use the Layout
cousins of these commands far more often.
The Text Ruler
The Text Ruler (View➝Text Ruler) is a visual version of the Paragraph formatting
dialog box. Use it to set indents and tab stops. The ruler has an arrow icon for the
Left, Right, and First Line indent settings (Figure 2-15), which you just drag to the
spot on the ruler where you want the indent set. You’ll learn how to set tab stops on
the next page.
When you turn on the Text Ruler, FileMaker adds a space along the top of the win-
dow to hold the ruler. When you’re in a field, the ruler itself appears in the portion of
this space directly above the field, with the zero point on the ruler lined up with the
left edge of the field. (When you’re not in a field, the ruler just measures the width
of the content area.)
Figure 2-15:
Like most word processors, FileMaker has a text ruler
that lets you position margin markers right where
you want them. When you drag the Left indent arrow
(the one on the bottom), it moves the First Line ar-
row (the one on the top) with it, so first drag the Left
indent arrow where you want it, and then move the
First Line arrow. If you want to move the Left indent
arrow without moving the First Line arrow, then hold
down the Alt (Option) key while you drag.
Left indent
First line
indent Right indent
Formatting Tabs
Since a field can hold just about any kind of text, you might eventually need to use
tab stops within a field. For example, you could have a nice large field into which you
paste rows of text from a spreadsheet. To make things line up properly, you can set
tab stops for each column of text. To type a tab into a field, press Ctrl+Tab (Option-
Tab). This is a special keystroke, obviously, because in FileMaker pressing Tab jumps
you to the next field. See page 302 to learn how Field Controls make plain old tabs
work the way you’re used to.
Like most word processing programs, FileMaker gives you two ways to create tab
stops: the Text Ruler and the Tabs dialog box.
79
:
Changing Text
Appearance
Setting tabs in the Text Ruler
With your cursor in a field, you can insert a new tab stop simply by clicking any-
where in the ruler. A small right-pointing arrow appears where you clicked, repre-
senting a left tab stop. (The arrow shows you what direction text goes when you start
typing.) FileMaker also supports other kinds of tab stops, but to get them, you have
to visit the Tabs dialog box, described next.
Setting tabs in the Tabs dialog box
The Tabs dialog box is a laborious way of setting tabs, but it gives you more options
because you can control all aspects of each tab stop manually. Here’s the drill:
1. With your cursor in a field choose Format➝Line Spacing➝Other.
The Paragraph dialog box makes its entrance.
2. Click Tabs.
Ta-da! You found the Tabs dialog box (Figure 2-16).
Tip: If the Text Ruler is showing (Figure 2-15), then you can get to the Tabs dialog box quickly. Just
double-click any tab stop in the ruler. The Tabs dialog box opens with the clicked tab preselected.
To make a new tab stop, simply select the appropriate options, and then click New.
A new entry appears in the list named after the Position you specified. The Apply
button lets you see the results of your settings without closing the dialog box. You
can create up to 20 tab stops, after which the New button is turned off. If you try to
add a tab stop at a ruler position where one already exists, then the new stop simply
replaces the old one.
Once you’ve created a tab stop, you can edit or delete it at will. Drag a tab around on
the Text ruler to move it, or drag it off the bottom to delete it. Use the dialog box’s
Clear button to delete a tab, if you prefer that method.
Figure 2-16:
The Tabs dialog box lists all the tab stops set for a field in the
list on the right. You can also adjust a tab stop, delete it, or add
a new one. Each stop has a Type, Position, and Fill Character.
To change the settings for any existing stop, first select the stop,
edit the settings, and then click Set.
80
FM P : T M M
Checking Spelling
Checking Spelling
Before printing out your database or otherwise sharing it with the greater public, you
want to make sure your spelling is correct. Nothing screams “amateur” louder than
a City field that reads “Chciago.” All the spell checking commands are found under
the Edit➝Spelling menu.
Spell Checking with Menu Commands
Sometimes you want to fly through data entry, and then do your spell checking later.
If this is your preference, you have three choices:
• Choose Edit➝Spelling➝Check Selection to spell check selected text only. This
method comes in handy when you’re pretty sure a short passage, or even a single
word, is wrong. Highlight the text you want to check, and then choose the menu
command.
• To check an entire record, choose Edit➝Spelling➝Check Record.
• Finally, you might want to check spelling on many records at once. In this case,
choose Edit➝Spelling➝Check All. When you choose this option, you’re tell-
ing the spell checker to look at every field of every record in the current found
set (choose Records➝Show All first if you want to check every record in the
database).
No matter how many records you’re checking, FileMaker opens the same Spelling
dialog box shown in Figure 2-17.
Figure 2-17:
The spell checker found a typo—”fture”. You can
see the misspelled word in the Word box, and
underlined in red in the box at the bottom of
the window. If FileMaker figures out the correct
spelling, then, in the list under the Word box,
it selects the spelling. And if you’re the type
who calculates your gas mileage every time
you fuel up, you’ll be delighted to discover
that FileMaker keeps track of how many words
you’ve spelled wrong so far, and tells you at the
bottom of the window.
81
:
Checking Spelling
TROUBLESHOOTING MOMENT
Units
In the figures in this chapter, the Indent options are speci-
fied in inches (you see “in” next to each text box). FileMaker
actually has a setting for the unit used here and other plac-
es. FileMaker comes factory-set to inches, but it’s nothing if
not flexible. You can use inches, centimeters, or pixels—the
choice is yours. If you’re used to the metric system, by all
means tell FileMaker to use centimeters. Or choose pixels
for really precise control over text positioning. Here’s how
to change how FileMaker displays measurements:
If the Paragraph dialog box is open, click Cancel. The re-
mainder of these steps work only if your database’s main
window is in front.
1. Choose View➝Layout Mode. In this mode, the con-
tent area of the window changes somewhat. Don’t be
alarmed…and don’t click anything in the window. (If
you accidentally change something, that’s OK. File-
Maker soon asks if you want to save.)
2. Choose Layouts➝Set Rulers to open the Set Rulers
dialog box.
3. In the Units pop-up menu, choose Pixels. (If you’d
rather use different units, you can select anything you
like. You can always repeat these steps later to get
things back.)
4. Click OK, and then choose View➝Browse Mode.
You should be back where you started now. If you get a mes-
sage asking if you want to save your changes, click Don’t
Save; this question refers to any accidental changes you
made to the layout itself, not to the change of ruler units.
Note: Even if, by the magic of planetary alignment, you have no misspellings, FileMaker still opens the
Spelling dialog box. In this case, though, it says “Status: Finished Spelling” in small print in the middle
of the busy window. You’re supposed to spot this right away and know the program’s done. Of course,
if you’re like most people, you stare blankly at the screen for 30 seconds trying to figure out what went
wrong first. Save yourself the confusion: Check the Status line when the window first appears. If FileMaker
is finished, click Done.
Near the bottom, the Spelling window says Status: Questionable Spelling. The Word
text box displays the word in question. Things can proceed from here few different
ways:
• Usually the correctly spelled word appears in the list of suggested spellings. If
it does, click the correct spelling, and then click Replace. (Or just double-click
the correct word.)
• If you don’t see the right spelling, correct it yourself. Type the correct spelling
into the Word box. To confirm that your new spelling is correct, click Check; the
status line changes to say Correct Spelling if you got it right. Otherwise, you’re
back where you started, with a misspelled word and a few suggestions below it.
• If you spelled it right originally, but FileMaker doesn’t agree, click Ignore All to
tell FileMaker to skip this so-called misspelling. Better yet, click Learn to teach
FileMaker the word so it doesn’t bother you in the future. (Clicking Learn adds
the word to your current user dictionary, which is explained below. Ignore All
82
FM P : T M M
Checking Spelling
only ignores the word temporarily; if you quit FileMaker and come back later,
then it thinks the word is misspelled again.)
• If you change your mind and want to stop the spell checker, just click Cancel.
This doesn’t undo your changes; it just closes the dialog box.
• When the spell checker has finished, the status line changes to say Finished
Spelling, and the Replace button says Done. Click the Done button to close the
dialog box.
Spell Checking As You Type
FileMaker’s spell checker also works automatically as you type. This visual spell
check is a per-database setting, so you control it from the File Options dialog box.
Choose File➝File Options, and then click the Spelling tab. You find two options that
you can mix and match to help you spell better, run faster, and jump higher. Well,
you’ll spell better, anyway.
The first option is “Indicate questionable words with special underline.” If you miss
your word processor, this one makes you feel right at home. You see that familiar red
line underneath any word FileMaker doesn’t like the looks of. Plus, if you right-click
(Control-click on the Mac) the underlined word, and then, from the shortcut menu,
choose Suggested Spellings, then FileMaker offers suggestions for spelling the word
properly. If you see the correct spelling among the suggestions, just click it and File-
Maker will replace the misspelled version. From the same menu, you can also tell
FileMaker to learn the word or ignore it.
If red lines don’t get your attention, then you can turn on “Beep on questionable
spellings”, and FileMaker makes your computer beep when you type a space after a
misspelled word. Unfortunately, it’s just the same old alert beep that your computer
makes in all kinds of other situations—so you can easily miss it. But in combination
with the red line, this pair can be a formidable reminder to spell better.
Tip: Visual spell checking can be handy. But often in a database your data entry includes things that don’t
need to be spell checked (inventory codes, abbreviations, email addresses and the like). Luckily, when you
design your own databases, you can turn off the as-you-type version of spell checking for any particular
field. See page 304 for details.
Managing Spelling Dictionaries
FileMaker comes with spelling dictionaries for various languages, and you can eas-
ily choose among them. Just choose Edit➝Spelling➝Select Dictionaries. The Select
Dictionaries window lets you choose the language to use for all spell checking opera-
tions. You can see it in Figure 2-18.
83
:
Preview Mode and
Printing
Figure 2-18:
Out of the box, FileMaker uses a Spelling Language that
matches the language of your operating system. But you can
use a different language if you prefer. Just select it from this
pop-up menu. As you can see, FileMaker even has a medical
language dictionary that keeps it from balking at all your ER
terms. Use the New button to create as many user dictionaries
as you want, and then select the one you want to use for a
particular database.
User dictionaries
Remember from “Spell Checking as You Type” when you clicked the Learn button
to teach FileMaker a new word? When you did so, behind the scenes, FileMaker
actually added that word to the user dictionary, which is separate from the normal
dictionary that comes with FileMaker.
You can even have multiple user dictionaries for different purposes. For example, if
you have two databases, one that tracks your apparel products and one that stores in-
formation about tools, it might make sense to keep two user dictionaries. The tools
version might include words like “mm” and “pcs” while the apparel version would
have “XXL” and “CottonPoly”.
Tip: In reality, it’s nine times easier to just use one user dictionary, so you don’t have to worry about
which one is selected. It doesn’t hurt to have thousands of words in your user dictionary, but not having
enough makes spell checking more time consuming. Nothing’s more boring than wading through the
same dozen correctly spelled words over and over. But, if you want more than one dictionary, you can
have it.
Preview Mode and Printing
It’s a cruel fact of life that eventually you need to put your data on paper. You might
want mailing labels for all your customers in Canada, or a special printed form pre-
filled with patient information for insurance filing. Sometimes you just need your
data with you when you’re away from your computer. As you’ll learn in Part 2, you
84
FM P : T M M
Preview Mode and
Printing
can arrange the data any way you want in FileMaker, and make certain layouts that
are particularly suitable for printing. But for now, remember that FileMaker lets you
print anything you see onscreen (just choose File➝Print). Its Print dialog box has a
few special options. Figure 2-19 shows the Windows version. You can see the Mac
OS X version (which requires a little more digging) in Figure 2-20.
POWER USERS’ CLINIC
Rewriting the Dictionary
You’ve already learned how to add to your dictionary us-
ing the Learn button in the spell checker. Well, if you’ve
ever wanted to just tell it what words you want it to skip,
you can. Just choose Edit➝Spelling➝Edit User Dictionary
to open the User Dictionary dialog box. Here you can add
new entries to the dictionary (type the word, and then click
Add), or remove existing entries (select the word, and then
click Remove).
You can also export all the entries to a text file where you
can edit them to your heart’s content. When you click Ex-
port, FileMaker asks where it should save the export file.
The file is a plain text file with one word on each line, which
you can edit in a text-editing program.
If you already have a file that has words you want, then
you can import those words into your user dictionary in
one shot. For instance, if you use a lot of technical terms,
then you might be able to download a list of terms from
your industry and load them into a dictionary. The file has
to have each word on its own line, so if it’s in some other
format, then you need to clean it up first. (For example,
use your word processor’s Find/Replace function to turn
a comma-separated list into one with a carriage return be-
tween each word.)
Also, make sure the file is plain text. A Microsoft Word
file (.doc) or other special format won’t work. (Making a
plain-text file on Windows is a breeze: Just use Notepad,
the simple text-editor program in the Accessories folder
in your Start menu. On Mac OS X, however, you need a
little more care. You can use Text Edit—it’s in your Applica-
tions folder—but you have to tell it you want plain text. Just
choose Format➝Make Plain Text before you save the file.)
Using the Import and Export features together can be par-
ticularly useful. You can export your user dictionary, edit it
manually in the text-editing program (where making lots of
edits might be easier), and then import it back in.
Figure 2-19:
FileMaker’s Print dialog box gives
you all the standard options, plus a
little more. The Print pop-up menu
(at the top in the dialog box in
Windows) lets you tell FileMaker
which records to print.
85
:
Preview Mode and
Printing
Figure 2-20:
On Mac OS X, File-
Maker’s special print
options are tucked
away in a secret
place. You have to
choose FileMaker
Pro or FileMaker
Pro Advanced from
this unnamed but
very important
pop-up menu. In this
example, you can see
the field styles you
can pick from if you
elect to print a “Blank
record, showing
fields”.
• “Records being browsed” tells FileMaker to print every record in the found set. To
print all your Canadian customers, find them first, and then choose this option.
• Current record prints just the current record, which comes in handy when you
just want to print one thing: your doctor’s contact information to keep in the car,
perhaps, or maybe Aunt Edna’s candied yams recipe.
• Blank record, showing fields tells FileMaker to print what’s onscreen with no
data at all. You can change the look of each field to a box or an underline if you
want (from the pop-up menu shown in Figures 2-19 and 2-20, just pick your
choice). Choose this option if you want to hand out pages for people to fill out
with a pen (it’s a kind of antique writing device), and later type their responses
into the real database.
To see how the printout is going to look without committing trees to it, you can use
Preview mode (Figure 2-21). You access Preview mode via the View menu, the Mode
pop-up menu, or Ctrl+U (⌘-U) (see page 19).
Note: When you first go to Preview mode, the page count says “?” instead of the number of pages. File-
Maker doesn’t know how many pages it’ll print until you force it to count them. If you drag the Page Slider
all the way to the right, then FileMaker shows the last page. On its way there, FileMaker counts the pages,
too. The process may take some time in a large document, but FileMaker catches up eventually.
86
FM P : T M M
Preview Mode and
Printing
Figure 2-21:
Preview mode shows
you what your database
looks like as though it
were printed on paper.
For instance, you can see
whether FileMaker’s going
to chop off any informa-
tion that doesn’t fit on the
page (anything beyond
the width of the page
simply isn’t printed). Pre-
view mode also indicates
the margins, and lets you
flip through the found set
page by page using the
book icon. The current
page number appears
where the current record
number was displayed in
Browse mode.
On some computers and printers, you can reduce the printout by a percentage us-
ing File➝Print Setup (Page Setup on Mac). When you do, Preview mode shows the
page proportionately larger or smaller so you can see how the content area fits on the
page. The scaling options you get vary by computer, operating system, and printer.
Note: Preview mode also has some green, tree-saving tools: Instead of printing, you can use one of
the buttons in the Status toolbar to save the records you’re viewing as an Excel file or a PDF. But if you
do have to print, the Page Setup and Print dialog boxes are just a click away. Those standard page setup
options affect Preview mode. If you change the paper orientation, then your print preview changes right
away.
ii
Part Two: Building Your
First Database
Chapter 3: Creating a Custom Database
Chapter 4: Adding Power to Your Database
Creating a Custom
Database
I
n Part 1, you learned that you can work organically, flowing smoothly from find-
ing, to sorting, and then to editing data as your needs dictate. In Part 2, you’ll
learn that FileMaker lets you create databases in a natural order, too. For starters,
you’ll create some fields for storing data about your property leasing business, and
then you’ll learn how to control layouts so they display data the way you want to see it.
Note: The tutorials in Part 2 serve as a general introduction to database creation. You’ll go through the
basics of all the major tasks associated with creating most databases. Later sections go into more detail on
the bigger topics, but you’ll get a solid foundation by reading Chapters 3 and 4 straight through.
Creating a New Database
When you create a database from scratch, you see both familiar territory and some
brand new concepts right away. For example, when you launch a word processing
program, and then open a new document, you can type a lot of text before you re-
member to save your document. But when you create a database, you need to give
your document a name and some basic structure before you can enter any data.
That’s partly because of the automatic saving feature you learned about on page 46.
Another reason is that you have to tell FileMaker about the fields you’ll be using to
store your data. Here’s how to get started creating a new database file:
1. Double-click the FileMaker Pro icon to launch the program.
The Quick Start screen appears (Figure 3-1).
90
FM P : T M M
Creating a New
Database
Tip: If you see a standard Open File dialog box instead of the Quick Start screen, just go to the Help
menu, and then choose Quick Start screen. Select “Show this screen when FileMaker Pro opens” at the
bottom of the Quick Start screen to make that your preferred open screen.
Figure 3-1:
From the Quick Start
screen, you can create
new files or click shortcut
links to existing ones. Get
help from a hands-on
tutorial, watch instruc-
tional videos, or hang out
with other FileMaker Pro
fans in a forum sponsored
by FileMaker, Inc. Tell the
Quick Start screen not to
show up by turning off
“Show this screen when
FileMaker opens”. That
way, the next time you
launch FileMaker, you’ll
see a standard Open File
dialog box.
2. Click the “Create a New Database” option. In the Save As field, type Lease
Agreement, and then choose a location to save your file.
The “Create a new file named” dialog box is very similar to a Save dialog box.
You can name your new file and navigate through your folders to find your
favorite storage spot.
3. Click Save when you’re done.
A new database window appears in Table view (page 50) ready for you to start
creating fields.
Note: It might seem odd to name the file “Lease Agreement” (singular) and not “Lease Agreements”
(plural). After all, the file is meant to store many agreements. True enough, and for that reason many de-
velopers always use the plural case for their file and table names. But at the record level, you’d never put
two peoples’ first names in one field, so it doesn’t make sense to name the field “First Names.” It’s easier
to remember never to use plural case than it is to remember a set of rules for naming database structural
items, so in this chapter you’ll stick to singular case.
91
:
Creating and
Managing Fields in
Table View
UP TO SPEED
Jumpstart the Quick Start Screen
There’s a lot of power packed into the Quick Start screen.
On page 90, you learned how to use the “Create a New
Database” link to get started on a custom database. The
“Use a Starter Solution” link gives you access to FileMaker’s
handy templates, including business, academic and per-
sonal templates.
Click the “Convert an Existing File” link to convert older
files (those with a pre-fp7 file extension) to the fp7 format.
If you select a file that’s already got an fp7 file extension,
FileMaker creates a new copy of the file you select. This
command also converts databases from other sources, like
Excel, dBase, or Bento (Mac only).
In the middle section, you see a list of shortcuts to File-
Maker files:
• Recent Files. FileMaker remembers which files
you’ve opened recently. Set the number displayed in
the list (it’s automatically set at 10) by choosing File-
Maker Pro➝Preferences (Mac) or Edit➝Preferences
(Windows), and then type the number you want in
the “Show recently opened files” field.
• Favorite Files. You determine which files appear
in this list. Click Manage Favorites in the Quick Start
screen or choose File➝Open Favorites➝Manage
Favorites to customize your favorites list. Or add the
file you’re working on to the list with File➝Open
Favorites➝Add Current File to Favorites.
• FileMaker Server. FileMaker Server lets lots of
people share the same database (Chapter 17). You
can add your favorites to this list with the tools listed
above.
• The Browse Button. Click to show the standard
Open File dialog box, from which you can navigate
your computer or network to the file(s) you need.
Creating and Managing Fields in Table View
When you create a new database in FileMaker Pro 11, the file starts out in Table
view. There isn’t much else to look at though. Figure 3-2 shows the familiar tools of
your Status toolbar. But since the file has no fields and no records, these tools aren’t
very useful yet. First you need to think about the fields the database needs for storing
data in a logical manner.
Figure 3-2:
This database window looks like a brand-
new spreadsheet with only one cell. Unlike
a spreadsheet, you determine how many
“columns” of data you need before you
store data in the file. The Create Field
button lets you give that first field a name.
Once your first field is named, a “+” sym-
bol lets you create and name more fields.
The “+” symbol to the left of the “row”
creates new records.