filemaker pro 11 the missing manual phần 4 pptx
Bạn đang xem bản rút gọn của tài liệu. Xem và tải ngay bản đầy đủ của tài liệu tại đây (1.88 MB, 91 trang )
249
:
Validation Options
6. In the text box below this checkbox, type The Zip Code you entered doesn’t
look correct. Are you sure that’s what you really want?
FileMaker displays this message if the validation fails. (For a little guidance on
what these messages should say, see the box on page 252.)
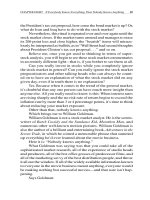
Figure 6-5:
The “Options for Field” dialog box’s
Validation tab lets you check for errors
before placing information into fields.
You can, for example, make sure only
numbers are entered, or that the first
name is no more than 30 characters.
You can apply as many validation
rules as you want, and FileMaker
checks each one whenever someone
modifies the field.
7. Click OK until you’re back on the Lease Agreement layout.
Switch to Browse mode (if necessary); it’s time to test. Try entering too many
characters into the Zip Code field, and you see your message when you exit the
field, as shown in Figure 6-6.
Note: It’s true that the validation settings you selected in the previous steps aren’t perfect. For example,
they don’t allow Zip+4 codes (46077-1039). At the same time, they would let you enter something like
123, which isn’t a valid Zip code at all. To handle the nuances of the simple Zip code, you need to use the
“Validate by calculation” option, which lets you set more specific validation standards by using the Specify
Calculation dialog box.
250
FM P : T M M
Validation Options
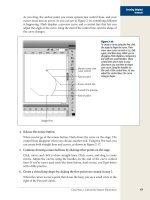
Figure 6-6:
If you enter a bogus Zip
code in your database
(background), you see
your custom message. Click
Yes to keep the invalid Zip
code. If you want to fix it,
click No and you’ll be back
in the field. If you click
Revert Field, the field value
changes back to what it
was before you started
editing.
Making Validation Stricter
Your Zip Code field validation options work pretty well, but there’s a pretty glaring
problem: anybody can enter just about anything they want, and then click Yes to
tell FileMaker to accept the invalid data. It may help prevent mistakes, but it doesn’t
ensure good information.
To make FileMaker more insistent, revisit the Options for Field dialog box’s Valida-
tion tab, and then turn off the “Allow user to override during data entry” checkbox
(it’s near the top of the window). Since this change removes the user’s “Yes” and
“No” choices when entering data, you also want to reword the custom message you
entered. Change it to something more informative, like Zip Codes can contain no
more than five characters, which have to be numeric. Please check your data entry and
try again.
251
:
Validation Options
With these settings in place, if someone enters a spurious Zip code, then he sees the
error message shown in Figure 6-7.
Figure 6-7:
When you turn off the “Allow user to override during data entry”
validation option, FileMaker won’t present a Yes to accept an
invalid value. So any custom message you provide should not be
phrased as a question. Instead, express the error as a statement
or suggestion.
FREQUENTLY ASKED QUESTION
Numbers and Text
You have to set an awful lot of validation options to make
sure people enter only Zip codes into a text field. Can’t I
just make the Zip Code field a number field instead?
No, you can’t. Zip codes are numeric characters, but they’re
not numbers, and that makes a big difference as far as
FileMaker is concerned. For example, number fields don’t
recognize leading zeros—like the ones at the beginning of
00501 and scores of other perfectly valid Zip codes. If you
enter 00501 in a number field, FileMaker thinks you meant
to type the number 501 and will treat it as the number 501
for almost all uses, including searches, sorts, and if saved
to an Excel spreadsheet. But “almost all uses” may not get
your mail to Holtsville, New York on time. FileMaker is kin-
da, sorta forgiving on this point, but when you absolutely,
positively have to rely on the Zip code entered in a field,
text type (with a numeric validation) is the way to go.
The Numeric Only validation option lets the field stay a text
field (which preserves all entered characters) but still ac-
cept only numerical digits on entry, which is exactly what
you want for a Zip code.
Some people also assume that a phone number should
be stored as a number field. Wrong again. Phone numbers
contain numerals and dashes, parentheses, and sometimes
other special characters—all mere text to FileMaker. As a
general rule, make a field a number field only if it’s express-
ing a mathematical value like height in inches, or the price
of a bag of potatoes.
Note: The Validation tab has two more options related to this one. Under “Validate data in this field” you
can choose “Always” or “Only during data entry”. Data entry has the same meaning here that it had for
auto-enter options. If you switch to the more strict “Always” setting, FileMaker enforces your validation
rules even when data is modified by a script (Chapter 11). The Always option also enforces validation
when you import data in bulk (page 837).
252
FM P : T M M
Validation Options
UP TO SPEED
Validation Messages
Custom validation messages (like the ones in Figures 6-6
and 6-7) give you a chance to communicate directly with
whoever uses your database. If you don’t provide a custom
message when you set up field validation, then FileMaker
uses a generic message of its own. This message explains
the validation option that’s being violated in language only
a software engineer would love. This message may be con-
fusing to whoever’s using your database. By writing your
own messages, you can explain things in a way that relates
to the exact type of information with which you’re dealing.
Custom messages make your database a pleasure to use,
and give it a professional quality.
Bear in mind, though, that although you can turn on as
many validation options as you want, you can provide only
one custom message per field. Unless you can depend
upon your database users to enter the correct format every
time, your message should explain exactly how to fill in the
field. A message that says, “Your widget description is inval-
id” gives your database users no indication of how to fix the
problem, and prevents them from getting their work done.
Validation Requirements
When you added validation to the Zip Code field (see page 248), you asked File-
Maker to accept only numbers and allow only five digits.
But data type and character count are just two of the eight kinds of validations File-
Maker has up its sleeve. In the Field Options window’s Validation tab, you have six
more checkboxes. Most of them work much the same way: They compare what you
type against some specific condition. But one option, “Validated by calculation”, of-
fers a completely flexible way to describe exactly what you’re looking for. Unfortu-
nately, to use it, you need to learn how to perform calculations (mathematical or
logical formulas) with your FileMaker data. They’re covered starting in Chapter 8.
Until then, here’s what the other options do:
Strict data type
This option lets you pick one of three specific validations. You’ve already seen “Nu-
meric only”, which insists every character in your text field be a number. “4-digit
Year Date” tells FileMaker to expect a date value, and that the year has to be four dig-
its long (2012 instead of 12). This choice works with text, date, and timestamp fields.
“Time of day” tells FileMaker that only time values that represent real clock times
are acceptable. Since time fields can hold any number of hours, minutes, and sec-
onds, you can enter something like 237:34:11 to mean “237 hours, 34 minutes, 11
seconds.” But if the field is supposed to be the time of your lunch meeting, that value
doesn’t make sense. This option prevents its entry. It applies to text and time fields
(timestamp fields always require a time of day).
253
:
Validation Options
Note: The “4-digit Year Date” and “Time of day” options also work on Number fields.
Not empty
If you insist on having something in a field, select the “Not empty” validation option.
This option makes FileMaker complain if you try to commit the record without
entering something. This option and “Validated by calculation” are the only options
that let you validate Container fields.
Unique
The “Unique value” option prevents you from putting the same value in a field for
two different records. It comes in handy for things like product codes, account
names, and course numbers.
Existing value
“Existing value” is just the opposite of “Unique value”; it doesn’t allow any value that
isn’t already in that field on some record in the database. Imagine you’ve been us-
ing a Book database for a while, and you’ve built up a representative list of Category
values. You can turn on the “Existing value” validation option for the Category field
to be sure any books you add in the future get one of the categories you’ve already
specified, so that typos are prevented.
This option doesn’t make sense until after you’ve put data in your database. Like all
the field options, you’re free to turn it on or off whenever you want.
Member of value list
You can attach value lists to fields to restrict data entry to the values in the list (page
116). But you can also make that list a validation requirement. You’d usually do that
if your users have found a way around using your value lists (like using a field on
another layout that doesn’t have a value list attached to it, for instance). That way,
even if the value list doesn’t appear on the field, you can set the validation message
options as a tighter control over data input.
When you select the “Member of value list” option, a pop-up menu becomes avail-
able, from which you can choose which value list to use as a validation. You can
choose an existing value list, or use the Manage Value Lists command in the pop-up
menu to create a new list.
In range
“In range” lets you specify a minimum and maximum allowable value. FileMaker then
protests if you enter a value outside this range. This method works for all the stan-
dard data types, since they all have a concept of order. For example, if you specify a
254
FM P : T M M
Storage Options
range of Adam to Johnson for a text field, validation fails for Schultz. Range valida-
tion is most common, however, with number, date, and time values. You can require
the Age field to be between 0 and 100, for example, or the Birth Date to be between
1/1/1900 and 12/31/2015.
Maximum number of characters
As previously mentioned, this option enforces a limit on the number of characters
you can enter into a field. FileMaker fields can normally hold a huge amount of text.
This option lets you keep things under control. You can use it to require specific
kinds of information, like the five-digit Zip code above, or to prevent abuse of the
database (for example, by limiting the First Name field to 30 characters so someone
doesn’t get carried away and paste the complete works of Shakespeare into it).
WORKAROUND WORKSHOP
Minimum Number of Characters
For some strange reason, FileMaker doesn’t provide a
simple validation option to enforce a minimum number of
characters in a field. If you need this sort of thing, then you
have to dip into validation calculations. Luckily, the calcula-
tion to do it is really simple. Here’s a validation calculation
for requiring at least five characters in the field:
Length(My Field) >= 5
To use this calculation, in the Validation tab, turn on the “Vali-
dated by calculation” option. In the window that appears,
type the calculation.
You have to change “My Field” to the name of your field. If
you want a number other than five, simply change it in the
calculation. When you’re done, click OK.
If you want more than five characters, change >= to >. If
you want exactly five characters (no more, no less) then
change >= to =. You don’t need a lot of expertise for this
calculation. If FileMaker gives you an error, and you can’t
figure it out, just click Cancel, and then try again. (See Part
4 for much more on using calculations.)
Storage Options
It’s time to get a little technical. Sorry. In the Field Options dialog box, the Storage
tab (see Figure 6-8) lets you control aspects of a field related to the nebulous concept
of storage. Like a highly organized attic, FileMaker both holds onto your informa-
tion and makes it easy to take out again. Lots of things determine how FileMaker
compartmentalizes and maintains that information.
You can actually tell FileMaker to store only one value in a field, no matter how
many records you have, or to allow one field to hold more than one value in each
record. Strange, but true. Also, you get control over indexing, as described in the
next section.
255
:
Storage Options
Figure 6-8:
The Storage tab is where various
behind-the-scenes field settings lurk.
Here, you can make a field Global so
it has only one value for the whole
table, or make it Repeating so it has
several values in each record. Many
of these options are most useful when
writing scripts (Chapter 10) or for very
advanced purposes.
Global Storage
“A field that uses global storage contains only one value that is shared across all
records.” So says the explanatory text in the dialog box, but what’s that in English?
When you use the “Use global storage” option, everything you learned about tables
goes out the window. A global field isn’t like a column in the table at all. Rather, it’s a
single bit of storage that can hold one value, no matter how many records you have.
In other words, if you change the contents of a global field on one record, then File-
Maker instantly changes it in every other record as well. Now every record has the
same value for that field. (You’ll learn a lot more about why you’d want to do this on
page 575.)
Repeating Fields
A field can hold only a single value, right? Well, not really. If you want to, you can
turn any field into a repeating field. These fields can hold more than one value, each
kept in a separate spot (and each shown in its own little box in Browse mode). In
the Storage tab section of the Field Options dialog box, you specify the maximum
number of repetitions the field can hold. When would you want to use repeating
fields? Almost never for normal data storage. See the box on page 256 for more info.
256
FM P : T M M
Storage Options
Note: The last tab in the Field Options dialog box applies only to Japanese text entry, and isn’t covered in
this book. Fortunately, should you ever need to add Furigana to your kanji, you can read how right in the
dialog box.
WORKAROUND WORKSHOP
Repeating Fields: No Substitute for Related Tables
With very few exceptions, repeating fields cause more trou-
ble than they’re worth. The truth is, they exist only because
years ago when FileMaker was a youngster, it wasn’t a re-
lational database. That means it didn’t have any way to tie
multiple tables together so that they could share informa-
tion and make connections between things in each table. In
a database that’s not relational (called a flat file database),
you have no good way to track lots of different kinds of
entities in one database, so in the bad old days FileMaker
came up with the concept of repeating fields to let you
store more than one kind of thing in a single record. For
example, you could have an Invoice table with one record
for each invoice. The line items on the invoice needed a
place to live too, so you created repeating fields. That way,
each individual invoice could hold, say, 20 invoice items.
But this is the 21st century, and FileMaker’s come a long
way. Nobody in her right mind would build an invoice da-
tabase that way anymore (she’d hook together two tables
instead—see page 143). Since FileMaker had repeating
fields 15 years ago, and since it’s really friendly about sup-
porting all your ancient databases, it still supports repeating
fields today.
That said, repeating fields are occasionally useful when
writing calculations (Chapter 8) and scripts or for some
very advanced uses like storing temporary data in arrays
or storing resource graphics for use elsewhere in your file.
Other than that, you should avoid them when storing most
data for a few reasons:
• Repeating fields are uniquely FileMaker. If you want
to take data out of your database and put it in some
other program (like a spreadsheet or another data-
base program), repeating fields can produce one se-
rious pain in the neck. Likewise for getting data from
other programs into repeating fields.
• Repeating fields are inherently limited: If you create
a field with 20 repetitions, then you get 20 spots for
data. If you need less, you’re saving space for empty
fields all the time. If you need more, you have to
modify your fields, and then make room on your
screen. A relational database, on the other hand, can
grow and shrink as needed without modifying the
database structure at all.
Indexing
Since you’re reading this book, you’re probably hoping FileMaker can help you
search through volumes of information faster than you could do it yourself, espe-
cially as your database grows from a simple electronic Rolodex to a humongous
mailing list. When you’re looking for the three people out of 5,000,000 whose birth-
day is February 29, FileMaker can find them in an instant because it doesn’t really
look at the birthday field on each record one by one. Instead, it uses the field’s index
to skip straight to the appropriate records. It’s similar to the way you’d use a book’s
index to go directly to the pages that mention the topic you’re interested in, rather
than skimming every single page in the book.
257
:
Storage Options
Note: FileMaker uses a field’s index in other ways, too. You need an index if you want to use the “Unique
value” option in the field Validation screen. You also need indexed fields to create relationships between
table occurrences in your database (page 143).
FileMaker’s indexing feature takes its own computerized notes about the data in
your fields in advance, so that when you enter Find mode, the hard work’s already
been done, and your finds go that much faster.
Just like a book, you can have a field without an index. When FileMaker needs to
find records based on what’s in that field, it has to check every single record—a pro-
cess that can take noticeably longer in big databases. But indexing has tradeoffs, as
explained in the box below.
FREQUENTLY ASKED QUESTION
The Dark Side of Indexing
If indexing makes searching faster, why not just index ev-
ery field?
Indexes have disadvantages as well. An index is useful only
if it’s up to date. When you change a field value, FileMaker
has to store that new value in the table. If the field is in-
dexed, FileMaker has to change the data you’ve typed, and
it also has to update the index so that it knows about the
changes to the field. Updating the index takes time (not
much time, mind you, but it does take time).
When you’re editing records in Browse mode, you never
notice because updating the index for a handful of fields
takes FileMaker less time than it takes you to realize
you’ve pressed Enter. But if you’re entering lots of infor-
mation (like when you’re importing records, as discussed
in Chapter 19), then the index updating can slow things
down noticeably.
Also, indexes take up space. A database file that has index-
ing turned on for every field could be much larger than
the same file without indexes. For most users, this isn’t an
issue, but if you have a very large file, and saving space is
a priority, you can turn off indexing where you don’t need
it, to save space.
Automatic indexing
The good news is you almost never need to think about indexing. FileMaker has a
really smart way of dealing automatically with indexing: Every field starts out with
no index at all, to save space and keep things as lean as possible. Later, while you’re
working with your database, if you do something that would be made faster with
an index, like use the field in a find request, then FileMaker automatically turns
indexing on for you. That first find is slow since FileMaker looks through records
one by one and builds the index (showing a progress bar in really big files), but once
the field is indexed, subsequent finds happen quickly. You almost always want this
automatic behavior.
258
FM P : T M M
Storage Options
Controlling indexing manually
In very large databases, there may come a time when you want to adjust indexing
manually. For instance, if you know you only very rarely search by a person’s middle
name, you can tell FileMaker not to index that field. Searches that include that field
are slow, but that’s OK since you hardly ever do it. On the Field Options Storage tab,
select None to turn indexing off for any field.
If you want to be able to search efficiently in a field, turn on All instead. The third
choice—Minimal—creates a smaller index for the field. This index has everything
FileMaker needs for relationships and field uniqueness, but not enough for fast
searching. If you don’t need to search in a field, but you do need it indexed for other
reasons, choose Minimal.
When None is selected, you can keep FileMaker’s automatically-turn-it-on-when-I-
need-it behavior by turning on “Automatically create indexes as needed”.
Note: FileMaker uses the field index when you do a find from Find mode, but not when you use the
Find/Replace command. The index points FileMaker to records, and since Find/Replace doesn’t find re-
cords (it finds text inside a record or records), the index does it no good. Therefore, when you do a Find/
Replace, you don’t make FileMaker automatically index a field. Several actions trigger indexing, including
using the field in a find request or value list, turning on Unique or Existing validation, and using the field in
a relationship (page 143).
POWER USERS’ CLINIC
Put Automatic Indexing to Use
FileMaker’s ability to automatically index a field when it
becomes necessary doesn’t just save you the trouble of
thinking about all this stuff. You can also use it to your
advantage in some situations. Sometimes people need to
distribute databases full of information.
For example, suppose you have a large parts catalog that’s
stored in a database, and you want your distributors to be
able to use the database themselves to find parts. You can
make a FileMaker database available on your website for
them to download, complete with your 10,000 parts records.
If there’s a lot of information about parts, then that data-
base is pretty big. To make the download more palatable,
tell FileMaker not to index any of the fields. But leave “Au-
tomatically create indexes as needed” turned on. This way,
the database is as small as possible when people down-
load it. However, once they get it, they can start performing
finds, and FileMaker automatically indexes fields, making
searches faster, and ballooning the size of the database.
Indexing language
To keep its indexes as small and tidy as possible, FileMaker doesn’t actually store all
a field’s text in the index. Instead, it performs a little cleanup on the field values first.
Most notably, it gets rid of the notion of uppercase and lowercase letters: “Peter” and
“peter” become the same entry in the index.
259
:
Storage Options
The index also splits the field value up into individual words and removes any char-
acters that aren’t generally part of a normal word. In order to do that, it needs to
know what language the text in the field is in. If your computer’s regional settings
are for English, then FileMaker’s field indexes use English, too. Usually, that’s exactly
what you want. But in some cases, FileMaker’s following the same language rules
as your computer can cause a problem. For example, if you enter another language
in a field without changing the index, then your searches can give you unexpected
results. If you search in an English-indexed field for lang (German for “long”), then
you get both “lang” and “länger” (“longer”), but if you set the index to German, you
only get “lang”. (In German, “ä” is a different character from “a”.)
You can select an automatic language for an index using the pop-up menu on the
Storage tab of the Options dialog box. A field’s language setting also comes into
play when you sort records. To use the example given above, when you’re sorting in
ascending order (from A–Z), “länger” comes before “lang” in a field indexed as Ger-
man (in accordance with rules for German alphabetizing), but after it if the field’s
index is set to English.
Note: If the Language pop-up menu is unavailable, the field is probably not a text field. You can specify
the language only for text fields.
POWER USERS’ CLINIC
Unicode Indexing
One language option, called Unicode, isn’t a language at
all. This setting tells FileMaker to forget everything it knows
about languages, and use the internal code numbers for
each character as is. When indexing with this language op-
tion, FileMaker doesn’t remove any special characters from
the index, and it doesn’t ignore uppercase and lowercase
letters.
A find in such a field is case-sensitive. When sorting, File-
Maker also uses the character code numbers. Whichever
code is lower comes first in the sort order, so capital “Z”
comes before lowercase “a.”
You rarely want your searches and sorts to be case-sensitive,
but if you do, you have the option. You’re more likely to
use Unicode indexing when you want to easily search for
punctuation. For example, a field that holds text from a
business-to-business Electronic Data Interchange (EDI)
document can be well served by Unicode indexing so you
can easily find the records that contain “~BIG.”
The Web is full of details about Unicode characters. Do a
web search for “Unicode table” if you want to find the code
for a particular character.
Seeing the index
When a field is indexed, you can get a glimpse of what’s in it, and even put it to use.
Just click in an indexed field in Browse mode, and then choose Insert➝From Index.
You see the window in Figure 6-9.
260
FM P : T M M
Storage Options
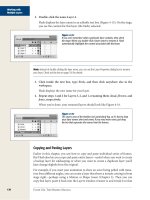
Figure 6-9:
Left: If you have indexing turned on
for a field, you can click into the field,
and then choose Insert➝From Index.
FileMaker shows this window. Here
you see one line in the list for each
unique value in the field. The list
shows the Minimal index, also called
the “Value index.”
Right: If the index’s storage options
are set to “Automatically create
indexes as needed,” you can select
the “Show individual words” option,
and the list shows the word index
instead—you see one line for each
unique word or number in the field.
When you show individual words,
you also switch the setting in the
field’s storage options, even if you
click Cancel after making the selec-
tion. But selecting “Re-sort values
based on”a different language
doesn’t change the field’s automatic
language. It’s just a way to temporarily
re-sort the index.
This window is handy when you want to quickly enter something you know you’ve
entered in a previous record. Just select the entry you want, and then click Paste to
have the value inserted into the current field. This trick works in Find mode, too,
where it lets you quickly see a list of things for which you may want to search. See
the box on the next page to learn how to use the index to clean up inconsistent data
entry.
Printing Field Definitions
Now that you’ve learned how to add auto-enter and validation options to your fields,
you may want to have a list to keep track of what you’ve done. The Field Options
window is the best reference for the current set of options you’ve applied to fields,
but if something goes wrong with a calculation or auto-enter option, it helps to have
a printed snapshot of your original settings so, you can see if anything’s changed.
Even better, you can use the printout as a map for putting things right. Or you can
print a field list to send to an associate so she can send you a file with the right bits
of data to be imported into your database.
To print a list of a table’s fields and their options, choose File➝Manage➝Database,
and then click Print. The printout looks like the field list, except that it’s expanded to
make room for everything about a field.
261
:
Beyond Text:
Container Fields
POWER USER’S CLINIC
Using the Index as a Housekeeping Tool
The View Index window is useful when you want to quickly
paste data that’s already in another record, but it has an-
other power-user trick up its sleeve—helping you search
out and clean up oddball values. For example, you might
need to clean up the data in a Street Address field because
users have entered their own unique versions of street
abbreviations: St, ST, Str, Stt, Bld, Boul, and other creative
variations. Here’s how to do the cleanup :
1. In Find mode, use View Index to paste in a specific
value (Stt, for example), and then perform the Find all
the records with that value. You’ll end up with a found
set of just those records with the bad abbreviation.
2. Make sure you’re still clicked into the Street Address
field, and then choose Records➝Replace Field Con-
tents. The Specify Calculation window appears.
3. Choose the “Replace with calculated result option” to
show the Specify Calculation window. In the calcula-
tion box, type Substitute ( Street Address ; “Stt” ;
“St” ). This formula tells FileMaker to look inside the
Street Address field and find all instances of “Stt” and
then replace them with “St” instead. See page 396 for
details on how this calculation works.
4. Click the OK button to close the Specify Calculation
window, and then click Replace to perform the re-
place. The found set is clean.
5. View the field’s index. The stray entry “Stt” is gone
from the index.
Lather, Rinse, Repeat for each bad abbreviation.
Note: You have to select at least one field for the Print button to become clickable. Then, when you click
Print, you’ll get details for any field that’s highlighted. To select and print just a few, Ctrl+click (�-click)
each field you want to print, and then click Print. If you want a printout of all the fields in the table, first
select one field, and then choose Edit➝Select All. Now every field is selected, and the Print button prints
them all.
Beyond Text: Container Fields
Text and numbers are the backbone of most databases, but as you saw when you
placed a PDF of a lease agreement right in the record with its data (page 95) you
can also store graphics and other multimedia files in your database. For example,
you can store a photograph of each employee along with the personnel record, or
add product shots to your inventory database. In either case, you use the graphics
much like data. You could print picture badges or product catalogs using your new
container fields.
Unlike all the other field types, container fields don’t expect (and won’t accept) typed
text. Instead, you use the Insert command to insert just about any file you want,
including pictures, sounds, animation, music, and movies. You can even put any
file from your hard drive into a container field, like a PDF file or a Word document.
262
FM P : T M M
Beyond Text:
Container Fields
Note: The Fields database you downloaded at the beginning of this chapter has a container field on the
Container Field tab that you can use to follow this section.
The Insert menu shows four commands for placing items into a container field: Pic-
ture, QuickTime, Sound, and File. Once you select a Picture, QuickTime or File,
and then choose a file to insert, you can also choose whether to store the file inside
FileMaker, or just store a reference to the file. In the next sections, you’ll learn how
you can use these commands to get what you need.
Note: This section is about using container fields. See page 95 to learn how to create them.
Pictures
A picture can be in any of more than a dozen formats, including the common kinds
like JPEG, GIF, PNG, TIFF, PICT, and BMP. FileMaker will also accept Photoshop
and PostScript (.eps) files. When you put a picture in a container field using the
Insert➝Picture command, the field displays the picture itself. But if you use the
Insert➝File command, you’ll just see a file icon and the file name.
Copy and paste
The most obvious way to put a picture into a container field is to paste it in. You
can copy a picture from a graphics program, click once in the field, and then choose
Edit➝Paste (Ctrl+V or �-V). If the picture doesn’t show up on both Mac and PC
platforms, delete the graphic (click in the field, and then press Delete). Check the
graphic’s format for cross-platform compatibility, and then choose Insert➝Picture
instead of pasting.
You can also copy data from the container field back into another program. Again,
simply click once on the field, and then choose Edit➝Copy (Ctrl+C or �-C) or
Edit➝Cut (Ctrl+X or �-X). Whatever was in the field is now ready to paste into
another field, record, or program.
Tip: Although you can’t type text into a container field, you can paste it in a pinch. You can’t edit the text
once it’s in the field, but you can copy it again or export it (page 96). Once the text is back in a text field or
a word processor, you can edit the text again.
Insert➝Picture
Copy and paste is simple, but sometimes doesn’t work cross platform, plus it doesn’t
let you store only a reference to the file. To get more control, use the Insert➝Picture
command. Here’s how:
263
:
Beyond Text:
Container Fields
1. Click in the Graphic field.
It’s on the Container Field tab in the sample database. You’ve now entered the
record, and the Graphic field is active.
2. Choose Insert➝Picture.
The Insert Picture dialog box appears. This window looks almost exactly like a
typical Open File dialog box in Windows or Mac OS X. You can use it to find
the picture you want to insert.
3. Select a picture or other graphic from your computer, and then select the
“Store only a reference to the file” option.
Instead of storing the file in the container field, which can make your file sizes
balloon, the path to the graphic is stored. The picture will still show in the con-
tainer field, however. See the box on page 265 for information that’ll help you.
4. Click Open.
FileMaker grabs the file path and shows the picture you choose in the Graphic
field (Figure 6-10).
Even though you’ve only stored a reference to the file, you can still see the graphic
displayed in the container field. But it’s important to remember that the real contents
of the field is a text version of the path you showed FileMaker when you selected the
file. So if the file is edited, your container field will display the changes in the picture.
But if the file gets moved or renamed, you won’t be able to see the picture unless you
insert it again, from the new location or with the new name. Or you could restore the
file to its original name or location.
That’s why it’s important to create a set of business rules for storing graphics. That
is, if you’re planning to store references to a lot of graphics or other files in your
database, you need a predictable folder structure, preferably on a shared volume or
a file server. When you’re ready to place a graphic, you upload it to the server first,
and then you insert it, making sure to store a reference (and not the file itself). That
way, the file is visible to everyone (as long as they have access to the server), and the
file isn’t likely to be moved.
Note: If you need to insert lots of pictures into a database, you can save yourself a lot of trouble by using
the File➝Import Records➝Folder command. See page 838 for the full explanation.
QuickTime
FileMaker uses QuickTime to help it deal with multimedia files, so you can insert
any file type that QuickTime supports. Because QuickTime is frequently upgraded,
the exact list of formats FileMaker supports also changes. If you’re having trouble,
check Apple’s website for the list that matches your version of QuickTime.
264
FM P : T M M
Beyond Text:
Container Fields
Figure 6-10:
A container field can hold any
file, but what you see on the
layout depends on what you
place in the field. If you insert
a picture into a container field,
FileMaker shows you the picture.
If you insert a sound file, File-
Maker shows a special speaker
icon that plays the sound when
clicked. Music and QuickTime
files give you the typical play,
pause, fast-forward, and rewind
controls, just like movies on the
Web. For other kinds of files,
FileMaker just shows you the
file’s icon.
When a container field holds a QuickTime file, you normally see the movie’s poster
frame, which is usually just the first frame of the movie. When you click the movie, a
standard movie controller appears, so you can play, pause, fast-forward, and rewind
it. The controller also has a button to adjust the volume and a little knob that shows
you where you are in the movie.
Use the Insert➝QuickTime menu command to select a QuickTime file from the
hard drive. If the command isn’t available, check to make sure you have QuickTime
installed on your computer.
265
:
Beyond Text:
Container Fields
Note: Unlike pictures and files, FileMaker never stores QuickTime movies in the database. Instead, the
program remembers where the original file is on your hard drive, and loads the data from it as needed. As
with other files that are stored as references, if you move or delete the original file, you’ll see a message
in your container field telling you FileMaker can no longer find the file. And as with other lost files, you’ll
need to show FileMaker where the file has been moved with another Insert command.
POWER USERS’ CLINIC
To Store or Not to Store
When you insert a picture or file (see page 262), the dia-
log box includes an option to “Store only a reference to
the file.” When this option is turned off, FileMaker copies
the actual file into your database. You can move or delete
the original file and the data will still appear in the field,
because the database now contains all the inserted file’s
information. If you turn on “Store only a reference to the
file,” FileMaker doesn’t copy the file into the field at all.
Instead, it just remembers data about the file you select,
including its name and the path to the file. Each time you
look at this record, FileMaker finds the original file so it can
display the data. In this respect, it works like a shortcut or
alias. If the file gets moved, deleted, or renamed FileMaker
can’t display the file, and you’ll see a short message inside
the field that tells you the file can’t be displayed.
There’s no simple rule for when you should store the actual
file, and when you should store a reference instead. Some
people store files because it’s easier. This is especially true
when multiple people are using the database from differ-
ent computers. However, here are a couple of reasons you
might want to store a reference instead:
• Storing many larger files can make your database get
big—really big—which can cause a number of prob-
lems. Performance can suffer, it takes longer to back
up, and moving a huge database file from one place
to another is a real pain. If you’re trying to email the
database to your home office, your ISP may not allow
a 3 GB attachment, for example. If the inserted files
aren’t critical to the record data, it may make sense
to leave them out of the database so it’s easier to
work with.
• Sometimes you want to catalog files inside FileMaker
even though they might change over time. For ex-
ample, if you wanted to put promotional images into
a database so they’re easy to locate, you probably
don’t want to make editing those images difficult. If
you store a reference to these images, you can still
edit the originals any time. As long as you haven’t
changed their name or location, when you look in
FileMaker, you’ll see the latest edits.
Sound
FileMaker considers a sound a recorded bit of audio. You can copy/paste recorded
sounds right into the container field. Use sound files to keep audio notes with a proj-
ect record, or record your practice speeches and save them for when you’re famous.
When a container field holds a sound, it displays a little speaker icon; double-click it
to hear the recorded sound.
266
FM P : T M M
Beyond Text:
Container Fields
Recording sound
The Insert➝Sound command doesn’t bring up the same dialog box as the other In-
sert commands. Instead, it shows the Record (Mac) or Sound Record (Windows)
dialog box (Figure 6-11). If your computer has a microphone, you can record any
sound directly into the field.
Figure 6-11:
Click in a container field, and then choose Insert➝Sound (or double-click an
empty container field) to record audio. Click the Record button to start, and
then click the stop or pause buttons as needed. Use the Play button to check
your recording. Most computers let you record any sound your computer
can play.
The Record dialog box is simple, but capable. The speaker icon provides feedback
about what the microphone is picking up, by showing little sound waves. The more
sound waves you see, the louder the recording. In fact, the speaker icon lets you
check for sound waves even when you’re not recording, so use it to do a quick sound
check (“Testing, testing, 1, 2, 3”) before you start recording.
Note: The Insert➝Sound command records sound directly into the field. If you already have a sound
file (an MP3, for example), choose Insert➝QuickTime instead. In general, if the data you’re putting in the
field has a time component (meaning it happens over time, like video or sound), treat it like a QuickTime
file.
Here’s how the buttons work:
• The Record button (a circle) starts the recording session. Click it when every-
thing is set up: the audio you want to record has begun to play, or you’ve cleared
your throat, reviewed your notes and are ready to speak.
• The Stop button (a square) stops whatever you’re doing. If you’re recording,
the session stops immediately, and you can’t add to it. If you’re playing back
recorded audio, clicking the Stop button stops the playback. The playback will
start again at the beginning the next time you click Play.
• The Pause button (double lines) pauses either a recording or a playback session.
Click it a second time to resume either operation.
• The Play button (right-pointing triangle) plays whatever you’ve recorded.
• Click Cancel to close the Sound record window.
• Click Save (Mac) or OK (Windows) to save your recording. Once you click OK
(Save), you’ll see the sound icon in the container field, and you can double-click
the field to play the audio.
267
:
Beyond Text:
Container Fields
Tip: If the record dialog box won’t appear, make sure you have an audio input device that works with
your computer, that your computer has a sound card, and that the audio device is setup properly. For
setup, use the Hardware and Sound Control Panel (Windows Vista) or Audio Devices Control Panel (Win-
dows XP) or the Sound System Preference Pane (Mac).
File
A container field can also hold a file. Since FileMaker doesn’t know what the file
is supposed to be, it simply shows you the file’s name and icon. Unfortunately, you
can’t do anything with a file like this while it’s in FileMaker. You can’t edit it. You
can’t even open it and view its contents while it’s in FileMaker. Rather, the container
field simply holds the file for you. This might sound limiting, but because you can
also export the contents of any field, including container fields, FileMaker databases
make good document tracking or retrieval systems.
The most common way to place a file into a container field is to use the Insert➝File
command. In Windows, you can also copy a file from your hard drive, and then
paste it into a container field. When you insert a file, FileMaker makes no effort to
figure out what’s in the file. Even if you choose a picture, you’ll still get just the name
and icon. If you want to see the picture itself in FileMaker, choose Insert➝Picture,
as described on page 262.
UP TO SPEED
PDFs in Mac OS X
The ability to store pictures, movies, sounds, and files in
your database can be useful for lots of reasons. For ex-
ample, if you’re a recruiter, you could store resumes in Mi-
crosoft Word or PDF format right in the database alongside
the info about a particular candidate. In fact, the Adobe
PDF format is so common that people often need to keep
track of PDF files—the brochure, flyer, or documentation
for each of your products, the prospectus for each of your
investments, or a floor plan for each of your properties.
You already know you can use the Insert➝File command
to store the PDF document right in a container field (and
get it back out again later to look at it). But if you’re on Mac
OS X, you can do one better. Choose Insert➝Picture, and
then select a PDF file. FileMaker shows you the PDF (the
first page of it, anyway) right in the container field. If your
document has more than one page, you need to export
the PDF out of the container field (see below) to read the
whole thing.
Or, try this unexpected twist: You can read multipage PDFs
right in FileMaker if you use Insert➝QuickTime instead.
This time, when you click the container field itself, the
standard QuickTime movie controls appear. Using these
controls, you can flip through the pages in the PDF: Fast
Forward goes to the next page, Rewind goes to the previous
page. If you press Play, FileMaker flips through the pages
one after the other until it reaches the end of the document.
If you need to search text within a PDF file, try this. Open
the PDF file, select all the text, copy it, and then paste it into
a regular text field. Now, FileMaker can search the contents
of the document in the text field, while you view the PDF in
all it’s glory from the container field.
268
FM P : T M M
Beyond Text:
Container Fields
Exporting data from container fields
Inserting files into container fields is all well and good, but it’s just as important to
get them back out again. To use the file in another program, click in the container
field, and then choose Edit➝Export Field Contents. FileMaker asks you where you
want to put the file, and what to name it. Click Save, and FileMaker creates a new
file that’s an exact copy of the one you put in the container field. For a refresher on
exporting, see the box on page 96.
Note: If you used the Insert➝File command and turned on the “Store only a reference to the file” option
(see the box on page 265) when you put the file into a container field, you don’t need to get it back out
again (after all, the file is on your hard drive somewhere). Instead, double-click the container field to open
the original file in the appropriate program.
269
Layout Tools
I
n Chapter 3, you learned how easy it is to lay out a database using FileMaker’s
tools. You can start out with one of the program’s Starter Solutions, and then
customize it by moving your fields around, adding text, lines, and other fancy
stuff. In this chapter, you’ll delve deeper into the individual parts that make up a
FileMaker layout.
By putting these parts together, you can build your own layout from the ground up.
It takes longer—in some cases, a lot longer—than using a Starter Solution, but you
get to pick your own fonts, colors, fields, and overall arrangement unencumbered by
anyone else’s work. In this chapter, you’ll learn how to assemble layout parts; create
field controls, like drop-down menus and date pickers; make your own buttons; and
format fields exactly the way you want them.
Layout Parts
A layout is made up of one or more parts, each of which define how and where your
data gets displayed. The Body part controls how much space to devote to each re-
cord. In Form view the Body part is usually fairly tall, so it can display fields from the
same record from top to bottom. But in a list the Body will be quite short, because it
generally only displays one row of fields per record. So while switching from Form to
List view can help you see data in a slightly different form, it makes sense to create a
list-specific layout with a very short Body part so you can see more records onscreen
at a time that you could see using a layout with a large Body.
Also, layout objects can behave differently when they’re placed in different parts. For
example, items in a Title Header only appear at the top of the first page of a printed
270
FM P : T M M
Layout Parts
report, but items in a Header appear at the top of every page in that report. Here’s
the rundown of part types:
• Title Header. Put objects in the Title Header that should appear only at the top
of the first page of a printed report. It only appears in Preview mode and print.
Some common Title Header objects are the report’s title, a company logo, large
column headings, and general information about the report itself. If you make a
Title Header the height of a full page, it can act like a cover page for your report.
• Header. Objects in a Header will appear at the top of every page in a report,
unless there’s a Title Header. In that case, Header objects appear from page 2
onward. When you’re in Browse mode, objects in the Header appear at the top
of your screen. Layout titles, column headings, and navigation buttons are gen-
erally well suited to Header parts.
• Leading Grand Summary. This part appears below the Header and above the
Body onscreen and in print. You’ll usually place special fields, called Summary
fields (page 240) in a Grand Summary part.
• Body. The Body shows data from each record. In Form view, the body appears
only once. In List or Table view, the Body repeats once for each record. Many
layouts, especially those meant to be viewed onscreen, will contain only a Body
part.
• Sub-Summary. Sub-summary parts work like Grand Summary parts, but they
summarize subsets of your data. For example, a sales report showing world-
wide totals in a Grand Summary, can also show a breakdown of totals by indi-
vidual country. Unlike the other parts, a single layout can contain more than
one Sub-summary. See page 601 for more info.
• Trailing Grand Summary. Just like a Leading Grand Summary, except it ap-
pears below the records it’s summarizing.
• Footer. A Footer is like a Header, but it appears at the bottom of every screen
or printed page, unless you use a Title Footer. Place page numbers, copyright
notices, small report titles, and anything else you want to appear at the bottom
of your screen or page.
• Title Footer. The Title Footer appears at the bottom of the first page when
printed or viewed in Preview mode.
Parts in Form View
When in Browse mode, and viewing the layout as a form, you see every part (sub-
summary parts are a special exception, as you’ll learn in Chapter 14). You never use
all these parts on a layout you plan on viewing in Form view. In general, if you only
ever want to view a layout as a form in Browse mode, then you really need only a
Body part, although if you plan to print, then you may want a Header part as well so
logos, menus, and other user interface items don’t repeat for every record you print.
271
:
Layout Parts
Parts in List View
List view is a list because it shows several records at once. FileMaker accomplishes
this magic by repeating the Body part once for each record. The layout may have
several other parts, too, which appear in the same order they appear in Layout mode.
(Title Headers and Title Footers don’t appear in Browse mode.)
Parts in Preview Mode
A quick glance at Preview mode might lead you to believe that it shows only the Title
Header and the Title Footer (exactly the opposite of List view), but that’s not entirely
true. Turn your eyes to Figure 7-1 for the whole story.
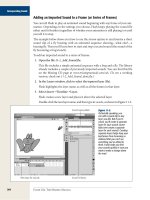
Figure 7-1:
Left: In Preview mode,
the Title Header and
Title Footer are at the
top and bottom of the
first page. The Lead-
ing Grand Summary
appears right before
the first record, and
FileMaker adds a copy
of the body for every
record until it fills up
the page.
Right: Every page
thereafter shows the
Header and Footer
instead of the Title
Header and Title Footer.
If you don’t have a Title
Header, then you get
the regular Header on
the first page, too (and
the same goes for the
Title Footer). Also notice
that the Trailing Grand
Summary appears after
the last record.
Just like List view, the Grand Summary parts place themselves before the first record
and after the last record. Finally, scrolling in Preview mode just scrolls the current
page. If you need to see other pages of your report while you’re in Preview mode, use
the book icon to move around.
272
FM P : T M M
Layout Parts
POWER USERS’ CLINIC
Getting Table View to Mind Its Manners
Table view is a real boon if you want a quick and easy
way to make your data look like a spreadsheet. With one
command, your layout displays data in rows and columns,
which you can rearrange and sort. But if you dig a little
deeper, then you find that you have a lot of control over
how Table view works. These controls lurk under the Lay-
out Setup command. When you click the Views tab, you
see that the Table View option has a button that leads you
one dialog box deeper—into Table View Properties.
• With the Grid controls, you can show or hide Table
view’s horizontal and vertical gridlines. Try switching
off the vertical gridlines to make rows more promi-
nent. This way, you can more easily read across the
data pertaining to a single record.
• The Grid Style option comes with two familiar pop-up
menus. You can choose a new color for the grids with
the Color pop-up menu or apply a pattern to them
from the Pattern pop-up menu. A sample swatch
shows you the choices you’ve made.
• Under Header and Parts, you control the header,
footer, and column headers. Headers and footers
anchor to the top or bottom of the screen while the
records scroll through long lists. Column headers are
the field names at the top of each column.
• Headers and footers are normally suppressed when a
layout’s in Table view. Choose “Include header part”
or “Include footer part” to display those parts of the
layout. (For obvious reasons, these options have no
effect on a layout in which you don’t have those par-
ticular parts.)
• Since the column headers tell you what information
you’re looking at, you don’t often find a reason to
turn off their display. But you can do it if you want to,
by unchecking “Include column headers”.
• More often, you may want to turn off some of the
column headers’ other features. Stop users from re-
sizing columns by unchecking “Resizable columns”.
Turn off “Reorderable columns” to keep folks from
rearranging their order on the table. That way, no-
body can move the First Name field so far away from
the Last Name field that the data loses its meaning.
Nobody can sort records if you uncheck “Sort data
when selecting column”.
• Choose “Use custom height” to set rows to a specific
height.
Part Setup Dialog Box
When you choose Layout➝Part Setup, FileMaker shows you the Part Setup dialog
box (see Figure 7-2). This often-ignored box isn’t just a slower way to get to the Part
Definition window, though. From this one screen, you can create new parts, and
edit, delete, and rearrange existing parts. But, as you’ll see on the next page, you can
do most of this work more easily without this window, so you won’t use it very often.
To add a new part, click Create. You’re presented with the Part Definition dialog
box, where you can decide what kind of part to create and set various options. You
can do the same thing by dragging the Part tool from the Status toolbar or choosing
Insert➝Part.
273
:
Layout Parts
Figure 7-2:
The Part Setup dialog box is a catchall for the
options pertinent to layout parts. You’ll find it
especially useful for rearranging parts of your
layout.
To see the part definition for an existing part, select it in the Part Setup dialog box,
and then click Change. This maneuver too has a shortcut: in Layout mode, just double-
click any part tag.
To delete a part, select it, and then click Delete. If the part contains any objects on
the layout, then FileMaker asks you if you’re sure, because when you delete a part,
you delete everything on it as well. You’ve already deleted parts without using this
window, though, by selecting the part, and then choosing Edit➝Clear. But if you
hate menus, then you can also just press Delete.
You can also rearrange parts using the same technique you use to order fields in the
Manage Database window. Just drag the arrow icon next to a part name. But some
parts (most parts, in fact) have a padlock symbol instead of an arrow icon. This sym-
bol tells you the part is locked in place and you can’t move it. The reason is simple:
It doesn’t make sense to move most parts. For example, the header is always below
the Title Header, and above everything else. You really only need to rearrange parts
when creating Sub-summary reports, which Chapter 14 covers.
When to Use Each Type
While it’s perfectly legal to put any parts on any layout, you’ve probably figured out
that some arrangements are more common than others:
• Detail layouts usually have just a Body part, or some combination of header,
body, and footer. These layouts may show only a single record, so there isn’t
much point to Summary parts since you have no list of data to summarize.
• List layouts usually have a header and a body, and sometimes a footer. Occa-
sionally, you want a Trailing Grand Summary on your List layout as well, since it
can show summary information after all the records without taking up precious
space like a footer.