filemaker pro 11 the missing manual phần 6 ppsx
Bạn đang xem bản rút gọn của tài liệu. Xem và tải ngay bản đầy đủ của tài liệu tại đây (1.24 MB, 91 trang )
431
:
Running Scripts
• When you exit a field that has Field Validation options.
• When you press a key on the keyboard while in a field, or while a button or tab
is selected.
• When you change the contents of a field in any way.
• When you switch from one tab panel to another.
• When you leave a field or tab away from a button or tab panel.
• When you leave a field after you’ve made changes to it (in other words, when
FileMaker has to save changes to the field).
You’ll learn how to use script triggers and more about how they behave at the end
of this chapter.
Performing Scripts When a File Is Opened and Closed
You can configure a script to run each time the database is opened or closed. (These
opening and closing scripts are a lot like script triggers, but FileMaker doesn’t call
them that.) The opening script runs when you first open the file. You can use this
script if you want to be greeted with the list of unpaid invoices first thing every
morning. The closing script runs when you close the last window for an open file.
This option is a little less common, but it has its uses: If you want to make sure other
related files close whenever the main file closes (even if they have open windows),
then you can write a script to close them all whenever you close the main file.
UP TO SPEED
A Script Action or a Script?
Attaching a single script action to a button is so easy that it’s
tempting to use that technique often (page 318). But even
if your buttons do only one thing, you’ll still save time in
the long run if you create a single-line script, and attach that
to your button instead. Yes, it’s a little more work upfront,
but scripts have a lot more flexibility over the long haul.
Here’s why.
Lots of the initial development work in a database has to
do with helping the users get around. So, many of the first
buttons you create just go to a layout, or to a set of related
records. But what if your business rules change—like from
now on, only managers can see a customer’s payment
history? You have to figure out how to stop unauthorized
folks from seeing payment data. With an If statement (page
436) that checks Get (PrivilegeSetName), a script can see
who’s logged in to the file before it allows the “Go to Lay-
out” to run. So you have to write the script, and then find
all the 14 places you created a button with a plain-vanilla
“Go to Layout” script action. If you’d written a “Go to Lay-
out” script, and attached that to your 14 buttons, you could
handle this new wrinkle just by editing the script. No time
spent finding all your “Go to Layout” buttons, or worrying
about what happens if you missed one, because the script
handles it all.
432
FM P : T M M
Running Scripts
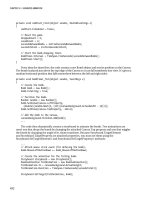
To make the selection, you need to visit the File Options window (File➝File Options). In
the File Options window, make sure the Open/Close tab is selected. In this window, you
first turn on one of the “Perform script” checkboxes (there’s one under “When opening
this file” and another under “When closing this file”). Then you can select one of your
scripts from the associated pop-up menu. Figure 10-12 shows the result.
Figure 10-12:
The Open/Close tab of the File Options window
(File➝File Options) lets you tell FileMaker what to
do when someone opens or closes a file. Most of
this window is devoted to the things that happen
when a file opens. Only the last checkbox (under
“When closing this file”) has to do with which
script should run when the file closes.
Timer Scripts
Finally, using the Install OnTimer Script script step, you can tell FileMaker to run
a particular script periodically. For instance, you might set up a special computer
that runs a script every 10 minutes to grab order information from your website. Or
perhaps when someone switches to a sensitive layout, you want a timer to automati-
cally switch to some place more innocuous after 5 minutes, in case he walks away
from the computer.
Timer scripts are notoriously tricky, so be prepared to experiment and test thor-
oughly. Timer scripts are definitely not for the faint of heart. The process of setting
one up, however, is simple. Just write a script that uses the “Install OnTimer Script”
script step. When you configure this step, you specify a script, and then provide an
interval, which is how often the script runs. You express the interval as a number of
seconds using a calculation.
433
:
Organizing Your
Scripts
Organizing Your Scripts
Most mature databases end up with dozens, or even hundreds, of scripts that make
life a lot easier for the folks who use it. But developers don’t usually have the luxury
of creating scripts in an order that makes sense for display in the Manage Scripts
window. That’s why FileMaker gives you a suite of tools you can use to organize your
scripts.
Creating Script Folders
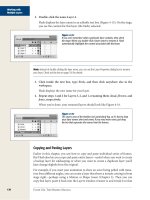
In Figure 10-13, you can see the Manage Scripts window from a database with a lot
of scripts. The window looks a little like a window on your operating system, where
documents are organized in folders. FileMaker lets you create folders for organizing
your scripts that same way. Not only can you give a new folder a descriptive name,
but also, like folders on your desktop, you can collapse them, so you don’t have to
scan a lengthy list of scripts to find those under Reports.
Figure 10-13:
When your database has lots of scripts, like this
one, organization becomes critical. Here, the scripts
are arranged in a logical order, and grouped into
folders, as described in the steps starting on the next
page. Some folders are open, and others are closed.
Most scripts aren’t set to show in the Scripts menu
because this solution has buttons for users to run
the scripts they need.
Script folders make the Manage Scripts window nice and tidy, but they also organize
the Scripts menu. Any scripts inside a folder appear in a hierarchical (or pop-out)
menu when you click the Scripts menu.
434
FM P : T M M
Organizing Your
Scripts
To see how all this works, you need to create a few extra scripts in your sample file.
But they don’t have to be real, working scripts. Just select your Find Unpaid Invoices
script, and then, in the Manage Scripts window, click the Duplicate button a few
times.
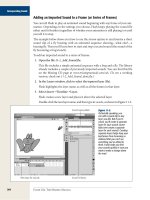
1. In the Manage Scripts window, select the top script in your list, and then, at
the right edge of the New button, press the little arrow that’s beside the New
button (see Figure 10-14).
The New item pop-up menu appears.
Figure 10-14:
In the Manage Scripts window, the New button
makes a new script. But if you click the little
arrow, then you get a pop-up menu of additional
choices. You can make a new folder instead, or
add a separator to the script list.
New
Script
Tiny
triangle
2. Choose New Folder.
The Edit Folder dialog box appears.
3. In the Folder Name box, type Reports.
Just like everything else in FileMaker, a descriptive name helps you figure out
what’s what. “Reports” is a little arbitrary, since this exercise is theoretical, but
it’s still a good habit to use descriptive names.
4. Click OK.
The Reports folder appears as the second item in your list. A new group always
appears just below any selected item in the list. If you forget to select a script
and the new folder lands all the way at the bottom of the list, you can move it
into place by dragging the double-headed arrow to the left of the folder’s name.
5. Drag the double arrow to the left of a script to move it into the Reports folder.
The motion can be a little twitchy until you get used to it. Drag straight up or
down to move a script to a new position in the list. But drag toward the right to
move a script into a group. If the new folder is directly above the scripts you’re
moving, then it’s easiest to move the first script under the folder right, and then
move each successive one right, also.
Tip: On the Mac, a blue line appears to help you see where a dragged item will land and folders highlight
when you drag over them. Let go of the mouse button while the folder is highlighted and the script you’re
moving will land inside the folder.
435
:
Branching and
Looping in Scripts
Move a few scripts into the Reports group to get the hang of the technique. When
you have some scripts in the new group, to the left of the group name, click the gray
triangle (Mac) to collapse it. A second click opens the group again. (Windows shows
a +/- icon to expand and collapse a folder.) Finally, click the Scripts menu to see how
script groups work there.
Creating Menu Separators
Groups help you when you’re plowing through a list of scripts trying to find the one
you need to tweak. But you can also help people who use your database by giving
them menu separators. It’s a good idea to use them to organize sets of scripts that do
different things. To create a menu separator, click to select the script that’s just above
where you want the separator to appear, and then, from the New item pop-up menu,
choose New Separator. If a separator isn’t where you want it, then you can drag it into
place. (On the Mac, you can click anywhere on the separator, and then drag it, but on
Windows, make sure to click the double-arrow, and then drag).
You can also use the Duplicate button to copy a whole bunch of separators with just
a few clicks. Each new separator appears just below the original; just drag them into
place.
A separator is really just an empty script whose name is “–”, so if you like to do things
the long way, you can make one manually. In Figure 10-15, you can see how a separa-
tor looks in a menu.
Branching and Looping in Scripts
Now that you have a basic foundation in what scripts do and how you can run them,
it’s time to see some of scripting’s more powerful features. The script you created at
the beginning of this chapter was the simplest kind: It goes through a series of steps
from start to finish every time. Sometimes your script needs more smarts. You can
add steps to the script that cause it to take different actions depending on the situ-
ation (called branching), or make it do the same thing over and over again (called
looping).
Branching with If, Else If, Else, and End If
Sometimes a script needs to take action based on certain conditions in your da-
tabase. When you send an email to a customer manually, you look him up in the
Customers layout, copy his email address, and then go to your mail program to cre-
ate, address and send the email. You’d like to add a button to the Customers layout
that creates the email directly, saving you all the trouble of copying, switching, and
pasting.
436
FM P : T M M
Branching and
Looping in Scripts
Figure 10-15:
In the Manage Scripts window, separators just show up as scripts
named “–” but everywhere else, they turn into proper visual
separators. Here, in the Specify Script window, the separator is
right under the “Buy Cappucino machine for office” script.
A one-line script using the Send Mail script step (which is just like the File➝Send
Mail command) will do the trick. It’s already created for you in the Invoices sample
file, or see Figure 10-16 for the settings you need. If you write the script from scratch
don’t forget to select the “Perform without dialog” option or to save the script.
If you run the Send Email to Customer script, it creates a new email addressed to
the current customer. But what happens if you don’t have an email address for this
customer? If the Customers::Email Address field is empty, then your script tries to
send an email without a valid address through your email program, which com-
plains mightily. Fortunately, you can head off this problem at the pass. If the Email
Address field is empty, the script should let you know, and then skip the Send Mail
step entirely.
The If step is the answer; it tests a condition and can take action based on the result
of its test. Here’s how to add an If step to the Send Email to Customer script:
1. In the Edit Script dialog box, add the If step to your script.
FileMaker adds this step after the Send Mail step. It also adds a third step: End
If. You can’t have an If without an End If, so you get both automatically.
437
:
Branching and
Looping in Scripts
Figure 10-16:
The Send Mail Options lets you type
an ordinary email address directly in
the To, CC, or BCC boxes, and enter
a Subject, and Message. Or, click
the triangle by any box and either
pick a field or enter a calculation
instead. That way, you can send
email to a person in the database, or
fill the message with details from the
current record. Turn on the “Multiple
emails (one for each record in found
set)” checkbox to use this script step
to send email to more than one
person at a time. But remember, this
option must be used for good, never
for evil. You’d never send spam
emails, would you? See the box on
page 439 to learn about the Send
Via options.
Note: If you accidentally delete the End If step from your script, then FileMaker shows an error message
when you try to save the script. To fix the error, you need to add the End If step back to your script, and
then drag it to its proper place.
2. Using the double-pointed arrow to the left of the If step, drag the step up
above the Send Mail step.
By rearranging the steps in your script, you’re telling FileMaker what order they
should run in. (A script doesn’t work as intended if you’ve got a step above
something that needs to happen first.) Your script should look like Figure 10-17.
3. Select the If step and, in the Script Step Options area, click Specify.
FileMaker shows you a standard Specify Calculation window. You use a calcula-
tion to define the condition of this If step. If the calculation evaluates to True,
then FileMaker does the steps after the If. If the calculation evaluates to False, then
FileMaker skips to the End If, and continues running the script from there.
438
FM P : T M M
Branching and
Looping in Scripts
Figure 10-17:
To prevent FileMaker
from making an
email message when
the customer has no
email address, wrap
the Send Mail step
inside an If block as
shown. Next, you’ll
put a condition in
that If step to tell
FileMaker when the
message should be
sent. Notice that the
Send Mail step is now
indented. Every step
inside an If block gets
indented this way.
4. In the calculation box, enter Not IsEmpty(Customers::Email Address), and
then click OK.
This calculation evaluates to True, and sends your customer an email only if the
Email Address field isn’t empty. See the box on page 441 for details on how this
calculation makes these decisions.
Your script now checks to see if the Email Address field has something in it before
running off to create the email message. But what happens when you run the script
and the Email Address field is empty? Right now, nothing at all. FileMaker evalu-
ates the If condition, sees that it’s False, and skips to the End If. There’s nothing after
the End If, so the script just stops and your user waits in suspense, until he finally
realizes that the requested email message simply isn’t coming and investigates the
problem on his own—or chucks his computer out the window.
In the interest of preventing property damage, your script should tell him why noth-
ing’s happening. For example, you can have your script show a message box saying,
“You can’t email this customer, since there’s no email address on file”, or whatever.
That’s what the Else step is for:
1. In your script, select the Send Mail script step.
When you add a new step, FileMaker inserts it after the selected step. You want
the Else step to go right after the Send Mail step, so you select that step first.
2. Add the Else step to the script.
FileMaker inserts an Else step between Send Mail and End If.
439
:
Branching and
Looping in Scripts
POWER USERS’ CLINIC
Two Ways to Send Mail
The first option in the Send Mail Options window (see Figure
10-16) is “Send via”, and it gives you two options, letting you
either use or bypass the email program on your computer:
• Choose E-mail Client to send the message using
your email program. If you turn on “Perform without
dialog” for the Send Mail script step, then the mes-
sage goes directly into your mail program’s outbox,
and that program sends it the next time the send/
receive mail process runs (which is automatic in most
mail programs). If you leave “Perform without dia-
log” off, then the message goes into the Drafts folder
instead. FileMaker also opens it up and switches to
your mail program. This way, you get a chance to
double-check the message and edit it as needed be-
fore you send it.
• Choose SMTP Server to send the message through
your mail server. In other words, you’re asking File-
Maker to bypass your email program, and go straight
to the network post office. You have to put in infor-
mation about your mail server, including its network
address and any user name and password it requires.
This configuration has no “Perform without dialog”
option, so you can’t edit the message before File-
Maker sends it off, and it doesn’t show up in your
sent mail folder.
Under most circumstances, you’re probably best off sticking
with the E-mail Client option. You can use it more easily
(because you don’t need to put in mail server settings). It’s
also more flexible since you can edit the message. Finally,
you get a record of the emails you’ve sent from your sent
mail folder.
But sometimes the E-mail Client option isn’t a good choice.
Sometimes you have a script that runs on the FileMaker
Server (you’ll learn about that in Chapter 17) or on a
shared computer that has no email client. In a case like
that, you’re better off going straight to the server so you
don’t have to set up and manage a mail program.
Also, when you use the SMTP Server option, you get to
specify the From name and address. If the message comes
from your email client, then it comes from you. But what
if you’re sending shipment notifications for your company?
You may want the messages to come from orders@my-
company.com, or some other shared address instead. In
a case like this, you can use the SMTP Server option, and
everybody in the office can send email from the same ac-
count through FileMaker.
Finally, if you’re sending lots of email, it can be faster and
more reliable to send messages directly to the mail server
(after all, its job is to send lots of email).
As a general rule, it’s fine to use the E-mail Client option
unless you need for the increased power (and hassle) of
the SMTP Server option.
Note: Don’t click the Else If step by mistake. You want the step called just Else. If you added the wrong
step, select it, click Clear, and then try, try again.
3. Right after the Else step, add the Show Custom Dialog script step to the script.
This step is also under Miscellaneous. Its job is to pop up a dialog box for some-
one. You get to decide what the box says, which buttons it includes, and which
fields—if any—it should show.
440
FM P : T M M
Branching and
Looping in Scripts
4. In the Script Step Options area, click the Specify button.
The “Show Custom Dialog” Options window appears (Figure 10-18).
Figure 10-18:
The Show Custom Dialog script step
lets you provide feedback, like why
an email script isn’t behaving as
expected. You can give your dialog
box a title, a message, and up to
three buttons for people to click.
You can also add input fields to the
dialog box by visiting the Input Fields
tab. You’ll learn about these on
page 678.
5. In the Title box, type No Email Address.
Whatever you type in this box appears in the title bar along the top of your cus-
tom dialog box. Punctuation marks like commas and periods look odd in title
bars, but you’re welcome to include them.
6. In the Message box, type You can’t email this customer because there’s no email
address on file.
This tells FileMaker what to put inside the dialog box.
7. From the Button 2 box, select, and then delete the word Cancel.
A custom dialog box can have up to three buttons. In this case, you want only
one: an OK button. (If you don’t type anything in the Button 2 and Button 3
boxes, then those buttons don’t show up.)
8. Click OK.
Your script should now look like the one shown in Figure 10-19.
441
:
Branching and
Looping in Scripts
Figure 10-19:
The finished Send
Email to Customer
script looks like this.
If you read it like a
book, it says, “If the
email address field is
not empty, Send Mail.
Otherwise show an
error message to the
person.” The If/Else/
End If steps create
two branches in the
script: one when the
email address field is
full, and one when it’s
empty.
UP TO SPEED
Not What?
In the script you wrote on page 438, the If script step runs
the indented steps only when the whole calculation evalu-
ates to True. To figure out when that happens, you have to
deconstruct the calculation itself.
By itself, the IsEmpty() function returns True when the
value you pass it is completely empty—in other words,
when the Email Address field is empty:
IsEmpty ( Customers::Email Address )
But that action doesn’t help you because you want the
email sent only when there is data in the email field. If you
have no email address entered, then the calculation above
returns True, and causes the Send Email step to run. If the
email address field is filled in, on the other hand, then the
calculation’s result is False, and FileMaker skips the Send
Mail step.
This behavior is exactly the opposite of what you want. To
flip the result of the calculation around, you use the Not
operator. It looks at the Boolean value to its right, and turns
a True to a False, or a False to a True. Here’s the calculation
you need:
Not IsEmpty ( Customers::Email Address )
You can easily tell if you’ve got the right construction by
reading the If step like a sentence: “If not is empty Email
Address.” It may not be grammatical perfection, but gets
the logic right.
If this kind of logic makes your head spin, then you have
another option. Remove the “not”, and then switch your
steps around. If you read the script in pseudo-English logic,
it’d go like this: “If the email address is empty, show a mes-
sage, else send the email.” That way, you can use a more
straightforward formula to test the Email Address field:
IsEmpty ( Customers::Email Address)
442
FM P : T M M
Branching and
Looping in Scripts
Now return to your database, and then try your script out: Find a customer without
an email address (or just delete the email address for the Customer record you’re
viewing—this is just a sample database so it’s OK), and choose Scripts➝“Send Email
to Customer”. If you look at a customer record with an email address, then the script
creates a email message in your mail program, ready for you to fill out. If the email
address field is empty, then you see an error message instead. Finish up by creating
a button for this script, and then add it to the Customers layout for the ultimate in
convenience.
Testing Multiple Conditions
If you have more than one condition to consider, you can use the Else If script step.
You could have a script like this, for instance:
If [ Get ( CurrentTime ) < Time ( 12 ; 0; 0 ) ]
Show Custom Dialog [ "Good Morning!" ]
Else If [ Get ( CurrentTime ) < Time ( 18 ; 0 ; 0 ) ]
Show Custom Dialog [ "Good Afternoon!" ]
Else
Show Custom Dialog [ "Good Evening!" ]
End If
When this script runs, it tests each condition in turn, deciding which custom dialog
box to show someone, based on the actual current time. If the current time is before
noon, she sees a “Good morning” message, and the script jumps to the end (the End
If script step) without needing to test the second condition.
If it isn’t before noon, the script does a second test to see if it’s before 6 p.m. If it is, the
user sees a “Good Afternoon” message, and the script jumps to the end. But if both
tests fail, no third condition is tested, and the Else just shows the “Good Evening”
message, like an automatic condition in a Case statement. However, you can add
other Else Ifs to test other conditions.
You can add as many Else If steps as you want, but they have to come between the If
and End If steps. Each Else If can test a different condition. If you have an Else step,
it should come after the If and every Else If, but before the End If. You can think of
the Else condition as the default condition in a Case() or an If() statement when you
write a calculation.
Tip: When you’re writing multiple condition scripts, it can be hard to figure out when a condition tests as
True. See the section on the Script Debugger (page 513) to learn how to watch your scripts run step by
step.
443
:
Branching and
Looping in Scripts
Looping
Sometimes you want to do the same thing over and over again, until you reach some
kind of end point. For example, people often write a script that does something to
every record in the found set, one after another. This script is called a looping script.
You make a script loop through records using the Loop script step.
Like the If step, the Loop step has a necessary partner called End Loop. When you
put script steps between Loop and End Loop, FileMaker simply repeats them over
and over, forever.
So how does a script like this end? Simple: You tell FileMaker to exit the loop at the
right time. FileMaker has three ways to exit a loop:
• The Go To Record/Request step has an “Exit after last” option when you go
to the next or previous record. That way, you can easily loop through all the
records in the found set, exiting the loop when you get to the last one.
• The Exit Loop If script step lets you provide a condition formula (just like If).
If the condition evaluates to True, then FileMaker immediately skips to the first
step after End Loop.
• The Exit Script and Halt Script steps both end a script immediately, even if
you’re in a loop.
For example, a simple looping script would have this structure:
Loop
# Do some stuff
Exit Loop If [ // some condition ]
End Loop
Note: This script is meant for show only. If you write and then try to run it, you’ll get into an endless
loop (one that won’t ever stop). This script’s Exit Loop If test is commented out and so it’ll never evaluate
as true and stop your loop. The “#” symbol before the “Do some stuff” step is a script comment. Learn
about them on page 673. Press your Escape key to stop a endless looping script.
The “Loop” step comes before the steps you want to repeat. Then you add those
steps, and the Exit Loop If step, which lets you write a calculation to figure out if
the loop should stop. It usually, but not always, comes at the end of the steps that’ll
repeat each time the loop runs. The Exit Loop If calculation is evaluated every time
the loop runs, and then when the condition is met, the script stops with the End
Loop step.
444
FM P : T M M
Branching and
Looping in Scripts
Using Go to Record/Request/Page to exit a loop
The most common type of looping script repeats a process on a found set of records.
If you’ve used loops in other programs, you may think you have to devise some kind
of test to figure out when you’ve reached the last record in your found set. You may
be tempted to write a loop like this:
Loop
# Your script’s work goes here.
Go to Record/Request/Page [ Next ]
Exit Loop If [ Get ( FoundCount ) = Get (RecordNumber) ]
End Loop
# Your script’s work goes here. Again!
This script starts with a loop that does your task on the current record, and then
moves to the next record (just as if you’d clicked the book icon’s right-hand page). If
the number of the record you’re now on equals the current found count, then File-
Maker exits the loop. This type of logic often requires you to repeat the steps within
a loop right after it in order to get the process to run on the last record in your found
set. But FileMaker has a better way. Use the “Go to Record/Request/Page” step, and
select the “Exit after last” option (Figure 10-20).
A loop that works on a found set of records is called a “record loop.” “Field loops”
work through fields within a record. You can even nest one loop inside another, as
when you need to work on a set of parent records, and then on each parent’s child
records. A nested loop’s structure looks like this:
Loop
# Work on the first parent record here
# Open a new window containing child records
Go to Related Record [From table: ChildTable; Using Layout: ChildLayout]
Loop
# Work on one set of child records here
Go to Record/Request/Page [Next; Exit after last]
Close Window [Current Window]
End Loop
# Go to the next parent record and then start the process over
Go to Record/Request/Page [Next; Exit after last]
End Loop
In this nested loop, the first loop works on a parent record and is called the outer
loop. It runs once for each parent record. The one the works on the child records is
called an inner loop and it runs once for each child record that’s related to the cur-
rently active parent record.
Note: You’ll write a basic looping script on page 719.
445
:
Script Triggers
Figure 10-20:
When “Next” is
selected in the Specify
pop-up menu, the Go
to Record/Request/
Page script step
has an “Exit after
last“ option. When
selected, “Exit after
last” exits the found
set (and stops the
loop) after the loop’s
steps have run on
the last record in the
found set. This script
will start on the first
record in the found
set and repeat the
actions represented
by the “#Your script’s
work goes here” com-
ment once for each
record in the found
set. You can work
through a found set
backwards by choos-
ing “Previous” in the
Specify pop-up menu,
and then selecting
“Exit after last.” This
makes sense if you
want to leave the user
on the first record in
a found set at the end
of a loop.
Script Triggers
Scripts are all about saving you (and your users) time. And what could be less time
consuming than something you don’t have to do at all? As you learned earlier in this
chapter, script triggers let you tell FileMaker to run a script automatically in response
to something that already happens when people use your database. You’ll get a brief
introduction to each of FileMaker’s trigger options here. Then, throughout the next
chapters, you’ll use these triggers in key places to make your database come alive.
446
FM P : T M M
Script Triggers
Script triggers come in two flavors. Layout triggers apply to the layout as a whole.
These triggers include actions like loading or committing a record, switching lay-
outs, or pressing a key on the keyboard. Object triggers are tied to a single layout
object (like a field, portal, Tab Control, or web viewer). These triggers fire when you
interact with that object in some way, like editing the data in a field, or switching to
a different tab panel.
In addition to the action that fires a script trigger, timing also comes into play. Some
triggers fire before their controlling action, and some fire afterwards. As with script-
ing itself, the order in which a step or a whole script occurs can make or break a
script.
So take care when you start to apply triggers. They’re simple to apply, but can be
tricky to predict unless you understand all their behaviors. So you’ll start this sec-
tion by applying a simple script trigger, and then you’ll learn how each trigger works.
You’ll see other examples of script triggers in later scripting chapters.
Creating a Simple Script Trigger
Since you’d only view the Invoices with Balance Due layout when you want to find
unpaid invoices, it makes perfect sense to run the Find Unpaid Invoices script every
time you switch to that layout. You’ll use an OnLayoutEnter script trigger to get the
job done:
1. Switch to your Invoices with Balance Due layout, and then go to Layout mode.
You’re creating a layout trigger (that fires when you switch to the Invoices with
Balance Due layout), so you need to be on the right layout.
2. Choose Layouts➝Layout Setup, and then switch to the Script Triggers tab.
This tab is where you configure triggers for the layout. You can see it in Figure
10-21.
3. In the list, turn on the OnLayoutEnter checkbox.
The Specify Script window appears.
4. Select the Find Unpaid Invoices script, and then click OK.
In the list, the OnLayoutEnter trigger is highlighted, and, in the Script column,
the Find Unpaid Invoices script shows. You can also see the script’s name beside
the Select button in the Script Trigger Properties section of the window.
5. Select the Browse and Preview checkboxes, and deselect the Find checkbox.
Since it does a Find, this script only makes sense in Browse mode and Preview
mode, so you want it to trigger only in those cases.
6. Click OK.
Now your trigger is installed, and ready to test.
447
:
Script Triggers
Figure 10-21:
The Layout Setup dialog box has a Script
Triggers tab. From here, you can turn on
various triggers, pick which scripts run,
and choose which modes the triggers ap-
ply to. You can turn on as many triggers
as you want, but each trigger can have
only one script. If you need to do more
than one thing for a trigger, just bundle
them together in one script (using two
or more Perform Script steps), and then
run it.
To test things properly, go to the Invoices layout, and then choose Records➝Show
All Records. Then switch to the Invoices with Balance Due layout. If all goes well,
FileMaker should automatically find only the unpaid invoices, and sort them for you.
Now that you’re on the List layout, you can find again if you want to see different
records, or sort in a different way. The trigger fires only when you first come to the
layout from somewhere else.
Layout Triggers
As you saw in the previous section, You configure layout triggers in the Layout Setup
dialog box (Layouts➝Layout Setup), in the Script Triggers tab. Layout triggers are
performed when an action takes place that concerns a layout itself. For example,
each time a new record is viewed, that’s considered a layout trigger. That makes
sense, given that the layout is FileMaker’s method of showing you a specific record.
When you think about it, you can see that the same trigger, running the very same
script, can behave slightly differently depending on whether it’s run on a detail or a
list type layout. Triggers can fire before their action or afterwards. Read on to learn
what that means.
OnRecordLoad
The OnRecordLoad trigger fires when a record is loaded. In other words, when you
first visit a layout, switch to a new record, make a new record, or perform a find, a
record is loaded. This trigger fires after the record is loaded and works in Browse
and Find modes. You’ll use this trigger in the next chapter to automatically sort a
set of records.
448
FM P : T M M
Script Triggers
OnRecordCommit
OnRecordCommit works in Browse and Find modes. When you commit a record,
the trigger fires. It doesn’t matter how you commit (by clicking out of the record,
switching layouts, or running a script, for instance). In each case, if this trigger is
turned on, then the script runs. Even though the trigger is called “OnRecordCom-
mit” it actually fires after you make the action that would normally commit the re-
cord but before FileMaker commits it.
That might seem like a subtle distinction, but it’s actually hugely important. It means
that the OnRecordCommit trigger (and any other one that fires before its triggering
event) can be cancelled. In other words, the script that’s triggered can cancel the
commit operation by returning a False value (you’ll learn about returning values
from scripts on page 684). If you cancel the commit, then you don’t leave the record,
and FileMaker doesn’t save your changes. You can use this power to force the person
using the database to make some kind of change to a record before saving, or require
some kind of extra confirmation.
OnRecordRevert
In the rare case that someone reverts a record (using the Records➝Revert Record
command, or the equivalent script step), the OnRecordRevert trigger kicks in. The
trigger fires before the record is reverted and works in Browse and Find modes.
OnLayoutKeystroke
The OnLayoutKeystroke trigger fires every time a key is pressed. Obviously, any
script you trigger should be quick, because it can be called very frequently. The trig-
ger fires before the keystroke is applied and works in Browse, Find and Preview
modes. You can use the Get (TriggerKeystroke) and Get (TriggerModifierKeys) func-
tions to find out which key was pressed.
You can also cancel keystrokes. So if you want to stop allowing the letter L in your
database, you can. Truthfully, though, keystroke triggers aren’t for beginners. People
can press lots of different keys. Your script needs to be fast, and it takes a lot of
knowledge to figure out which keys were pressed. For instance, this trigger fires even
if someone presses an arrow key, or the Ctrl or � key, the Tab key, or a function key.
You’ll learn about keystroke triggers on page 698.
Note: One exception is Ctrl or � key combinations. These don’t fire keystroke triggers. If you want to
configure keyboard shortcuts to run scripts, then use custom menus (page 538).
449
:
Script Triggers
OnLayoutEnter
When you switch to a layout, the OnLayoutEnter trigger fires (you did just that on
page 446). The trigger fires after the layout shows onscreen and works in Browse,
Find and Preview modes. You can do some initial tab setup, or sort the records, or
even bounce to a different layout if you want. OnLayoutEnter is one of the bread-
and-butter triggers for an advanced database that aims to streamline people’s
workflows.
Tip: This trigger was called OnLayoutLoad in previous versions. It was changed in FileMaker Pro 11 to
mirror the new function OnLayoutExit.
OnLayoutExit
When you switch away from a layout, OnLayoutExit fires. It fires before you leave
the layout and works in Browse, Find, and Preview modes. It might seem as if you
don’t need this trigger if you’ve already got OnLayoutEnter, but it can make your
scripting cleaner. That is, you can actually prevent a user from leaving a layout by
checking some condition before prior to exiting the layout. That keeps you from
having to write a script that remembers where the user was before they tried to
switch to a new layout, and then take them back if you want to cancel that switch to
keep them where they were. This way, you prevent the switch until some condition
(like entering data in all the required fields on a layout) is met.
OnModeEnter and OnModeExit
The OnModeEnter trigger fires when you switch to a mode. For instance, if you
switch to Find mode, then the OnModeEnter trigger fires when you get there. By
contrast, the OnModeExit trigger fires when you leave a mode. As with the layout
enter/exit triggers, if you use both triggers, then OnModeExit fires first, before you
leave the current mode. Then OnModeEnter fires after the switch. The distinction
between these two is subtle but important. First, a script triggered by OnModeEnter
runs once you’re in the new mode. So it can look at the current mode (using the
Get(WindowMode) function), and act accordingly.
On the other hand, OnModeExit is cancelable. So if you choose, you can refuse to let
someone leave the current mode.
OnViewChange
OnViewChange fires each time you switch between Form, List or Table views. It fires
after the view is switched and works in Browse and Find modes. It doesn’t activate
when you first open a window or switch to a layout. Since it fires after its event, this
trigger isn’t cancelable.
450
FM P : T M M
Script Triggers
Object Triggers
To configure an object’s triggers, on the layout, first select the object, and then choose
Format➝Set Script Triggers. The resulting window looks familiar (Figure 10-22).
Before you look at each type, bear this in mind: You can apply triggers only to fields,
Tab Controls, portals, buttons, and web viewers. You can’t put a trigger on a text
label, line, shape, or picture. The Set Script Triggers command will be grayed out
when those objects are selected.
Figure 10-22:
The Format➝Set Script Triggers menu
command lets you configure triggers
for the selected layout object. The list of
triggers is smaller than for layouts, but
since so many object types exist, it can be
harder to make sense of them. Read on
to get the full scoop.
Object triggers sound picky when you scan through their names (and to a degree
they are), but that’s just to give you as much control about when they fire as possible.
If you read through this list, you’ll see that object triggers appear in the same order as
users interact with an object, in this case, say a field. So for any particular interaction
with a field, the following actions might take place:
• The field is entered—when you click in it.
• The field is modified—you type new data into it.
• The field’s validation kicks in—you click out of the field.
• The field’s new data is saved—FileMaker’s autosave makes the new data
permanent.
• The field is exited—a new object is entered or the record is committed.
And there’s even one more action that can take place on an object. As with layouts,
you can have each keystroke trigger a script. As you’ll see in this section, the better
you understand how FileMaker handles objects, the easier it is to apply the proper
object trigger.
451
:
Script Triggers
Tip: When you’re trying to tease these triggers apart, it’s helpful to write a very simple script that does
nothing but the Beep script step. Assign an object trigger that runs the script to a field, and then interact
with the field, noticing when the beep occurs. Try each trigger—you’ll soon get the picture.
OnObjectEnter
The OnObjectEnter trigger, generally speaking, fires after you enter an object. It’s
available in Browse and Find modes. Usually you use this trigger with a field. It fires
when you enter the field, whether by clicking, tabbing, or script.
If you set an OnObjectEnter trigger on a button or Tab Control, then it fires if you
put the object in the tab order, and then tab to it (causing it to get a black outline).
If you use the mouse to click a button or tab, then the OnObjectEnter trigger doesn’t
fire.
For portals, the trigger fires whenever you go to a new row. For instance, if you click
into a field on the portal, then the trigger fires. If you click a second field on the same
row, then it doesn’t fire again. But if you click a field on a different row, then it fires
again. This way you can track someone as she switches from row to row.
For a web viewer, the trigger fires if you click into the web page, or tab into a field
on the page.
OnObjectKeystroke
Once you’re entered an object, it becomes the target for keystrokes. If you press a key
on the keyboard, the object’s OnObjectKeystroke trigger fires before the keystroke
is entered. It can be applied in Browse and Find modes. For fields, the script runs
repeatedly as you type or arrow around in the field. It also fires when you press the
Tab key or Enter key to leave the field. For buttons and Tab Controls, you have to
tab into the object for it to receive keystrokes. Portals and web viewers never receive
keystrokes, so this trigger never fires if you assign it to one of them.
Finally, the keystroke trigger can be cancelled, which lets you, for instance, prevent
entry of certain characters in a field. You’ll see an example of this on page 700.
OnObjectModify
The OnObjectModify trigger also varies from object to object. For a field, it fires after
something in the field changes but while you’re in the field. For instance, if you type
into the field, then the trigger fires each time you add or delete a character. But it
doesn’t fire if you just use the arrow keys to move around in the field, or if you press
Tab or Enter to leave the field. It also fires once each time you cut or paste in the
field. It’s available for Browse and Find modes.
452
FM P : T M M
Script Triggers
Warning: The OnObjectModify trigger doesn’t fire if you modify the field without entering it. For
instance, if a script runs the Set Field script step while you’re on the layout, then the field changes but
the trigger doesn’t fire. New in FileMaker Pro 11, dragging text from one field into another, does fire the
OnObjectModify trigger. Users with version 10 won’t trigger, though, so take care with this trigger if you
have a mix of versions.
If you attach this trigger to a Tab Control, then it fires whenever you switch tabs.
OnObjectModify never fires with buttons, portals, and web viewers.
OnObjectValidate
This trigger can be applied to any object, but is only triggered for fields that have
field Validation options (page 248). The trigger fires before the data in the field
changes and so won’t be triggered just by clicking or tabbing into the field. The trig-
ger can be cancelled. It’s available in Browse and Find modes.
Not all changes to data in validated fields will cause the trigger to fire, however. Spell
Check and Find/Replace don’t fire OnObjectValidate. Whether you run them manu-
ally or by script, Import (page 826), Replace Field Contents (page 70) and Relookup
Field Contents (page 224) also don’t fire this trigger.
OnObjectSave
While OnObjectModify fires as you modify a field, OnObjectSave fires after the
field’s data has been validated and saved, but before the field is exited. With this
trigger, you can modify the field repeatedly without interruption. Then, when you’re
done and you leave the field by tabbing, pressing Enter, clicking in another field, or
by any other means, the trigger fires.
This trigger fires only if you actually make a change. If you click in a field, and then
leave the field without making changes, nothing is saved, and the trigger doesn’t run.
Once again, this trigger can be cancelled. If your script returns False, then it forces
the user back into the field. It’s available in Browse and Find modes. It applies to
fields only.
OnObjectExit
The OnObjectExit trigger is exactly the opposite of OnObjectEnter. It fires when you
leave an object. For fields, this means tabbing away, committing the record, and so
forth. For buttons and Tab Controls, it means tabbing away. For portals, it fires when
you leave a portal row in any way. Finally, for web viewers, it fires when you had
previously clicked or tabbed into the page, and you then click away. Any script step
that causes an object to be exited will fire the trigger.
453
:
Script Triggers
Many actions can trigger an exit from a field, portal, or web viewer. For instance, you
might leave the layout, close the window, or quit FileMaker. In every case, the trigger
fires, and in every case, if the script returns False, then the action is cancelled. So you
can even stop folks from closing the window before they attend to the demands of
your trigger. It’s available in Browse and Find modes.
Script triggers are possibly FileMaker’s most powerful and complex feature. A simple
trigger can be a real timesaver, and for the adventuresome, more advanced trigger
scenarios can produce very powerful results.
Exploring Script Steps
N
ow that you know how to create scripts, it’s time to expand your repertoire.
FileMaker has a script step for just about everything you can do from the
menus and Status toolbar. You can use any combination of these steps with
script techniques like looping, branching, custom dialog boxes, and more to auto-
mate just about anything FileMaker can do. Major areas of scripting include working
with field data and records, finding, sorting, working with windows and files, and
printing. This chapter is a compendium of steps—and boatloads of scripting
possibilities.
Note: Download sample databases for this chapter from this book’s Missing CD page at www.missing-
manuals.com. Do the tutorials in the file called Invoices START.fp7. Use Invoices FINISHED.fp7 to compare
your work, or if you want to check something as you work.
Go to Layout
The “Go to Layout” script step was introduced in the last chapter. Its purpose is
simple: change layouts. It works just like making a choice from the Layout bar’s Lay-
out pop-up menu, except that the script can go to any layout (even if it doesn’t show
in the menu).
“Go to Layout” has just one option, a pop-up menu labeled Specify. In addition to
every layout in your database, this menu also has three special choices:
• The original layout option causes FileMaker to switch to the layout someone
was on when the script started. After all, you can run lots of scripts anywhere,