how to do everything with microsoft office access 2003 phần 7 potx
Bạn đang xem bản rút gọn của tài liệu. Xem và tải ngay bản đầy đủ của tài liệu tại đây (1.83 MB, 56 trang )
12
CHAPTER 12: Create Charts and Graphs 313
HowTo-Tght (8) / How to Do Everything with Microsoft Office Access 2003 / Andersen / 222938-1 / Chapter 12
Patterns, Axis, Y Error Bars, Data Labels, and Options. The 3-D and pie series Format dialog boxes
show four tabs.
The Patterns tab offers the same color, border, and fill options as before. The other tabs offer
the following options:
■
Axis tab Specifies whether to plot the series on the primary or secondary axis. A sample
chart illustrates the current choice.
■
Y Error Bars tab Offers the option of displaying the statistical error estimation or the
standard deviation in the values either as values or percentages. This option is handy for
presenting the results of a statistical survey for which you need to express the validity.
■
Data Labels tab Enables you to display the data values and labels with the data series.
You can display the values as percentages or in the unit of the value itself.
■
Options tab For a column data series, this tab enables you to overlap the series and set
the amount of overlap, and also specify the amount of space between the sets of data series.
Options vary with different types of data series.
A 3-D column data series Format dialog box includes the Shape tab that offers different
configurations including cones, pyramids, and cylinders.
When you choose to format the data table that you have added below the chart, you see only
two tabs in the Format dialog box: Patterns and Font. To format the plot area or the walls of a chart,
you have only the Patterns options.
Change Chart Type When you are creating charts to analyze the data in your database, you
may want to try out different representations. You may want to show trends with a line chart
or comparative values with a pie chart. There are two ways to change the chart type:
■
Click the Chart Type toolbar button and choose from the palette containing
18 chart types.
P:\010Comp\HowTo8\938-1\ch12.vp
Friday, August 08, 2003 10:44:55 AM
Color profile: Generic CMYK printer profile
Composite Default screen
314 How to Do Everything with Microsoft Office Access 2003
HowTo-Tght (8) / How to Do Everything with Microsoft Office Access 2003 / Andersen / 222938-1 / Chapter 12
■
Choose Chart | Chart Type and choose from the Chart Type dialog box. The Standard
Types include 14 types with many sub-types for each. In the Standard Types tab, press
and hold the button below the Chart sub-type pane to see a sample of the selected chart.
The Custom Types tab shows an additional 20 chart types from the built-in list of charts;
if you have created any custom chart types, they are displayed when you choose Select
from User-Defined.
After making your selection, click OK to apply it to the current chart. You can also specify
a chart type as the default chart.
Set Chart Options You can adjust many additional chart features to achieve the appearance you
want. When you choose Chart | Chart Options, the Chart Options dialog box opens with six tabs:
Titles, Axes, Gridlines, Legend, Data Labels, and Data Table.
P:\010Comp\HowTo8\938-1\ch12.vp
Friday, August 08, 2003 10:44:55 AM
Color profile: Generic CMYK printer profile
Composite Default screen
12
The tabs offer the following options:
■
In the Titles tab, you enter the text you want to display as the chart title and the axes
titles. You can specify a primary and secondary title for each axis but only one for the
chart itself.
■
In the Axes tab, you specify whether to display the axes and choose the method by
which to display the Category (X) axis.
CHAPTER 12: Create Charts and Graphs 315
HowTo-Tght (8) / How to Do Everything with Microsoft Office Access 2003 / Andersen / 222938-1 / Chapter 12
Troubleshoot Charts
Sometimes the changes you make in Microsoft Graph fail to show up in the chart when you
switch to Form view or Print Preview even though they appear in Design view. For example,
you can change the column headings in the Microsoft Graph datasheet to display the text you
want in the legend. When you return to Access, the new labels appear in the design but not in
Form view or Print Preview.
The reason for this seeming inconsistency is that you have several places in which to
specify the chart information and Access must set an order of precedence to decide which
values to use. The order is as follows:
■
First, the data in the underlying table or query; for example, the
field names or the expressions in the Field row of the query grid.
■
Second, the contents of the Row Source property.
■
Last, the data entered in Microsoft Graph.
P:\010Comp\HowTo8\938-1\ch12.vp
Friday, August 08, 2003 10:44:55 AM
Color profile: Generic CMYK printer profile
Composite Default screen
■
In the Gridlines tab, you specify whether to display the gridlines on one or both of the
axes. You can choose to display both major and minor gridlines on each axis.
■
In the Legend tab, you choose whether to display the legend with the chart. The Legend
tab offers these options for placing the legend: Bottom, Corner, Top, Right, or Left.
■
The Data Labels tab includes the same options as the Data Labels tab in the Format Data
Series dialog box.
■
In the Data Table tab you can choose to display the data in the underlying data source
in a grid attached to the bottom of the chart. When you choose to display the data table,
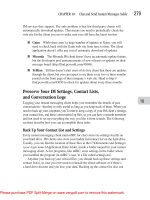
you can also display the legend keys. Figure 12-11 shows the Total by Year chart with
the corresponding data table. The Data Table option is not available for some of the
chart types.
316 How to Do Everything with Microsoft Office Access 2003
HowTo-Tght (8) / How to Do Everything with Microsoft Office Access 2003 / Andersen / 222938-1 / Chapter 12
FIGURE 12-11 The data table added to the chart
If you set the legend text in Microsoft Graph but the underlying query column headings
are different, they will override the Microsoft Graph settings. If the columns don’t appear in
the order you want in the chart, open the Query Builder and rearrange the fields, left to right;
then choose the sort order for each.
P:\010Comp\HowTo8\938-1\ch12.vp
Friday, August 08, 2003 10:44:56 AM
Color profile: Generic CMYK printer profile
Composite Default screen
HowTo-Tght (8) / How to Do Everything with Microsoft Office Access 2003 / Andersen / 222938-1 / Chapter 13
blind folio 317
Par t III
Improve the
Access 2003
Workplace
P:\010Comp\HowTo8\938-1\ch13.vp
Friday, August 08, 2003 11:18:47 AM
Color profile: Generic CMYK printer profile
Composite Default screen
HowTo-Tght (8) / How to Do Everything with Microsoft Office Access 2003 / Andersen / 222938-1 / Front Matter
Blind Folio FM:ii
P:\010Comp\Build8\769-9\fm.vp
Tuesday, January 07, 2003 1:28:08 PM
Color profile: Generic CMYK printer profile
Composite Default screen
This page intentionally left blank
HowTo-Tght (8) / How to Do Everything with Microsoft Office Access 2003 / Andersen / 222938-1 / Chapter 13
blind folio 319
Chapter 13
Customize
the Workplace
P:\010Comp\HowTo8\938-1\ch13.vp
Friday, August 08, 2003 11:18:50 AM
Color profile: Generic CMYK printer profile
Composite Default screen
320 How to Do Everything with Microsoft Office Access 2003
HowTo-Tght (8) / How to Do Everything with Microsoft Office Access 2003 / Andersen / 222938-1 / Chapter 13
How to…
■
Personalize your workplace
■
Create custom groups
■
Change Access startup options
■
Excuse or modify the Office Assistant
Some of the features discussed in this chapter have been briefly mentioned in previous
chapters; some are covered in detail later. However, we have brought them all together in
one place for easy reference. Using the many Access and Windows options, you can change
the default appearance and behavior of many aspects of your workplace. In addition to making
changes that affect the current Access database, you can change many Access startup options
such as displaying a startup form; opening a specific database; and displaying custom icons,
menus, and toolbars.
Personalize the Workplace
You don’t have to bow down to the layout and behavior of the Access environment as it is when
first installed. The Access developers have designed a workplace that is appropriate for most users,
but if there are some aspects you would like to change, it is easy to change them. For example, if
you have a large screen, you might want to see a larger font size. Of course, you can change each
of these factors every time you work with Access, but you also can change the default settings
once and for all.
Rearrange Icons
In the Database window, each page displays icons representing objects of that type in the current
database. You can change the icon size and amount of detail shown with the icons and arrange
them in a specific order, such as by name or date last modified. The changes you make on one
page are applied to all the object pages.
The buttons at the top of the Database window and the commands in the View menu contain
ways to display the object icons as follows:
■
Choose Large Icons to show expanded object icons in rows with the name appearing
below each one.
■
Choose Small Icons to show smaller object icons in rows but with the name beside
each one.
■
Choose List to show the object icons in columns with the name beside each one.
■
Choose Details to show each object icon in a single row with its name and four
additional columns containing other information about the object: the description
you entered in the object property sheet, the time/date the object was last modified,
the time/date the object was created, and the type of object.
P:\010Comp\HowTo8\938-1\ch13.vp
Friday, August 08, 2003 11:18:50 AM
Color profile: Generic CMYK printer profile
Composite Default screen
13
CHAPTER 13: Customize the Workplace 321
HowTo-Tght (8) / How to Do Everything with Microsoft Office Access 2003 / Andersen / 222938-1 / Chapter 13
When you show the object icons with the details, you can make other adjustments to the
display. For example, you can resize the column width by dragging the vertical column separator
in the column heading or resize it to fit the widest information in it by double-clicking the
column separator. If you want to sort the icons by one of the detail categories, just click once
in the column heading to sort in ascending order. Click in the column heading again to change
the order to descending.
The View | Arrange Icons commands sort the icons in ascending order by name, type,
date/time created, or date/time modified. These commands accomplish the same
arrangements as clicking once in the column headings of the details. The Auto Arrange
command, which is available only if you have selected Large Icons or Small Icons,
moves the icons back into the specified arrangement.
Create a Shortcut
If you use an Access object regularly, you can create a shortcut that launches Access and opens
the database object directly from the Windows desktop. The easiest way is to drag the object
from the Access Database window to the Windows desktop. You must first resize the Access
window so you can see the area on the desktop where you want to place the shortcut icon. When
you double-click the shortcut, Access opens the database that contains the object and displays
the object.
To delete a shortcut, click it and press
DEL. This does not delete the object itself; only
the shortcut.
Another way to create a shortcut is to use the Create Shortcut command on the object
shortcut menu. With this method, you can create a shortcut in a location other than the desktop
by entering a path in the Create Shortcut dialog box. Type a new path in the Location box or click
Browse to search for the desired location and let Access fill in the path for you. If the database is
on a network, Access automatically selects the This Database is on the Network check box and
fills in the path in the Full Network Path box.
P:\010Comp\HowTo8\938-1\ch13.vp
Friday, August 08, 2003 11:18:51 AM
Color profile: Generic CMYK printer profile
Composite Default screen
If you have moved the database that is the destination of a shortcut, remove the shortcut
and create a new one with the new path.
Set Workplace Options
Access is installed with certain characteristics set as defaults. For example, the width of the print
margins, default database folder, color of hyperlinks, gridlines, and font styles in a datasheet are
set by default. If you find yourself changing specific default values when you work with a database,
you can reset the default value to the one you use the most. All default values can be overridden
later, if necessary.
Access stores most option settings in the workgroup information file instead of your
database file. Changes you make to those settings in the Options dialog box apply to
any database opened or created by anyone who uses the same workgroup information
file. If you don’t check with the others in your workgroup, you might surprise them with
your changes. See Chapter 20 for information about workgroups and the workgroup
information file.
To change default values, choose Tools | Options and click the tab that contains the values
you want to change. To change values on more than one tab, keep the Options dialog box open
and click another tab. When you are finished setting the default values, click OK to close the
dialog box.
This chapter won’t cover every option on every tab of the Options dialog box, so if
you want to know more about any of the settings, close the Options dialog box, type
the option name in the Ask a Question box, and press
ENTER to view the Help topic.
The Options dialog box has 12 tabs, as shown in Figure 13-1. The following sections
describe the most commonly used options.
The tab that is visible when you open the Options dialog box is the one you last
accessed.
View Options
The options on the View tab relate to what you see on the screen during specific activities. For
example, some of the options determine what you see at startup, others while you are working
in the Database window or when you are creating a macro.
For example, if you don’t want to see the Startup task pane, clear the Startup Task Pane check
box. The “New object shortcuts” option in the Show group refers to items such as “Create form
by using wizards” that appear in the object pages of the database window. If you are building an
application for an end user who won’t be creating or editing any Access objects, you can clear
this check box and have more room in the Database window for the object icons.
322 How to Do Everything with Microsoft Office Access 2003
HowTo-Tght (8) / How to Do Everything with Microsoft Office Access 2003 / Andersen / 222938-1 / Chapter 13
P:\010Comp\HowTo8\938-1\ch13.vp
Friday, August 08, 2003 11:18:52 AM
Color profile: Generic CMYK printer profile
Composite Default screen
13
When you start a new macro, by default the Macro Name and Condition columns are not
displayed. If you need them most of the time, check these options to save a little time in macro
building. If you don’t need them, you can clear them after opening the macro design window.
General Options
The General tab (see Figure 13-2) shows options that don't fit comfortably into any of the other
categories of settings. In the “Print margins” group, you can enter any number that is compatible
with your printer and paper size, ranging from 0 to the height or width of the printed page. If you
want to print a document using other margin sizes, override these default settings by running
Page Setup before you print a form or report.
With the “Recently used file list” option on the General tab, you can specify the number of
filenames to display in the Getting Started task pane or at the bottom of the list when you choose
File. The default setting is 4 but you can change that to any number from 0 to 9. If you don’t want
to use the default My Documents folder, enter a different path in the Default database folder box.
The Name AutoCorrect group helps Access propagate name changes to objects that refer to
the renamed object. The group offers three options that help fix common side effects that occur
when you make changes in an object through a user interface. Access stores an identifier for each
object and tracks naming information. When Access notices that an object has been changed
since the last Name AutoCorrect event, it runs the process again for all items in that object. For
CHAPTER 13: Customize the Workplace 323
HowTo-Tght (8) / How to Do Everything with Microsoft Office Access 2003 / Andersen / 222938-1 / Chapter 13
FIGURE 13-1 Setting View default options in the Options dialog box
P:\010Comp\HowTo8\938-1\ch13.vp
Friday, August 08, 2003 11:18:52 AM
Color profile: Generic CMYK printer profile
Composite Default screen
example, if you have added a text box to a form that is bound to the Alpha Card table and you
change the Alpha Card table name to Alpha Card Plus, Access can track down all the items from
the original Alpha Card and change their names to match the new table name.
Edit/Find Options
The Edit/Find tab (see Figure 13-3) default settings are meant to speed up finding, replacing, and
filtering processes as much as possible. For example, Fast search searches the current field only
and matches the entire field. Other settings require confirmation before changing data, deleting
documents or running an action query.
The Confirm group is the one that always asks you if you really want to do what you just did.
It’s a good idea to leave all these checked as a precaution against any unintended changes or
deletions.
The “Filter by form defaults for…” group contains options that limit or extend the size of the
value list displayed in the Filter by Form window and sets the maximum number of records to
read when building a list of unique values for a given field. The more fields you include in the
filter operation, the longer it takes. These settings apply only to the current database.
■
Local indexed fields limits the value list to the indexed fields in the current database.
■
Local nonindexed fields includes the fields in the current database that are not indexed.
324 How to Do Everything with Microsoft Office Access 2003
HowTo-Tght (8) / How to Do Everything with Microsoft Office Access 2003 / Andersen / 222938-1 / Chapter 13
FIGURE 13-2 Setting General default options
P:\010Comp\HowTo8\938-1\ch13.vp
Friday, August 08, 2003 11:18:52 AM
Color profile: Generic CMYK printer profile
Composite Default screen
13
CHAPTER 13: Customize the Workplace 325
HowTo-Tght (8) / How to Do Everything with Microsoft Office Access 2003 / Andersen / 222938-1 / Chapter 13
■
ODBC fields includes fields in a linked table in an external source.
■
Enter a number in the Don’t display lists where more than this number of records
read: box. This will set the maximum number of records you want to read to build
the list of unique values for the field. If the number of records exceeds this amount,
no values will be displayed for the field in the Filter by Form window.
Keyboard Options
The settings in the Keyboard tab (see Figure 13-4) determine the consequences of pressing certain
keys such as
ENTER, TAB, RIGHT ARROW, and LEFT ARROW.
The selection you choose in the “Move after enter” group of options determines the behavior
of the insertion point (cursor) after you press
ENTER. It can either stay put, move to the next field,
or to the next record.
■
The “Arrow key behavior” settings specify what happens when you press RIGHT ARROW
and LEFT ARROW. Choosing Next field moves the insertion point to the next or previous
field when you press
RIGHT ARROW or LEFT ARROW whereas Next character moves the
insertion point to the next or previous character in the current field instead.
Customize Your Hyperlinks
If you are fussy about the looks of the hyperlinks in your Access documents, click the Web
Options button. Choose the colors you want for the hyperlinks before and after jumping to
them. You can also remove the underline that shows up when you move the mouse pointer
to the hyperlink.
P:\010Comp\HowTo8\938-1\ch13.vp
Friday, August 08, 2003 11:18:52 AM
Color profile: Generic CMYK printer profile
Composite Default screen
326 How to Do Everything with Microsoft Office Access 2003
HowTo-Tght (8) / How to Do Everything with Microsoft Office Access 2003 / Andersen / 222938-1 / Chapter 13
FIGURE 13-3 Setting Edit/Find default options
FIGURE 13-4 Setting Keyboard default options
P:\010Comp\HowTo8\938-1\ch13.vp
Friday, August 08, 2003 11:18:53 AM
Color profile: Generic CMYK printer profile
Composite Default screen
13
■
The “Behavior entering field” group determines what happens when the insertion point
enters a field.
■
The “Cursor stops at first/last field” setting locks the insertion point within the current
record and prevents the
RIGHT ARROW and LEFT ARROW keys from moving the insertion
point to the next or previous record in a form or datasheet.
Datasheet Options
The Datasheet tab (see Figure 13-5) includes settings for the visual properties of a datasheet. The
default colors, fonts, gridlines, and cell special effects are established in this tab. The Show animations
option is the one that shows columns sliding over when you insert or delete a column.
Form and Report Options
The settings in the Forms/Reports tab of the Options dialog box (see Figure 13-6) all relate to
designing a form or report.
■
The Selection behavior group specifies the result of dragging a rectangle in the design to
select controls. Partially enclosed is easier to use because it selects all controls that have
any part within the drawn rectangle, whereas Fully enclosed selects only those controls
that are totally within the drawn rectangle.
CHAPTER 13: Customize the Workplace 327
HowTo-Tght (8) / How to Do Everything with Microsoft Office Access 2003 / Andersen / 222938-1 / Chapter 13
FIGURE 13-5 Setting Datasheet default options
P:\010Comp\HowTo8\938-1\ch13.vp
Friday, August 08, 2003 11:18:53 AM
Color profile: Generic CMYK printer profile
Composite Default screen
328 How to Do Everything with Microsoft Office Access 2003
HowTo-Tght (8) / How to Do Everything with Microsoft Office Access 2003 / Andersen / 222938-1 / Chapter 13
■
The Form template and Report template settings allow you to specify an existing form
or report as the default template for new designs. Type the name of the form or report
you want to use as the default template.
■
The “Always use event procedures” setting takes you directly to the VB Editor
window when you click the Build button in a property sheet, bypassing the Choose
Builder dialog box, which usually offers the choice of Expression Builder, Macro Builder,
or Code Builder.
■
The Show Smart Tags on Forms setting displays the Smart Tab Action button when
you move to a control that has a Smart Tag attached.
■
The Use Windows Themed Controls on Forms applies to Access forms the Windows
theme (or scheme, depending on your version of Windows) sets in the Display Properties
dialog box.
FIGURE 13-6 Setting form and report default options
P:\010Comp\HowTo8\938-1\ch13.vp
Friday, August 08, 2003 11:18:53 AM
Color profile: Generic CMYK printer profile
Composite Default screen
13
Advanced Options
The Advanced tab (see Figure 13-7) contains five groups of options, including a list of timing
settings plus a couple of individual options. Many of the settings in this tab relate to a multiple-
user environment or interfacing with external applications. For example, the DDE operations
options either ignore requests from external sources or allow updating of DDE links.
The next group of selections in the Advanced tab deals with shared databases and
interactions with external sources. For example, enter a number between 0 and 300 seconds in
the OLE/DDE Timeout (sec) option to set the period of time Access should wait to re-attempt
a failed OLE or DDE operation. The “Number of update retries” option refers to the number of
times Access tries to save a changed record that is locked by another user. You can enter a number
between 0 and 10.
In the Default File Format option, you can choose between Access 2000 and Access
2002-2003 as the default format for new databases.
In the “Default open mode” group, you have a choice between Shared, which allows others to
open the database at the same time you have it open, and Exclusive, which gives you sole access to
the database. See Chapter 20 for more information about running Access in a shared environment.
CHAPTER 13: Customize the Workplace 329
HowTo-Tght (8) / How to Do Everything with Microsoft Office Access 2003 / Andersen / 222938-1 / Chapter 13
FIGURE 13-7 Setting the Advanced default options
P:\010Comp\HowTo8\938-1\ch13.vp
Friday, August 08, 2003 11:18:54 AM
Color profile: Generic CMYK printer profile
Composite Default screen
You can set the Default record locking option to No locks, which does not lock records while
they are being edited; All records, which locks all the records in a form or datasheet (and the
underlying tables) as long as the form or datasheet is open; or Edited record, which locks only
the record currently being edited.
The last option in the Advanced tab is Open databases using record-level locking, which
minimizes the page size required by the Unicode format representation. When you check this
option, instead of locking an entire page that might include several records, only one row or
record is locked at a time.
International Options
The International tab (see Figure 13-8) contains options that deal with the direction and alignment
of the text and the movement of the cursor through data. If you are building a database for Middle
Eastern language users, change the Default direction to right-to-left and set the General alignment
to Interface mode, which sets the text alignment consistent with the user interface language. For
example, if the language reads right to left, the text is aligned to the right.
If you have date fields in the database, you also might want to check Use Hijri Calendar to
change to the Middle Eastern calendar.
Error Checking Options
Automatic error checking is a new option with Access 2003 and a most welcome addition. The
feature detects errors in form and report designs and even offers ways to correct them. You can
330 How to Do Everything with Microsoft Office Access 2003
HowTo-Tght (8) / How to Do Everything with Microsoft Office Access 2003 / Andersen / 222938-1 / Chapter 13
FIGURE 13-8 Setting International default options
P:\010Comp\HowTo8\938-1\ch13.vp
Friday, August 08, 2003 11:18:54 AM
Color profile: Generic CMYK printer profile
Composite Default screen
13
CHAPTER 13: Customize the Workplace 331
HowTo-Tght (8) / How to Do Everything with Microsoft Office Access 2003 / Andersen / 222938-1 / Chapter 13
apply automatic error detection to five types of common errors. You set the error checking rules
on the Error Checking tab of the Options dialog box, as shown in Figure 13-9.
To request any error checking, check the “Enable error checking” check box. Then choose a
color for the error indicator, the small triangle that appears in the upper-left corner of the control
that caused the error. The types of errors you can monitor include:
■
An “Unassociated label and control” error occurs when you select a label and a control
that are not associated with each other.
■
The “New unassociated labels” error occurs when you add a label to a form or report
that is not associated with another control.
■
“Keyboard shortcut” errors occur when you select a control on a form that shows an
invalid shortcut key. Examples include duplicate shortcut keys, an unassociated label,
or an underlined space.
■
The “Invalid control properties” error occurs when you select a control that has an
invalid value in one or more properties.
■
“Common report” errors occur when the report has an invalid sorting and grouping
definition or when the report width exceeds the paper width.
Spelling Options
The Spelling options tab contains options for adjusting the AutoCorrect feature, changing the
dictionary, and setting exceptions to correcting apparent misspellings. The spelling option settings
are shared with other Office users.
Design for Multiple Languages
When you have a database that involves two languages, one left-to-right and the other
right-to-left, you can specify how the cursor decides which way to move as you enter text
or when to click the
RIGHT ARROW or LEFT ARROW keys. In the Cursor movement group,
you have a choice between Logical and Visual.
■
If you choose Logical, the cursor moves within bidirectional text according to the
direction of the language it is encountering. For example, if the same sentence includes
both English and Arabic words, the insertion point moves left to right in the English
text, then starts at the rightmost character of the Arabic word and continues to move
in a right-to-left direction.
■
If you choose Visual, the cursor moves within bidirectional text by moving to the
next adjacent character. For example, if the same sentence includes both English
and Arabic text, the insertion point moves left to right through the English text and
continues at the leftmost character of the Arabic word in the left-to-right direction.
P:\010Comp\HowTo8\938-1\ch13.vp
Friday, August 08, 2003 11:18:54 AM
Color profile: Generic CMYK printer profile
Composite Default screen
Table and Query Options
The Tables/Queries tab of the Options dialog box is divided into two sections: one for table
design and the other for query design (see Figure 13-10).
The Table design group includes default field size and type choices that you can select to
match your most frequent data entries.
The AutoIndex on Import/Create setting is very useful when you import a table from an
external source or create a new table in Design view. This setting tells Access to automatically
index on all fields in the imported table that begin or end with the characters you type in the box.
For example, the entries in the AutoIndex box instruct Access to create an index on all fields
whose names begin or end with the characters ID, key, code, or num. Separate multiple entries
by semicolons.
The new Show Property Update Options buttons option gives you the option of propagating
property changes made to fields in a table or query to controls in a form or report that are bound
to those fields.
In the Query design default settings, you can display the table names in the Table row of the
query grid. This helps to keep track of the field source when multiple tables are used in a query.
If you want all the fields in the design returned when you run the query but don’t want to bother
adding them to the grid, check “Output all fields.” When you select this option, only new queries
are affected.
332 How to Do Everything with Microsoft Office Access 2003
HowTo-Tght (8) / How to Do Everything with Microsoft Office Access 2003 / Andersen / 222938-1 / Chapter 13
FIGURE 13-9 Setting automatic Error Checking default options
P:\010Comp\HowTo8\938-1\ch13.vp
Friday, August 08, 2003 11:18:54 AM
Color profile: Generic CMYK printer profile
Composite Default screen
13
CHAPTER 13: Customize the Workplace 333
HowTo-Tght (8) / How to Do Everything with Microsoft Office Access 2003 / Andersen / 222938-1 / Chapter 13
The Enable AutoJoin option automatically creates an inner join between two tables in the
query grid if they have fields with the same name and of the same data type. One of the fields
must be the primary key field for that table. If you want to define the relationships yourself,
clear the option.
You can also change the Run permissions setting to Owner’s to keep others from saving any
changes to a new query. In the SQL Server Compatible Syntax (ANSI 92) option group, you can
choose options that help ensure that current or new databases are SQL server compatible.
You also can set some of the default features on menu bars and toolbars. For details of
the options at your disposal, refer to Chapter 16.
Create Custom Groups
Groups help you organize different database objects by placing shortcuts to the objects in a
custom group. For example, you can group all the pieces that you use to create and print your
company’s annual report. You can always place an object in the Favorites group but if you want
to begin grouping objects from your Access database in a different group, you can create a new
custom group. You can also add objects from other applications to the group.
FIGURE 13-10 Setting table and query default options
P:\010Comp\HowTo8\938-1\ch13.vp
Friday, August 08, 2003 11:18:55 AM
Color profile: Generic CMYK printer profile
Composite Default screen
To create a new group:
1. Right-click on one of the objects you want to add to the group and choose
Add to Group | New Group from the shortcut menu.
2. Enter the name for the new group in the New Group dialog box.
3. Click OK.
The new group name is added to the Groups list in the left pane of the Database window.
You also can create a new group without adding an object to it right away by right-
clicking on an existing group button, such as Favorites, and choosing New Group
from the shortcut menu. Name the group and click OK.
To add another object to the group, right-click on the object in the Database window, then
point to Add to Group in the shortcut menu and select the name of the group where you want to
place the object. Alternatively, you can simply drag the object icon to the group name in the left
pane of the Database window and drop it there. The object always remains in its original location;
only a shortcut is added to the group.
To rename or delete a group, right-click the group button and choose Rename Group or Delete
Group from the shortcut menu. If you choose to delete a group that contains shortcuts, Access
warns you that all the shortcuts will also be permanently deleted. When you delete the shortcut
from the group, the original object remains unaffected. If you choose to rename the group, a Rename
Group dialog box opens where you can type a new name, then click OK.
Change the Way Access Starts
Access receives information from several sources that tell it how to start and what to show when
it does start. Some startup settings affect only the current Access database; others affect the way
Access itself appears and behaves. The easiest way to control Access at startup is to set options
in the Startup dialog box.
The startup options you set in the Startup dialog box apply only to the current database so
you can choose different options for each of your databases or applications. When you set a
startup option such as a title bar with a custom name and icon, Access automatically sets the
corresponding database property for you. To set startup options, choose Tools | Startup to open
the Startup dialog box.
334 How to Do Everything with Microsoft Office Access 2003
HowTo-Tght (8) / How to Do Everything with Microsoft Office Access 2003 / Andersen / 222938-1 / Chapter 13
P:\010Comp\HowTo8\938-1\ch13.vp
Friday, August 08, 2003 11:18:55 AM
Color profile: Generic CMYK printer profile
Composite Default screen
13
Most of the changes in the startup options take effect the next time you open the database.
Only the Application Title and Application Icon options take effect as soon as you close the
dialog box.
After you have set startup options, you can bypass them by pressing
SHIFT when you
open the database.
■
Application Title To display a custom title in the Database window title bar,
enter the text you want displayed in the Application Title box.
■
Application Icon To add a custom icon to the title bar in place of the default Access
icon in the Windows title bar, type the name of the bitmap (.bmp) or icon (.ico) file
in the Application Icon box. If you don’t know the name of the file you want to use,
click the Browse button next to the box and use the Icon Browser to locate the file.
You can also choose to display the icon on form and report title bars.
If you are creating an application that is to be distributed to multiple users, you should
place the icon file in the same folder as the host application.
■
Menu Bar When you create a custom global menu bar that offers limited commands,
you can control what your users can do with the database. Use this option to replace the
default menu bar with your custom menu bar by choosing the name of the menu from the
drop-down list. This choice has no effect on the custom menu bars you have created for a
form or report. See Chapter 20 for information about creating custom startup menu bars.
The user might still have access to the built-in global menu if the Allow Full Menus
option is checked.
■
Allow Full Menus When this option is checked, the user has access to all the built-in
menus. If you clear this option, Access hides certain menus such as View and Insert that
give the user the power to open an object in Design view and make changes.
CHAPTER 13: Customize the Workplace 335
HowTo-Tght (8) / How to Do Everything with Microsoft Office Access 2003 / Andersen / 222938-1 / Chapter 13
P:\010Comp\HowTo8\938-1\ch13.vp
Friday, August 08, 2003 11:18:56 AM
Color profile: Generic CMYK printer profile
Composite Default screen
336 How to Do Everything with Microsoft Office Access 2003
HowTo-Tght (8) / How to Do Everything with Microsoft Office Access 2003 / Andersen / 222938-1 / Chapter 13
■
Allow Default Shortcut Menus Leave this option checked to allow access to the
built-in shortcut menus that appear when you right-click an object, a toolbar, or a menu
bar. Clear the option to disable all shortcut menus. If you want the user to be able to use
the shortcut menus but not to customize toolbars and menu bars, leave the option checked
but clear the Allow Toolbar/Menu Changes check box.
■
Display Form/Page Many applications display a special form or data access page
when opening, either as a welcoming screen or as a switchboard with a list of actions
you can take next, such as enter/edit data or preview a report. After you create the
special form and save it in the current database, you can use it as the startup form.
To choose a form for display at startup, click the drop-down arrow in the Display
Form box and choose the form from the list of forms in the current database.
■
Display Database Window If you don't want the user to see the Database window
behind the opening form, clear the Display Database Window check box. The user
might still be able to access the Database window by pressing
F11. If you hide the
Database window, the startup form must be a switchboard with navigation tools for
using the database. See Chapter 17 for more information about creating and using
switchboard forms.
■
Display Status Bar Clear this option to prevent the status bar from appearing at the
bottom of the window.
This option applies only to the current database, but you can keep from displaying
the status bar in all databases by clearing the Status Bar option in the View tab
of the Options dialog box.
■
Shortcut Menu Bar Select the name of a custom shortcut menu to replace the built-in
shortcut menus for forms and reports in the current database. Choose Default to use the
built-in shortcut menus.
■
Allow Built-in Toolbars Check this option to give the user access to all the built-in
toolbars in the current database or clear the option to prevent user access. If you want the
user to be able to use but not modify the built-in toolbars, select this option and clear the
Allow Toolbar/Menu Changes option. If you want the user to be able to use and modify
the toolbars, select both options.
■
Allow Toolbar/Menu Changes Check this option to permit the user to modify any
of the built-in or custom toolbars and menu bars in the database. Clear the option to lock
the toolbars by preventing access to the Customize dialog box. This option disables the
right mouse button click on a toolbar and the Tools | Customize command.
If this option is cleared, the user can still move, size, and dock toolbars and menu bars
unless specifically denied in the Customize dialog box for the toolbar or menu bar.
P:\010Comp\HowTo8\938-1\ch13.vp
Friday, August 08, 2003 11:18:57 AM
Color profile: Generic CMYK printer profile
Composite Default screen
13
CHAPTER 13: Customize the Workplace 337
HowTo-Tght (8) / How to Do Everything with Microsoft Office Access 2003 / Andersen / 222938-1 / Chapter 13
■
Use Access Special Keys You can use the special key combinations that display the
Database or Immediate window, menu bars, or modules in the Module window. If you
have cleared this option and specified a custom menu bar, the built-in menu bar is not
accessible. The special keys are
■
F11 Brings the Database window to the front if you are in the Access window
■
CTRL-G Displays the Immediate window
■
CTRL-BREAK Stops retrieving records from the server
■
ALT-F11 Starts the Visual Basic Editor
You can use the selections in the Startup dialog box instead of or in conjunction with
the actions contained in the AutoExec macro. An AutoExec macro is a series of actions
that take place when you open the database (after the Startup options have taken effect).
Because of the sequence of events, it is important to avoid conflicts between the two. For
example, the AutoExec macro could undo the options you set in the Startup dialog box.
See Chapter 15 for more information about AutoExec macros and how they are used.
Modify the Office Assistant
The Office Assistant can offer help and tips and answer questions relating to the Office program
you are currently using. Just like the list of relevant topics you see when you type a question in
the question box, the Assistant can display that list, specific tips about using the features or keyboard
shortcuts more effectively, and a variety of messages.
The Assistant is an animated character with sound that you can change to any one of the seven
characters that come with Office. If you get tired of the paper clip, you can change to a cat or a
dog or even an Einstein character. There are also many options that you can set to customize the
Assistant to match your needs.
Show and Hide
To open the Office Assistant, choose Help | Show the Office Assistant. If the Office Assistant has
not been installed, Access asks whether you want to install it now. Click Yes. Access may prompt
you to insert the Microsoft Office CD. To hide the Assistant, right-click the character and choose
Hide from the shortcut menu. You can also choose Help | Hide Office Assistant to close the assistant.
To close the Office Assistant balloon, click the character.
Set Office Assistant Options
To customize the help offered by the Assistant, you can change some of the options. If the Assistant
balloon is visible, click Options to display the Options tab of the Office Assistant dialog box (see
Figure 13-11). If the balloon is not visible, right-click the character and choose Options from the
shortcut menu.
P:\010Comp\HowTo8\938-1\ch13.vp
Friday, August 08, 2003 11:18:57 AM
Color profile: Generic CMYK printer profile
Composite Default screen