how to do everything with microsoft office access 2003 phần 8 pps
Bạn đang xem bản rút gọn của tài liệu. Xem và tải ngay bản đầy đủ của tài liệu tại đây (2.14 MB, 56 trang )
15
CHAPTER 15: Automate with Macros 369
HowTo-Tght (8) / How to Do Everything with Microsoft Office Access 2003 / Andersen / 222938-1 / Chapter 15
The first argument in the DateAdd function, “yyyy,” indicates that the interval you want
to increment is the year part of the date value. The second argument is the number to
add; the third names the control that contains the original date.
Set Control Properties
You can set many of the properties of forms, reports, and controls by running a macro. For example,
you can hide a control from view on the form or disable it so the user can’t enter data in it. You
can also change colors, fonts, and other appearance properties.
As an example of setting a property with a macro, disable the Drivers License control if the
subject of the Alpha Card report is younger than 16. To do this, set the Enabled property to No.
When a control is disabled, it still appears on the screen but is dimmed; you can’t reach it by
pressing
TAB or by clicking it.
To ensure that you enter the correct identifier, you can use the Expression Builder. After
adding the SetValue action to the macro, click Build (…) next to the Item argument to open
the Expression Builder, then do the following:
1. Double-click on the Forms folder, then double-click on the All Forms folder in the left
panel to open the list of forms in the current database.
2. Choose the Alpha Card form. A list of all controls and labels in the form appears in the
center panel.
3. Choose Drivers License. A list of all the properties that apply to the Drivers License text
box control appears in the right panel.
4. Choose Enabled and click Paste. When you click OK, the expression is placed in the
Item argument box.
To complete the macro:
1. Enter No in the Expression argument.
2. Add a condition to the Action row that runs the macro only if the Age value is less than 16.
P:\010Comp\HowTo8\938-1\ch15.vp
Friday, August 08, 2003 10:58:05 AM
Color profile: Generic CMYK printer profile
Composite Default screen
3. Attach the macro to the Age control’s After Update event property.
You probably will want to add another macro to reenable the Drivers License when you
move to the next record.
If you want to hide a control, set its Visible property to No. If the property value is a string
expression, enclose it in quotation marks in the Expression argument box.
Change the Flow of Operations
Adding conditions that determine whether a macro action is carried out is one way to control the
flow of operations. You can add the MsgBox function to a macro condition to let the user decide
which action to carry out. The MsgBox function is similar to the MsgBox action with the exception
that the function returns a value, depending on which button the user clicks in the message box. The
MsgBox function displays a dialog box containing the message and waits for the user to click a
button indicating the user’s choice. Several arrangements of buttons are available in the dialog box.
The MsgBox function has three main arguments and two additional arguments; only the first
one is required:
■
Prompt A string expression displayed in the dialog box. You can display up
to 1,024 characters, depending on the font size.
■
Button A number equal to the sum of three values, which specify the visual
characteristics of the message box such as the number and type of buttons, the
default button, the icon style, and the modality of the message box.
■
Title A string expression that is displayed in the dialog box title bar.
Two additional arguments can specify a Help file and context number in the file where you
can find context sensitive help.
You can display seven different buttons in various arrangements, plus a choice of four icons.
You also can specify which of the buttons is the default. Each button arrangement and dialog box
feature has a numeric value. These values are totaled and placed in the Button argument. The six
arrangements of the seven buttons and their values are:
■
0 displays only OK
■
1 displays OK with Cancel
370 How to Do Everything with Microsoft Office Access 2003
HowTo-Tght (8) / How to Do Everything with Microsoft Office Access 2003 / Andersen / 222938-1 / Chapter 15
P:\010Comp\HowTo8\938-1\ch15.vp
Friday, August 08, 2003 10:58:06 AM
Color profile: Generic CMYK printer profile
Composite Default screen
15
CHAPTER 15: Automate with Macros 371
HowTo-Tght (8) / How to Do Everything with Microsoft Office Access 2003 / Andersen / 222938-1 / Chapter 15
■
2 displays Abort, Retry, and Ignore
■
3 displays Yes, No, and Cancel
■
4 displays Yes and No
■
5 displays Retry and Cancel
Add 16 to the button sum to show the Critical Message icon or 32 for the Warning Query, 48
for the Warning Message, or 64 for the Information Message. Finally, you can add to the sum to
specify which button is the default. The default button activates if you press
ENTER.
For example, to display the Yes, No, and Cancel buttons in that order, add 3 to the Button sum.
If you want to display the Critical Message icon, add 16 to the sum. To set the No button as the
default, add 256 to the sum. For these features, enter 275 as the Button argument in the MsgBox
function. See the Help topic “MsgBox Function” for a complete list of all the button arrangements
and dialog box features.
When you use the MsgBox function in a macro condition, you can compare the returned
value to a specific number and carry out the action if the comparison is True. For example, you
can use the MsgBox function to display a confirmation message before deleting a record. The
box contains three buttons: Yes, No, and Cancel.
When the user clicks one of the buttons, the MsgBox function returns a value depending on
which button was clicked: 1 for OK, 2 for Cancel, 3 for Abort, 4 for Retry, 5 for Ignore, 6 for Yes,
and 7 for No.
For example, if the user clicks the Yes button, the function returns 6; so if any other value is
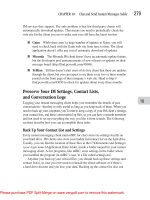
returned, the user did not click Yes. Figure 15-3 shows a macro using the MsgBox function in a
condition that evaluates to True if the function returned any value except 6 (Yes). If the value is
FIGURE 15-3 Using the MsgBox function in a macro condition
P:\010Comp\HowTo8\938-1\ch15.vp
Friday, August 08, 2003 10:58:06 AM
Color profile: Generic CMYK printer profile
Composite Default screen
372 How to Do Everything with Microsoft Office Access 2003
HowTo-Tght (8) / How to Do Everything with Microsoft Office Access 2003 / Andersen / 222938-1 / Chapter 15
not 6, the deletion event is canceled. You could add other conditions that carry out actions as
a result of the other button selections.
The Button argument in the MsgBox function in Figure 15-3 is 291, which is the sum
of the Yes, No, and Cancel button arrangement (3), the Warning Query icon (32), and
setting the second button (No) as the default (256).
After you save the Verify Deletion macro, attach it to the form’s Before Del Confirm event
property. The message box displays when you select a record and press
DEL. In Figure 15-3, the
user selected the Alpha Entry record for Index 24 before pressing
DEL. You can see that it has
been deleted from the Form view but has not yet been confirmed. If you click No in the box, the
record is returned. If you respond by clicking Yes, Access deletes the record.
If the deletion will result in cascade deletions of other records or interfere in some other
way with the relationships in the database, Access displays another confirmation message.
Filter Records
You can create a macro to limit the records you want to print by adding a Where Condition to the
OpenReport action. For example, suppose that you want to preview the Alpha Entry records for
all incidents with a Code in the danger range, 11000 to 19999. Start a new macro in the macro
design window and do the following:
1. Choose OpenReport in the Action column.
2. In the Report Name argument, select Alpha Entries from the list of available reports.
3. Choose Print Preview as the View argument.
4. Enter [Alpha Entry]![Code] Between 11000 And 19999 in the Where Condition
argument or click the Build button to get help from the Expression Builder.
Don’t use an equal sign in the Where Condition argument.
5. Click Run.
You can see in the Print Preview that only three of the incidents reported fall in the danger range.
P:\010Comp\HowTo8\938-1\ch15.vp
Friday, August 08, 2003 10:58:07 AM
Color profile: Generic CMYK printer profile
Composite Default screen
15
If you want to see a fancy example of filtering records by using macro conditions, open
the Northwind sample database’s Customer Phone List macro.
Create an AutoExec Macro
You can create a special macro that runs when you first open a database. The AutoExec macro
can carry out such actions as opening a form for data entry, displaying a message box prompting
the user to enter his or her name, or playing a sound greeting. All you need to do is create the
macro with the actions you want carried out at startup and save it with the name AutoExec.
A database can have only one macro named AutoExec.
When you open a database, all the startup options you have set in the Startup dialog box take
place first. You can see these by choosing Tools | Startup. Access looks for a macro named AutoExec
and executes the actions in it. You can bypass both the startup options and the AutoExec macro
by pressing
SHIFT when you open the database.
Many of the same options can be set in the AutoExec macro as in the Startup dialog
box. Be careful not to include conflicting settings in the macro. See Chapter 13 for
information about the startup settings.
Create a Macro Group
If you have created several macros that apply to controls on the same form or report, you can
group them together as one file. There are two advantages to using macro groups:
■
It reduces the number of macro names in the Database window.
■
You can find all the macros for a single form or report in one place where they are easy
to edit.
An example of using grouped macros is the Choose Report dialog box that asks you to select
the report you are interested in and then decide to print or preview the report. See Chapter 17 for
details of this form.
CHAPTER 15: Automate with Macros 373
HowTo-Tght (8) / How to Do Everything with Microsoft Office Access 2003 / Andersen / 222938-1 / Chapter 15
P:\010Comp\HowTo8\938-1\ch15.vp
Friday, August 08, 2003 10:58:08 AM
Color profile: Generic CMYK printer profile
Composite Default screen
374 How to Do Everything with Microsoft Office Access 2003
HowTo-Tght (8) / How to Do Everything with Microsoft Office Access 2003 / Andersen / 222938-1 / Chapter 15
To create a macro group:
1. Open the macro sheet as usual.
2. Click the Macro Names button or choose View | Macro Names.
3. Add a macro to the sheet and enter a name for it in the Macro Name column of the first
row of the macro.
4. Add the rest of the actions to the macro.
5. To add another macro, enter the name in the Macro Name column and add the actions
you want to occur. Figure 15-4 shows the completed Choose Report macro group.
6. Save and close the macro window.
When Access runs a macro in a group, it begins with the action in the row that contains the
macro name and continues until it finds no more actions or encounters another macro name. After
adding all the macros to the group, close and save it as usual with the group name.
You will find the macros in a group will be much easier to read if you leave at least one
blank row between the macros.
FIGURE 15-4 Grouping macros
P:\010Comp\HowTo8\938-1\ch15.vp
Friday, August 08, 2003 10:58:08 AM
Color profile: Generic CMYK printer profile
Composite Default screen
15
When you assign macros from a group to an event property, you must use the group name as
well as the macro name. In the property sheet for a control, the drop-down list in an event property
shows compound names for all the macros in a group and the names of all the single macros. The
group name and the macro name both appear separated by a period: macrogroupname.macroname.
Assign AutoKeys
Access offers a special macro group named AutoKeys in which you can assign an action or set of
actions to a specific key or key combination. Pressing the key or combination of keys carries out
the action you specify. You can add as many individual macros to the group as you need, each
one named with the key or key combination that will run it.
For example, the following macro opens the Alpha Card form when the user presses
CTRL-F.
The SendKey syntax form is used as the macro name. The carat symbol (^) represents
CTRL and the
plus sign (+) represents
SHIFT. Function keys and other key names are enclosed in curly brackets.
See the Help topic “AutoKey Combinations” for a list of key combinations and their SendKey
syntax for the macro name.
If you assign a key combination that is already used by Access (for example, CTRL-C),
the Access assignment will no longer work unless you change it manually or reset to
default. Be warned, though, that resetting to the default will remove all custom
assignments.
CHAPTER 15: Automate with Macros 375
HowTo-Tght (8) / How to Do Everything with Microsoft Office Access 2003 / Andersen / 222938-1 / Chapter 15
P:\010Comp\HowTo8\938-1\ch15.vp
Friday, August 08, 2003 10:58:09 AM
Color profile: Generic CMYK printer profile
Composite Default screen
HowTo-Tght (8) / How to Do Everything with Microsoft Office Access 2003 / Andersen / 222938-1 / Front Matter
Blind Folio FM:ii
P:\010Comp\Build8\769-9\fm.vp
Tuesday, January 07, 2003 1:28:08 PM
Color profile: Generic CMYK printer profile
Composite Default screen
This page intentionally left blank
HowTo-Tght (8) / How to Do Everything with Microsoft Office Access 2003 / Andersen / 222938-1 / Chapter 16
blind folio 377
Chapter 16
Customize Menus
and Toolbars
P:\010Comp\HowTo8\938-1\ch16.vp
Friday, August 08, 2003 11:21:16 AM
Color profile: Generic CMYK printer profile
Composite Default screen
378 How to Do Everything with Microsoft Office Access 2003
HowTo-Tght (8) / How to Do Everything with Microsoft Office Access 2003 / Andersen / 222938-1 / Chapter 16
How to…
■
Customize Access command bars
■
Build custom command bars
■
Attach a customized command bar to an object
■
Modify and delete custom command bars
■
Restore built-in command bars
In Access 97, Microsoft blended the three types of user interaction tools into a single global
concept: the command bar. Although the terms toolbars, menu bars, and shortcut menus are still
valid in Access 2003 and do describe differing implementations, the methods used to create and
modify custom command bars are the same for all types. The purpose is to make them more
consistent and easier to use and customize.
You have worked extensively with all of these interaction tools in the previous chapters of
this book and when running other Office programs. In this chapter, you will see how to work
with and customize built-in command bars and create custom command bars for an application.
Use Access Command Bars
The basic element of toolbars, menu bars, and shortcut menus is the command the user chooses
to cause an action such as printing a report or running a query. You reach a command by clicking
a toolbar button or choosing from a hierarchy of menus and submenus.
Toolbar button
Command bar
Menu
Submenu
Menu commands
P:\010Comp\HowTo8\938-1\ch16.vp
Friday, August 08, 2003 11:21:16 AM
Color profile: Generic CMYK printer profile
Composite Default screen
16
CHAPTER 16: Customize Menus and Toolbars 379
HowTo-Tght (8) / How to Do Everything with Microsoft Office Access 2003 / Andersen / 222938-1 / Chapter 16
The command can appear as a button with an image or a menu command showing text.
Menu commands with equivalent toolbar buttons often also display the icon that appears on
the button. You can set options so that menu commands and buttons can show both text and
images. You can also group a set of related items in a menu, toolbar, or shortcut menu.
Some command bars are classified as global and are available to any database or application.
Built-in command bars are predefined and are automatically displayed in specific views in any
database. Custom command bars are user-defined and are limited to the database in which they
were created. Custom command bars can also be attached to specific forms or reports.
Show and Hide Built-in Toolbars
The built-in Access toolbars appear automatically in certain contexts. For example, when you are
in form Design view, the default toolbars are Form Design and Formatting (Form/Report). If you
right-click in one of the toolbars, you will see that you can also display several other toolbars; the
list varies depending on the current view.
To add to the window any toolbars not in the list, open the Customize dialog box using one
of the following methods:
■
Right-click in a toolbar and choose Customize at the bottom of the shortcut menu
■
Choose View | Toolbars | Customize
■
Choose Tools | Customize
The Toolbars tab of the Customize dialog box contains a list of all three types of available
toolbars. Click the check box of any toolbar you want to add to the display and click Close.
Clear the check mark to remove the toolbar from the screen.
You can also remove a toolbar from the display by right-clicking in any toolbar and removing
the check mark from the name in the drop-down list. If the toolbar is not the default for this view,
P:\010Comp\HowTo8\938-1\ch16.vp
Friday, August 08, 2003 11:21:16 AM
Color profile: Generic CMYK printer profile
Composite Default screen
the name will also be removed from the drop-down list. Default toolbar names remain on that list
even though they are not showing.
Three additional toolbars, which are not defaults for any view, appear in the Toolbars list in
the Customize dialog box:
■
The Source Code Control toolbar displays buttons you can use to control changes
while creating Visual Basic code in a multiple-developer environment.
■
The Utility 1 and Utility 2 toolbars are empty, built-in toolbars you can use to create
custom global toolbars as described in the section “Create a Global Toolbar” later in
this chapter.
Two other items on the Toolbars list that are not really toolbars are Menu Bar and Shortcut
Menus. Menu Bar displays the default menu bar for the current view. The names of any new
custom command bars you create will appear in alphabetic order at the end of the list.
When you check Shortcut Menus in the Toolbars list, a menu bar is displayed containing all
the built-in shortcut menus. As shown in Figure 16-1, clicking Report on the Shortcut Menus menu
380 How to Do Everything with Microsoft Office Access 2003
HowTo-Tght (8) / How to Do Everything with Microsoft Office Access 2003 / Andersen / 222938-1 / Chapter 16
FIGURE 16-1 Viewing the list of built-in shortcut menus
Shortcut Menus
menu bar
Shortcut menu for a
report in Design view
List of report
elements
Toolbar
Options
P:\010Comp\HowTo8\938-1\ch16.vp
Friday, August 08, 2003 11:21:17 AM
Color profile: Generic CMYK printer profile
Composite Default screen
16
CHAPTER 16: Customize Menus and Toolbars 381
HowTo-Tght (8) / How to Do Everything with Microsoft Office Access 2003 / Andersen / 222938-1 / Chapter 16
bar displays a list of elements in the report that have associated shortcut menus, such as Design
View Title Bar or Design View Control. When you click on one of the elements in the list, you
see the shortcut menu that appears when you right-click on that part of the report in either Design
View or Print Preview.
If you create custom shortcut menus, the names are not displayed separately in the Toolbars
list. Instead, they are listed as menu items in the Custom category on the Shortcut Menus
menu bar.
Show and Hide Toolbar Buttons
You don’t have to display all the default toolbar buttons on a toolbar. Using the Toolbar Options
button, you can choose which buttons to display. Click the Toolbar Options button (actually a
gray area rather than a conventional button) on the right end of the toolbar (or at the right end of
the title bar next to the Close button if the toolbar is floating) to display the list of available buttons.
Click the Add or Remove Buttons drop-down arrow and point to the toolbar name in the list of
buttons. Figure 16-2 shows the list of buttons normally displayed on the Table Datasheet toolbar.
The arrow at the end of the list indicates there are additional buttons not in view.
To hide a button, clear the check mark next to the button name. To restore the button to the
toolbar, check it in the list again. The last item in the list is Reset Toolbar, which restores the toolbar
to its original default button set.
Move and Resize Command Bars
A command bar is docked if it is fixed to one edge of the window. Menu bars and toolbars normally
appear docked at the top of the window. You can drag them away from the edge and turn them
into floating command bars, which can be moved about on the screen. A docked command bar
has no title bar, whereas a floating command bar has an identifying title bar. The Design Toolbox
that you use to work with a form or report design is an example of a toolbar that is by default a
floating toolbar.
To move a toolbar or menu bar from its docked position, click and drag its moving handle
(the stack of small dots at the left end of the bar). You can also click on an empty space, on any
separator bar in the menu bar, or on a toolbar to drag it away from the dock. To dock the command
bar to an edge of the window, drag it to the side until it spreads out to the full height or width of
the window.
After moving the command bar away from the edge of the window, you can drag the toolbar
borders to change the height and width of the bar. To close a floating toolbar, click the Close button
in the title bar. You cannot close a floating menu bar because it does not include a Close button.
You can also change the arrangement of the menu bar and the toolbars when they are docked.
For example, if you want the toolbar to appear above the menu bar, click the toolbar moving handle
and drag it over the menu bar.
Change Menu and Toolbar Options
In addition to repositioning and resizing a built-in menu or toolbar, you can use the Options tab
of the Customize dialog box to set other features. The upper pane sets options for the menus and
P:\010Comp\HowTo8\938-1\ch16.vp
Friday, August 08, 2003 11:21:17 AM
Color profile: Generic CMYK printer profile
Composite Default screen
382 How to Do Everything with Microsoft Office Access 2003
HowTo-Tght (8) / How to Do Everything with Microsoft Office Access 2003 / Andersen / 222938-1 / Chapter 16
toolbars as personalized by Access. The lower pane contains options that change the way command
bars look and behave. These option settings all remain in effect until you change them.
FIGURE 16-2 Toolbar Options list for the Table Datasheet toolbar
P:\010Comp\HowTo8\938-1\ch16.vp
Friday, August 08, 2003 11:21:17 AM
Color profile: Generic CMYK printer profile
Composite Default screen
16
CHAPTER 16: Customize Menus and Toolbars 383
HowTo-Tght (8) / How to Do Everything with Microsoft Office Access 2003 / Andersen / 222938-1 / Chapter 16
The toolbar shown below has large icons with both ScreenTips and shortcut keys displaying.
Notice the double arrows at the right end of the toolbar, indicating that additional buttons are out
of view offscreen.
Customize Command Bars
Access provides so many useful menu bars and toolbars; why would anyone want to create
custom command bars? One reason could be that you do not want the user to be able to make
changes in a form or report design. You can remove the View button from the toolbar to keep
the user from switching to Design view.
Other possible customizations are:
■
Adding a Save Record button to the toolbar so the user can quickly test the validity of
the data just entered without leaving the record
■
Removing the New Object button from the toolbar to keep the user from designing new
forms, reports, or other Access objects
■
Tailoring the commands and button options to match the terminology and practice of
a specific application
You use the Customize dialog box to create and customize all three types of command bars.
You use the same techniques and tools to modify built-in command bars to create new custom
command bars. The difference between them is that the modified command bar is available to all
Access databases, whereas the custom bar is available only to the database where it was created.
Create a Global Toolbar
There are two ways to create a custom toolbar that will be available to all your databases: modify
a built-in toolbar or create a new global toolbar. The list of available toolbars in the Customize
dialog box includes the blank Utility 1 and Utility 2 built-in toolbars. When you add buttons
and menu commands to them, they become custom global toolbars and are available to all the
databases and Access client projects. They actually are treated as modified built-in toolbars,
not custom toolbars. You can’t rename these toolbars.
Create Custom Toolbars and Menu Bars
Whether you’re creating a new custom toolbar, menu bar, or shortcut menu, it all begins the
same way:
1. Open the Customize dialog box using one of the methods described earlier.
P:\010Comp\HowTo8\938-1\ch16.vp
Friday, August 08, 2003 11:21:18 AM
Color profile: Generic CMYK printer profile
Composite Default screen
2. Click the Toolbars tab and click New, then type a name for the new toolbar in the New
Toolbar dialog box.
3. Click OK. A tiny, empty toolbar appears in front of the Customize dialog box and the
toolbar name, Alpha Card, appears at the bottom of the list in the Toolbars box.
4. On the Toolbars tab, click Properties. The Toolbar Properties dialog box opens.
5. Here is where the processes diverge. Do one of the following:
■
To continue with a custom toolbar, set the toolbar properties, as described next.
■
If you want to create a new menu bar, choose Menu Bar from the Type list, then
set the properties.
■
If you want to create a new shortcut menu, choose Popup from the Type list and
set the properties.
6. Choose Close when you have finished setting the properties.
The Selected Toolbar box in the Toolbar Properties dialog box shows the name of the toolbar.
Click the down arrow to see the list of all toolbars, menu bars, and shortcut menus in the current
database. Although the properties are called Toolbar Properties, they apply equally to menu bars.
Shortcut menus have fewer properties available.
If you change the toolbar type to Popup to create a shortcut menu, the only property
available is Allow Customizing; all others are dimmed. Access displays a warning if
you try to change a toolbar or menu to a popup.
384 How to Do Everything with Microsoft Office Access 2003
HowTo-Tght (8) / How to Do Everything with Microsoft Office Access 2003 / Andersen / 222938-1 / Chapter 16
P:\010Comp\HowTo8\938-1\ch16.vp
Friday, August 08, 2003 11:21:18 AM
Color profile: Generic CMYK printer profile
Composite Default screen
16
If you are modifying a built-in toolbar, some of the properties are not available. For example,
the Toolbar Name and Type properties are dimmed because you can’t rename a built-in toolbar or
change its type. Also the Show on Toolbars Menu option is dimmed because the built-in toolbars
that are in context with the current view are always shown when you right-click the toolbar or
choose View | Toolbars. However, the Restore Defaults button, which you can click to restore
a built-in toolbar to its original condition, does become available.
After setting the desired properties for the new toolbar, menu bar, or shortcut menu, you can
add buttons and menus.
Add and Delete Toolbar Buttons
Once you create a new toolbar, you can add buttons to it in two ways:
■
Copy or move a built-in or previously created custom button from another toolbar.
■
Select the button from the list of commands in the Commands tab of the Customize
dialog box.
Figure 16-3 shows the commands in the Query Design toolbar. Commands in the list that
show an ellipsis (…) after the text (for example, Show Table) open a dialog box. Those with
a vertical bar and a black triangle, such as Query Type, open a submenu.
Many commands are available in the Commands box, including the built-in buttons that
appear in built-in toolbars. The commands are grouped into categories. Click the desired
CHAPTER 16: Customize Menus and Toolbars 385
HowTo-Tght (8) / How to Do Everything with Microsoft Office Access 2003 / Andersen / 222938-1 / Chapter 16
FIGURE 16-3 The Commands tab of the Customize dialog box
Opens dialog box
Opens submenu
P:\010Comp\HowTo8\938-1\ch16.vp
Friday, August 08, 2003 11:21:18 AM
Color profile: Generic CMYK printer profile
Composite Default screen
category to see the commands that are available in that category. You might have to examine
more than one category to find the button you want—some are stored in unusual categories.
To add a button from the Customize dialog box:
1. Choose the type of command you want in the Categories list. The Commands list shows
images and text of commands in that category.
2. When you find the button you want, drag it to the toolbar. When you see a dark I-beam,
drop the button on the toolbar.
3. Continue to add other buttons to the toolbar. You can drop a button between two buttons
already in the toolbar. The bar will expand as you add buttons. To move a button already
in place, drag it to the desired position.
If another toolbar has a button you can use, you can move or copy it to the new toolbar. Often
it is easier to use an existing button than to start from scratch. An additional advantage is that
when you copy or move a command from a built-in toolbar, the command keeps all the pointers
to Access Help topics.
Moving a button from one toolbar to another removes it from the source toolbar.
You must have both toolbars showing to move or copy a button. The Customize dialog box
can be open or closed. To move a button from another toolbar:
■
If the Customize dialog box is open, drag the button to the new toolbar.
■
If the Customize dialog box is not open, hold down ALT while you drag the button.
To copy a button from another toolbar:
■
If the Customize dialog box is open, hold down CTRL while you drag the button.
■
If the Customize dialog box is not open, hold down CTRL-ALT while you drag the button.
386 How to Do Everything with Microsoft Office Access 2003
HowTo-Tght (8) / How to Do Everything with Microsoft Office Access 2003 / Andersen / 222938-1 / Chapter 16
Add a Button That Opens
a Form or Report
If you want to use the button to open a specific form or report or want to run a query, choose
All Forms, All Reports, or All Queries in the Categories list. The Commands box shows
the names of all the objects of that type in the current database. Drag the name of the object
from the Commands box to the toolbar. The default button for that type of object appears on
the toolbar—for example, the Form View button for a form or the Print Preview button for
a report. There also are button categories that open a table or run a macro.
P:\010Comp\HowTo8\938-1\ch16.vp
Friday, August 08, 2003 11:21:19 AM
Color profile: Generic CMYK printer profile
Composite Default screen
16
CHAPTER 16: Customize Menus and Toolbars 387
HowTo-Tght (8) / How to Do Everything with Microsoft Office Access 2003 / Andersen / 222938-1 / Chapter 16
If you copy a built-in button, the copy is not independent of the original button. If you
make changes to the copy of the button, the same changes also affect the built-in button.
If you intend to make changes to the button, it is better to create a new custom toolbar
and drag the buttons from the Commands box.
If you want to add a button that opens a database object in its default view, you can
simply drag the object from the Database window to the toolbar. The Customize dialog
box must be closed to do this. The button ScreenTip displays the name of the object it
will open.
To remove a button with the Customize dialog box open, drag it off the toolbar or right-click
the button and choose Delete from the shortcut menu. When you delete a built-in button, it is still
available from the Commands box, but deleting a custom button removes it permanently. If the
Customize dialog box is not open, hold down
ALT while you drag the button off the toolbar.
If you want to keep custom buttons for later use instead of deleting them completely,
create a new toolbar for storing them until you need them. Move the buttons from
one toolbar to the other, then hide the new toolbar by clearing the check mark in
the Toolbars box of the Customize dialog box.
Add Built-in Menus
You can add built-in menus to a toolbar or a menu bar using the same two methods: drag from
the Commands box of the Customize dialog box, or move or copy from an existing toolbar or
menu bar. The only difference between adding toolbar buttons and menus is that by default the
menus show only text whereas the buttons show only an image. These properties can be changed
and customized.
With the new menu bar or toolbar showing, open the Customize dialog box and click the
Commands tab. Scroll down the Categories list and select Built-in Menus. Figure 16-4 shows
some of the built-in menus that are available.
Drag the menu from the Commands box to the menu bar or toolbar and drop the menu when
you see the dark I-beam. Most of the commands in the built-in menu are carried over, depending
on the context of the new menu bar or toolbar.
Add Custom Menus
If you want to build a new menu that is not a copy of one that Access offers, you can use the
New Menu tool and customize it to fit your needs. To add a custom menu to a toolbar or menu
bar, create it in place on the bar. To add a new custom menu:
1. With the toolbar or menu bar showing, open the Customize dialog box and click the
Commands tab.
P:\010Comp\HowTo8\938-1\ch16.vp
Friday, August 08, 2003 11:21:20 AM
Color profile: Generic CMYK printer profile
Composite Default screen
2. Scroll down the list of Categories and select New Menu.
3. Drag New Menu from the Commands box to the menu bar or toolbar.
4. Right-click the new menu and enter a name in the Name box of the shortcut menu
and press
ENTER (see Figure 16-5).
Adding Menu Commands to a Toolbar or Menu Bar
Menu commands can be added to toolbars and menu bars using the same procedure. The menu
commands are placed in a column under the menu name.
To add a menu command:
1. With the menu bar, toolbar, or shortcut menu showing, open the Customize dialog box
and click the Commands tab.
2. Click the appropriate menu or view category in the Categories box.
3. Drag the command from the Commands box and rest it on the menu in the menu bar
or toolbar. You will see the list of commands already in the menu (or an empty box
if the menu is new); drag the command to the position in which you want it to appear.
A horizontal bar appears in the drop-down menu just above the position where the
command will be inserted. When the bar is in the right place, release the mouse.
If the menu is new, release the mouse button over the empty box.
388 How to Do Everything with Microsoft Office Access 2003
HowTo-Tght (8) / How to Do Everything with Microsoft Office Access 2003 / Andersen / 222938-1 / Chapter 16
FIGURE 16-4 Selecting a built-in menu
P:\010Comp\HowTo8\938-1\ch16.vp
Friday, August 08, 2003 11:21:20 AM
Color profile: Generic CMYK printer profile
Composite Default screen
16
In the following example, the Print Preview command is added as the first command in the
new custom menu, named Forms/Reports.
If you add a menu command to a built-in menu that appears in more than one view, such
as the File menu, that command appears in the menu in all the views where the menu
appears.
You can also move or copy a menu command from another menu bar, toolbar, or shortcut
menu. If you are moving or copying a menu command to a menu in a different menu bar or
toolbar, both the source and destination bars must be showing and the Customize dialog box
also must be open.
■
To move the command, drag it over the menu where you want it to appear; when you see
the list of the commands in the menu, release the mouse at the desired position.
CHAPTER 16: Customize Menus and Toolbars 389
HowTo-Tght (8) / How to Do Everything with Microsoft Office Access 2003 / Andersen / 222938-1 / Chapter 16
FIGURE 16-5 Adding a new menu to a toolbar
P:\010Comp\HowTo8\938-1\ch16.vp
Friday, August 08, 2003 11:21:20 AM
Color profile: Generic CMYK printer profile
Composite Default screen
■
To copy the command, press CTRL while you drag the command to the new menu
or toolbar.
■
To delete a menu command from a menu or toolbar, drag the command off the menu
and away from the other menu bars or toolbars.
If you remove a command from a built-in menu, the command is removed from that
menu in every menu bar in which it appears.
Add a Submenu
A submenu is created the same way as a menu. You start a new menu and add commands to it.
To add a custom submenu to an existing menu:
1. Drag the New Menu command from the Commands box to the menu you want to contain
the submenu. When you see the horizontal line, release the mouse; the New Menu control
is placed with the other menu commands. The only difference between adding a command
and adding a submenu is that the submenu shows a pointer indicating that it opens another
list of menu commands.
You can also add one of the built-in menus or toolbar buttons that opens a submenu and
customize its commands.
2. Right-click New Menu and type a name for the submenu, such as Run Queries, then
press
ENTER.
3. Slowly click the new submenu to display a small, empty box to the right of the submenu
where the menu commands will be placed. If you click too fast, the box does not appear.
4. Select and drag a command, such as a query name from the All Queries category, to the
empty box. When the I-beam appears, release the mouse. The Forms/Reports menu has
two submenus: the built-in View menu and a custom submenu for running queries.
5. Drag the names of the other queries you want in the submenu from the All Queries list to
the submenu.
Add Commands to a Shortcut Menu
When you close the Toolbar Properties dialog box after choosing Popup as the toolbar type, the
new shortcut menu is added to the Custom category on the Shortcut Menus toolbar. The Shortcut
390 How to Do Everything with Microsoft Office Access 2003
HowTo-Tght (8) / How to Do Everything with Microsoft Office Access 2003 / Andersen / 222938-1 / Chapter 16
P:\010Comp\HowTo8\938-1\ch16.vp
Friday, August 08, 2003 11:21:21 AM
Color profile: Generic CMYK printer profile
Composite Default screen
16
CHAPTER 16: Customize Menus and Toolbars 391
HowTo-Tght (8) / How to Do Everything with Microsoft Office Access 2003 / Andersen / 222938-1 / Chapter 16
Menus toolbar is the group designation for all shortcut menus in the application. When you are
ready to complete the shortcut menu, do the following:
1. Open the Customize dialog box and click Shortcut Menus in the Toolbars box on the
Toolbars tab. The Shortcut Menu toolbar appears at the top of the screen.
2. Click the Custom category on the Shortcut Menus toolbar.
3. Add menu commands from the Customize dialog box the same way as for menu bars
and toolbars.
A shortcut menu can be global or context sensitive. To specify a shortcut menu as
global, set the option in the Startup dialog box as described shortly in this chapter
in the section “Specify Global Command Bars.” A context-sensitive shortcut menu
contains commands that relate to the object to which it is attached.
Attach a Custom Command Bar to an Object
Reports, forms, and controls have properties that specify which command bar is to be displayed
when the object is in view. The following properties apply mostly to forms and reports but you
can also attach a shortcut menu to controls on a form.
■ The Menu Bar property specifies the menu bar to display when a form or report has
focus. If the property is left blank, Access displays the built-in menu bar for the report
or the global menu bar as defined in the Startup dialog box.
■
The Toolbar property specifies the toolbar to use with a form or report when it is opened.
If the property is left blank, Access displays the default toolbar for the form or report.
■
The Shortcut Menu Bar property specifies the shortcut menu to display when you
right-click a form, a report, or a control on a form (but not a control on a report). If
the property is left blank, Access displays the default shortcut menu or the global
shortcut menu as defined in the Startup dialog box. To display the shortcut menu
when you right-click in the form, set the Shortcut Menu property to Yes.
To set one of these properties, open the object’s property sheet and click the Other tab. Select
the name of the command bar from the drop-down list next to the appropriate property box.
Repeat the process for each form, report, or control to which you want to attach a command bar.
When you attach a custom command bar to a form, the bar appears only when the form
is in Form view. Similarly, a custom command bar attached to a report appears only in
Print Preview.
Specify Global Command Bars
A global menu bar replaces the built-in menu bar in all the windows in an application except
where you have specified a custom menu bar for a form or report. A global shortcut menu
replaces the shortcut menus for datasheets, forms, form controls, and reports.
P:\010Comp\HowTo8\938-1\ch16.vp
Friday, August 08, 2003 11:21:22 AM
Color profile: Generic CMYK printer profile
Composite Default screen
392 How to Do Everything with Microsoft Office Access 2003
HowTo-Tght (8) / How to Do Everything with Microsoft Office Access 2003 / Andersen / 222938-1 / Chapter 16
To specify a custom menu bar or custom shortcut menu as the default for the entire database
or application, you must change the settings in the Startup dialog box. To set global command
bars to replace the defaults:
1. Choose Tools | Startup to open the Startup dialog box.
2. Click the arrow next to the Menu Bar box and select the name of the menu bar to use
instead of the default. The list includes only the custom menu bars.
3. Click the arrow next to the Shortcut Menu Bar box and select the shortcut menu to use
instead of the default.
4. Click OK to close the dialog box.
The changes will take effect the next time you open the database. To bypass the startup
options, press
SHIFT while the database is opening.
Delete a Custom Command Bar
To delete a custom toolbar, menu bar, or shortcut menu, open the Customize dialog box as usual
and click the Toolbars tab. Select the item you want to delete and click Delete. If the toolbar or
menu bar is a built-in one that you have modified, the Delete button is not available. Instead,
click Reset to remove the custom features and restore the built-in command bar to its original
default state.
Deleting a shortcut menu is a little different. You must convert it to a toolbar before you can
delete it. Perform the following steps to delete a custom shortcut menu:
1. Open the Customize dialog box and click the Toolbars tab, then select any toolbar. Since
the shortcut menus are not in the list of toolbars, you need to select an available toolbar
to get started.
2. Click Properties to open the Toolbar Properties dialog box.
3. In the Selected Toolbar box, choose the name of the shortcut menu you want to delete.
P:\010Comp\HowTo8\938-1\ch16.vp
Friday, August 08, 2003 11:21:22 AM
Color profile: Generic CMYK printer profile
Composite Default screen
16
4. Choose Toolbar in the Type list to change it to a toolbar, then click Close to return to the
Customize dialog box. The shortcut menu name is added to the list of toolbars.
5. Select the name of the shortcut menu in the list of toolbars and click Delete. Click OK to
confirm the deletion.
Modify Command Bars
All changes to command bars are made with the Customize dialog box open. You can add more
buttons, menus, and menu commands and rearrange them on the bar. The Rearrange Commands
feature is new with Access 2003 and it provides a single platform for modifying command bars.
The Rearrange Commands dialog box also gives you access to a shortcut menu where you can
specify other settings and properties for individual commands.
You can modify a command bar only if it is visible when the Customize dialog box is
displayed. Open the Customize dialog box and select all the toolbars you want to work on.
Then select the Commands tab and click the Rearrange Commands button. The Menu Bar
box in the Rearrange Commands dialog box contains a complete list of all the menus and
submenus in the Menu Bar. In Figure 16-6, the File menu from the built-in Menu Bar is
selected in the Menu Bar box and the menu items and submenus are displayed in the Controls
box below.
CHAPTER 16: Customize Menus and Toolbars 393
HowTo-Tght (8) / How to Do Everything with Microsoft Office Access 2003 / Andersen / 222938-1 / Chapter 16
FIGURE 16-6 Opening the Rearrange Commands dialog box
P:\010Comp\HowTo8\938-1\ch16.vp
Friday, August 08, 2003 11:21:22 AM
Color profile: Generic CMYK printer profile
Composite Default screen