Beginning SQL Server 2005 for Developers From Novice to Professional phần 2 ppsx
Bạn đang xem bản rút gọn của tài liệu. Xem và tải ngay bản đầy đủ của tài liệu tại đây (2.36 MB, 53 trang )
30
CHAPTER 2
■ SQL SERVER MANAGEMENT STUDIO
7. As you can see, the only real difference from the Connect to Server dialog box is that the Server Name
combo box is empty and there is a new section called Registered Server. In this area, you can give a
registration a different name, such as Development Server or User Testing Region, and on top of this
give the registration a description. You don’t have a server to register, so just click Cancel now.
8. Moving back to SSMS’s explorer window below the registered servers, take a look at the Object Explorer,
which should have been present when you first brought up SSMS. If it isn’t there or if it disappears, you
can redisplay it by selecting View ➤ Object Explorer or by pressing F8. You will likely use this explorer
the most, as it details every object, every security item, and many other areas concerning SQL Server.
You can see that SSMS uses nodes (which you expand by clicking the + signs) to keep much of the
layout of the Object Explorer (the hierarchy) compact and hidden until needed. Let’s go through each of
the nodes you see in Figure 2-6 now.
Figure 2-6. Object Explorer nodes
• Databases: Holds the system and user databases within the SQL Server you are connected to.
• Security: Details the list of SQL Server logins that can connect to SQL Server. You will see more on
this in Chapter 4.
• Server Objects: Details objects such as backup devices and provides a list of linked servers, where
one server is connected to another remote server.
• Replication: Shows the details involving data replication from a database on this server to another
database (on this or another server) or vice versa.
• Management: Details maintenance plans, which you will learn more about in Chapter 7, and provides
a log of informational and error messages that can be very useful when troubleshooting SQL Server.
• Notification Services: Sends out notifications of changes of data or objects to “the outside world” via
media such as e-mail or SMS. People can subscribe to these notifications, and details of these processes
are held in this node.
• SQL Server Agent: Builds and runs tasks within SQL Server at certain times, with details of success
of failures sent to pagers, e-mail, or operators defined within SQL Server. The running of these jobs
and the notifications of these failures or successes are dealt with by SQL Server Agent, and the details
are found in this node.
9. Select the topmost node in the Object Explorer to see a summary page similar to the one in Figure 2-7.
This area is known as the documents area. You don’t have to be on the top node for this page to be of
use, as it will provide a summary of any node within this explorer. This works a bit like folders within
Windows Explorer, where you can navigate through each item to get a summary of details of objects
within the node.
Dewson_5882C02.fm Page 30 Monday, January 2, 2006 2:55 PM
CHAPTER 2 ■ SQL SERVER MANAGEMENT STUDIO
31
Figure 2-7. Summary page
10. Moving to the menu bar of SSMS, the first item of interest is the View menu option. The first three options
on the View menu, shown in Figure 2-8, bring up the two explorer windows, Object Explorer and Registered
Servers Explorer, and the summary page we encountered previously. Therefore, if you ever need to
close these items to give yourself more screen space, you can reopen them from the menu or with the
shortcut keys you see defined. The other options on the View menu are as follows:
• Template Explorer: Provides access to code templates. In the examples in this book, we will be
building objects using T-SQL. Rather than starting from scratch, we can use code templates that
contain the basic code to create these objects.
• Solution Explorer: Displays solutions, which are convenient groupings of objects, T-SQL, or special
programs called stored procedures, among other items.
• Properties Window: Displays the set of properties for each object.
• Bookmark Window: Allows you to create bookmarks, which you place into various locations in your
code to allow you to jump quickly to those locations.
• Toolbox: Holds a list of objects that are database maintenance tasks, and where these tasks can be
altered.
• Web Browser: Brings up a web browser within SQL Server, ideal for searching the web for answers to
SQL Server problems for which you may require information.
• Other Windows: Allows you to access other windows generated when running T-SQL from Query
Editor, which may hold error messages or results from queries.
• Toolbars: Brings up toolbars for Query Editor, diagramming the database, and integration with Visual
SourceSafe for source control all, if they are not opened by default.
• Full Screen: Removes title bars and explorer windows, and then maximizes SSMS to show as much
of the main pages as possible.
Dewson_5882C02.fm Page 31 Monday, January 2, 2006 2:55 PM
32
CHAPTER 2
■ SQL SERVER MANAGEMENT STUDIO
Figure 2-8. The View menu options
11. SQL Server has two built-in tools as well as the capability to include other tools when they are launched.
These can be accessed through the Tools menu, shown in Figure 2-9, along with the means to customize
keyboard commands, show or hide toolbar buttons, etc., as is the case with other Microsoft products
such as Word. In particular, note the following options:
• SQL Server Profiler: There will come a time when you wish to monitor SQL Server’s performance. This
tool will monitor and log events, running code, etc., that you have informed it to check when they
happen within SQL Server.
• Database Engine Tuning Advisor: It is possible to take a workload of data and process it through your
solution. This advisor can suggest ways to improve the performance of this process.
• Options: This option lets you access different options you can use to set up your SSMS as you like. We
will take a look at each of these options in the next section.
Figure 2-9. The Tools menu options
12. The final part of SSMS that we will take a look at is the main SSMS toolbar, as you can see in Figure 2-10.
Some of the icons, such as the Save icon, will be instantly recognizable, but let’s go through each button
so that it is clear what they all do.
Dewson_5882C02.fm Page 32 Monday, January 2, 2006 2:55 PM
CHAPTER 2 ■ SQL SERVER MANAGEMENT STUDIO
33
Figure 2-10. Main toolbar
13. In the next section, you will see how you can write code to add objects, work with data, and so on. Clicking the
New Query button will open up a new query window, which allows you to do this using the connection
already made with SQL Server.
14. Similar to the New Query button, the New Database Engine Query button will also create a new query
window. However, this will give you the option of having a different connection to SQL Server through
which to run your code. This is a good way of testing code with a different connection to ensure that you
cannot see data that should be secure, such as wages, via that connection.
15. Data within a specialized database known as an analysis database allows you to interrogate the data
and analyze the information contained within. The three New Analysis Service Query buttons allow you
to build different types of analysis queries. I include this information here only for your reference, as
analysis databases fall outside the scope of this book.
16. SQL Server editions also include an edition called SQL Server Mobile. This allows SQL Server to run on
devices such as PDAs. If you have this installed, then clicking the SQL Server Mobile Query button will
allow a SQL Server Mobile query to be run. Again, this book does not cover this particular function further.
17. As with every other Windows-based product, it is possible to open and save files. The Open button (the
first one shown in the following image) will allow you to search for a T-SQL file. The next two buttons
change their function depending on what you are doing, but in the main, the Single Save button will give
you the option to save the details of the window that is active in the main documents area of SSMS. The
Multiple Save button will give you the option to save all the open tabs in the documents window.
18. The last set of buttons open up explorers and document tabs that we have covered already. From left to
right in the following image, these buttons access the Registered Servers Explorer, summary page,
Object Explorer, Template Explorer, and Properties window.
Dewson_5882C02.fm Page 33 Monday, January 2, 2006 2:55 PM
34
CHAPTER 2
■ SQL SERVER MANAGEMENT STUDIO
Now that we’ve covered the main areas of SSMS, we’ll next take a closer look at the Options
area off the Tools menu, as it warrants a more detailed discussion.
Examining SSMS’s Options
As you saw earlier, the Tools menu has an Options menu choice. This allows you to choose
what options you would like to set as part of the setup for SSMS. We will go through each node
and option in this area one at a time, except for the options dealing with Analysis Services,
which are not of interest to us just now.
Environment Node
The first node we’ll look at is the Environment node, which covers the SSMS environment and
how you would like it to look and feel. This contains the General, Fonts and Colors, Keyboard,
and Help nodes, which you’ll see next.
General Node
The General node, shown in Figure 2-11, contains the following options:
• At Startup: This controls how SSMS behaves when it is started. You have a choice of four
options here. It is possible to open Object Explorer after prompting for a connection,
open a new query window after prompting for a connection, open both of these after a
connection, or open with an empty SSMS and no connection.
• Hide System Objects: In SQL Server, system objects are hidden. This is a good option to
have enabled unless you are a database administrator.
• Environment Layout: The layout can either be defined as tabbed documents (a bit like
Excel) or as MDI (a bit like Word).
• Docked Tool Window—Close Button: If checked, when you click the close button, only
the active document is closed. Unchecked means that all windows will be closed.
• Docked Tool Window—Auto Hide Button: You can pin toolboxes or unpin explorers to
hide them. Unpinning windows affects only the currently active document.
• Display NN Files in Recently Used List: This indicates the number of recently opened files
to place under the File menu option.
Dewson_5882C02.fm Page 34 Monday, January 2, 2006 2:55 PM
CHAPTER 2 ■ SQL SERVER MANAGEMENT STUDIO
35
Figure 2-11. Environment area, General options
Fonts and Colors Node
As you might guess, the Fonts and Colors node options, shown in Figure 2-12, affect the fonts
and colors for different areas of SSMS. The Display Items list box contains a list of all the
different areas that can be set. By selecting one of these items, you can define the color of the
foreground and background as well the font type and size.
Figure 2-12. Environment area, Fonts and Colors options
Dewson_5882C02.fm Page 35 Monday, January 2, 2006 2:55 PM
36
CHAPTER 2
■ SQL SERVER MANAGEMENT STUDIO
Keyboard Node
The Keyboard node section, shown in Figure 2-13, allows you to define fast keys for commands
you run often. Any T-SQL stored procedure can be defined. The examples in this book assume
you are using the standard keyboard scheme.
■Note A stored procedure is a set of code that is stored within SQL Server, a bit like a program.
Figure 2-13. Environment area, Keyboard options
Help Node
The help system for SQL Server as a whole has been altered: you now have the ability to use not
only the help installed on the computer, but also the online help; thus you have access to the
most up-to-date information. Configure the help system through the Help node options shown
in Figure 2-14.
Dewson_5882C02.fm Page 36 Monday, January 2, 2006 2:55 PM
CHAPTER 2 ■ SQL SERVER MANAGEMENT STUDIO
37
Figure 2-14. Environment area, Help options
Source Control Node
When creating code or objects, you can integrate a source control system with SQL Server so
that changes are immediately stored for safety. For each source control system, it is possible to
define a plug-in that will then populate the combo box, as shown in Figure 2-15. You can then
use this source control along with source control buttons and menu options.
Figure 2-15. Source Control options
Dewson_5882C02.fm Page 37 Monday, January 2, 2006 2:55 PM
38
CHAPTER 2
■ SQL SERVER MANAGEMENT STUDIO
Text Editor Node
The text editor node contains options that affect how you work with text.
File Extensions
Files specific to a particular Microsoft product have their own unique file extension so that they
are instantly recognizable to users and can then be linked to the relevant product. These prod-
ucts have different filtering when accessing them through Open from the File menu so that you
will only see files with the relevant extension. This also holds true for SQL Server, but it is possible
to alter these extensions within the File Extension option, as you see in Figure 2-16, although
I strongly recommend that you don’t. You’ll come across a few of these extensions throughout
the book, although the majority are for more advanced work.
Figure 2-16. Text Editor, File Extension defaults
All Languages ➤ General
Taking a look at the second option within the Text Editor node, you can see how different text
editors’ options can be set. The All Languages node sets the options from both the Plain Text
and XML nodes below, as shown in Figure 2-17. Of the general options discussed here, the first
three are for the XML editor:
• Auto List Members: Lists the members, properties, and values available to you when typing.
• Hide Advanced Members: Shows more commonly used items.
• Parameter Information: Displays the parameters for the current procedure.
• Enable Virtual Space: Adds spaces so that comments are placed at a consistent location
when using a text editor.
• Word Wrap: Specifies text be wrapped to the next line once you type past the end of the
viewing area.
Dewson_5882C02.fm Page 38 Monday, January 2, 2006 2:55 PM
CHAPTER 2 ■ SQL SERVER MANAGEMENT STUDIO
39
• Show Visual Glyphs: Enabled when word wrap is checked. Shows text glyphs when a line
has been word wrapped. This is a logical character that doesn’t physically exist, and
therefore will not appear on any printouts.
• Apply Cut or Copy Commands to Blank Lines: If this is checked, and you “copy” a blank
line, a blank line will be pasted. If this is unchecked, nothing is inserted.
• Line Numbers: Displays line numbers only against the code. This will help when an error
occurs and is reported back, because the error message will mention the line number.
• Enable Single-Click URL Navigation: When working with data and a URL is displayed,
then as the cursor moves over it, the cursor will change to a hand to indicate a URL, and
clicking it will open up a browser.
• Navigation Bar: Displays a navigation bar at the top of the code editor.
Figure 2-17. Text Editor, All Languages, General options
All Languages ➤ Tabs
The Tabs node deals with tabs within editors. As you can see in Figure 2-18, there are only two
sections:
• Indenting: The first two options are for plain text and XML. When you press Enter, these
set whether the new line starts at the leftmost point (None) or at the same point as the
preceding line (Block). The Smart option is for XML only and determines whether the new
line is tabbed, depending on the context of the XML element.
• Tab: This sets the number of characters for a physical tab (via Tab Size) and the number
of characters in an intelligent tab, or an indent (via Indent Size). If you want spaces in the
tabbing or indentation, then click the Insert spaces option; otherwise tabbing will use
tabulation characters.
Dewson_5882C02.fm Page 39 Monday, January 2, 2006 2:55 PM
40
CHAPTER 2
■ SQL SERVER MANAGEMENT STUDIO
Figure 2-18. Text Editor, All Languages, Tabs options
Query Execution Node
The Query Execution node contains options that affect your T-SQL code. You can change the
environment in which you write T-SQL and how SSMS interacts with SQL Server when running
T-SQL.
SQL Server ➤ General
When we come to running T-SQL code within Query Editor, a number of options affect how it
will run, and these are shown in Figure 2-19. The settings are only for SSMS and don’t apply to
other connections such as a .NET program connecting to the data.
• SET ROWCOUNT: Defines the maximum number of rows to return before stopping.
A setting of 0 defines that every row should be returned. This option is more often defined at
the top of your T-SQL code to reduce the number of rows for that query—for example, if
you have a large table and you want to see only a few rows as examples.
• SET TEXTSIZE: Sets the maximum size of text data that will be seen in the results editor.
• Execution Time-out: Specifies how long you are prepared for the query to run before
forcing it to stop. This can be useful especially in a production environment, when you
don’t wish a query to take up a large amount of processing time.
Dewson_5882C02.fm Page 40 Monday, January 2, 2006 2:55 PM
CHAPTER 2 ■ SQL SERVER MANAGEMENT STUDIO
41
• Batch Separator: Separates batches of code by a word or character. At present this is set
to GO. Although you could change this, it is best not to, because GO is known universally
as a batch separator.
• By Default, Open New Queries in SQLCMD Mode: Selecting this option will open a command
prompt utility for creating queries based on SQLCMD code rather than T-SQL code. This
will allow you to create code that has extensions within it that can then be used to run as
a batch file via the SQLCMD utility. We don’t look at SQLCMD within this book, but if
you want to run code as a batch file, then Books Online can show you how.
Figure 2-19. SQL Server Query Execution, General options
SQL Server ➤ Advanced
This area deals with how SQL Server executes T-SQL code within SSMS, and the options avail-
able here are shown in Figure 2-20. We go through those options relevant to someone learning
SQL Server when creating a database in Chapter 3. The only two options not covered in that
chapter that you should know are the following:
• Suppress Provider Message Headers: Status messages about the query that is running will
not show the data provider. Therefore, by selecting this option, you will be suppressing
the data provider for SQL Server being displayed (.NET SqlClient Data Provider).
• Disconnect After the Query Executes: After your query has completed, disconnect the
connection. This is ideal for situations where you have a limited number of connections
or you want to keep the connection count down.
Dewson_5882C02.fm Page 41 Monday, January 2, 2006 2:55 PM
42
CHAPTER 2
■ SQL SERVER MANAGEMENT STUDIO
Figure 2-20. SQL Server Query Execution, Advanced options
SQL Server ➤ ANSI
Like the options for the previous area, the options for the ANSI area are discussed in Chapter 3.
For now, note the default settings shown in Figure 2-21.
Figure 2-21. SQL Server Query Execution, ANSI standard options
Query Results Node
When you run T-SQL code, the database will return the results to SSMS. The Query Results
node is where you can modify how these results will look.
Dewson_5882C02.fm Page 42 Monday, January 2, 2006 2:55 PM
CHAPTER 2 ■ SQL SERVER MANAGEMENT STUDIO
43
SQL Server ➤ General
The options in this area, shown in Figure 2-22, detail how results will be displayed and where
they will be saved.
• Default Destination for Results: This option defines how you would like to see the results
of a query that returns some data.
• Default Location: This option specifies the default directory for saved results.
• Play the Windows Default Beep: If you wish SQL Server to beep you at the end of a query,
check this option, and if you run a lot of queries, be prepared to lose a lot of friends.
I would leave this unchecked unless you are going to be running a long-term query,
which will allow for notification when the query finishes rather than your having to sit
and watch it.
Figure 2-22. Query Results, General options
SQL Server ➤ Results to Grid
When we run T-SQL to retrieve data, SSMS can place it within a grid, a bit like in Excel (although
it will be read-only), or represent it as text, like in Notepad (also read-only). You can also save
the data to a file, which is based on Results to Text options. The Results to Grid options, shown
in Figure 2-23, cover how the results will look if we are outputting to a grid.
• Include the Query in the Result Set: The T-SQL used to run the query is placed prior to the
results.
• Include Column Headers: If you want to copy information from the results, for example,
to place it within an e-mail, then selecting this option will include the column headers as
well as the results.
• Discard Results After Execution: Once the query executes, any results displayed will be
immediately discarded at the end, therefore leaving nothing to display.
Dewson_5882C02.fm Page 43 Monday, January 2, 2006 2:55 PM
44
CHAPTER 2
■ SQL SERVER MANAGEMENT STUDIO
• Display Results in a Separate Tab: Instead of the results appearing below the query, they
can instead be in their own tab, giving more space for a larger set of results to be
displayed.
• Maximum Characters Retrieved: This defines the maximum amount of data to be displayed
in a single cell for results.
Figure 2-23. Query Results when the results are to grids
SQL Server ➤ Results to Text
The other results options, shown in Figure 2-24, affect how results are displayed when they are
in text format.
• Output Format: This combo box presents you with five different formatting options:
Column Aligned, Comma Delimited, Tab Delimited, Space Delimited, and Custom
Delimiter. These different options allow you to set your output delimiter so that you can
import your data into other systems.
• Include Column Headers in the Result Set: Uncheck this if you just wish the results.
Again, this is ideal for when you are passing data on to other systems.
• Include the Query in the Result Set: The T-SQL used to run the query is placed prior to
the results.
• Scroll As Results Are Received: As rows are returned, if they extend pass the end of the
page, then the results are scrolled so that the last row of data is displayed.
• Right Align Numeric Values: Any numeric values are aligned to the right instead of the left.
• Discard Results After Query Executes: Once the query executes, any results displayed will
be immediately discarded at the end, therefore leaving nothing to display.
Dewson_5882C02.fm Page 44 Monday, January 2, 2006 2:55 PM
CHAPTER 2 ■ SQL SERVER MANAGEMENT STUDIO
45
• Display Results in a Separate Tab: Instead of the results appearing below the query, they
can instead be in their own tab, giving more space for a larger set of results to be
displayed.
• Maximum Number of Characters Displayed in Each Column: This defines the maximum
amount of data to be displayed in a single cell for results.
Figure 2-24. Query Results when the results are to text
That completes our look at the options that are of relevance to us. The next section
discusses the Query Editor within the documents area of SSMS.
Query Editor
As we progress through the book, the creation of objects, the manipulation of data, and the
execution of code will be shown either by using the graphical interface and options that Object
Explorer provides or by writing code using T-SQL. To write code, we need a free-form text
editor so that we can type anything we need. Luckily, SSMS provides just such an editor as a
tabbed screen within the document view on the right-hand side. This is known as a Query
Editor, and it can be found when you click New Query of the main toolbar or by selecting File ➤
New ➤ Database Engine Query.
We discussed some of the options that affect the Query Editor, such as how text is entered
and how results from running the T-SQL code are displayed, in the preceding section. There is
not a great deal to say about the editor itself, as it really is a free-form method of entering
commands and statements for SQL Server to execute. However, the Query Editor has a toolbar
that is worth covering at this point in time. Figure 2-25 shows this Query Editor toolbar.
Figure 2-25. Query Editor toolbar
Dewson_5882C02.fm Page 45 Monday, January 2, 2006 2:55 PM
46
CHAPTER 2
■ SQL SERVER MANAGEMENT STUDIO
The first three buttons, as shown in the following image, work with connections to the
server. The first button requests a connection to the server if one doesn’t currently exist, the
second disconnects the current server connection, and the third allows you to change the
connection you are using.
The next item is a combo box that lists all the databases in the server you are currently
connected to. If you wish a query to run against a different database, you can select it here. The
database the code will execute against, providing you have permissions, is the database that is
displayed.
The next buttons are concerned with executing the code entered in the Query Editor. The
red exclamation mark and the Execute button execute the code. The green tick will parse the
code, but will not actually run it. Parsing the code will not find every error that could occur but
will ensure that the syntax is correct. The last option is a grayed-out button that turns red when
code is executing. If you would like to send a cancel command to SQL Server, then press this
button. This may not always instantly cancel the query, depending on what is executing and
whether your server is local or remote. There will be a delay in sending the command and SQL
Server “pausing” to receive the command.
The next two buttons help you analyze the T-SQL query for optimization. We won’t look at
this subject within this book.
Rather than typing T-SQL code by hand, we can use a type of wizard that allows a query to
be built up by selecting tables and columns via check boxes, and so on. Pressing the button
shown in the following image brings up this wizard, known as the Query Design Editor, which
you will see in action in Chapter 9.
The following button allows you to work with code templates. Templates feature the basics of
commands or actions. They have options that act as default values. Pressing this button brings
up a dialog box to change the values in each of a template’s parameters.
The next set of buttons deals with the query. The first two place details on how your code
was executed and statistics about the code within the output. The third button runs your code as
a command prompt as if it were run by SQLCMD, which is a command-line utility for executing
SQL batches. These options are not covered within this book.
Dewson_5882C02.fm Page 46 Monday, January 2, 2006 2:55 PM
CHAPTER 2 ■ SQL SERVER MANAGEMENT STUDIO
47
The first two buttons shown in the following image affect how the results from the query
are displayed, either as text or as a grid, respectively. The third button sends results to a file.
Finally, we can comment out lines of code by clicking the first button shown in the next
image, or we can uncomment code by clicking the second button. The third and fourth buttons
will place or remove indentations of code. All of these buttons work only on currently selected
lines of code.
Now that we have seen the Query Editor toolbar, let’s turn our attention to a security tool
you need to know about.
Surface Area Configuration Tool
The last section in this chapter is our first look at locking down security within SQL Server. The
Surface Area Configuration tool, or SAC, which is new to SQL Server 2005, is not, as the name
may imply, a tool for configuring what parts of SSMS are displayed on your screen or how. This
tool is a method for reducing the number of services and components of SQL Server that run to
help protect SQL Server from a security breach. You can also change how SQL Server runs to
the same end.
This tool does have a number of areas that can be configured, but we will take a look at
only four of these services, which will give you good grounding in how to work with the other
services and components when the need arises.
Every item within this tool can be dealt with from another means within your computer.
For example, with services, you can also do the same actions we will be performing from
Control Panel ➤ Administrative Tools ➤ Services. The benefit of the Surface Area Configuration
tool, though, is that it offers a unified interface and brings together all the items required to
keep security of SQL Server at its optimum, in one place.
Try It Out: Using the Surface Area Configuration Tool
1. To start up the Surface Area Configuration tool, select Start ➤ Programs ➤ Microsoft SQL Server 2005
➤ Configuration Tools ➤ SQL Server Surface Area Configuration. This will bring up the tool, as shown
in Figure 2-26. You then have two choices on which area you wish to work with. Click the first choice,
Surface Area Configuration for Services and Connections.
Dewson_5882C02.fm Page 47 Monday, January 2, 2006 2:55 PM
48
CHAPTER 2
■ SQL SERVER MANAGEMENT STUDIO
Figure 2-26. SAC tool selection
2. This brings you to the dialog box shown in Figure 2-27. Notice in the title bar that there is a suffix of
localhost. This shows that the tool is working with a local install of SQL Server. If you wish to work with
a different install, you need to return to the screen shown in Figure 2-26 and select the Change Computer
option. The first item we’ll discuss, as shown in Figure 2-27, is under Database Engine ➤ Service. Here
you will see how the SQL Server database engine service is defined on this computer, how it starts, and
its status:
• Our first area of interest is Startup Type, which could have a setting of Automatic, as you see in
Figure 2-27, which means that SQL Server will start when your machine reboots; Manual, which
means that SQL Server will only start when you start the service; and Disabled, which means that the
service cannot be started.
• The Service Status box shows us what the state of the service is (whether it is running or not). You
can change the state as required with the four buttons underneath the status box.
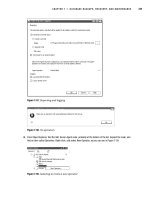
3. The Remote Connections node governs client connections. Figure 2-28 shows the default settings. Your
installation will probably only allow local connections, which means that if your standalone computer is
switched to being on a network, no other computer on the network will be able to connect to it until you
select the Local and Remote Connections radio button option. By keeping Local Connections Only selected,
you know that your SQL Server will be safe from other users on your network who may be defined as
administrators on your computer, for example, as this would allow them to connect to SQL Server. Once
you have specified all your options, click Apply or OK, which will then take you back to the screen in
Figure 2-26.
Dewson_5882C02.fm Page 48 Monday, January 2, 2006 2:55 PM
CHAPTER 2 ■ SQL SERVER MANAGEMENT STUDIO
49
Figure 2-27. SAC tool for configuring a component’s services
Figure 2-28. SAC tool for configuring a component’s connections
Dewson_5882C02.fm Page 49 Monday, January 2, 2006 2:55 PM
50
CHAPTER 2
■ SQL SERVER MANAGEMENT STUDIO
4. Now that you are back at the main screen, click Surface Area Configuration for Features. The first option
we will take a look here at is Ad Hoc Remote Queries, shown in Figure 2-29. It is possible for ad hoc queries
to execute from SQL Server against other data sources that are not explicitly defined, and return data
back from functions. By default, this option is disabled and should only be switched on for remote queries.
Figure 2-29. SAC tool for ad hoc queries
5. The last area we will look at is the option that affects the dedicated administrator connection (DAC),
shown in Figure 2-30. There may be times that SQL Server is under stress or has a problem and you
cannot connect to it via SSMS. This option allows for a separate unique and specialized connection to
SQL Server that will allow you to connect and perform administrative functions to help get SQL Server
working again. If you wish to allow this connection to be enabled from a remote computer, then you can
switch it on here. However, it should only be enabled if your SQL Server is behind a secure firewall; otherwise,
it could lead to a connection to your server that is undesired.
Dewson_5882C02.fm Page 50 Monday, January 2, 2006 2:55 PM
CHAPTER 2 ■ SQL SERVER MANAGEMENT STUDIO
51
Figure 2-30. SAC tool for DAC
■Caution If you have a network install, then you may wish to consider disabling Analysis Services, Reporting
Services, etc., if they are not being used.
This concludes our look at the Surface Area Configuration tool.
Summary
SQL Server Management Studio (SSMS) is a tool for working with SQL Server that you will see
in action throughout this book, whether we work with the graphical interface or use Query
Editor for writing T-SQL code. As you learned in this chapter, the main areas of the tool are the
Registered Servers Explorer, the Object Explorer, and the main documents window that will
contain graphical representations of objects in the database.
Dewson_5882C02.fm Page 51 Monday, January 2, 2006 2:55 PM
Dewson_5882C02.fm Page 52 Monday, January 2, 2006 2:55 PM
53
■ ■ ■
CHAPTER 3
Database Design and Creation
Now that you’ve installed SQL Server and examined the main tools you’ll use as a SQL Server
developer or administrator, it’s almost time to start building the ApressFinancial database
solution. However, you can’t do this yet because you still don’t know what the database will
hold. At this point in time, all the information you have so far is that you’ll be building a data-
base to hold some financial transactions for a personal or corporate financial tool. You’ll gear
this database toward a financial tool that a corporation might use, because SQL Server can be
scaled from one user to thousands of users very easily. The next step is to gather more informa-
tion about the requirements of the solution and about what information is required to be
stored in the database. Once the information gathering stage is complete, you’ll then be able to
create the database within SQL Server 2005.
The design of a database solution is not a simple task; it requires a great deal of work. This
chapter will provide you with insight into the vast area that is database design. Armed with this
information, you’ll proceed through arranging the data so that retrieval is as efficient as possible
(this is referred to as normalizing the data) and ensuring that data duplication is minimal, or
ideally that no data duplication exists. You’ll also need to know how the system and the data
within it will be used on a day-to-day basis. Finally, you need to know what type of system is
being built—for instance, whether it will receive instant data updates or just be used to analyze
already defined data. Once the design is complete, building a database solution is a much
smoother process. A good design ensures you’ve gathered all the information you need to build
the correct tables with the correct information without duplication.
Although the methods and processes involved with the design may not meet the needs of
every organization and its methods, this chapter presents an overview of the processes involved,
and also shows how to build up information and ensure that the design is well thought out.
This chapter covers the following topics:
• What a database is, what it consists of, and where it is stored
• How to define the type of system: transactional or analytical
• How to collect data about the current system and seek out information about the new
system
• How to create a database through SQL Server Management Studio, a wizard, or a Query
Editor window, and how to set database options in a Query Editor window
• How to review the database details
• How to remove a database using SQL Server Management Studio and a Query Editor
window
Dewson_5882C03.fm Page 53 Monday, January 9, 2006 3:24 PM
54
CHAPTER 3
■ DATABASE DESIGN AND CREATION
■Note No specific formal design techniques will be used in this chapter’s exercise, as this is not a book
specifically on database design. However, the processes—both physical and logical—to get to the final
design of the database will be the same.
Defining a Database
A database is a container for objects that not only store data, but also enable data storage and
retrieval to operate in a secure and safe manner. A SQL Server 2005 database can hold the
following (although when a database is first created, some of this information has not yet been
built):
• Table definitions
• Columns within those tables, which make up rows of data
• Programs (either stored procedures or assemblies) used to access or manipulate the data
• Indexes, which are used to speed up the retrieval of data
• Views, which are specialized ways of looking at the actual data
• Functions, which are repetitive tasks that can be applied to rows of data
The preceding list contains a fair number of technical terms, so let’s take a few moments
to look at their definitions:
• Tables: These are where data is kept within the database. A database must contain at
least one table to be of use, although you can have a database with no user tables and
only system tables. System tables are special tables that SQL Server uses to help it work
with the database. These tables contain information within rows and columns, much
like in Excel, but they have a great deal more power than cells within Excel. Temporary
tables, another type of database table, can take several different forms.
• Columns: These provide a definition of each single item of information that builds up to
a table definition. A column is made up of cells that all hold data, much like a column in
Excel. Unlike in Excel, though, where each cell can hold a different type of data, a column
within a SQL Server table is restricted as to what the data within it relates to, the type of
data it will hold, and how much information can be stored in it. Each table must have at
least one column, although the column doesn’t need to contain any information.
• Rows: A row is made up of one cell from every column defined for the table. There can be
any number of rows in a table; you are limited only by your disk space or the amount of
disk space that you defined as the maximum in your database creation definition, or the
amount of disk space on your server. A row will define a single unit of information, such
as a user’s bank account details or a product on an e-commerce site. Rows are also called
records.
Dewson_5882C03.fm Page 54 Monday, January 9, 2006 3:24 PM