Beginning SQL Server 2008 for Developers From Novice to Professional phần 2 pps
Bạn đang xem bản rút gọn của tài liệu. Xem và tải ngay bản đầy đủ của tài liệu tại đây (1.97 MB, 45 trang )
20
CHAPTER 1
■ SQL SERVER 2008 OVERVIEW AND INSTALLATION
Figure 1-11. Creating a new user account
6. Stay in the Name the Account and Choose an Account Type dialog box, as you want to add a second username.
Repeat the preceding process using the following details:
Username: VMcGlynn
Account type: (Computer) Administrator
7. Log off from Windows and then log on using the first ID that you created: JThakur.
8. Once logged in, start up SQL Server Management Studio by selecting Start ➤ All Programs ➤ Microsoft SQL
Server 2008 ➤ SQL Server Management Studio. You will need to populate the dialog with the server name of the
install. Click on Browse For More, then select Database Engine and select the install. We go through this in more
detail in Chapter 2. The dialog should look like Figure 1-12.
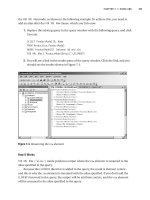
9. Examine the error message that appears, which should resemble what you see in Figure 1-13. JThakur as a login
has not been defined within SQL Server specifically and does not belong to a group that allows access. The only
group at the minute is a user who is in the Administrators Windows group. Recall that JThakur is a Limited user.
10. We will now try out the other user we created. Close down SQL Server, log off Windows, and log on using the
second ID we created—VMcGlynn. Once logged in, start up SQL Server Management Studio and connect to your
server. This time the login will work.
We have created two usernames: one that has restricted access (JThakur) and one that has administration rights (VMcGlynn).
However, neither of these specific usernames exists within SQL Server itself: after all, we haven’t entered them and they
haven’t appeared as if by magic. So why did one succeed and one fail?
The Windows security model has ensured that both IDs are valid. If the ID or password were incorrect, there would be no
way that you could be logged in to Windows. Therefore, when you try to connect to SQL Server, the only check that is per-
formed is whether the user has access to SQL Server either via membership of an operating system group or through the
specific logged-in user account. As you can see in Figure 1-14, neither JThakur nor VMcGlynn exist.
Dewson_958-7C01.fm Page 20 Monday, June 30, 2008 5:01 PM
CHAPTER 1 ■ SQL SERVER 2008 OVERVIEW AND INSTALLATION
21
Figure 1-12. Attempting to connect to SQL Server
Figure 1-13. Failed login to server
Figure 1-14. Object Explorer for SQL Server
However, you can see that there is a Windows group called BUILTIN\Administrators. This means that any username
that is part of the Administrators group will have the capacity to log on to this SQL Server. Hence, avoid if possible
setting up users as administrators of their own PCs.
In a production environment, it may be advisable to remove this group from the system if you do allow users to be admin-
istrators. As VMcGlynn is a member of the Administrators group, then this username will also be a member of the
BUILTIN\Administrators group.
Dewson_958-7C01.fm Page 21 Monday, June 30, 2008 5:01 PM
22
CHAPTER 1
■ SQL SERVER 2008 OVERVIEW AND INSTALLATION
Mixed Mode
If we installed SQL Server with mixed mode, this means we could use either Windows authentica-
tion, as has just been covered, or SQL Server authentication.
How does mixed mode differ from Windows authentication mode? To start with, you need to
supply a user ID and password to connect rather than SQL Server taking the Windows ID, or the group
the user belongs to, of the logged-in account. There is no assumption that the username supplied is a
valid ID. Using mixed mode is also appropriate in many cases when working with ISPs. To clarify this,
if you are working on your remote data at a local client machine, the remote machine would need to
know the credentials of your login, and the easiest method is to use SQL Server authentication. Do
not get confused here, though. If you want to work with your data at your ISP, the ISP may provide
some sort of tool, or you may use SQL Server Management Studio to connect to your data. You would
then be able to do what you want. The web site code, if written in ASP.NET, will use a Windows account
to log in, so although you may lock out your SQL Server mixed mode account, it should not stop your
web site from working.
You will learn how to add usernames to SQL Server (as opposed to adding Windows users) when
I talk about security in Chapter 4.
This leaves one area of security left that needs to be discussed here: the sa login.
The sa Login
The sa login is a default login that has full administration rights for SQL Server. If you had selected
mixed mode authentication during the installation process, you would have seen that you would be
forced to include a password for this account. This is because the sa user ID is such a powerful login.
It also exists in every SQL Server installation; therefore, any hacker knows that this user ID exists and
so will try to connect to the server using it. Prior to SQL Server 2005 when creating a password became
compulsory, many installations had the password blank, therefore allowing hackers instant access.
If you logged in to SQL Server as sa, you will have full control over any aspect of SQL Server. SQL
Server inserts this ID no matter which authentication mode you install. If you have a Windows account
defined as sa—for example, for Steve Austin—then this user will be able to log in to the server if you
have set up the server as implementing Windows authentication mode without any further inter-
vention on his part. Try to avoid login IDs of sa.
In a mixed mode installation, sa will be a valid username and validated as such. As you can
guess, if any user gets ahold of this username and the password, it would be possible for that user to
have full access to view and amend or delete any item of data. At worst, the user could corrupt any
database, as well as corrupt SQL Server itself. He or she could even set up tasks that e-mail data to a
remote location as it is being processed.
It is essential to set up a strong password on the sa account in the Authentication Mode screen
if you choose mixed mode. It is a major improvement in SQL Server 2008 that you are now forced to
enter a password, although it is possible to set up a very easily guessed password. Do not use pass-
words such as password or adminpwd, for example. Always keep the password safe, but also make a
note of it in a safe place. If you forget the sa password and this is the only administration ID that
exists, you will need to reinstall SQL Server to get out of this problem. A good password is one that
mixes numbers and letters, but doesn’t include letters than can be made into numbers and numbers
into letters. For example, pa55word is just as easy to guess as password. Or 4pr355 for Apress.
There is also another reason not to log on to SQL Server with the sa username. At times it will be
essential to know who is running a particular query on a SQL Server database. In a production data-
base, someone may be running an update of the data, which is filling up the disk space or filling up
the transaction log. We will need to contact that person to check whether he or she can stop the
process. If that person logs in as sa, we will have no idea who he or she is. However, if that person
logged on with an identifiable name, he or she would have an ID in SQL Server, which we could track.
Dewson_958-7C01.fm Page 22 Monday, June 30, 2008 5:01 PM
CHAPTER 1 ■ SQL SERVER 2008 OVERVIEW AND INSTALLATION
23
By restricting the sa login so that people have to use their own accounts, we can ensure a much
higher degree of system monitoring and integrity.
There will be times when we’ll want mixed mode authentication; it is perfectly acceptable to
wish this. Internet providers use mixed mode, as many applications may be on one web server. If this
ISP is a reseller (in other words, many people around the globe use the one computer), you will not
want these people to have the ability to see your data. We have also decided not to have sa as an
administration logon at this point. So what do we do? Well, we create a logon ID that will have the
access privileges we wish; in other words, the ability to just see the data and work with the data that
we need, and no more. The ISP may require you to supply a user ID and password that it uses to
create an account on its SQL Server instance. You will encounter more about this in Chapter 4.
■Note Regardless of the authentication mode, it is important that you always supply a strong password.
Summary
By this point, you should understand the small differences between each version of SQL Server. You
should also know how to check your computer to see if it is suitable for a SQL Server installation.
By following the steps given earlier, you should have a successful installation of SQL Server 2008
on your computer. You may even have completed the installation twice so that you have a develop-
ment server installation as well as a test server installation. This is a good idea, and something to
consider if you have only one installation so far. Whether you are working in a large corporation or
are a “one-man band,” keeping your production and development code separate leads to greatly
reduced complications if, when developing, you need to make a production fix.
This chapter introduced you to security in SQL Server so that you can feel comfortable knowing
which way you want to implement this and how to deal with different usernames. You may not have
any data yet, but you want to ensure that when you do, only the right people get to look at it!
You are now ready to explore SQL Server 2008. One of the best ways of managing SQL Server is
by using SQL Server Management Studio, which will be discussed next.
Dewson_958-7C01.fm Page 23 Monday, June 30, 2008 5:01 PM
Dewson_958-7C01.fm Page 24 Monday, June 30, 2008 5:01 PM
25
■ ■ ■
CHAPTER 2
SQL Server Management Studio
Now that SQL Server 2008 is successfully installed on your machine, it is time to start exploring the
various areas that make this an easy and effective product to use. This chapter concentrates on SQL
Server Management Studio (SSMS), which you will use to develop and maintain your databases and
the objects SSMS contains.
SSMS is the graphical user interface (GUI) you will use to build your database solutions. This is
an easy-to-use and intuitive tool, and before long, you will feel confident in using it to work with SQL
Server quickly and efficiently. I will be discussing several aspects of SSMS in this chapter. You can
then use this knowledge throughout the book. I’ll discuss some aspects in more detail throughout
the book.
SSMS is crucial to your success as a developer. Learning about it and working with actual samples
throughout the book will make your life easier. Therefore, by the end of this chapter, you will have
gained experience with it and be proficient in the following areas:
• The components of SSMS
• How to configure SSMS
Let’s start right away by having a look at SSMS and how it is used to work with SQL Server 2008.
A Quick Overview of SSMS
As I touched on in Chapter 1, SQL Server runs as a separate Windows process on a suitable Windows-
based computer, be it on a standalone desktop machine, or on a server or network. If you open Task
Manager and move to the Processes tab, you will see, among other processes, sqlservr.exe. This process
or service runs in its own process space and is isolated from other processes on the machine. This
means that SQL Server should not be affected by any other piece of software that does not talk to any
SQL Server component. If you have to kill any other component’s process, the SQL Server engine
should continue to run.
SQL Server runs as a service that is controlled and monitored by Windows itself. SQL Server
ensures that it is given the right amount of memory, processing power, and time from the operating
system by instructing Windows what it needs. However, pressures on the server mean that SQL Server
modifies what it requests based on what is available. Because SQL Server runs as a service, it has no
interface attached to it for a user to interact with. As a result, there needs to be at least one separate
utility that can pass commands and functions from a user through to the SQL Server service, which
then passes them through to the underlying database. The GUI tool that accomplishes this is SSMS.
There are other tools that you can use, and you could even create your own GUI, but I’ll only be
concentrating on SSMS within this book.
Dewson_958-7.book Page 25 Monday, June 30, 2008 3:01 PM
26
CHAPTER 2
■ SQL SERVER MANAGEMENT STUDIO
SSMS can be used to develop and work with several installations of SQL Server in one applica-
tion. These installations can be on one computer or on many computers connected through a local
area network (LAN), a wide area network (WAN), or even the Internet. Therefore, it is possible to deal
with your development, system testing, user testing, and production instances of SQL Server from
one instance of SSMS. SSMS helps you in the development of database solutions, including creating
and modifying components of a database, amending the database itself, and dealing with security
issues. Getting to know this tool well is crucial to becoming a successful professional SQL Server
developer, as well as a database administrator.
One of the tools within SSMS that we will use for completing tasks is Query Editor. This tool allows
program code to be written and executed, from objects, to commands that manipulate data, and even
complete tasks such as backing up the data. This program code is called Transact SQL (T-SQL). T-SQL is
a Microsoft proprietary language, although it is strongly linked with a standard set by the American
National Standards Institute (ANSI). The current specification Microsoft bases its code on is ANSI-92.
Query Editor is a tool within SSMS that allows you to programmatically build the same actions
as dragging and dropping or using wizards. However, using T-SQL within Query Editor can give you
more control over certain aspects of certain commands. Note that the name “Query Editor” comes
from the fact that it sends queries to the database using T-SQL. Don’t worry if you don’t quite grasp
this—all will become clear very soon.
Let’s spend some time taking a look at SSMS in more detail.
Try It Out: Touring SQL Server Management Studio
1. Start up SSMS as you saw in Chapter 1, and select Start ➤ Programs ➤ Microsoft SQL Server 2008 ➤
SQL Server Management Studio.
2. Click the Options button to bring up a Connect to Server dialog box similar to the one in Figure 2-1. Note the
following items in this dialog box:
• Server Type: For the purposes of the examples in this book, leave the server type as Database Engine. The
other options are other types of servers that are available for connection.
• Server Name: The second combo box contains a list of SQL Server installations that the Connect to Server
dialog box can find, or knows about. In the dialog box in Figure 2-1, you will see the name of the computer
that the local install is on. If you open the Server Name combo box, you can search for more servers locally
or over a network connection using <Browse for more >.
• Authentication: The final combo box specifies which type of connection you wish to use. We installed SQL
Server with Windows authentication in Chapter 1; therefore, this is the option to use. If you had installed
SQL Server with Mixed mode, then you could change this option to SQL Server authentication, which would
enable the next two text boxes and allow you to enter a username and password.
Figure 2-1. SQL Server Management Studio Connect to Server dialog box without
expanded options
Dewson_958-7.book Page 26 Monday, June 30, 2008 3:01 PM
CHAPTER 2 ■ SQL SERVER MANAGEMENT STUDIO
27
3. Click Options, which switches you to the Connection Properties tab. Here you will see specific properties for this
connection, as shown in Figure 2-2:
• Connect to Database: This combo box provides a list of databases based on the server and login details in
the Login tab. Clicking the down button for this combo box allows you to browse for and select a database
on the server to which you wish to connect. Only the databases that the Windows account or SQL Server
login can connect to will populate this list. Also, any error in the login details will cause an error message
to be displayed here instead of listing databases.
• Network: This area details how we want this connection to be made with SQL Server. At the moment, there
is no need to change the current settings.
• Connection: This area deals with connection timeouts. The first item, Connection Time-out, defines how
long the connection should wait before returning an error. For local installs and even most network installs, a
setting of 15 seconds should be more than enough. The only situation that may require you to increase
this setting is if you were connecting over a WAN or to a SQL Server installation at an ISP. The second
option, Execution Time-out, details the timeout value for any T-SQL code that you execute. A setting of 0
means that there is no timeout; there should be few, if any, occasions when you would want to change
this setting.
• The final option is a check box for whether you want to encrypt your connection to SQL Server. This is
useful for those times when the connection is going outside your organization.
Figure 2-2. SQL Server Management Studio connection properties
4. Once you are happy with all of the items in the Connection Properties tab, click Connect. This brings you to SSMS
itself. If you have ever used Visual Studio .NET (VS .NET), you will notice that SSMS has a reasonably similar
layout. This is deliberate on Microsoft’s part, as the company is making SQL Server more integrated with .NET.
Your layout should look like the one in Figure 2-3, with only minor name changes based on the server you have
connected to and the connection you have used. This figure shows I have connected to FAT-BELLY SQL Server
using the Windows account FAT-BELLY\rdewson. Figure 2-3 also shows the Object Explorer details window,
which may not be displayed initially but can be displayed from the menu option view. Finally, the version number
will probably differ depending on any patch releases to SQL Server since the book was written.
Dewson_958-7.book Page 27 Monday, June 30, 2008 3:01 PM
28
CHAPTER 2
■ SQL SERVER MANAGEMENT STUDIO
5. The first area of SSMS we will look at is the Registered Servers explorer. Access this explorer, shown in Figure 2-4, by
selecting View ➤ Registered Servers or by pressing Ctrl+Alt+G. This area details all SQL Server servers that
have been registered by you on this SSMS installation. At present, there will only be the server just registered,
but as time progresses, you will see more. This explorer will also show registered services for other services
such as Reporting Services (which is covered in detail in Chapter 14). By clicking the buttons, it will only show the
servers registered for that service.
6. If you need to register another server, right-click the Local Server Groups node and select New ➤ Server Regis-
tration to bring up a dialog box very similar to the Connect to Server dialog box shown earlier. Go ahead and do this now
to familiarize yourself with the New Server Registration dialog box, shown in Figure 2-5. You don’t need to register
servers to connect to them, but it will make it easier to find any regular servers.
7. As you can see, the only real difference from the Connect to Server dialog box is that the Server Name combo box
is empty and there is a new section called Registered Server. In this area, you can give a registration a different
name, such as Development Server or User Testing Region, and on top of this give the registration a description.
You don’t have a server to register, so just click Cancel now. When bringing up the New Server Registration dialog
box, you may have noticed an option to create a new server group. Along with using a different name, I suggest
you also group your registrations so that you can instantly tell where a server resides.
Figure 2-3. SQL Server Management Studio graphical interface for SQL Server
Figure 2-4. A list of registered servers
Dewson_958-7.book Page 28 Monday, June 30, 2008 3:01 PM
CHAPTER 2 ■ SQL SERVER MANAGEMENT STUDIO
29
Figure 2-5. The New Server Registration dialog box
8. Moving back to SSMS’s explorer window below the registered servers, take a look at Object Explorer, which
should have been present when you first brought up SSMS. If it isn’t there or if it disappears, you can redisplay it by
selecting View ➤ Object Explorer or by pressing F8. You will likely use this explorer the most, as it details every
object, every security item, and many other areas concerning SQL Server. You can see that SSMS uses nodes
(which you expand by clicking the + signs) to keep much of the layout of the Object Explorer (the hierarchy)
compact and hidden until needed. Let’s go through each of the nodes you see in Figure 2-6 now:
• Databases: Holds the system and user databases within the SQL Server you are connected to.
• Security: Details the list of SQL Server logins that can connect to SQL Server. You will see more on this in
Chapter 4.
• Server Objects: Details objects such as backup devices and provides a list of linked servers, where one
server is connected to another remote server.
• Replication: Shows the details involving data replication from a database on this server to another data-
base (on this or another server) or vice versa.
• Management: Details maintenance plans, policy management, data collection, and Database Mail setup,
which you will learn more about in Chapter 7, and provides a log of informational and error messages that
can be very useful when troubleshooting SQL Server.
• SQL Server Agent: Builds and runs tasks within SQL Server at certain times, with details of successes or
failures that can be sent to pagers, e-mail, or operators defined within SQL Server. The running of these
jobs and the notifications of these failures or successes are dealt with by SQL Server Agent, and the details
are found in this node. We will look at this more in Chapter 7, where you will schedule backup jobs.
Dewson_958-7.book Page 29 Monday, June 30, 2008 3:01 PM
30
CHAPTER 2
■ SQL SERVER MANAGEMENT STUDIO
Figure 2-6. Object Explorer nodes
9. Select the topmost node, the server node, in the Object Explorer to see a summary page similar to the one in
Figure 2-7, if you opened up the Object Browser summary screen as mentioned previously. This area is known
as the documents area. You don’t have to be on the top node for this page to be of use, as it will provide a
summary of any node within this explorer. This works a bit like folders within Windows Explorer, where you can
navigate through each item to get a summary of details of objects within the node. The left column matches the
groupings below the node you have selected in Object Explorer, and the right column details how compliant your
database is compared to a set of policies defined. You will see policies detailed in Chapter 4.
Figure 2-7. Summary page
Dewson_958-7.book Page 30 Monday, June 30, 2008 3:01 PM
CHAPTER 2 ■ SQL SERVER MANAGEMENT STUDIO
31
10. Moving to the menu bar of SSMS, the first item of interest is the View menu option. Three of the first four options
on the View menu, shown in Figure 2-8, bring up the two explorer windows, Object Explorer and Registered
Servers Explorer, and the summary page we encountered previously. Therefore, if you ever need to close these
items to give yourself more screen space, you can reopen them from the menu or with the shortcut keys you see
defined. The other remaining option alters the servers displayed in the Registered Servers explorer, where you
can switch between Database Engines and Compact Engine databases. The other options on the View menu are
as follows:
■Note A Compact Edition database is one that resides on hardware such as PDAs.
• Template Explorer: Provides access to code templates. In the examples in this book, we will be building
objects using T-SQL. Rather than starting from scratch, we can use code templates that contain the basic
code to create these objects.
• Solution Explorer: Displays solutions, which are convenient groupings of objects, T-SQL, or special programs
called stored procedures, among other items.
• Properties Window: Displays the set of properties for each object.
• Bookmark Window: Allows you to create bookmarks, which you place into various locations in your code
to allow you to jump quickly to those locations.
• Toolbox: Holds a list of objects that are database maintenance tasks, and details where these tasks can
be altered.
• Error List: Shows errors found in the code you have entered in the editor.
• Web Browser: Brings up a web browser within SQL Server, ideal for searching the Web for answers to SQL
Server problems for which you may require information.
• Other Windows: Allows you to access other windows generated when running T-SQL from Query Editor,
which may hold error messages or results from queries.
• Toolbars: Brings up toolbars for Query Editor, diagramming the database, and integration with Visual
SourceSafe for source control, if they are not opened by default.
• Full Screen: Removes title bars and explorer windows, and then maximizes SSMS to show as much of the
main pages as possible.
Figure 2-8. The View menu options
Dewson_958-7.book Page 31 Monday, June 30, 2008 3:01 PM
32
CHAPTER 2
■ SQL SERVER MANAGEMENT STUDIO
11. SQL Server has two built-in tools as well as the capability to include other tools when they are launched. These
can be accessed through the Tools menu, shown in Figure 2-9, along with the means to customize keyboard
commands, show or hide toolbar buttons, and so on, as is the case with other Microsoft products such as Word.
The first two options are available outside of SSMS from the Performance Tools sub programs list from the Start
menu. These programs are separate from SSMS. In particular, note the following options:
• SQL Server Profiler: There will come a time when you’ll wish to monitor SQL Server’s performance. This
tool will monitor and log events, running code, and so on that you have informed it to check when they happen
within SQL Server.
• Database Engine Tuning Advisor: It is possible to take a workload of data and process it through your solution.
This advisor can suggest ways to improve the performance of this process.
• Options: This option lets you access different options you can use to set up your SSMS as you like. We will
take a look at each of these options in the next section.
Figure 2-9. The Tools menu options
12. The final part of SSMS that we will take a look at is the main SSMS toolbar, as you can see in Figure 2-10. Some
of the icons, such as the Save icon, will be instantly recognizable, but we will go through each button so that it
is clear what they all do.
Figure 2-10. Main toolbar
13. In the next section, you will see how you can write code to add objects, work with data, and so on. Clicking the
New Query button opens up a new query window, which allows you to do this using the connection already made
with SQL Server.
14. Similar to the New Query button, the New Database Engine Query button also creates a new query window.
However, it gives you the option of having a different connection to SQL Server through which to run your code.
This is a good way of testing code with a different connection to ensure that you cannot see data that should be
secure, such as wages, via that connection.
15. Data within a specialized database known as an analysis database allows you to interrogate the data and analyze
the information contained within. The three New Analysis Service Query buttons allow you to build different types
of analysis queries. I include this information here only for your reference, as analysis databases fall outside the
scope of this book.
Dewson_958-7.book Page 32 Monday, June 30, 2008 3:01 PM
CHAPTER 2 ■ SQL SERVER MANAGEMENT STUDIO
33
16. SQL Server editions also include an edition called SQL Server Compact Edition. This allows SQL Server to run on
devices such as PDAs. If you have this installed, then clicking the SQL Server Compact Query button will allow a
SQL Server Compact query to be run. Again, this book does not cover this particular function further.
17. As with every other Windows-based product, it is possible to open and save files. The Open button (the first one
shown in the following image) allows you to search for a T-SQL file. The next two buttons change their function
depending on what you are doing, but in the main, the Single Save button gives you the option to save the details
of the window that is active in the main documents area of SSMS. The Multiple Save button gives you the option
to save all the open tabs in the documents window.
18. The last set of buttons open up explorers and document tabs that we have covered already. From left to right in
the following image, these buttons access the Registered Servers Explorer, summary page, Object Explorer,
Template Explorer, and Properties window.
Now that we’ve covered the main areas of SSMS, we’ll next take a closer look at the Options area
off the Tools menu, as it warrants a more detailed discussion.
Examining SSMS’s Options
As you saw earlier, the Tools menu has an Options menu choice. This allows you to choose what
options you would like to set as part of the setup for SSMS. We will go through each node and option
in this area one at a time, except for the options dealing with Analysis Services, which are not of
interest to us just now.
Environment Node
The first node we’ll look at is the Environment node, which covers the SSMS environment and how
you would like it to look and feel. This contains the General, Fonts and Colors, Keyboard, and Help
nodes, which you’ll see next.
General Node
The General node, shown in Figure 2-11, contains the following options:
• At Startup: This option controls how SSMS behaves when it is started. You have a choice of
four options here. It is possible to open Object Explorer after prompting for a connection,
open a new query window after prompting for a connection, open both of these after a connec-
tion, or open with an empty SSMS and no connection.
• Hide System Objects in Object Explorer: In SQL Server, system objects are hidden. This is a
good option to have enabled unless you are a database administrator. For example, if you’re
creating a desktop package that will be rolled out onto developers’ desktops, then set this. It
won’t stop developers from using the system objects, but it will declutter their view.
Dewson_958-7.book Page 33 Monday, June 30, 2008 3:01 PM
34
CHAPTER 2
■ SQL SERVER MANAGEMENT STUDIO
• Environment Layout: The layout can either be defined as tabbed documents (a bit like Excel)
or as MDI (a bit like Word).
• Docked Tool Window Behavior—Close button: If checked, when you click the close button,
only the active document is closed. Unchecked means that all windows will be closed.
• Docked Tool Window Behavior—Auto Hide button: You can pin toolboxes or unpin explorers
to hide them. Unpinning windows affects only the currently active document.
• Display NN Files in Recently Used List: This indicates the number of recently opened files to
place under the File menu option.
Figure 2-11. Environment area, General options
Fonts and Colors Node
As you might guess, the Fonts and Colors node options, shown in Figure 2-12, affect the fonts and
colors for different areas of SSMS. The Display Items list box contains a list of all the different areas
that can be set. By selecting one of these items, you can define the color of the foreground and back-
ground as well the font type and size.
Dewson_958-7.book Page 34 Monday, June 30, 2008 3:01 PM
CHAPTER 2 ■ SQL SERVER MANAGEMENT STUDIO
35
Figure 2-12. Environment area, Fonts and Colors options
Keyboard Node
The Keyboard node section, shown in Figure 2-13, allows you to define fast keys for commands you
run often. Any T-SQL stored procedure can be defined. The examples in this book assume you are
using the standard keyboard scheme.
■Note A stored procedure is a set of code that is stored within SQL Server, a bit like a program.
Figure 2-13. Environment area, Keyboard options
Dewson_958-7.book Page 35 Monday, June 30, 2008 3:01 PM
36
CHAPTER 2
■ SQL SERVER MANAGEMENT STUDIO
Help Node
The help system for SQL Server as a whole has been altered: you now have the ability to use not only
the help installed on the computer, but also the online help; thus, you have access to the most up-to-
date information. Configure the help system through the Help node options shown in Figure 2-14.
Figure 2-14. Environment area, Help options
Source Control Node
When creating code or objects, you can integrate a source control system with SQL Server so that
changes are immediately stored for safety. For each source control system, it is possible to define a
plug-in that will then populate the combo box, as shown in Figure 2-15. You can then use this source
control along with source control buttons and menu options.
Figure 2-15. Source Control options
Dewson_958-7.book Page 36 Monday, June 30, 2008 3:01 PM
CHAPTER 2 ■ SQL SERVER MANAGEMENT STUDIO
37
Text Editor Node
The Text Editor node contains options that affect how you work with text.
File Extension
Files specific to a particular Microsoft product have their own unique file extension so that they are
instantly recognizable to users and can then be linked to the relevant product. These products have
different filtering when accessing them through Open from the File menu so that you will only see
files with the relevant extension. This also holds true for SQL Server, but it is possible to alter these
extensions within the File Extension option, as you see in Figure 2-16, although I strongly recommend
that you don’t. You’ll come across a few of these extensions throughout the book, although the majority
are for more advanced work.
Figure 2-16. Text Editor
➤
File Extension defaults
All Languages ➤ General
Taking a look at the second option within the Text Editor node, you can see how different text
editors’ options can be set. The All Languages node sets the options from both the Plain Text and
XML nodes below, as shown in Figure 2-17. Of the general options discussed here, the first three are
for the XML editor:
• Auto List Members: Lists the members, properties, and values available to you when typing.
• Hide Advanced Members: Shows more commonly used items.
• Parameter Information: Displays the parameters for the current procedure.
• Enable Virtual Space: Adds spaces so that comments are placed at a consistent location when
using a text editor.
• Word Wrap: Specifies text to be wrapped to the next line once you type past the end of the
viewing area.
Dewson_958-7.book Page 37 Monday, June 30, 2008 3:01 PM
38
CHAPTER 2
■ SQL SERVER MANAGEMENT STUDIO
• Show Visual Glyphs for Word Wrap: Enabled when word wrap is checked. Shows text glyphs
when a line has been word wrapped. This is a logical character that doesn’t physically exist,
and therefore will not appear on any printouts.
• Apply Cut or Copy Commands to Blank Lines When There Is No Selection: Pastes a blank line if
this is checked and you “copy” a blank line. If this is unchecked, nothing is inserted.
• Line Numbers: Displays line numbers only against the code. This helps when an error occurs
and is reported back, because the error message will mention the line number.
• Enable Single-Click URL Navigation: When working with data and a URL is displayed, then as
the cursor moves over it, the cursor will change to a hand to indicate a URL, and clicking it will
open up a browser.
• Navigation Bar: Displays a navigation bar at the top of the code editor.
Figure 2-17. Text Editor
➤
All Languages
➤
General options
All Languages ➤ Tabs
The Tabs node deals with tabs within editors. As you can see in Figure 2-18, there are only two sections:
• Indenting: The first two options are for plain text and XML. When you press Enter, these set
whether the new line starts at the leftmost point (None) or at the same point as the preceding
line (Block). The Smart option is for XML only and determines whether the new line is tabbed,
depending on the context of the XML element.
• Tab: This sets the number of characters for a physical tab (via Tab Size) and the number of char-
acters in an intelligent tab, or an indent (via Indent Size). If you want spaces in the tabbing or
indentation, then click the Insert Spaces option; otherwise, tabbing will use tabulation characters.
Dewson_958-7.book Page 38 Monday, June 30, 2008 3:01 PM
CHAPTER 2 ■ SQL SERVER MANAGEMENT STUDIO
39
Figure 2-18. Text Editor
➤
All Languages
➤
Tabs options
Query Execution Node
The Query Execution node contains options that affect your T-SQL code. You can change the envi-
ronment in which you write T-SQL and how SSMS interacts with SQL Server when running T-SQL.
SQL Server ➤ General
When we come to running T-SQL code within Query Editor, a number of options affect how it will
run, and these are shown in Figure 2-19. The settings are only for SSMS and don’t apply to other
connections such as a .NET program connecting to the data.
• SET ROWCOUNT: Defines the maximum number of rows to return before stopping. A setting
of 0 means that every row should be returned. This option is more often defined at the top of
your T-SQL code to reduce the number of rows for that query—for example, if you have a large
table and you want to see only a few rows as examples.
• SET TEXTSIZE: Sets the maximum size of text data that will be seen in the results pane within
SSMS.
• Execution Time-out: Specifies how long you are prepared for the query to run before forcing
it to stop. This can be useful especially in a production environment, when you don’t wish a
query to take up a large amount of processing time.
• Batch Separator: Separates batches of code by a word or character. At present, this is set to GO.
Although you could change this, it is best not to, because GO is known universally as a batch
separator.
• By Default, Open New Queries in SQLCMD Mode: Allows you to use SQLCMD-based keywords
and extensions in your queries. We don’t look at SQLCMD within this book, but if you want to
run code as a batch file, then Books Online can show you how.
Dewson_958-7.book Page 39 Monday, June 30, 2008 3:01 PM
40
CHAPTER 2
■ SQL SERVER MANAGEMENT STUDIO
Figure 2-19. Query Execution
➤
SQL Server
➤
General options
SQL Server ➤ Advanced
This area deals with how SQL Server executes T-SQL code within SSMS, and the options available
here are shown in Figure 2-20. In Chapter 3, we go through those options relevant to someone learning
SQL Server when creating a database. The only two options not covered in that chapter that you
should know are the following:
• Suppress Provider Message Headers: Status messages about the query that is running will not
show the data provider. Therefore, by selecting this option, you suppress the data provider for
SQL Server from being displayed (.NET SqlClient Data Provider).
• Disconnect After the Query Executes: After your query has completed, disconnect the connec-
tion. This is ideal for situations where you have a limited number of connections or you want
to keep the connection count down.
Figure 2-20. Query Execution
➤
SQL Server
➤
Advanced options
Dewson_958-7.book Page 40 Monday, June 30, 2008 3:01 PM
CHAPTER 2 ■ SQL SERVER MANAGEMENT STUDIO
41
SQL Server ➤ ANSI
Like the options for the previous area, the options for the ANSI area are discussed in Chapter 3. For
now, note the default settings shown in Figure 2-21.
Figure 2-21. Query Execution
➤
SQL Server
➤
ANSI standard options
Query Results Node
When you run T-SQL code, the database returns the results to SSMS. The Query Results node is
where you can modify how these results will look.
SQL Server ➤ General
These options in the SQL Server area, shown in Figure 2-22, detail how results will be displayed and
where they will be saved:
• Default Destination for Results: This option defines how you would like to see the results of a
query that returns some data.
• Default Location for Saving Query Results: This option specifies the default directory for saved
results.
• Play the Windows Default Beep When a Query Batch Completes: If you wish SQL Server to beep
you at the end of a query, check this option, and if you run a lot of queries, be prepared to lose
a lot of friends. I would leave this unchecked unless you are going to be running a long-term
query, which will allow for notification when the query finishes so you don’t have to sit and
watch it.
Dewson_958-7.book Page 41 Monday, June 30, 2008 3:01 PM
42
CHAPTER 2
■ SQL SERVER MANAGEMENT STUDIO
Figure 2-22. Query Results
➤
SQL Server
➤
General options
SQL Server ➤ Results to Grid
When we run T-SQL to retrieve data, SSMS can place it within a grid, a bit like in Excel (although it
will be read-only), or represent it as text, like in Notepad (also read-only). You can also save the data
to a file, which is based on Results to Text options. The Results to Grid options, shown in Figure 2-23,
cover how the results will look if we are outputting to a grid:
• Include the Query in the Result Set: The T-SQL used to run the query is placed prior to the results.
• Include Column Headers When Copying or Saving the Results: If you want to copy information
from the results—for example, to place it within an e-mail—then selecting this option will
include the column headers as well as the results.
• Quote strings containing list separators when saving .csv results: When you return results to a
grid and then right-click and select Save Results As, the resulting .csv file will place quotation
marks around text columns that contain commas.
• Discard Results After Execution: Once the query executes, any results displayed will be imme-
diately discarded at the end, therefore leaving nothing to display.
• Display Results in a Separate Tab: Instead of the results appearing below the query, they can
instead be in their own tab, giving more space for a larger set of results to be displayed.
• Maximum Characters Retrieved: This option defines the maximum amount of data to be
displayed in a single cell for results.
Dewson_958-7.book Page 42 Monday, June 30, 2008 3:01 PM
CHAPTER 2 ■ SQL SERVER MANAGEMENT STUDIO
43
Figure 2-23. Query Results
➤
SQL Server
➤
Results to Grid options
SQL Server ➤ Results to Text
These other results options, shown in Figure 2-24, affect how results are displayed when they are in
text format:
• Output Format: This combo box presents you with five different formatting options: Column
Aligned, Comma Delimited, Tab Delimited, Space Delimited, and Custom Delimiter. These
different options allow you to set your output delimiter so that you can import your data into
other systems.
• Include Column Headers in the Result Set: Uncheck this if you just wish the results. Again, this
is ideal for when you are passing data on to other systems.
• Include the Query in the Result Set: The T-SQL used to run the query is placed prior to the results.
• Scroll As Results Are Received: As rows are returned, if they extend past the end of the page,
then the results are scrolled so that the last row of data is displayed.
• Right Align Numeric Values: Any numeric values are aligned to the right instead of the left.
• Discard Results After Query Executes: Once the query executes, any results displayed will be
immediately discarded at the end, therefore leaving nothing to display.
• Display Results in a Separate Tab: Instead of the results appearing below the query, they can
instead be in their own tab, giving more space for a larger set of results to be displayed.
• Maximum Number of Characters Displayed in Each Column: This option defines the maximum
amount of data to be displayed in a single cell for results.
Dewson_958-7.book Page 43 Monday, June 30, 2008 3:01 PM
44
CHAPTER 2
■ SQL SERVER MANAGEMENT STUDIO
Figure 2-24. Query Results
➤
SQL Server
➤
Results to Text options
SQL Server ➤ Multiserver Results
I don’t cover how to deal with multiserver connections, but the Multiserver Results option allows
you to define how you want the results to look.
SQL Server Object Explorer ➤ Commands
The first option defines the number of rows to return when viewing the Audit logs. Once you’ve defined
your tables or views, you can right-click to open a pop-up window, then either edit or display a
predefined number of rows. This is an ideal option, as it means that SQL Server doesn’t return either
the full set of data or a set of data to cache defined by its own logic. You are in control of the volume
of data. I would keep the options set to the default. Figure 2-25 shows the default settings.
Figure 2-25. The number of rows to return as default when using SSMS
Dewson_958-7.book Page 44 Monday, June 30, 2008 3:01 PM