Beginning SQL Server 2005 for Developers From Novice to Professional phần 7 pdf
Bạn đang xem bản rút gọn của tài liệu. Xem và tải ngay bản đầy đủ của tài liệu tại đây (1.56 MB, 53 trang )
CHAPTER 8 ■ WORKING WITH THE DATA
295
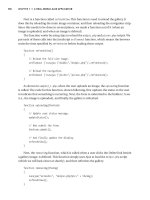
SELECT CustomerFirstName, CustomerLastName,
ClearedBalance, UnclearedBalance
FROM CustomerDetails.Customers
WHERE CustomerId = 1
You should now see the alteration in place, as shown in Figure 8-45.
Figure 8-45. Updating multiple columns
8. Now let’s move on to updating columns in which the data types don’t match. SQL Server does a pretty
good job when it can to ensure the update occurs, and these following examples will demonstrate how
well SQL Server copes with updating an integer data type with a value in a varchar data type. The first
example will demonstrate where a varchar value will successfully update a column defined as integer.
Enter the following code:
DECLARE @WrongDataType VARCHAR(20)
SET @WrongDataType = '4311.22'
UPDATE CustomerDetails.Customers
SET ClearedBalance = @WrongDataType
WHERE CustomerId = 1
9. Execute the code; you should see the following message when you do:
(1 row(s) affected)
10. The value 4311.22 has been placed into the ClearedBalance column for CustomerId 1. SQL
Server has performed an internal data conversion (known as an implicit data type conversion) and has
come up with a money data type from the value within varchar, as this is what the column expects, and
therefore can successfully update the column. Here is the output as proof:
SELECT CustomerFirstName, CustomerLastName,
ClearedBalance, UnclearedBalance
FROM CustomerDetails.Customers
WHERE CustomerId = 1
Figure 8-46 shows the results of updating the column.
Figure 8-46. Updating a column with internal data conversion
Dewson_5882C08.fm Page 295 Wednesday, January 4, 2006 3:43 PM
296
CHAPTER 8
■ WORKING WITH THE DATA
11. However, in this next example, the data type that SQL Server will come up with is a numeric data type.
When we try to alter an integer-based data type, bigint, with this value, which we can find in the
AddressId column, the UPDATE does not take place. Enter the following code:
DECLARE @WrongDataType VARCHAR(20)
SET @WrongDataType = '2.0'
UPDATE CustomerDetails.Customers
SET AddressId = @WrongDataType
WHERE CustomerId = 1
12. Now execute the code. Notice when we do that SQL Server generates an error message informing you
of the problem. Hence, never leave data conversions to SQL Server to perform. Try to get the same data
type updating the same data type. We look at how to convert data within Chapter 12.
Msg 8114, Level 16, State 5, Line 3
Error converting data type varchar to bigint.
Updating data can be very straightforward, as the preceding examples have demonstrated. Where at all possible,
either use a unique identifier, for example, the CustomerId, when trying to find a customer, rather than a name.
There can be multiple rows for the same name or other type of criteria, but by using the unique identifier, you can
be sure of using the right record every time. To place this in a production scenario, we would have a Windows-based
graphical system that would allow you to find details of customers by their name, address, or account number. Once
you found the right customer, instead of keeping those details to find other related records, keep a record of the
unique identifier value instead.
Getting back to the UPDATE command and how it works, first of all SQL Server will filter out from the table the first
record that meets the criteria of the WHERE statement. The data modifications are then made, and SQL Server
moves on to try to find the second row matching the WHERE statement. This process is repeated until all the rows
that meet the WHERE condition are modified. Therefore, if using a unique identifier, SQL Server will only update one
row, but the WHERE statement looks for rows that have a CustomerLastName of McGlynn, in which case multiple
rows could be updated. So choose your row selection criteria for updates carefully.
But what if you didn’t want the update to occur immediately? There will be times when you will want to perform an
update, and then check that the update is correct before finally committing the changes to the table. Or when doing
the update, you want to check for errors or unexpected data updates. This is where transactions come in, and these
are covered next.
Transactions
A transaction is a method through which developers can define a unit of work logically or
physically that, when it completes, leaves the database in a consistent state. A transaction
forms a single unit of work, which must pass the ACID test before it can be classified as a trans-
action. The ACID test is an acronym for Atomicity, Consistency, Isolation, and Durability:
Dewson_5882C08.fm Page 296 Wednesday, January 4, 2006 3:43 PM
CHAPTER 8 ■ WORKING WITH THE DATA
297
• Atomicity: In its simplest form, all data modifications within the transaction must be
both accepted and inserted successfully into the database, or none of the modifications
will be performed.
• Consistency: Once the data has been successfully applied, or rolled back to the original
state, all the data must remain in a consistent state, and the data must still maintain
its integrity.
• Isolation: Any modification in one transaction must be isolated from any modifications
in any other transaction. Any transaction should see data from any other transaction
either in its original state or once the second transaction has completed. It is impossible
to see the data in an intermediate state.
• Durability: Once a transaction has finished, all data modifications are in place and can
only be modified by another transaction or unit of work. Any system failure (hardware or
software) will not remove any changes applied.
Transactions within a database are a very important topic, but also one that requires a
great deal of understanding. This chapter covers the basics of transactions only. To really do
justice to this area, we would have to deal with some very complex and in-depth scenarios,
covering all manner of areas such as triggers, nesting transactions, and transaction logging,
which is beyond the scope of this book.
A transaction can be placed around any data manipulation, whether it is an update, inser-
tion, or deletion, and can cater to one row or many rows, and also many different commands.
There is no need to place a transaction around a SELECT statement unless you are doing a
SELECT INTO, which is of course modifying data. This is because a transaction is only required
when data manipulation occurs such that changes will either be committed to the table or
discarded. A transaction could cover several UPDATE, DELETE, or INSERT commands, or indeed a
mixture of all three. However, there is one very large warning that goes with using transactions.
■Caution Be aware that when creating a transaction, you will be keeping a hold on the whole table, pages
of data, or specific rows of information in question, and depending upon how your SQL Server database is set
up to lock data during updates, you could be stopping others from updating any information, and you could
even cause a deadlock, also known as a deadly embrace. If a deadlock occurs, SQL Server chooses one of
the deadlocks and kills the process; there is no way of knowing which process SQL Server will select.
A deadlock is where two separate data manipulations, in different transactions, are being
performed at the same time. However, each transaction is waiting for the other to finish the
update before it can complete its update. Neither manipulation can be completed because
each is waiting for the other to finish. A deadlock occurs, and it can (and will) lock the tables
and database in question. So, for example, transaction 1 is updating the customers table
Dewson_5882C08.fm Page 297 Wednesday, January 4, 2006 3:43 PM
298
CHAPTER 8
■ WORKING WITH THE DATA
followed by the customer transactions table. Transaction 2 is updating the customer transac-
tions table followed by the customers table. A lock would be placed on the customers table
while those updates were being done by transaction 1. A lock would be placed on the customer
transactions table by transaction 2. Transaction 1 could not proceed because of the lock by
transaction 2, and transaction 2 could not proceed due to the lock created by transaction 1.
Both transactions are “stuck.” So it is crucial to keep the order of table updates the same, espe-
cially where both could be running at the same time.
It is also advisable to keep transactions as small, and as short, as possible, and under no
circumstances hold onto a lock for more than a few seconds. We can do this by keeping the
processing within a transaction to as few lines of code as possible, and then either roll back
(that is, cancel) or commit the transaction to the database as quickly as possible within code.
With every second that you hold a lock through a transaction, you are increasing the potential
of trouble happening. In a production environment, with every passing millisecond that you
hold on to a piece of information through a lock, you are increasing the chances of someone
else trying to modify the same piece of information at the same time and the possibility of the
problems that would then arise.
There are two parts that make up a transaction, the start of the transaction and the end of
the transaction, where you decide if you want to commit the changes or revert back to the orig-
inal state. We will now look at the definition of the start of the transaction, and then the T-SQL
commands required to commit or roll back the transaction. The basis of this section is that
only one transaction is in place, and that you have no nested transactions. Nested transactions
are much more complex and should only really be dealt with once you are proficient with SQL
Server. The statements we are going through in the upcoming text assume a single transaction;
the COMMIT TRAN section changes slightly when the transaction is nested.
BEGIN TRAN
The T-SQL command, BEGIN TRAN, denotes the start of the transaction processing. From this
point on, until the transaction is ended with either COMMIT TRAN or ROLLBACK TRAN, any data
modification statements will form part of the transaction.
It is also possible to suffix the BEGIN TRAN command with a name of up to 32 characters
in length. If you name your transaction, it is not necessary to use the name when issuing a
ROLLBACK TRAN or a COMMIT TRAN command. The name is there for clarity of the code only.
COMMIT TRAN
The COMMIT TRAN command will commit the data modifications to the database permanently,
and there will be no going back once this command is executed. This function should only be
executed when all changes to the database are ready to be committed.
ROLLBACK TRAN
If you wish to remove all the database changes that have been completed since the beginning
of the transaction, say, for example, because an error had occurred, then you could issue a
ROLLBACK TRAN command.
So, if you were to start a transaction with BEGIN TRAN and then issue an INSERT that succeeds,
and then perhaps an UPDATE that fails, you could issue a ROLLBACK TRAN to roll back the transac-
tion as a whole. As a result, you roll back not only the UPDATE changes, but also, because they
Dewson_5882C08.fm Page 298 Wednesday, January 4, 2006 3:43 PM
CHAPTER 8 ■ WORKING WITH THE DATA
299
form part of the same transaction, the changes made by the INSERT, even though that particular
operation was successful.
To reiterate, keep transactions small and short. Never leave a session with an open trans-
action by having a BEGIN TRAN with no COMMIT TRAN or ROLLBACK TRAN. Ensure that you do not
cause a deadly embrace.
If you issue a BEGIN TRAN, then you MUST issue a COMMIT TRAN or ROLLBACK TRAN transaction
as quickly as possible; otherwise, the transaction will stay around until the connection is
terminated.
Locking Data
The whole area of locking data, how locks are held, and how to avoid problems with them, is a
very large complex area and not for the fainthearted. However, it is necessary to be aware of
locks, and at least have a small amount of background knowledge on them so that when you
design your queries you stand a chance of avoiding problems.
The basis of locking is to allow one transaction to update data, knowing that if it has to roll
back any changes, no other transaction has modified the data since the first transaction did.
To explain this with an example, if you have a transaction that updates the CustomerDetails.
Customers table, and then moves on to update the TransactionDetails.Transactions table, but
hits a problem when updating the TransactionDetails.Transactions table, the transaction
must be safe in the knowledge that it is only rolling back the changes it made, and not changes
by another transaction. Therefore, until all the table updates within the transaction are either
successfully completed or have been rolled back, the transaction will keep hold of any data
inserted, modified, or deleted.
However, one problem with this approach is that SQL Server may not just hold the data
that the transaction has modified. Keeping a lock on the data that has just been modified is
called row-level locking. On the other hand, SQL Server may be set up to lock the database,
which is known as database-level locking, found in areas such as backups and restores. The
other levels in between are row, page, and table locking, and so you could lock a large resource,
depending on the task being performed.
This is about as deep as I will take this discussion on locks, so as not to add any confusion
or create a problematic situation. Dealing with locks is handled automatically by SQL Server,
but it is possible to make locking more efficient by developing an effective understanding of
the subject, and then customizing the locks within your transactions.
Updating Data: Using Transactions
Now, what if, in the first update query of this chapter, we had made a mistake or an error
occurred? For example, say we chose the wrong customer, or even worse, omitted the WHERE
statement, and therefore all the records were updated. These are unusual errors, but quite
possible. More common errors could result from where more than one data modification has
to take place and succeed, and the first one succeeds but a subsequent modification fails. By
using a transaction, we would have had the chance to correct any mistakes easily, and could
then revert to a consistent state. Of course, this next example is nice and simple, but by working
through it, the subject of transactions will hopefully become a little easier to understand and
appreciate.
Dewson_5882C08.fm Page 299 Wednesday, January 4, 2006 3:43 PM
300
CHAPTER 8
■ WORKING WITH THE DATA
Try It Out: Using a Transaction
1. Make sure Query Editor is running for this first example, which will demonstrate COMMIT TRAN in
action. There should be no difference from an UPDATE without any transaction processing, as it will
execute and update the data successfully. However, this should prove to be a valuable exercise, as it
will also demonstrate the naming of a transaction. Enter the following code:
SELECT 'Before',ShareId,ShareDesc,CurrentPrice
FROM ShareDetails.Shares
WHERE ShareId = 3
BEGIN TRAN ShareUpd
UPDATE ShareDetails.Shares
SET CurrentPrice = CurrentPrice * 1.1
WHERE ShareId = 3
COMMIT TRAN
SELECT 'After',ShareId,ShareDesc,CurrentPrice
FROM ShareDetails.Shares
WHERE ShareId = 3
Notice in the preceding code that the COMMIT TRAN does not use the name associated with the BEGIN
TRAN. The label after the BEGIN TRAN is simply that, a label and performs no functionality. It is therefore
not necessary to then link up with a similarly labeled COMMIT TRAN.
2. Execute the code. Figure 8-47 shows the results, which list out the Shares table before and after the
transaction.
Figure 8-47. Updating with transaction label and a COMMIT TRAN
3. We are now going to work through a ROLLBACK TRAN. We will take this one stage at a time so that you
fully understand and follow the processes involved. Note in the following code that the WHERE statement
has been commented out with By having the WHERE statement commented out, hopefully you’ll
have already guessed that every record in the ShareDetails.Shares table is going to be updated.
The example needs you to execute all the code at once, so enter the following code into your Query
Editor pane, and then execute it. Note we have three SELECT statements this time—before, during, and
after the transaction processing.
SELECT 'Before',ShareId,ShareDesc,CurrentPrice
FROM ShareDetails.Shares
WHERE ShareId = 3
BEGIN TRAN ShareUpd
Dewson_5882C08.fm Page 300 Wednesday, January 4, 2006 3:43 PM
CHAPTER 8 ■ WORKING WITH THE DATA
301
UPDATE ShareDetails.Shares
SET CurrentPrice = CurrentPrice * 1.1
WHERE ShareId = 3
SELECT 'Within the transaction',ShareId,ShareDesc,CurrentPrice
FROM ShareDetails.Shares
ROLLBACK TRAN
SELECT 'After',ShareId,ShareDesc,CurrentPrice
FROM ShareDetails.Shares
WHERE ShareId = 3
4. The results, as you see in Figure 8-48, show us exactly what has happened. Take a moment to look over
these results. The first list shows the full set of rows in the ShareDetails.Shares table prior to our
UPDATE. The middle recordset shows us the BEGIN transaction where we have updated every share,
and the final listing shows the data restored back to its original state via a ROLLBACK TRAN.
Figure 8-48. Updating with transaction label and a ROLLBACK TRAN
Nested Transactions
Let’s look at one last example before moving on. It is possible to nest transactions inside one
another. We touch on this enough for you to have a good understanding on nested transactions,
but this is not a complete coverage, as it can get very complex and messy if you involve save
points, stored procedures, triggers, and so on. The aim of this section is to give you an under-
standing of the basic but crucial points of how nesting transactions work.
Nested transactions can occur in a number of different scenarios. For example, you could
have a transaction in one set of code in a stored procedure, which calls a second stored procedure
that also has a transaction. We will look at a simpler scenario where we just keep the transactions in
one set of code.
Dewson_5882C08.fm Page 301 Wednesday, January 4, 2006 3:43 PM
302
CHAPTER 8
■ WORKING WITH THE DATA
What you need to be clear about is how the ROLLBACK and COMMIT TRAN commands work in
a nested transaction. First of all, let’s see what we mean by nesting a simple transaction. The
syntax is shown here, and you can see that two BEGIN TRAN statements occur before you get to
a COMMIT or a ROLLBACK:
BEGIN TRAN
Statements
BEGIN TRAN
Statements
COMMIT|ROLLBACK TRAN
COMMIT|ROLLBACK TRAN
As each transaction commences, SQL Server adds 1 to a running count of transactions
it holds in a system variable called @@TRANCOUNT. Therefore, as each BEGIN TRAN is executed,
@@TRANCOUNT increases by 1. As each COMMIT TRAN is executed, @@TRANCOUNT decreases by 1. It is
not until @@TRANCOUNT is at a value of 1 that you can actually commit the data to the database.
The code that follows might help you to understand this a bit more.
Enter and execute this code and take a look at the output, which should resemble Figure 8-49.
The first BEGIN TRAN increases @@TRANCOUNT by 1, as does the second BEGIN TRAN. The first COMMIT
TRAN marks the changes to be committed, but does not actually perform the changes because
@@TRANCOUNT is 2. It simply creates the correct BEGIN/COMMIT TRAN nesting and reduces @@TRANCOUNT
by 1. The second COMMIT TRAN will succeed and will commit the data, as @@TRANCOUNT is 1.
BEGIN TRAN ShareUpd
SELECT '1st TranCount',@@TRANCOUNT
BEGIN TRAN ShareUpd2
SELECT '2nd TranCount',@@TRANCOUNT
COMMIT TRAN ShareUpd2
SELECT '3rd TranCount',@@TRANCOUNT
COMMIT TRAN It is at this point that data modifications will be committed
SELECT 'Last TranCount',@@TRANCOUNT
Figure 8-49. Showing the @@TRANCOUNT
■Note After the last COMMIT TRAN, @@TRANCOUNT is at 0. Any further instances of COMMIT TRAN or
ROLLBACK TRAN will generate an error.
Dewson_5882C08.fm Page 302 Wednesday, January 4, 2006 3:43 PM
CHAPTER 8 ■ WORKING WITH THE DATA
303
If in the code there is a ROLLBACK TRAN, then the data is immediately rolled back no matter
where you are within the nesting, and @@TRANCOUNT is set to 0. Therefore, any further ROLLBACK
TRAN or COMMIT TRAN instances will fail, so you do need to have error handling, which we look at
in Chapter 11.
Try to avoid nesting transactions where possible, especially when one stored procedure
calls another stored procedure within a transaction. It is not “wrong,” but it does require a
great deal of care.
Now that updating data has been completed, the only area of data manipulation left is row
deletion, which we look at now.
Deleting Data
Deleting data can be considered very straightforward, especially compared to all of the other
data manipulation functions covered previously, particularly transactions and basic SQL.
However, mistakes made when deleting data are very hard to recover from. Therefore, you
must treat deleting data with the greatest of care and attention to detail, and especially test any
joins and filtering via a SELECT statement before running the delete operation.
Deleting data without the use of a transaction is almost a final act: the only way to get the
data back is to reenter it, restore it from a backup, or retrieve the data from any audit tables that
had the data stored in them when the data was created. Deleting data is not like using the recycle
bin on a Windows machine: unless the data is within a transaction, it is lost. Keep in mind that
even if you use a transaction, the data will be lost once the transaction is committed. That’s
why it’s very important to back up your database before running any major data modifications.
This section of the chapter will demonstrate the DELETE T-SQL syntax and then show how
to use this within Query Editor. It is also possible to delete records from the results pane within
SQL Server Management Studio, which will also be demonstrated.
However, what about when you want to remove all the records within a table, especially
when there could be thousands of records to remove? You will find that the DELETE command
takes a very long time to run, as each row to delete is logged in the transaction log, thus
allowing transactions to be rolled back. Luckily, there is a command for this scenario, called
TRUNCATE, which is covered in the section “Truncating a Table” later in the chapter. However,
caution should be exercised when using this command, and you’ll see why later.
First of all, it is necessary to learn the simple syntax for the DELETE command for deleting
records from a table. Really, things don’t come much simpler than this.
DELETE Syntax
The DELETE command is very short and sweet. To run the command, simply state the table you
wish to delete records from, as shown here:
DELETE
[FROM] tablename
WHERE where_condition
The FROM condition is optional, so your syntax could easily read
DELETE tablename
WHERE where_condition
Dewson_5882C08.fm Page 303 Wednesday, January 4, 2006 3:43 PM
304
CHAPTER 8
■ WORKING WITH THE DATA
There is nothing within this command that has not been covered in other chapters. The
only area that really needs to be mentioned is that records can only be deleted from one table
at a time, although when looking for rows to delete, you can join to several tables, as you can
with SELECT and UPDATE.
Now that you’ve seen the DELETE syntax, let’s dive right in with an example.
Using the DELETE Statement
Recall we created a table with the SELECT INTO command called CustTemp. Rather than delete
data from the main tables created so far, we’ll use this temporary table in this section of the book.
We’ll use transactions a great deal here to avoid having to keep inserting data back into the
table. It’s a good idea to use transactions for any type of table modification in your application.
Imagine that you’re at the ATM and you are transferring money from your savings account to
your checking account. During that process, a transaction built up of many actions is used to
make sure that your money doesn’t credit one system and not the other. If an error occurs, the
entire transaction rolls back, and no money will move between the accounts.
Let’s take a look at what happens if you were to run this statement:
BEGIN TRAN
DELETE CustTemp
When this code runs, SQL Server opens a transaction and then tentatively deletes all the
records from the CustTemp table. The records are not actually deleted until a COMMIT TRAN state-
ment is issued. In the interim, though, SQL Server will place a lock on the rows of the table, or
if this was a much larger table, SQL Server may decide that a table lock (locking the whole table
to prevent other modifications) is better. Because of this lock, all users trying to modify data
from this table will have to wait until a COMMIT TRAN or ROLLBACK TRAN statement has been issued
and completed. If one is never issued, users will be blocked. This problem is one of a number
of issues frequently encountered in applications when analyzing performance issues. There-
fore, never have a BEGIN TRAN without a COMMIT TRAN or ROLLBACK TRAN.
So, time to start deleting records.
Try It Out: Deleting Records
1. Enter the following commands in an empty Query Editor pane. This will remove all the records from our
table within a transaction, prove the point by trying to list the rows, and then roll back the changes so
that the records are put back into the table.
BEGIN TRAN
SELECT * FROM CustTemp
DELETE CustTemp
SELECT * FROM CustTemp
ROLLBACK TRAN
SELECT * FROM CustTemp
Dewson_5882C08.fm Page 304 Wednesday, January 4, 2006 3:43 PM
CHAPTER 8 ■ WORKING WITH THE DATA
305
2. Execute the code. You should see the results displayed in Figure 8-50. Notice that the number of records
in the CustTemp table before the delete is 5, then after the delete the record count is tentatively set to 0.
Finally, after the rollback, it’s set back to 5. If we do not issue a ROLLBACK TRAN command in here, we
would see 0 records, but other connections would be blocked until we did.
Figure 8-50. Deletion of all rows that were rolled back
3. Let’s take this a stage further and only remove the last three records of the table. Again, this will be
within a transaction. Alter the preceding code as indicated in the following snippet. Here we are using
the TOP command to delete three random rows. Why random? SQL Server only stores rows in a definite
order if they are covered by a clustered index. No other index, or no index, can guarantee the order in
which SQL Server stores other rows. This is not the best way to delete rows, as in virtually all cases you
will want to control the deletion.
BEGIN TRAN
SELECT * FROM CustTemp
DELETE TOP (3) CustTemp
SELECT * FROM CustTemp
ROLLBACK TRAN
SELECT * FROM CustTemp
4. Execute the code, which should produce the results shown in Figure 8-51.
Dewson_5882C08.fm Page 305 Wednesday, January 4, 2006 3:43 PM
306
CHAPTER 8
■ WORKING WITH THE DATA
Figure 8-51. Deletion of three rows that were rolled back
Truncating a Table
All delete actions caused by DELETE statements are recorded in the transaction log. Each time a
record is deleted, a record is made of that fact. If you are deleting millions of records before
committing your transaction, your transaction log can grow quickly. Recall from earlier in
chapter the discussions about transactions; now think about this a bit more. What if the table
you are deleting from has thousands of records? That is a great deal of logging going on within
the transaction log. But what if the deletion of these thousands of records was, in fact, cleaning
out all the data from the table to start afresh? Or perhaps this is some sort of transient table?
Performing a DELETE would seem a lot of overhead when you don’t really need to keep a log of
the data deletions anyway. If the action failed for whatever reason, you would simply retry
removing the records a second time. This is where the TRUNCATE TABLE command comes into
its own.
By issuing a TRUNCATE TABLE statement, you are instructing SQL Server to delete every
record within a table, without any logging or transaction processing taking place. In reality,
minimal data is logged about what data pages have been deallocated and therefore removed
from the database. This is in contrast to a DELETE statement, which will only deallocate and
remove the pages from the table if it can get sufficient locks on the table to do this. The deletion
of the records can be almost instantaneous, and a great deal faster than using the DELETE
command. This occurs not only because of the differences with what happens with the trans-
action log, but also because of how the data is locked at the time of deletion. Let’s clarify this
point before progressing.
When a DELETE statement is issued, each row that is to be deleted will be locked by SQL
Server so that no modifications or other DELETE statements can attempt to work with that row.
Deleting hundreds or thousands of rows is a large number of actions for SQL Server to perform,
and it will take time to locate each row and place a lock against it. However, a TRUNCATE TABLE
Dewson_5882C08.fm Page 306 Wednesday, January 4, 2006 3:43 PM
CHAPTER 8 ■ WORKING WITH THE DATA
307
statement locks the whole table. This is one action that will prevent any data insertion, modifi-
cation, or deletion from taking place.
■Note A TRUNCATE TABLE statement will delete data from a table with millions of records in only a few
seconds, whereas using DELETE to remove all the records on the same table would take several minutes.
The syntax for truncating a table is simple:
TRUNCATE TABLE [{database.schema_name.}]table
■Caution Use the TRUNCATE TABLE statement with extreme caution: there is no going back after the
transaction is committed; you cannot change your mind. Also, every record is removed: you cannot use this
command to selectively remove some of the records.
One “side effect” to the TRUNCATE TABLE clause is that it reseeds any identity columns. For
example, say that you have a table with an identity column that is currently at 2,000,000. After
truncating the table, the first inserted piece of data will produce the value 1 (if the seed is set to
1). If you issue a DELETE command to delete the records from the table, the first piece of data
inserted after the table contents have been deleted will produce a value of 2,000,001, even
though this newly inserted piece of data may be the only record in the table!
One of the limitations with the TRUNCATE TABLE command is that you cannot issue it against
tables that have foreign keys referencing them. For example, the Customers table has a foreign
key referencing the Transactions table. If you try to issue the following command:
TRUNCATE TABLE CustomerDetails.Customers
you will receive the following error message:
Msg 4712, Level 16, State 1, Line 1
Cannot truncate table 'customers' because it is being referenced
by a FOREIGN KEY constraint.
Dropping a Table
Another way to quickly delete the data in a table is to just delete the table and re-create it. Don’t
forget that if you do this, you will need to also re-create any constraints, indexes, and foreign
keys. When you do this, SQL Server will deallocate the table, which is minimally logged. To
drop a table in SQL Server, issue the following command:
DROP TABLE table_name
Dewson_5882C08.fm Page 307 Wednesday, January 4, 2006 3:43 PM
308
CHAPTER 8
■ WORKING WITH THE DATA
As with TRUNCATE TABLE, DROP TABLE cannot be issued against a table that has a foreign key
referencing it. In this situation, either the foreign key constraint referencing the table or the
referencing table itself must first be dropped before it is possible to drop the original table.
Summary
This chapter has taken a look at how to insert and then retrieve data on a set of tables in simplest
form. Later in the book, we will return to retrieving data with more complex language as well as
when working with data from more than one table within the single query.
We have taken a look at NULL values and default values, as well as how to insert data within
columns defined with these settings and constraints. You should also be comfortable with
getting information from tables using different searching, filtering, and ordering criteria.
Updating data can go wrong, and does, especially when you are working in a live environ-
ment and you wish to update data that is in flux. In such a scenario, getting the correct rows of
information to update and then actually updating them is akin to a fine art.
Therefore, surrounding any of your work with a transaction will prevent any costly and
potentially irretrievable mistakes from taking place, so always surround data modifications or
deletions with a transaction. With data inserts, it is not quite so critical that you surround your
work with a transaction, although it is recommended. For example, if you are inserting data
within a test environment and the data insertion is easily removed if you have part of the inser-
tion wrong, then perhaps it’s not overly critical to use a transaction; although to be safe, really
and truly, I still recommend that you use a transaction.
Updating columns within a table is very straightforward. As long as the data type defined
for the column to update is the same as, or is compatible with, the data type of the column, vari-
able, or static value that is being used to update this column, then you will have no problem. For
example, you can update a varchar column with char data type values. However, it is not possible
to update an integer column with a varchar value that has a noninteger value without converting
the varchar value to an integer. But don’t be fooled, you can update a varchar with an integer
or numeric data type.
The DELETE command in this chapter completes the commands for data retrieval and
manipulation. From this point, SQL Server is your oyster, and there should be no stopping you
now. Deleting data is a very straightforward process, perhaps too straightforward, and with no
recycle bin, you really do have to take care. Having to reinstate data is a lot harder than having
to remove records inserted incorrectly or changing back modifications completed in error.
Whenever deleting data (no matter how small the recordset is), it is strongly recommend
that a transaction be used, as this chapter has demonstrated, and also that a SELECT statement
be included to check your work.
Finally, the removal of every record within a table was also shown, along with the dire
warnings if you got it wrong. Really, only use the TRUNCATE TABLE command in development or
with the utmost extreme care within production.
So where can you go from here? The next chapter will look at views of data.
Dewson_5882C08.fm Page 308 Wednesday, January 4, 2006 3:43 PM
309
■ ■ ■
CHAPTER 9
Building a View
A view is a virtual table that, in itself, doesn’t contain any data or information. All it contains
is the query that the user defines when creating the view. You can think of a view as a query
against one or more tables that is stored within the database. Views are used as a security measure
by restricting users to certain columns or rows; as a method of joining data from multiple tables
and presenting it as if it resides in one table; and by returning summary data instead of detailed
data. Another use for a view is to provide a method of accessing the underlying data in a manner
that provides the end user with a business layout. For example, you will see within this chapter
the building of a view that shows customer details along with enriched transaction details, thus
making it easier for anyone interrogating your data who has no knowledge of the underlying
data model to access useful information.
Building a simple view is a straightforward process and can be completed in SQL Server
Management Studio or a Query Editor pane using T-SQL within SQL Server. Each of these tools
has two options to build a view, and this chapter covers all four options so that you become
conversant with building a view no matter which tool is currently at hand.
To give things a bit more bite in this chapter, a query within a query, known as a subquery,
will also be demonstrated, along with how to build a subquery to create a column.
Finally, placing an index on a view can speed up data retrieval, but it also can give performance
problems as well. An index on a view is not quite as straightforward as building an index on a table.
The aim of this chapter is to
• Make you aware of what a view is.
• Inform you as to how views can improve a database’s security.
• Show how to encrypt your view so that the source tables accessed cannot be seen.
• Demonstrate building a view using
• Management Studio View Designer
• Management Studio Create a View Wizard
•A Query Editor pane and T-SQL
• Show how to join two tables within a view.
• Demonstrate subqueries within a view.
• Build an index on a view and give the reasons as to why you would or would not do this.
Dewson_5882C09.fm Page 309 Monday, January 9, 2006 3:28 PM
310
CHAPTER 9
■ BUILDING A VIEW
What Is a View?
There will be times when you want to group together data from more than one table, or
perhaps only allow users to see specific information from a particular table, where some of the
columns may contain sensitive or even irrelevant data. A view can take one or more columns
from one or more tables and present this information to a user, without the user accessing the
actual underlying tables. A view protects the data layer while allowing access to the data. All of
these scenarios can be seen as the basis and reason for building a view rather than another
method of data extraction. If you are familiar with MS Access, views are similar to Access queries.
Because a view represents data as if it was another table, a virtual table in fact, it is also possible to
create a view of a view.
Let’s take a look at how a view works. As you know, we have a customer table that holds
information about our customers such as their first name, last name, account number, and
balances. There will be times when you want your users to have access to only the first and last
names, but not to the other sensitive data. This is where a view comes into play. You would
create a view that returns only a customer’s first and last name but no other information.
Creating a view can give a user enough information to satisfy a query he or she may have
about data within a database without that user having to know any T-SQL commands. A view
actually stores the query that creates it, and when you execute the view, the underlying query
is the code that is being executed. The underlying code can be as complex as required, there-
fore leaving the end user with a simple
SELECT * command to run with perhaps a small amount
of filtering via a simple
WHERE statement.
From a view, in addition to retrieving data, you can also modify the data that is being
displayed, delete data, and in some situations insert new data. There are several rules and limi-
tations for deleting, modifying, and inserting data from multitable views, some of which will be
covered in the “Indexing a View” section later in the chapter.
However, a view is not a tool for processing data using T-SQL commands, like a stored
procedure is. A view is only able to hold one query at a time. Therefore, a view is more like a
query than a stored procedure. Just as with a stored procedure or a query within a Query Editor
pane, you can include tables from databases that are running on different servers. Providing
the user ID has the necessary security credentials, it is possible to include tables from several
databases.
So to summarize, a view is a virtual table created by a stored SQL statement that can span
multiple tables. Views can be used as a method of security within your database, and they
provide a simpler front end to a user querying the data.
Later in the chapter, you will see how to build a view and how all of these ideas are put into
practice. Before we get to that, let’s look in more depth at how a view can be used as a security
vehicle.
Using Views for Security
Security is always an issue when building your database. So far, the book has covered the different
database-provided roles, when to use them, how to set up different types of roles, and how
useful they are. By restricting all users from accessing or modifying the data in the tables, you
will then force everyone to use views and stored procedures to complete any data task. (There
will be more on stored procedures in the next chapter.)
Dewson_5882C09.fm Page 310 Monday, January 9, 2006 3:28 PM
CHAPTER 9 ■ BUILDING A VIEW
311
However, by taking a view on the data and assigning which role can have select access,
update access, and so on, you are protecting not only the underlying tables, but also particular
columns of data. This is all covered in the discussions involving security in this chapter.
Security encompasses not only the protection of data, but also the protection of your
system. At some point as a developer, you will build a view and then someone else will come
along and remove or alter a column from an underlying table that was used in the view. This
causes problems; however, this chapter will show you how to get around this problem and
secure the build of a view so that this sort of thing doesn’t happen.
Imagine that you have a table holding specific security-sensitive information alongside
general information—an example would be where you perhaps work for the licensing agency
for driver licenses and alongside the name and address, there is a column to define the number
of fines that have had to be paid. As you can see, this is information that should not be viewed
by all employees within the organization. So, what do you do?
The simplest answer is to create a view on the data where you exclude the columns holding
the sensitive data. In this way, you can restrict access on the table to the bare minimum of roles
or logins, and leave either a view or a stored procedure as the only method of data retrieval
allowed. This way, the information returned is restricted to only those columns that a general
user is allowed to see.
It is also possible to place a
WHERE statement within a view to restrict the rows returned.
This could be useful when you don’t wish all employee salaries to be listed: perhaps excluding
the salaries of the top executives would be advised!
All these methods give you, as a developer, a method for protecting the physical data lying
in the base tables behind the views. Combine this with what you learned with roles, and
restricting table access, and you can really tighten the security surrounding your data. With
more and more companies embracing initiatives like Sarbanes-Oxley, where security should
be so tight a company can be defined as having secure data, views are a great method of getting
towards this goal.
Another method of securing views is to encrypt the view definition, which we explore next.
Encrypting View Definitions
As well as restricting access to certain tables or columns within a database, views also give the
option of encrypting the SQL query that is used to retrieve the data. Once a view is built and you
are happy that it is functioning correctly, you would release that view to production; it is at this
point that you would add the final area of security—you would encrypt the view.
The most common situation where you will find views encrypted is when the information
returned by the view is of a privileged nature. To expand further, not only are you using a view
to return specific information, you also don’t wish anyone to see how that information was
returned, for whatever reason. You would therefore encrypt the SQL code that makes up the
view, which would mean that how the information was being returned would not be visible.
There is a downside to encrypting a view: once the process of encryption is completed, it
is difficult to get back the details of the view. There are tools on the Internet that can decrypt an
encrypted view. When you encrypt a view, the view definition is not processed via encryption
algorithms, but is merely obfuscated, in other words, changed so that prying eyes cannot see
the code. These tools can returned the obfuscation back to the original code. Therefore, if you
need to modify the view, you will find that it is awkward. Not only would you have to use a tool,
but you would have to delete the view and re-create it, as it would not be editable. So, if you
Dewson_5882C09.fm Page 311 Monday, January 9, 2006 3:28 PM
312
CHAPTER 9
■ BUILDING A VIEW
build a view and encrypt it, you should make sure that you keep a copy of the source some-
where. This is why it is recommended that encrypted views should be used with care, and really
should only be placed in production, or at worst, in user testing.
Always keep a copy of the original view, before encryption, in the company’s source
control system, for example, SourceSafe, and make sure that regular backups are available.
Now that we have touched upon the security issues behind views, it is time to start
creating views for the database solution that we are building together.
Creating a View: SQL Server Management Studio
The first task for us is to create a view using SQL Server Management Studio. This is perhaps the
simplest solution, as it allows us to use “drag and drop” to build the view. This may be the
slowest method for creating a new view, but it does give us the greatest visual flexibility for
building the view, and this may also be the best method for dealing with views that already exist
and require only minor modifications.
The View Designer can aid you in the design of a view, or modification of any view already
built. For example, it can assist if you are trying to build a complex view from a simple view, or
it can even be used as a trial-and-error tool while you are gaining your T-SQL knowledge.
However, enough of the background—let’s take a look at how the View Designer works. In
this example, we will be making a view of
Shares.
Try It Out: Creating a View in SQL Server Management Studio
1. Ensure that SQL Server Management Studio is running, and that the ApressFinancial database
is expanded.
2. Find the Views node, and right-click it—this brings up the pop-up menu shown in Figure 9-1; from there
select New View.
Figure 9-1. Creating a new view
3. The next screen you will see is the View Designer, with a modal dialog box on top presenting a list of
tables that you can add to make the view. The background is pretty empty at the moment (move the
dialog box around if you need to) . It is within the View Designer that you will see all of the information
required to build a view. There are no tables in the view at this time, so there is nothing for the View
Designer to show. For those of you who are familiar with Access, you will see that the View Designer is
similar to the Access Query Designer, only a bit more sophisticated! We want to add our table, so moving
back to the modal dialog box, shown in Figure 9-2, select Shares, click Add, and the click Close to
remove the dialog box.
Dewson_5882C09.fm Page 312 Monday, January 9, 2006 3:28 PM
CHAPTER 9 ■ BUILDING A VIEW
313
Figure 9-2. Selecting the tables for your view
4. Take a moment to see how the View Designer has changed, as illustrated in Figure 9-3. Notice that the
background Query Designer area has been altered, the ShareDetails.Shares table has been added,
and the beginnings of a SELECT statement now appears about two thirds of the way down the screen.
By adding a table, the Query Designer is making a start to the view you wish to build.
Figure 9-3. The basic view
Dewson_5882C09.fm Page 313 Monday, January 9, 2006 3:28 PM
314
CHAPTER 9
■ BUILDING A VIEW
5. There are four separate parts to the View Designer, each of which can be switched on or off for viewing
via the toolbar buttons on top. Take a look at these toolbar buttons, as shown close up in Figure 9-4. The
first button brings up the top pane, the diagram pane, where you can see the tables involved in the view
and can access them via the leftmost toolbar button. The next button accesses the criteria pane, where
you can filter the information you want to display. The third button accesses the SQL pane, and the fourth
button accesses the results pane. As with the Query Editor, here you also have the ability to execute a
query through the execute button (the one with the red exclamation point). The final button relates to
verifying the T-SQL. When building the view, although the T-SQL is created as you build up the view, you
can alter the T-SQL code, and this button will verify any changes.
Figure 9-4. View toolbar buttons
6. We will see the ShareDetails.Shares table listed in the top part of the Query Designer (the diagram
pane) with no check marks against any of the column names, indicating that there are not yet any columns
within the view. What we want is a view that will display the share description, the stock market ticker
ID, and the current price. If we wanted all the columns displayed, we could click the check box next to
* (All Columns), but for our example, just place checks against the last three columns, as shown
in Figure 9-5. Notice as you check the boxes how the two areas below the table pane alter. The middle
grid pane lists all the columns selected and gives you options for sorting and giving the column an alias
name. The bottom part is the underlying query of the columns selected. The finished designer will look
as shown in Figure 9-5.
Figure 9-5. Our view with the columns selected
Dewson_5882C09.fm Page 314 Monday, January 9, 2006 3:28 PM
CHAPTER 9 ■ BUILDING A VIEW
315
7. We are going to change the details in the column grid now to enforce sorting criteria and to give the
column aliases. This means that if a user just does SELECT * from the view, then he or she will receive
the data in the order defined by the view’s query and also that some of the column names will have been
altered from those of the underlying table. We want to ensure that the shares come out from the view
in name order ascending. Move to the Sort Type column and click in the row that corresponds to ShareDesc.
Select Ascending as shown in Figure 9-6.
Figure 9-6. Placing an order on the data
8. In the next column, if we were defining more than one column to sort, we would define the order to sort
the columns in. However, we still need to add the aliases, which are found in the second column of the
grid. Notice the third option, CurrentPrice. To make this column more user friendly, we make the
name Latest Price, with a space. When we type this and tab out of the column, it becomes [Latest
Price], as you see in Figure 9-7; SQL Server places the square brackets around the name for us
because of the space.
Figure 9-7. Alias with identifier
9. Scrolling to the right of the screen would allow us to define a filter for the view as well. This is ideal if
we want to restrict what a user can see. Although sort orders can be changed by the T-SQL that calls the
view, filters placed within the view cannot return more data than the view allows. So going back to our
salary example mentioned earlier, this would be where we would restrict users to not seeing the MD’s
salary. In our example, we will only list those shares that have a current price, in other words where
CurrentPrice is greater than 0, as shown in Figure 9-8.
Figure 9-8. Filtering the data
10. Notice the Query Editor pane, which now has the filter within it as well as the sorting order. Also take a
look at the diagram pane and how the table display has been altered, as you see in Figure 9-9.
Dewson_5882C09.fm Page 315 Monday, January 9, 2006 3:28 PM
316
CHAPTER 9
■ BUILDING A VIEW
Figure 9-9. The table with the view options applied
11. Moving back to the T-SQL in the SQL pane, what about the TOP (100) PERCENT clause? Where did
that come from? First of all, if you specify an order in a view, then by default SQL Server will place the
TOP (100) PERCENT clause within the SQL. It can be used if the table is very large and you don’t want
to allow users to return all the data on a production system, as it would tie up resources. You can also
remove that clause from the Query Editor pane if you want; this will unlink your query from the designer
and the Properties window, but you would also need to remove the ORDER BY. A final point to notice is
how the column aliases are defined. The physical column is named followed by AS and then the alias.
■Note The AS when defining aliases is optional.
SELECT TOP (100) PERCENT
ShareDesc AS Description,
ShareTickerId AS Ticker,
CurrentPrice AS [Latest Price]
FROM ShareDetails.SharesWHERE (CurrentPrice > 0)
ORDER BY ShareDesc
12. If you wish to remove the TOP clause, it would be better to do this within the Properties window, shown
in Figure 9-10, usually found on the bottom right of SQL Server Management Studio; however, you
would also need to remove the sorting. If it’s not there, it can be found by selecting View ➤ Toolbox from
the menu or by pressing F4. Within the properties, we can give the view a description—very useful—
but we can also remove the TOP clause by setting Top Specification to No. We can also define
whether this view is read-only by setting Update Specification to No.
13. We do need to change some of the properties in the view definition, as shown in Figure 9-11. First of all,
it is better to give the view a description. Also, like a table, a view should belong to a schema. This can
be from an existing schema, or if you have a view traversing more than one table, you may have a
schema to cater to that scenario. In our case, it fits into the ShareDetails schema.
Dewson_5882C09.fm Page 316 Monday, January 9, 2006 3:28 PM
CHAPTER 9 ■ BUILDING A VIEW
317
Figure 9-10. The properties of a view
Figure 9-11. Populated properties of a view
Dewson_5882C09.fm Page 317 Monday, January 9, 2006 3:28 PM
318
CHAPTER 9
■ BUILDING A VIEW
14. We think the view is complete, but we need to test it out. By executing the query with the execute button
(the one sporting the red exclamation point) we will see the results in the results pane.
15. Now that the view is complete, it is time to save it to the database. Clicking the close button will bring
up a dialog box asking whether you want to save the view. Click Yes to bring up a dialog box in which
you give the view a name. You may find while starting out that there is a benefit to prefixing the name
of the view with something like vw_ so that you know when looking at the object that it’s a view. Many
organizations do use this naming standard; however, it is not compulsory, and SQL Server Management
Studio makes it clear what each object is. The naming standard comes from a time when tools did not
make it clear what object belonged to which group of object types. Once you have the name you wish,
as shown in Figure 9-12, click OK.
Figure 9-12. Naming the view
16. This will bring us back to SQL Server Management Studio, where we will see the view saved (see
Figure 9-13).
Figure 9-13. Finding a view in Object Explorer
We have now created our first view on the database. However, this method of building a view could be seen as a bit
slow and cumbersome for something so simple. What if we wanted to combine two tables, or a view and another table?
Creating a View Using a View
Creating a view that uses another view is as straightforward as building a view with a table. The
downside of building a view with a view is that it cannot be indexed for faster execution. There-
fore, depending on what the T-SQL of the final view is, data retrieval may not be as fast as it could
be with an index. Also, by having a view within a view, you are adding increased complexity
when debugging or profiling performance. Therefore, consider including the T-SQL from the
selected view in this new view.
Dewson_5882C09.fm Page 318 Monday, January 9, 2006 3:28 PM
CHAPTER 9 ■ BUILDING A VIEW
319
In this example, we will build a view of share prices using the vw_Shares view created
previously. In reality, we would use the ShareDetails.Shares table along with ShareDetails.
SharesPrices for the reasons just discussed.
Try It Out: Creating a View with a View
1. From SQL Server Management Studio Object Explorer, find Views, right-click, and select New View.
The Add Table dialog box comes up as before (see Figure 9-14). From the Table tab, select
SharePrices(ShareDetails).
Figure 9-14. Add a table
2. Move to the Views tab; there should only be one view, shown in Figure 9-15, as that is all we have
created. Select the view, click Add, and then click Close.
Figure 9-15. Adding a view
Dewson_5882C09.fm Page 319 Monday, January 9, 2006 3:28 PM