Wireless Network Hacks & Mods for Dummies phần 4 ppt
Bạn đang xem bản rút gọn của tài liệu. Xem và tải ngay bản đầy đủ của tài liệu tại đây (934.28 KB, 38 trang )
Using Mac OS X
Mac OS X doesn’t have a single interface that shows available networks quite
as completely as does Windows XP — the interface on the Mac is a bit less
involved, but probably also a bit easier. To “sniff” out available networks
using OS X, simply open Apple’s Internet Connect application — it’s in your
Applications Folder, and may very well be located on the OS X dock.
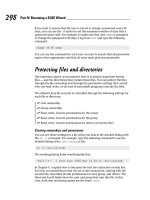
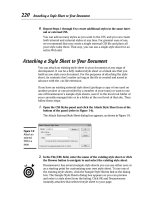
When Internet Connect is open, click on the AirPort tab. You see a pulldown
menu that displays each wireless network within range of your Mac (shown
in Figure 6-2). Put another way, it displays each wireless network that has
enough signal strength to reach your Mac. This display provides a green bar
graph display of signal strength — simply choose another network from the
pulldown menu.
You can streamline this process by putting your AirPort display in the OS X
menu bar. Just go to System Preferences (in your Applications folder or on
the Dock) and click on Network. In Network, click on the AirPort tab and
make sure that the Show AirPort Status in Menu Bar checkbox is selected —
if it’s not, select it and click the Apply Now button.
When the AirPort status is in the menu bar, you always see a list of available
networks in the menu bar, and you can open Internet Connect by simply
using this pulldown menu.
Using wireless client software
Although Windows Zero Config is the easiest way for Windows users to find
and examine wireless networks, it’s not the only way. Most wireless network
adapters include their own client software that handles network configura-
tion, AP selection, and more.
Figure 6-2:
Showing
signal
strength in
Mac OS X.
97
Chapter 6: Better Living Through Network Monitoring
11_595830_ch06.qxd 8/26/05 7:47 PM Page 97
These client software packages usually offer a network monitoring applica-
tion that gives you more network information than the software clients that
are built into the operating systems. For example, these clients may provide
more elaborate signal strength and SNR meters and may even offer some raw
data on the actual data throughput across your wireless network (for exam-
ple, showing bit or packet rates and error rates).
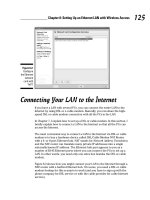
For example, the client software included with NETGEAR’s wireless network
adapters, shown in Figure 6-3, shows transmit, receive, or both transmit and
receive data rates graphically and numerically (in terms of packets of data
per second). It also shows the packet error rate, which, although not identi-
cal, is proportional to the BER we discussed earlier in the chapter.
Using Free “Stumblers”
The Wi-Fi client software included with operating systems and network
adapters can be very handy for tracking down available networks and for
seeing really high-level representations of network performance, but they are
not good tools for doing really precise measurements and monitoring of net-
work performance.
If you’re looking to really examine your wireless network environment, try this
easy (and free!) solution: Download a wireless sniffer or monitoring program.
The most popular (and famous) of these programs is an application known as
NetStumbler — a Windows program — but there are other programs for Mac
OS X, Linux, and even Pocket PC and Palm OS handheld computers.
Figure 6-3:
Checking
packet
throughput
using
NETGEAR’s
wireless
client
software.
98
Part II: Boosting Performance on Your Wireless Network
11_595830_ch06.qxd 8/26/05 7:47 PM Page 98
Network Stumbler
The king of the network monitoring programs, at least for Windows users
(which is to say, for most folks) is Network Stumbler (or NetStumbler),
www.netstumbler.com. This freeware program (version 0.4.0 is current as
we write) actively searches the airwaves for available wireless networks and
displays a wealth of data about them, including
ߜ SSID
ߜ Channel
ߜ Nominal speed (for example, 11 Mbps or 54 Mbps)
ߜ Signal strength (in dBm)
ߜ Noise (in dBm)
ߜ SNR
ߜ Encryption (NetStumbler doesn’t differentiate between WEP and WPA; it
simply says “WEP” when encryption is on, and is blank when it’s not.)
ߜ System vendor (helpful if you know you’re looking for, say, an Apple
AirPort)
ߜ IP address
NetStumbler is easy to use — just download the software from the NetStumbler
Web site and run the installer. A few seconds later, you’re ready to try it out.
NetStumbler is an active scanning network monitoring tool. It finds and moni-
tors networks by actively sending out probe requests on all the Wi-Fi channels
supported by the card in your PC. Most networks respond to these probe
requests, but not all do. A passive scanning monitoring tool (such as Kismet
for Linux computers, or KisMAC for Mac OS X, which we discuss in the next
section) sets your network adapter in a special “listening” mode (called
RFMON mode) that can pick up all of the wireless traffic in your area. We
mention this not because we think NetStumbler is a weak tool (we think it’s a
great tool, in fact), but to let you know that there may be some networks that
it won’t pick up.
NetStumbler doesn’t support all wireless network adapters, but it supports
many. You can find a list of supported cards in the Release Notes file on the
NetStumbler site (
www.netstumbler.com/downloads/netstumbler_v0.4.0_
release_notes.pdf
), but you may not know which chipset is inside your card.
We recommend that you just download the program and try it out. It’s free, it’s
not a big download, and it won’t mess your system up at all, so try it!
99
Chapter 6: Better Living Through Network Monitoring
11_595830_ch06.qxd 8/26/05 7:47 PM Page 99
The first time you run NetStumbler (to do so, just go to your Start menu and
select All Programs➪Network Stumbler), you’ll want to set a few preferences.
To set your NetStumbler prefs, do the following:
1. Select Options in the View menu.
The Options dialog box opens, as shown in Figure 6-4.
2. In the General tab, click and drag the Scan Speed slider all the way to
the right to the Fast setting.
3. In this same tab, make sure that the Reconfigure Card Automatically
check box is selected.
This allows NetStumbler to find all the networks in your area, instead of
just the ones you’re already associated with.
4. If you like, you can click on the MIDI tab and select the Enable MIDI
Output of the SNR check box.
Choosing this option causes NetStumbler to emit (through your MIDI-
enabled sound card) “poor-sounding musical instrument noises.” (We’re
quoting the NetStumbler help file here!) This is mostly annoying, but it
can be useful in situations where you can’t closely watch the screen
while you’re moving around trying to determine signal quality. The pitch
of the musical instrument increases as the SNR increases. (The better
the SNR, the more brain-rattling the pitch!)
5. Click OK to save your settings and close the Options dialog box.
When you run NetStumbler, it automatically turns off Windows Zero Config
(as long as you checked that Reconfigure Card Automatically checkbox in the
preferences) and begins to actively scan all channels in the 802.11a/b/g spec-
trum (depending upon the network adapter you’re using) — as long as your
wireless network adapter is supported.
Figure 6-4:
Configuring
NetStumbler
preferences.
100
Part II: Boosting Performance on Your Wireless Network
11_595830_ch06.qxd 8/26/05 7:47 PM Page 100
Sometimes, NetStumbler does not see any available networks, even though
they are there and “should” be seen. If this happens, your network adapter
may not be supported. Before you give up hope, however, go into the
NetStumbler Device menu and see if there’s more than one driver for your
wireless adapter. For example, for Pat’s NETGEAR RangeMax 802.11g card,
NetStumbler offers a choice of two drivers (Atheros and NDIS 5.1, as shown in
Figure 6-5). For this particular card, the NDIS driver works with NetStumbler,
and the Atheros driver does not. It should say
Unsupported next to the
driver if the driver won’t work with NetStumbler, but occasionally it won’t
say that — NetStumbler just won’t see all of your networks. Choose a differ-
ent driver and see if that makes NetStumbler work for you! You can also
check the following URL to see if your card is compatible:
www.stumbler.
net/compat/
.
If you select the NDIS driver for your wireless network adapter, NetStumbler
will receive RSSI data instead of signal and noise data (measured in dBm). In
this case, the signal strength data in NetStumbler will be useful, but any noise
or SNR data will not be.
Figure 6-5:
Choosing a
driver in
NetStumbler.
101
Chapter 6: Better Living Through Network Monitoring
11_595830_ch06.qxd 8/26/05 7:47 PM Page 101
After NetStumbler has begun monitoring the airwaves, you can find different
ways to display (and therefore analyze) the data. In the left pane of the
NetStumbler window (shown in Figure 6-6), you see several different display
options, each with an expand/collapse plus/minus sign next to it (they’re all
expanded in the figure). You can sort through your networks using these con-
trols by
ߜ Channel: You can look at individual 802.11a/b/g channels to see which
access points are on which channels. This can be handy when you’re
trying to figure out to which channel to assign your APs (you can figure
out what the neighbors are using). Click on the plus signs next to indi-
vidual channels to expand the listing of devices on each channel (listed
by MAC address).
ߜ SSID: You can also sort by SSID. This may seem unnecessary, but it actu-
ally can be a good tool to see if there are multiple APs using the same
SSID. (Maybe your neighbors all bought identical routers during the last
sale at Fry’s!)
ߜ Filters: NetStumbler also provides a range of filters that let you sort
through available networks to find only those that meet certain criteria.
A number of these filters are available, but some of the most interesting
include
• Encryption On or Encryption Off: You can quickly find “open” net-
works (or ensure that your APs have encryption enabled) by using
these filters. This can be a handy tool when you’re searching for
that “free” AP at the hotel or café to check your e-mail.
• ESS (AP) or IBSS (Peer): Use these filters to sort through the avail-
able networks by their status as access points and as peer-to-peer
client networks. (You probably won’t want to try to associate with
peer-to-peer wireless networks unless you’re absolutely sure who
you’re connecting to.)
• Short Slot Time (11g): This filter tells you which 802.11g networks
(if any are available) are set up for “802.11g only” mode. If you’re
looking for the fastest networks around, this is one way (along with
signal strength) to find them.
When you sort NetStumbler using these navigation tools, you see a listing of
each AP or network that fits into that particular category. From this view, you
can read the text columns on the right side of the window (shown in Figure
6-7) to see important network data (like SNR) at a quick glance.
102
Part II: Boosting Performance on Your Wireless Network
11_595830_ch06.qxd 8/26/05 7:47 PM Page 102
Figure 6-7:
Viewing
NetStumbler
data in
column
form.
Figure 6-6:
Navigate
NetStumbler
by
expanding
or collapsing
the
navigation
tools on
the left.
103
Chapter 6: Better Living Through Network Monitoring
11_595830_ch06.qxd 8/26/05 7:47 PM Page 103
To get a graphical representation of any particular network, simply click on
the MAC Address of the device within the channels and SSID views and the
right pane shifts to the display shown in Figure 6-8. From this view, you can
see a running, time-based graphical representation of either signal strength
(for the NSID drivers) or signal strength and noise (for other drivers).
This display can be very handy when you’re changing your network in some
way because you can watch the effects of changes unfold on your computer
screen in real-time.
For example, if you’re trying to find out how well your AP covers your home,
you could use a laptop running NetStumbler and slowly move around the
house (like the Verizon “Can you hear me now?” guy), and watch the signal
strength or SNR dip and peak as you move in and out of good coverage.
If you find a room with poor coverage, have a helper adjust your AP or antenna
placement while you watch the SNR and use NetStumbler as a tool for optimiz-
ing placement. You can also turn on the MIDI audio output we mentioned at the
beginning of this section to add an aural dimension to this process.
We talk in more detail about how to do this kind of network optimization in
Chapter 7, but we mention it here so you get an idea about how tools like
NetStumbler can be used.
Figure 6-8:
Using
NetStumbler
to graph
performance
over time.
104
Part II: Boosting Performance on Your Wireless Network
11_595830_ch06.qxd 8/26/05 7:47 PM Page 104
If you use a Windows Mobile/PocketPC handheld with wireless capabilities,
check out the portable companion to NetStumbler, MiniStumbler. Currently
compatible only with PocketPC 2002, PocketPC 3.0, and HPC2000 (until the
next version comes out, anyway), this program gives you most of the func-
tionality of NetStumbler in a truly portable platform, which is great for doing
site surveys of your home or office.
Other stumblers and sniffers
A ton of network monitoring programs are available for download on the
Internet. We talk about NetStumbler in detail because it’s the most popular
monitoring program and is the primary tool for Windows users, but it’s not the
only solution. Here are a few other programs we think you might want to try.
Check our
www.digitaldummies.com site for links to the latest versions of
these programs and for new additions as they become available:
ߜ MacStumbler: Found at
www.macstumbler.com, this Mac OS X utility
is no longer being actively developed (which means that new versions
are probably not on the way), but it remains a solid tool for detecting
and monitoring 802.11b and g networks for Mac users. Although
its name is similar to NetStumbler’s (and so is the functionality —
MacStumbler is also an active scanner), the program is not written by,
or based on the code of NetStumbler. Sometimes imitation is the sin-
cerest form of flattery!
ߜ Kismet: This is probably the most powerful of all scanning programs —
if you’ve got a Linux PC (which we’re not covering here), get Kismet
(
www.kismetwireless.net). Kismet is a passive scanning program that
can find any and all wireless networks within range, and scan all of the
traffic going across the network. The real power of Kismet (beyond the
passive scanning) is that the program can be used along with programs
like Snort (
www.snort.org) to become part of a wireless IDS or
Intrusion Detection System.
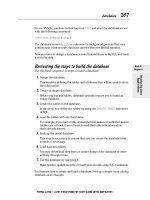
ߜ KisMAC: Because Mac OS X is a Unix-based OS, you can actually run a
version of Kismet on Mac OS X computers (check out
www.dopesquad.
net/security/
for the drivers needed to do this), but only with the
original 802.11b AirPort card — not with the current 802.11g AirPort
Extreme cards. A similar application, built from the ground up for OS X,
is KisMAC (
kismac.binaervarianz.de). This program provides a pas-
sive scanning capability (like Kismet, which is its inspiration), and adds
in support for AirPort Extreme cards and more — including functionality
that can be used to “break” WEP encryption. Use it discreetly! Figure 6-9
shows KisMAC in action.
105
Chapter 6: Better Living Through Network Monitoring
11_595830_ch06.qxd 8/26/05 7:47 PM Page 105
Getting Fancy
Freeware and open source tools such as NetStumbler, Kismet, KisMAC, and
the like can be very powerful tools for monitoring and observing wireless
LANs. If you’ve got a really big network to plan, build, and operate, however,
you might want to consider investing in a system that goes beyond simple
monitoring and offers some additional planning and security measures.
On the planning side of things, these programs allow you to enter the dimen-
sions and characteristics of your building (or outdoor space) that you plan to
cover — including details like building materials, room sizes and shapes, and
so on — and they use some predictive software to recommend locations for
AP installations.
Added to this predictive capability is a centralized monitoring software that
works in conjunction with RF sensors (basically, “passive” access points that
listen rather than transmit) to perform a supercharged version of the moni-
toring performed by your laptop using a NetStumbler-type program.
Some of these systems include
ߜ AirMagnet: Found at
www.airmagnet.com, this system is advertised as
a wireless intrusion prevention system — using sensors and a central-
ized server, AirMagnet monitors the airwaves for unauthorized users,
rogue access points, and more. You can also find laptop and handheld
PC versions of the AirMagnet software for performing site surveys.
ߜ AirTight Networks: The SpectraGuard system from AirTight Networks
(
www.airtightnetworks.net) is another monitoring system that com-
bines hardware sensors and centralized server software to monitor and
protect the airwaves.
Figure 6-9:
Mac OS X
users can
be snoopy
with
KisMAC.
106
Part II: Boosting Performance on Your Wireless Network
11_595830_ch06.qxd 8/26/05 7:47 PM Page 106
ߜ Wireless Valley: A leader in wireless network design for cellular and
other wireless networks, Wireless Valley (
www.wirelessvalley.com)
has recently released some planning and monitoring tools for wireless
LANs called LANPlanner and RF Manager to provide both up-front plan-
ning and ongoing maintenance and monitoring capabilities for large
wireless LANs.
All of these products are designed (and priced!) for larger networks. The sen-
sors, for example, are too expensive for home or small office networks. This
is about to change because sensor prices are coming down rapidly. In fact,
companies like AirMagnet are beginning to make partnerships with access
point vendors to include sensors right in the AP (at a considerably lower
price than standalone sensors). We think this trend will continue and that
dedicated monitoring hardware (and the software that makes it work) will be
reduced to prices that consumers can afford.
107
Chapter 6: Better Living Through Network Monitoring
11_595830_ch06.qxd 8/26/05 7:47 PM Page 107
108
Part II: Boosting Performance on Your Wireless Network
11_595830_ch06.qxd 8/26/05 7:47 PM Page 108
Chapter 7
Boosting Signal Strength
Where You Need It
In This Chapter
ᮣ Why Wi-Fi needs a boost
ᮣ Understanding signal paths
ᮣ Using antennas
ᮣ Using boosters
ᮣ Going with MIMO
W
ireless networking systems like Wi-Fi (or any wireless system, for that
matter) sometimes need a boost. The power levels used to transmit
Wi-Fi signals are miniscule compared to other radio systems, and there are
plenty of items in homes and offices (walls, for instance) that can interfere
with and reduce the strength of your signal. Distance itself is the enemy of a
wireless LAN — every doubling of distance from a radio transmitter equates
to a quartering of signal strength.
It doesn’t take much to reduce a Wi-Fi signal’s strength enough to reduce the
speed of a network connection, or simply to cause some funkiness with your
network’s performance (like dropouts in audio signals to a media adapter or
on a VoIP Wi-Fi phone call).
Fortunately, you can take steps to overcome signal strength issues and boost
your network’s signals as they travel around your home or office. In this
chapter, we discuss some of these steps, beginning with a discussion of
antennas and their effect on your network. We follow up with a discussion of
signal booster products, which add amplifiers with higher power output
levels to external antennas — providing an extra mechanism for improving
signal strength. Finally, we discuss a new generation of Wi-Fi products —
using a new antenna technology known as MIMO (Multiple Input/Multiple
Output), which uses multiple antennas (and multiple signal paths) to
increase range and speed across a wireless LAN.
12_595830_ch07.qxd 8/26/05 7:50 PM Page 109
Antennas for All
Most of us are familiar with what antennas do: provide a means for radiating
radio waves to and from a transmitter onto the airwaves over which they
eventually travel. There are a few basic concepts which define all antennas,
including:
ߜ Gain: The most important antenna characteristic is the antenna’s gain.
Gain is simply the measure of an antenna’s ability to amplify a signal’s
strength in a particular direction (compared to an ideal antenna, which
radiates its signal equally in all directions, three dimensionally. Antenna
gain is typically measured in dBi (decibels gain over isotropic — that
ideal 3-D radiating antenna). The higher the dBi gain of an antenna, the
greater the signal boost the antenna can provide, at least in its optimal
directions.
ߜ Radiation pattern: An antenna’s gain is usually greatly affected by its
radiation pattern. For example, an antenna that is designed to focus its
radio waves in a very tight sector usually has a higher gain than an omni-
directional antenna, which sends equal signal strength in all directions.
Most add-on antennas for Wi-Fi are directional — they have a greater
gain in one or another specific directions or sectors. Typically, the nar-
rower the optimal radiation pattern, the greater the gain of the antenna.
ߜ Resonant frequency and bandwidth: These concepts define the optimal
frequencies that an antenna operates in. The Wi-Fi antenna you buy is
designed to operate best in a range of frequencies appropriate to the
Wi-Fi system you’re supporting (2.4 GHz for 802.11b and g, and 5 GHz for
802.11a). The key thing to remember here is that you can’t just hook any
antenna up to your Wi-Fi system and expect it to work. You need an
antenna custom-built and designed for Wi-Fi frequencies.
So how does an antenna (and its gain) figure into your network’s performance?
Engineers use a complex formula to do radio frequency (RF) planning and
optimization, but here’s a simple reduction of it. To work properly, your Wi-Fi
system needs to make sense of the following formula:
Received signal = transmission power – losses in the
transmission path + transmitting antenna gain –
over-the-air transmission losses + receiving
antenna gain – losses in the receiving path.
What this means, in plain English, is that you have a certain amount of trans-
mission power. You lose some of this power going through the cable and con-
nectors in your transmission system, but you gain something via antenna
gain. On the far end of the equation, you again gain something due to antenna
gain, but lose something due to losses in the cables and connectors. The sum
of all these gains and losses is the received signal.
110
Part II: Boosting Performance on Your Wireless Network
12_595830_ch07.qxd 8/26/05 7:50 PM Page 110
To determine how a specific received signal will affect your Wi-Fi performance,
you need only compare it to the receiver sensitivity ratings of your Wi-Fi system.
Receiver sensitivity is basically a measure of how fast a Wi-Fi connection that a
piece of equipment can support at a certain signal level and quality. As the
received signal strength and quality drops, a Wi-Fi system drops down to a
lower speed (for example, from 11 Mbps to 5.5 Mbps).
Quality and quantity both matter when it comes to your Wi-Fi signal. That’s
why signal-to-noise ratio (SNR) is such a great measure; it accounts for both
the absolute strength of the signal and the quality of it (which relates to the
amount of noise picked up by your antenna). A high-powered signal with a
ton of noise might not be any better (in terms of your connection speed) than
a lower power signal with almost no noise. Ultimately, you want relatively
high power and relatively low noise.
To maximize your Wi-Fi system’s performance, you want to ensure that your
received signal is above the receiver sensitivity for the highest speed that
your system supports. In Chapter 6, we talk about network monitoring soft-
ware that can help you do just this.
Understanding Wi-Fi Antennas
Wi-Fi equipment (access points, network adapters, media adapters, bridges,
and repeaters — any bit of Wi-Fi gear) comes standard with some sort of
antenna. What kind of antenna your gear comes with — and more impor-
tantly, how it is mounted or connected to your system — makes a big differ-
ence in the performance and upgradeability of the equipment.
Counting your antennas
The first thing you might notice on many Wi-Fi systems (particularly on APs
and Wi-Fi routers) is that they sport a pair of antennas. If you’ve skipped
ahead to the end of this chapter and read about MIMO, you might think that
there’s something MIMO-ish going on here. In fact, there is not. Many systems
use two antennas in what’s known as an antenna diversity system. This means
that both antennas receive a signal and the AP (or other device, although it’s
usually an AP) chooses the antenna with the strongest signal and uses it.
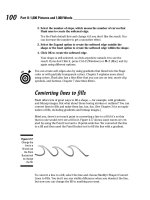
Figure 7-1 shows the popular Linksys WRT54G Wi-Fi router with its pair of
non-MIMO antennas.
Other types of Wi-Fi gear (like the Apple AirPort Extreme router) have no
visible antennas — everything is hidden inside away from view (and prying
fingers). Although such an approach is more aesthetically pleasing (and
safer from accidental antenna snap-off incidents), it can sometimes reduce
the performance of the system and also make upgrades a pain.
111
Chapter 7: Boosting Signal Strength Where You Need It
12_595830_ch07.qxd 8/26/05 7:50 PM Page 111
You can upgrade the antenna of most “internal” antenna system APs (as well
as many laptops with internal antennas), but it often means getting inside
your individual hardware and doing a bit of hardware modification. In many
cases, you can find kits that include all the pieces and parts you need as well
as very specific instructions on what and how to modify your hardware. An
example is the QuickerTek 27 dBm transceiver for the Apple AirPort or
AirPort Extreme (shown in Figure 7-2). This unit includes both an amplifier
(discussed later in the section titled “Adding Amplification”) and an external
antenna connector for the AirPort. (The latest versions of AirPort Extreme
already have an external antenna connector, but many existing AirPort
Extreme base stations do not.)
Going external
You can really boost the signal of your Wi-Fi equipment when you connect an
external antenna to the device. Despite a few glaring exceptions, most APs (and
many other Wi-Fi devices like PCI card network adapters, bridges and repeaters,
and media adapters) now come with external, removable antennas.
This is a great thing because a wealth of different antennas are now available
on the market designed to supplement or replace the factory-installed anten-
nas on your gear.
Figure 7-1:
Two
antennas,
but only one
is used at
any given
time.
112
Part II: Boosting Performance on Your Wireless Network
12_595830_ch07.qxd 8/26/05 7:50 PM Page 112
Understanding the connectors
The following discussion may quite possibly turn your brain into jelly.
Connectors are not fun, and they are obscure. Anything you learn about
Wi-Fi connectors most likely will not ever help you again in your life.
Before you can add an antenna to your Wi-Fi equipment, you need to ascer-
tain what type of antenna connection is available on that equipment. Dozens
of different antenna connectors are used in the Wi-Fi world. (It’s not simple
like the connectors used for TV signals, where the F-connector is used for
satellite, cable TV, and even most over-the-air antenna connections.)
A few of the most commonly used connectors are listed below (and shown in
Figure 7-3):
ߜ N-type
ߜ SMA
ߜ RP-SMA
ߜ MC
ߜ MC-X
ߜ MMX
Figure 7-2:
Adding an
antenna to
an Apple
AirPort or
AirPort
Extreme.
113
Chapter 7: Boosting Signal Strength Where You Need It
12_595830_ch07.qxd 8/26/05 7:50 PM Page 113
ߜ TNC
ߜ RP-TNC
ߜ BNC
ߜ APC-7
Some important facts to remember about Wi-Fi antenna connectors are
ߜ RP stands for reverse polarity.
ߜ The N connector is the most commonly found connector on the external
antennas themselves.
ߜ Almost all come in both male and female versions. The one big exception
is the APC-7 connector, which is sexless.
Pay attention to whether you need a male or female connector when
you’re buying an antenna or antenna cable. Nothing is more frustrating
than getting your shiny new antenna and not being able to hook it up
because you got the wrong type of connector.
ߜ A few pieces of equipment go even further down the road to obscurity
by offering standard connectors with reverse threads — making them
even harder to find the proper cables to match!
Male N connector Female RP-TNC connector
Male RP-SMA connector Female MC (Lucent proprietary) connector
Figure 7-3:
A cornu-
copia of
Wi-Fi
antenna
connectors.
114
Part II: Boosting Performance on Your Wireless Network
12_595830_ch07.qxd 8/26/05 7:50 PM Page 114
Rather than spending a lot of time trying to figure out different connectors,
we recommend that you just focus on those connectors that are installed on
your equipment. A great online resource for determining connector types is
www.radiolabs.com/products/cables/cable.php#connector.
Grabbing the pig’s tail
If you have a fairly common antenna connection, you may very well be able
to find external antennas that connect directly to your Wi-Fi device. This is
especially true if you buy the antennas from the same manufacturer who
made your AP or other device. If you’ve got an SMC AP and you buy a high
gain antenna from SMC, the chances are good that it’s got exactly the connec-
tion you need already.
But if you don’t buy your antenna from the same vendor as your Wi-Fi gear, or
if you’ve got a somewhat obscure connector to deal with, you will need a spe-
cial cable called a pigtail.
A pigtail, shown in Figure 7-4, is simply a thin, short-range cable that con-
nects a Wi-Fi device to an external antenna and that usually (but not always)
converts between different types of connectors. Most pigtails have one of the
many connectors described on one end, and an N connector on the other.
One key attribute of a pigtail is its small size. Because the pigtail uses thin
cables without a bunch of shielding, it is designed for short runs between the
Wi-Fi equipment and the antenna. A distance of 2 feet is a maximum, and
1 foot is even better. For longer runs, you can connect a length of LMR-400
cable between the pigtail and the antenna (this low-loss coaxial cable can
withstand longer runs than can most pigtails).
Figure 7-4:
It’s a Wi-Fi
antenna-
modifier’s
friend, the
pigtail.
115
Chapter 7: Boosting Signal Strength Where You Need It
12_595830_ch07.qxd 8/26/05 7:50 PM Page 115
Antenna types
After you’ve got your connectors and pigtails figured out, it’s time to pick an
antenna.
Looking at antenna types
Your most basic choice is to choose between directional or omnidirectional
antennas:
ߜ Omnidirectional antennas radiate their energy over 360 degrees, emit-
ting a relatively even signal around the entire horizon, in a shape similar
to a doughnut. Omnidirectional antennas are usually shaped like a
simple pole or rod, and they transmit most of their energy (the dough-
nut shape) outward from the pole itself — in other words, the energy
“doughnut” is much like a ring around the pole in a game of ring toss.
One interesting fact to note about the doughnut shape of this energy is
that the weakest points are immediately above and below the AP’s
antenna. So don’t expect to get a great signal if, for example, the AP is in
the basement directly below the couch. It might be a short distance, but
the signal isn’t being propagated in that direction.
The small pole antennas found on almost all APs with external antennas
are omnidirectional.
ߜ Directional antennas radiate their energy in some sort of a sector — be it
narrow or wide — rather than in all directions. A wide variety of direc-
tional antennas are on the market, each with their own radiation patterns
and uses. Some are quite specialized; some are good for almost all Wi-Fi
users.
The directionality of an antenna affects not only its transmission characteris-
tics but also its reception characteristics. So a directional antenna that trans-
mits well in a certain sector also receives better in that same direction.
Going to the poles
All antennas have different radiation patterns in the horizontal and vertical
planes as well. As we mentioned above, an omnidirectional antenna puts out
most of its power in the horizontal plane (perpendicular to the antenna’s
axis) and very little vertically. Such an antenna’s signal is said to be vertically
polarized.
116
Part II: Boosting Performance on Your Wireless Network
12_595830_ch07.qxd 8/26/05 7:50 PM Page 116
The key thing to remember about polarization is that you will get the best
results when both antennas in a “connection” — your AP and PC’s network
adapter antennas, for example — use the same polarization. Some antennas
can be either horizontal or vertical polarization, depending upon how they
are mounted.
Looking at directional antennas
A large variety of directional antennas are on the market, built for a range of
different functions. Some, for example, are highly directional, offer extremely
high gain, and are well-suited for a point-to-point connection (for example,
reaching another building with your Wi-Fi network). Others limit your best
signal to a relatively wide sector, offering less gain but more flexibility for use
in a home or office.
117
Chapter 7: Boosting Signal Strength Where You Need It
Making a move
Sometimes you don’t need to go so far as to
replace your antenna — you simply need to
move it to avoid obstacles and to get a clear
“shot” to the rest of your Wi-Fi network. You can
try to do this by simply moving the Wi-Fi equip-
ment itself (for example, raising your AP to a
higher spot in the room), but such a move isn’t
always practical for infrastructure (cable place-
ment, for example) or even just aesthetic rea-
sons. (Have you seen some of these APs? Ugly!)
You may, however, be able to move just the
antennas. For example, check out Linksys’s
AS1SMA Antenna Stand for SMA Antennas,
shown in the following figure. (Check it out
online at
www.linksys.com/products/
product.asp?grid=33&scid=38&prid=
647
.) This product, which you can buy online for
about $20, provides you with a remote stand for a
regular or high gain SMA antenna (Linksys also
offers a model for TNC antennas). You do lose
some of your signal strength by running the signal
over a cable to this remote antenna, but in many
cases you gain more in improved signal path (less
path loss) than you lose in the transmission path.
12_595830_ch07.qxd 8/26/05 7:50 PM Page 117
Some common types of directional antennas include
ߜ Patch or sector antennas: These are the least “extreme” of the directional
antennas, offering a sector that’s as much as 180 degrees in a compact
antenna that looks a lot like an omnidirectional that’s been flattened out a
bit. Patch or sector antennas can be helpful within a home or office when
you just need a little extra help reaching the AP.
ߜ Yagi antennas: We just love saying “Yagi.” Yagi antennas are highly direc-
tional antennas that look sort of like the TV antenna you had in the attic
as a kid (or at least like the one Pat had in his attic). They are hard to
describe, so check out Figure 7-5 to see one in all its Yagi glory. Yagis are
particularly good for outdoor, point-to-point applications, and not quite
as good for general use indoors.
ߜ Parabolic antennas: Even more directional are the parabolic antennas.
These devices look like the “dishes” used to pick up satellite TV, and
share similar design philosophies. You probably won’t ever use a para-
bolic antenna in your network unless you’re trying to shoot a signal
across the country many miles.
ߜ Waveguide: Have you heard of the Pringles can Wi-Fi antenna? This
famous hack involves putting a waveguide antenna (an antenna that
focuses the radio waves from your Wi-Fi system) inside a Pringles potato
chip can. You can find a commercial version of this concept at
http://
shop.netstumbler.com/detail.aspx?ID=288
.
When would you use a directional antenna if you’re not building a point-to-
point outdoor network? Typically, we recommend an omnidirectional antenna
on your main AP (you may wish to upgrade your AP’s antenna to a higher gain
omnidirectional). Directional antennas come in handy on remote wireless sta-
tions in your home or office.
Can’t reach the east wing of the house? Try a patch antenna or even a Yagi.
Got trouble with the home office over the garage? See if a sector antenna
helps. Our general rule of thumb is to stick with an omnidirectional for the AP
and go with directionals where needed at the edge of your network.
Feel free to break this rule if the layout of your home or office dictates that
your AP is not physically near the center of your space. If your AP is going in
the home office in a corner of the house, feel free to try a sector or patch
antenna that focuses your signal over 180 degrees and effectively covers the
rest of the house better than an omnidirectional antenna would.
118
Part II: Boosting Performance on Your Wireless Network
12_595830_ch07.qxd 8/26/05 7:50 PM Page 118
Adding Amplification
Recall the formula we mentioned earlier in the chapter for received signal
strength, in the section called “Antennas for All”? One element of this formula
was the transmit power. Antennas don’t actually boost this power — at best,
a high gain antenna directs more of this power in a particular direction,
increasing the effective signal strength.
But in some situations, you need to start off with a little extra juice to begin
with — meaning you want to increase the transmit power itself. To do this,
you need to add a device known as a signal amplifier or signal booster.
These devices simply add an amplifier to the signal path between your Wi-Fi
device and the antenna. This amplifier (like the amplifier in your home
stereo, for example) simply increases the power level of a signal, hopefully
with a minimum of increased noise and distortion.
A signal booster can have two components:
ߜ A transmit booster: This increases the outgoing signal level by amplify-
ing the signal before it hits the antenna.
ߜ A receive booster: This increases the incoming signal level by amplify-
ing it after it has been received by the antenna.
Figure 7-5:
Go, Yagi, go!
119
Chapter 7: Boosting Signal Strength Where You Need It
12_595830_ch07.qxd 8/26/05 7:50 PM Page 119
Most (legal) boosters transmit at about 500 mWatts (a half a Watt) of power,
whereas the APs themselves transmit at one tenth (or less) of that amount.
Installation varies by unit, but most signal boosters are simple plug-in
replacements for an existing antenna. For example, the RadioLabs 2.4Ghz
Wireless Range Extender (
www.radiolabs.com/products/wireless/
wireless-range-extender.php
, $119.95) plugs into any AP using an RP-
SMA or RP-TMC connector and provides an instant power boost in both
directions. Figure 7-6 shows this unit.
Boosters provide you with the most benefit on the transmit side of things —
making it easier to pick up signals at greater distances. On the receive side of
things, they do indeed “boost” the signal that’s being picked up, but they
don’t improve the quality of the signal. If a signal is really noisy, the noise (as
well as the signal itself) is also boosted — so you may not get a great increase
in quality and speed.
Going with MIMO
The latest technological trend, however, is not to increase power, or even to
increase the gain of antennas (although both of these techniques can work to
boost your Wi-Fi network’s range and throughput). Instead, you can boost
your network’s range by boosting the number of antennas (and signal paths)
used to carry data across the network.
Figure 7-6:
Boost your
AP’s power
by a big
margin with
a Wireless
Range
Extender.
120
Part II: Boosting Performance on Your Wireless Network
12_595830_ch07.qxd 8/26/05 7:51 PM Page 120
That’s the promise of a new generation of technologies known as MIMO —
Multiple Input/Multiple Output. MIMO technologies take a type of wireless
interference known as multipath and turn it from a negative to a positive.
In simple terms, multipath occurs when a single radio signal arrives at an
antenna more than once (and at different times) due to reflections and refrac-
tions (and other physics class phenomena that affect electromagnetic waves).
In a normal system, multipath causes transmission errors and may slow down
your network as it retransmits data.
MIMO, on the other hand, is inherently multipath and it likes it! MIMO sys-
tems add a spatial element to the mix. MIMO systems use multiple antennas
on both the input and output side of things and use special algorithms and
DSP (digital signal processing) to divide data up among these antennas and
then send this data to a remote wireless device over separate physical paths
through the airwaves.
The MIMO equipment on the far end receives these data streams and then
reassembles them. The bottom line is that MIMO promises to be faster —
perhaps a lot faster — than today’s 802.11g and 802.11a systems.
The preceding description of MIMO is only one possible use of MIMO in a
Wi-Fi system. Other MIMO systems use the multiple radios and antennas
differently. For example, another system uses the multiple antennas to
form a radio beam that is aimed at the remote receivers — sort of like an
electronically-formed self-adjusting directional antenna.
MIMO will almost certainly be part of the future 802.11n specification (see
Chapter 3). What is not clear today is exactly which MIMO system will take
precedence. (As we write this, in mid-2005, two main technology “camps” are
competing for dominance.)
You can buy MIMO-based Wi-Fi gear today, but it is not standards-based. Some
vendors are calling this Pre-N gear, which is an understatement: Nobody knows
exactly what 802.11n will require.
Don’t buy any Pre-N gear with the anticipation that it will work with the stan-
dardized 802.11n gear in a year or two. Maybe it will, but odds are stronger
that it won’t. That doesn’t mean your gear will stop working, but it does mean
that you won’t be able to easily expand your network without reverting back
to 802.11g.
That said, you can buy MIMO gear today, and it really does work. We’ve used
MIMO gear from a couple of different manufacturers and had some good
results with them — greater range and faster throughput. You do need to
have MIMO gear on both ends of the connection to gain full results, but some
systems claim to offer increased range even with your old 802.11g network
adapters on the far end of the connection.
121
Chapter 7: Boosting Signal Strength Where You Need It
12_595830_ch07.qxd 8/26/05 7:51 PM Page 121