Wireless Network Hacks & Mods for Dummies phần 6 pps
Bạn đang xem bản rút gọn của tài liệu. Xem và tải ngay bản đầy đủ của tài liệu tại đây (1.11 MB, 38 trang )
ߜ JiWire Spotlock: The folks at JiWire (you might know them for their hot
spot “finder” services) have just launched a VPN and security service
for hot spot users called Spotlock (
www.jiwire.com/spotlock.htm).
Spotlock combines IPSec VPN connectivity with JiWire’s hot spot data-
base, making it easy for you to both find and securely connect to a hot
spot. Other features for your $4.95 a month (or $49.95 a year) include a
connection manager that saves and manages your hot spot connections
for you, and an SMTP relay service that makes it easier to send e-mail
messages when you’re away from home (that is, if your ISP doesn’t allow
outgoing e-mail when you’re not connected to the ISP’s own network).
ߜ HotSpotVPN.com: Another company focusing on the wireless security of
mobile workers and hot spot aficionados is HotSpotVPN. The company
offers a slightly broader menu of services than personalVPN — with
both a software client-based SSL service (HotSpotVPN2) or a service
that uses the VPN client software built into Windows 2000/XP, Palm OS,
Mac OS X, or PocketPC (HotSpotVPN1). The range of choices also
includes the strength of the encryption used — ranging from very strong
(128-bit Blowfish) to super-duper-pretty-much-unbreakable-by-even-the-
government (256-bit AES).
The pricing of HotSpotVPN varies depending upon the service taken (1
or 2) and the strength of the encryption. You pay less money for weaker
encryption, which isn’t quite as secure, but which makes for a faster
connection! Costs range between $8.88 and $13.88 a month. You can also
buy short-term one-, three-, or seven-day contracts for less than the
monthly amount, if you get on the road only infrequently.
Using SSL to connect to Web sites
Whether you’re using a secure or insecure hot spot, or whether you’re using
a VPN, you should take some basic security precautions when doing sensitive
things on the Internet. For example: Don’t send your credit card number in an
unencrypted e-mail, be sure to turn on your PC’s firewall, and so on.
One active step that you should always take when you’re in a hot spot envi-
ronment, even if you’re taking other precautions, is to always use secure Web
sites whenever you can.
For basic Web surfing, you don’t have this option. You can’t check the news
on CNN.com at a secure version of the site — they simply don’t offer this
option. But you can (and should) always make sure that you’re using an SSL
Web site when you’re doing things like checking your Web mail, accessing a
personal banking site, doing some online shopping, or any other activity
where you share confidential information such as passwords or credit card
numbers.
173
Chapter 10: Staying Safe on Any Wireless Network
16_595830_ch10.qxd 8/26/05 8:03 PM Page 173
You know you’re on a secure Web site because of two things:
ߜ The site’s URL starts with an
https:// instead of a plain http://.
ߜ Your browser displays a yellow padlock icon (in most browsers, this
appears on the status bar at the bottom-right of the window).
If you’re connected to a secure Web site, even if all of your other hot spot
traffic is being intercepted, you can feel confident that the data you send
back and forth with the secured Web site is not being read by the guy sitting
across the room with his laptop out — at least not in any legible form.
Some Web sites have secure log-in using SSL, but they hide that fact from
you. For example, Google’s Gmail service (
gmail.google.com) has a secure
login inside a frame within the overall window. Even though you don’t see the
https:// or the yellow padlock, your log-in information is indeed secured.
Unfortunately, the only way to know if your favorite Web site does this is to
check out their FAQs or to ask them!
It’s very rare, but potentially you could connect to a hot spot that isn’t the
one you wanted to connect to (the evil twin we mentioned earlier in the chap-
ter) or that was set up by someone who is up to no good. On these rare occa-
sions, a person could set up a fake Web site that looks like an online banking
or other secure site and lure you into giving out your personal login data. You
can avoid this by using authenticated hot spots or a VPN connection — but if
you can’t do this, you can at least examine the security certificate of the Web
site you’re visiting by double-clicking on the yellow padlock in your browser.
Check to make sure that it’s actually the site you intend to visit. If you’ve got
some really confidential information, and you’re not sure that you’re securely
connected to the legitimate site you’re looking for, consider waiting until
you’re back home!
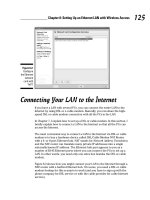
Some ISPs (not most, but many) let you set up your e-mail client software to
connect to your e-mail servers using SSL. This is a simple checkbox setting
within your favorite e-mail client. (Outlook Express, Eudora, and Apple Mail
all support SSL connections to the POP and SMTP mail servers.) Check with
your ISP to see if they offer this option — if they do, get instructions from
them to set up your e-mail client software for SSL. This keeps the e-mails you
send back and forth from a hot spot secure. If you can’t use SSL for checking
your ISP’s e-mail, you might consider switching to a Web mail service like
Gmail, which is secure, at least while you’re on the road. Figure 10-1 shows
these settings in Microsoft Outlook Express using Windows XP.
174
Part III: Wireless on the Go
16_595830_ch10.qxd 8/26/05 8:03 PM Page 174
Making a VPN Connection
Connecting to a VPN requires a few different things, both on your PC and in
the location that you’re connecting to “privately.” Specifically, you need
ߜ A VPN server or appliance at the remote location to terminate your
connection. This is simply the device that your computer connects to
on the remote end of the VPN connection. Most of the time, the VPN
functionality is built into a company’s firewall or network security appli-
ance. If you’re connecting to your corporate network, this may be a
server or appliance that you own (like the NETGEAR ProSafe VPN
Firewall (
/>which retails for about $550, but you may be able to find it for a couple
hundred less). If you’re connecting to a service (like WiTopia or
HotSpotVPN.com), the VPN server or appliance is owned and operated
by the service provider. You simply need the IP address (and a few other
bits of data) for this networked device.
If you’re using a VPN firewall to support more than a few users, look for
a device that has been equipped with hardware accelerated encryption,
which can help keep the throughput of your network from bogging down
when multiple users access it.
ߜ VPN client software on your PC, which establishes the secure connec-
tion to the server and encrypts the communications, leaving the PC to
Figure 10-1:
Setting up
secure mail
checking.
175
Chapter 10: Staying Safe on Any Wireless Network
16_595830_ch10.qxd 8/26/05 8:03 PM Page 175
ensure that they can’t be intercepted. A client can be as simple as your
Web browser (for some more limited VPNs, your Web browser can con-
nect via SSL and establish the VPN); it can be built into your operating
system (both Windows and Mac OS X have support for VPN built-in); or
it can be a separate piece of software that you install on your computer.
ߜ A VPN protocol. The VPN client and server “talk” to each other using
standardized protocols — your client and the server must support the
same protocol in order to communicate securely. Three primary proto-
cols are used in VPNs:
• SSL: This is the same protocol (secure sockets layer) used for
making secure Web page connections. For very simple VPNs, you
can simply use a Web browser to make the connection and access
mail, files, and servers. For more complex VPN uses (where you
need to use a variety of applications), you can use a client like
OpenVPN (
www.openvpn.net).
• IPSec: This is the most common protocol for corporate VPN serv-
ices and is widely supported right in operating systems. Mac OS X,
Windows 2000, and XP, and most UNIX variants (like OpenBSD and
Solaris) support IPSec connections right in the OS.
• PPTP: Point-to-point tunneling protocol is an older but still widely
supported VPN protocol developed by Microsoft. Most security
experts think that it’s less secure than IPSec (and it’s often less
widely supported and used these days).
ߜ An Internet connection between the two points. Finally, you need an
Internet connection to make this all work. When the VPN client and
server “find” each other and make a connection, they create a secure
“tunnel” across the public Internet, which uses encryption to keep
prying eyes out.
Setting up an IPSec connection
with Windows XP
The most common way to connect to a corporate VPN connection (or to
many VPN services that use IPSec) is to use the IPSec VPN client built into
Windows XP. This client allows you to establish the secure tunnel for all
applications on your computer — so you can set up a wireless hot spot con-
nection, turn on the VPN connection, and surf (or e-mail, IM, and transfer
files) without worry.
176
Part III: Wireless on the Go
16_595830_ch10.qxd 8/26/05 8:03 PM Page 176
When you connect to your “work” VPN, you are secure, but you may not be
free to do what you want on the Internet. Many businesses have strict poli-
cies on Web surfing and Internet usage, and may restrict what you can do (or
even log what sites you visit — which could cause you grief later on).
Some corporate VPNs may be set up to allow split tunneling. In such a case,
all of your corporate-specific traffic (like e-mail and access to the intranet)
goes through a VPN tunnel, but all of your other Internet traffic (like Web
surfing and your personal e-mail) does not. If you are using a corporate VPN,
talk to your IT folks about how things are set up; if you’ve got this kind of
split arrangement, take other precautions (as we discuss throughout the
chapter) when you’re online on the road.
To get set up, you simply need some basic information about your VPN
server (obtained from your IT manager or from your service provider) and
then follow the steps below:
1. Open Network Connections and click Create a New Connection. When
the New Connection Wizard window opens, click Next.
2. Select the Connect to the Network at My Workplace radio button and
click Next as shown in Figure 10-2.
3. Select the Virtual Private Network Connection radio button and click
Next as shown in Figure 10-3.
Figure 10-2:
Starting
to create
a VPN
connection
in Win-
dows XP.
177
Chapter 10: Staying Safe on Any Wireless Network
16_595830_ch10.qxd 8/26/05 8:03 PM Page 177
4. In the text box in the Connection Name window that appears (shown
in Figure 10-4), type a name for the network (it can be anything that
you can easily remember later). Click Next.
Lots of Nexts to click in a wizard!
5. In the Public Network window that appears (show in Figure 10-5),
select the Do Not Dial the Initial Connection radio button and click
Next.
This button is used only when you’re using a dial-up connection to con-
nect to the VPN — we’re skipping the wires!
Figure 10-4:
Give your
VPN
connection
a name that
you can
remember.
Figure 10-3:
Choose VPN
connection
here.
178
Part III: Wireless on the Go
16_595830_ch10.qxd 8/26/05 8:03 PM Page 178
6. When the VPN server selection window opens (as shown in
Figure 10-6), type the IP address or host name of your VPN server
and click Next.
Your service provider or network administrator gives this data to you.
7. In the final window, select the Add a Shortcut to This Connection to
My Desktop check box and click the Finish button.
A new dialog box appears on your desktop, as shown in Figure 10-7.
Figure 10-6:
Your
network
admin or
VPN hosting
company
gives you
the server
address.
Figure 10-5:
For Wi-Fi
connections,
turn off the
automatic
dialing.
179
Chapter 10: Staying Safe on Any Wireless Network
16_595830_ch10.qxd 8/26/05 8:03 PM Page 179
8. You can connect to the VPN immediately if you have a username and
password provided to you, or you can click the Properties button to
configure advanced properties of the VPN connection.
To invoke your VPN connection later and connect securely, simply
establish your Wi-Fi (or other) Internet connection and then right-click
on the VPN connection icon you created on your desktop and select
Connect.
We don’t walk you through the setting on the Properties dialog box because
the settings vary widely based upon the particular VPN to which you are con-
necting. The steps we walked through set up the connection to automatically
negotiate protocols and make a connection to most VPNs. If your VPN
requires specific settings (like special authentication EAP types), you can
make these configuration changes in the Properties dialog box.
As we mentioned, this VPN wizard sets up a connection that automatically
negotiates things like VPN protocol type. Although our focus is on IPSec
VPNS here because they’re most common, the exact same process sets you
up (generically) to connect to a PPTP VPN as well.
Using OpenVPN client and
WiTopia’s SSL VPN service
An alternative to IPSec VPNs are those that use the SSL encryption protocol.
As we mention earlier in this section, the simplest SSL VPNs exist simply in
the domain of a Web browser: You log into a secure
https: Web portal and
perform your VPN activities from within the Web browser.
Figure 10-7:
Use this
Windows
dialog box
to begin
a VPN
session
or to set
advanced
properties.
180
Part III: Wireless on the Go
16_595830_ch10.qxd 8/26/05 8:03 PM Page 180
This approach is great if your VPN needs are relatively simple: Web browsing,
file access, chat — applications that can be built into a Web browser, in other
words. If, however, you wish to use non-browser applications on your PC,
these simple SSL VPNs won’t provide you the security you need.
To make all of your applications secure on an SSL VPN, you need some client
software on your computer that basically acts as an intermediary between
applications and the Wi-Fi or Internet connection that your computer is
using. (This is what the built-in IPSec VPN client in Windows does.) One good
(and free!) client for this purpose is the OpenVPN client, an open source
(GPL-licensed, if you’re interested in such things) client that provides cross-
platform (Windows, Linux, Mac OS X, and so on) SSL VPN connectivity.
You can download an appropriate build of OpenVPN at the project’s main
site:
www.openvpn.net. For a version specifically designed for Windows
operating systems, with a full GUI (graphical user interface), check out the
OpenVPN GUI for Windows version at
/>The cool thing about OpenVPN is that companies can build upon the basic
OpenVPN framework to create their own variants of the software. For exam-
ple, the folks at WiTopia (we discuss their service a little earlier in this chap-
ter) have built their own WiTopia VPN service around a variant of the
Windows GUI version of OpenVPN.
Installing the WiTopia personalVPN client
As soon as you subscribe to WiTopia’s personalVPN service (www.witopia.
net/aboutpersonal.html
), you receive an e-mail with some details about
your order and about the service. You must take two steps to get your ser-
vice up and running:
ߜ Download the client software: Included in this e-mail is a link to down-
load WiTopia’s version of the Windows GUI OpenVPN client software. It’s
a simple installation process — just double-click on the downloaded .exe
file and follow the onscreen instructions. The e-mail you receive has
explicit instructions — basically, you just need to accept all of the
default settings in the installer program and click Next until you’re done!
This software runs on Windows 2000 and XP computers.
ߜ Register for a certificate: This is the real key to the service. The
certificate identifies you as the authorized user, and in turn identifies
WiTopia’s VPN server as the legitimate end point for your VPN connec-
tion. The certificate provides mutual authentication so that you can rest
assured that you and only you can use your account, and that you’ll not
be connected to a bogus VPN server somewhere along the line. We talk
about how to get your certificate in the remainder of this section.
181
Chapter 10: Staying Safe on Any Wireless Network
16_595830_ch10.qxd 8/26/05 8:03 PM Page 181
In order to create your certificate, you need to access both a Web browser
and the WiTopia.net Certificate Wizard program, which opens when you com-
plete the installation of the VPN software.
1. Follow the onscreen instructions within the Certificate Wizard pro-
gram, as shown in Figure 10-8.
You fill out some details about yourself (name, e-mail address, country,
and state) and provide the system a ten-digit (or more) password.
Don’t forget your password — this is used every time you log onto
the VPN.
2. The results of Step 1 include a private key (which is created in your
C:\Program Files\WiTopia.Net\config folder, and a certificate request
key (which is a bunch of gobbledygook on your screen beginning with
the words
BEGIN CERTIFICATE REQUEST ). Select this text
and press Ctrl+C to copy it onto your clipboard.
Don’t close this window just yet — you may need to come back and re-
copy the certificate request text, just in case you accidentally clear your
clipboard.
3. Switch to your e-mail program and click the link that says T
o activate
personalVPN service from WiTopia, click the following link: in
your e-mail from WiTopia.Net (the exact URL is different for every
customer).
The link opens in your Web browser (if it doesn’t, cut and paste the link
into a new browser window).
Figure 10-8:
Using the
Certificate
Wizard to
generate a
unique
certificate
for your
VPN.
182
Part III: Wireless on the Go
16_595830_ch10.qxd 8/26/05 8:03 PM Page 182
4. Follow the steps onscreen, including the pasting of the certificate
request text.
When you’re done, close any remaining open WiTopia programs and go
about your business. You need to wait for up to a day for your certificate
to be generated and e-mailed back to you.
You soon get an e-mail from WiTopia containing two files: your certifi-
cate (named FirstName_LastName.crt — substitute your actual name as
you registered yourself), and a .zip file containing that certificate (.crt)
file. You get both because some e-mail programs don’t handle .crt files
very well — for example, with Lotus Notes and Gmail (the two mail sys-
tems we use), you can’t open a .crt file at all — the .zip file helps you get
around this. Open this e-mail and see which of the two files you can
access. Depending on what you see, follow these steps:
a. If you can access the .crt file, simply save it in the c:\Program
Files\WiTopia.Net\config directory on your computer using your
e-mail client’s standard Save process.
b. If you can’t see the .crt file, but you can see the .zip file, simply
open the .zip file with your favorite .zip decompression utility (we
like WinZip —
www.winzip.com — but any .zip utility can handle
this task), and save it to that same directory.
c. If you can’t see either file, your e-mail program isn’t handling the
certificate files in a friendly way at all (Gmail does this, unfortu-
nately). Reply to the e-mail you’ve received with a different e-mail
address, and the certificates are forwarded to you again.
After you’ve installed that certificate file, you’re ready to go. The OpenVPN
GUI client is installed in the Windows taskbar on your computer. To make
your VPN connection, simply right-click the icon and select Connect. Enter
your password (the one you created in Step 1) in the OpenVPN Connection
window that pops up (shown in Figure 10-9).
Figure 10-9:
Connecting
to WiTopia’s
personal
VPN service.
183
Chapter 10: Staying Safe on Any Wireless Network
16_595830_ch10.qxd 8/26/05 8:03 PM Page 183
You are connected to the WiTopia.Net VPN server and your connection is
secure. You see a notification (shown in Figure 10-10) above your taskbar
showing the new public IP address of your VPN connection. (Your computer
will no longer use the public IP address of the Wi-Fi network you are con-
nected to, but instead will appearto be located in WiTopia’s data center.)
Figure 10-10:
Pat’s
connected
securely
through
personal-
VPN.
184
Part III: Wireless on the Go
16_595830_ch10.qxd 8/26/05 8:03 PM Page 184
Chapter 11
Outfitting Your Car with Wireless
In This Chapter
ᮣ Linking your cellphone to your car radio
ᮣ Checking out GPS
ᮣ Synching your car to your home music system
ᮣ Watching for viruses in your automobile
ᮣ Setting up wireless caravans on the road
W
ireless technologies have been creeping into the car ever since Paul
Galvin, the head of Galvin Manufacturing Corporation, invented the
first car radio back in 1929. Not unlike many new technologies for cars today,
the first car radios back then were not available from carmakers; instead, you
bought a retrofit kit from Galvin’s company. Galvin coined the name Motorola
for the company’s new products. The rest is, as we say, history.
Today, you can still add neat new wireless gizmos to your car, but you’re still
likely to have to do so via some sort of third-party device. Only a few high-
end cars even offer any sort of wireless integration into the car, and even
then it’s usually limited to putting a cellphone into the dashboard.
We’ve got better ideas than that, and this chapter tells you how to add
Bluetooth, Wi-Fi, and even satellite TV to your car. And as a bonus, we also
tell you how to seamlessly integrate your cellphone into the equation. If you
love cars as much as Pat does, this will simply be an irresistible set of first
projects for you to tackle!
In this chapter, we don’t spend a lot of time talking about cellular phone or
related data services themselves, but instead focus on how to link your cell-
phone to your car to take advantage of that mobile data stream.
Bluetooth for In-Car Communications
When it comes to adding wireless capabilities for audio, video, and comput-
ing purposes to cars, automakers have changed their minds about a zillion
17_595830_ch11.qxd 8/26/05 8:02 PM Page 185
times. They’ve explored proprietary wireless services, building wireless-
enabled consumer devices into the cars, linking car components to commer-
cial wireless services, and all sorts of combinations and in-betweens of the
above.
Although it’s still early in the wireless-enablement game, automakers finally
appear to be heading down some consistent paths regarding deployment of
specific wireless technologies in automobiles — and the first major commit-
ment, at least for the near-to-mid-term, is to the Bluetooth standard for com-
munications between the car and consumer devices like cellphones and
iPods. (Check out the official Bluetooth Web site —
www.bluetooth.com —
for details about the technology itself.)
Automakers found out that it was rather a pain to try to outfit cars with cell-
phones built in. See, even the fastest new improvements to cars take 18–24
months from concept to car lot; in the cellular industry, 18–24 months can
represent three cellphone generations and a whole lot of technical advance-
ment. So by the time a car outfitted with a cellphone made it to your town,
the cellphone technology would likely be obsolete — usually very obsolete.
So the carmakers abandoned that approach and have focused on using
Bluetooth as a wireless technology to “talk” to cellphones to enable inte-
grated, hands-free communications in the car, and support access to the
Internet and other data locations via the cellphone’s data services. With
this approach, which phone or which carrier you use is unimportant: As
long as it has Bluetooth on board, the car can talk to the world. (Makes you
wonder what Chitty Chitty Bang Bang would have ordered from Amazon.com,
doesn’t it?)
Bluetooth in action
Here’s a practical usage scenario: You climb into your car and turn it on. Next
to your speedometer is a liquid crystal display of your telephone’s address
book — complete with your most recently dialed numbers, missed calls,
scheduled calls, and so on. You scroll through the list, find who you want to
call, press the Call button, and you hear the call being placed through the
car’s sound speakers.
It gets better: If your phone rings when you are in your car, your sound
system lowers the volume on the music and replaces it with your caller’s
voice. Caller ID is displayed on the dashboard, naturally. Some cars even use
voice recognition: You can simply call out a string of numbers, and they are
recognized by your phone, which places the call. Most of these systems sup-
port speed-dial phrases: Just say “Home,” and that phrase is matched to a
186
Part III: Wireless on the Go
17_595830_ch11.qxd 8/26/05 8:02 PM Page 186
phone number, which saves you the trouble of remembering a number. Your
signal strength and battery level can also be displayed on the dashboard
readouts, depending on the specific phone you own.
But wait, there’s more! You can use your cellphone to enable your car to send
diagnostic info to your car dealership as well. Way cool.
All this is possible today, starting with select 2005 model cars, and all of it hap-
pens with the phone still in your pocket — the car is talking to your phone via
Bluetooth, accessing its phone records and speed-dial numbers, and extending
the speaker system and microphone pickup to the domain of the car itself. You
can control your car’s phone functionality from buttons usually located on
your car’s steering wheel. Now that’s seamless interconnectivity.
Although you can pair (or network) more than one phone with your car, you
can only use one phone at a time to place calls using the car’s functionality.
Although more than 20 carmakers offer factory-installed Bluetooth options
on more than 30 2005 models, you can expect this number to explode to near-
ubiquity within a few model years. Bluetooth costs have plummeted and the
demand for integration — spurred by devices like the iPod — is booming.
Where there’s demand, there’s usually supply within a reasonable timeframe.
Car-based Bluetooth modules and your Bluetooth phones are loaded with
Bluetooth profiles. A Bluetooth profile is a specification that defines the mini-
mum requirements that the Bluetooth device must support to do specific
things, like to place phone calls or to display signal strength. These require-
ments define the end-user services and the features and procedures that the
Bluetooth device must support to enable interoperability with peer devices.
Devices with similar profile support should be able to support similar fea-
tures. Most Bluetooth car kits sport the Bluetooth Hands Free Profile. More
and more, you also see the Bluetooth SIM Access Profile for Bluetooth-enabled
GSM mobile phones that incorporate the SIM Access Profile.
Wanna see this in action? Check out the video on the Acura Web site at
www.
acura.com/models/handsfreelink_index.asp?referrer=acura
to see
someone using their Bluetooth-enabled phone with their Acura car.
Now for the disclaimers. Not all Bluetooth-enabled phones work with all
Bluetooth-enabled cars. Before you buy that $45,000 accessory (a new car, in
other words) for your Bluetooth phone, ask if the car supports your specific
phone and service plan — and ask them to “pair up” the phone to make sure it
works in the car you want. For instance, at the time of this writing, Bluetooth
was only partially implemented on some cellular provider’s phones. We found
one user on the Audi technical support forums with this to say: “I am unable
to download my address book, the car’s signal strength meter does not work,
187
Chapter 11: Outfitting Your Car with Wireless
17_595830_ch11.qxd 8/26/05 8:02 PM Page 187
the car can not recall the last numbered dialed. I am able to make calls
through the car’s multi-media interface. The rumor is that [my carrier] is con-
sidering fully supporting Bluetooth in the near future.” So try before you buy.
You can find a lot out about your car’s Bluetooth integration — and other
wireless tidbits from actual users — at Inside Line (
www.edmunds.com/
insideline/do/ForumsLanding
), by car expert Edmunds.com. In the
Maintenance and Repair Forums for each car type, you’ll find the lowdown
on your car’s wireless capabilities.
Bluetooth aftermarket options
If you are like us, you don’t have a Bluetooth-enabled car and you don’t have
a Bluetooth-enabled phone. That doesn’t mean you are left out of this revolu-
tion! You can get Bluetooth adapters for your phone (or get a new phone),
and you can buy and install a Bluetooth aftermarket kit to enable your car.
Like anything else in life, the more functionality you want, the more it costs.
The easy answer is to buy a new Bluetooth phone (as we write, we crave a
Treo 650 from Handspring —
www.handspring.com). You are probably on a
cellphone term plan with your cellular provider — check out their site for
information on Bluetooth-enabled phones. Here are some URLs for the major
U.S. carriers:
ߜ Cingular:
/>service/cell-phones/cell-phones.jsp?CategoryId=1717200037&
CategoryId=1717200027
ߜ Sprint: www1.sprintpcs.com/explore/PhonesAccessories/
AllPhones.jsp
ߜ T-Mobile: www.t-mobile.com/products/default.asp?class=phone
ߜ Verizon: www.verizonwireless.com/b2c/splash/bluetooth.jsp
If your phone or PDA has an SDIO (Secure Digital Input/Output) card slot, you
can add an SD Bluetooth Card that adds a Bluetooth radio to the device.
Just because a device has an SDIO card slot doesn’t mean that it can take an
SDIO Bluetooth card. SD cards are used for lots of things and you need to
make sure that your device has software drivers for Bluetooth functionality
before it will work. Case in point: The fabulous Treo 600 unit from PalmOne
has an SDIO card slot, but does not support a Bluetooth SDIO card. Do your
research to be positive that a device offers driver support before you order
anything for your phone or PDA. The best source for info is the device manu-
facturer’s own Web site; search for Bluetooth to find information fast.
188
Part III: Wireless on the Go
17_595830_ch11.qxd 8/26/05 8:02 PM Page 188
Want to find out more about SDIO cards? There are lots of neat applications,
including TV tuner SDIO cards. Check out the SD Card Association’s summary
of SDIO cards at
www.sdcard.com/usa/TextPage.asp?Page=5.
For your car, there are a range of aftermarket kits to transform your car into
wireless central. The most common aftermarket kits on the market today
come from Motorola, Nokia, Parrot, and Sony Ericsson — and they range
from professionally installed units to small portable ones that clip on your
visor or plug into your cigarette lighter. Here’s a sample of the growing
number of kits on the market:
ߜ Motorola (
www.hellomoto.com) has three units. The top of the line is
the Motorola BLNC Bluetooth Car Kit IHF1000 ($240). The IHF1000 sup-
ports voice activation in four languages. The mid-range product is the
HF850 ($150), which has many of the same features of the IHF1000 but
has less sophisticated voice recognition capability. Both the IHF1000 and
HF850 have a backlit controller that is mounted to the dashboard. At the
low end is the HF820 ($100), which is a portable product that requires
no installation and can be carried into, and out of, any car you drive.
For more on Motorola Bluetooth products, go here:
http://promo.
motorola.com/bluetooth/index.html
.
ߜ Parrot (
www.driveblue.com) has three aftermarket kits — the Evolution
3000 ($114.99), 3100 ($199.99), and 3300 ($349.99) — which are installed
units that offer either no LCD, LCD, or LCD plus GPS, respectively.
ߜ Parrot also has two plug-and-play units. The Parrot EasyDrive is
designed to plug into your cigarette lighter and provides hands-free
operation (using a tethered control unit; see Figure 11-1) when paired
to the Bluetooth phone ($99). The DriveBlue Plus ($79) is a similar
but slightly older model that has a clip-on capability.
ߜ On the ultra-simple side, you can also get Bluetooth speakerphones for
your car, which is nice because not many of the Bluetooth-enabled
phones also have speakerphones on board. The Motorola HF800/98595
Bluetooth Portable Wireless Speaker ($75,
www.motorola.com) is a nice
little unit that you can use as a hands-free speaker in the car (it clips to
the visor) or on your desk or table for conference calls with business
associates or friends.
Nokia and Ericsson have similar add-on kits. Models change fairly frequently,
so check the manufacturer sites for the latest versions. New gear is coming
out all the time. There’s no limit to how much you can Bluetooth-enable your
car. LG Electronics has demonstrated a rearview mirror that displays caller
identification information as calls come into your Bluetooth mobile phone;
the driver just pushes a button on the rearview mirror to answer the call.
“Pretty handy!” we say.
189
Chapter 11: Outfitting Your Car with Wireless
17_595830_ch11.qxd 8/26/05 8:02 PM Page 189
Remember our discussion earlier in the chapter about profiles? Profiles are
very important with aftermarket gear because some gear can be quite specific
in what it does and does not do. Be sure to buy wisely. Look for profiles such
as HFR (Hands Free), HSP (Headset Profile), and DUN (Dial-up Networking) —
these are profiles commonly available in many current production cellphones.
Other Bluetooth profiles you might see include IP (Intercom Profile), FTP (File
Transfer Protocol), FP (Fax Profile), SAP (SIM Access Profile), LAN (Local Area
Network), PAN (Personal Area Network), SP (Synchronization Profile), and so
on. A lot of Bluetooth products only support a single profile. Car kits generally
support only the hands-free profile, and a few (notably the Parrot car kits)
support hands-free, headset, and DUN profiles. If you want to know more
about some of this techie stuff, check out Microsoft’s site on the topic at
/>en-us/wcecomm5/html/wce50conBluetoothProfiles.asp
.
If you use a system with a car radio mute feature, remember that this is usu-
ally not a user-selectable feature that you turn on and off — it’s either
installed or not. Be sure to make that decision before you install your unit.
Also, if you have a lot of other aftermarket stereo gear in your car, the car
mute option might not work. Unfortunately, we can’t give you a lot of guid-
ance here because there’s no real guide to incompatibilities among aftermar-
ket manufacturers. Just know it can be an issue and check out any
manufacturer Web sites beforehand if you can to snoop around for any poten-
tial problems.
Figure 11-1:
The Parrot
EasyDrive
just plugs
into your
cigarette
lighter.
190
Part III: Wireless on the Go
17_595830_ch11.qxd 8/26/05 8:02 PM Page 190
For more Bluetooth for your car, check out the Bluetooth Special Interest
Group’s site at
www.bluetooth.com. Not only can they update you on wire-
less options, but they have a listing of Bluetooth-certified products as well.
Setting up a Bluetooth aftermarket kit
There’s not much to installing a Bluetooth aftermarket kit. If you have ever
installed any sort of electronics in your car, you have a good idea of what’s
involved. And even if you haven’t ever done this before, it’s really not that
hard.
There’s a great reference site for some of the details about how to remove
your car stereo and how to install new aftermarket items. It’s run by a small
stereo install shop in Florida called Factory Car Stereo Repair, Inc., and has
great info on a per car, per model basis. Most of their info costs a couple of
bucks to look at — insanely reasonable, we think — and it helped us get
Danny’s stereo out of his car and back in without his wife knowing about it —
very nice! (If you are married, you know exactly why that was important!)
Check out
www.carstereohelp.com/stereoremoval.htm, as shown in
Figure 11-2.
Figure 11-2:
Finding out
how to
remove your
stereo at
carstereo
help.com.
191
Chapter 11: Outfitting Your Car with Wireless
17_595830_ch11.qxd 8/26/05 8:02 PM Page 191
To give you an idea of what you’re in for, here’s a high-level view of the steps
required to install a system, using the Parrot CK 3300 Kit as our example:
1. Always check to make sure that your battery has been disconnected.
Some car alarms, radios, and other electronic gear require you to enter a
code for reconnection of the battery. If you don’t know these codes, be
forewarned that you may be digging out some manuals at the end of this
process.
Carstereohelp.com explains how to find the stereo codes: “Look through
the glove box for what looks like a white credit card, the ‘Code card.’
The code can be four or five digits depending on the automobile and
stereo. Many times, dealerships write the code on a piece of tape or
label and may place it in one of several areas — on one of the sides of
the glove box, on the bottom of the ash tray, in the trunk on the trunk
lid, in the trunk on the bottom of the package shelf, or in one of the door
jambs. Check the owner’s manual; the code may be written in one of the
stereo pages, one of the covers, or other pages by the previous owner.
On rare occasions, the code may be written on the stereo.”
2. The 3300 has five major components that we recommend you install
first before hooking up everything to the control box. You’ll be run-
ning a cable for the microphone unit, the LCD screen, the power
cable, the GPS antenna, and the in-car radio input.
Parrot does a nice job of labeling all the wires for you, so hopefully you
won’t get confused. See Figure 11-3.
How you connect your car radio depends on what sort of connectors it
has on the backside of the radio. Here are three possible options:
a. Line-in connectors: Take the green (“positive”) and brown (“nega-
tive”) wires and attach them to the corresponding +/- inputs of
your radio; plug the end of the yellow mute cable into the mute
interface. Do not connect the yellow mute wire; this also mutes the
Parrot. Because most line inputs are auxiliary lines, most radios
switch sources automatically when input is detected. If it does not
switch automatically, the user will have to switch manually when a
phone call is made or received.
Line-in connectors are more common on aftermarket radios.
Most stock radios make use of the car kit’s ISO connectors.
(See Figure 11-4.)
b. ISO connectors: Take the factory harness out of the radio and plug
it into the female ISO connector of the car kit. Take the male ISO
connector from the car kit and plug it into the radio. The yellow
mute wire is only needed in vehicles that have more than four
speakers. Because the ISO connector has support for up to four
speakers, any speakers connected to the car kit will automatically
be muted by the relay (the smaller black box). If you do need to
connect the yellow mute wire, connect it to the mute input at the
192
Part III: Wireless on the Go
17_595830_ch11.qxd 8/26/05 8:02 PM Page 192
back of the radio. If the radio does not have a mute input, the
ground signal from the mute wire can be used in a power relay
(which you can buy at Radio Shack) to shut off the ignition connec-
tion at the radio. This in effect mutes all the speakers in the vehicle.
c. Other connectors: You’ll need to get an ISO adapter cable for that
particular radio’s audio input connector. Try
www.carstereo
help.com
.
+
-
Connection car
power cable
Power
cable
Mute
cable
GPS antenna
Car radio
Loud
speakers
1. Rear right speaker
2. Front right speaker
3. Front left speaker
4. Rear left speaker
1
2
3
4
1
2
3
4
1
2
3
4
1
2
3
4
Figure 11-3:
Your GPS-
outfitted
CK3300
components.
193
Chapter 11: Outfitting Your Car with Wireless
17_595830_ch11.qxd 8/26/05 8:02 PM Page 193
3. Now you can hook up the cables as shown in Figure 11-3:
a. Disconnect the car radio’s speaker and power harnesses.
b. Connect the male connectors of the audio cable and the power
supply cable to the car radio.
c. Connect the vehicle’s audio and power supply leads to the female
connectors of the electronic box.
d. If the car radio has a Mute input, connect the yellow wire on the
Mute cable to one of the Mute inputs.
4. Connect the power supply cable.
It’s fairly straightforward, but you have to ignore the manual here. If
your vehicle does not use the ISO connectors, cut off the gray ISO con-
nectors — be sure to cut the red and orange wires after the white plastic
fuses in the power supply cable so that they are still in the wiring path. If
your car does have ISO connections, use them. Attach the red wire of
the power cable to the permanent 12V connection (also called the 12V
constant); the orange wire to the 12V ignition connection (also called the
12V accessory); and the black wire to the ground connection (amusingly
called the earth connection in the manual).
That’s it! You’ve installed the CK3300. That wasn’t hard, was it?
You do not want to leave your orange wire connected to the permanent
12V circuit — you might find your batteries dead after a short while. Take a
second to verify the electric wiring of the power bundle. In some vehicles, it
is necessary to reverse the positions of the red and orange wires. This opera-
tion is simply done by reversing the fuse holders. You’ll know that you have
it right when you turn off the car and see a goodbye message on the LCD
screen. If you don’t see that, your ignition and permanent 12V connections
need to be reversed.
Figure 11-4:
ISO connec-
tors are
standard-
ized plugs
for your
gear.
194
Part III: Wireless on the Go
17_595830_ch11.qxd 8/26/05 8:02 PM Page 194
If your car came with, or you have installed, an extra amplifier/booster in
your stereo system, you will probably need to call technical support for help
figuring out the wiring — it’s not the same, but we can’t really tell you exactly
how to adjust these directions because we don’t know what you’ve got. (Hey,
we’re smart, but not clairvoyant.) If the vehicle has an external amplifier, the
car kit can be installed in the same fashion, except after the amplifier. The car
kit already outputs an amplified signal. Feeding that to the amplifier would
amplify the signal twice causing the volume to come out dangerously loud.
This can also damage the amplifier. The setup would be radio➪amplifier➪male
ISO of car kit➪female ISO of car kit➪speakers.
After it’s installed, you have to “pair” your phone to the CK3300. To do this,
simply activate Bluetooth on the phone and search for any available periph-
eral devices. You should see the Parrot CK3300 displayed on your phone.
Enter the link code 1234 to validate the connection. You will see the phrase
Pairing Underway displayed on your 3300 screen. When you see Pairing
Complete
on the Parrot screen display, you are all set up. Your CK3300 then
connects to the phone, and once connected, it displays a Bluetooth logo on
the screen.
If you have a phone with only a headset profile, the Bluetooth logo does not
display.
195
Chapter 11: Outfitting Your Car with Wireless
Understanding your powered connections
In most aftermarket device manuals, you’ll hear
references to wires like +12V run or +12V con-
stant wires. What does this all mean? Many of
these wires are actually the same thing called
by different names. Most connections have two
main power wires:
ߜ Ignition: The ignition wire is so-called
because it is only powered when the igni-
tion key is turned to its “accessory” or
“run” position. Accordingly, some people
call it the accessory wire or, less commonly,
the run wire.
ߜ Constant: The constant wire is so-called
because it is always powered, even when
the car is turned off and not running. This is
used to provide power for retaining memory
on user-programmed functions, like keeping
the clock set to the right time or your security
codes intact. That’s why if you have to totally
disconnect the power during an installation,
you have to reset all the system codes to
restart all your electronic security and radio
functions. Note that compared to the capac-
ity of your battery, the current drawn by
these devices is minimal, so having them run
your car battery to zero power is unlikely
unless a wire is crossed or misconnected.
17_595830_ch11.qxd 8/26/05 8:02 PM Page 195
You can now access your cellphone’s address book and other features via the
LCD screen, as shown in Figure 11-5. You can also make use of the GPS soft-
ware loaded on your PDA or phone. Figure 11-6 shows the Parrot CK3300
installed in a console.
Figure 11-5:
The LCD
screen of
the Parrot
CK3300.
196
Part III: Wireless on the Go
Coming soon: The Love Bug’s evil twin
Wireless capability in cars is, in many ways, an
accident waiting to happen. Increasingly, cars
are controlled by electronics and, as more and
more subsystems become interlinked, forming a
true car LAN, the opportunity exists for someone
to sneak in via a wireless link and wreak havoc.
Some fool will think that it would be funny to build
a virus to slam on your brakes when you are
cruising down the highway, or to lock the steer-
ing wheel. We don’t even want to imagine driving
such a possessed car.
Although no one has documented an intrusion
into an automotive electronics systems, via wire-
less or otherwise, many are anticipating the day
when it occurs. Depending on how you outfit your
car with voice, data, and video functionality, you
may be making this easier for a would-be hacker.
Given this is still theoretical at this time, we can
only advise you to treat your car as you would
your PC. If you installed a car PC, for example,
add virus protection and limit sharing to shared
folders. Limit connectivity to known interfaces
such as into your speaker system and stereo
head unit (where the most damage someone
could do is play Pat Boone over and over). If you
know enough to hack into your car’s maintenance
and control systems, it would be ridiculous of us
to say, “We don’t advise this and if you do, be
careful doing it,” so we won’t.
When the appropriate security measures for your
car come of age, don’t hesitate to install them.
You don’t want to be the first car hack statistic.
17_595830_ch11.qxd 8/26/05 8:02 PM Page 196
Wi-Fi–Enabling Your Car
Bluetooth is nice if you just want to have hands-free dialing in your car. And
to be fair, other Bluetooth applications are being developed to build out your
car’s local area network.
But a wireless local area network is usually more the domain of Wi-Fi, and
wouldn’t you know it — Wi-Fi is making a play here as well. (Savoir Faire,
Wi-Fi is everywhere!)
Figure 11-6:
The Parrot
CK3300
LCD unit
installed
in a car.
197
Chapter 11: Outfitting Your Car with Wireless
Here comes HSDPA mobile broadband!
The forthcoming WiMax wireless broadband
protocol (check out
www.wimaxforum.org)
has the potential to really reinvent your broad-
band access, but it’s not the only high-speed
game in town — HSDPA (high-speed downlink
packet access) is on the horizon.
HSDPA is the next step for GSM cellphone tech-
nology, improving upon the 384 Kbps speeds of
UMTS with a promise of 3 Mbps to your mobile
phone. Although it’s not as fast as WiMax, it’s
expected to be much more portable. HSDPA
uses cellular infrastructure, so supporting it
simply requires downloading new software. On
the other hand, WiMax involves deployment of
new technology.
The world will start seeing the first HSDPA in Asia
in 2005/2006, in phones, handhelds, and PC cards.
HSDPA will arrive in the U.S. soon thereafter.
With speeds up to 3 Mbps to your car, all the
major applications for voice, data, and video are
possible. It will be like you plugged your cable
modem into your exhaust pipe. Vroom, vroom!
17_595830_ch11.qxd 8/26/05 8:02 PM Page 197