essential computer security phần 2 doc
Bạn đang xem bản rút gọn của tài liệu. Xem và tải ngay bản đầy đủ của tài liệu tại đây (709.97 KB, 30 trang )
I assume by reading this book that you do not intend to leave your computer
disconnected and sealed in the box. I commend you.There is a vast world of infor-
mation and productivity awaiting as long as you invest just a little time to do so
securely. A little bit of knowledge applied with a little bit of common sense is
enough to protect you from most computer threats.
Microsoft has made vast improvements in the security of their operating systems
and applications in the last couple of years. Windows XP Service Pack 2 made some
dramatic changes aimed at making the operating system even more secure. Sadly
though, the operating systems intended for home users, a market that arguably needs
the security features the most, are more insecure.
Many users view security from the perspective of “I don’t have anything of value
worth protecting, so why should I care?” First of all, there is a lot more of value on
your computer than you may be aware of. Have you done your own income taxes
on your computer and saved the files? Are there any files or documents that contain
your full name? Birth date? Social Security Number? All of this information has
value to someone that may want to access your financial information or steal your
identity.
The other reason to operate your computer securely is “to protect the rest of
us,” which is a different concept. If you leave your house unlocked and you get
robbed, it really only affects you. If you leave your car unlocked and your CD stereo
gets stolen, it really only affects you. But, if you leave your computer “unlocked” and
it gets “stolen,” it can impact other computer systems on the network or the
Internet.
Why Are You at Risk?
It has become so common to hear about viruses, worms, identity theft, phishing
scams, and other computer attacks that you may actually be wondering “where isn’t
there a threat?” Understanding the importance of computer security is easier,
though, if you have some idea of the threats you are defending against.
Malware
Malware is a general term used to refer to a wide variety of malicious programs. It
includes threats such as viruses, worms,Trojan horses, spyware, and any other mali-
cious programs.
Even if you believe you have nothing of value to protect on your computer
system, leaving it unprotected can leave you vulnerable to hundreds of different mal-
ware programs floating around the Internet which could arrive in your e-mail inbox
www.syngress.com
Basic Windows Security • Chapter 1 5
413_Sec101_01.qxd 10/9/06 4:53 PM Page 5
daily.These programs can accomplish a wide variety of malicious activities, including
possibly capturing your passwords and credit card numbers, sending out malware to
other computers or to e-mail addresses of people you know, using your computer in
a denial-of-service attack against a Web site, and more.
Weak Passwords
Passwords are the primary method most users are familiar with for gaining access to
a computer system or program. If you have a weak password and an attacker man-
ages to guess or crack it, he or she can access your private information, steal your
identity, install and execute programs using your account, and more. Even worse,
some of this can be done without ever knowing your password—by using remote
threats.
Physical Security
Physical security is admittedly less of an issue in a home environment. Generally, you
aren’t concerned with someone in your home sitting down at your computer and
hacking into it. Nevertheless, your computer could still be stolen or lost.
The bottom line when it comes to physical security is that once someone has
physical access to your computer, the gloves are off.There are ways that an attacker
sitting at your computer and using your keyboard and disk drives can bypass the var-
ious security measures you have put in place to gain access to your data.
Network “Neighbors”
Computers that are connected to the same network as yours or within the same
range of IP addresses are able to communicate with your computer more freely and
gather information easier than other computers.
If you are using a cable modem to access the Internet, you are sharing the net-
work with the other subscribers in your area.That means it is possible for other
cable modem users in your area to view and access your drives and data if you aren’t
careful about how you share them out and what security measures you implement.
These are just a few of the ways your computer and the data it contains are at
risk.The following sections will walk you through securing your computer, limiting
the power of users, controlling access to files and folders, and other security measures
you should put in place before you start networking with other computers around
you or connecting your computer to the Internet.
www.syngress.com
6 Chapter 1 • Basic Windows Security
413_Sec101_01.qxd 10/9/06 4:53 PM Page 6
Logging In
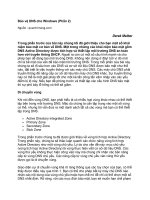
Windows XP has a slick feature called the Welcome screen.The first time the system
boots up you will be greeted with the Welcome screen like the one shown in
Figure 1.1.
Figure 1.1 The Windows XP Welcome Screen Is Displayed by Default When a
Windows XP System Is First Booted
Initially, you will be able to access the system, as an Administrator, simply by
clicking the picture next to the username. If you assign a password to a user account,
clicking the picture will open a box for you to enter the password before logging in
to the system.
On Windows XP Professional machines connected to a domain network, the
Welcome screen is replaced with a login screen like Windows 2000.The user is
required to press the Ctrl, Alt, and Delete keys simultaneously and then a window
appears where you must enter a valid username and password to log in to the
system.
User Accounts
A User Account is one of the primary means of controlling access to your data and
resources as well as customizing Windows to look and act the way you want it to.
www.syngress.com
Basic Windows Security • Chapter 1 7
413_Sec101_01.qxd 10/9/06 4:53 PM Page 7
Older versions of Windows, like Windows 95 and Windows 98, have User Profiles
which allow each user to customize the look and feel of Windows, but the User
Profiles offer no security whatsoever.They give an illusion of security because they
are associated with a password, but anyone can simply hit the Esc key and log in to
the system with the default user profile.
The goal of this book is not necessarily to teach you every detail of User
Accounts, but to show you in simple language how to set up your User Accounts in
a secure fashion.The bad guys know a thing or two about the User Accounts that
are installed by default. By following the advice in this section you can throw most
novice hackers off the trail and thwart their attacks.
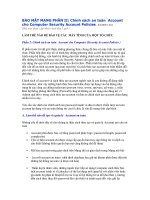
When Windows XP is first installed, it forces you to create at least one User
Account and allows you to create as many as five (see Figure 1.2).Any accounts cre-
ated at this point are automatically added to the Administrators group for the
machine and are created with a blank password. For these reasons, I recommend that
you add only one account at this point and add other accounts later when you can
control what level of access to grant and assign appropriate passwords.
Figure 1.2 Creating User Accounts with Windows XP
If you are upgrading from a previous Windows version, any existing users will
also be automatically added to the Administrators group with a blank password
when installing Windows XP. One exception is that if you are installing Windows
XP Professional on a system connected to a network domain rather than in a
www.syngress.com
8 Chapter 1 • Basic Windows Security
413_Sec101_01.qxd 10/9/06 4:53 PM Page 8
workgroup or as a stand-alone system, the installation will offer you the opportu-
nity to create a password.
NOTE
A quick note before we move on. Most of the advice will require that
you log in as the Administrator or that your account is a member of the
Administrators group. Based on what I described earlier, that may very
well be the case for any accounts that were created during a Windows
XP installation. But, if you run into any problems or receive any mes-
sages stating that you don’t have permission or authority to complete
the action, you should check into this and make sure the account you
are using to make these changes is a member of the Administrators
group.
Limiting the Number of Accounts
In order for different users to have their own customized and personalized configu-
rations of Windows and their own My Documents folder (among other things), they
need to have their own User Accounts.
Tools & Traps…
Administrative Tools
Having access to the Administrative Tools will also make life a lot easier when it
comes to following the advice in this book and configuring and administering
your computer in general. Microsoft does not make these tools visible by default
in Windows XP. To get to these tools, follow these steps:
1. Right-click the Start Bar at the bottom of the screen and select
Properties.
2. Click the Start Menu tab.
3. Click the Customize button.
4. Click the Advanced tab.
www.syngress.com
Basic Windows Security • Chapter 1 9
Continued
413_Sec101_01.qxd 10/9/06 4:53 PM Page 9
5. In the Start Menu Items box, scroll to the bottom and select an
option to display the Administrative Tools.
However, the more User Accounts there are, the more targets there are for a
potential attacker.Therefore, it is important to limit the number of User Accounts
on the system. In a home environment, you may choose to have separate accounts
for the adults, but have a single “Kids” account that they share.You definitely want to
make sure you remove any duplicate or unused User Accounts.
You can view the User Accounts by clicking User Accounts in the Control
Panel. However, this view only shows you the accounts that are allowed to log in
to the computer system locally.There are other hidden accounts used by the oper-
ating system or applications.To see the complete list you should view them in the
Computer Management module. Unfortunately, in Windows XP Home you can’t
view the User Accounts in this way. Short of jumping through a ring of fire upside
down while chanting Bill Gates (or some risky registry hacking), there isn’t much
you can do to make some of these changes. Windows XP Home users will have to
just stick with making changes through the User Accounts button in the
Control Panel.
You can get to the Computer Management module a variety of ways:
■
Right-click My Computer on the desktop if you have it available and
select Manage.
■
Right-click My Computer in the left-hand navigation pane of a
Windows Explorer window and select Manage.
■
Click Start | All Programs | Administrative Tools, if you have it avail-
able, and select Computer Management.
■
Click Start | Run and enter compmgmt.msc to open the Computer
Management module.
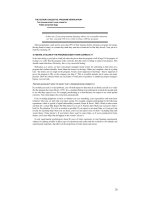
Using any of these methods will open the Computer Management window (see
Figure 1.3).To view the User Accounts, simply click the plus sign next to Local
Users and Groups and then click Users.You will see a window similar to the one in
Figure 1.3 that lists all of the User Accounts on the system. Currently disabled
accounts will have a red X on them.
www.syngress.com
10 Chapter 1 • Basic Windows Security
413_Sec101_01.qxd 10/9/06 4:53 PM Page 10
Figure 1.3 The Windows XP Computer Management Console Allows You to
Manage a Variety of Administrative Tasks
You can right-click any of the User Accounts to rename them, delete them, or
change their passwords.You can also select Properties to perform other tasks such as
disabling the account, setting the password so that it must be changed at the next
login, configuring the password so it can never be changed, and more.
Disabling the Guest Account
Disabling the Guest account has been recommended by security experts since the
Guest account was first created. Under previous Windows versions, the Guest
account had virtually no real-world purpose and served simply as another means for
an attacker to gain access to a system, especially because the Guest account also has
no password by default.
In Windows XP, it is another story.The Guest account can still be an easy target
for attackers, but in Windows XP Home and in Windows XP Professional systems
that are not connected to a network domain, the Guest account is an integral part of
sharing resources with other computers on the network. In fact, in Windows XP
Home, it is not possible (at least not without the prerequisite jumping through the
ring of fire upside down while chanting Bill Gates… you get the idea) to truly
delete the Guest account.
By clicking Control Panel and going into User Accounts to turn off the Guest
account in Windows XP Home, all you’ve really done is disable the Guest account
www.syngress.com
Basic Windows Security • Chapter 1 11
413_Sec101_01.qxd 10/9/06 4:53 PM Page 11
for local logon.The account won’t appear on the Welcome screen and nobody will
be able to walk up and log on to the computer using the Guest account; however,
the actual credentials and password are still active behind the scenes. Simply put,
Windows XP Home relies on the Guest account for its network file and resource
sharing.Your best bet to secure the Guest account on a Windows XP Home system
is to assign a strong password—a password that is difficult to guess or crack—to the
Guest account.
NOTE
For more information about passwords and creating strong passwords,
see Chapter 2. See also Perfect Passwords: Selection, Protection,
Authentication (Syngress Publishing, 2006, ISBN: 1-59749-041-5).
Creating a password for the Guest account is also not an easy task in Windows
XP Home. When you open the User Accounts console from the Control Panel in
Windows XP Home and select the Guest account, Create a Password is not one of
the available options.
To create a password for the Guest account, you will need to open a command-
line window (click Start
||
All Programs
||
Accessories
||
Command Prompt).
Enter the following: net user guest <password>.
Leave off the brackets and simply type the password you want to assign at the
end of the command line and press Enter. Oddly, now that you have created a pass-
word for the Guest account, the options for changing or removing the password will
now appear in the User Accounts console.
Renaming the Administrator Account
In order for an attacker to gain access to your system, they really only need two
things: a valid username and its associated password. It’s easy for an attacker to learn
what operating system and application vendors do by default when their product is
installed.Therefore, everyone knows that Windows sets up a User Account called
Administrator, which by default is a member of the Administrators group, and that
Windows XP creates these accounts with blank passwords during installation. With
this information, an attacker has the keys to the kingdom so to speak.
While there are ways that an attacker can tell which account is truly the
Administrator account, it is recommended that you rename the Administrator
www.syngress.com
12 Chapter 1 • Basic Windows Security
413_Sec101_01.qxd 10/9/06 4:53 PM Page 12
account to make it harder to find.This way, you will at least protect your system
from novice or casual hackers.
You should select a name which means something to you, but that doesn’t make
it obvious it’s an Administrator account—in other words, calling it Home or Family
or even some variation of your own name (for instance “Chuck” if your name is
Charlie, or “Mike” if your name is Michael). If you rename it to Admin or
LocalAdmin or anything else, it will still look like an administrative account and you
won’t be able to throw off an attacker for long.
You can rename the Administrator account by following the steps listed earlier to
open the Computer Management console and clicking the plus sign next to Local
Users and Groups, and then clicking Users.You can then right-click the
Administrator account and select Rename.You will have to use a different
account with Computer Administrator privileges to make the change, however,
because you can’t rename the account you’re currently logged in under.
Windows XP Home does not create an “Administrator” account per se (it does
exist as a hidden account that is only visible if you log in using SafeMode), but you
should follow similar logic in deciding what to name accounts given Computer
Administrator privileges.
Creating a Dummy Administrator Account
Hand in hand with the preceding advice, you should also create a “dummy”
Administrator account. Most users with enough knowledge to try to hack or attack
your computer know that Windows 2000 and Windows XP Professional will create
an Administrator account by default. If they manage to access your system and see
that no Administrator account exists, that will tip them off that one of the other
existing accounts must be the “real”Administrator.
Again, there are more sophisticated ways for an advanced hacker to determine
which account is truly the Administrator, but that is still no reason to make it easy
for the novices. Once you rename the Administrator account by following the pre-
vious steps, you should create a new account named Administrator and assign it to
the Limited account type.
Security Groups
Just like User Accounts, Security Groups help you control access to your data and
resources. Where User Accounts allow you to define permissions and grant access on
an individual basis, a Security Group allows you to define permissions and grant
access on a group basis.
www.syngress.com
Basic Windows Security • Chapter 1 13
413_Sec101_01.qxd 10/9/06 4:53 PM Page 13
This is more useful in a business network where there are typically more people
involved and there is more data that may need to be accessible by one group of
employees and inaccessible by others.That is probably why Microsoft only includes
the ability to use Security Groups in Windows XP Professional and not in Windows
XP Home. If you are using Windows XP Professional on a home network, this
information may be helpful, but if you are focused only on Windows XP Home sys-
tems, you can safely skip this section.
Using Security Groups can help to make assigning permissions and access privi-
leges more manageable. In situations where a number of users will access a resource,
it is much simpler to assign one set of permissions for the parents or managers and a
more restrictive set of permissions for the children or regular users. Using Security
Groups rather than individual User Accounts will make administering the permis-
sions as users come and go an easier task.
You can use the same steps illustrated earlier under User Accounts to open the
Computer Management module, and then just select Groups, instead of Users, from
the left pane.
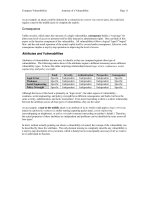
Windows comes with certain Security Groups predefined.Table 1.1 lists the var-
ious built-in Security Groups by operating system and includes a brief description
of each.
Table 1.1 Windows 2000 and Windows XP Pro Built-in Security Groups
Windows Windows
Security Group 2000 XP Pro Description
Administrators X X Most powerful Security Group.
Members of this group have the
power to do just about anything
on the computer.
Users X X This group has the ability to use
most parts of the system, but has
very limited ability to install or
change any part of the computer.
Guests X X Guests have very limited access
and ability to do anything on the
system. In Windows XP, however,
the Guest account is integral to
the Simple File Sharing system.
HelpServices X This group is new in Windows XP
and allows support technicians to
connect to your computer.
www.syngress.com
14 Chapter 1 • Basic Windows Security
Continued
413_Sec101_01.qxd 10/9/06 4:53 PM Page 14
Table 1.1 continued Windows 2000 and Windows XP Pro Built-in Security
Groups
Windows Windows
Security Group 2000 XP Pro Description
Power Users X X In between Users and
Administrators, this group grants
users more power and ability to
install and configure the system
without making them full
Administrators.
Backup Operators X X A special group designed to give
its members the ability to back
up and restore files and folders
that they might otherwise not
have access to.
Replicator X X Pertinent only in domain-based
networks, this group has the
ability to manage file replication.
Network X This group grants its members
Configuration the ability to add, change, or
Operators delete network connections, and
to change TCP/IP settings.
Remote X Members of this group are able
Desktop Users to connect to remote computers
using the Remote Desktop
Connection feature.
If none of these are appropriate for your purposes, you can also create your own
custom Security Groups to use in defining access and granting permission to files,
folders, or other network resources such as printers.
Windows 2000 and Windows XP Professional users can view these Security
Groups and add or remove members from them using Local Users and Groups in
the Computer Management console.
Windows XP Home Account Types
The extent of your ability to easily select a Security Group in Windows XP Home
is based on what Account Type you select in the User Accounts screen in the
Control Panel.You have two choices: Computer Administrator or Limited.
www.syngress.com
Basic Windows Security • Chapter 1 15
413_Sec101_01.qxd 10/9/06 4:53 PM Page 15
Computer Administrator is equivalent to Administrator with all-powerful access
to the whole computer, while the Limited Account Type is more equivalent to the
Users Security Group shown earlier. Users assigned to the Limited Account Type
will be unable to install or alter programs or computer configurations.
FAT32 versus NTFS
You may never have heard of the terms FAT32 and NTFS, or at least never cared
enough to find out what they are, but they are file systems. When you format your
hard drive, you can choose whether to format it using FAT32 or NTFS.
They both have pros and cons, but from a security perspective, you should
choose NTFS. FAT32 does not offer any sort of file or folder security. NTFS, on the
other hand, allows you to secure files at an individual level and specify which users
are authorized to access them.You must also use NTFS if you want to use EFS
(Encrypting File System) to further secure your data.
When it comes to sharing files and folders with other computers on your net-
work, the underlying file system does not matter. Other computers on your net-
work, whether running Windows XP, Windows NT, Linux or some other operating
system, will be able to access the shared data. If you share out files on a drive using
FAT32, though, you will be unable to provide security at a file level.Thus, anyone
who can access the share will have access to everything in the shared drive or folder.
As a final note, NTFS also offers support for larger file sizes and drive partitions
and provides better data compression and less file fragmentation than the FAT32 file
systems.
File and Folder Security
One way to secure your data is to set permissions and access restrictions to identify
which users or Security Groups are allowed to view, add, change, or delete files. If
you set your files up so that only you can access them and a different user on the
machine becomes compromised—either through a virus or worm, or by a hacker or
some other means—that user’s compromised account will not be able to wreak any
havoc on your protected data.
To configure the security and permissions for a file or folder, simply right-click
it and select the Sharing and Security or Properties options. Once it opens, you
can then select the Sharing tab in Windows XP Home or the Security tab for
Windows 2000 or Windows XP Professional using the classic file and folder security
model.
www.syngress.com
16 Chapter 1 • Basic Windows Security
413_Sec101_01.qxd 10/9/06 4:53 PM Page 16
Keeping It Simple
Windows XP Home uses a sharing model called Simple File Sharing. In Windows
XP Professional machines that are not connected to a network, Simple File Sharing
is an option. Like many “features” designed to make things easier for the user, it also
is less configurable and provides less security than the file and folder sharing in
Windows XP Professional or Windows 2000.
Simple File Sharing is some sort of Dr. Frankenstein combination of the power
inherent in Windows XP combined with the security model (or lack thereof ) in
Windows 98. With Simple File Sharing, you can choose to share a folder or not to
share that folder, but even if you use NTFS, you don’t get to take advantage of file-
level access or permissions. Essentially, once the folder is shared, anyone on the net-
work will be able to access anything on the share.
TIP
Windows XP Home users are stuck with Simple File Sharing. Users of
Windows XP Professional, however, can enable or disable it by clicking
Tools | Folder Options on the toolbar from within Windows Explorer.
Click the View tab and then scroll to the bottom of the Advanced
Settings to find the Simple File Sharing setting.
This is also a big concern for Windows XP Home users on the Internet. If cer-
tain precautions (like blocking the ports Windows uses for file and folder sharing at
your firewall) aren’t taken, anyone who can see your computer from the Internet
will also be able to access the files on the shared folder. If you assigned a strong pass-
word to the Guest account, as described earlier in this chapter, the risk of this is even
lower.
Windows XP Home and Windows XP Professional systems using Simple File
Sharing also offer the opposite end of the spectrum—the option to make a folder
“private.” When you mark a folder private, the file permissions are set so that only
you have the ability to open or view the data they contain (see Figure 1.4).
www.syngress.com
Basic Windows Security • Chapter 1 17
413_Sec101_01.qxd 10/9/06 4:53 PM Page 17
Figure 1.4 Right-Click a Folder in Windows Explorer and Choose Sharing and
Security to Configure Access to the Folder
Sharing and Security
If you are using Windows XP Professional, I would advise that you turn off Simple
File Sharing and use the standard file and folder security.To turn off Simple File
Sharing, open My Computer or a Windows Explorer window and select Tools
||
Folder Options.Then click the View tab and scroll all the way to the bottom of
the Advanced Settings options and make sure there is no checkmark in the
checkbox next to Use Simple File Sharing.
Tools & Traps…
XP Password Alert
If you attempt to mark a file or folder as “Private” using a User Account that does
not have a password assigned, Windows XP will alert you and offer you an
opportunity to create a password.
The alert says:
You do not currently have a password on your User Account. Even though
you made this folder private, anyone can log in as you and access this folder.
Do you want to create a password for yourself?
www.syngress.com
18 Chapter 1 • Basic Windows Security
413_Sec101_01.qxd 10/9/06 4:53 PM Page 18
When using the classic file and folder sharing of Windows 2000 or Windows
XP Professional with Simple File Sharing disabled, you have a lot of control over the
access privileges different users have to your data.
You can add or remove the User Accounts and Security Groups defined for the
file or folder you are configuring (remember, it’s easier to track and administer per-
missions using Security Groups if you are dealing with more than just two or three
users). For each User Account or Security Group, you can select either Allow or
Deny for a variety of actions to customize the level of access granted.
You can choose to Allow or Deny Full Control which would give that User
Account or Security Group the ability to do anything they want with the data,
including modifying or deleting it entirely or even changing the permissions for
other users. If you don’t grant Full Control, you can choose to Allow or Deny the
ability to Modify, Read & Execute, List Folder Contents, Read, or Write.Table 1.2
includes a brief summary of each of these access levels.
Table 1.2 Access Levels for Windows 2000 or Windows XP Professional
File and Folder Permission Grants the Ability to
Full Control Change or configure permissions for
other User Accounts and Security Groups,
take ownership of the file or folder,
delete the folder or any subfolders in the
case of Folder permissions, or delete the
file in the case of File permissions. Full
Control also grants the ability to perform
all of the functions of the other file and
folder permissions.
Modify This permission allows users to delete the
folder in the case of Folder permissions
as well as perform any of the actions per-
mitted by the Write permission and the
Read & Execute permission.
Read & Execute Allows users to read the contents of the
folder or file, including viewing the file
attributes and permissions. This permis-
sion also allows users to execute files or
run executable files contained in the
folder.
www.syngress.com
Basic Windows Security • Chapter 1 19
Continued
413_Sec101_01.qxd 10/9/06 4:53 PM Page 19
Table 1.2 continued Access Levels for Windows 2000 or Windows XP
Professional
File and Folder Permission Grants the Ability to
List Folder Contents Unique to Folder permissions, this per-
mission allows users to display the direc-
tory of names of files and subfolders in
the folder.
Read This permission allows users to view the
files and subfolders in a folder in the case
of Folder permissions. For file permis-
sions, it grants the ability to read the file
in question. Users can also view
attributes of the file or folder including
ownership, permissions, and attributes
(such as Read-only, Hidden, Archive, and
System).
Write The Write permission allows users to add
new files to a folder or modify a file or
document as the case may be. The Folder
permission allows users to also add sub-
folders to the folder, alter attributes and
view folder ownership and permissions.
The File permission allows users to per-
form similar actions on Files, including
overwriting the file, altering the file
attributes, and viewing file ownership
and permissions.
There are two items to note when you are setting permissions. First, permissions
can be inherited from parent directories. If you see checkmarks in the boxes but
they are grayed out, meaning you can not change them, that is because they are
inherited from somewhere else. If you click the Advanced button under the
Permissions settings box, you can view or change the current setup and turn off
the inheritance of permissions from parent folders.
On the Permissions tab of the Advanced box, you will see each of the User
Accounts and Security Groups with permissions on the object. Next to each it will
display their Permission level, where it was inherited from, and what that permission
level applies to. At the bottom of this tab are two checkboxes. One is to select
whether or not you wish to allow permissions from other directories to be inherited
www.syngress.com
20 Chapter 1 • Basic Windows Security
413_Sec101_01.qxd 10/9/06 4:53 PM Page 20
by this object.The second is whether or not you want the permissions from this
object to be applied to the files and folders underneath it.
The second item of note is in regards to selecting Deny for any of the permis-
sion settings and what the result would be for a user. Deny overrides all other
options. So, for example, let’s assume Bob is a member of both the Administrators
and Users groups. If the Administrators group has Full Control permission, while the
Users group only has Read permission, Bob would have Full Control because he
would get the cumulative total for both permissions. However, if you also add Bob’s
individual User Account and select Deny for Full Control, that selection will over-
ride his membership in the Administrators and the Users groups and Bob will be
unable to access or perform any actions on that object.
In the Advanced options discussed previously, there is also a tab called Effective
Permissions.This handy tool will let you enter any User Account or Security Group
and it will display for you what the net permissions are for that account on this par-
ticular object.This way you can see the effect of different permissions and what level
of access the user or group actually has.
You should try to use a designated folder or folders to house your personal and
confidential files so that you can easily protect (and back up) that information rather
than having to search all over your computer or protect individual files scattered
about the hard drive.
WARNING
Any drive or partition that you format using the FAT32 file system will
not be able to provide file or folder security. In order to secure your data
and apply file and folder permissions as we have discussed here, you
must use the NTFS file system.
Windows Services
A Windows “service” is a program that runs in the background on Windows.They
aren’t programs that will show up on the Start Bar at the bottom of the screen or
programs in the sense that you would directly access or interact with them.
Windows services generally provide some functionality for the operating system or
process actions and requests from other programs.
To see a list of the services installed on your computer and whether or not they
are currently enabled, you need to go into the Services Console.You can accomplish
www.syngress.com
Basic Windows Security • Chapter 1 21
413_Sec101_01.qxd 10/9/06 4:53 PM Page 21
this by going into the Control Panel / Administrative Tools folder and selecting
Services.
You will see a number of services listed along with a brief description of what
the service does, its current status, its startup configuration, and what access level it
logs in under (see Figure 1.5).
Figure 1.5 Select Services from the Administrative Tools Group to Open the
Windows Services Console
Many of these services are unnecessary or rarely used. Sites such as LabMice.net
( or TheElderGeek.com (www.theeldergeek.com/
services_guide.htm) provide checklists and recommendations for how to configure
each of the standard Windows services. For our purposes, we will just talk about the
services that directly affect the security of your system.
In general, any service you don’t have a need for should be disabled because they
simply offer opportunities for someone to possibly exploit a vulnerability or security
weakness in that service to gain access to your system.
The following is a list of Windows services that you should disable because they
provide an avenue for an attacker to compromise your system while not providing
any useful functionality for most users:
■
SSDP Discovery Service Enables discovery of UPnP (Universal Plug
and Play) devices on your home network.This service provides half of the
www.syngress.com
22 Chapter 1 • Basic Windows Security
413_Sec101_01.qxd 10/9/06 4:53 PM Page 22
UPnP functionality which has no real-world purpose but has been proven
vulnerable to attack.This service does not affect Windows 2000.
■
Universal Plug and Play Device Host Provides support to host
Universal Plug and Play devices.This is the other half of the UPnP func-
tionality.This service does not affect Windows 2000.
■
NetMeeting Remote Desktop Sharing Enables an authorized user to
access the local computer remotely using the NetMeeting program. Unless
you intend to use NetMeeting on a regular basis, leaving this on simply
provides a possible way for an attacker to gain access to your system.
■
Remote Registry Enables remote users to modify Registry settings on
the local computer. With rare exception there is no reason that you would
want someone to be able to alter your Registry settings remotely. If you
leave this service on, you run the risk that an unauthorized user may
change your Registry settings remotely.
■
Messenger Transmits Net Send and Alerter service messages between
clients and servers.This service is a security concern from the standpoint
that spam pushers have discovered they can use Net Send to transmit spam
messages directly to your desktop rather than sending them through your
e-mail.
■
Internet Information Services Internet Information Services (IIS)
should not be installed by default on any of these operating systems, but as
long as you are in the Services Console you should take a look to make
sure the Internet Information Services are not enabled unless you are actu-
ally using IIS to host web sites or FTP on your local computer. IIS is prone
to vulnerabilities which have allowed viruses such as CodeRed and Nimda
to propagate.
If you right-click any of the services in the Services Console, you can start and
stop the service. However, stopping a service using this technique will only stop it
temporarily.The next time you reboot the computer, or the next time another ser-
vice tries to call or interact with the service, it will restart.
To disable a service so that it will not start again, right-click the service in the
Services Console and select Properties. In the middle of the screen under the
General tab is a drop-down box titled Startup Type.The drop-down box offers three
choices: Automatic, Manual, and Disabled (see Figure 1.6).
www.syngress.com
Basic Windows Security • Chapter 1 23
413_Sec101_01.qxd 10/9/06 4:53 PM Page 23
Figure 1.6 You Can Disable a Windows Service by Right-Clicking the Service
in the Windows Services Console and Selecting Properties
Services configured for Automatic startup will be started each time you boot up
the computer and the Windows operating system begins. Services that are config-
ured for Manual startup will only start when another program or service activates
them or if you right-click the service and manually start it. Services that are disabled
will be unable to start at all.
To secure your operating system and protect it from easy access by hackers, I
recommend that you disable all of the services mentioned previously, if they are not
already disabled.
Hidden File Extensions
Microsoft created the ability to hide known file extensions so that everyday users
would not need to be bothered with too much technical stuff.The icon associated
with the file type would show you what sort of file it was so there was no need to
inundate users with technical jargon like EXE or VBS or DOC or HTM.
It didn’t take long for virus writers and developers of other malware to figure
out that you can add more than one extension at the end of the file name and that
the last one will be hidden. So a file like mynotes.txt could be replaced with a mali-
cious executable program called mynotes.txt.vbs, and with the file extensions being
hidden it would still appear as mynotes.txt.
www.syngress.com
24 Chapter 1 • Basic Windows Security
413_Sec101_01.qxd 10/9/06 4:53 PM Page 24
There are two things to note here. One, an observant user might detect the fact
that only the malicious file shows any file extension at all. Using the double file
extension hides the true file extension, but it still shows a file extension which gives
away the fact that something is different.Two, the hidden file extensions only work
in Windows Explorer. If you view the files using the dir command at a command
prompt window, it will show the complete file name, including both file extensions.
Even with those caveats in mind, though, it is best to simply disable this feature
so that any and all file extensions are readily visible.To disable the hiding of file
extensions, go into Windows Explorer (Start
||
All Programs
||
Accessories
||
Windows Explorer) and select Tools, and then Folder Options. Click the View
tab and uncheck the box titled Hide extensions for known file types (see Figure
1.7). All that was hidden shall now be revealed unto you, or at least the file exten-
sions of the files on your computer system.
Figure 1.7 Click Tools on the Menu Bar in Windows Explorer and Choose
Folder Options to Disable the Hiding of File Extensions in Windows
Screen Saver
Screen savers started off as a measure to protect your monitor.The technology used
in older monitors was subject to having the image burned into the phosphorous
permanently if the same image stayed on the screen for too long.The result of
www.syngress.com
Basic Windows Security • Chapter 1 25
413_Sec101_01.qxd 10/9/06 4:53 PM Page 25
walking away to go to lunch and coming back an hour later might be that the
spreadsheet data you were working with would be a permanent ghostly image on
your monitor.
Companies sprang up for the sole purpose of developing new and creative
screen savers to keep this from happening. Basically, the screen saver program moni-
tors computer activity and if there is no activity for a predefined period of time, the
screen saver kicks off sending swirling shapes, flying toasters, swimming fish, or just
about anything you can imagine randomly bouncing around the screen so that no
single image is left in one place long enough to burn the monitor. Meanwhile, all of
your programs and files are kept running in the background just as you left them.
Over time, monitor technology has improved to the point that the screen saver is
no longer truly needed to protect the monitor. However, screen savers have taken on
a new, arguably more important role. Now when you walk away to go to lunch for
an hour the concern is not that your spreadsheet data will be burned into the phos-
phorous, but that anyone walking by would be able to see your spreadsheet data.
Worse yet, anyone walking by could sit at your computer and access any of your
files, or files on other computers you have access to, or send e-mail on your behalf,
or any number of other things.The bottom line is that walking away from your
computer is a huge security risk.
Thankfully, Windows offers an option to require a password to unlock the com-
puter once the screen saver is started. If the user account being used does not have a
password assigned, you will still see a message box stating that the system has been
locked and that a password is needed. However, anyone can still get into the system
by just hitting Enter if there is no password in place.
To configure your screen saver in Windows, you can right-click anywhere on
the desktop and select Properties. Click the Screen Saver tab and check the box
that says On resume, password protect.
You can also set the amount of time you want the system to wait before auto-
matically starting the screen saver.You should set it for a short enough time to pro-
vide protection for your computer and your data should you leave your computer
system, but long enough that the screen saver won’t automatically start while you’re
trying to read your e-mail and become more of an annoyance than a benefit (see
Figure 1.8).
www.syngress.com
26 Chapter 1 • Basic Windows Security
413_Sec101_01.qxd 10/9/06 4:53 PM Page 26
Figure 1.8 You Can Open the Windows Display Properties by Right-Clicking
the Desktop and Selecting Properties
www.syngress.com
Basic Windows Security • Chapter 1 27
413_Sec101_01.qxd 10/9/06 4:53 PM Page 27
Summary
This chapter provided some fundamental knowledge about how to use and con-
figure the basic Windows XP security features.You learned about how Windows
controls access to the system, and how User Accounts and Security Groups can be
used, together with file and folder security, to restrict access and protect your system.
You also gained some knowledge about Windows services and how to disable
those you aren’t using, as well as the danger of hidden file extensions and how they
can be used against you. Lastly, you learned that the screensaver is more than a
frivolous toy to fill your screen while you’re away. It can also be used as a security
system for your computer.
Armed with this basic knowledge of how to protect and secure the Windows
XP operating system, you can proceed through the book and learn how to use other
applications more securely.
Additional Resources
The following resources provide more information on Windows security:
■
Description of the Guest Account in Windows XP. Microsoft’s Help and Support
Web Page ( />■
How to Configure File Sharing in Windows XP. Microsoft’s Help and Support
Web Page ( />■
How to Create and Configure User Accounts in Windows XP. Microsoft’s Help
and Support Web Page ( />■
How to Use Convert.exe to Convert a Partition to the NTFS File System.
Microsoft’s Help and Support Web Page
( />■
Limitations of the FAT32 File System in Windows XP. Microsoft’s Help and
Support Web Page ( />■
User Accounts That You Create During Setup Are Administrator Account Types.
Microsoft’s Help and Support Web Page
( />www.syngress.com
28 Chapter 1 • Basic Windows Security
413_Sec101_01.qxd 10/9/06 4:53 PM Page 28
Passwords
Topics in this chapter:
■
Password Power
■
Password Cracking
■
Storing Your Passwords
■
One Super-Powerful Password
Chapter 2
29
Summary
Additional Resources
413_Sec101_02.qxd 10/9/06 4:56 PM Page 29