Nghệ thuật gấp giấy_Con Mèo
Bạn đang xem bản rút gọn của tài liệu. Xem và tải ngay bản đầy đủ của tài liệu tại đây (163.67 KB, 4 trang )
A
circled
number
step
number
on
the
diagrams
means
there
are
written
instructions
for
that
step.
Please
read
them
before
folding.
The
folding
sequence
seems
very
mathematical.
In
reality
most
location
points are
not
that
critical:
It’s
just
a
way
of
minimizing
free
folding.
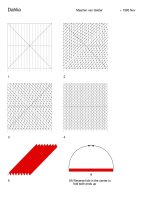
6.
Fold
the
bisector.
Step
7
indicates
the
position
of
the
endpoint.
8.
Crimp
on
an
existing
valleyfold.
The
mountainfold
starts
at
the
endpoint
of
that
valley
and
Step
9
indic-
ates
its
angle.
Avoid
creating
the
bottom
border.
10.
Mountain
fold
starting
at
A,
nearly
parallel
to
Y
but
widening
slightly
towards
the
top.
Endpoint
C
is
just
a
fraction
higher
than
B.
11.
Make
a
tiny
mark
with
your
fingernail
in
the
centre
of
the
point.
12.
Fold
the
bisector,
starting
from
the
mark
in
11.
Fold
only
the
bottom
third
of
the
point.
16.
Fold
the
point
so
that
its
edge
crosses
the
circled
point.
19.
&
20.
Rearrange
existing
folds
on
one
layer
of
paper
only.
21.
Pinch
both
layers
of
paper
at
the
indicated
spots
and
move
your
hands
together,
curving
the
paper
in
between
(make
a
bump,
not
a
hollow.)
The
top
point
should
open
out
and
move
down.
24.
Twist
the
top
point
to
the
front,
wringing
the
cat’s
neck.
40.
Side
view.
Pull
apart
the
two
layers
of
the
ears.
43.
Gently
curve
the
ears,
the
paper
wants
to
do
this
anyway.
44.
Curved
‘eyebrows’.
Practice
this
in
a
separate
sheet
first.
45.
Inside
reverse
fold.
Don’t
fold
the
edges,
only
curves
here.
47.
Side
view.
Get
rid
of
the
point
by
folding
it
up
into
the
head.
56.
Make
sure
flap
A
is
folded
into
the
tail.
59.
Run
your
thumbnail
along
the
tail
furrow
and
extend
it,
curving
upwards.
61.
Gently
curve
back
the
paper
along
the
dotted
lines.
The
final
model
will
need
a
support
to
stand.
Copyright
Q
c
1996
Herman
van
Goubergen,
all
rights
reserved.
version
1999
by
Sebastian
Marius
Kirsch
< skirsch@t - online.de > .
Distribution
for
noncommercial
purposes
is
free.
Please
contact
the
author
if
you
want
to
use
this
model
for
commercial
purposes.