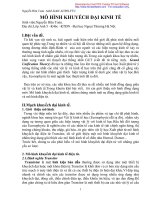
Mô hình Lâu đài Florence cathedral
Bạn đang xem bản rút gọn của tài liệu. Xem và tải ngay bản đầy đủ của tài liệu tại đây (2.61 MB, 5 trang )
East face
South face
West face
North face
View of completed model
The Florence Cathedral is a world heritage listed gothic-style basilica, and is a famous landmark of the
historical district of Italy's Florence. Construction of the basilica began in 1296, and took more than
140 years to complete.The Florence Cathedral is composed of three buildings: the"Duomo," which is
famous for its huge dome roof and is the fourth-biggest cathedral in the world;
the "Baptistery of San Giovanni," an octagonal building famous for the "Gates of Paradise;"and
"Giotto's Bell Tower," which stands to the side of the Duomo.
The white, green, and red marble exterior of the Cathedral is decorated with beautiful sculptures and
mosaic works from many different artists.
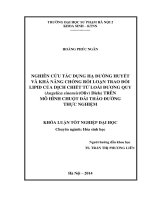
Parts sheet (Pattern) : Ten A4 sheets
No. of Parts : 69 (Including 2 spare parts)
Assembly Instructions : Five A4 sheets
* Build the model by carefully reading the Assembly Instructions, in the parts sheet page order.
* Assembly will be easier if you write the part's number on the back of each part.
Assembly tip: Before gluing, crease the paper along mountain fold
and valley fold lines and make sure rounded sections are nice and stiff.
Before starting.
Sheet No.3
Each page of the "Parts sheet" has a sheet number in the top left-hand corner (Sheet No.2
Work in order of these sheet numbers.
No.10).
The numbers
in the Assembly Instructions indicate the order to attach parts.
Follow this order when attaching.
Each part has a "parts number" printed on it. Also, each glue tab is marked with one of three symbols.
indicates glue tabs to be attached to connection areas within the same part.
For glue tabs marked with a number, attach them to the glue tab with the same number
on the connection areas of other parts.
For glue tabs marked with a "parts number," attach them to the part with the number printed.
Check the diagrams in the "Assembly Instructions" carefully for each part as you work.
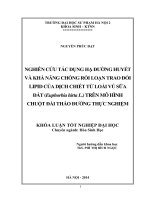
Sheet No.2
* The raised up part of the roof peak
Attach the red circled area of 2B
to the part of 2D indicated
by the arrow as shown.
Handy Hint
For small parts, assembly
will be easier if you use a
slightly thinner type of paper.
* Glue together the inside edges
of the seam to make the roof peak stand up.
Sheet No.4
Sheet No.5
Attach parts 4D 4K to
the areas of 4C as shown.
There are spares provided for the small parts,
to use in case of misplaced parts or cutting errors.
Handy Hint
For small parts, assembly will be easier if you use
a slightly thinner type of paper.
Align the reverse sides and attach.
Attach the cross so that it
faces the east-west direction.
Valley fold
Mountain fold
North
West
Attach 25 and 26
in the same way.
* Attach to the areas labeled 14, 15, and 16 on part 8A of the display stand.
( Refer to Assembly Instructions page 5)
West face
East
South
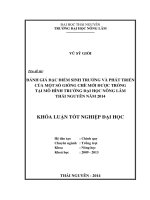
Sheet No.6, 7
Sheet No.8, 9, 10
Sheet No.6
Sheet No.9
Sheet No.10
Sheet No.8
* After completing the display stand,
attach the buildings to the areas shown.
Sheet No.7
Florence Cathedral, Italy : Assembly Instructions
Sheet No.9, 10
Sheet No.9
* Fold in the center, and glue the reverse sides.
Sheet No.10
* Glue this side
* Attach the four corners.
* Attach the short side flaps inside.
* Attach the buildings
to the completed display stand.
South
East
West
North
entrance
Attach the face with the
entrance (shown above)
so that it faces the east
direction.
View of completed model