slide môn học HDJ bài 4 using forms and frames
Bạn đang xem bản rút gọn của tài liệu. Xem và tải ngay bản đầy đủ của tài liệu tại đây (312.4 KB, 25 trang )
Using Forms and Frames
Session 4
1
Objectives
► Using
Forms and Common HTML Input
Elements
► Using Frames
2
Introduction to Forms
► Uses
of Forms
Collecting names, addresses, telephone numbers,
e-mail addresses, and other information to
register users for a service or event
Gathering information for the purchase of an
item. For example, if we want to purchase a book
over the Internet, we would be required to fill in
our name, mailing address, mode of payment,
and so on
3
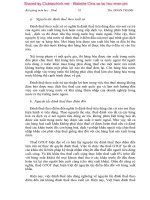
A Sample Form
4
Using Forms
► The
FORM element
<FORM> … </FORM>
► Form Attribute
ACCEPT
ACTION
METHOD
5
HTML Input Element Attribute
► The
INPUT Element
TYPE
NAME
VALUE
SIZE
MAXLENGTH
CHECKED
SRC
6
Input –Type Attribute
►
►
►
►
►
►
►
TEXT [ Default ]
CHECKBOX
RADIO
SUBMIT
RESET
IMAGE
BUTTON
7
INPUT types
► Button
Name
Size
Type
Value
Text
Type
Value
Name
Size
<INPUT TYPE=button VALUE=“” NAME=“button1" SIZE=20>
<INPUT TYPE=text VALUE=“” NAME="textbox" SIZE=20>
8
Continue..
► Checkbox
checked
name
size
status
type
Value
9
Continue..
► Radio
checked
name
size
status
type
value
10
Continue..
► Submit
► RESET
► Image
11
Other Input Elements-1
► The
TextArea Element
cols
rows
Size
type
Value
► The BUTTON Element
name
value
type
12
Other INPUT Elements-2
► The
SELECT Element
Name
size
Multiple
► The LABEL Element
13
Select Element
<SELECT NAME="Experience" SIZE="3" >
<OPTION VALUE="1" SELECTED>1 year
<OPTION VALUE="2">1 - 3 years
<OPTION VALUE="3">None
</SELECT>
14
Creating Forms
► Controlling
the elements
Setting focus
Tab order
Access keys
Disabling Elements
Structuring the form
15
<HTML>
<HEAD>
<TITLE>Using Buttons</TITLE>
</HEAD>
<BODY>
<H2> <CENTER><FONT size = 5 color = hotpink face = arial>Personal Information
</FONT> </CENTER> </H2>
<HR align = “center”>
<FORM action="" method="post">
First name: <INPUT type="text" name="firstname"><BR><BR>
Last name: <INPUT type="text" name="lastname"><BR><BR>
<INPUT type="radio" name="sex" value="Male"> Male
<INPUT type="radio" name="sex" value="Female"> Female<BR><BR><BR>
<BUTTON name="submit" value="submit" type="submit">
Send<IMG src="c:\happy.bmp" alt="wow">
</BUTTON>
<BUTTON name="reset" type="reset">
Reset<IMG src="c:\delete.bmp" alt="delete">
</BUTTON>
</FORM>
</BODY>
</HTML>
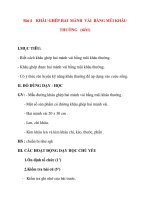
Output
17
Frames
► Frames
divide a Web browser’s window into
separate regions, each of which can display a
separate scrollable page.
► For example, we can use three frames in the
Web page, one with a banner, one for the
navigation menu and one to display data.
18
Uses of Frames
► To
display a logo or static information in one
fixed portion of the page
► The user can just click and move around the
web site without having to move back
constantly to the contents page
► Multiple views
19
FRAMESET Element
► Frames
are created
FRAMESET tag
► The attributes are:
Rows
Cols
using
the
20
FRAME Element
► The
attributes of the FRAME element include:
name
src
noresize
scrolling
frameborder
marginwidth
marginheight
21
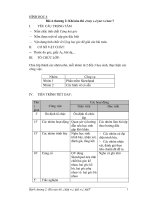
Nested Frame sets
<HTML>
<HEAD>
<TITLE>Nested Frames</TITLE>
</HEAD>
<FRAMESET cols="33%, 33%, 34%">
<FRAME src = "flowers.jpg">
<FRAMESET rows="40%, 50%">
<FRAME src = "x.html">
<FRAME src = "y.html">
</FRAMESET>
<FRAME src = "flowers.jpg">
</FRAMESET>
</HTML>
22
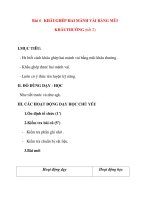
Output
23
The NOFRAMES Element
<HTML>
<FRAMESET COLS=”40%,60%”>
SCROLLING=yes>
<FRAMESET ROWS=”60,*”>
SCROLLING=no FRAMEBORDER=no>
<FRAME SRC=”y.html” NAME=”y”>
<NOFRAMES>
Frames are not being displayed. Click here
</NOFRAMES>
</FRAMESET>
</FRAMESET>
</HTML>
24
Inline Frames
► Attribute
Name
Width
Height
25