xây dựng ứng dụng tổng hợp bài đăng từ các trang web
Bạn đang xem bản rút gọn của tài liệu. Xem và tải ngay bản đầy đủ của tài liệu tại đây (240.87 KB, 39 trang )
1
MỤC LỤC
2
1. Giới thiệu tổng quát về Wordpress
Wordpress là một Content Management ( Hệ th ống quản trị nội dung) được vi ết
tắt là CMS. Được phát triển dựa trên PHP và MySQL. Wordpress cung c ấp m ột
WebService dựa trên XML/RPC cho phép quản trị trang web của người dùng từ xa.
1.1. WordPress Web service XML-RPC
WordPress sử dụng xmlrpc làm web service mặc định cho h ệ th ống mã ngu ồn
wordpress của nó. Xmlrpc là một cài đặt RPC (Remote Procedure Call) trên n ền giao
thưc HTTP, sử dụng xml để mã hóa và trao đổi dữ liệu. XML-RPC là một giao th ức
sử dụng trong dịch vụ web SOAP được sử dụng rộng rãi trong nhiều ngôn ngữ lập
trình như java, android,..php,..
Các gói/namespace được sử dụng với wordpress xml-rpc là: Blogger API,
metaWeblog API, Movable Type API, Pingback API. Vì XML-RPC là web server do đó
có 2 phần: XML-RPC server và XML-RPC client.
Về cơ bản, client sử dụng XML để mã hóa tham số, và gửi XML vào XML-RPC
server, dùng để gọi hàm từ xa và trả về cho XML-RPC client vói n ội dung XML đã
được mã hóa.
1.2. Kích hoạt XML-RPC trong wordpress
Tính năng XML-RPC trong wordpress bị ẩn mặc định, để kích hoạt xmlrpc lên
bạn truy cập: Settings->Writing->remote publishing. N ếu option này ch ưa được bật
bạn cài plugin “Control XML-RPC publishing”
Truy cập lại Settings->Write->Remote publishing with XML-RPC và ch ọn vào
Enabled -> nhấn Save changes. Ok tính năng xmlrpc đã được kích ho ạt và s ẵn sàng
sử dụng.
Địa
chỉ
endpoint
cho
https://<yourwordpress>/xmlrpc.php
website
wordpress
là:
Test kết nối xmlrpc bằng lệnh curl. Cách làm việc này giống giao thức xmpp.
Thực thi công việc thông qua việc truyền tải đoạn xml lên server b ằng ph ương
3
thức POST, và đây là nguyên lý khi gọi hàm. Trong ví dụ sau đây gửi n ội dung xml
chứa thông tin gọi hàm vào xmlrpc wordpress server.
<?xml version='1.0' encoding='iso-8859-1'>
<methodCall>
<methodName>system.listMethods</methodName>
</methodCall>
Thẻ methodName xác định tên phương thức thu ộc namespace system.
WordPress xmlrpc cung cấp sẵn các namespace: system, demo, pingback, mt,
metaWeblog, blogger, wp.
Tham số được sử dụng trong hàm, xác định bởi thẻ params, hàm listMethods không
có đối số do đó cung cấp thẻ trống
Hàm Kết quả trả về danh sách cách hàm được sử dụng.
1.3. WordPress XMLRPC Server
Đăng ký hàm xmlrpc mới
Wordpress xmlrpc api có filter xmlrpc_methods giúp bạn tạo phương thức riêng.
Đăng ký hàm rpc với đoạn code sau, copy vào theme functions.php
add_filter( 'xmlrpc_methods', 'add_xml_rpc_methods' );
function add_xml_rpc_methods( $methods ) {
$methods['frs.helloWorld'] = 'hello_world';
//Where frs.helloWorld is
the XML-RPC method name, and hello_world is the callback, namespace 'frs' for any
you want.
return $methods;
}
Ở ví dụ trên, chúng ta đăng ký hàm helloWorld thuộc namespace mới frs, và khai
báo lời gọi hàm callback hello_worldcho hàm helloWorld.
Phần định nghĩa hàm callback. Xem ví dụ mẫu:
function hello_world($params){
global $wp_xmlrpc_server;
$arg1
= $params[1];
return "Hello ".$wp_xmlrpc_server->escape( $arg1 );
}
4
*Chú ý: Hàm cần trả về giá trị, giá trị này sẽ được lấy khi gọi hàm. Không s ử
dụng echo, print để xuất chuỗi ra màn hình.
Xóa hàm rpc
Tương tự như cách tạo hàm, sử dụng xmlrpc_methods để xóa các hàm không
mong muốn. Thêm vào functions.php
function mynamespace_remove_xmlrpc_methods( $methods ) {
unset( $methods['demo.addTwoNumbers'] );
unset( $methods['frs.helloWorld'] );
return $methods;
}
add_filter( 'xmlrpc_methods', 'mynamespace_remove_xmlrpc_methods');
1.4. XMLRPC Client
1.4.1. Tạo lớp sử lý gọi hàm từ XMLRPC Server.
Tạo lớpXMLRPC_Client với nội dung sau:
/*create XML-RPC PHP client*/
class XMLRPC_Client {
private $url;
function __construct( $url ) {
$this->url = $url;
}
/**
* Call the XML-RPC method named $method and return
* the results, or die trying!
*
* @param string $method XML-RPC method name
* @param mixed ... optional variable list of parameters
* to pass to XML-RPC call
*
* @return array result of XML-RPC call
*/
public function call() {
// get arguments
$params = func_get_args();
$method = array_shift( $params );
$post = xmlrpc_encode_request( $method, $params );
5
$ch = curl_init();
// set URL and other appropriate options
curl_setopt( $ch, CURLOPT_URL,
$this->url );
curl_setopt( $ch, CURLOPT_POST,
true );
curl_setopt( $ch, CURLOPT_POSTFIELDS,
$post );
curl_setopt( $ch, CURLOPT_RETURNTRANSFER, true );
// issue the request
$response = curl_exec( $ch );
$response_code = curl_getinfo( $ch, CURLINFO_HTTP_CODE );
$curl_errorno = curl_errno( $ch );
$curl_error = curl_error( $ch );
curl_close( $ch );
// check for curl errors
if ( $curl_errorno != 0 ) {
die( "Curl ERROR: {$curl_errorno} - {$curl_error}n" );
}
// check for server errors
if ( $response_code != 200 ) {
die( "ERROR: non-200 response from server: {$response_code} - {$response}n"
);
}
return xmlrpc_decode( $response );
}
}
1.4.2. Gọi hàm rpc
Kết nối tới XMLRPC Server sử dụng class XMLRPC_Client. Tạo instance của
classXMLRPC_Client và gọi hàm rpc trên XMLRPC Server bởi phương thức call.
//call method
$client = new XMLRPC_Client( "http://127.0.0.1:81/wordpress/xmlrpc.php" );
$available_methods = $client->call( 'system.listMethods' );
print_r( $available_methods );
Lợi ích của XMLRPC là bạn có thể gọi nhiều hàm trên m ột k ết n ối XMPRPC, nh ư
ở đây chúng ta có thể gọi tiếp hàm demo.sayHello.
$test= $client->call( 'demo.sayHello' );
print_r($test);
1.4.3. Xây dựng hàm RPC
6
Lấy giá trị tham số truyền vào hàm
function hello_world( $params ) {
global $wp_xmlrpc_server;
$blog_id = (int) $params[0]; // tham số đầu tiên không được sử dụng, tham số
này trả về id của blog wordpress (built in XML-RPC actions)
//tham số 1
$username = $params[1];
$password = $params[2];
//tham số 2
$args
= $params[3]; //tham số 3
}
Truyền tương tương các tham số vào phương thức $client->call.
$client->call( 'frs.helloWorld', 1, 'xmlrpc-user', 'xmlrpc-pass', array( 'name' =>
'Justin' ) );
Như
vậy $params[1] có giá
và $params[3] là mảng còn lại.
trị
‘xmlrpc-user’, $params[2] =
‘xmlrpc-pass’
Escape giá trị tham số chuỗi.
$params[1]=$wp_xmlrpc_server->escape( $params[1] );
1.4.4. Xử lý lỗi
Một ví dụ về cách sử lý lỗi trong hàm rpc, đoạn code này ki ểm tra ng ười dùng
nếu không có quyền chỉnh sửa bài viết, thì xuất lỗi 403 kèm theo tin nhắn.
function hello_world( $params ) {
...
// check for edit_posts capability (requires contributor role)
// (obviously not required for this simple example, but just for demonstration
purposes)
if ( ! current_user_can( 'edit_posts' ) )
return new IXR_Error( 403, __( 'You are not allowed access to details about
orders.' ) );
...
}
Ví dụ khác sử lý lỗi 500 (thiếu tham số).
function hello_world( $params ) {
...
$args = $params[3]; //giả sử tham số này là mảng
// required parameter
7
if ( ! isset( $args['name'] ) ) return new IXR_Error( 500, __( "Missing parameter
'name'" ) );
...
}
Ví dụ:
$client->call( 'frs.helloWorld', 1, 'xx', 'yy', array( 'age' => '23' ) );
Ví dụ trên truyền thiếu tham số ‘name’ vào hàm helloWorld, ->gặp lỗi 500.
1.4.5. Tạo phiên làm việc của user (verify credentials)
WordPress RPC API có đối tượng global $wp_xmlrpc_server giúp hàm sử dụng kết
nối vào hệ thống wordpress api. Đăng nhập tài khoản user với phương thức login.
function hello_world( $params ) {
global $wp_xmlrpc_server;
...
$username = $params[1];
$password = $params[2];
// verify credentials
if ( ! $wp_xmlrpc_server->login( $username, $password ) ) {
return $wp_xmlrpc_server->error;
}
...
}
Các tin nhắn lỗi trong quá trình sử dụng wordpress api được lưu tại
biến $wp_xmlrpc_server->error.
Ví dụ gọi hàm wp.getCommentCount để đếm comments của user. Như vậy chúng
ta cần sử dụng phiên làm việc của user.
//requires a WordPress username and password to execute
$client = new XMLRPC_Client( "http://localhost/wordpress/xmlrpc.php" );
$comment_count = $client->call( 'wp.getCommentCount', 1, 'user1', '123456' );
print_r( $comment_count );
1.4.6. Gọi hàm RPC khác từ một hàm RPC
Thực thi action xmlrpc_call với tên hàm cần gọi. Bằng cách này cho phép gọi hàm
rpc trong hàm rpc, không cần gọi thêm một phương th ức $client->call. Điều này rất
hữu ích vì đôi khi bạn cần gọi hàm trước khi sử lý đến 1 lệnh tiếp theo.
8
function hello_world( $params ) {
...
do_action( 'xmlrpc_call', 'system.listMethods' );
...
}
1.5. Jwordpress
Trong bài tập này, ta không sử dụng trực tiếp XML/PRC trên Java mà thông qua
một thư viện API nhỏ, mã nguồn mở gọi là Jwordpress. API này được cung c ấp t ại
/>Giải thích về API được cung cấp tại đường dẫn: />
9
2. Framework Jena
Trong xây dựng các ứng dụng dựa trên công nghệ Semantic web, đ ể có th ể th ực
hiện các thao tác như đọc/xuất, hay thực hi ện các truy v ấn trên m ột tài li ệu có mô
tả ngữ nghĩa dạng RDF ta có thể sử dụng các công cụ như Jena hoặc Sesame. M ặc
dù hiện nay Sesame đã được đẩy mạnh phát triển và ngày càng được quan tâm t ừ
phía người sử dụng, nhưng theo chúng tôi, với tính năng tốt và tài li ệu API rõ ràng,
Jena vẫn thích hợp trong triển khai các ứng dụng hướng đến công ngh ệ web ngữ
nghĩa còn mới mẻ này.
Jena () là một công cụ mã nguồn mở hàng đ ầu đ ể
triển khai Web ngữ nghĩa cho các lập trình viên Java, được phát tri ển b ởi HP Labs
Semantic Web Research ( Jena là một Java
Framework dùng để xây dựng các ứng dụng Web ngữ nghĩa. Jena cung cấp môi
trường lập trình cho RDF, RDFS, OWL và SPARQL - ngôn ngữ truy v ấn cho RDF. Jena
bao gồm các thành phần và tính năng sau:
-
-
RDF API: Giao diện lập trình cho RDF.
OWL API: Giao diện lập trình cho OWL.
Xuất và đọc các file RDF theo dạng RDF/XML, N3 và N-Tribles.
Cho phép lưu trữ trong bộ nhớ, lưu trữ cố định trong các tập tin đ ơn hay trong
các hệ quản trị cơ sở dữ liệu (MySQL, HSQLDB, PostgreSQL, Oracle, Microsoft
SQL Server).
Hệ truy vấn SPARQL.
2.1. RDF API
RDF API: Jena là một API trong ngôn ngữ l ập trình Java, t ạo và x ử lý các bi ểu đ ồ
RDF, có thể tạo mới hoặc chỉnh sửa từ những mô hình đã có. Jena có các l ớp đ ối
tượng biểu diễn đồ thị, tài nguyên và thuộc tính, literal và các gói chứa interface t ạo
đồ thị, dùng tạo mô hình dữ liệu RDF, đọc và ghi các file RDF, truy xu ất, li ệt kê các
phát biểu trong mô hình dữ liệu RDF.
10
2.2. OWL API
OWL API: OWL là mở rộng của RDF. OWL liên quan tới các l ớp và giao di ện ho ặc
sử dụng các lớp, giao diện của RDF API.
-
Properties phân ra thành: Datatype properties, Object properties, Symmetric,
Functional, InverseFunctional…
-
Các tài nguyên ontology: các lớp và các thể hiện
-
Quan hệ lớp cha lớp con
-
Quan hệ tương đương, tách rời (Equivalency/Disjointness)
-
Ràng buôc trên
restrictions,…)
-
OWL API cung cấp các lớp và giao diện thể hiện tất cả các lĩnh v ực c ủa ngôn
ngữ OWL.Các lớp và giao diện này nằm trong package com.hp.hpl.jena.ontology.
-
OntModel là interface phổ biến nhất được sử dụng để quản lý các ontology.
OntModel chứa các ontology statement, được sử dụng đ ể lấy các tài nguyên t ồn
tại (Class, individual, properties) hoặc tạo một ontology statement m ới.
-
Các Class được thể hiện bởi OntClass. Ở đó, các phương th ức của OntClass có th ể
được sử dụng để xem các thể hiện, lớp con, lớp cha, quan h ệ gi ữa class v ới th ể
hiện lớp hoặc để xác nhận quan hệ lớp cha lớp con. Các class có th ể được gán
nhãn dưới các thể hiện được phân loại: UnionClass, IntersectionClass,
EnumeratedClass, ComplementClass. OWL API cung cấp cách xác đ ịnh xem m ột
lớp thuộc phân loại nào trong nhóm trên. OntModel cung cấp các ph ương th ức
để xây dựng các định nghĩa phức tạp này.
-
Các properties được thể hiện bởi OntProperty. OntProperty cung cấp các
phương thức xác định các domain và range của properties cũng như xác đ ịnh
loại property: DatatypeProperty,
ObjectProperty,
SymmetricProperty,
FunctionProperty.
các
properties
(AllValuesFrom,
<Min/Max>Cardinality
Ví dụ về Class:
// Create an empty ontology model
OntModel ontModel = ModelFactory.createOntologyModel();
11
String ns = new String(“ />String baseURI = new String(“ />Ontology onto = ontModel.createOntology(baseURI);
// Create ‘Person’, ‘MalePerson’ and ‘FemalePerson’ classes
OntClass person = ontModel.createClass(ns + "Person");
OntClass malePerson = ontModel.createClass(ns + "MalePerson");
OntClass femalePerson = ontModel.createClass(ns + "FemalePerson");
// FemalePerson and MalePerson are subclasses of Person
person.addSubClass(malePerson);
person.addSubClass(femalePerson);
// FemalePerson and MalePerson are disjoint
malePerson.addDisjointWith(femalePerson);
femalePerson.addDisjointWith(malePerson);
Ví dụ về datatype property:
// Create datatype property 'hasAge'
DatatypeProperty hasAge =
ontModel.createDatatypeProperty(ns + "hasAge");
// 'hasAge' takes integer values, so its range is 'integer'
// Basic datatypes are defined in the ‘vocabulary’ package
hasAge.setDomain(person);
hasAge.setRange(XSD.integer); // com.hp.hpl.jena.vocabulary.XSD
// Create individuals
Individual john = malePerson.createIndividual(ns + "John");
Individual jane = femalePerson.createIndividual(ns + "Jane");
Individual bob = malePerson.createIndividual(ns + "Bob");
// Create statement 'John hasAge 20'
Literal age20 =
ontModel.createTypedLiteral("20", XSDDatatype.XSDint);
Statement johnIs20 =
ontModel.createStatement(john, hasAge, age20);
ontModel.add(johnIs20);
Ví dụ về Object property:
// Create object property 'hasSibling'
12
ObjectProperty
"hasSibling");
hasSibling
=
ontModel.createObjectProperty(ns
+
// Domain and Range for 'hasSibling' is 'Person'
hasSibling.setDomain(person);
hasSibling.setRange(person);
// Add statement 'John hasSibling Jane‘
// and 'Jane hasSibling John'
Statement siblings1 = ontModel.createStatement(john, hasSibling,
jane);
Statement siblings2 = ontModel.createStatement(jane, hasSibling,
john);
ontModel.add(siblings1);
ontModel.add(siblings2);
Ví dụ về Property Restriction
// Create object property ‘hasSpouse’
ObjectProperty hasSpouse = ontModel.createObjectProperty(ns +
"hasSpouse");
hasSpouse.setDomain(person);
hasSpouse.setRange(person);
Statement spouse1 = ontModel.createStatement(bob, hasSpouse,
jane);
Statement spouse2 = ontModel.createStatement(jane, hasSpouse,
bob);
ontModel.add(spouse1);
ontModel.add(spouse2);
// Create an AllValuesFromRestriction on hasSpouse:
// MalePersons hasSpouse only FemalePerson
AllValuesFromRestriction onlyFemalePerson =
ontModel.createAllValuesFromRestriction(null,
femalePerson);
hasSpouse,
//
A
MalePerson
can
have
at
most
one
spouse
MaxCardinalityRestriction
MaxCardinalityRestriction hasSpouseMaxCard =
ontModel.createMaxCardinalityRestriction(null, hasSpouse, 1);
->
13
// Constrain MalePerson with the two constraints defined above
malePerson.addSuperClass(onlyFemalePerson);
malePerson.addSuperClass(hasSpouseMaxCard);
Ví dụ về định nghĩa việc liên kết giữa các class:
// Create class ‘MarriedPerson’
OntClass
marriedPerson
=
ontModel.createClass(ns
"MarriedPerson");
MinCardinalityRestriction mincr =
ontModel.createMinCardinalityRestriction(null, hasSpouse, 1);
+
// A MarriedPerson ó A Person, AND with at least 1 spouse
// A list must be created, that will hold the Person class
// and the min cardinality restriction
RDFNode[] constraintsArray = { person, mincr };
RDFList constraints = ontModel.createList(constraintsArray);
// The two classes are combined into one intersection class
IntersectionClass ic =
ontModel.createIntersectionClass(null, constraints);
// ‘MarriedPerson’ is declared as an equivalent of the
// intersection class defined above
marriedPerson.setEquivalentClass(ic);
2.3. RDF
Thông qua Ontology API, Jena hướng tới việc cung cấp giao di ện l ập trình phù
hợp cho việc phát triển ứng dụng ontology độc lập với ngôn ngữ ontology mà b ạn
đang sử dụng trong ngôn ngữ lập trình của bạn. Một trong những lý do chính xây
dựng các ứng dụng dựa trên ontology là sử dụng b ộ suy di ễn đ ể rút ra nh ững đi ều
đúng đắn thêm về các khái niệm mà bạn đang mô hình hoá. Có r ất nhi ều ki ểu l ập
luận tự động và rất nhiều thuật toán lập luận khác nhau. Jena cũng h ỗ tr ợ r ất
nhiều bộ lập luận thông qua inference API. Một đặc đi ểm chung của b ộ l ập lu ận
Jena là chúng tạo ra một mô hình RDF mới đ ể ch ứa các b ộ ba dữ li ệu đ ược rút ra t ừ
việc suy luận cũng như các bộ ba dữ liệu trong mô hình c ơ b ản. Ontology API khai
14
phá đặc điểm này: các phương thức tiện ích mà ontology API cung c ấp có th ể truy
vấn một mô hình suy diễn mở rộng như mô hình RDF ban đầu.
Jena cung cấp bộ suy diễn trong package com.hp.hpl.jena.reasoner có th ể đ ược
gắn luôn cùng với Model. OntModel mà không h ỗ tr ợ lập luận thì ch ỉ tr ả l ời nh ững
câu truy vấn thông thường để lây ra các statement. Còn OntModel h ỗ tr ợ l ập lu ận
sẽ sử dụng các statement có để lập luận và đưa ra kết quả.
Jena hỗ trợ việc truy xuất dữ liệu được lưu trong các file RDF.V ấn đề đặt ra là:
làm thế nào để lưu trữ dữ liệu hiệu quả, truy xuất nhanh? Jena cũng h ỗ tr ợ chúng
ta trong việc ánh xạ dữ file RDF với cơ sở dữ liệu và ngược lại. Vì v ậy, trong h ệ
thống mà chúng tôi đang xây dựng, chúng tôi sẽ sử dụng cơ s ở dữ li ệu quan h ệ
MySQL để lưu trữ dữ liệu nhằm tận dụng khả năng lưu trữ và quản lý dữ li ệu có
sẵn của hệ quản trị cơ sở dữ liệu này.
2.4. SPARQL
Bộ xử lý truy vấn SPARQL: Jena sử dụng ARQ đ ể xử lý truy v ấn SPQRQL. Các
class của ARQ API được tìm thấy trong com.hp.hpl.jena.query:
-
Query: thể hiện một câu truy vấn SPARQL đơn.
-
Dataset: Tri thức dựa trên các câu truy vấn được th ực thi(tương đương v ới RDF
Models)
-
QueryFactory: Được sử dụng để sinh ra các đối tượng Query từ các string
SPARQL.
-
QueryExecution: Cung cấp các phương thức để thực thi các câu truy v ấn.
-
ResultSet: Chứa kết quả lấy từ câu truy vấn được thực thi.
-
QuerySolution: thể hiện một dãy các kết quả truy vấn.
-
Nếu có nhiều câu trả lời cho 1 câu truy vấn, một ResultSet đ ược tr ả l ại sau khi
câu truy vấn được thực thi. ResultSet chứa nhiều QuerySolutions.
15
// Prepare query string
String queryString =
"PREFIX rdf: < +
"PREFIX : < +
"SELECT ?married ?spouse WHERE {" +
"?married rdf:type :MarriedPerson.\n" +
"?married :hasSpouse ?spouse." +
"}";
// Use the ontology model to create a Dataset object
// Note: If no reasoner has been attached to the model, no results
// will be returned (MarriedPerson has no asserted instances)
Dataset dataset = DatasetFactory.create(ontModel);
// Parse query string and create Query object
Query q = QueryFactory.create(queryString);
// Execute query and obtain result set
QueryExecution qexec = QueryExecutionFactory.create(q, dataset);
ResultSet resultSet = qexec.execSelect();
// Print results
while(resultSet.hasNext()) {
// Each row contains two fields: ‘married’ and ‘spouse’,
// as defined in the query string
QuerySolution row = (QuerySolution)resultSet.next();
RDFNode nextMarried = row.get("married");
System.out.print(nextMarried.toString());
System.out.print(" is married to ");
RDFNode nextSpouse = row.get("spouse");
System.out.println(nextSpouse.toString());
}
Trong hệ thống sử dụng công nghệ đa agent, jena chính là thành phần trung gian
hỗ trợ các agent trong việc sử dụng các ontology để xử lý các thông điệp được gửi
tới, truy xuất cơ sở dữ liệu và lập luận để đưa ra các kết quả một cách chính xác.
16
3. Ví dụ thực hiện.
3.1. Về ứng dụng
Trong ví dụ này, ứng dụng đọc dữ liệu từ nhiều nguồn khác nhau là các bài đăng
trong các blog như wordpress, blogspot, tinhte.vn. Qua đó tạo nên m ột c ơ s ở d ữ li ệu
lớn về các bài báo, tuy nhiên mỗi trang lại cung cấp những ph ương th ức khác nhau
cho phép người dùng truy cập dữ liệu.
Bài tập này triển khai lấy dữ liệu từ trang wordpress thông qua Jwordpress, l ưu
lại ở dạng RDF/XML. Trong phần này sử dụng framework Jena. Jena h ỗ tr ợ rất t ốt,
cho phép lưu trữ ở nhiều định dạng khác nhau như: XML, JSON, TURTLE, TRIPLE-N.
Với định dạng XML, ta có thể cho phép nhiều người sử dụng ở chu ẩn XML v ới
nhiều ngôn ngữ lập trình, nhiều hệ thống khác nhau.
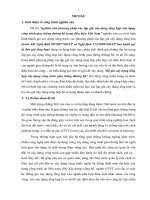
Để trực quan, nhóm trích dữ liệu trong các file định dạng XML ra d ạng HTML s ử
dụng trong các web ứng dụng web rất thông dụng. Trong ph ần này, ta s ử d ụng th ư
viện Jsoup cũng là một thư viện mở cho phép thao tác v ới đ ịnh dạng XML, HTML
rất đơn giản và hiệu quả.
3.2. Về kết quả
Mẫu file xml:
<rdf:Description rdf:nodeID="A0">
<wp:type>post</wp:type>
<wp:link> /><wp:date>Tue May 26 04:47:23 ICT 2015</wp:date>
<wp:title>Thông tin chi tiết về cấu hình Bphone: 5" FullHD, SnapDragon 801AC, 3GB,
13MP, 3000mAh, BOS</wp:title>
<wp:post-id>38</wp:post-id>
</rdf:Description>
<rdf:Description rdf:nodeID="A1">
<wp:type>post</wp:type>
<wp:link> /><wp:date>Tue May 26 05:07:43 ICT 2015</wp:date>
<wp:title>Trên tay LG Magna với thiết kế cong, màn hình cong 5" HD, chip 4 nhân
1.3GHz, giá 4 triệu đồng</wp:title>
<wp:post-id>47</wp:post-id>
</rdf:Description>
<rdf:Description rdf:nodeID="A2">
17
<wp:type>post</wp:type>
<wp:link> /><wp:date>Tue May 26 05:22:02 ICT 2015</wp:date>
<wp:title>Bphone có 3 phiên bản bộ nhớ, 4 màu khác nhau, giá bán từ 9.9 đến 20.19
triệu đồng</wp:title>
<wp:post-id>91</wp:post-id>
</rdf:Description>
<rdf:Description rdf:nodeID="A3">
<wp:type>post</wp:type>
<wp:link> /><wp:date>Tue May 26 05:29:17 ICT 2015</wp:date>
<wp:title>ASUS ZenFone C có mức giá bán hấp dẫn chỉ còn 2.190.000 VNĐ</wp:title>
<wp:post-id>100</wp:post-id>
</rdf:Description>
<rdf:Description rdf:nodeID="A4">
<wp:type>page</wp:type>
<wp:link> /><wp:date>Tue May 26 03:21:08 ICT 2015</wp:date>
<wp:title>About</wp:title>
<wp:page-id>1</wp:page-id>
<wp:author>Đức đẹp zai</wp:author>
</rdf:Description>
<rdf:Description rdf:nodeID="A5">
<wp:type>post</wp:type>
<wp:link> /><wp:date>Tue May 26 05:16:33 ICT 2015</wp:date>
<wp:title>[Thảo luận] Tại sao Android tốn pin và hiệu suất không cao bằng HĐH
khác</wp:title>
<wp:post-id>89</wp:post-id>
</rdf:Description>
<rdf:Description rdf:nodeID="A6">
<wp:type>post</wp:type>
<wp:link> /><wp:date>Tue May 26 05:11:33 ICT 2015</wp:date>
<wp:title>Hé lộ Galaxy S6 Edge phiên bản Iron Man, số lượng hạn chế 1.000
máy</wp:title>
<wp:post-id>81</wp:post-id>
</rdf:Description>
<rdf:Description rdf:nodeID="A7">
<wp:type>post</wp:type>
<wp:link> /><wp:date>Tue May 26 04:41:40 ICT 2015</wp:date>
<wp:title>Quy trình đánh giá thời gian sử dụng pin của một thiết bị Android</wp:title>
<wp:post-id>35</wp:post-id>
</rdf:Description>
<rdf:Description rdf:nodeID="A8">
<wp:type>post</wp:type>
<wp:link> /><wp:date>Tue May 26 04:32:58 ICT 2015</wp:date>
18
<wp:title>Đánh giá thời lượng pin của LG G2</wp:title>
<wp:post-id>21</wp:post-id>
</rdf:Description>
<rdf:Description rdf:nodeID="A9">
<wp:fullname>Bùi Minh Đức</wp:fullname>
<wp:homepage></wp:homepage>
<wp:type>author</wp:type>
</rdf:Description>
<rdf:Description rdf:nodeID="A10">
<wp:type>post</wp:type>
<wp:link> /><wp:date>Tue May 26 05:23:44 ICT 2015</wp:date>
<wp:title>Rò rỉ Asus ZenPad 7 và 8: màn hình tỉ lệ 4:3, chip Intel, ra mắt tháng sau?
</wp:title>
<wp:post-id>94</wp:post-id>
</rdf:Description>
<rdf:Description rdf:nodeID="A11">
<wp:type>post</wp:type>
<wp:link> /><wp:date>Tue May 26 05:26:40 ICT 2015</wp:date>
<wp:title>Android 5.1 đã có cho Nexus 5, Nexus 7 2012 và Nexus 10, bạn đã tải về chưa?
</wp:title>
<wp:post-id>97</wp:post-id>
</rdf:Description>
<rdf:Description rdf:nodeID="A12">
<wp:type>post</wp:type>
<wp:link> /><wp:date>Tue May 26 04:20:34 ICT 2015</wp:date>
<wp:title>10 ứng dụng đẹp và miễn phí dành cho Android 5.0 Lollipop</wp:title>
<wp:post-id>6</wp:post-id>
</rdf:Description>
</rdf:RDF>
3.3. Ứng dụng html sử dụng các dữ liệu RDF/XML:
19
3.4. Source code
Các gói và lớp:
Lớp RDFType: lớp này khai báo một số định dạng lưu trữ RDF.
package dark.rdf;
public enum RDFType {
//
public static final String RDFXML="RDF/XML";
//
public static final String N_TRIPLE="N-TRIPLE";
20
//
public static final String TURTLE="TURTLE";
RDFXML,N_TRIPLE,TURTLE
}
Lớp RDF2HTML:
package dark.reason;
import com.hp.hpl.jena.rdf.model.*;
import dark.wordpress.Account;
import java.io.*;
import org.jsoup.Jsoup;
import org.jsoup.nodes.Document;
import org.jsoup.nodes.Element;
import org.jsoup.parser.Tag;
public class RDF2HTML {
private static final String PROJECT_PATH = System.getProperty("user.dir");
private static final String PROPERTY_PREFFIX = " />private static final String TYPE = "type";
private static final String LINK = "link";
private static final String DATE = "date";
private static final String TITLE = "title";
21
private static final String POST_ID = "post-id";
private static final String DESC = "description";
private static final String PAGE_ID = "page-id";
private static final String AUTHOR = "author";
private static final String PAGE = "page";
private static final String USERNAME = "username";
private static final String HOMEPAGE = "homepage";
private static final String FULLNAME = "fullname";
private static final String PROPERTY_SUFFIX[] = { TYPE, LINK, DATE, TITLE,
POST_ID, PAGE_ID, DESC };
private static final String RDF_FOLDER = "rdf";
private static final String HTML_FOLDER = "html";
private Model model;
private File rdfFodler;
private File htmlFolder;
private File[] rdfFiles;
private Account[] author;
private int count;
public RDF2HTML() throws FileNotFoundException {
rdfFodler = new File(PROJECT_PATH + File.separator + RDF_FOLDER);
htmlFolder = new File(PROJECT_PATH + File.separator + HTML_FOLDER);
rdfFiles = rdfFodler.listFiles();
22
author = new Account[rdfFiles.length];
count = 0;
}
public void convert() throws FileNotFoundException {
for (int i = 0; i < rdfFiles.length; i++) {
InputStream inputStr;
try {
count = i;
author[count] = new Account();
inputStr = new FileInputStream(rdfFiles[i]);
model = ModelFactory.createDefaultModel();
model.read(inputStr, null);
int length = rdfFiles[i].getName().length();
String fileName = rdfFiles[i].getName()
.substring(0, length - 4);
fileName += ".html";
File outFile = new File(PROJECT_PATH + File.separator
+ HTML_FOLDER + File.separator + fileName);
if (!outFile.exists())
outFile.createNewFile();
createHTMLFile(outFile);
} catch (IOException e) {
e.printStackTrace();
}
23
}
}
private void buildTableHeader(Element table) {
Element tr = new Element(Tag.valueOf("tr"), "");
for (int i = 0; i < PROPERTY_SUFFIX.length; i++) {
Element th = new Element(Tag.valueOf("th"), "")
.text(PROPERTY_SUFFIX[i]);
tr.appendChild(th);
}
table.appendChild(tr);
}
private void buildTableBody(Element table, String value[]) {
if (value[0].equals("author"))
return;
if (value[0].equals("page")) {
table.before("
<a href=" + value[1] + ">about page</a>");
return;
}
Element tr = new Element(Tag.valueOf("tr"), "");
24
for (int i = 0; i < PROPERTY_SUFFIX.length; i++) {
Element td = new Element(Tag.valueOf("td"), "");
if (value[i] != null && PROPERTY_SUFFIX[i].equals(LINK)) {
td.appendChild(new Element(Tag.valueOf("a"), "").attr("href",
value[i]).text("link"));
} else
td.text(value[i] == null ? "" : value[i]);
tr.appendChild(td);
}
table.appendChild(tr);
}
public void createHTMLFile(File file) {
System.out.println("Tôi là người việt nam");
Document doc = Jsoup.parse("");
Element body = doc.getElementsByTag("body").get(0);
Element table = new Element(Tag.valueOf("table"), "");
table.attr("border", "1");
body.appendChild(table);
buildTableHeader(table);
// build news table
ResIterator iter = model.listResourcesWithProperty(null);
25
while (iter.hasNext()) {
Resource rs = iter.nextResource();
String value[] = new String[PROPERTY_SUFFIX.length];
// check information of author
Property propURL = model.getProperty(PROPERTY_PREFFIX + HOMEPAGE);
StmtIterator iterator = rs.listProperties(propURL);
if (iterator.hasNext()) {
String url = iterator.nextStatement().getObject().toString();
if (url != null) {
author[count].setURL(url);
}
}
Property propFullname = model.getProperty(PROPERTY_PREFFIX
+ FULLNAME);
iterator = rs.listProperties(propFullname);
if (iterator.hasNext()) {
String fullname = iterator.nextStatement().getObject()
.toString();
if (fullname != null) {
author[count].setFullname(fullname);
}
}
Property propUsername = model
.getProperty(PROPERTY_PREFFIX + AUTHOR);
iterator = rs.listProperties(propUsername);